vue with typescript
Typescript를 사용하는 이유
- 생산성 효율
- 최신 자바스크립트 지원 (ex/ Decorator, types, annotations 지원, 클래스 기반 객체 지향 언어가 지원하는 접근 제한자(private, public, protected) 사용 가능)
- TS로 작업을 하고 자바스크립트로 컴파일이 되기 때문에 큰 공수는 들지 않는다.
- TS는 Static type, JS 는 Dynamic type인데요. 타입을 지정한다면 많은 에러를 막을 수 있다.
- TS는 추상화 할 수 있다.
- JS는 문서를 보지 않는다면 인자의 타입을 알 수 없다. (ex/ jqeury.ajax(url, settings) ajax를 문서를 보지 않았다면 url 의 인자가 무엇인지 알 수 없지만, interface가 문서가 될 수 있다.)
vue-cli로 Typescript 프로젝트 생성하기
yarn global add @vue/cli // vue 설치

vue --version // 설치 확인 명령어

vue create project-name
// 프로젝트 생성,
// preset 설정에서 Typescript, Router, Vuex, Linter 를 선택. Babel 해제.
// class style component 선택 유무. TsLint, Tslint 추가 설정 Default로.
프로젝트 구조 설명 및 설정
- dist
- node modules : package 관리
- public : 정적 파일 관리
- src : 주로 사용 할 폴더 (컨벤션 따라 파일을 관리)
- views : 화면 컴포넌트
- app.vue : 라우터 뷰만 작성 됨. 실제 화면에 해당하는 뷰는 다른 뷰에 작성.
- assets
- components
- router.ts : 라우터 생성
- store.ts : 스토어 생성
- tsconfig.json : 타입스크립트 설정 (ex/ module : module에 대한 설정, strict (엄격 모드), include: path 기준으로 빌드를 하게 된다. exclude: 빌드 제외)
- tslint.json : tslint 규칙 설정. (npm lint 명령어로 자동으로 수정 가능)
- main.ts : vue 인스턴스 생성, 프로젝트 엔트리 포인터 (ex/ 라우터, 스토어)에 넣어주면 아이디 app에 렌더링 해줌, public 폴더에 index.html의 app 에 렌더링이 됨)
- views : 화면 컴포넌트
Class-Based 컴포넌트
@decorator 사용하기
@Component란?
  // 컴포넌트를 하나의 모듈로 정의
  import { Component, Vue } from 'vue-property-decorator';
  // class 를 생성해서 Vue를 상속받는다.
  // class 인스턴스로 사용하기 위해서 컴포넌트 데코레이터를 붙여준다.
  @Component
  export default class Message extends Vue {
    // 클래스 스타일은 맴버 스타일로 정의
    message: string = '메세지를 입력해주세요';
  }
@prop란 ? 부모와 자식간의 상호작용 (https://kr.vuejs.org/v2/guide/components.html#%EC%BB%B4%ED%8F%AC%EB%84%8C%ED%8A%B8-%EC%9E%91%EC%84%B1)
// 함수형 props 선언
Vue.component('child', {
  // props 정의
  props: ['message'],
  template: '<span>{{ message }}</span>'
})

// 클래스 기반 props 선언
@Component
  export default class Children extends Vue {
    @Prop() private parentMessage?: string;
  }
@watch란 ? 데이터 변화 감지.
https://developer.mozilla.org/ko/docs/Web/JavaScript/Reference/Global_Objects/Object/defineProperty
// 객체의 재정의
Object.defineProperty(obj, prop, descriptor)
watch 함수는 감시 할 property 를 선언하면 속성이 변경 될때마다 함수가 실행
// 함수 기반
Vue.component('simple-counter', {
  template: '<button v-on:click="counter += 1">{{ counter }}</button>',
  data: {
    question: '',
    answer: '대답'
  },
  watch: {
  	question: funcgtion (newQuestion) {
       this.answer = '입력 기다림 ...'
    }
  }
})

// 클래스 기반

  private alertMessage: string = '';
  @Prop() private parentMessage?: string;

  // 감시 할 property 설정
  // watch 옵션은 두가지가 있음.
  // immediate 속성값을 즉시 호출, deep 속성이 객체의 경우, 내부 속성까지 감지하겠다
  @Watch('parentMessage', { immediate: true, deep: true })
  private update(value: string, oldValue: string) {
    this.alertMessage = `parentMessage property는 watch에서 감지를 하고, 설정 된 함수 실행 ${this.parentMessage}`;
  }
@Emit란 ?
Vue.component('button-counter', {
  template: '<button v-on:click="incrementCounter">{{ counter }}</button>',
  data: function () {
    return {
      counter: 0
    }
  },
  methods: {
    incrementCounter: function () {
      this.counter += n
      // increment 이벤트 핸들러를 emit 을 통해 트리거
      // emit을 통해 파라미터를 넘기면 부모에서 사용 가능
      this.$emit('increment', n)
    }
  },
})

// children 컴포넌트
// 부모에게 전달 할 Emit 선언
@Emit()
public counter() {
  // console.log('trigger emit counter');
}

// 부모 컴포넌트
<Children
  @counter="setCounter"
></Children>

private setCounter() {
   this.count++;
}
interface로 Vuex (상태관리라이브러리) 구현
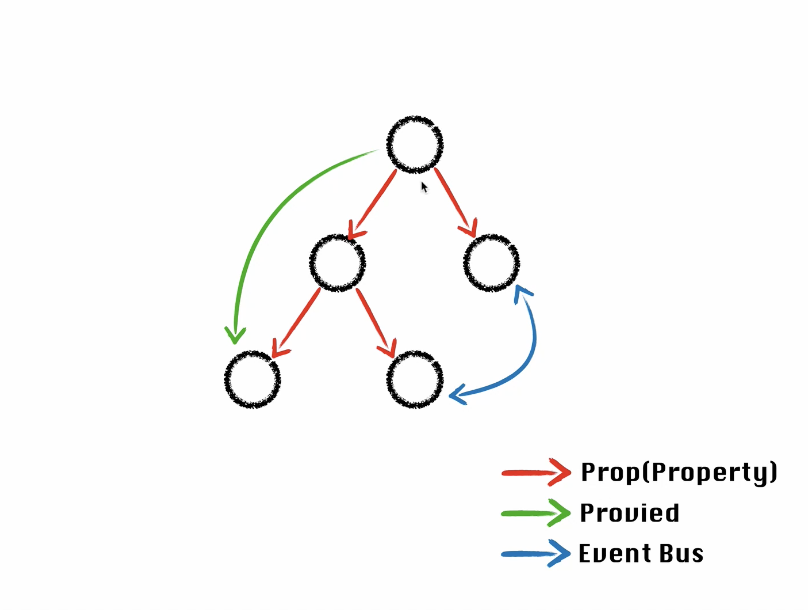
- 이벤트 버스, props, provide를 이용해서 컴포넌트는상호 작용 할 수 있지만, 어플리케이션이 커지면 어디서 상호 작용하는지 구분하기 어려울 수 있다. vue 공식 문서에 따르면, "보다 복잡한 경우에는" 전용 상태 관리 패턴을 고려해야 한다고 했다.
event-but.ts // 빈 vue 인스턴스를 만들어서 a, b component를 상호 작용 할 수 있다.
import Vue from 'vue';

export default new 'Vue';

a.vue
import Bus from '@/common/event-bus';

Bus.$emit('sendText', 'text')

b.vue
// 이벤트 등록
Bus.$on('sendText', (text: string) => {
   // trigger
})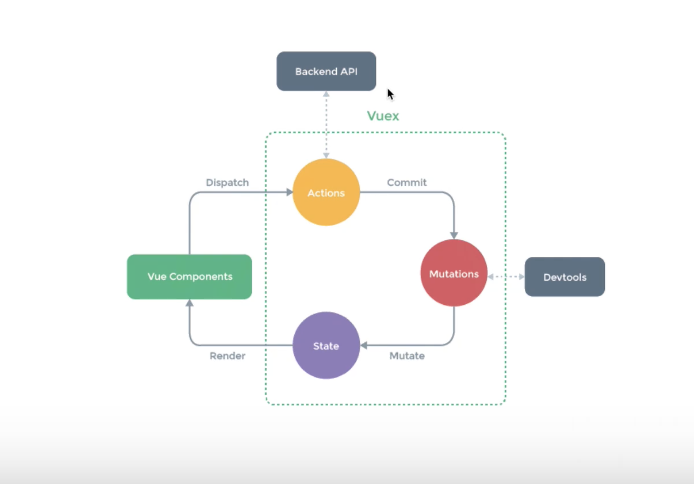
ex/ 로그인에 대한 정보를 가져온다면 로그인 버튼이 실행이 되면 Dispatch 가 실행이 되어 Action 에서 password, id 로 서버에 요청을 한다. 서버에 값을 내려주면 commit을 보내준다. Mutation 에서 state 데이터가 변경이 되고 셋 해준다. 이 State 값이 바뀌면 Component는 리렌더링 한다. 모든 Component는 이 하나의 State를 바라볼 수 있다.
Interface
interface Square {
  color?: string;
  width?: number;
}

function createSquare(square: Square) {}
Vuex Module Interface를 구현하여 Store 분리

Module을 Data 성격에 따라 관리를 한다.
무를 심자.