Part 2: JWT Login Implementation

지난 포스트에서는 OAuth2 방식을 사용했을 때 로그인 흐름이 어떻게 진행되는지 파악하고 Google OAuth2 Strategy를 정의하였다. 이번에는 한 단계 나아가 JWT를 연동하여 실제 서비스에서 사용할 수 있는 로그인, 로그아웃 기능을 구현해볼 것이다. 이번 포스트에서 구현하는 로그인 방식은 프론트엔드 개발자의 부담을 최소화하기 위해 스스로 고안해낸 것이다.
나는 개발이란 논리적으로 문제가 없는 비즈니스 로직을 설계하는 하나의 예술이라고 생각한다. 따라서 OAuth2에 JWT 로그인 방식을 똑같이 도입했더라도 전혀 다른 시각으로 비즈니스 로직을 설계할 수 있으니 참고만 바란다.
나는 몇 달 전 다른 서비스에서 JWT 방식으로 액세스 토큰과 리프레시 토큰을 모두 사용한 로그인을 구현한 적이 있다(이 링크). 그때는 RDBMS의 사용자 테이블에 리프레시 토큰을 저장하는 식으로 Refresh 동작의 비즈니스 로직을 구현했었는데, 서비스를 확장하면서 RDBMS 말고 다른 데이터베이스를 사용해 더 보안성 있게 리프레시 토큰을 관리해볼 수 있지 않을까하는 생각이 들었다.
그래서 이번에는 리프레시 토큰을 Redis에 저장하는 방식으로 Refresh 동작의 비즈니스 로직을 구현해 보았다. 자세한 설명은 뒤에 이어서 하겠다.
비즈니스 로직: 로컬 회원과 OAuth2 회원의 인증 방식 통합
서비스 목표 개발 기간이 짧고, 사용자 인증 기능 외에도 구현해야 할 기능이 많기 때문에 로컬 회원과 OAuth2 회원의 인증 정보를 처리하는 방식을 통일하는 것이 필요했다. 두 종류의 회원이 다른 인증 방식을 갖고 있다면 프론트엔드와 백엔드가 둘 다 처리해야 할 케이스가 많아져 힘들 것이기 때문이다.
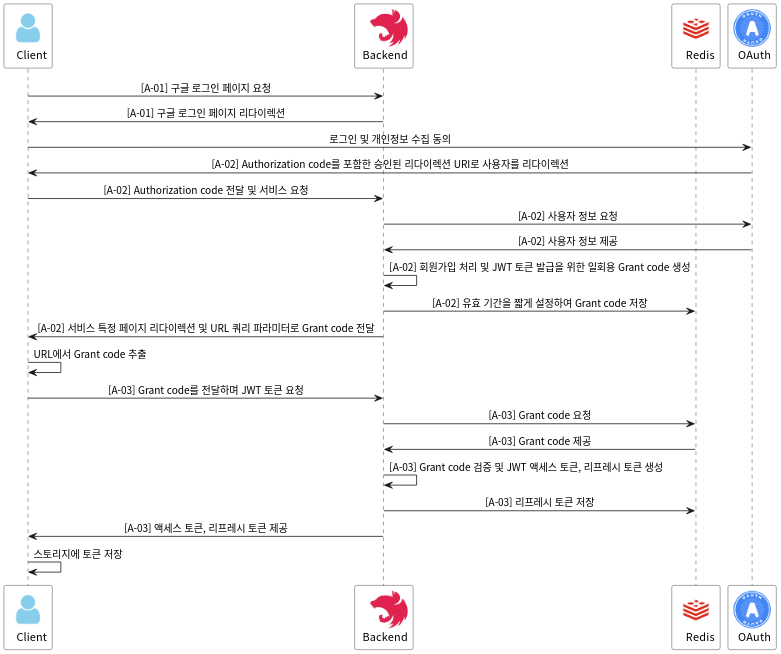
시퀀스 다이어그램만 보았을 때 조금은 복잡해 보이지만, OAuth2에서 사용자 인증 정보를 제공해주는 로직에서 영감을 받아 3개의 API로 아주 획기적인 로직을 설계해 보았다. 흐름은 다음과 같다.
- 클라이언트가 구글 로그인 페이지에서 로그인에 성공한다.
- 백엔드 서버는 OAuth Provider로부터 사용자 정보를 제공받고 회원가입 처리(upsert)한다.
- JWT 토큰을 즉시 발급하지 않고, JWT 토큰 발급을 위한 일회용 코드(Grant code)를 생성한다. 이 코드 역시 JWT 방식으로 인코딩되어 있다.
- 생성한 Grant code에 1분 정도의 유효 기간을 설정해 Redis에 저장한다.
- 서비스의 특정 페이지로 사용자를 리다이렉션하고 이때 URL의 쿼리 파라미터에 ?code=[grant code]와 같은 키와 값을 설정하여 Grant code를 전달한다.
- 클라이언트는 URL에서 Grant code를 추출하여 백엔드 서버에 JWT 토큰 발급을 요청한다.
- 백엔드 서버는 Redis에 저장한 Grant code와 비교하여 검증한다.
- 검증 성공 시 JWT 액세스 토큰, 리프레시 토큰을 생성하여 응답한다.
- 클라이언트는 이를 스토리지에 저장하여 요청 시 활용한다.
이제 [A-03] API를 구현한 과정까지 살펴보겠다. 나머지 리프레시나 로그아웃 로직은 나의 깃허브 프로젝트 링크를 통해 확인할 수 있다.
기본적인 패키지 설치 및 디렉터리 구조
$ npm i @nestjs/jwt @nestjs/passport passport passport-jwt redis ioredis
$ npm i --save-dev @types/passport @types/passport-jwt @types/redis @types/ioredis
나는 Secret을 .env로 분리했기 때문에 @nestjs/config, dotenv 패키지도 설치했는데, 일단 그것은 꼭 필요한 패키지는 아니므로 위에 명시하진 않았다.
디렉터리 구조는 다음과 같다.
├── auth
│   ├── auth.controller.spec.ts
│   ├── auth.controller.ts
│   ├── auth.module.ts
│   ├── auth.service.spec.ts
│   ├── auth.service.ts
│   ├── dto
│   │   ├── access-token.dto.ts
│   │   ├── google-profile.dto.ts
│   │   ├── local-login.dto.ts
│   │   ├── refresh.dto.ts
│   │   ├── sign-up.dto.ts
│   │   ├── signed-member.dto.ts
│   │   ├── token-grant-code.dto.ts
│   │   ├── tokens.dto.ts
│   │   └── verify-grant-code.dto.ts
│   └── strategies
│       ├── google.strategy.ts
│       └── jwt.strategy.ts
...
├── common
│   ├── constants
│   │   └── event.constant.ts
│   ├── decorators
│   │   └── get-member.decorator.ts
│   └── types
│       ├── KBO-team.enum.ts
│       ├── account-status.enum.ts
│       ├── chat-status.enum.ts
│       ├── chat-type.enum.ts
│       ├── game-status.enum.ts
│       ├── grant-code-paylaod.type.ts
│       ├── jwt-payload.type.ts
│       ├── member-type.enum.ts
│       └── refresh-token.type.ts
├── config
│   ├── jwt.config.ts
│   ├── redis-client.factory.ts
│   ├── rmq.option.ts
│   └── typeorm.config.ts
...
└── redis
    ├── redis.module.ts
    ├── redis.repository.ts
    ├── redis.service.spec.ts
    └── redis.service.ts
구현: Redis 모듈
Redis를 활용하기 위한 모듈을 따로 분리하였다. 이를 위해 이 링크를 참고하여 많은 도움을 받았고, 전체적인 코드는 다음과 같다.
config/redis-client.factory.ts
import { FactoryProvider } from '@nestjs/common';
import Redis from 'ioredis';

export const RedisClientFactory: FactoryProvider<Redis> = {
  provide: 'RedisClient',
  useFactory: () => {
    const redisInstance = new Redis({
      host: 'localhost',
      port: 6379,
    });

    redisInstance.on('error', (e) => {
      throw new Error(`Redis connection failed: ${e}`);
    });

    return redisInstance;
  },
  inject: [],
};
설정 파일을 따로 분리했다. provide 속성이 리포지토리 계층에서 레디스 클라이언트를 의존성 주입할 때 사용되는 이름이므로 잘 정의해 두자.
redis/redis.repository.ts
import { Inject, Injectable, OnModuleDestroy } from '@nestjs/common';
import Redis from 'ioredis';

@Injectable()
export class RedisRepository implements OnModuleDestroy {
  constructor(@Inject('RedisClient') private readonly redisClient: Redis) {}

  onModuleDestroy(): void {
    this.redisClient.disconnect();
  }

  async get(prefix: string, key: string): Promise<string | null> {
    return this.redisClient.get(`${prefix}:${key}`);
  }

  async set(prefix: string, key: string, value: string): Promise<void> {
    await this.redisClient.set(`${prefix}:${value}`, value);
  }

  async delete(prefix: string, key: string): Promise<void> {
    await this.redisClient.del(`${prefix}:${key}`);
  }

  async setWithExpiry(
    prefix: string,
    key: string,
    value: string,
    expiry: number,
  ): Promise<void> {
    await this.redisClient.set(`${prefix}:${key}`, value, 'EX', expiry);
  }
}
리포지토리 로직은 아주 기본적인 기능들만을 구현했다.
redis/redis.service.ts
import { Injectable } from '@nestjs/common';
import { RedisRepository } from './redis.repository';

@Injectable()
export class RedisService {
  constructor(private readonly redisRepository: RedisRepository) {}

  /**
   * method for storing refresh token to Redis
   * @param memberId member's id
   * @param refreshToken generated refresh token
   * @param expiry exiration time
   */
  async setRefreshToken(
    memberId: number,
    refreshToken: string,
    expiry: number,
  ): Promise<void> {
    // store the refresh token to Redis
    await this.redisRepository.setWithExpiry(
      'refresh_token',
      String(memberId),
      refreshToken,
      expiry,
    );
  }

  /**
   * method for getting stored refresh token from Redis
   * @param memberId member's id
   * @returns the found refresh token
   */
  async getRefreshToken(memberId: number): Promise<string | null> {
    // get and return the stored refresh token
    return this.redisRepository.get('refresh_token', String(memberId));
  }

  /**
   * method for deleting stored refresh token from Redis
   * @param memberId member's id
   */
  async deleteRefreshToken(memberId: number): Promise<void> {
    // delete the member's refresh token
    return this.redisRepository.delete('refresh_token', String(memberId));
  }

  /**
   * method for storing grant code to Redis
   * @param memberId member's id
   * @param code grant code
   */
  async setGrantCode(memberId: number, code: string): Promise<void> {
    // store the grant code to Redis
    await this.redisRepository.setWithExpiry(
      'grant_code',
      String(memberId),
      code,
      60, // with 60 seconds of life
    );
  }

  /**
   * method for getting stored grant code
   * @param memberId member's id
   * @returns found grant code
   */
  async getGrantCode(memberId: number): Promise<string | null> {
    // get and return grant code
    return this.redisRepository.get('grant_code', String(memberId));
  }

  /**
   * method for deleting stored grant code
   * @param memberId member's id
   */
  async deleteGrantCode(memberId: number): Promise<void> {
    // delete the grant code from Redis
    await this.redisRepository.delete('grant_code', String(memberId));
  }
}setGrantCode(): 일회용 코드를 60초의 유효 기간과 함께 레디스에 저장한다.getGrantCode(): 일회용 코드를 레디스에서 조회한다.deleteGrantCode(): 일회용 코드를 레디스에서 삭제한다. 일회용이라는 속성을 보장하기 위해 사용되는 매우 중요한 메서드이다.
redis/redis.module.ts
import { Module } from '@nestjs/common';
import { RedisService } from './redis.service';
import { RedisRepository } from './redis.repository';
import { RedisClientFactory } from '../config/redis-client.factory';

@Module({
  providers: [RedisClientFactory, RedisService, RedisRepository],
  exports: [RedisService],
})
export class RedisModule {}
모듈 파일은 이렇게 구성해 주었다.
구현: JWT 전략 및 설정
auth/strategies/jwt.strategy.ts
import { Injectable, UnauthorizedException } from '@nestjs/common';
import { ConfigService } from '@nestjs/config';
import { PassportStrategy } from '@nestjs/passport';
import { ExtractJwt, Strategy } from 'passport-jwt';
import { JwtPayload } from '../../common/types/jwt-payload.type';
import { MemberRepository } from '../../member/member.repository';

@Injectable()
export class JwtStrategy extends PassportStrategy(Strategy, 'jwt') {
  constructor(
    private readonly configService: ConfigService,
    private readonly memberRepository: MemberRepository,
  ) {
    super({
      jwtFromRequest: ExtractJwt.fromAuthHeaderAsBearerToken(),
      ignoreExpiration: false,
      secretOrKey: configService.get<string>('JWT_ACCESS_SECRET'),
    });
  }

  async validate(payload: JwtPayload) {
    // find the member from DB
    const member = await this.memberRepository.findMemberById({
      id: payload.sub,
    });

    // if the member does not exist, throw Unauthorized exception
    if (!member) {
      throw new UnauthorizedException('Member not found');
    }

    return payload;
  }
}jwtFromRequest: Bearer 방식을 채택했다.ignoreExpireation: 액세스 토큰의 만료 검증을 백엔드 서버에서도 진행할 수 있도록 설정했다.secretOrKey: .env 파일에 시크릿을 은닉했다.validate(): 요청으로 주어진 JWT 토큰을 해독한 후 생성된 payload를 검증한다. 여기서 사용자의 존재성을 검증하도록 설정했다.
config/jwt.config.ts
import { JwtSignOptions } from '@nestjs/jwt';
import * as dotenv from 'dotenv';
dotenv.config();

export const jwtAccessOptions: JwtSignOptions = {
  secret: process.env.JWT_ACCESS_SECRET,
  expiresIn: '7d',
};

export const jwtRefreshOptions: JwtSignOptions = {
  secret: process.env.JWT_REFRESH_SECRET,
  expiresIn: '30d',
};

export const jwtGrantCodeOptions: JwtSignOptions = {
  secret: process.env.JWT_GRANT_SECRET,
  expiresIn: '1m',
};
설정 파일은 별도로 분리하고 dotenv 패키지를 사용해 시크릿을 은닉했다.
구현: 컨트롤러 로직
auth/auth.controller.ts
...
  @Get('login/oauth2/google/redirect')
  @HttpCode(HttpStatus.FOUND)
  @UseGuards(AuthGuard('google'))
  async googleAuthRedirect(@Req() req: Request, @Res() res: Response) {
    // get the OAuth2 member information
    const member = req.user as Member;

    // generate token grant code
    const code: string = await this.authService.issueTokenGrantCode(member);

    // TODO: redirect service's actual loading page
    return res.redirect(`http://localhost:8080/?code=${code}`);
  }

  @Post('login/oauth2/grant-code')
  @HttpCode(HttpStatus.OK)
  async verifyGrantCode(
    @Body() VerifyGrantCodeDto: VerifyGrantCodeDto,
  ): Promise<TokensDto> {
    // verify grant code and issue JWT tokens
    const tokens: TokensDto =
      await this.authService.verifyTokenGrantCode(VerifyGrantCodeDto);

    // return the issued tokens
    return tokens;
  }
...
사용되는 DTO들은 다음과 같다.
VerifyGrantCodeDto
import { ApiProperty } from '@nestjs/swagger';
import { IsNotEmpty, IsString } from 'class-validator';

export class VerifyGrantCodeDto {
  @ApiProperty({ description: 'OAuth grant code for issuing JWT tokens' })
  @IsString()
  @IsNotEmpty()
  code: string;
}
TokensDto
import { ApiProperty } from '@nestjs/swagger';
import { IsNotEmpty, IsString } from 'class-validator';

export class TokensDto {
  @ApiProperty({ description: 'JWT access token' })
  @IsString()
  @IsNotEmpty()
  accessToken: string;

  @ApiProperty({ description: 'JWT refresh token' })
  @IsString()
  @IsNotEmpty()
  refreshToken: string;
}
컨트롤러만으론 비즈니스 로직을 파악하기 어려우므로, 여기서는 googleAuthRedirect()의 마지막 리다이렉트 동작만 확인하면 된다. 아직 서비스 개발이 이루어지고 있기 때문에 실제 페이지를 지정하진 않았지만, 어쨌든 서비스의 특정 페이지로 리다이렉션하면서 Grant code를 쿼리 파라미터로 제공하는 것이 핵심이다.
구현: 서비스 로직
auth/auth.service.ts
@Injectable()
export class AuthService {
  private readonly logger: Logger = new Logger('[Auth Service]');

  constructor(
    private readonly memberRepository: MemberRepository,
    private readonly jwtService: JwtService,
    private readonly redisService: RedisService,
  ) {}

  /**
   * method for issuing token grant code to get JWT tokens when the member is trying to log in with OAuth2
   * @param member Member type object
   * @returns issued grant code encrypted by JWT
   */
  async issueTokenGrantCode(member: Member): Promise<string> {
    // define JWT payload
    const payload: GrantCodePayload = { sub: member.id };

    // issue grant code
    const code: string = this.jwtService.sign(payload, jwtGrantCodeOptions);

    // store it to Redis
    await this.redisService.setGrantCode(member.id, code);

    // return the grant code
    return code;
  }

  /**
   * method for verifying grant code to log in by OAuth
   * @param verifyGrantCodeDto grant code issued by OAuth login
   * @returns JWT access token, refresh token
   */
  async verifyTokenGrantCode(
    verifyGrantCodeDto: VerifyGrantCodeDto,
  ): Promise<TokensDto> {
    // destruct DTO
    const { code } = verifyGrantCodeDto;

    // decode the JWT grant code
    let decoded: GrantCodePayload;
    try {
      // verify grant code and get the payload
      decoded = await this.jwtService.verifyAsync<GrantCodePayload>(
        code,
        jwtGrantCodeOptions,
      );
    } catch {
      throw new UnauthorizedException('Grant code is invalid or expired');
    }

    // extract the member's id
    const memberId: number = decoded.sub;

    // find grant code from Redis
    const foundCode: string = await this.redisService.getGrantCode(memberId);
    // if the found grant code does not exist or not the same as passed code
    if (!foundCode || foundCode !== code) {
      // throw Unauthorized exception
      throw new UnauthorizedException('Grant code is invalid or expired');
    }

    // delete the grant code from Redis to prevent being used
    await this.redisService.deleteGrantCode(memberId);

    // find member from DB
    const member: Member = await this.memberRepository.findMemberById({
      id: memberId,
    });

    // if member has not been found, throw NotFound exception
    if (!member) {
      throw new NotFoundException(`Member with id: ${memberId} not found`);
    }

    // create JWT payload
    const jwtPayload: JwtPayload = {
      sub: member.id,
      nickname: member.nickname,
      profile: member.profile,
      preferTeam: member.preferTeam,
    };

    // login and return JWT tokens
    return this.login(jwtPayload);
  }

  /**
   * method for logging in and getting JWT tokens
   * @param jwtPaylod sub, nickname, profile(image), preferTeam
   * @returns access token, refresh token
   */
  async login(jwtPayload: JwtPayload): Promise<TokensDto> {
    // issue JWT tokens
    const tokens: TokensDto = await this.issueJwtTokens(jwtPayload);

    this.logger.debug('tokens:', tokens);

    // store refresh token in Redis
    await this.redisService.setRefreshToken(
      jwtPayload.sub,
      tokens.refreshToken,
      60 * 60 * 24 * 30,
    );

    this.logger.debug('tokens are stored');

    // return the generated tokens
    return tokens;
  }

  /**
   * method for issuing JWT tokens
   * @param jwtPayload payload of JWT token
   * @returns access token, refresh token
   */
  async issueJwtTokens(jwtPayload: JwtPayload): Promise<TokensDto> {
    return {
      accessToken: await this.jwtService.signAsync(
        jwtPayload,
        jwtAccessOptions,
      ),
      refreshToken: await this.jwtService.signAsync(
        jwtPayload,
        jwtRefreshOptions,
      ),
    };
  }

  /**
   * method for refreshing access token
   * @param refreshToken passed refresh token
   * @returns an object containing the new access token, if the token is not valid then return null
   */
  async refreshToken(refreshDto: RefreshDto): Promise<AccessTokenDto> {
    // destruct DTO
    const { refreshToken } = refreshDto;

    // decode the old refresh token
    let decoded: JwtPayload;
    try {
      // verify refresh token and get the payload
      decoded = await this.jwtService.verifyAsync<JwtPayload>(
        refreshToken,
        jwtRefreshOptions,
      );
    } catch (error) {
      // if the passed token is invalid, throw Unauthorized exception
      throw new UnauthorizedException('Failed to verify refresh token');
    }

    // get the stored refresh token from Redis
    const storedRefreshToken: string = await this.redisService.getRefreshToken(
      decoded.sub,
    );

    // if the stored token and passed token are the same
    if (storedRefreshToken && storedRefreshToken === refreshToken) {
      // create the JWT payload
      const payload: JwtPayload = {
        sub: decoded.sub,
        nickname: decoded.nickname,
        profile: decoded.profile,
        preferTeam: decoded.preferTeam,
      };

      // sign new access token
      const newAccessToken: string = this.jwtService.sign(
        payload,
        jwtAccessOptions,
      );

      // and return it
      return {
        accessToken: newAccessToken,
      };
    }

    // or else, return null
    return null;
  }
}
동작 이해를 돕기 위해 마지막에 리프레시 비즈니스 로직까지 추가해 두었다. 동작을 주석으로 잘 설명해 두었으므로 자세한 설명은 생략하겠다.
Remind: 전체적인 흐름
다시 처음에 확인한 전체적인 흐름을 살펴보자.
In-memory 기반으로 동작하며 key:value 형태로 데이터를 저장하는 레디스의 특성상 Grant code와 같이 금방 만료되는 데이터를 저장하는 것은 매우 적합한 설계이다. 그러나 생각해 보아야 할 점이 있다.
리프레시 토큰을 레디스에 저장하는 것이 적절한 설계인가?
지금은 임의로 리프레시 토큰의 유효 기간을 30일로 지정해 두었다. 그러나 레디스의 주 사용 목적이 인메모리 캐싱, 고속 접근임을 고려할 때 이 유효 기간을 고수할 경우 메모리 효율성이 감소한다. 따라서 액세스 토큰과 리프레시 토큰의 유효 기간을 둘 다 짧게 설정하고, 자주 갱신하는 방식으로 보안성을 늘리는 방식도 괜찮아 보인다. 이 경우 리프레시 비즈니스 로직에서 액세스 토큰만 재발급하는 것이 아니라 리프레시 토큰 역시 재발급하여 기존의 데이터를 덮어 쓰는 방식도 고려해볼 수 있다.
앞서 RDBMS에 리프레시 토큰을 저장하면서 느꼈던 보안성과 관련한 이슈는 위와 같은 로직을 통해 개선할 수 있다. 리프레시 토큰 자체도 자주 재발급되면 공격자에게 탈취당하더라도 금방 무효화되기 때문이다.
이렇게 2편에 걸쳐 OAuth2와 JWT를 활용해 로그인 기능을 구현해 보았다. 이제 다음으로는 웹 소켓을 사용해 채팅 기능을 구현해야 하는데 인증 모듈에만 거의 3~4일을 써버려서 정말 큰일났다. 그래도 그동안 빠르게 프로젝트를 진행하면서 인증에 무게를 많이 못 주는 경향이 있었는데 이번 기회에 백엔드 중급 기능 정도로 볼 수 있는 OAuth 로그인 방식도 드디어 도입해 보고, 기존에 사용했던 방식 그대로가 아니라 레디스까지 활용해 보고, Grant code를 사용한 로그인 방식도 스스로 고안해 보면서 인증 기능에 대한 통찰이 어느 정도 생겼다.
학부생이 진행하는 수준의 프로젝트에서는 이 인증 기능이 프로젝트 진행을 지연시키는 걸림돌 정도로 취급되는 경향이 있다. 결국 대회 같은 데서 수상을 하는 데는 서비스의 컨셉을 담고 있는 몇몇 주요한 비즈니스 로직이 지배적인 역할을 하기 때문이다. 하지만 우리가 백엔드 개발자로서 나중에 취직을 해서 직장에 들어가면 그 순간부터는 이미 사용자를 많이 보유하고 있는 서비스를 다루게 될 가능성이 높기 때문에, 이를 보안성 있게 유지보수하여 사용자 정보를 외부 공격자로부터 보호하는 것 또한 하나의 큰 책임이 된다고 생각한다. 그래서 아무리 급해도, 급할 수록 천천히.. 그런 태도로 개발하는 것이 맞는 듯하다.
마지막으로, 만약 먼 훗날 누군가가 이 글을 보고 로그인 기능을 구현하게 된다면 CORS 설정 안 해놨으니까 바로 사용하지 말고 반드시 main.ts에 꼭 설정해 두기를 바란다. 나도 이제 개발에 도가 좀 터서 그런지 더 이상 CORS로 인한 트러블 슈팅은 안 하지만, 그래도 한 번씩 깜빡하는 요소라 적어둔다.