Part 1: OAuth2 Strategy Implementation
이번에 개발하는 서비스에서 OAuth2로 로그인을 구현하기로 했다. 처음엔 요즘 공부하고 있는 스프링으로 구현해볼까 했지만, 아직 Spring Security까지는 공부를 하지 못해서 그냥 엎어버리고 NestJS로 개발하고 있다.
역시 자바스크립트로 개발하니 개발에 속도감도 붙고 재미도 붙는다. 이제까지 Node.js로 개발한 애플리케이션에서 세션 기반, 토큰 기반의 로컬 로그인을 모두 적용해 보았지만 OAuth 로그인은 이번이 처음이다. 사용자 편의성 측면에선 이것만한 게 없지만 구현하는 입장에선 아주 고되다는 걸 체감했다. 오늘 학교 갔다 오고 8시간 동안 이것만 구현하였다..
OAuth 요청의 흐름
클라이언트 사이드에서 OAuth 로그인을 수행할 때 보이지 않는 곳에선 어떤 일이 일어날까?
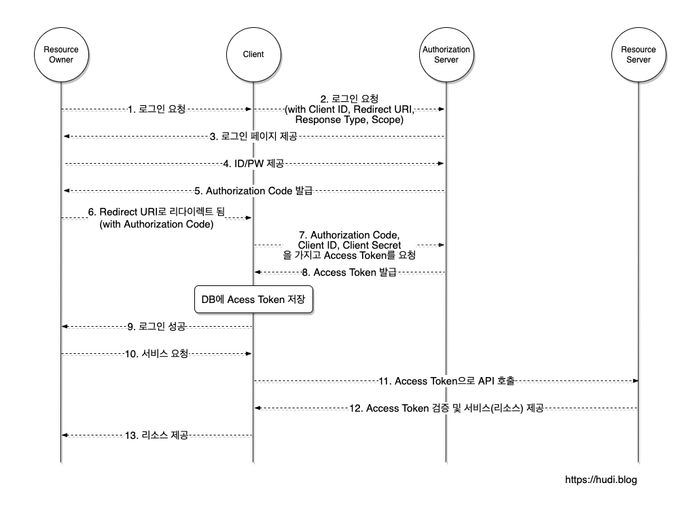
출처: https://hudi.blog/oauth-2.0/
OAuth 인증의 전반적인 흐름을 가장 잘 나타낸 시퀀스 다이어그램인 것 같아 가져와봤다. 해당 시퀀스 다이어그램에서 대강 8번까지가 내가 활용하고자 하는 핵심 부분이고, 해당 부분까지의 과정을 요약하면 다음과 같다.
- 클라이언트가 백엔드 서버로 로그인 페이지 요청을 보낸다.
- 백엔드 서버는 OAuth provider(예: 구글 클라우드 콘솔)로부터 인증을 받기 위해 필요한 정보(Client ID, Redirect URI 등)를 포함한 로그인 URL을 생성하여 클라이언트에게 리다이렉션한다.
- 클라이언트는 OAuth provider가 제공한 로그인 페이지로 리다이렉트되어 외부 서비스 로그인을 진행한다.
- 클라이언트가 OAuth provider에서 로그인에 성공하면 OAuth provider는 사전에 승인된 Redirect URI(백엔드 서버에 존재)로 인증 코드(Authorization Code)와 함께 사용자를 리다이렉션한다. 따라서 사용자는 인증 코드를 포함한 요청을 백엔드 서버로 보내게 된다.
- 백엔드 서버는 OAuth provider로부터 받은 인증 코드를 이용해 액세스 토큰을 요청한다. 이 요청에는 Client ID, Client Secret, Redirect URI, 인증 코드가 포함된다.
- 백엔드 서버는 OAuth provider로부터 액세스 토큰을 받고, 이를 이용해 사용자 정보를 요청한다.
- 백엔드 서버는 받아온 사용자 정보를 이용해 로그인 또는 회원가입을 처리하고 클라이언트가 4번에서 승인된 리다이렉션 URI로 보내온 요청에 대한 응답을 보낸다.
이처럼 클라이언트가 외부 서비스에 로그인하기만 하면 Client Secret, Authorization Code를 사용한 보안성 있는 통신은 백엔드와 OAuth Provider 사이에서 이루어지기 때문에 클라이언트와 백엔드 간 중요한 정보가 탈취될 일이 없다.
OAuth와 관련하여 다양한 문서를 찾아봤는데 프론트엔드와 백엔드가 나뉘어 협업하는 과정에서 이에 대한 책임을 어느 정도 합리적으로 분리하여 구현하는 경우도 볼 수 있었다. 서로 일을 균형 있게 나누는 것은 정말 좋은 일이지만 보안이 걸려 있는 것은 백엔드가 책임을 온전히 가져가는 것이 맞다고 생각한다.
이론적인 내용은 위와 같고, 이제 극도로 잘 추상화된 Node.JS의 passport 패키지를 사용해 위 내용은 잊어버릴 정도로 간단히 이를 구현해 보고자 한다. 구글 클라우드 콘솔에 접속하여 클라이언트 아이디와 시크릿을 생성하는 부분은 인터넷에 문서가 풍부하기 때문에 생략하겠다.
기본적인 패키지 설치 및 디렉터리 구조
$ npm i --save @nestjs/passport passport passport-google-oauth20
$ npm i --save-dev @types/passport-google-oauth20
위와 같이 passport를 설치해 준다.
...
├── auth
│   ├── auth.controller.ts
│   ├── auth.module.ts
│   ├── auth.service.ts
│   ├── dto
│   │   └── google-profile.dto.ts
│   └── strategies
│       └── google.strategy.ts
├── main.ts
├── member
│   ├── member.entity.ts
│   ├── member.module.ts
│   ├── member.repository.ts
│   └── types
│       ├── account-status.type.ts
│       ├── email.dto.ts
│       └── member-type.type.ts
...
디렉터리 구조는 위와 같다.
구현: 구글 로그인 전략
일단 가장 먼저 손봐줘야 할 것은 passport의 전략이다. 내부의 과정이 아주 고도로 추상화되어 있기 때문에 우리는 기초적인 설정만 해주면 된다.
auth/strategies/google.strategy.ts
import { Injectable, Logger } from '@nestjs/common';
import { ConfigService } from '@nestjs/config';
import { PassportStrategy } from '@nestjs/passport';
import { Strategy, Profile, VerifyCallback } from 'passport-google-oauth20';
import { GoogleProfileDto } from '../dto/google-profile.dto';
import { plainToInstance } from 'class-transformer';
import { AuthService } from '../auth.service';

@Injectable()
export class GoogleStrategy extends PassportStrategy(Strategy, 'google') {
  private readonly logger: Logger = new Logger('[Google Strategy]');

  constructor(
    private readonly configService: ConfigService,
    private readonly authService: AuthService,
  ) {
    super({
      clientID: configService.get<string>('GOOGLE_CLIENT_ID'),
      clientSecret: configService.get<string>('GOOGLE_CLIENT_SECRET'),
      callbackURL: `${configService.get<string>('BASE_URL')}/auth/v1/login/oauth2/google/redirect`,
      scope: ['email', 'profile'],
    });
  }

  async validate(
    accessToken: string,
    refreshToken: string,
    profile: Profile,
    done: VerifyCallback,
  ): Promise<any> {
    this.logger.verbose('OAuth2 login request has been passed.');

    // extract google account's information
    const { name, emails, photos } = profile;
    this.logger.verbose(`name: ${name}`);
    this.logger.verbose(`emails: ${emails}`);
    this.logger.verbose(`photos: ${photos}`);

    // define google profile DTO
    const googleProfileDto: GoogleProfileDto = plainToInstance(
      GoogleProfileDto,
      {
        email: emails[0].value,
        firstName: name.givenName,
        lastName: name.familyName,
        picture: photos[0].value,
      },
    );

    // find or create the google member
    const member = this.authService.findOrCreateGoogleMember(googleProfileDto);
    done(null, member);
  }
}
strategy는 Guard level에서 작동한다. 즉, 여기서 처리된 정보가 컨트롤러로 전달된다.
class GoogleStrategy extends PassportStrategy(Strategy, 'google'):passport패키지의 외부 서비스(Google) 로그인 전략을 사용한다.super(): Google OAuth에 대한 설정을 구성한다.clientID,clientSecret속성에 각각 구글 클라우드 콘솔에서 발급한 클라이언트 아이디와 시크릿을 전달하고,callbackURL에는 구글 클라우드 콘솔에서 설정한 승인된 리다이렉션 URL을 전달한다. 마지막으로scope설정도 잊지 말자. 구글 클라우드 콘솔에서도 마찬가지로scope를 잘 설정해 주어야 한다.validate(): 클라이언트가 로그인에 성공하면 호출되는 메서드이다. 매개변수의accessToken,refreshToken은 서비스에서 로그인 시 사용하는 것과는 관련이 없으니 주의하자.profile에 우리가 원하는 사용자의 정보가 담겨 있다. 이 메서드에서 사용자 정보를 담아done(null, member)를 호출하면 익스프레스req객체의user속성에 해당 정보가 담겨 컨트롤러로 전달된다.
구현: 컨트롤러
auth/auth.controller.ts
import { Controller, Get, Logger, Req, Res, UseGuards } from '@nestjs/common';
import { ConfigService } from '@nestjs/config';
import { AuthGuard } from '@nestjs/passport';
import { Request, Response } from 'express';

@Controller('auth/v1')
export class AuthController {
  private readonly logger: Logger = new Logger('[Auth Controller]');

  constructor(private readonly configService: ConfigService) {}

  @Get('login/oauth2/google')
  @UseGuards(AuthGuard('google'))
  async googleAuth() {
    // redirect to google login page
  }

  @Get('login/oauth2/google/redirect')
  @UseGuards(AuthGuard('google'))
  async googleAuthRedirect(@Req() req: Request, @Res() res: Response) {
    const member = req.user;
    this.logger.verbose(`finally redirected member: ${member}`);

    // TODO: refine below response
    res.redirect('https://www.naver.com');
  }
}AuthGuard('google'):passport가 생성한 구글 로그인 가드이다. 이 가드가 적절하게 사용자를 로그인 페이지로 인도하거나, 앞서 전략에서 정의한validate()메서드를 실행한다.googleAuth(): 사용자가 구글 로그인을 할 수 있도록 로그인 페이지 URL을 생성하고 리다이렉션한다.googleAuthRedirect():validate()메서드를 통과한 후 도착한 컨트롤러이다. 여기서req.user를 참조하여 앞서 저장한 사용자 정보를 추출할 수 있다. 주의할 점은 이 메서드는 승인된 리다이렉션 URL을 경로 매핑해야 한다는 것이다.
전체적인 흐름
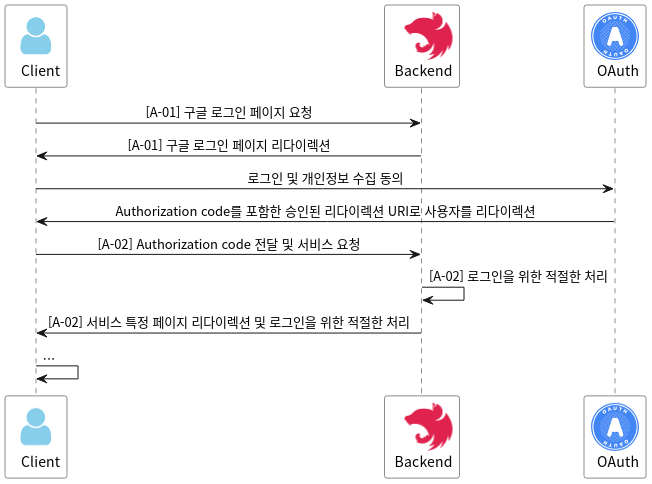
우리가 실제로 보는 동작에선 그렇게나 많이 요청이 왔다갔다 하는지 잘 알 수 없다. 일련의 과정이 고도로 추상화되어 있기 때문이다. 전략을 잘 정의하고, 컨트롤러단에 메서드를 두 개만 정의하면 간단히 OAuth로 로그인을 구현할 수 있다. 그래도 그 과정 상에서 어떤 일이 일어나는지 명확히 파악하고 있어야 문제가 생겼을 시 대처할 수 있다.
[A-02] 요청에 대한 응답 이후의 흐름은 OAuth2와는 연관이 없는 서비스의 로그인 로직 구현 부분이다. 따라서 글을 2편으로 나누어 1편에서는 OAuth2의 전략을 구현하는 것을 설명하고 2편에서는 이 서비스에서 내가 실제로 로그인을 구현한 방법을 소개하고자 한다.
1편은 이것으로 마친다.