
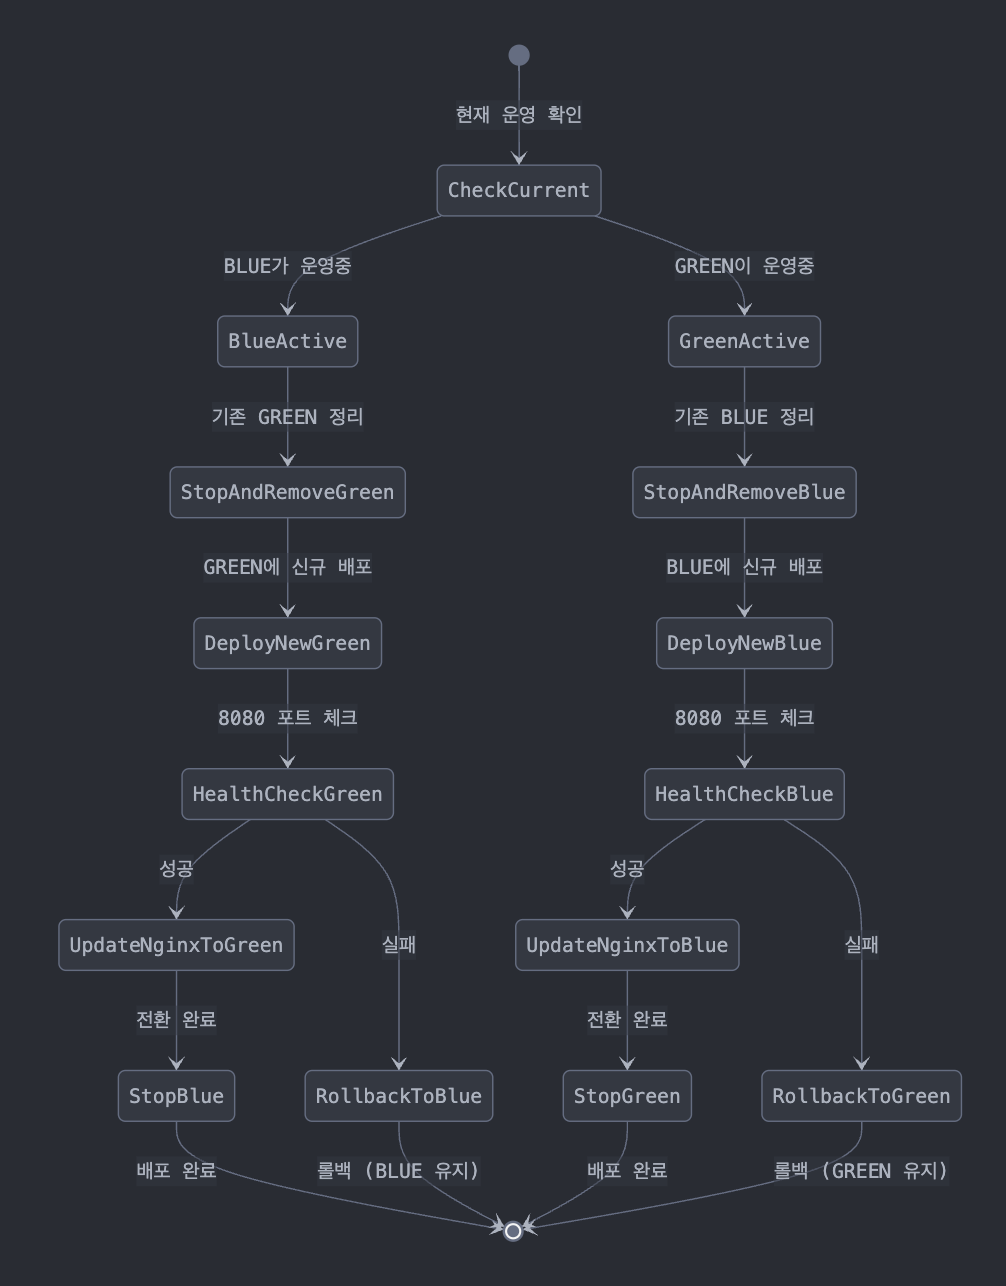
기존의 8080 단일 포트 blue green
1.초기 상태
- BLUE 또는 GREEN 중 하나만 8080 포트로 운영
- 다른 컨테이너는 중지된 상태
- Nginx가 현재 운영 중인 컨테이너로 라우팅
2. 배포 프로세스 상세
A.배포 전 확인
# 현재 운영 중인 컨테이너 확인
BLUE_RUNNING=$(docker ps --filter "status=running" --filter "name=spring-boot-blue" -q)
GREEN_RUNNING=$(docker ps --filter "status=running" --filter "name=spring-boot-green" -q)

# Nginx 설정에서 현재 active 서버 확인
B.배포 진행
if [ -n "$BLUE_RUNNING" ]; then
    # BLUE가 운영 중일 때
    1. 기존 GREEN 컨테이너 제거 (있다면)
    2. 새 버전으로 GREEN 컨테이너 시작 (8080 포트)
    3. GREEN 헬스체크
    4. 성공시: Nginx 설정 변경 후 BLUE 중지
    5. 실패시: GREEN 제거하고 BLUE 유지
else
    # GREEN이 운영 중일 때
    1. 기존 BLUE 컨테이너 제거 (있다면)
    2. 새 버전으로 BLUE 컨테이너 시작 (8080 포트)
    3. BLUE 헬스체크
    4. 성공시: Nginx 설정 변경 후 GREEN 중지
    5. 실패시: BLUE 제거하고 GREEN 유지
fi
3. 8080 포트 사용의 특징
장점
1. 단순한 포트 관리
   - 항상 8080 포트만 사용
   - 포트 충돌 걱정 없음

2. 리소스 효율성
   - 한 번에 하나의 포트만 사용
   - 포트 매핑 관리가 단순

3. 설정 단순화
   - 스프링 부트 기본 포트 사용
   - 추가 환경변수 설정 불필요
단점
1. 배포 순서 중요
   - 기존 컨테이너 중지 후 새 컨테이너 시작 필요
   - 포트 충돌 방지를 위한 정확한 타이밍 필요

2. 일시적 서비스 불가능 구간
   - 컨테이너 전환 시 매우 짧은 순간 서비스 중단 가능
   - 정확한 타이밍 제어 필요

3. 롤백 시간
   - 문제 발생 시 롤백에 더 많은 시간 소요
   - 포트 재사용을 위한 대기 시간 필요
주요 차이점
1. 배포 방식
   - 8080: 순차적 배포 (중지 -> 시작)
   - 8081/8082: 병렬 배포 가능

2. 가용성
   - 8080: 매우 짧은 순간 서비스 중단 가능성
   - 8081/8082: 완전한 무중단 배포

3. 리소스 사용
   - 8080: 한 번에 하나의 포트만 사용
   - 8081/8082: 두 개의 포트 동시 사용

4. 설정 복잡도
   - 8080: 상대적으로 단순
   - 8081/8082: 포트 관리 로직 추가 필요
주의 사항
1. 배포 방식
   - 8080: 순차적 배포 (중지 -> 시작)
   - 8081/8082: 병렬 배포 가능

2. 가용성
   - 8080: 매우 짧은 순간 서비스 중단 가능성
   - 8081/8082: 완전한 무중단 배포

3. 리소스 사용
   - 8080: 한 번에 하나의 포트만 사용
   - 8081/8082: 두 개의 포트 동시 사용

4. 설정 복잡도
   - 8080: 상대적으로 단순
   - 8081/8082: 포트 관리 로직 추가 필요
5.주의 사항
1. 컨테이너 중지/시작 타이밍 제어 중요
2. 포트 바인딩 해제 대기 시간 고려
3. 헬스체크 실패 시 빠른 롤백 필요
4. Nginx 설정 변경 타이밍 중요
이러한 특징들 때문에 완전한 무중단 배포를 위해서는 8081/8082 방식이 더 안전하고 권장. 8080 단일 포트 방식이 더 단순하지만, 매우 짧은 서비스 중단 가능성이 있다.
8081,8082 포트로 사용시
1.초기상태
- BLUE가 현재 운영 중 (8081 포트)
- GREEN이 대기 상태 (8082 포트)
- Nginx가 BLUE로 트래픽 라우팅 중
2.빌드 프로세스
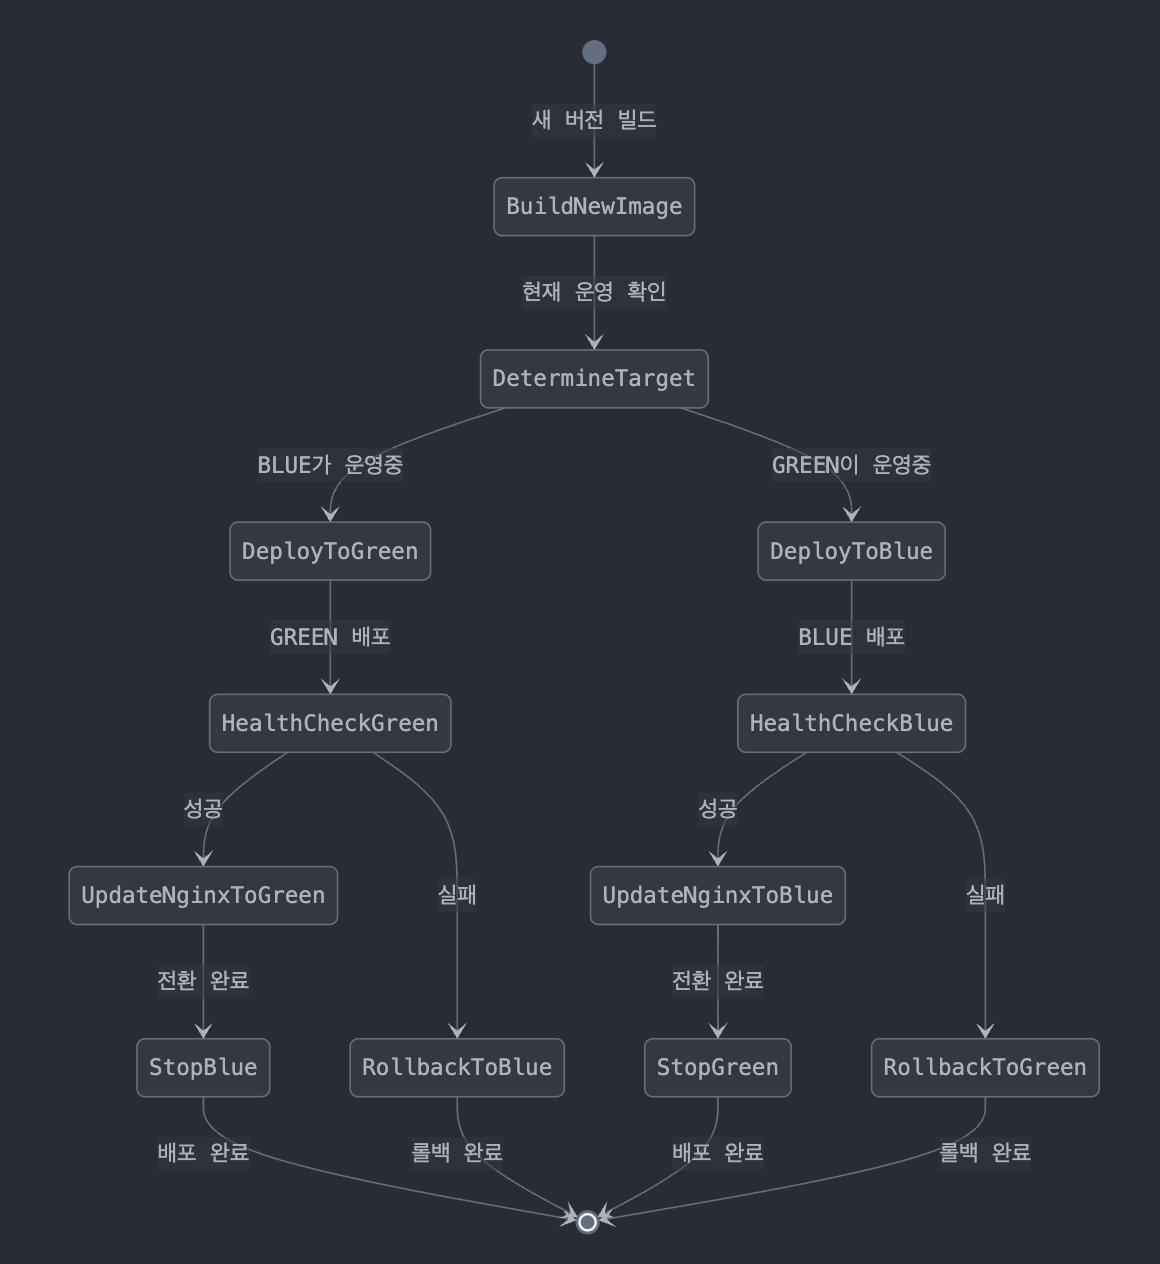
3. 상세 배포 프로세스
A. 빌드 전
1. 현재 운영 중인 컨테이너 확인
   - docker ps로 BLUE/GREEN 상태 체크
   - Nginx 설정에서 현재 active 컨테이너 확인
B.빌드 중
1. 새 버전 이미지 빌드
   - Dockerfile을 사용하여 새 애플리케이션 이미지 생성
   - 이미지를 Docker registry에 push

2. 배포 대상 결정
   - BLUE가 운영 중이면 -> GREEN으로 배포
   - GREEN이 운영 중이면 -> BLUE로 배포
C.빌드 후
1. 새 컨테이너 실행
- 대상(BLUE/GREEN)에 맞는 포트로 컨테이너 실행
- BLUE는 8081, GREEN은 8082 포트 사용
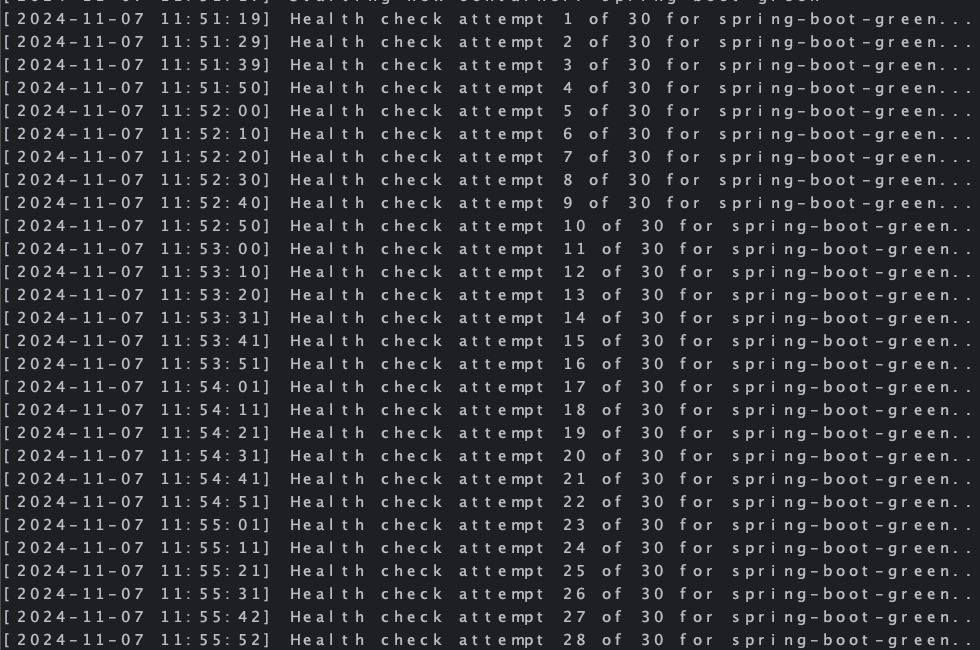
2. 헬스 체크
- 새 컨테이너의 /actuator/health 엔드포인트 체크
- 최대 30회 시도, 10초 간격
3. 성공 시:
- Nginx 설정 업데이트
- 트래픽을 새 컨테이너로 전환
- 이전 컨테이너 중지 (grace period 적용)
4. 실패 시:
- 새 컨테이너 제거
- 이전 상태 유지 (자동 롤백)4. 예시 시나리오
정상 배포시
1. 현재 BLUE 운영 중 (8081 포트)
2. 새 버전 GREEN 배포 (8082 포트)
3. GREEN 헬스 체크 성공
4. Nginx 설정 업데이트 (GREEN을 primary로)
5. 트래픽 GREEN으로 전환
6. BLUE 컨테이너 정상 종료
롤백 시
1. 현재 BLUE 운영 중 (8081 포트)
2. 새 버전 GREEN 배포 시도 (8082 포트)
3. GREEN 헬스 체크 실패
4. GREEN 컨테이너 제거
5. BLUE 계속 운영 (변화 없음)
주요 장점
1. 무중단 배포 가능
2. 롤백이 빠르고 안전
3. 버전 간 분리가 명확
4. 운영 중 서비스 영향 최소화
주의 사항
1. 두 배의 리소스 필요
2. 데이터베이스 스키마 변경 시 주의
3. 세션 관리 필요 (Redis 사용)
4. 헬스 체크 설정 중요
이러한 프로세스를 통해 안전하고 효율적인 무중단 배포가 가능하다. 각 단계에서 실패가 발생하더라도 이전 버전이 계속 운영되기 때문에 서비스 중단 없이 배포를 관리할 수 있다.
5.코드
spring-boot-blue:
    container_name: spring-boot-blue
    image: ${DOCKER_USERNAME}/spring:latest
    expose:
      - "8081"  # 8080 -> 8081
    environment:
      - SERVER_PORT=8081  # 새로 추가
      ...
    healthcheck:
      test: ["CMD", "curl", "-f", "http://localhost:8081/actuator/health"]  # 8080 -> 8081
      ...

spring-boot-green:
    container_name: spring-boot-green
    image: ${DOCKER_USERNAME}/spring:latest
    expose:
      - "8082"  # 8080 -> 8082
    environment:
      - SERVER_PORT=8082  # 새로 추가
      ...
    healthcheck:
      test: ["CMD", "curl", "-f", "http://localhost:8082/actuator/health"]  # 8080 -> 8082
      ...
nginx.conf
upstream spring-app {
    server spring-boot-blue:8081 max_fails=3 fail_timeout=30s;  # 8080 -> 8081
    server spring-boot-green:8082 backup max_fails=3 fail_timeout=30s;  # 8080 -> 8082
    keepalive 32;
}
common.sh ( 쉘 스크립트에서 쓰는 공통 함수를 묶어논 부분. 각 스크립트에서 import 해서 쓴다)
# 컨테이너 헬스체크
check_container_health() {
    local container=$1
    local port=$2  # 새로 추가
    local max_attempts=${3:-30}  # 파라미터 순서 변경
    local attempt=1

    while [ $attempt -le $max_attempts ]; do
        log "Health check attempt $attempt of $max_attempts for $container..."
        if docker exec $container curl -f http://localhost:$port/actuator/health > /dev/null 2>&1; then
            log "Health check passed for $container!"
            return 0
        fi
        attempt=$((attempt + 1))
        sleep 10
    done
    return 1
}

# nginx 설정 업데이트 함수
update_nginx_config() {
    local target_container=$1
    local nginx_conf="${APP_DIR}/nginx.conf"
    local temp_conf="${APP_DIR}/nginx.conf.tmp"

    if [ ! -f "$nginx_conf" ]; then
        log "Error: nginx configuration file not found at $nginx_conf"
        return 1
    }

    if [ "$target_container" = "spring-boot-blue" ]; then
        sed '/upstream spring-app/,/}/{/server/d};/upstream spring-app/a\        server spring-boot-blue:8081 max_fails=3 fail_timeout=30s;\n        server spring-boot-green:8082 backup max_fails=3 fail_timeout=30s;' "$nginx_conf" > "$temp_conf"
    else
        sed '/upstream spring-app/,/}/{/server/d};/upstream spring-app/a\        server spring-boot-green:8082 max_fails=3 fail_timeout=30s;\n        server spring-boot-blue:8081 backup max_fails=3 fail_timeout=30s;' "$nginx_conf" > "$temp_conf"
    fi
    ...
}
application.yml
server:
  address: 0.0.0.0
  # port 설정 제거 (docker-compose에서 환경변수로 설정)
  tomcat:
    threads:
      max: 200
    max-connections: 8192
    accept-count: 100
트러블 슈팅
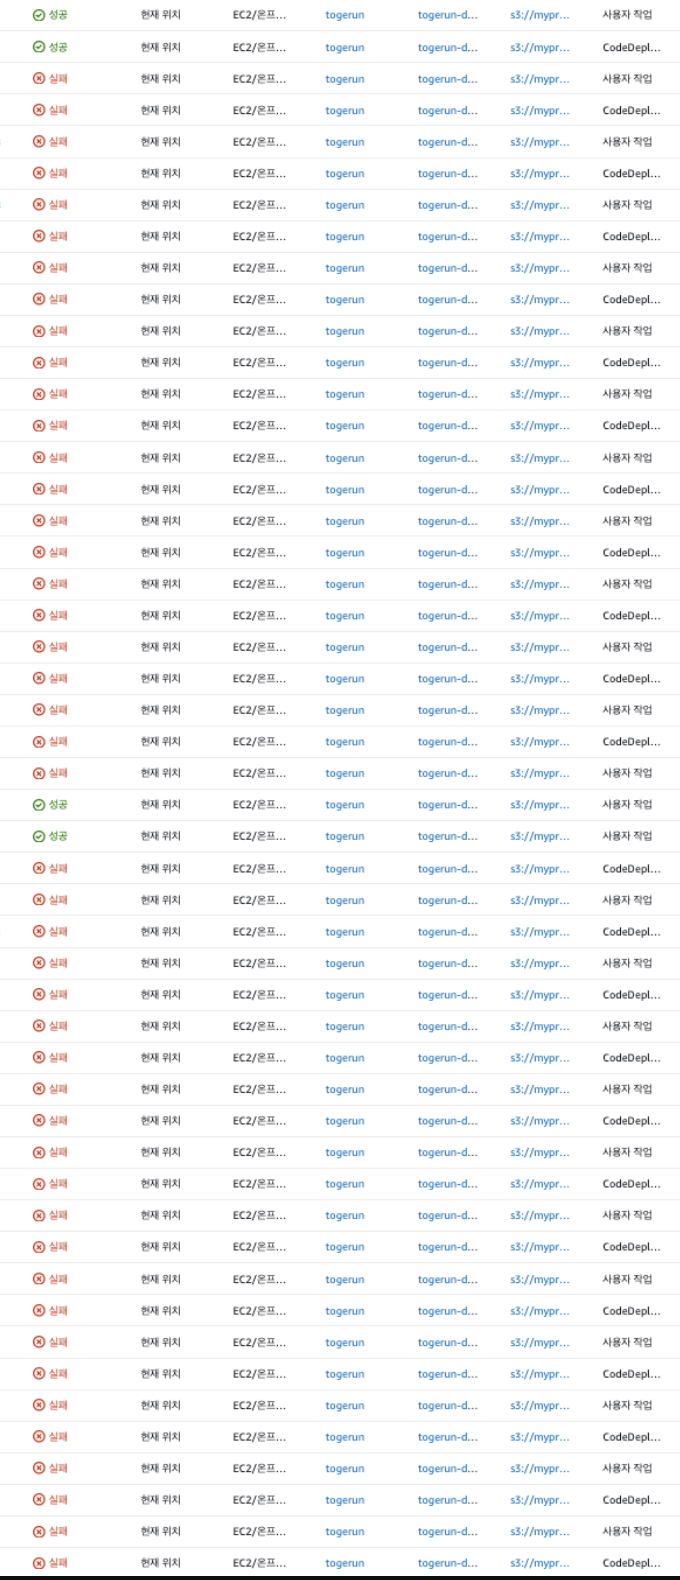
/app/logs 에 저장한 codeDeploy log
경험상 좀 애매하다 싶으면
docker compose down 뒤 docker compose up --build -up 으로 clean 한 상태에서 build 하는게 경험상 더 오류가 더 적었다.
# 로깅하며 입력했던 커맨드들
# docker compose 경로나 파일 명이 다르다면 아래 커맨드로 입력한다.
docker compose -f [파일경로]/docker-compose.yml down
docker compose -f [파일경로]/docker-compose.yml up --build -d
# Health 체크 관련 파이프 커맨드
docker inspect [container_id/name] | grep -A 10 Health
# 헬스 체크 포인트 직접 입력
docker exec spring-boot-blue curl -v localhost:8082/actuator/health

# ec2 내의 nginx.conf 확인 커맨드
cd app cat nginx.conf
#컨테이너 내 conf 파일 확인
docker exec nginx stat /etc/nginx/nginx.conf

# code deploy agent log 확인 커맨드
sudo grep "ERROR" /var/log/aws/codedeploy-agent/codedeploy-agent.log
# code deploy 에서 설정한 로깅 파일 확인 커맨드
cat app/logs/deploys.log

# 실행시 전달된 환경변수 확인
docker inspect spring-boot-blue | grep -A 10 "Env"
# 컨테이너 실행 명령어 확인
docker inspect spring-boot-blue | grep -A 20 "Config"
문제의 원인
blue green 배포에 따라 nginx.conf 의
upstream부분을 유동적으로 변경 해주어야 하는데 이 부분이 ec2의 ngix.conf 까지는 제대로 복사 하지만 실행 중인 도커 컨테이너에 복사를 하지 못하고 있었다. 아래 커맨드로직접복사 후 컨테이너를재빌드하면 잠시 정상구동 되는 것을 확인 했다. 실행 중인nginx컨테이너의conf파일을 교체하기 위해 여러 시도를 했었다. 컨테이너 이미지 재시작이 아닌reload를 하면 재시작 없이 매우 빠른 시간에 설정 파일을 교체할 수 있다는 내용을 참고 했다.
# 직접 복사
docker cp "/home/ubuntu/app/nginx.conf" nginx:/tmp/nginx.conf

docker compose -f docker-compose.blue-green.yml down && docker compose -f docker-compose.blue-green.yml up --build -d
수 많은 시행 착오와 중간중간 롤백의 흔적들..
시도 1. health 체크 서순의 변경 start -> validate 스크립트
helath 체크 부분이 nginx reload 이전에 위치해 뒷단으로 변경 했다. (실패)
포트 갱신이 있기 전에 helath 체크를 해 발생하던 오류를 순서를 변경해 오류 해결 시도
[stdout]2024-11-07T02:55:57.668Z INFO 1 --- [SimpleChatApp] [0.0-8082-exec-7] c.e.s.security.filter.JWTCheckFilter : .....CHECK URI:/actuator/health.....
[stdout]2024-11-07T02:55:57.670Z INFO 1 --- [SimpleChatApp] [0.0-8082-exec-7] c.e.s.security.filter.JWTCheckFilter : .....JWT Check Filter Skip.....
[stdout]2024-11-07T02:56:07.728Z INFO 1 --- [SimpleChatApp] [0.0-8082-exec-8] c.e.s.security.filter.JWTCheckFilter : .....CHECK URI:/actuator/health.....
[stdout]2024-11-07T02:56:07.728Z INFO 1 --- [SimpleChatApp] [0.0-8082-exec-8] c.e.s.security.filter.JWTCheckFilter : .....JWT Check Filter Skip.....
[stdout]2024-11-07T02:56:17.793Z INFO 1 --- [SimpleChatApp] [.0-8082-exec-10] c.e.s.security.filter.JWTCheckFilter : .....CHECK URI:/actuator/health.....
[stdout]2024-11-07T02:56:17.793Z INFO 1 --- [SimpleChatApp] [.0-8082-exec-10] c.e.s.security.filter.JWTCheckFilter : .....JWT Check Filter Skip.....
시도2. temp 파일 생성 후 nginx.conf 로 rename 하는 전략
현재 파일이 사용 중이므로 바꿀 수 없었다.
[stderr]mv: can't rename '/tmp/nginx.conf.new': Resource busy
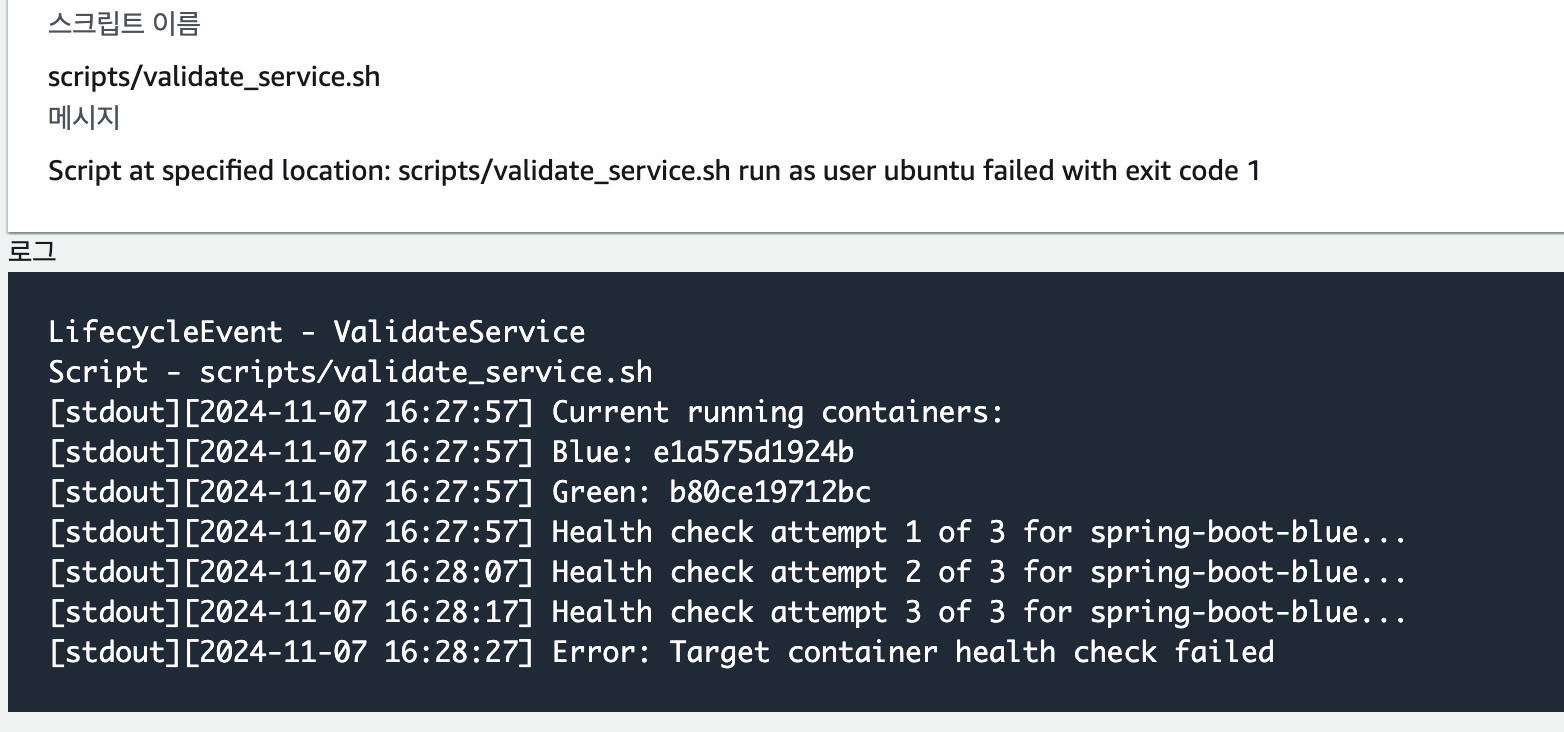
LifecycleEvent - ValidateService
Script - scripts/validate_service.sh
[stdout][2024-11-07 16:22:57] Current running containers:
[stdout][2024-11-07 16:22:57] Blue: e1a575d1924b
[stdout][2024-11-07 16:22:57] Green: 0949cdde01bf
[stdout][2024-11-07 16:22:57] Starting validation for spring-boot-blue on port 8081...
[stdout][2024-11-07 16:22:57] Updating nginx configuration...
[stderr]nginx: the configuration file /tmp/nginx.conf.new syntax is ok
[stderr]nginx: configuration file /tmp/nginx.conf.new test is successful
[stderr]mv: can't rename '/tmp/nginx.conf.new': Resource busy
[stdout][2024-11-07 16:22:58] Error: Failed to update nginx configuration in container
[stdout][2024-11-07 16:22:58] Error: Failed to update nginx configuration
시도3. nginx.conf 를 직접 생성해 덮어쓰는 전략
이미 생성된 파일 이슈로 바꿀 수 없었다.
[stderr]cp: can't create '/etc/nginx/nginx.conf': File exists
LifecycleEvent - ValidateService
Script - scripts/validate_service.sh
[stdout][2024-11-07 16:17:57] Current running containers:
[stdout][2024-11-07 16:17:57] Blue: e1a575d1924b
[stdout][2024-11-07 16:17:57] Green: 107f456c8f06
[stdout][2024-11-07 16:17:57] Starting validation for spring-boot-blue on port 8081...
[stdout][2024-11-07 16:17:57] Updating nginx configuration...
[stderr]nginx: the configuration file /tmp/nginx.conf.new syntax is ok
[stderr]nginx: configuration file /tmp/nginx.conf.new test is successful
[stderr]cp: can't create '/etc/nginx/nginx.conf': File exists
[stdout][2024-11-07 16:17:58] Error: Failed to update nginx configuration in container
[stdout][2024-11-07 16:17:58] Error: Failed to update nginx configuration
시도4. ngonx:alpine 버전의 bash command error
nginx:apline 버전에는
bash가 설치 안됐다고 하여sh로 변경 했다.
process: exec: "bash": executable file not found in $PATH: unknown
LifecycleEvent - ValidateService
Script - scripts/validate_service.sh
[stdout][2024-11-07 16:11:48] Current running containers:
[stdout][2024-11-07 16:11:48] Blue: e1a575d1924b
[stdout][2024-11-07 16:11:48] Green: 51fd64160ac6
[stdout][2024-11-07 16:11:48] Starting validation for spring-boot-blue on port 8081...
[stdout][2024-11-07 16:11:48] Updating nginx configuration...
[stderr]nginx: the configuration file /tmp/nginx.conf.new syntax is ok
[stderr]nginx: configuration file /tmp/nginx.conf.new test is successful
[stdout]OCI runtime exec failed: exec failed: unable to start container process: exec: "bash": executable file not found in $PATH: unknown
[stdout][2024-11-07 16:11:48] Error: Failed to update nginx configuration in container
[stdout][2024-11-07 16:11:48] Error: Failed to update nginx configuration
시도5
미리 교체할 upsteam 부분을 작성 해놓고 참조해 nginx.conf 를 수정하는 방식으로 진행 하려고 했었다. 마찬 가지로 실행 중인 nginx.conf 는 바꿀 수 없었다.
'/home/ubuntu/app/nginx/conf.d/upstream.conf.tmp': No such file or directory
LifecycleEvent - ValidateService
Script - scripts/validate_service.sh
[stdout][2024-11-07 15:11:09] Current running containers:
[stdout][2024-11-07 15:11:09] Blue: 91fa90376b9c
[stdout][2024-11-07 15:11:09] Green: ee0bf445faf3
[stdout][2024-11-07 15:11:09] Starting validation for spring-boot-blue on port 8081...
[stdout][2024-11-07 15:11:09] Updating nginx configuration...
[stderr]/home/ubuntu/app/scripts/common.sh: line 93: /home/ubuntu/app/nginx/conf.d/upstream.conf: No such file or directory
[stderr]/home/ubuntu/app/scripts/common.sh: line 104: /home/ubuntu/app/nginx/conf.d/upstream.conf.tmp: No such file or directory
[stderr]lstat /home/ubuntu/app/nginx: no such file or directory
[stdout][2024-11-07 15:11:09] Error: Failed to copy upstream configuration
[stderr]rm: cannot remove '/home/ubuntu/app/nginx/conf.d/upstream.conf.tmp': No such file or directory
[stdout][2024-11-07 15:11:09] Error: Failed to update nginx configuration
시도 6 컨테이너 내부에서 직접 파일 복사, 강제 덮어쓰기
docker exec nginx sh -c 'cp /tmp/new.conf /etc/nginx/nginx.conf'
docker exec nginx sh -c 'mv -f /tmp/new.conf /etc/nginx/nginx.conf'

# 호스트의 설정 파일을 컨테이너로 복사
docker cp ./nginx.conf nginx:/etc/nginx/nginx.conf
시도 7. Redis 재연결 오류
024-11-08T01:21:19.706Z  WARN 1 --- [SimpleChatApp] [ioEventLoop-4-1] i.l.core.protocol.ConnectionWatchdog     : Cannot reconnect to [redis/<unresolved>:6379]: Connection refused: redis/172.18.0.2:6379
2024-11-08T01:21:19.705Z  WARN 1 --- [SimpleChatApp] [ioEventLoop-4-2] i.l.core.protocol.ConnectionWatchdog     : Cannot reconnect to [redis/<unresolved>:6379]: Connection refused: redis/172.18.0.2:6379
2024-11-08T01:21:19.792Z  WARN 1 --- [SimpleChatApp] [ioEventLoop-4-2] i.l.core.protocol.ConnectionWatchdog     : Cannot reconnect to [redis/<unresolved>:6379]: Connection refused: redis/172.18.0.2:6379
원인은 헬스 체크 부분이었다.
# docker-compose.green.yml의 spring-boot-green
healthcheck:
  test: ["CMD", "curl", "-f", "http://localhost:8081/actuator/health"]  # 포트가 8081로 잘못됨
# Redis 컨테이너 내에서 연결 테스트
docker exec -it redis_boot redis-cli
auth ********
ping

# Spring 컨테이너에서 Redis로의 연결 테스트
docker exec -it spring-boot-blue ping redis
docker exec -it spring-boot-green ping redis

# Spring 컨테이너에서 환경변수 확인
docker exec -it spring-boot-blue env | grep REDIS
docker exec -it spring-boot-green env | grep REDIS
시도 8. nginx health 체크 오류
# docker logs nginx
::1 - - [08/Nov/2024:01:27:14 +0000] "GET /health HTTP/1.1" 301 169 "-" "Wget" "-" ::1 - - [08/Nov/2024:01:27:20 +0000] "GET /health HTTP/1.1" 301 169 "-" "Wget" "-" ::1 - - [08/Nov/2024:01:27:25 +0000] "GET /health HTTP/1.1" 301 169 "-" "Wget" "-" ::1 - - [08/Nov/2024:01:27:30 +0000] "GET /health HTTP/1.1" 301 169 "-" "Wget" "-" ::1 - - [08/Nov/2024:01:27:35 +0000] "GET /health HTTP/1.1" 301 169 "-" "Wget" "-"

# docker ps

****** nginx:alpine "/docker-entrypoint.…" 7 minutes ago Up 7 minutes (unhealthy) 0.0.0.0:80->80/tcp, :::80->80/tcp, 0.0.0.0:443->443/tcp, :::443->443/tcp nginx
로그에서 nginx 컨테이너가 unhealthy 와 동시에 logs 에서는 health 체크 부분에서 못넘어가고 있었다.
switch_nginx() {
    local target_color=$1
    local nginx_container="nginx-proxy"

    log "Switching to $target_color deployment..."

    # nginx 컨테이너가 실행 중인지 확인
    if ! docker ps -q -f name=$nginx_container | grep -q .; then
        log "Error: Nginx container is not running"
        return 1
    fi

    # 새로운 설정 적용
    docker exec $nginx_container sh -c "ln -sf /etc/nginx/conf.d/${target_color}.conf /etc/nginx/conf.d/current.conf"

    # nginx 설정 리로드
    if ! docker exec $nginx_container nginx -s reload; then
        log "Error: Failed to reload nginx configuration"
        return 1
    fi

    # 헬스체크
    local max_attempts=30
    local attempt=1
    while [ $attempt -le $max_attempts ]; do
        log "Health check attempt $attempt of $max_attempts for nginx..."
        if docker exec $nginx_container wget -q --spider http://localhost/health; then
            log "Health check passed for nginx!"
            return 0
        fi
        attempt=$((attempt + 1))
        sleep 5
    done

    log "Error: Health check failed for nginx"
    return 1
    }
code deploy 마지막 과정인 validate servcie 에서 쓰이는 switch_nginx() 함수이다. blue green 에 따라 conf 파일을 동적으로 변경 해주는 역할을 하는데 local_container 명을 nginx 가 아닌 nginx_container 로 설정해서 health 체크 부분을 못 넘어가고 있었다.
시도 9. nginx 404 error (1)
#프록시 설정
include /etc/nginx/conf.d/current.conf*;
#proxy_pass http://blue;
proxy_http_version 1.1;
현재 blue, green 배포 전략을 사용하며 각기 다른 docker-compsoe.yml 과 한개의 nginx.conf 를 쓰고 있다. 각기 빌드시 마다 타겟 되는 주 컨테이너에 따라 proxy_pass 부분을 미리 작성한 파일로 갈아 끼우고 있다. 따라서 proxy_pass 부분을 주석 처리하고 include 처리 했다. 하지만 어째서인지
current.conf를 생성 하지 못하고 있었다.
# 각 설정 파일의 내용 확인
docker exec nginx ls /etc/nginx/conf.d/

# nginx 컨테이너 내부의 conf.d 디렉토리 권한 확인
docker exec nginx ls -la /etc/nginx/conf.d/

# 해당 설정 파일 읽기
docker exec nginx cat /etc/nginx/conf.d/blue.conf
docker exec nginx cat /etc/nginx/conf.d/green.conf
docker exec nginx cat /etc/nginx/conf.d/current.conf

# HTTP 응답 헤더에서 업스트림 서버 확인
curl -I https://api.togerun.shop
# nginx 액세스 로그 확인
docker exec nginx tail -f /var/log/nginx/access.log
# nginx 에러 로그 확인
docker exec nginx tail -f /var/log/nginx/error.log
읽기 전용 옵션을 해제 했더니 해결 했다.
- ${APP_DIR}/nginx/nginx.conf:/etc/nginx/nginx.conf:ro <- 제거
- ${APP_DIR}/nginx/conf.d:/etc/nginx/conf.d:ro <- ro 제거
- ${APP_DIR}/nginx/nginx.conf:/etc/nginx/nginx.conf
- ${APP_DIR}/nginx/conf.d:/etc/nginx/conf.d
시도 10. nginx 404 error (2)
이번에는
current.conf에 생성을 성공 했는데 예상치 못한{문자가 포함 되어 있다고 나왔다.LifecycleEvent - ValidateService Script - scripts/validate_service.sh [stdout][2024-11-08 11:32:38] Current running containers: [stdout][2024-11-08 11:32:38] Blue: [stdout][2024-11-08 11:32:38] Green: [stdout][2024-11-08 11:32:38] Switching to blue deployment... [stderr]2024/11/08 02:32:39 [emerg] 39#39: unexpected "}" in /etc/nginx/conf.d/current.conf:5 [stderr]nginx: [emerg] unexpected "}" in /etc/nginx/conf.d/current.conf:5 [stdout][2024-11-08 11:32:39] Error: Failed to reload nginx configuration
# green.conf
location / {
    proxy_pass http://green;
}

# blue.conf
location / {
    proxy_pass http://blue;
}
nginx.conf부분에서current.conf삽입 부분을 이미location'/{}안에 작성해서 발생한 문제였다.
	#green.conf
    proxy_pass http://green;
	#blue.conf
    proxy_pass http://blue;
중괄호와 영역 구분 전부 지워주니 문제 해결.
최종 코드
8080 -> 8081, 8082 포트를 분리 해서 쓰며 기존에
docker-compose.blue.green.yml을docker-compose.blue.yml,docker-compose.green.yml로 분리했다.nginx.conf는 하나의 파일을 쓰고 빌드된 이미지 마다 다른proxy_pass를 쓰도록 각기 파일을 ec2에 업로드 하도록 하고 include 를 써서 해당하는 컨테이너에proxy_pass를 동적으로 삽입할 수 있게 했다. 기존에 권한 문제, busy 이슈, 등으로 삽입 수정이 안되던 upstream 부분은 아래 처럼 각개 분리 했다.
# 블루/그린 업스트림 설정
upstream blue {
  server spring-boot-blue:8081;
  keepalive 32;
}

upstream green {
  server spring-boot-green:8082;
  keepalive 32;
}
# 프록시 설정
include /etc/nginx/conf.d/current.conf*;
#proxy_pass http://blue; 해당 부분은 주석 처리 후 include로 동적 생성
proxy_http_version 1.1;code deploy scripts 부분
appec.yml
version: 0.0
os: linux
files:
  - source: /
    destination: /home/ubuntu/app
files_exists_behavior: overwrite
permissions:
  - object: /home/ubuntu/app/scripts
    pattern: "*.sh"
    mode: 755
    owner: ubuntu
    group: ubuntu
    type:
      - file
  - object: /home/ubuntu/app
    pattern: "**/*"
    owner: ubuntu
    group: ubuntu
    mode: 644
    type:
      - file
  - object: /home/ubuntu/app/.env
    mode: 600
    owner: ubuntu
    group: ubuntu
    type:
      - file
hooks:
  BeforeInstall:
    - location: scripts/before_install.sh
      timeout: 300
      runas: ubuntu
  AfterInstall:
    - location: scripts/set_environment.sh
      timeout: 300
      runas: root
  ApplicationStart:
    - location: scripts/start_application.sh
      timeout: 600
      runas: ubuntu
  ValidateService:
    - location: scripts/validate_service.sh
      timeout: 300
      runas: ubuntu
위와 같은 순서로 진행 되며 함수는
common.sh로 분리 시켰다. 계속 문제가 되던 부분은validate_service에서health_check와nginx_switch부분.
#!/bin/bash
source /home/ubuntu/app/scripts/common.sh
cd $APP_DIR

# 현재 실행 중인 컨테이너 확인
get_running_containers

log "Current running containers:"
log "Blue: ${BLUE_RUNNING:-none}"
log "Green: ${GREEN_RUNNING:-none}"

# 대상 컨테이너 결정
if [ -n "$BLUE_RUNNING" ]; then
    TARGET_COLOR="blue"
    TARGET_CONTAINER="spring-boot-blue"
    TARGET_PORT=8081
else
    TARGET_COLOR="green"
    TARGET_CONTAINER="spring-boot-green"
    TARGET_PORT=8082
fi

# nginx 전환
switch_nginx $TARGET_COLOR || exit 1

# 최종 헬스체크 (3번 시도)
check_container_health_validate $TARGET_CONTAINER $TARGET_PORT 3 || {
    log "Error: Target container health check failed"
    exit 1
}

log "Deployment validation completed successfully"
exit 0
common.sh
# nginx 컨테이너 전환 함수
switch_nginx() {
    local target_color=$1
    local nginx_container="nginx"

    log "Switching to $target_color deployment..."
    # nginx 컨테이너가 실행 중인지 확인
    if ! docker ps -q -f name=$nginx_container | grep -q .; then
        log "Error: Nginx container is not running"
        return 1
    fi

    # 새로운 설정 적용
    docker exec $nginx_container sh -c "ln -sf /etc/nginx/conf.d/${target_color}.conf /etc/nginx/conf.d/current.conf"

    # nginx 설정 리로드
    if ! docker exec $nginx_container nginx -s reload; then
        log "Error: Failed to reload nginx configuration"
        return 1
    fi

    # switch_nginx 함수에 디버깅 로그 추가
    docker exec $nginx_container ls -l /etc/nginx/conf.d/ || log "Error: Cannot list nginx config directory"
    docker exec $nginx_container cat /etc/nginx/conf.d/current.conf || log "Error: Cannot read current nginx config"

    # nginx 설정 테스트 단계 추가
    if ! docker exec $nginx_container nginx -t; then
        log "Error: Nginx configuration test failed"
        return 1
    fi

    # 헬스체크
    local max_attempts=30
    local attempt=1
    while [ $attempt -le $max_attempts ]; do
        log "Health check attempt $attempt of $max_attempts for nginx..."        if docker exec $nginx_container wget -q --spider http://localhost/health; then
            log "Health check passed for nginx!"
            return 0
        fi
        attempt=$((attempt + 1))
        sleep 5
    done

    log "Error: Health check failed for nginx"
    return 1
    }


check_container_health_validate() {
    local container=$1
    local port=$2
    local max_attempts=${3:-30}
    local attempt=1

    while [ $attempt -le $max_attempts ]; do
        log "Health check attempt $attempt of $max_attempts for $container..."
        if docker exec $container curl -f http://localhost:$port/actuator/health > /dev/null 2>&1; then
            log "Health check passed for $container!"
            return 0
        fi
        attempt=$((attempt + 1))
        sleep 10
    done
    return 1
}
핵심 코드 부분 : blue.conf 혹은 green.conf 로 proxy_pass 부분을 적용 하고 reload 한다. 이때 짧은 시간 nginx 가 중지 된다.
    # 새로운 설정 적용
    docker exec $nginx_container sh -c "ln -sf /etc/nginx/conf.d/${target_color}.conf /etc/nginx/conf.d/current.conf"

    # nginx 설정 리로드
    if ! docker exec $nginx_container nginx -s reload; then
        log "Error: Failed to reload nginx configuration"
        return 1
    fi
로깅 하며 썼던 커맨드
# 컨테이너 헬스체크 상태
docker inspect [container_id/name] | grep -A 10 Health

# 환경변수 확인
docker inspect spring-boot-blue | grep -A 10 "Env"
docker exec -it spring-boot-blue env | grep REDIS
docker exec -it spring-boot-green env | grep REDIS

# 컨테이너 설정 확인
docker inspect spring-boot-blue | grep -A 20 "Config"
Nginx 관련 명령어
bash

# 설정 파일 관리
docker exec nginx stat /etc/nginx/nginx.conf
docker exec nginx ls /etc/nginx/conf.d/
docker exec nginx ls -la /etc/nginx/conf.d/
docker exec nginx cat /etc/nginx/conf.d/blue.conf
docker exec nginx cat /etc/nginx/conf.d/green.conf
docker exec nginx cat /etc/nginx/conf.d/current.conf

# 로그 확인
docker exec nginx tail -f /var/log/nginx/access.log
docker exec nginx tail -f /var/log/nginx/error.log

# HTTP 응답 확인
curl -I https://api.***.***

# Docker Compose 컨테이너 관리
docker compose -f [파일경로]/docker-compose.yml down
docker compose -f [파일경로]/docker-compose.yml up --build -d

# 배포 로그 확인
cat app/logs/deploys.log
sudo grep "ERROR" /var/log/aws/codedeploy-agent/codedeploy-agent.log
헬스체크/연결성 테스트
bash

# Spring Boot 헬스체크
docker exec spring-boot-blue curl -v localhost:8082/actuator/health

# Redis 연결 테스트
docker exec -it redis_boot redis-cli
auth ********
ping

# 컨테이너 간 네트워크 연결 테스트
docker exec -it spring-boot-blue ping redis
docker exec -it spring-boot-green ping redis
설정 파일 확인

cd app cat nginx.conf
8080 포트에서 8081, 8082 포트로 분리 하면서 health 체크 관련 엔드포인트, 컨테이너에 따라 nginx.conf 를 동적으로 변경해야 하는 부분이 특히 어려웠다.
