
출처
제목: "[Spring Boot] WebSocket과 채팅 (4) - RabbitMQ"
작성자: tistory(조용한고라니)
작성자 수정일: 2021년 7월 30일
링크: https://dev-gorany.tistory.com/325
작성일: 2022년 2월 22일
목차
- STOMP + RabbitMQ
- Dependency
- Configuration
- DTO
- Controller
- RabbitMQ
- HTML
- Destination
외부의 메세지 브로커의 필요성
- 로드밸런싱 시, 채팅 서버는 스프링 프로젝트에 종속적이기 때문에 같은 채팅방에 있다 하더라도 같은 내용의 채팅을 볼 수 없다.
- 동시접속자가 특정 범위를 초과하면(컨테이너가 수용할 수 있는 수를 초과하면) 다른 컨테이너의 서버로 켜지기 때문에 동일한 채팅을 볼 수 없다.
- WebSocket
- 페이지의 refresh 없이 나 또는 다른 사람이 보낸 채팅을 받을 수 있어야 한다.
- 즉, 연결이 끊기지 않아야 한다.
- SockJS
- 브라우저에서 WebSocket을 지원하지 않거나, 네트워크 Proxy 제약 등으로 인한 WebSocket을 사용할 수 없을 경우 fallback option을 제공하는데, 이는 SockJS Protocol에 기반으로 WebSocket API를 사용할 수 있도록 한다.
- STOMP
- 웹소켓만 사용했을땐 직접 세션을 관리해서, 해당 세션으로 채팅 데이터를 전송해야 했다면, STOMP를 사용함으로써 publish/subscribte 구조로 간단하게 메세지를 선택적으로 수신할 수 있었다.
이처럼 채팅을 구현하는데 왜 위와 같은 것들을 사용했는지 간단하게 짚어보았다.
조금 나아가 RabbitMQ 라는 메시지 브로커를 사용해보자.
RabbitMQ
오픈소스 소프트웨어이고, AMQP라는 프로토콜을 구현한 메세지 브로커이다.자세한 설명과 설치 방법은 아래 링크에서 참고하자. 로컬 스토리지에 설치하는 방법과 Docker를 이용해 끌어오는 방법이 있는데, 이번 실습에는 로컬에 설치를 진행해보자. (RabbitMQ를 범용적으로 사용하기 위해서는 Docker라는 것을 이용해 외부에 두고 사용하는 것이 더 좋긴 하다)
- [RabbitMQ] install: https://dev-gorany.tistory.com/312
- https://www.rabbitmq.com/#getstarted
STOMP + RabbitMQ
-
STOMP가 내장하고 있는
SimpleBroker라는 것을 사용해도 채팅을 구현하는 것에는 문제가 없다 -
이용자 수가 적을때는 성능을 크게 고려하지 않아도 되지만, 이용자 수가 증가하여 처리해야 하는 데이터가 많아진다면, 내장되어 있는
SimpleBroker는 철저하게 Spring Boot가 실행되는 곳의 메모리를 잡아 먹는다.- 따라서 다른 많은 비즈니스 로직과 채팅에 대한 부담까지 하나의 서버가 떠안게 된다.
-
그래서 조금 더 개선시켜 보고자 한 것이 이 방향이다
- 채팅 관리를 따로 빼서 서버의 부담을 줄여주자
- 실제로 Spring docs의 Websocket에 관한 부분을 보면 다음과 같은 설명이 있다.

다음은 외부 메세지 브로커를 사용했을대의 Message Flow에 대한 그림이다.

출처: https://docs.spring.io/spring-framework/docs/current/reference/html/web.html#spring-web
이전 포스팅에 있는 그림과 비교해보면 똑같으면서도 다르다. 노란색 원기둥이 추가 되었다. 이전 그림과 가장 큰 차이점은
-
TCP를 통해 외부 STOMP 브로커로 메세지를 전달하고, 브로커에서 구독 CLient로 메세지를 전달하기 위해
Broker relay를 사용한다는 점이다. -
WebSocket Connection으로부터 메세지를 받았을 때, STOMP 메세지 프레임으로 decode되고, Spring Message 표현으로 변한다. 그리고 나머지 처리를 위해ClientBoundChannel로 보내진다. -
For example, STOMP messages whose destination headers start with /app may be routed to @MessageMapping methods in annotated controllers, while /topic and /queue messages may be routed directly to the message broker.
Dependency
implementation 'org.springframework.boot:spring-boot-starter-data-jpa'
	implementation 'org.springframework.boot:spring-boot-starter-thymeleaf'
	implementation 'org.springframework.boot:spring-boot-starter-web'
	implementation 'org.springframework.boot:spring-boot-starter-websocket'
	compileOnly 'org.projectlombok:lombok'
	developmentOnly 'org.springframework.boot:spring-boot-devtools'
	runtimeOnly 'com.h2database:h2'
	annotationProcessor 'org.projectlombok:lombok'
	testImplementation 'org.springframework.boot:spring-boot-starter-test'

	// https://mvnrepository.com/artifact/org.webjars/stomp-websocket
    implementation 'org.webjars:stomp-websocket:2.3.4'
    // https://mvnrepository.com/artifact/org.springframework.boot/spring-boot-starter-reactor-netty
    implementation 'org.springframework.boot:spring-boot-starter-reactor-netty:2.6.4'
    // https://mvnrepository.com/artifact/com.fasterxml.jackson.core/jackson-databind
    implementation 'com.fasterxml.jackson.core:jackson-databind:2.13.1'
    // https://mvnrepository.com/artifact/org.webjars/sockjs-client
    implementation 'org.webjars:sockjs-client:1.5.1'
    // https://mvnrepository.com/artifact/org.springframework.boot/spring-boot-starter-amqp
    implementation 'org.springframework.boot:spring-boot-starter-amqp:2.6.4'
Configuration
채팅을 위해 STOMPConfig,RabbitConfig를 설정해야 하고, properties에도 몇가지 정보를 추가해야 한다.
properties
#RabbitMQ
spring.rabbitmq.username=guest //default ID
spring.rabbitmq.password=guest //default Password
spring.rabbitmq.host=localhost //default host
spring.rabbitmq.port=5672      //default port
StompConfig
@Configuration
@EnableWebSocketMessageBroker
public class StompConfig implements WebSocketMessageBrokerConfigurer {

    @Override
    public void registerStompEndpoints(StompEndpointRegistry registry) {
        registry.addEndpoint("/stomp/chat")
                .setAllowedOriginPatterns("http://*.*.*.*:8081", "http://*:8081") //안해도 무관
                .withSockJS();
    }

    @Override
    public void configureMessageBroker(MessageBrokerRegistry registry) {
        registry.setPathMatcher(new AntPathMatcher("."));  // url을 chat/room/3 -> chat.room.3으로 참조하기 위한 설정
        registry.setApplicationDestinationPrefixes("/pub");

        //registry.enableSimpleBroker("/sub");
        registry.enableStompBrokerRelay("/queue", "/topic", "/exchange", "/amq/queue");
    }
}
RabbitConfig
@Configuration
@EnableRabbit
public class RabbitConfig {

    private static final String CHAT_QUEUE_NAME = "chat.queue";
    private static final String CHAT_EXCHANGE_NAME = "chat.exchange";
    private static final String ROUTING_KEY = "room.*";

    // Queue 등록
    @Bean
    public Queue queue() {
        return new Queue(CHAT_QUEUE_NAME, true);
    }

    // Exchange 등록
    @Bean
    public TopicExchange exchange() {
        return new TopicExchange(CHAT_EXCHANGE_NAME);
    }

    // Exchange 와 Queue 바인딩
    @Bean
    public Binding binding() {
        return BindingBuilder.bind(queue()).to(exchange()).with(ROUTING_KEY);
    }


    @Bean
    public  com.fasterxml.jackson.databind.Module dateTimeModule() {
        return new JavaTimeModule();
    }


    // Spring 에서 자동생성해주는 ConnectionFactory 는 SimpleConnectionFactory
    // 여기서 사용하는 건 CachingConnectionFactory 라 새로 등록해줌
    @Bean
    public ConnectionFactory connectionFactory() {
        CachingConnectionFactory factory = new CachingConnectionFactory();
        factory.setHost("localhost");
        factory.setUsername("guest");
        factory.setPassword("guest");
        return factory;
    }

    /**
     * messageConverter를 커스터마이징 하기 위해 Bean 새로 등록
     */

    @Bean
    public RabbitTemplate rabbitTemplate() {
        RabbitTemplate rabbitTemplate = new RabbitTemplate(connectionFactory());
        rabbitTemplate.setMessageConverter(jsonMessageConverter());
        rabbitTemplate.setRoutingKey(CHAT_QUEUE_NAME);
        return rabbitTemplate;
    }

    @Bean
    public SimpleMessageListenerContainer container() {
        SimpleMessageListenerContainer container = new SimpleMessageListenerContainer();
        container.setConnectionFactory(connectionFactory());
        container.setQueueNames(CHAT_QUEUE_NAME);
        container.setMessageListener(null);
        return container;
    }

    @Bean
    public Jackson2JsonMessageConverter jsonMessageConverter() {
        //LocalDateTime serializable 을 위해
        ObjectMapper objectMapper = new ObjectMapper();
        objectMapper.configure(SerializationFeature.WRITE_DATES_AS_TIMESTAMPS, true);
        objectMapper.registerModule(dateTimeModule());
        return new Jackson2JsonMessageConverter(objectMapper);
    }

}
DTO
ChatDto
@Builder
@AllArgsConstructor
@NoArgsConstructor
@Data
public class ChatDto {
    private Long id;
    private Long chatRoomId;
    private Long memberId;
    private String message;
    private String region;

    @JsonDeserialize(using = LocalDateTimeDeserializer.class)
    private LocalDateTime regDate;
}
ChatRoomDTO
...Controller
- 컨트롤러는 간단하게 채팅방을 주는 컨트롤러와, 전송한 메세지를 받아 처리하는 컨트롤러만 있으면 된다.
ChatRoomController
@Controller
@RequestMapping("/chat")
public class ChatRoomController {

    @GetMapping("/rooms")
    public String getRooms() {
        return "chat/rooms";
    }

    @GetMapping("/room")
    public String getRoom(Long chatRoomId, String nickname, Model model) {
        model.addAttribute("chatRoomId", chatRoomId);
        model.addAttribute("nickname", nickname);
        return "chat/room";
    }
}
StompRabbitController
@Controller
@RequiredArgsConstructor
@Slf4j
public class StompRabbitController {

    private final RabbitTemplate template;

    private final static String CHAT_EXCHANGE_NAME = "chat.exchange";
    private final static String CHAT_QUEUE_NAME = "chat.queue";

    @MessageMapping("chat.enter.{chatRoomId}")
    public void enter(ChatDto chatDto, @DestinationVariable String chatRoomId) {
        chatDto.setMessage("입장하셨습니다.");
        chatDto.setRegDate(LocalDateTime.now());

        // exchange
        template.convertAndSend(CHAT_EXCHANGE_NAME, "room." + chatRoomId, chatDto);
        // template.convertAndSend("room." + chatRoomId, chat); //queue
        // template.convertAndSend("amq.topic", "room." + chatRoomId, chat); //topic
    }


    @MessageMapping("chat.message.{chatRoomId}")
    public void send(ChatDto chatDto, @DestinationVariable String chatRoomId) {
        chatDto.setRegDate(LocalDateTime.now());

        template.convertAndSend(CHAT_EXCHANGE_NAME, "room." + chatRoomId, chatDto);
        //template.convertAndSend( "room." + chatRoomId, chat);
        //template.convertAndSend("amq.topic", "room." + chatRoomId, chat);
    }

    // receiver()는 단순히 큐에 들어온 메세지를 소비만 한다. (현재는 디버그 용도)
    @RabbitListener(queues = CHAT_QUEUE_NAME)
    public void receive(ChatDto chatDto) {
        log.info("chatDto.getMessage() = {}",chatDto.getMessage());
    }
}-
SimpMessagingTemplate->RabbitTemplate -
@MessageMapping()의'/'->'.' -
@DestinationVariable은 RESTFul API에서@PathVaraible과 비슷한 용도이다. -
@RabbitListener(queues = CHAT_QUEUE_NAME)-
chat.queue라는 Queue을 구독해 그 큐에 들어온 메세지를 소비하는 소비자가 되겠다는 어노테이션이다. -
물론 속성은 더 많고 다르게 쓰일 수 있지만 여기서는 그렇다.
-
convertAndSend([exchange 이름],routing-key,전송하고자 하는 것)
-
RabbitMQ
$ rabbitmq-server start
-
Browser에 http://localhost:15672를 치면 다음과 같은 창이 나온다.
-
여기에 기본적으로 ID:guest PW:guest를 입력하면 접속이 가능하다.

접속하면 위와 같이 현재 RabbitMQ 서버에 대한 개요를 볼 수 있으니 나중에 유용하게 써먹도록 하자.
STOMP를 적용하기 위해 플러그인을 설치해주어야 하는데, Command 창을 켜고 다음 명령어를 입력한다
$ rabbitmq-plugins enable rabbitmq_stomp
HTML
rooms.html
<!DOCTYPE html>
<html lang="en" xmlns:th="http://www.thymeleaf.org">

<head>
    <title>hello</title>
</head>


<body>
<div class="container">

    <div class="col-6">
        <label><b>채팅방</b></label>
    </div>

    <form th:action="@{/chat/room}" method="get">
        <input type="text" name="chatRoomId" class="form-control">
        <input type="text" name="nickname" class="form-control">
        <button class="btn btn-secondary">참여하기</button>
    </form>

</div>
</body>

</html>-
자바스크립트로 클라이언트 코드를 짰는데, 구독(sub)를 어떻게 하느냐에 따라 Rabbit의 동작이 천차만별로 달라진다.
-
일단 틀만 만들어두자.
room.html
<!DOCTYPE html>
<html lang="en" xmlns:th="http://www.thymeleaf.org">
<head>
    <meta charset="UTF-8">
    <title>Title</title>

    <style>
        .chats{
            display: flex;
            flex-direction: column;

            gap: 10px;
        }
        .mine{
            background: #e9e9e9;
            border-radius: 5px;
        }
        .yours{
            background: #efef87;
            border-radius: 5px;
        }
        .nickname{
            font-size: 16px;
            font-weight: bold;
        }
        .message{
            font-size: 14px;
        }
    </style>
</head>
<body>

<h1>CHAT ROOM</h1>
<h2 th:text="'Room No. ' + ${chatRoomId}"></h2>
<h2 th:text="'Nickname = ' + ${nickname}"></h2>

<form>
    <input type="text" id="message">
    <input type="submit" value="전송" class="btn-send">
</form>

<div class="chats">
    <div class="mine">

    </div>
</div>

<script src="https://cdn.jsdelivr.net/npm/sockjs-client@1/dist/sockjs.min.js"></script>
<script src="https://cdnjs.cloudflare.com/ajax/libs/stomp.js/2.3.3/stomp.min.js"></script>
<script th:inline="javascript">
    const chats = document.querySelector('.chats');
    const messageContent = document.querySelector('#message');
    const btnSend = document.querySelector('.btn-send');

    const chatRoomId = [[${chatRoomId}]];
    const nickname = [[${nickname}]];

    const sockJS = new SockJS("/stomp/chat");
    const stomp = Stomp.over(sockJS);

    stomp.heartbeat.outgoing = 0; //Rabbit에선 heartbeat 안먹힌다고 함
    stomp.heartbeat.incoming = 0; //Rabbit에선 heartbeat 안먹힌다고 함

    function onError(e) {
        console.log("STOMP ERROR", e);
    }

    function onDebug(m) {
        console.log("STOMP DEBUG", m);
    }

    stomp.debug = onDebug;

    stomp.connect('guest', 'guest', function (frame) {

        console.log('STOMP Connected');

        /* subscribe 설정에 따라 rabbit의 Exchange, Queue가 상당히 많이 바뀜 */
        stomp.subscribe(``, function (content) {

            const payload = JSON.parse(content.body);

            let className = payload.nickname == nickname? 'mine' : 'yours';

            const html = `<div class="${className}">
                            <div class="nickname">${payload.nickname}</div>
                            <div class="message">${payload.message}</div>
                        </div>`

            chats.insertAdjacentHTML('beforeend', html);

            //밑의 인자는 Queue 생성 시 주는 옵션
            //auto-delete : Consumer가 없으면 스스로 삭제되는 Queue
            //durable : 서버와 연결이 끊겨도 메세지를 저장하고 있음
            //exclusive : 동일한 이름의 Queue 생길 수 있음
        },{'auto-delete':true, 'durable':false, 'exclusive':false});

        //입장 메세지 전송
        stomp.send(`/pub/chat.enter.${chatRoomId}`, {}, JSON.stringify({
            memberId: 1,
            nickname: nickname
        }));

    }, onError, '/');

    //메세지 전송 버튼 click
    btnSend.addEventListener('click', (e) => {
        e.preventDefault();

        const message = messageContent.value;
        messageContent.value = '';

        stomp.send(`/pub/chat.message.${chatRoomId}`, {}, JSON.stringify({
            message: message,
            memberId: 1,
            nickname: nickname
        }));
    });
</script>
</body>
</html>
Prepare Client
-
localhost:8080/chat/room?chatRoomId=1&nickname=a
-
localhost:8080/chat/room?chatRoomId=1&nickname=b
-
localhost:8080/chat/room?chatRoomId=1&nickname=c
-
localhost:8080/chat/room?chatRoomId=1&nickname=d
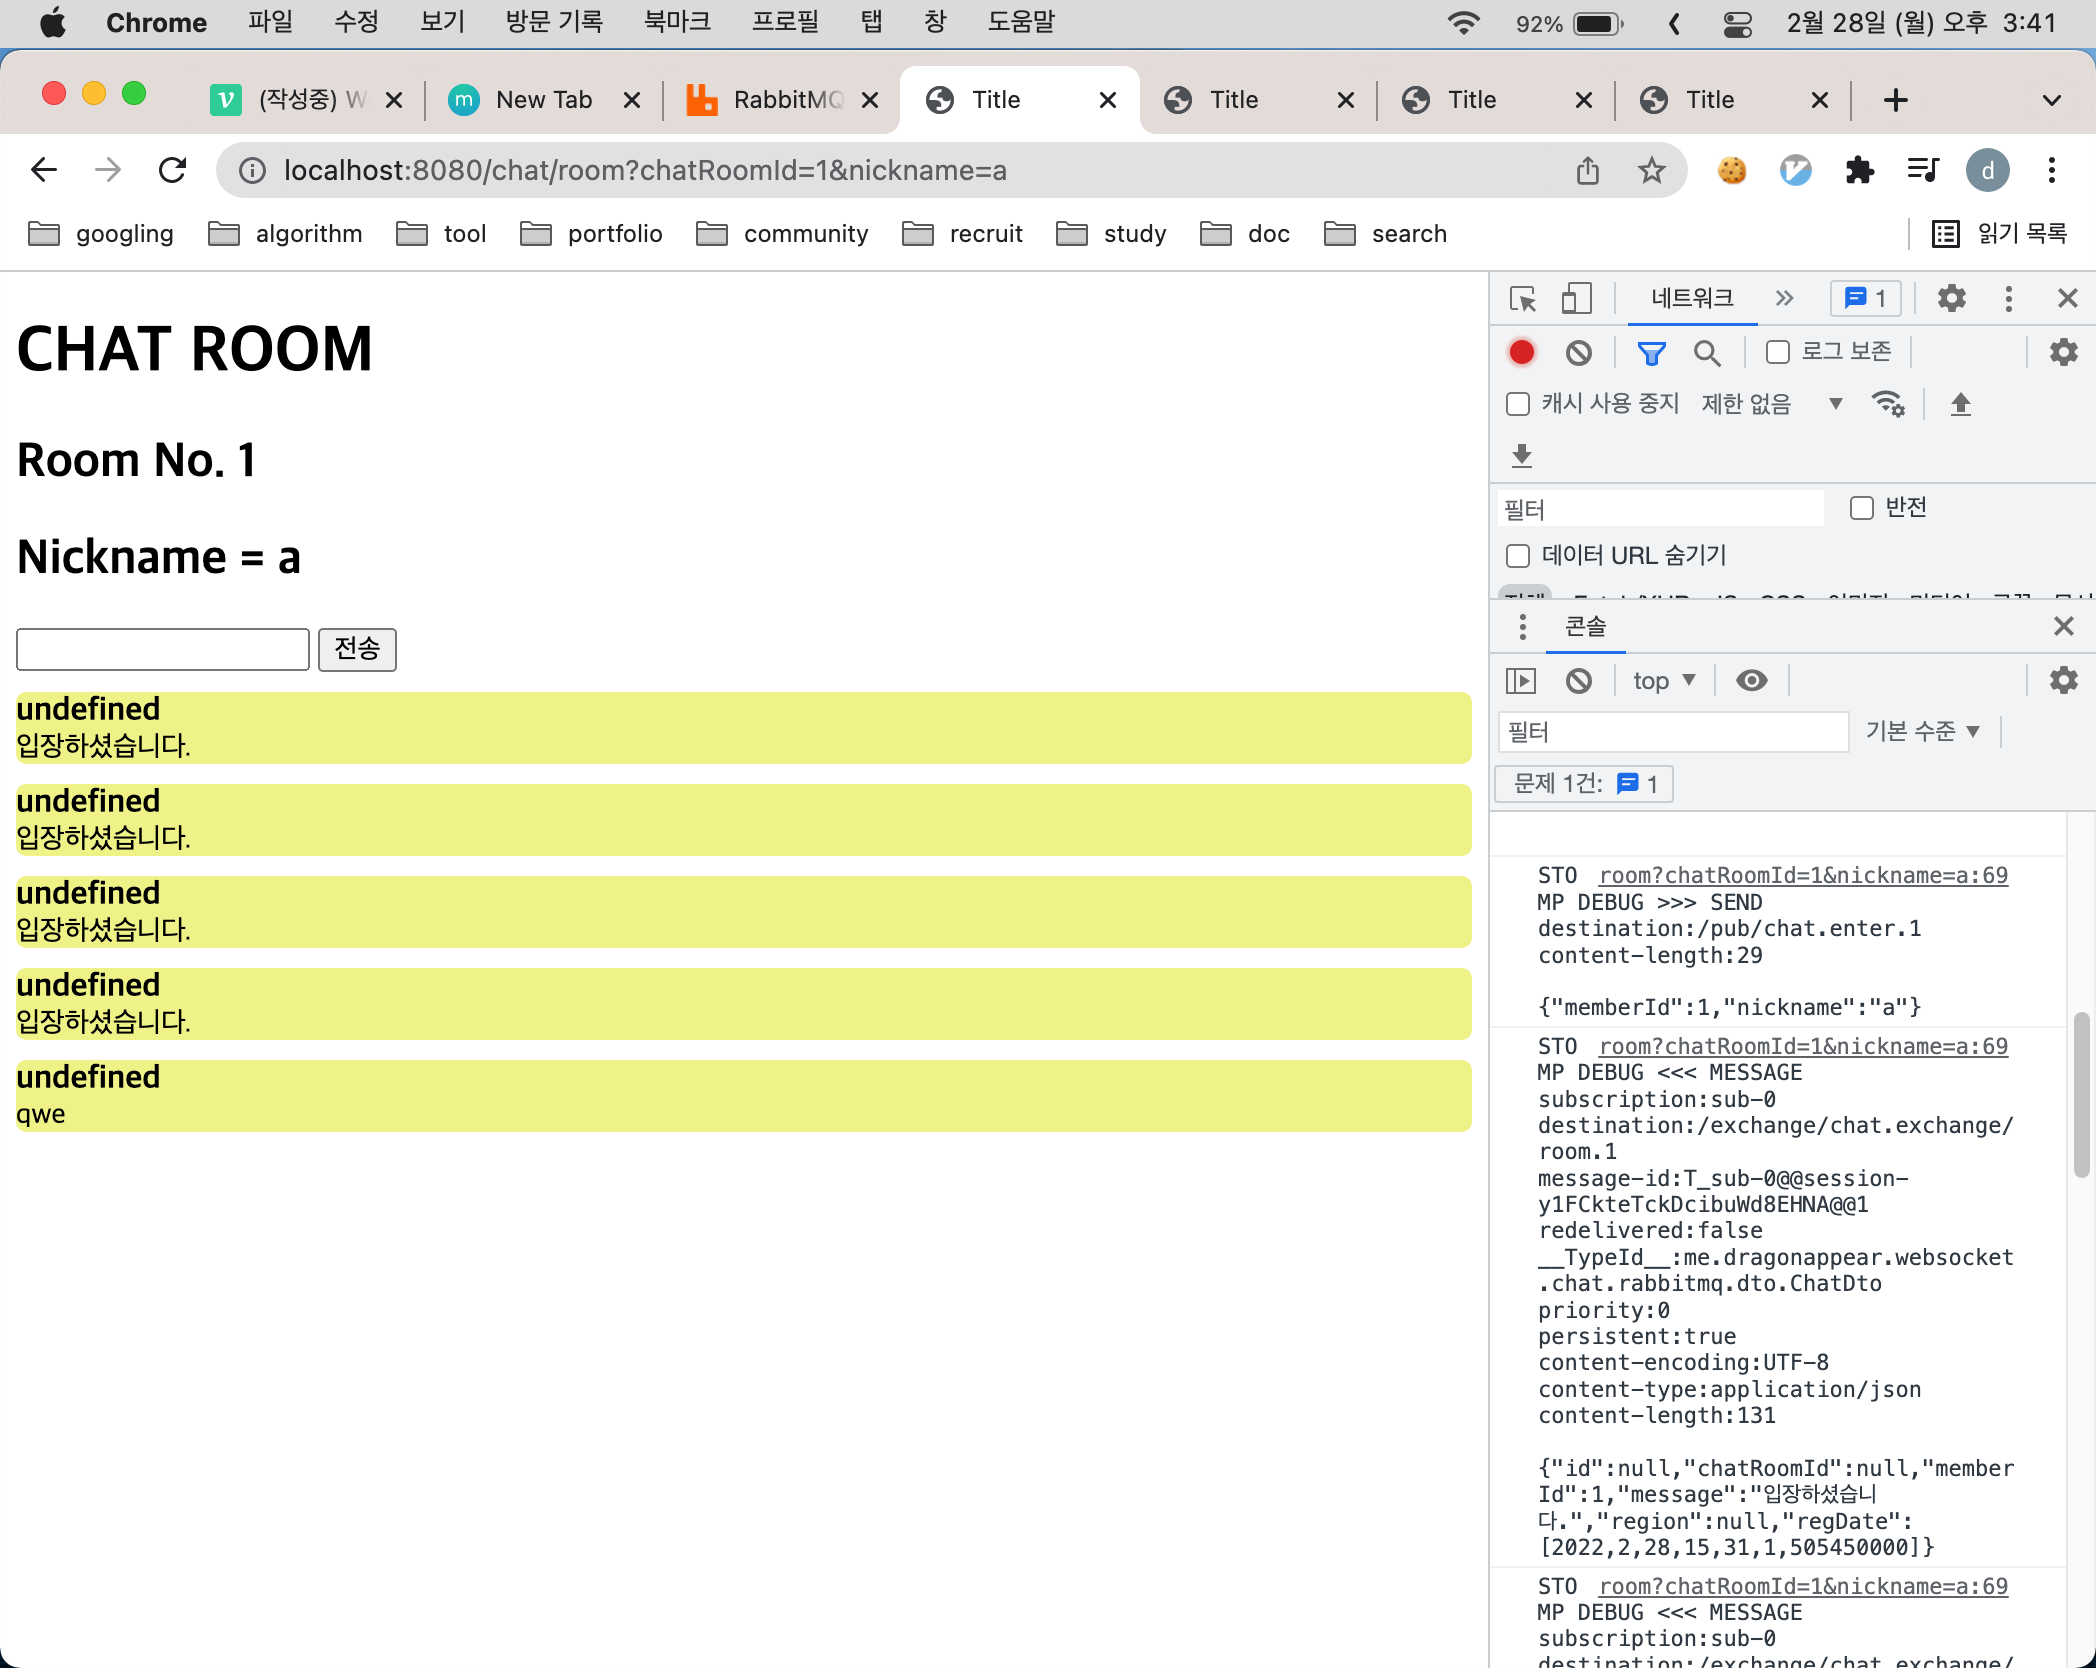
총 4개의 Client를 만들었다.
일단은 채팅방의 번호와 NickName이 들어오는지 확인해보자.
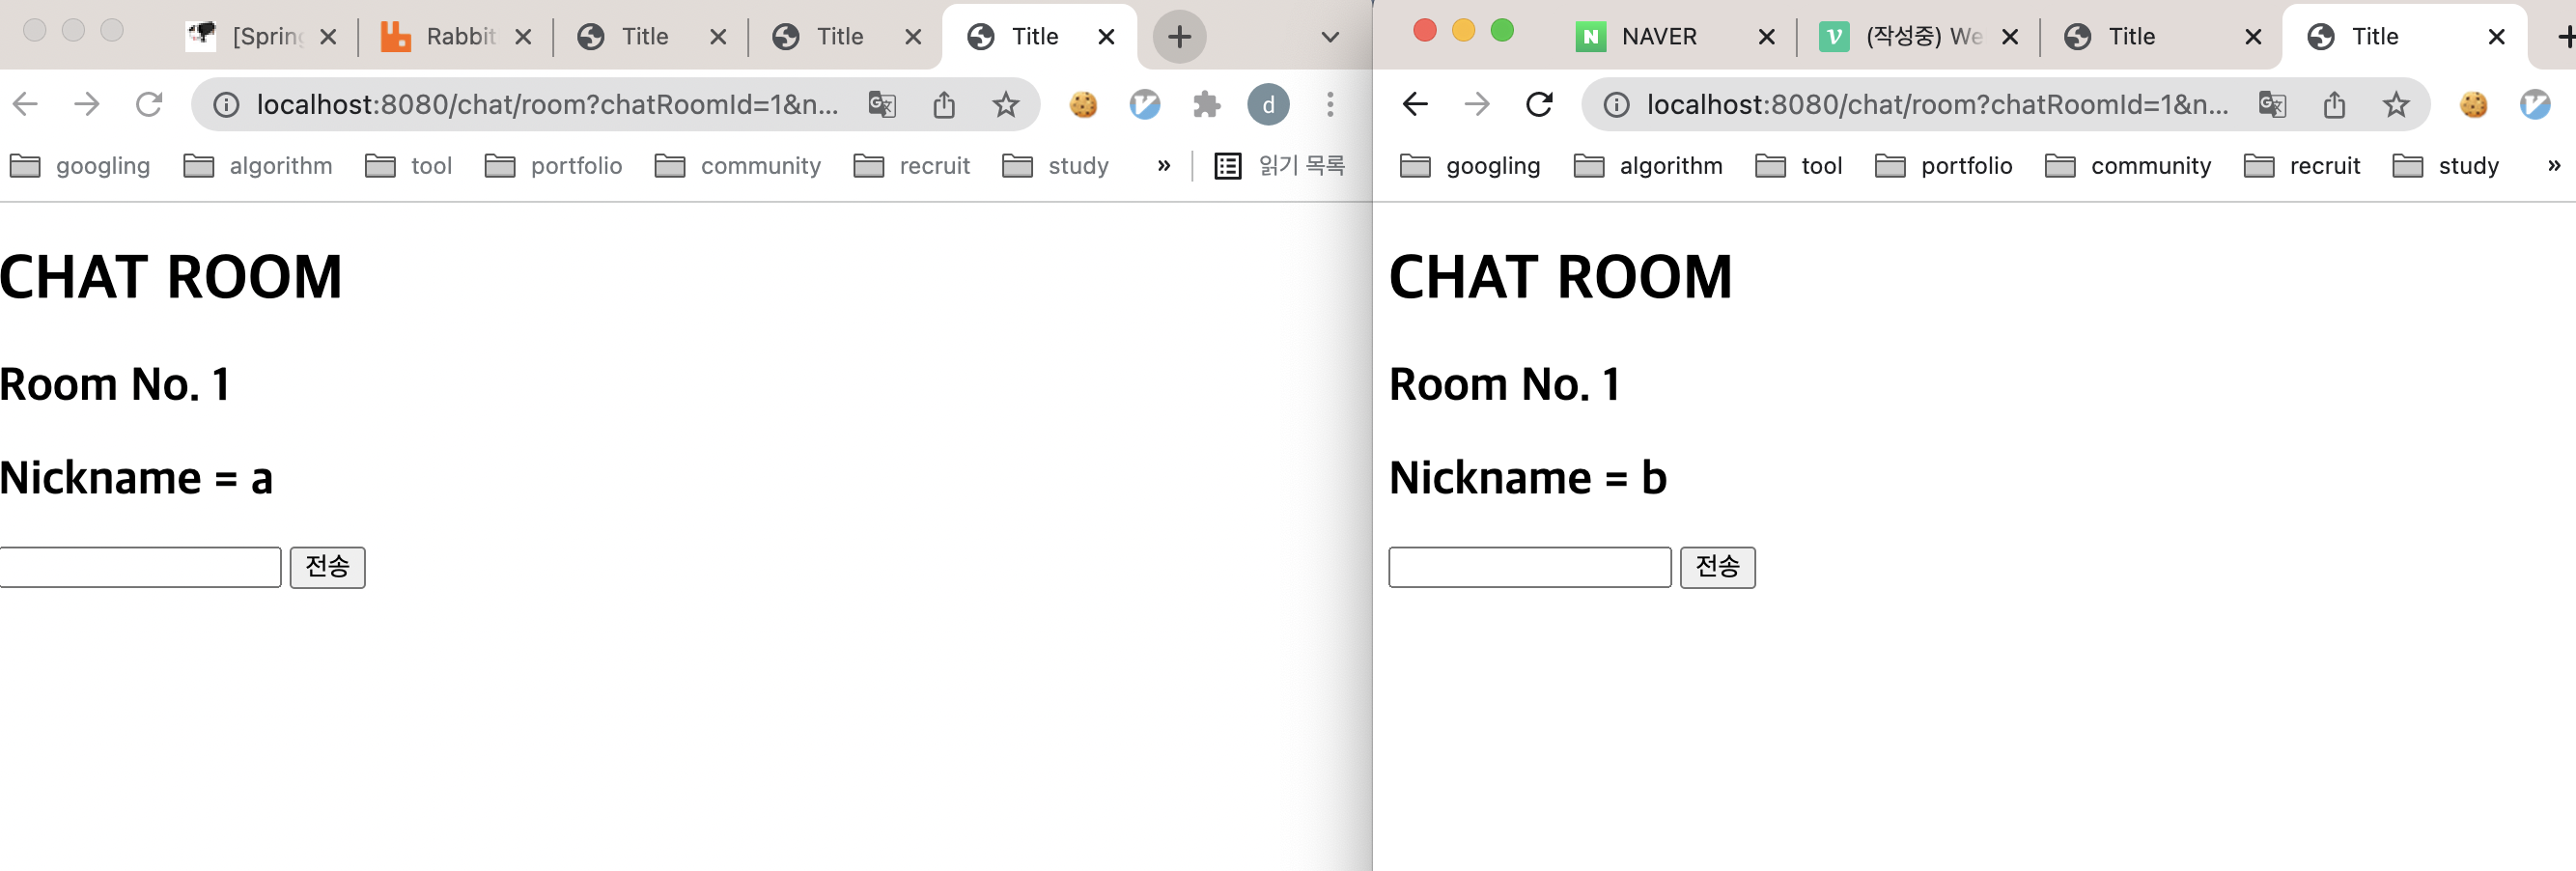
현재
stomp.subscribe(``, function(content) { ...}처럼 되어있기 때문에 위와 같이 되지 않을 것 이다. (메세지가 오지 않을 것) 저 캡쳐는 설명을 위해 해둔 것 이므로 잠시기다려보자!
Destination
-
RabbitMQ를 사용해
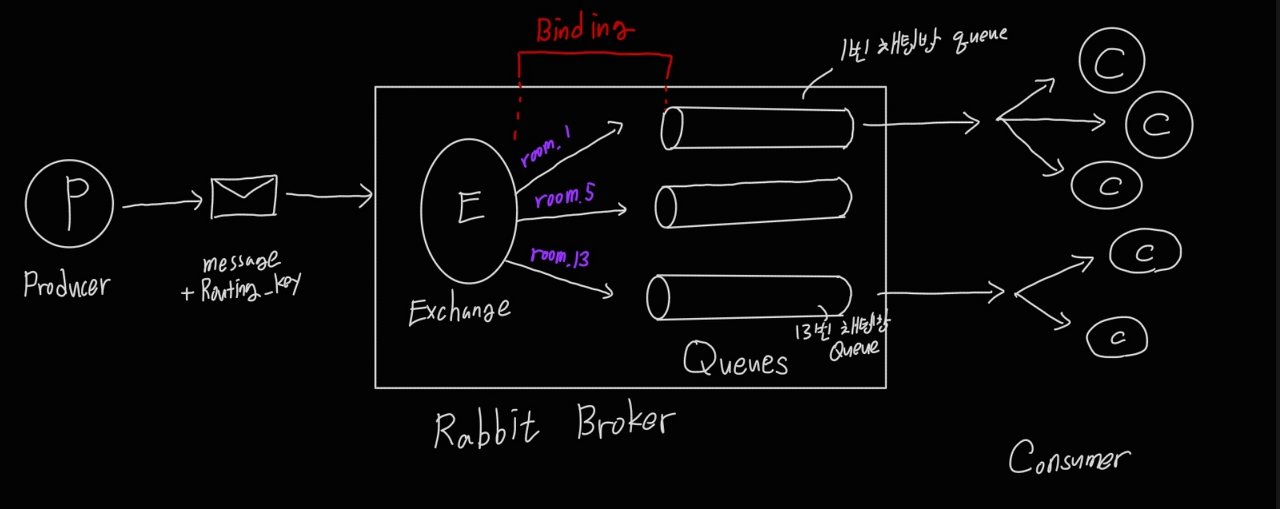
Producer(Client)->Message(+routing_key)->Rabbit Broker[Exchange+Queues]->Consumer(Client)의 구성은 이미 다 만들었지만, 문제가 있다. -
애당초에 예상했던 모델링은 다음과 같다
-
클라이언트(Producer)가 어디로 가야할 지에 대한
Routing_key와 함께 메세지 내용을 담아 서버로 보낸다. -
서버는 이를
Rabbit Broker로 위임한다. -
Rabbit Broker는 특정 Exchange로 보내고, 메시지에 있는 routing_key와 매칭된(바인딩된) Queue로 메세지를 보낸다.(사실 진짜 보내는 것이 아닌 참조를 보낸다) -
Queue에 Push된 메세지들은 그 Queue를 구독하고 있는 클라이언트(Consumer)들에게 소비된다.
- 이렇게 되면 하나의 Topic Exchange, 채팅방 N개에 대한 Queue가 N개가 존재하는 그림이다.
-
/exchange- SUBSRIBE: 임의의 바인딩 패턴으로 구독
- SEND: 임의의 라우팅키로 함께 전송
-
/queue- SUBSCRIBE: STOMP에서 관리하는 Queue 구독
- SEND: STOMP에서 관리하는 Queue로 전송
-
/amq/queue- SUBSCRIBE: STOMP gateway 바깥에서 만들어진 Queue 구독
- SEND: STOMP gateway 바깥에서 만들어진 Queue로 전송
-
/topic- SUBSCRIBE: 일시적이고 지속되는 topic으로 구독
- SEND: 일시적이고 지속되는 topic으로 전송
-
/temp-queue- SUBSCRIBE: 안함
- SEND: 안함
AMQP 0-9-1 의미론적
Message 프레임의destination헤더는 마치 SEND 프레임에 있는 것처럼 설정되있다.
- destination을
/queue/<name>으로 설정하면 메세지는 default exchange로 발행된다(중요)- destination을
/topic/<routing_key>로 설정하면 메세지는amq.topic이라는 exchange로 발행된다.- 나머지 destination에 대해
/exchange/<exchange_name>/[routing_key]의 exchange로 메세지가 발행된다.
Exchange Destination
- SUBSCRIBE 프레임에 대해 목적지로
/exchange/<name>/[pattern]이 사용될 수 있다.- 배타적이고, 자동으로 삭제되는
<name>으로 명명된 exchange가 생긴다. - 만약
[pattern]이 있으면, exchange 와 queue를 패턴으로 바인딩한다. - 현재 STOMP 세션에서 그 queue에 대해 구독한다.
- 배타적이고, 자동으로 삭제되는
이 형태로 테스트를 해보자. 우리는 RabbitConfig에서 chat.exchange라는 exchange와 chat.queue라는 queue를 생성했고, room.*이라는 바인딩 키로 바인딩 서로를 바인딩 시켜놨다. 고로 현재 exchange는 다음과 같이 존재한다.
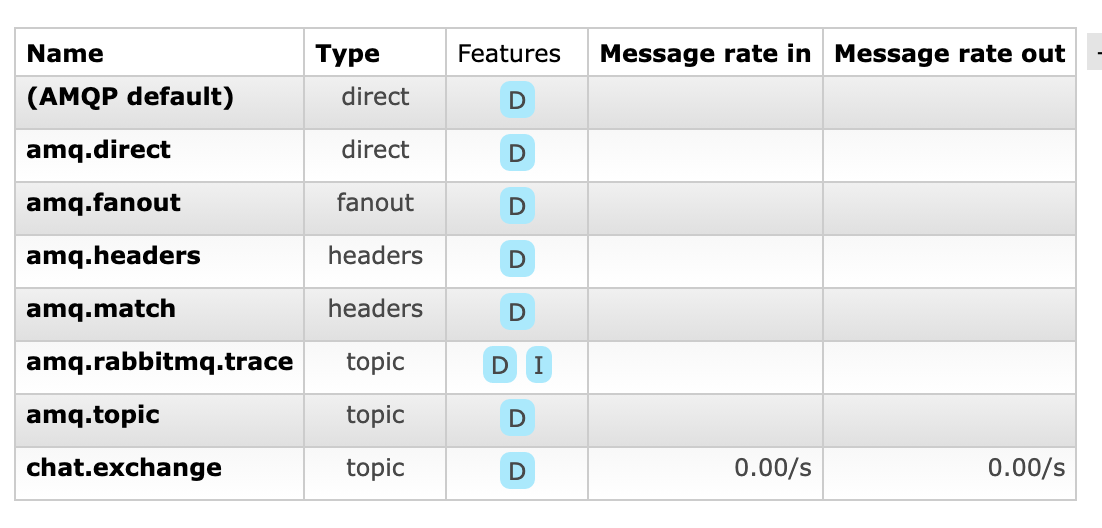
제일 아래에 있는 chat.exchange는 우리가 만든 것이고, 위에 나머지는 rabbit에서 기본으로 만들어준 것들이다.
아래에서 exchange를 사용해보자.
아까 비워놨던 자바스크립트 코드에 가서,
stomp.subscribe(`/exchange/chat.exchange/room.${chatRoomId}`, function (content) {
...
}
이 때 StompRabbitController의 코드이다.
@Controller
@RequiredArgsConstructor
@Slf4j
public class StompRabbitController {

    private final RabbitTemplate template;

    private final static String CHAT_EXCHANGE_NAME = "chat.exchange";
    private final static String CHAT_QUEUE_NAME = "chat.queue";

    @MessageMapping("chat.enter.{chatRoomId}")
    public void enter(ChatDto chatDto, @DestinationVariable String chatRoomId) {
        chatDto.setMessage("입장하셨습니다.");
        chatDto.setRegDate(LocalDateTime.now());

        // exchange
        template.convertAndSend(CHAT_EXCHANGE_NAME, "room." + chatRoomId, chatDto);
        // template.convertAndSend("room." + chatRoomId, chat); //queue
        // template.convertAndSend("amq.topic", "room." + chatRoomId, chat); //topic
    }


    @MessageMapping("chat.message.{chatRoomId}")
    public void send(ChatDto chatDto, @DestinationVariable String chatRoomId) {
        chatDto.setRegDate(LocalDateTime.now());

        template.convertAndSend(CHAT_EXCHANGE_NAME, "room." + chatRoomId, chatDto);
        //template.convertAndSend( "room." + chatRoomId, chat);
        //template.convertAndSend("amq.topic", "room." + chatRoomId, chat);
    }

    // receiver()는 단순히 큐에 들어온 메세지를 소비만 한다. (현재는 디버그 용도)
    @RabbitListener(queues = CHAT_QUEUE_NAME)
    public void receive(ChatDto chatDto) {
        log.info("chatDto.getMessage = {}",chatDto.getMessage());

    }
}- 위와 같이 설정하고 위에서 만들었던 4개의 클라이언트 생성해보자
- 그러면 다음과 같이 4개의 Queue가 생긴다.
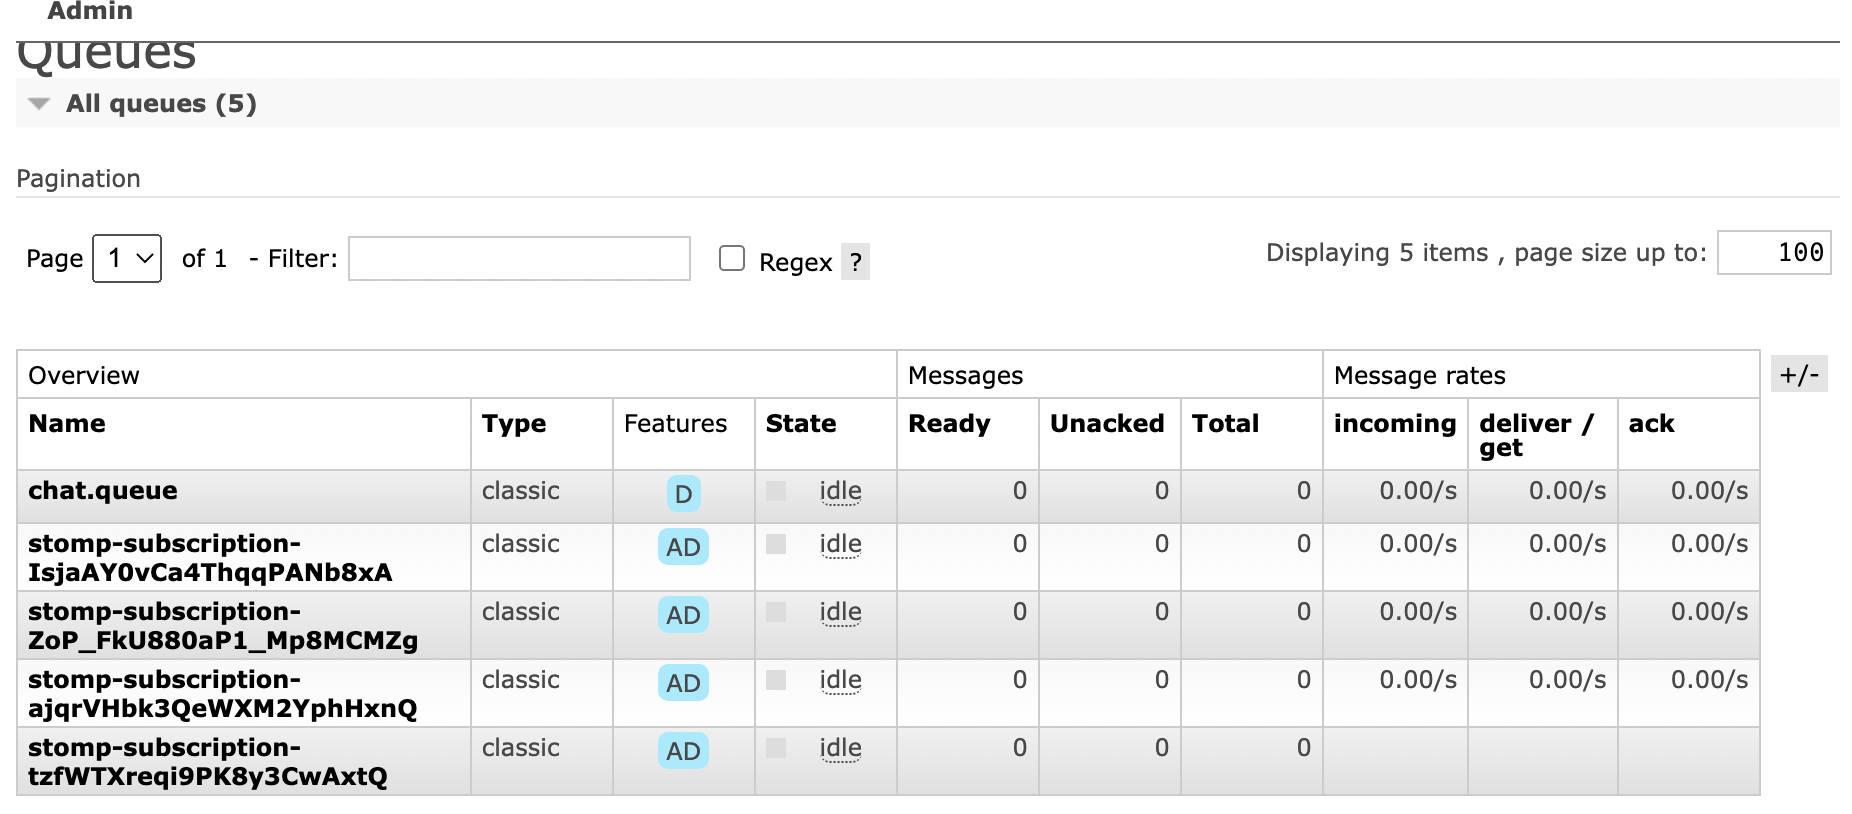
위를 보면 각 클라이언트마다 하나의 큐를 생성하고, exchange에게서 메세지를 받아오는 것이다.
Queue를 자세히 보면 다음과 같이 바인딩된 것을 알 수 있다.
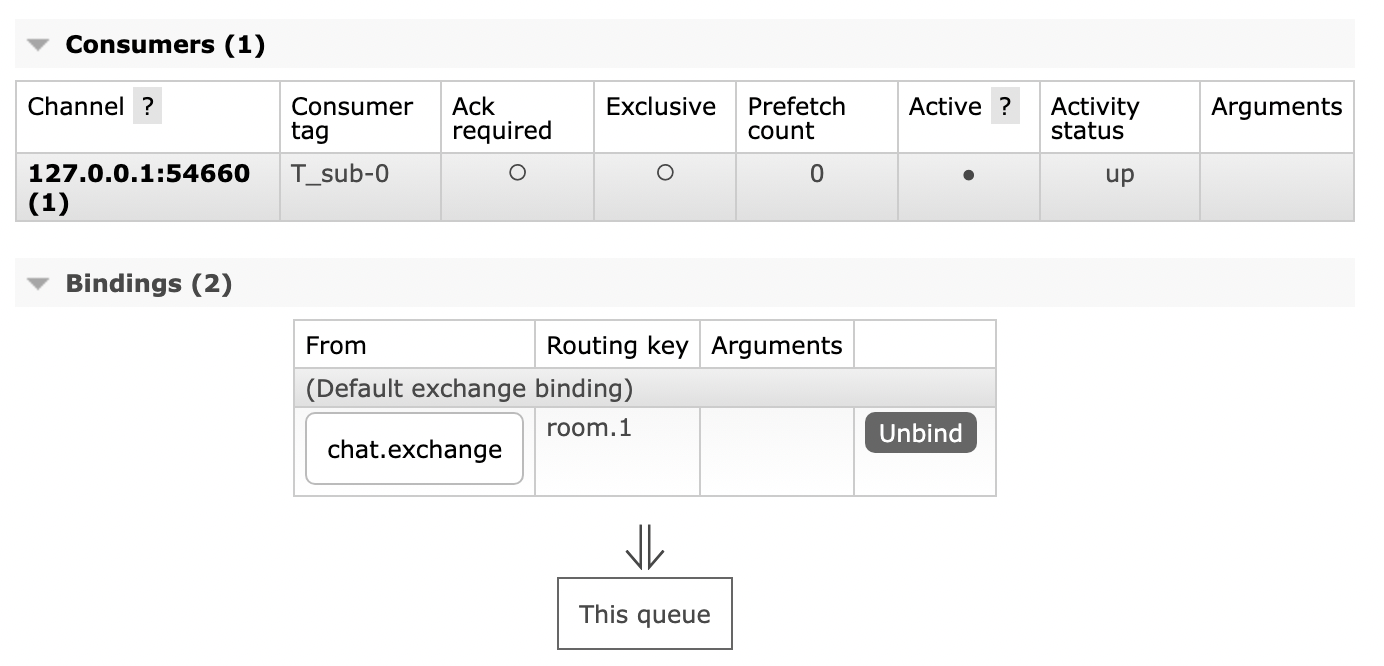
- 잘 동작한다.
Queue Destination
Controller는 다음과 같다.
@Controller
@RequiredArgsConstructor
@Slf4j
public class StompRabbitController {

    private final RabbitTemplate template;

    private final static String CHAT_EXCHANGE_NAME = "chat.exchange";
    private final static String CHAT_QUEUE_NAME = "chat.queue";

    @MessageMapping("chat.enter.{chatRoomId}")
    public void enter(ChatDto chatDto, @DestinationVariable String chatRoomId) {
        chatDto.setMessage("입장하셨습니다.");
        chatDto.setRegDate(LocalDateTime.now());


        // template.convertAndSend(CHAT_EXCHANGE_NAME, "room." + chatRoomId, chatDto); // exchange
        template.convertAndSend("room." + chatRoomId, chatDto); //queue
        // template.convertAndSend("amq.topic", "room." + chatRoomId, chat); //topic
    }


    @MessageMapping("chat.message.{chatRoomId}")
    public void send(ChatDto chatDto, @DestinationVariable String chatRoomId) {
        chatDto.setRegDate(LocalDateTime.now());

        //template.convertAndSend(CHAT_EXCHANGE_NAME, "room." + chatRoomId, chatDto); // exchange
        template.convertAndSend( "room." + chatRoomId, chatDto); // queue
        //template.convertAndSend("amq.topic", "room." + chatRoomId, chatDto); // topic
    }

    // receiver()는 단순히 큐에 들어온 메세지를 소비만 한다. (현재는 디버그 용도)
    @RabbitListener(queues = CHAT_QUEUE_NAME)
    public void receive(ChatDto chatDto) {
        log.info("received: {}",chatDto.getMessage());
    }
}stomp.subscribe(`/queue/room.${chatRoomId}`, function (content) {
...
}
// chatRoomId = 1일때
// room.1 이라는 이름의 Queue를 생성하고 구독한다.
// 단, RabbitMQ의 default Exchange(AMQP Default)와 바인딩 된다.
// 바인딩 키는 queue의 이름과 동일한다.
// 이거하면 채팅이 안된다. 4개의 클라이언트 중 1개의 클라이언트에게만 메세지가 간다
// 이유는 AMQP Default의 type이 driect이기 때문이다.- Run 해보자.
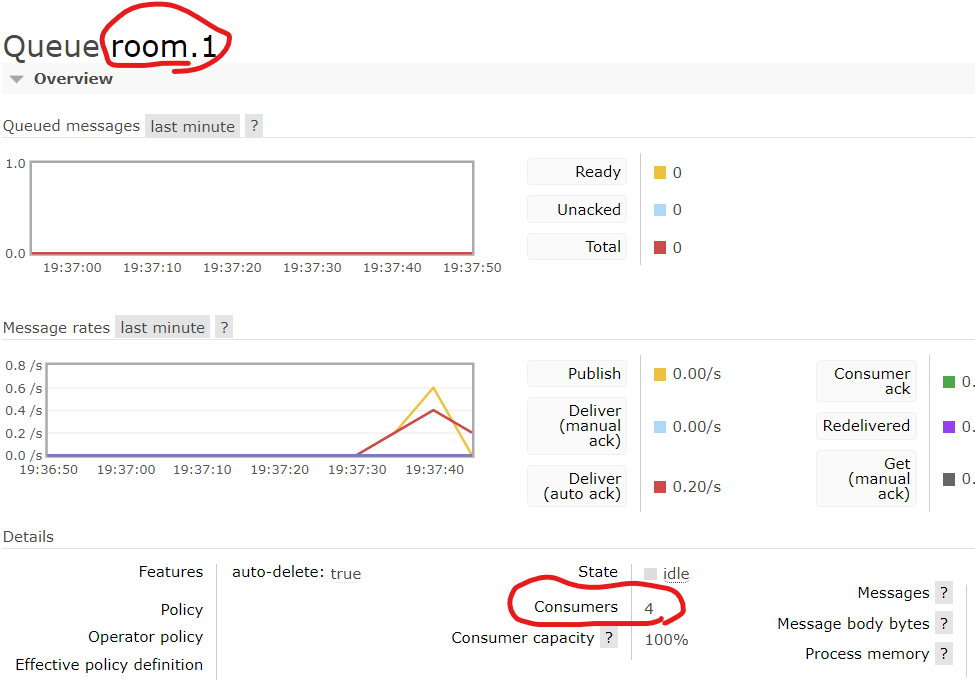
예상대로 room.1이라는 이름의 Queue가 생기고, 1번 채팅방의 모두가 Consumer가 된것을 알 수 있다.
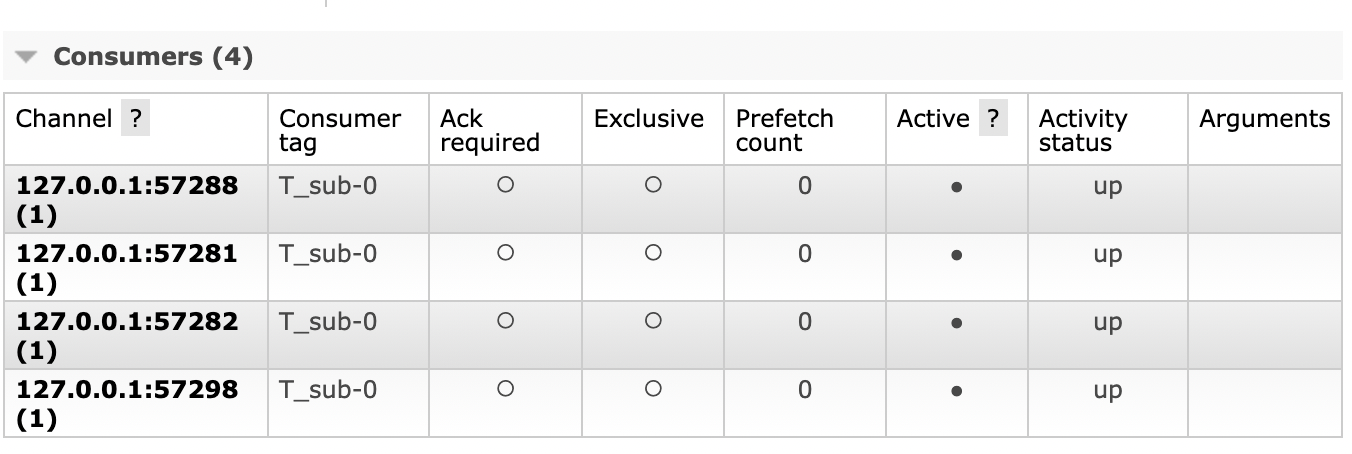

바인딩도 디폴트 익스체인지로 된 것을 알 수 있다.
하지만 채팅을 해보면?
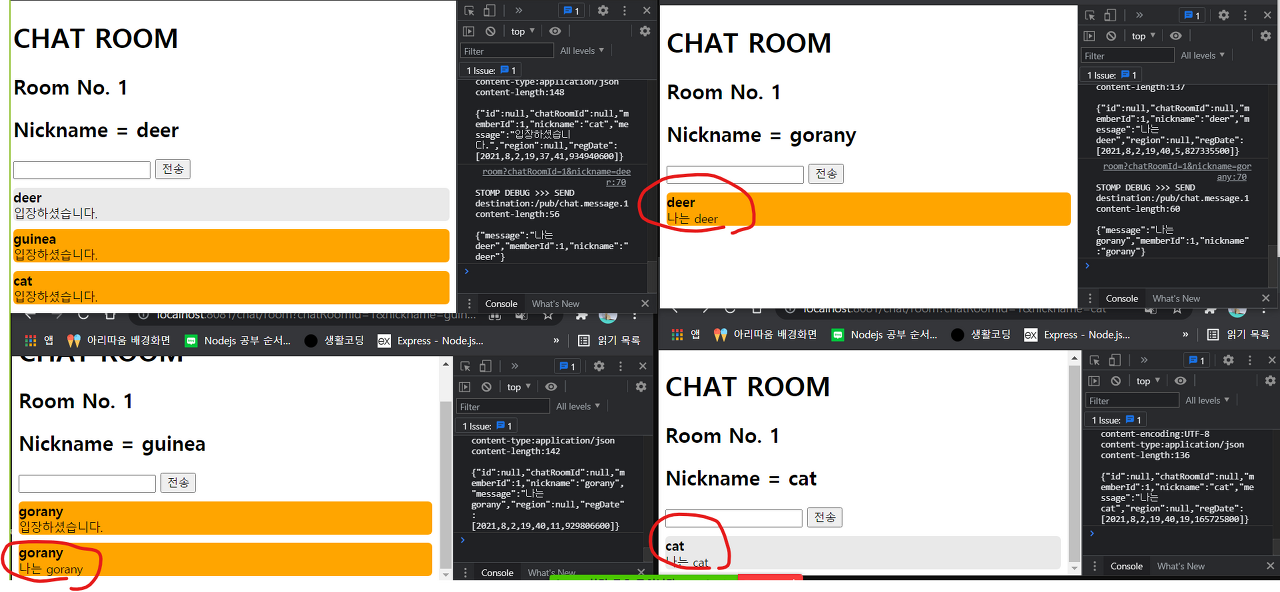
- 각 채팅이 모든 클라이언트에게 전달되어야 하는데, 한 클라이언트에게만 전달된다.
- 채팅에는 어울리지 않는 exchange type이다.
Topic Destination
@Controller
@RequiredArgsConstructor
@Slf4j
public class StompRabbitController {

    private final RabbitTemplate template;

    private final static String CHAT_EXCHANGE_NAME = "chat.exchange";
    private final static String CHAT_QUEUE_NAME = "chat.queue";

    @MessageMapping("chat.enter.{chatRoomId}")
    public void enter(ChatDto chatDto, @DestinationVariable String chatRoomId) {
        chatDto.setMessage("입장하셨습니다.");
        chatDto.setRegDate(LocalDateTime.now());


        // template.convertAndSend(CHAT_EXCHANGE_NAME, "room." + chatRoomId, chatDto); // exchange
        // template.convertAndSend("room." + chatRoomId, chatDto); //queue
        template.convertAndSend("amq.topic", "room." + chatRoomId, chatDto); //topic
    }


    @MessageMapping("chat.message.{chatRoomId}")
    public void send(ChatDto chatDto, @DestinationVariable String chatRoomId) {
        chatDto.setRegDate(LocalDateTime.now());

        //template.convertAndSend(CHAT_EXCHANGE_NAME, "room." + chatRoomId, chatDto); // exchange
        //template.convertAndSend( "room." + chatRoomId, chatDto); // queue
        template.convertAndSend("amq.topic", "room." + chatRoomId, chatDto); // topic
    }

    // receiver()는 단순히 큐에 들어온 메세지를 소비만 한다. (현재는 디버그 용도)
    @RabbitListener(queues = CHAT_QUEUE_NAME)
    public void receive(ChatDto chatDto) {
        log.info("received: {}",chatDto.getMessage());
    }
}stomp.subscribe(`/topic/room.${chatRoomId}`, function (content) {
...
}
// /topic/<name> 의 형태
// if: chatRoomId = 1
// `amq.topic` 이라는 Rabbit이 준비해둔 Exchange에 바인딩되는데, 바인딩 되는 Queue는 임의 적인 이름을 가지며, Binding_key는 room.1이다.
// exchange와 마찬가지로 클라이언트 당 1개의 Queue가 생긴다.
// 이 때 생성되는 Queue는 auto_deleted하고, durable하며 이름은 subscription-xxx...와 같이 생성된다.
실행해보자
amp.topic이라는 exchange를 상세히 보면 다음과 같이 4개의 Queue에 대해room.1이라는 라우팅 키로 바인딩 된 것을 확인할 수 있다.
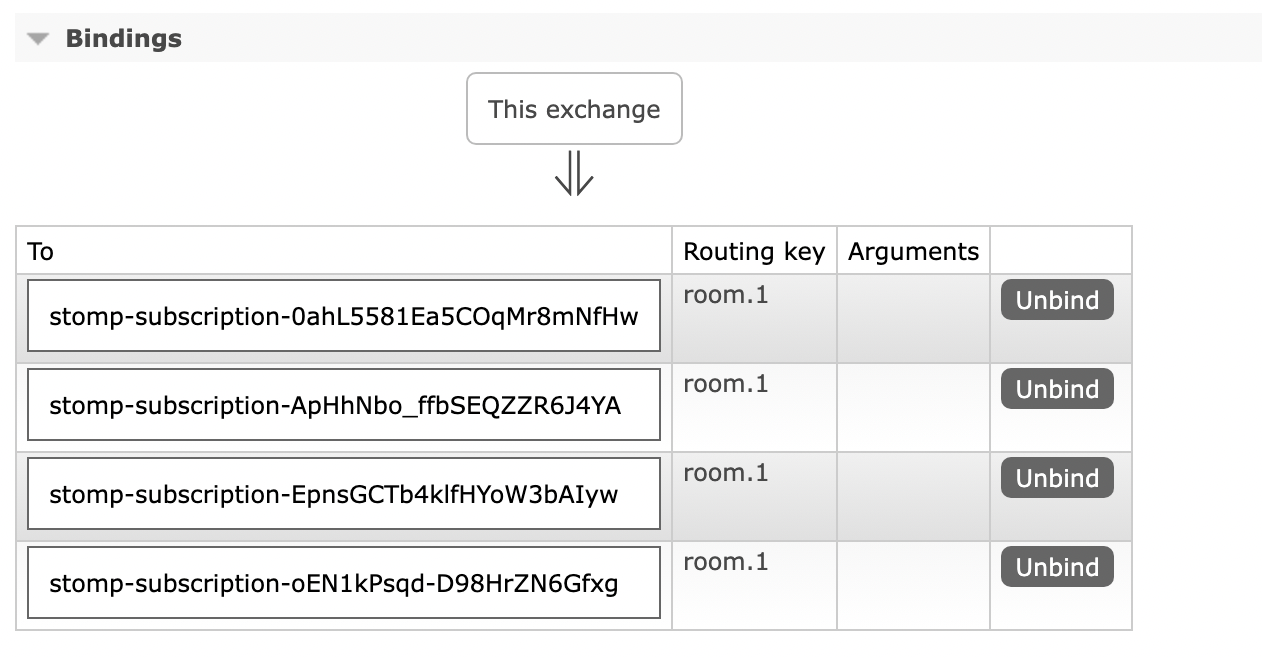
/exchange때처럼subscription-xxx...형태로 Queue가 1개씩 생김을 확인하였다.

Amq/queue Destination
/amq/queue/<name>의 형태<name>이라는 queue가 존재해야만 한다(존재하지 않을때 예외 발생)
amq/queue 형태의 경우, 미리 만들어둔 Queue를 사용하기 때문에 따로 바인딩을 생각할 필요는 없다.
예를 들어 아까 만들어둔 [chat.queue]와 [chat.exchange]는 [room.*]이라는 라우팅 키로 바인딩을 시켜놓았다.
이 chat.queue라는 큐를 쓸 때 /amq/queue/chat.queue 라고 써주면 된다.
@Controller
@RequiredArgsConstructor
@Slf4j
public class StompRabbitController {

    private final RabbitTemplate template;

    private final static String CHAT_EXCHANGE_NAME = "chat.exchange";
    private final static String CHAT_QUEUE_NAME = "chat.queue";

    @MessageMapping("chat.enter.{chatRoomId}")
    public void enter(ChatDto chatDto, @DestinationVariable String chatRoomId) {
        chatDto.setMessage("입장하셨습니다.");
        chatDto.setRegDate(LocalDateTime.now());

        template.convertAndSend(CHAT_EXCHANGE_NAME, "room." + chatRoomId, chatDto); // exchange
        // template.convertAndSend("room." + chatRoomId, chatDto); //queue
        // template.convertAndSend("amq.topic", "room." + chatRoomId, chatDto); //topic
    }


    @MessageMapping("chat.message.{chatRoomId}")
    public void send(ChatDto chatDto, @DestinationVariable String chatRoomId) {
        chatDto.setRegDate(LocalDateTime.now());

        template.convertAndSend(CHAT_EXCHANGE_NAME, "room." + chatRoomId, chatDto); // exchange
        // template.convertAndSend( "room." + chatRoomId, chatDto); // queue
        // template.convertAndSend("amq.topic", "room." + chatRoomId, chatDto); // topic
    }

    // receiver()는 단순히 큐에 들어온 메세지를 소비만 한다. (현재는 디버그 용도)
    @RabbitListener(queues = CHAT_QUEUE_NAME)
    public void receive(ChatDto chatDto) {
        log.info("received: {}",chatDto.getMessage());
    }
}stomp.subscribe(`/amq/queue/room.${chatRoomId}`, function (content) {
...
}
이해가 잘 돼요 감사합니다!