1. Filter
- Web Context 부분, Tomcat에서 관리하는 부분이다
- 클라이언트의 request 中 가장 날 것의 부분이다
- 주로 필터에서는 들어온 데이터를 다른 데이터로 변환시켜서 안쪽으로 보내준다던지
- 들어온 데이터에 대해서 json 바디에 대해서 모든 내용을 기록하는 역활을 한다
- 개발 하는 중 컨트롤러에 내용이 이상하게 들어온다고 느낄 수 있음
- 이때 filter을 통해서 -> raw한 json을 확인해 볼 수 있다
A. Filter 사용
- 우리는 협업시, 많은 오류가 발생한다
- 혹은 오류가 발생하지 않아도, 예상하지 못하게 작동할 수 있다
- 예를들어, snake_case로 데이터를 받기로 했는데... camel_case로 데이터가 들어왔다
이럴 때, 🤔 우리는 데이터가 snake_case가 아니라 came_case로 왔어요.
해당 부분을 수정해주세요 라고 요청할 수 있어야 한다
- 그러기 위해서는, 어떤 데이터가 들어왔는지 우리는 log를 남겨야 한다 -> 이를 filter를 통해서 한다
- 자세한 내용은.. 필터,인터셉터를 참고하자
- filter의
doFilter을 오버라이드해서 구현하자!!!
@Slf4j
@Component
public class LoggerFilter implements Filter {
@Override
public void doFilter(ServletRequest request, ServletResponse response, FilterChain chain) throws IOException, ServletException {
log.info(">>>>> 진입");
HttpServletRequestWrapper req = new HttpServletRequestWrapper((HttpServletRequest) request);
HttpServletResponseWrapper res = new HttpServletResponseWrapper((HttpServletResponse) response);
BufferedReader br = req.getReader();
List<String> list = br.lines().collect(Collectors.toList());
list.forEach(it ->{
log.info("{}",it);
});
chain.doFilter(req,res);
- 해당 코드 실행시...
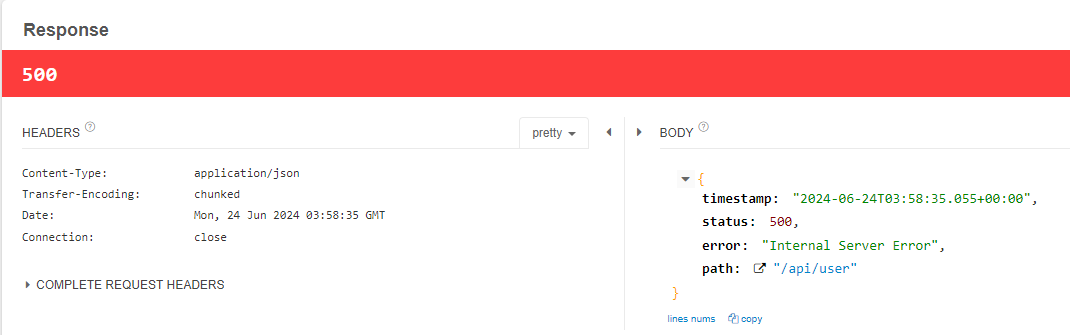

java.lang.IllegalStateException: getReader() has already been called for this request
이유는, ✅ HttpServletRequestWrapper의 reader는 inputStream 이기 때문이다
- stream 이 한번 흐름이 끝나서, log는 filter에서 잘 출력이 되었지만,,,
- 🤔 Controller 레벨에서, 요청의 데이터를 읽을 수 없기 때문에,
IllegalStateException 예외가 발생한다
B. ContentCachingRequestWrapper
- 스프링은 해당 문제를 해결하기 위해 CopntentCachingRequestWrapper라는 클래스를 만들어 두었다
- 이는 **바이트에 해당 내용을 미리 복사해두고, stream을 통해서 읽는 것**이다
@Slf4j
@Component
public class LoggerFilter implements Filter {
@Override
public void doFilter(ServletRequest request, ServletResponse response, FilterChain chain) throws IOException, ServletException {
log.info(">>>>> 진입");
ContentCachingRequestWrapper req = new ContentCachingRequestWrapper((HttpServletRequest) request);
ContentCachingResponseWrapper res = new ContentCachingResponseWrapper((HttpServletResponse) response);
chain.doFilter(req,res);
String reqJson = new String(req.getContentAsByteArray());
log.info("req : {}",reqJson);
String resJson = new String(res.getContentAsByteArray());
log.info("res : {}",resJson);
log.info("<<<<< 리턴");
res.copyBodyToResponse();
}
}
- log에서 stream을 이용해, 데이터를 log레벨로 출력하고
res.copyBodyToResponse(); 메서드를 통해, response에 카피해두었던 내용을 response에 다시 씌워주어야 한다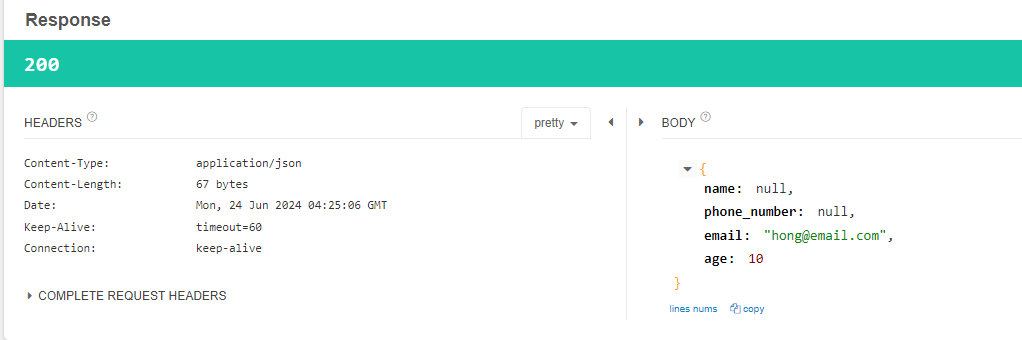

- 먼저 doFilter전에 읽었던 내용도, ApiController에서 다시 읽을 수 있게 되었다
- doFilter 이후의 로그 부분도, 어떤 데이터가 들어가고, 어떤 데이터가 반환되었는지 log로 출력할 수 있게 되었다
2. Interceptor
- 컨트롤러로 보내기 직전의 영역이다
- spring에서 관리하는 것
- handler mapping을 통해서 해당 요청이 어느 컨트롤러로 갈지 정해져있기 때문에,
- header을 통해 권한 검사, 특정 어노테이션을 찾아서 작업을 하는 역활을 한다
- 주로 interceptor을 통해 인증을 많이 한다
A. Interceptor 사용
@Slf4j
@Component
public class OpenApiInterceptor implements HandlerInterceptor {
@Override
public boolean preHandle(HttpServletRequest request, HttpServletResponse response, Object handler) throws Exception {
log.info("pre handler");
return true;
}
@Override
public void postHandle(HttpServletRequest request, HttpServletResponse response, Object handler, ModelAndView modelAndView) throws Exception {
log.info("post handler");
}
@Override
public void afterCompletion(HttpServletRequest request, HttpServletResponse response, Object handler, Exception ex) throws Exception {
log.info("after completion");
}
}
- Interceptor는 3가지의 메서드가 있다
- preHandler는 controller에 들어가기 전에 조건을 확인하는 곳이다
- 만약 참이면 -> Controller로 이동하고 false면 이동하지 않는다
- postHandler는 ModelAndView가 있고
- afterCompletion에는 예외를 처리할 수 있는 곳이다
- 자세한 내용은 위의 블로그를 참조하자!
B. Configuration 추가
- 수동으로 우리는 interceptor를 등록시켜주어야 한다
WebMvcConfigurer를 구현하고, addInterceptors를 오버라이드 해준다- 여기서 interceptor을 설정할 경로들을 지정해준다
addPathPatterns , excludePathPatterns 를 통해 추가,제거해준다Order을 통해 적용되는 interceptor의 순서를 지정해줄 수 있다
@Configuration
public class WebConfig implements WebMvcConfigurer {
    @Autowired
    private OpenApiInterceptor openApiInterceptor;
    @Override
    public void addInterceptors(InterceptorRegistry registry) {
        registry.addInterceptor(openApiInterceptor)
                .addPathPatterns("/**")
                .excludePathPatterns();
    }
}
C. 어노테이션 추가 -> Interceptor 적용
- Interceptor을 가지고
preHandle에서 controller을 적용할지 말지를 적용할 수 있다
- 어노테이션을 하나 만들어서 -> 해당 어노테이션이 메서드,클래스 레벨에 있다면 interceptor을 적용하는 예제를 만들어보자
OpenApi
@Target(value = {ElementType.METHOD, ElementType.TYPE})
@Retention(RetentionPolicy.RUNTIME)
public @interface OpenApi {
}
ApiController
@Slf4j
@RestController
@RequestMapping("/api/user")
public class UserApiController {
    @OpenApi
    @PostMapping("")
    public UserRequest register(
            @RequestBody UserRequest userRequest
    ){
        log.info("{}",userRequest);
        return userRequest;
    }

    @GetMapping("/hello")
    public void hello(){
        log.info("hello");
    }
}
- 간단하게 api/user는
@OpenApi 어노테이션을 메서드 레벨로 적용하였고,
- api/user/hello는 어노테이션을 적용하지 않았다
preHandler
@Slf4j
@Component
public class OpenApiInterceptor implements HandlerInterceptor {
@Override
public boolean preHandle(HttpServletRequest request, HttpServletResponse response, Object handler) throws Exception {
log.info("pre handler");
HandlerMethod handlerMethod = (HandlerMethod) handler;
OpenApi methodLevel = handlerMethod.getMethodAnnotation(OpenApi.class);
if (methodLevel !=null){
log.info("method level");
return true;
}
OpenApi classLevel = handlerMethod.getBeanType().getAnnotation(OpenApi.class);
if (classLevel != null){
log.info("class level");
return true;
}
log.info("open api 아닙니다 : {}", request.getRequestURI());
return false;
}
- prehandler에서 handler의 매개변수를 (HandlerMethod)로 다운 캐스팅해주고
getMethodAnnotation()getBeanType().getAnnotation() 을 통해서
- 해당 어노테이션이 있다면 -> true를 반환해서, Controller로 이동
- 해당 어노테이션이 없다면 -> false를 반환해서, Controller로 이동하지 않는다
api/user 실행
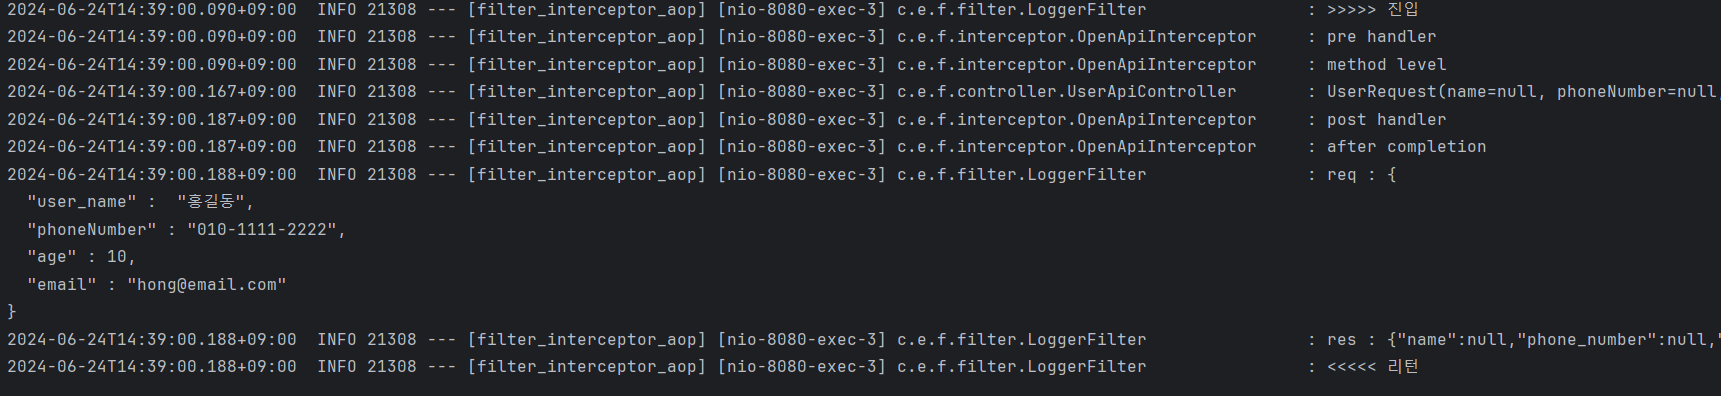
- 먼저 filter을 통해서 >>>>> 진입 한 후,
- pre handler의 method level의 로그를 출력 후, 해당 컨트롤러 실행
- 컨트롤러 실행 후, postHandle, afterCompletion 실행한 후
- 마지막으로 filter의 doFilter 이후의 부분이 출력되고 종료된다
api/user/hello 실행

- filter 진입 후, prehandler에서 false 반환!
- 컨트롤러 실행 X
- postHandle, afterCompletion 실행한 후
- 마지막으로 filter의 doFilter 이후의 부분이 출력되고 종료된다
3. Aop
- Aspect Oriented Programming , 관점 지향 프로그램
- Spring application은 특별한 경우를 제외하고는, MVC 웹 어플리케이션에서 Wab layer, Business Layer, Data Layer 로 정의한다
Web layer : REST api를 제공하며, client 중심의 로직 적용Business Layer : 내부 정책에 따른 logic 개발Data Layer : 데이터 베이스 및 외부와의 연동을 처리한다

- 클라이언트에게 요청에 대해서 -> 각 서비스 로직에 로그를 찍지 않고, 공통적으로 로그릴 미리 찍는 Method Parameter Log를 처리할 수 있다
- 이렇게 web, business, data 로직을 건들지 않고 -> 공통적인 기능을 적용시키는 것을 관점지향 프로그래밍 즉 AOP라고 한다
A. Aop 기능
| Annotation | 의미 |
|---|
| @Aspect | 자바에서 널리 사용하는 AOP 프레임워크에 포함되며, AOP를 정의하는 Class에 할당 |
| @Pointcut | 기능을 어디에 적용시킬지, 메소드? Annotation? 등 AOP를 적용 시킬 지점을 설정 |
| @Before | 메소드 실행하기 이전 |
| @After | 메소드가 성공적으로 실행 후, 예외가 발생 되더라도 실행 |
| @AfterReturing | 메소드 호출 성공 실행 시 (Not Throws) |
| @AfterThrowing | 메소드 호출 실패 예외 발생 (Throws) |
| @Around | Before / after 모두 제어 |
- Aop는 스프링에서 관리되는 Bean들에서만 적용이 된다
- 만약 Bean이 아니라 다른 곳에 적용하고 싶으면 Aop가 아니라, aspectj를 이용해야 한다
B. Aop 적용
@Slf4j
@Aspect
@Component
public class TimerAop {
@Pointcut(value = "within(com.example.filter_interceptor_aop.controller.UserApiController)")
public void timerPointCut(){}
@Before(value= "timerPointCut()")
public void before(JoinPoint joinPoint){
System.out.println("before");
}
@After(value= "timerPointCut()")
public void after(JoinPoint joinPoint){
System.out.println("after");
}
@AfterReturning(value= "timerPointCut()",returning = "result")
public void afterRetuning(JoinPoint joinPoint,Object result){
System.out.println("after returning");
}
@AfterThrowing(value= "timerPointCut()",throwing = "tx")
public void afterThrowing(JoinPoint joinPoint,Throwable tx){
System.out.println("after throwing");
}
@Around(value = "timerPointCut()")
public void around(ProceedingJoinPoint joinPoint) throws Throwable {
Arrays.stream(joinPoint.getArgs()).forEach(
it ->{
if (it instanceof UserRequest){
UserRequest tempUser = (UserRequest) it;
tempUser.setPhoneNumber(tempUser.getPhoneNumber().replace("-",""));
}
}
);
List<UserRequest> newObjs = Arrays.asList(new UserRequest());
StopWatch stopWatch = new StopWatch();
stopWatch.start();
log.info("메소드 실행 이전");
joinPoint.proceed();
stopWatch.stop();
System.out.println("총 소요된 시간 : "+stopWatch.getTotalTimeMillis());
log.info("메소드 실행 이후");
}
}
@Aspect 를 통해서, Aop 사용을 알려준다Pointcut을 사용해 어디에 Aop를 적용시킬지를 정한다@Around를 통해 Aop 작업을 실행한다- 지금은 전화번호의 010-1211-1111를 01012111111로 변경해주는 코드이다
- 또한 암,복호화와, 로깅을 해줄 수 있다
- 또한 메서드 레벨의 시간을 재기 위한 StopWatch 기능도 사용할 수 있다
C. 포인트컷 지시자(PCD)
| PCD | 의미 |
|---|
| execution | 반환타입, 타입, 메소드, 파라미터 기준으로 지정 |
| within | 특정 경로의 타입을 기준으로 지정 |
| this | 특정 타입의 객체를 기준으로 지정 |
| target | 특정 타입의 객체를 기준으로 지정 |
| args | 특정 타입의 파라미터를 가지는 메소드를 기준으로 지정 |
| @target | 특정 어노테이션을 가지는 객체를 기준으로 지정 |
| @args | 특정 어노테이션의 파라미터를 가지는 메소드를 기준 |
| @within | 특정 클래스의 경로의 어노테이션을 기준 |
| @annotation | 특정 메소드의 어노테이션을 기준 |
| bean | 스프링 빈을 기준으로 지정 |
Excutation
| 접근제한자 | 접근 제한자를 지정 (생략 가능) | example |
|---|
| public | public 제한자 선택 | execution(public |
| private | private 제한자 선택 | execution(private |
| 생략 | 생략 | execution( set |
리턴타입
| 리턴타입 | 리턴 타입 | example |
|---|
| * | 모든 리턴타임 | execution(public * |
| void | 리턴 타입이 void 인 메소드 | execution(public void |
| !void | 리턴타임 void가 아닌 메소드 | execution(public !void |
패키지 지정
| 패키지지정 | 패키지 경로 | example |
|---|
| com.example.controller | 패키지의 경로 | execution(public * com.example.controller |
| com.example.* | example패키지 내의 모든 조인포인트 | execution(public com.example. |
| com.example.. | example 패키지로 시작하는 모든 포인트 | execution(public * com.example.. |
| com.example..impl | example패키지 하위의 impl로 끝나는 패키지 | execution(public * com.example..impl |
클래스 지정
| 클래스 | 클래스 설명 | example |
|---|
| Foo | Foo 클래스 지정 | execution(public * com.example.service.Foo |
| *Sample | 이름이 Sample로 끝나는 클래스 | execution(public com.example.service.Sample |
메서드 지정
| 메서드 | 메서드 설명 | example |
|---|
| set*(..) | set으로 시작하는 모든 메서드 | execution( set(..)) |
| *(..) | 모든 메서드 | execution(public * *(..)) |
| foo(..) | foo 이름의 메서드를 지정 | execution(public * foo(..)) |
매개변수 지정
| 매개변수 | 매개변수 설명 | example |
|---|
| (..) | set으로 시작하는 모든 메소드 (매개변수 포함) | execution( set(..)) |
| (*) | set으로 시작하는 메소드 중 매개변수가 1개인 메소드 | execution( set(*)) |
| (com.example.dto.userDto) | userDto를 매개변수로 가지는 메소드 | execution( set(com.example.dto.userDto)) |
| (!com.example.dto.userDto) | userDto를 매개변수로 가지지 않는 메소드 | execution( set(!com.example.dto.userDto)) |
| (String, ..) | String type의 첫번째 매개변수를 가지고 매개변수가 N개 이상인 메소드 | execution( set(String, ..)) |
| (String, *) | String type의 첫번째 매개변수를 가지고 매개변수가 2개인 메소드 | execution( set(String, *)) |
within
| example | 설명 |
|---|
| within(com.example.dto.*) | com.example.dto 패키지의 클래스의 모든 메소드 지정 |
| within(com.example.dto..*) | com.example.dto 패키지 하위의 모든 패키지의 모든 메소드 지정 |
| within(com.example.dto.UserService) | com.example.dto.UserService 클래스의 모든 메소드 지정 |
this/target
| example | 설명 |
|---|
| this(com.example.dto.ifs.UserIfs) | UserIfs를 상속받은 모든 객체에 대해서 지정 |
args
| example | 설명 |
|---|
| "execution(* setId(..)) && args(id))" | SetId 메소드의 파라미터 args 지정 |
@특정 어노테이션
| example | 설명 |
|---|
| @target(com.example.annotation.PhoneNumber) | PhoneNumber 어노테이션이 붙은 클래스 |
| @args(com.example.annotation.Entity) | Entity 어노테이션이 붙은 매개변수 |
| @within(com.example.annotation.Controller) | Controller 어노테이션이 붙은 클래스 |
| @annotation(com.example.annotation.Encrypt) | Encrypt 어노테이션이 붙은 메소드 |
| @annotation(Encrypt) | Encrypt 어노테이션이 붙은 메소드 |
Bean
| example | 설명 |
|---|
| bean(userService) | UserService bean의 모든 메서드 |
모두 외울 수 없으니...
