📌 QR 코드 다뤄보기 2탄 !
이번 시간에는 QR 코드 스캔 화면을 기존에는
가로방향으로 밖에 사용하지 못하였는데,세로방향으로도 스캔을 하는 법과 QR 코드 스캔 화면의텍스트,이미지등 여러가지 설정 값들을 사용하여 BarcodeScanner를 Customizing 하는 방법을 알아보는 시간을 가져보도록 하려고 한다.
세로 모드 스캔은 어떻게 할까 ? 🤔
세로,가로방향의 스캔 모드를 지원하는 것이 아니라 다음과 같은 작업을 진행하면세로,가로방향으로 회전 시, 모든 방향으로의 스캔 모드를 지원하는 것이었다.
다음과 같은 작업을 진행하지 않으면, 기존 처럼 가로 모드의 스캔 화면만 지원한다.
공식 문서에 제시되어 있는 Changing the orientation 방법이다.
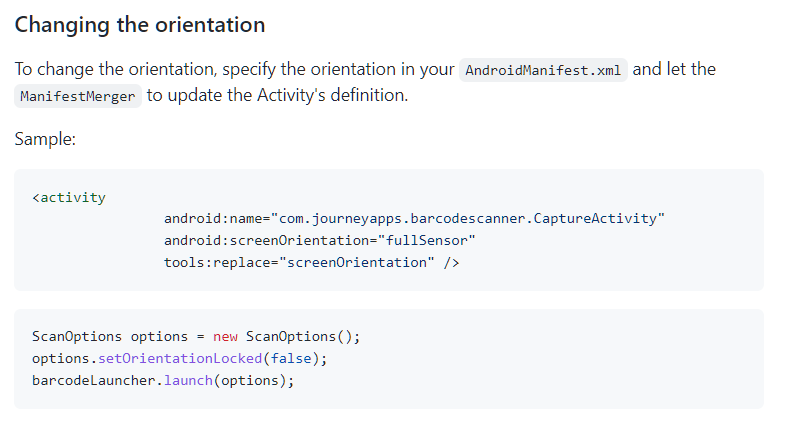
Changing the orientation
1. AndroidManifest.xml 에 다음과 같은 구문을 추가한다.
<activity
		android:name="com.journeyapps.barcodescanner.CaptureActivity"
		android:screenOrientation="fullSensor"
		tools:replace="screenOrientation" />
android:screenOrientation 에 대해서는 다음 링크를 참조하면 좋을 것 같다.
android:screenOrientation 의 값에 따라 기기에서 보여질 바코드 스캐너인 CaptureActivity 의 디스플레이 방향이 설정된다.
- ex
android:screenOrientation = "landscape"-> 가로 방향으로 스캐너가 켜질 것이다.android:screenOrientation = "portrait"-> 세로 방향으로 스캐너가 켜질 것이다.android:screenOrientation = "fullSensor"-> 기기의 4 방향 센서에 따라 디스플레이 방향되며 스캐너가 작동될 것이다.
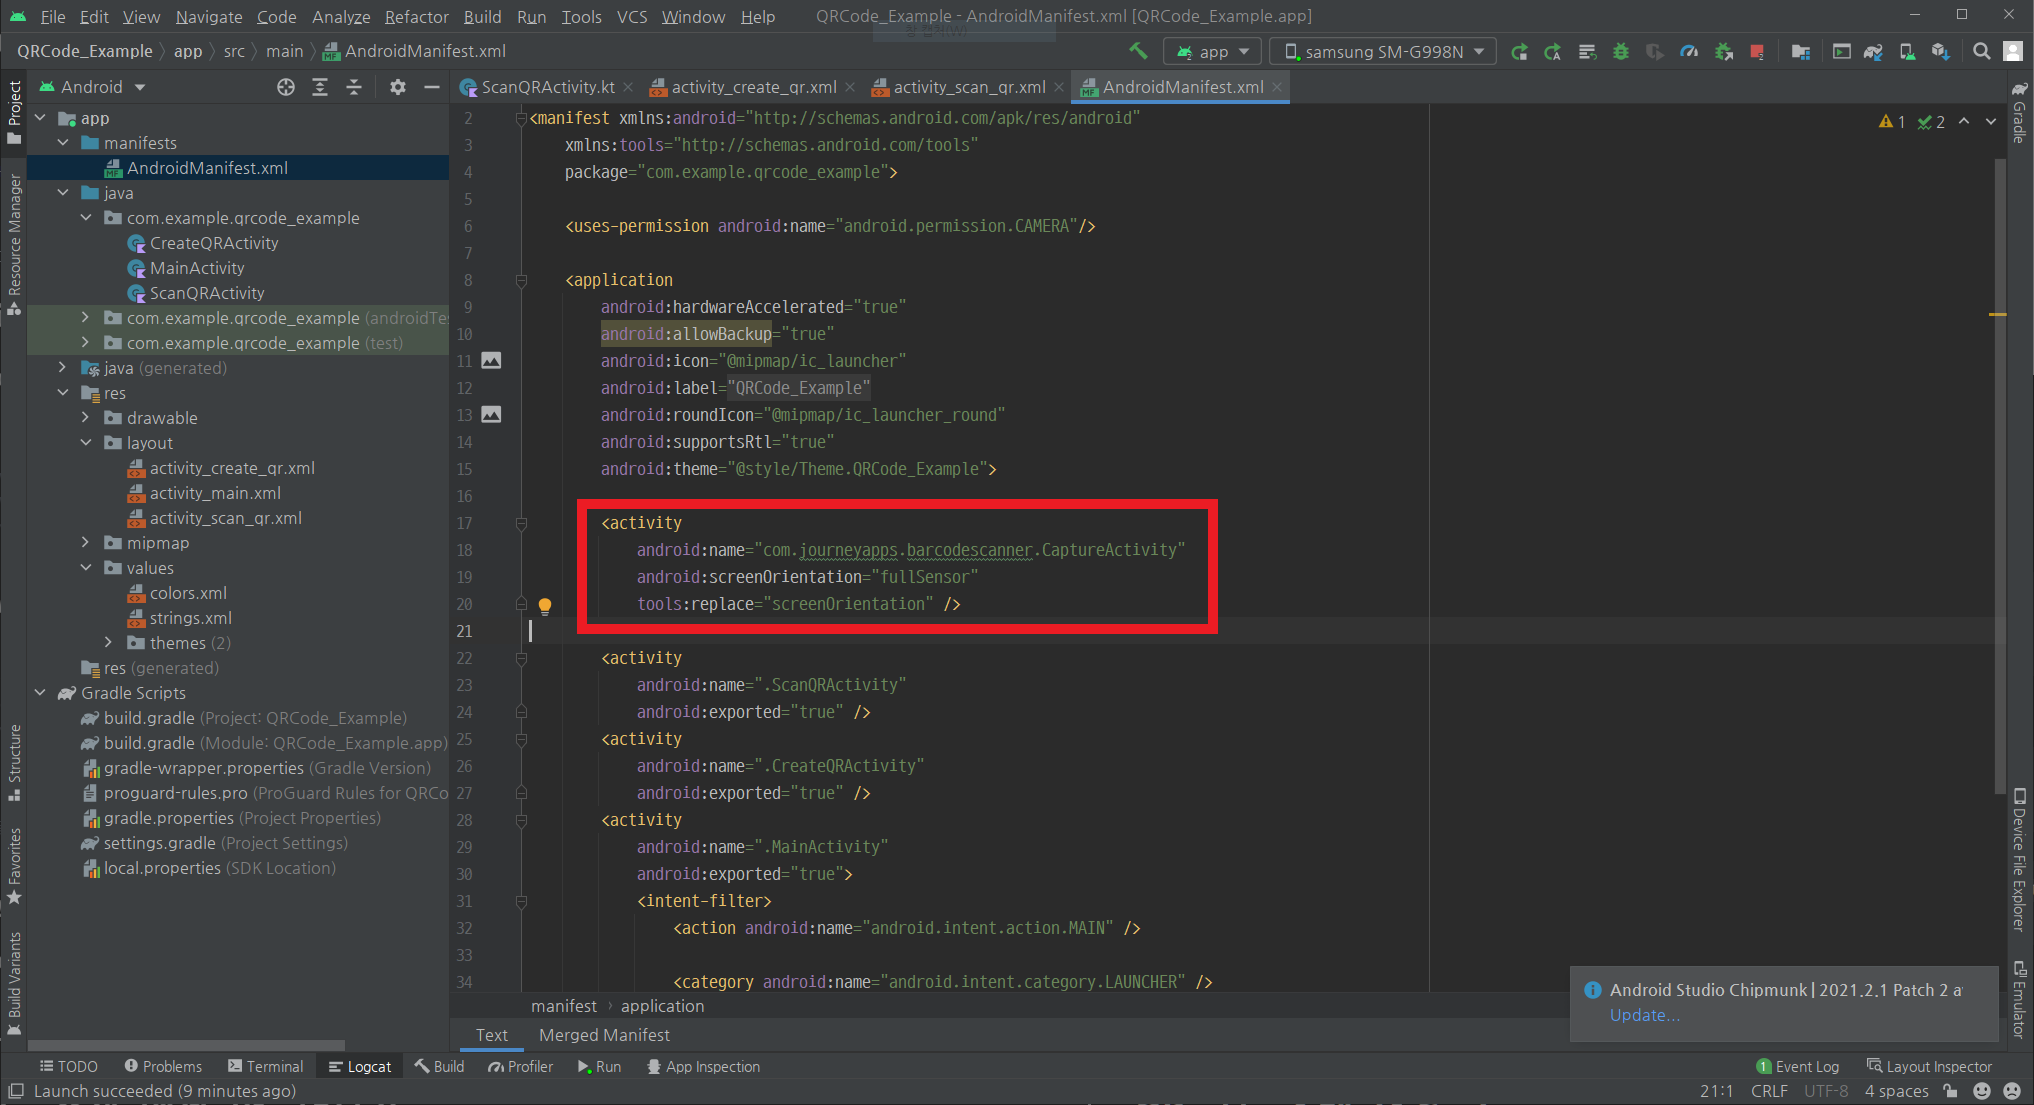
다음과 같이 추가하였다.
2. ScanOption 의 setOrientationLocked 값을 false로 변경한다.
barcodeLauncher.launch(ScanOptions())기존에는 다음과 같이 ScanOption 의 아무 설정도 하지 않은 새로운 객체를 생성하여 BarcodeLauncher로 실행하였는데,
ScanOptions options = new ScanOptions()
options.setOrientationLocked(false)
barcodeLauncher.launch(options)
위 코드는 Orientation Lock을 false로 설정한 새로운 ScanOption 객체로 BarcodeLauncher를 실행하는 것으로 보인다.
위와 같은
Changing the Orientation기능은 앞서 작성한 Android에서 QR 코드 다뤄보기 1 글에서 사용했던 스캔 화면에서ScanQRActivity에 코드를 추가 작성하여 구현해 볼 예정이다.
ScanQRActivity(.kt)
package com.example.qrcode_example

import android.os.Bundle
import android.widget.Button
import android.widget.TextView
import android.widget.Toast
import androidx.appcompat.app.AppCompatActivity
import com.journeyapps.barcodescanner.ScanContract
import com.journeyapps.barcodescanner.ScanIntentResult
import com.journeyapps.barcodescanner.ScanOptions


class ScanQRActivity : AppCompatActivity() {

    private lateinit var txtResult : TextView

    // 스캐너 설정
    private val barcodeLauncher = registerForActivityResult(
        ScanContract()
    ) { result: ScanIntentResult ->
        // result : 스캔된 결과

        // 내용이 없다면
        if (result.contents == null) {
            Toast.makeText(this, "Cancelled", Toast.LENGTH_LONG).show()
        }
        else { // 내용이 있다면

            // 1. Toast 메시지 출력.
            Toast.makeText(
                this,
                "Scanned: " + result.contents,
                Toast.LENGTH_LONG
            ).show()

            // 2. 결과 값 TextView에 출력.
            txtResult.text = result.contents.toString()
        }
    }

    // SCAN - onClick
    fun onScanButtonClicked() {
        // Launch ( SCAN 실행 )
        // barcodeLauncher.launch(ScanOptions())    // Orientation Lock 을 해제하지 않은 상태로 실행.

		// Changing the Orientation
        val options = ScanOptions()
        options.setOrientationLocked(false)     // ScanOption 의 Orientation Lock 을 해제하기.
        barcodeLauncher.launch(options)         // Orientation Lock 을 해제한 상태로 실행.
    }


    override fun onCreate(savedInstanceState: Bundle?) {
        super.onCreate(savedInstanceState)
        setContentView(R.layout.activity_scan_qr)

        val btnScan : Button = findViewById(R.id.btnScan)
        txtResult = findViewById(R.id.txtResult)

        // 가로 SCAN 버튼 클릭
        btnScan.setOnClickListener {
            onScanButtonClicked()
        }
    }
}
onScanButtonClicked() 메서드를 제외하면 기존의 ScanQRActivity의 코드는 동일하다.
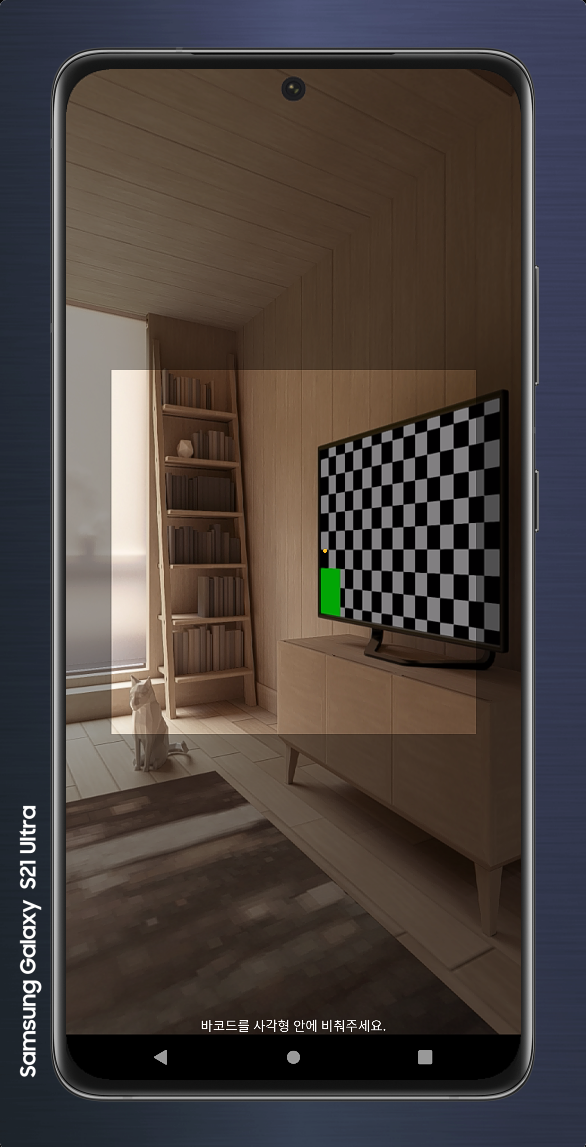
실행결과

android:screenOrientation = "fullSensor" 로 매니페스트에 지정하였기 때문에
default 값으로는 세로 방향 스캔만 지원하며

가로 방향으로 회전하더라도 OrientationLock을 풀어주지 않았기 때문에 default가 그대로 유지됨을 알 수 있다.
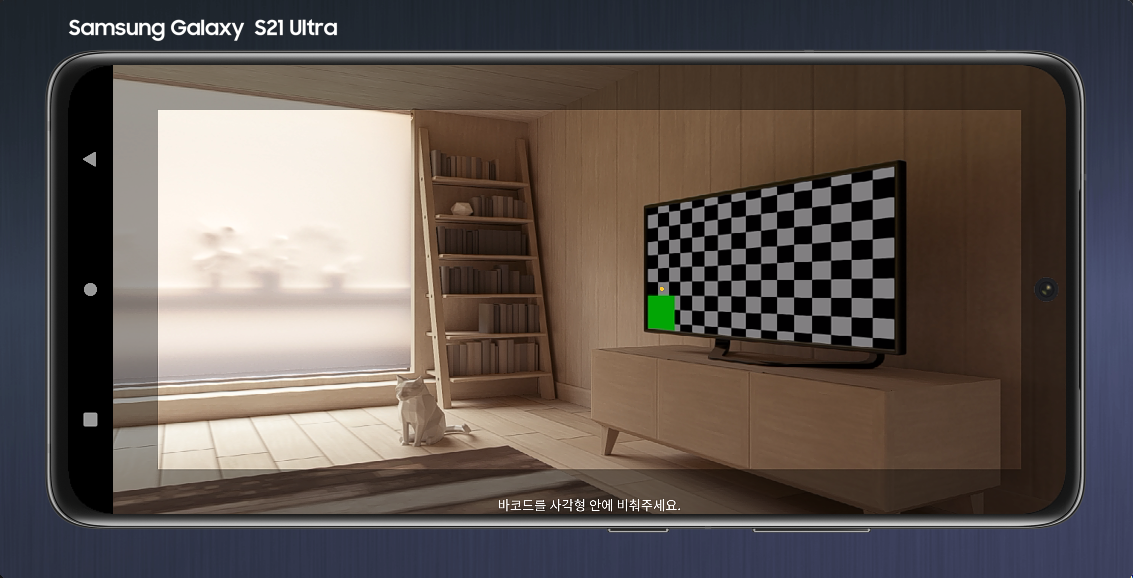
Orientation Lock을 해제하게 되면 android:screenOrientation = "fullSensor" 로 매니페스트에 지정하였기 때문에
가로, 세로 360도 방향으로 디스플레이가 회전이 가능하게 된다.


지금까지 Changing the Orientation 방법에 대해서 알아보았다.
📌 QR 코드 스캔 화면 Customizing
기존 스캔 화면
기존 스캔 화면이다.
Customizing ? 🤔
이러한 스캔 화면의 레이아웃을 사용자 정의에 따라 Customizing 하려면 어떻게 해야할까 ?
또는 스캐너에 대한 설정 값은 어떤 것들이 있을까 ?
먼저 Custom Scanner를 실행할 Activity인 CustomBarcodeScannerActivity 와 그 레이아웃인 activity_custom_barcode_scanner.xml 을 만들어주자.
activity_custom_barcode_scanner.xml
<?xml version="1.0" encoding="utf-8"?>
<LinearLayout
    xmlns:android="http://schemas.android.com/apk/res/android"
    xmlns:app="http://schemas.android.com/apk/res-auto"
    xmlns:tools="http://schemas.android.com/tools"
    android:layout_width="match_parent"
    android:layout_height="match_parent"
    android:orientation="vertical"
    tools:context=".CustomBarcodeScannerActivity">

    <Button
        android:layout_margin="10dp"
        android:layout_gravity="left"
        android:id="@+id/btnFlash"
        android:text="Flash ON"
        android:layout_width="wrap_content"
        android:layout_height="wrap_content"/>

    <TextView
        android:layout_marginTop="100dp"
        android:layout_gravity="center"
        android:padding="10dp"
        android:textColor="@color/black"
        android:textAlignment="center"
        android:text="QR 코드를 스캔하여 주세요."
        android:layout_width="wrap_content"
        android:layout_height="wrap_content" />

    <com.journeyapps.barcodescanner.DecoratedBarcodeView
        android:layout_gravity="center"
        android:id="@+id/decoratedBarcodeView"
        android:layout_margin="10dp"
        android:layout_width="match_parent"
        android:layout_height="400dp"
        app:zxing_scanner_layout = "@layout/custom_barcode_scanner"
        />

</LinearLayout>
레이아웃은 다음과 같이 구성하였다. Zxing의 Embedded(내장된) 라이브러리 중 DecoratedBarcodeView 커스텀 뷰를 사용한다.
DecoratedBarcodeView의 내부 디자인인 서브 뷰 디자인은app:zxing_scanner_layout = "서브 뷰 레이아웃 파일 위치"설정 값으로 지정해주어야 한다.
ex)app:zxing_scanner_layout = "@layout/custom_barcode_scanner"
커스텀 스캐너 레이아웃 파일은 layout 폴더에 custom_barcode_scanner.xml로 추가적으로 만들었다.
custom_barcode_scanner.xml
<?xml version="1.0" encoding="utf-8"?>
<merge xmlns:android="http://schemas.android.com/apk/res/android"
    xmlns:tools="http://schemas.android.com/tools"
    xmlns:app="http://schemas.android.com/apk/res-auto">

    <com.journeyapps.barcodescanner.BarcodeView
        android:layout_width="match_parent"
        android:layout_height="match_parent"
        android:id="@+id/zxing_barcode_surface"
        app:zxing_framing_rect_width="300dp"
        app:zxing_framing_rect_height="300dp"
        app:zxing_preview_scaling_strategy="fitCenter" />

    <com.journeyapps.barcodescanner.ViewfinderView
        android:layout_width="match_parent"
        android:layout_height="match_parent"
        android:id="@+id/zxing_viewfinder_view"
        app:zxing_possible_result_points="@color/zxing_custom_possible_result_points"
        app:zxing_result_view="@android:color/holo_orange_light"
        app:zxing_viewfinder_laser="@color/zxing_custom_viewfinder_laser"
        app:zxing_viewfinder_laser_visibility="true"
        app:zxing_viewfinder_mask="@color/zxing_custom_viewfinder_mask"/>

    <!-- mask 영역에 적혀있는 스캔 안내 문구 영역 -->
    <TextView
        android:id="@+id/zxing_status_view"
        android:layout_width="wrap_content"
        android:layout_height="wrap_content"
        android:layout_gravity="bottom|center_horizontal"
        android:background="@color/zxing_transparent"
        android:padding="10dp"
        android:text="@string/zxing_msg_default_status"
        android:textColor="@color/zxing_status_text"/>

</merge>
BarcodeView 설정 값 알아보기
framing_rect_width: 바코드 뷰 중 SCAN하는 영역의 너비framing_rect_height: 바코드 뷰 중 SCAN하는 영역의 높이
다음 값들이 클 수록, 사용자들이 바코드를 스캔하기 편하다.
ViewfinderView 설정 값 알아보기
zxing_viewfinder_laser: SCAN하는 영역 가운데 바코드를 식별하는 레이저(라인)의 색zxing_viewfinder_laser_visibility: SCAN 창의 가운데 바코드를 식별하는 레이저(라인)의 시각 여부zxing_viewfinder_mask: SCAN하는 영역을 제외한 mask 영역 배경 색
activity_scan_qr.xml
ScanQRActivity(QR 인식 화면)에서 Custom SCAN Button을 만들어주자.
activity_scan_qr.xml에 다음과 같이 버튼을 추가해주었다.
<?xml version="1.0" encoding="utf-8"?>
<androidx.constraintlayout.widget.ConstraintLayout
    xmlns:android="http://schemas.android.com/apk/res/android"
    xmlns:app="http://schemas.android.com/apk/res-auto"
    xmlns:tools="http://schemas.android.com/tools"
    android:layout_width="match_parent"
    android:layout_height="match_parent"
    tools:context=".ScanQRActivity">

    <Button
        android:id="@+id/btnScan"
        android:layout_width="200dp"
        android:layout_height="wrap_content"
        android:layout_marginTop="250dp"
        android:text="SCAN"
        app:layout_constraintLeft_toLeftOf="parent"
        app:layout_constraintRight_toRightOf="parent"
        app:layout_constraintTop_toTopOf="parent" />

    <Button
        android:id="@+id/btnCustomScan"
        android:layout_width="200dp"
        android:layout_height="wrap_content"
        android:layout_marginTop="10dp"
        android:text="Custom SCAN"
        app:layout_constraintLeft_toLeftOf="parent"
        app:layout_constraintRight_toRightOf="parent"
        app:layout_constraintTop_toBottomOf="@+id/btnScan" />

    <TextView
        android:id="@+id/txtResult"
        android:layout_width="match_parent"
        android:layout_height="wrap_content"
        android:layout_margin="10dp"
        android:background="#eaeaea"
        android:padding="10dp"
        android:text="결과 텍스트"
        android:textAlignment="center"
        android:textColor="@color/black"
        android:textSize="15sp"
        app:layout_constraintTop_toBottomOf="@+id/btnCustomScan"/>

</androidx.constraintlayout.widget.ConstraintLayout>
ScanQRActivity(QR 인식 화면)에서 Custom SCAN Button을 눌렀을 때,
ScanOptions + captureActivity(CustomScannerActivity) 절차로 진행해야 한다.
따라서 ScanQRActivity에서 Custom SCAN BUTTONOnClicked 이벤트에 다음과 같이 작성해 주면 된다.
// ScanOptions + captureActivity(CustomScannerActivity)
val options = ScanOptions()
options.setOrientationLocked(false)
// options.setCameraId(1)            // 0 : 후면(default), 1 : 전면,
options.setBeepEnabled(true)
// options.setTorchEnabled(true)      // true : 실행되자마자 플래시가 켜진다.
options.setPrompt("커스텀 QR 스캐너 창")
options.setDesiredBarcodeFormats( ScanOptions.QR_CODE )
options.captureActivity = CustomBarcodeScannerActivity::class.java
barcodeLauncher.launch(options)setOrientationLocked,setCameraId,setBeepEnabled,setTorchEnabled,setPrompt,setDesiredBarcodeFormats 는 생략해주어도 문제가 발생하지는 않는다.
이들은 Advance Options 를 지정할 때 사용되고 아래에서 자세하게 설명하도록 하겠다.
ScanQRActivity
class ScanQRActivity : AppCompatActivity() {

    private lateinit var txtResult : TextView

    // 스캐너 설정
    private val barcodeLauncher = registerForActivityResult(
        ScanContract()
    ) { result: ScanIntentResult ->
        // result : 스캔된 결과

        // 내용이 없다면
        if (result.contents == null) {
            Toast.makeText(this, "Cancelled", Toast.LENGTH_LONG).show()
        }
        else { // 내용이 있다면

            // 1. Toast 메시지 출력.
            Toast.makeText(
                this,
                "Scanned: " + result.contents,
                Toast.LENGTH_LONG
            ).show()

            // 2. 결과 값 TextView에 출력.
            txtResult.text = result.contents.toString()
        }
    }

    // SCAN - onClick
    private fun onScanButtonClicked() {
        // Launch ( SCAN 실행 )
        // barcodeLauncher.launch(ScanOptions())    // Orientation Lock 을 해제하지 않은 상태로 실행. (default : 세로)

        // Changing the Orientation
        val options = ScanOptions()
        options.setOrientationLocked(false)     // ScanOption 의 Orientation Lock 을 해제하기.
        barcodeLauncher.launch(options)         // Orientation Lock 을 해제한 상태로 실행. ( 세로, 가로 스캔 화면 모두 가능. )
    }

    // 커스텀 스캐너 실행하기
    // Custom SCAN - onClick
    private fun onCustomScanButtonClicked() {
        // Custom Scan Layout -> Activity

        // Intent ? -> 맞는 방법일까 ?
        // val intent = Intent( this, CustomBarcodeScannerActivity::class.java)
        // startActivity(intent)

        // ScanOptions + captureActivity(CustomScannerActivity)
        val options = ScanOptions()
        options.setOrientationLocked(false)
        // options.setCameraId(1)          // 0 : 후면(default), 1 : 전면,
        options.setBeepEnabled(true)
        // options.setTorchEnabled(true)      // true : 실행되자마자 플래시가 켜진다.
        options.setPrompt("커스텀 QR 스캐너 창")
        options.setDesiredBarcodeFormats( ScanOptions.QR_CODE )
        options.captureActivity = CustomBarcodeScannerActivity::class.java

        barcodeLauncher.launch(options)
    }

    override fun onCreate(savedInstanceState: Bundle?) {
        super.onCreate(savedInstanceState)
        setContentView(R.layout.activity_scan_qr)

        val btnScan : Button = findViewById(R.id.btnScan)
        txtResult = findViewById(R.id.txtResult)

        // 가로 SCAN 버튼 클릭
        btnScan.setOnClickListener {
            onScanButtonClicked()
        }

        val btnCustomScan : Button = findViewById(R.id.btnCustomScan)
        // Custom Scan 버튼 클릭
        btnCustomScan.setOnClickListener {
            onCustomScanButtonClicked()
        }

    }
}
CustomBarcodeScannerActivity
package com.example.qrcode_example

import androidx.appcompat.app.AppCompatActivity
import android.os.Bundle
import android.widget.Button
import com.journeyapps.barcodescanner.CaptureManager
import com.journeyapps.barcodescanner.DecoratedBarcodeView

class CustomBarcodeScannerActivity : AppCompatActivity() {

    private lateinit var captureManager: CaptureManager
    private lateinit var decoratedBarcodeView: DecoratedBarcodeView
    private lateinit var btnFlash : Button

    private var isFlash : Boolean = false   // 플래시가 켜져있는지 확인하기 위한 변수

    override fun onCreate(savedInstanceState: Bundle?) {
        super.onCreate(savedInstanceState)
        setContentView(R.layout.activity_custom_barcode_scanner)

        decoratedBarcodeView = findViewById(R.id.decoratedBarcodeView)  // 커스텀 바코드 뷰
        btnFlash = findViewById(R.id.btnFlash)          // 플래시 버튼

        captureManager = CaptureManager( this, decoratedBarcodeView)
        captureManager.initializeFromIntent( intent, savedInstanceState )
        captureManager.setShowMissingCameraPermissionDialog(true,"카메라 권한 요청")	// 권한요청 다이얼로그 보이게 할 지 말 지
        captureManager.decode()		// decoding 시작

        // 플래시 버튼 클릭 ?
        btnFlash.setOnClickListener {
            if( !isFlash ) {
                // 플래시가 현재 꺼져있을 때 버튼이 눌렸다면 플래시를 켠다.
                btnFlash.text = "Flash OFF"
                isFlash = true
                decoratedBarcodeView.setTorchOn()
            }
            else {
                // 플래시가 현재 켜져있을 때 버튼이 눌렸다면 플래시를 끈다.
                btnFlash.text = "Flash ON"
                isFlash = false
                decoratedBarcodeView.setTorchOff()
            }
        }
    }

    // LifeCycle 에 따라 CaptureManager 또한 처리해주어야 한다.

    override fun onResume() {
        super.onResume()
        captureManager.onResume()
    }

    override fun onPause() {
        super.onPause()
        captureManager.onPause()
    }

    override fun onDestroy() {
        super.onDestroy()
        captureManager.onDestroy()
    }

    // onSaveInstanceState ? 또한 처리해주어야 한다.
    override fun onSaveInstanceState(outState: Bundle) {
        super.onSaveInstanceState(outState)
        captureManager.onSaveInstanceState(outState)
    }

    // 카메라 권한을 요청할 수 있기 때문에
    override fun onRequestPermissionsResult(
        requestCode: Int,
        permissions: Array<out String>,
        grantResults: IntArray
    ) {
        super.onRequestPermissionsResult(requestCode, permissions, grantResults)
        captureManager.onRequestPermissionsResult(requestCode, permissions, grantResults)
    }
}
커스텀 바코드 뷰 실행 사진

위 레이아웃 코드의 디자인과 동일하게 커스텀 바코드 뷰가 성공적으로 구현되었음을 알 수 있다.
실행영상
Advanced Options ?
ScanOptions 클래스의 코드 중 일부이다.
public class ScanOptions {

    // ...

    /**
     * Set a prompt to display on the capture screen, instead of using the default.
     *
     * @param prompt the prompt to display
     */
    public final ScanOptions setPrompt(String prompt) {
        if (prompt != null) {
            addExtra(Intents.Scan.PROMPT_MESSAGE, prompt);
        }
        return this;
    }

    /**
     * By default, the orientation is locked. Set to false to not lock.
     *
     * @param locked true to lock orientation
     */
    public ScanOptions setOrientationLocked(boolean locked) {
        addExtra(Intents.Scan.ORIENTATION_LOCKED, locked);
        return this;
    }

    /**
     * Use the specified camera ID.
     *
     * @param cameraId camera ID of the camera to use. A negative value means "no preference".
     * @return this
     */
    public ScanOptions setCameraId(int cameraId) {
        if (cameraId >= 0) {
            addExtra(Intents.Scan.CAMERA_ID, cameraId);
        }
        return this;
    }

    /**
     * Set to true to enable initial torch
     *
     * @param enabled true to enable initial torch
     * @return this
     */
    public ScanOptions setTorchEnabled(boolean enabled) {
        addExtra(Intents.Scan.TORCH_ENABLED, enabled);
        return this;
    }


    /**
     * Set to false to disable beep on scan.
     *
     * @param enabled false to disable beep
     * @return this
     */
    public ScanOptions setBeepEnabled(boolean enabled) {
        addExtra(Intents.Scan.BEEP_ENABLED, enabled);
        return this;
    }

    /**
     * Set to true to enable saving the barcode image and sending its path in the result Intent.
     *
     * @param enabled true to enable barcode image
     * @return this
     */
    public ScanOptions setBarcodeImageEnabled(boolean enabled) {
        addExtra(Intents.Scan.BARCODE_IMAGE_ENABLED, enabled);
        return this;
    }

    /**
     * Set the desired barcode formats to scan.
     *
     * @param desiredBarcodeFormats names of {@code BarcodeFormat}s to scan for
     * @return this
     */
    public ScanOptions setDesiredBarcodeFormats(Collection<String> desiredBarcodeFormats) {
        this.desiredBarcodeFormats = desiredBarcodeFormats;
        return this;
    }

    /**
     * Set the desired barcode formats to scan.
     *
     * @param desiredBarcodeFormats names of {@code BarcodeFormat}s to scan for
     * @return this
     */
    public ScanOptions setDesiredBarcodeFormats(String... desiredBarcodeFormats) {
        this.desiredBarcodeFormats = Arrays.asList(desiredBarcodeFormats);
        return this;
    }

    /**
     * Initiates a scan for all known barcode types with the default camera.
     * And starts a timer to finish on timeout
     *
     * @return Activity.RESULT_CANCELED and true on parameter TIMEOUT.
     */
    public ScanOptions setTimeout(long timeout) {
        addExtra(Intents.Scan.TIMEOUT, timeout);
        return this;
    }


}
BarcodeLauncher 에 ScanOption을 지정하여 실행하면 다음과 같은 Advanced Options를 지정할 수 있다.
지정해주지 않으면 default값으로 ScanOption이 지정된다.
Advanced Options...
-
setPrompt(String prompt)- 스캐너의하단 문구를 지정할 수 있다. -
setOrientationLocked(boolean locked)- 회전을 통해 스캐너의회전 방향 전환 잠금을 설정할 수 있다.default = false(Lock) -
setCameraId(int cameraId)- 값이0이면후면카메라,1이면전면카메라를 사용할 수 있도록 설정할 수 있다.default = 0(후면) -
setTorchEnabled(boolean enabled)- 초기에 스캐너가 실행될 때플래시가 켜진다.default = false(플래시가 꺼져있음) -
setBeepEnabled(boolean enabled)- 스캐너가바코드를 포착시,Beep소리가 나거나 안 나도록 설정할 수 있다. -
setDisiredBarcodeFormats(Collection<String> desiredBarcodeFormats)- 스캐너가Decode할 수 있는 특정Barcode Format을 지정한다. -
setTimeout(long timeout)- 지정한ms동안 스캐너가 작동 후,Cancel된다. -
ScanOptions().captureActivity = CustomCaptureActivity- 커스텀 스캐너를 지정할 때 사용한다.
실습
ScanQRActivity
package com.example.qrcode_example

import android.os.Bundle
import android.widget.Button
import android.widget.TextView
import android.widget.Toast
import androidx.appcompat.app.AppCompatActivity
import com.journeyapps.barcodescanner.ScanContract
import com.journeyapps.barcodescanner.ScanIntentResult
import com.journeyapps.barcodescanner.ScanOptions
import android.content.Intent
import android.graphics.Camera
import androidx.camera.core.CameraInfo
import com.google.zxing.client.android.Intents


class ScanQRActivity : AppCompatActivity() {

    private lateinit var txtResult : TextView

    // 스캐너 설정
    private val barcodeLauncher = registerForActivityResult(
        ScanContract()
    ) { result: ScanIntentResult ->
        // result : 스캔된 결과

        // 내용이 없다면
        if (result.contents == null) {
            Toast.makeText(this, "Cancelled", Toast.LENGTH_LONG).show()
        }
        else { // 내용이 있다면

            // 1. Toast 메시지 출력.
            Toast.makeText(
                this,
                "Scanned: " + result.contents,
                Toast.LENGTH_LONG
            ).show()

            // 2. 결과 값 TextView에 출력.
            txtResult.text = result.contents.toString()
        }
    }

    // SCAN - onClick
    private fun onScanButtonClicked() {
        // Launch ( SCAN 실행 )
        // barcodeLauncher.launch(ScanOptions())    // Orientation Lock 을 해제하지 않은 상태로 실행. (default : 세로)

        // Changing the Orientation
        val options = ScanOptions()
        options.setOrientationLocked(false)     // ScanOption 의 Orientation Lock 을 해제하기.
        barcodeLauncher.launch(options)         // Orientation Lock 을 해제한 상태로 실행. ( 세로, 가로 스캔 화면 모두 가능. )
    }

    // 커스텀 스캐너 실행하기
    // Custom SCAN - onClick
    private fun onCustomScanButtonClicked() {

        // Advanced Option Scans Test...
        // scanBarcodeInverted()		 // The scan should be inverted. White becomes black, black becomes white.
        // scanMixedBarcodes()			// Scan alternating inverted and normal barcodes.
        // scanPDF417()					// PDF417 타입의 바코드를 SCAN
        // scanBarcodeFrontCamera()		// 전면 카메라를 사용한 SCAN
        // scanWithTimeout()

    }

    override fun onCreate(savedInstanceState: Bundle?) {
        super.onCreate(savedInstanceState)
        setContentView(R.layout.activity_scan_qr)

        val btnScan : Button = findViewById(R.id.btnScan)
        txtResult = findViewById(R.id.txtResult)

        // 가로 SCAN 버튼 클릭
        btnScan.setOnClickListener {
            onScanButtonClicked()
        }

        val btnCustomScan : Button = findViewById(R.id.btnCustomScan)
        // Custom Scan 버튼 클릭
        btnCustomScan.setOnClickListener {
            onCustomScanButtonClicked()
        }

    }

    // The scan should be inverted. White becomes black, black becomes white.
    fun scanBarcodeInverted() {
        val options = ScanOptions()
        options.addExtra(Intents.Scan.SCAN_TYPE, Intents.Scan.INVERTED_SCAN)
        barcodeLauncher.launch(options)
    }

    // Scan alternating inverted and normal barcodes.
    fun scanMixedBarcodes() {
        val options = ScanOptions()
        options.addExtra(Intents.Scan.SCAN_TYPE, Intents.Scan.MIXED_SCAN)
        barcodeLauncher.launch(options)
    }

    // PDF417 타입의 바코드를 SCAN
    fun scanPDF417() {
        val options = ScanOptions()
        options.setDesiredBarcodeFormats(ScanOptions.PDF_417)
        options.setCameraId(0)
        options.setPrompt("Scan something")     // setPrompt - 하단 문구
        options.setOrientationLocked(false)     // setOrientationLocked - 가로, 세로 방향 전환
        options.setBeepEnabled(false)           // setBeepEnabled - 바코드 포착 시, Beep 소리 발생 여부 지정.
        barcodeLauncher.launch(options)
    }


    // 전면 카메라를 사용한 SCAN
    private fun scanBarcodeFrontCamera() {
        val options = ScanOptions()
        // options.setCameraId(android.hardware.Camera.CameraInfo.CAMERA_FACING_FRONT)  // Deprecated..
        options.setCameraId(1)		// 0 : 후면, 1 : 전면
        barcodeLauncher.launch(options)
    }


    // Timeout 을 지정하여 8000ms 후 종료되는 SCAN
    private fun scanWithTimeout() {
        val options = ScanOptions()
        options.setTimeout(8000)
        barcodeLauncher.launch(options)
    }
}
📌 참조