지난 글에서는 TensorFlow를 설치하고 MNIST 손글씨 숫자 분류 실습을 진행했다.
이번에는 TensorFlow Hub에서 제공하는 사전 학습된 모델을 이용해 Object Detection(객체 탐지)을 실습해 보았다.
1. Object Detection이란?
Object Detection은 이미지 안에 어떤 객체가 존재하는지 찾고, 동시에 객체의 위치와 종류를 탐지하는 기술이다.
예를 들어 식당 사진이 있다면,
- Table
- Chair
- Tree
- Flowerpot
등의 객체를 찾아내고 이미지에서 해당 객체가 어디에 있는지 Bounding Box로 표시한다.
단순한 이미지 분류가 "이 사진에는 의자가 있다." 라면, Object Detection은 "이 사진에서 의자가 이 위치에 있다." 까지 찾아내는 것이다.
2. 필요한 라이브러리 설치
먼저 TensorFlow Hub와 이미지 처리를 위한 라이브러리를 설치했다.
python -m pip install tensorflow-hub matplotlib pillow six설치 후 tensorflow_hub를 import하는 과정에서 다음과 같은 오류가 발생했다.
ModuleNotFoundError: No module named 'pkg_resources'확인해 보니 현재 설치된 setuptools 버전에서는 pkg_resources 관련 호환성 문제가 있었다.
따라서 setuptools를 81 미만 버전으로 설치했다.
python -m pip install "setuptools<81"3. 라이브러리 import
object_detection.py 파일을 생성하고 필요한 라이브러리를 불러왔다.
import tensorflow as tf
import tensorflow_hub as hub
import matplotlib.pyplot as plt
import numpy as np

from PIL import Image
from PIL import ImageColor
from PIL import ImageDraw
from PIL import ImageFont
from PIL import ImageOps

import time
GPU가 정상적으로 인식되는지도 확인했다.
print("TensorFlow:", tf.__version__)
print("GPU:", tf.config.list_physical_devices("GPU"))
4. TensorFlow Hub 모델 불러오기
이번에는 TensorFlow Hub에서 제공하는 Faster R-CNN 모델을 사용했다.
module_handle = (
    "https://tfhub.dev/google/"
    "faster_rcnn/openimages_v4/"
    "inception_resnet_v2/1"
)

detector = hub.load(module_handle).signatures["default"]
내가 사용한 모델은 Faster R-CNN + Inception ResNet V2모델이다.
Faster R-CNN은 이미지에서 객체의 위치를 찾고 객체의 종류를 분류하는 대표적인 Object Detection 모델이다.
5. 테스트 이미지 준비
객체 탐지에 사용할 식당 사진을 다운로드했다.
import urllib.request

url = "https://upload.wikimedia.org/wikipedia/commons/6/60/Naxos_Taverna.jpg"

urllib.request.urlretrieve(url, "test.jpg")
이미지를 불러와 크기도 확인했다.
image = np.array(Image.open("test.jpg"))

print(image.shape)
실행 결과:
(1024, 1536, 3)즉,
- 높이: 1024
- 너비: 1536
- 채널: 3(RGB)
인 이미지이다.
6. 이미지 전처리
TensorFlow 모델에 넣을 수 있도록 이미지를 Tensor로 변환했다.
converted_img = tf.image.convert_image_dtype(
    tf.convert_to_tensor(image),
    tf.float32
)[tf.newaxis, ...]tf.newaxis를 사용하여 Batch 차원을 추가했다.
결과적으로 모델에는 다음과 같은 형태의 데이터가 입력된다.
(1, 1024, 1536, 3)7. 객체 탐지 실행
이제 실제로 모델을 실행했다.
start_time = time.time()

result = detector(converted_img)

result = {
    key: value.numpy()
    for key, value in result.items()
}

print("객체 탐지 완료!")
print("추론 시간:", time.time() - start_time)
실행 결과 약 16초 정도가 걸렸다.
또한 실행 과정에서 다음과 같은 메시지를 확인할 수 있었다.
Loaded cuDNN version 92501이를 통해 TensorFlow가 GPU 환경에서 모델을 실행하고 있음을 확인할 수 있었다.
8. 탐지 결과 확인
모델의 결과에는 여러 정보가 포함되어 있다.
print(result.keys())실행 결과:
dict_keys([
    'detection_class_labels',
    'detection_class_names',
    'detection_scores',
    'detection_boxes',
    'detection_class_entities'
])
이번 실습에서는 주로 다음 세 가지를 사용했다.
| 값 | 의미 |
|---|---|
| detection_scores | 객체일 확률 |
| detection_boxes | 객체의 Bounding Box 위치 |
| detection_class_entities | 객체의 종류 |
9. 탐지된 객체 출력
확률이 30% 이상인 객체만 출력하도록 했다.
scores = result["detection_scores"]
boxes = result["detection_boxes"]
classes = result["detection_class_entities"]

print("\n===== 탐지 결과 =====")

for i in range(len(scores)):
    if scores[i] >= 0.3:
        class_name = classes[i]

        if isinstance(class_name, bytes):
            class_name = class_name.decode("utf-8")

        print(
            f"{i + 1}. {class_name} "
            f"(확률: {scores[i] * 100:.2f}%)"
        )
실제 실행 결과에서는 다음과 같이 탐지되었다.
1. Table (확률: 81.79%)
2. Chair (확률: 80.36%)
3. Chair (확률: 73.66%)
4. Table (확률: 71.69%)
5. Chair (확률: 68.99%)
6. Table (확률: 62.89%)
7. Chair (확률: 62.65%)
8. Tree (확률: 59.38%)
9. Flowerpot (확률: 51.24%)
10. Table (확률: 49.93%)
...
10. Bounding Box 그리기
탐지된 객체의 위치를 이미지에 표시했다.
result_image = Image.fromarray(image.copy())
draw = ImageDraw.Draw(result_image)

height, width = image.shape[:2]

for i in range(len(scores)):
    if scores[i] < 0.3:
        continue

    ymin, xmin, ymax, xmax = boxes[i]

    left = int(xmin * width)
    top = int(ymin * height)
    right = int(xmax * width)
    bottom = int(ymax * height)

    class_name = classes[i]

    if isinstance(class_name, bytes):
        class_name = class_name.decode("utf-8")

    label = f"{class_name}: {scores[i] * 100:.1f}%"

    draw.rectangle(
        [left, top, right, bottom],
        outline="red",
        width=3
    )

    draw.text(
        (left, max(0, top - 20)),
        label,
        fill="red"
    )

result_image.save("result.jpg")
실행하면 원본 이미지에 Bounding Box가 표시된 result.jpg가 생성된다.
11. NMS 적용
Object Detection 모델은 하나의 객체에 대해 여러 개의 Bounding Box를 예측하는 경우가 있다.
예를 들어 하나의 의자를 대상으로 서로 조금 다른 위치에 여러 개의 박스가 생성될 수 있다.
이때 사용하는 것이 NMS(Non-Maximum Suppression) 이다.
NMS는 서로 많이 겹치는 Bounding Box 중에서 높은 확률을 가진 박스를 남기고 나머지를 제거하는 방법이다.
selected_indices = tf.image.non_max_suppression(
    boxes,
    scores,
    max_output_size=20,
    iou_threshold=0.5,
    score_threshold=0.3
)

selected_indices = selected_indices.numpy()
여기서
iou_threshold=0.5로 설정했다.
그리고 NMS 결과를 출력했다.
print("\n===== NMS 적용 결과 =====")

for i in selected_indices:
    class_name = classes[i]

    if isinstance(class_name, bytes):
        class_name = class_name.decode("utf-8")

    print(
        f"{class_name} "
        f"(확률: {scores[i] * 100:.2f}%)"
    )
12. NMS 결과 이미지 생성
NMS를 통과한 객체만 Bounding Box로 표시했다.
result_image = Image.fromarray(image.copy())
draw = ImageDraw.Draw(result_image)

height, width = image.shape[:2]

for i in selected_indices:
    ymin, xmin, ymax, xmax = boxes[i]

    left = int(xmin * width)
    top = int(ymin * height)
    right = int(xmax * width)
    bottom = int(ymax * height)

    class_name = classes[i]

    if isinstance(class_name, bytes):
        class_name = class_name.decode("utf-8")

    label = f"{class_name}: {scores[i] * 100:.1f}%"

    draw.rectangle(
        [left, top, right, bottom],
        outline="red",
        width=3
    )

    draw.text(
        (left, max(0, top - 20)),
        label,
        fill="red"
    )

result_image.save("result_nms.jpg")

print("NMS 결과 이미지 저장 완료: result_nms.jpg")
실행 후 result_nms.jpg를 확인했다.
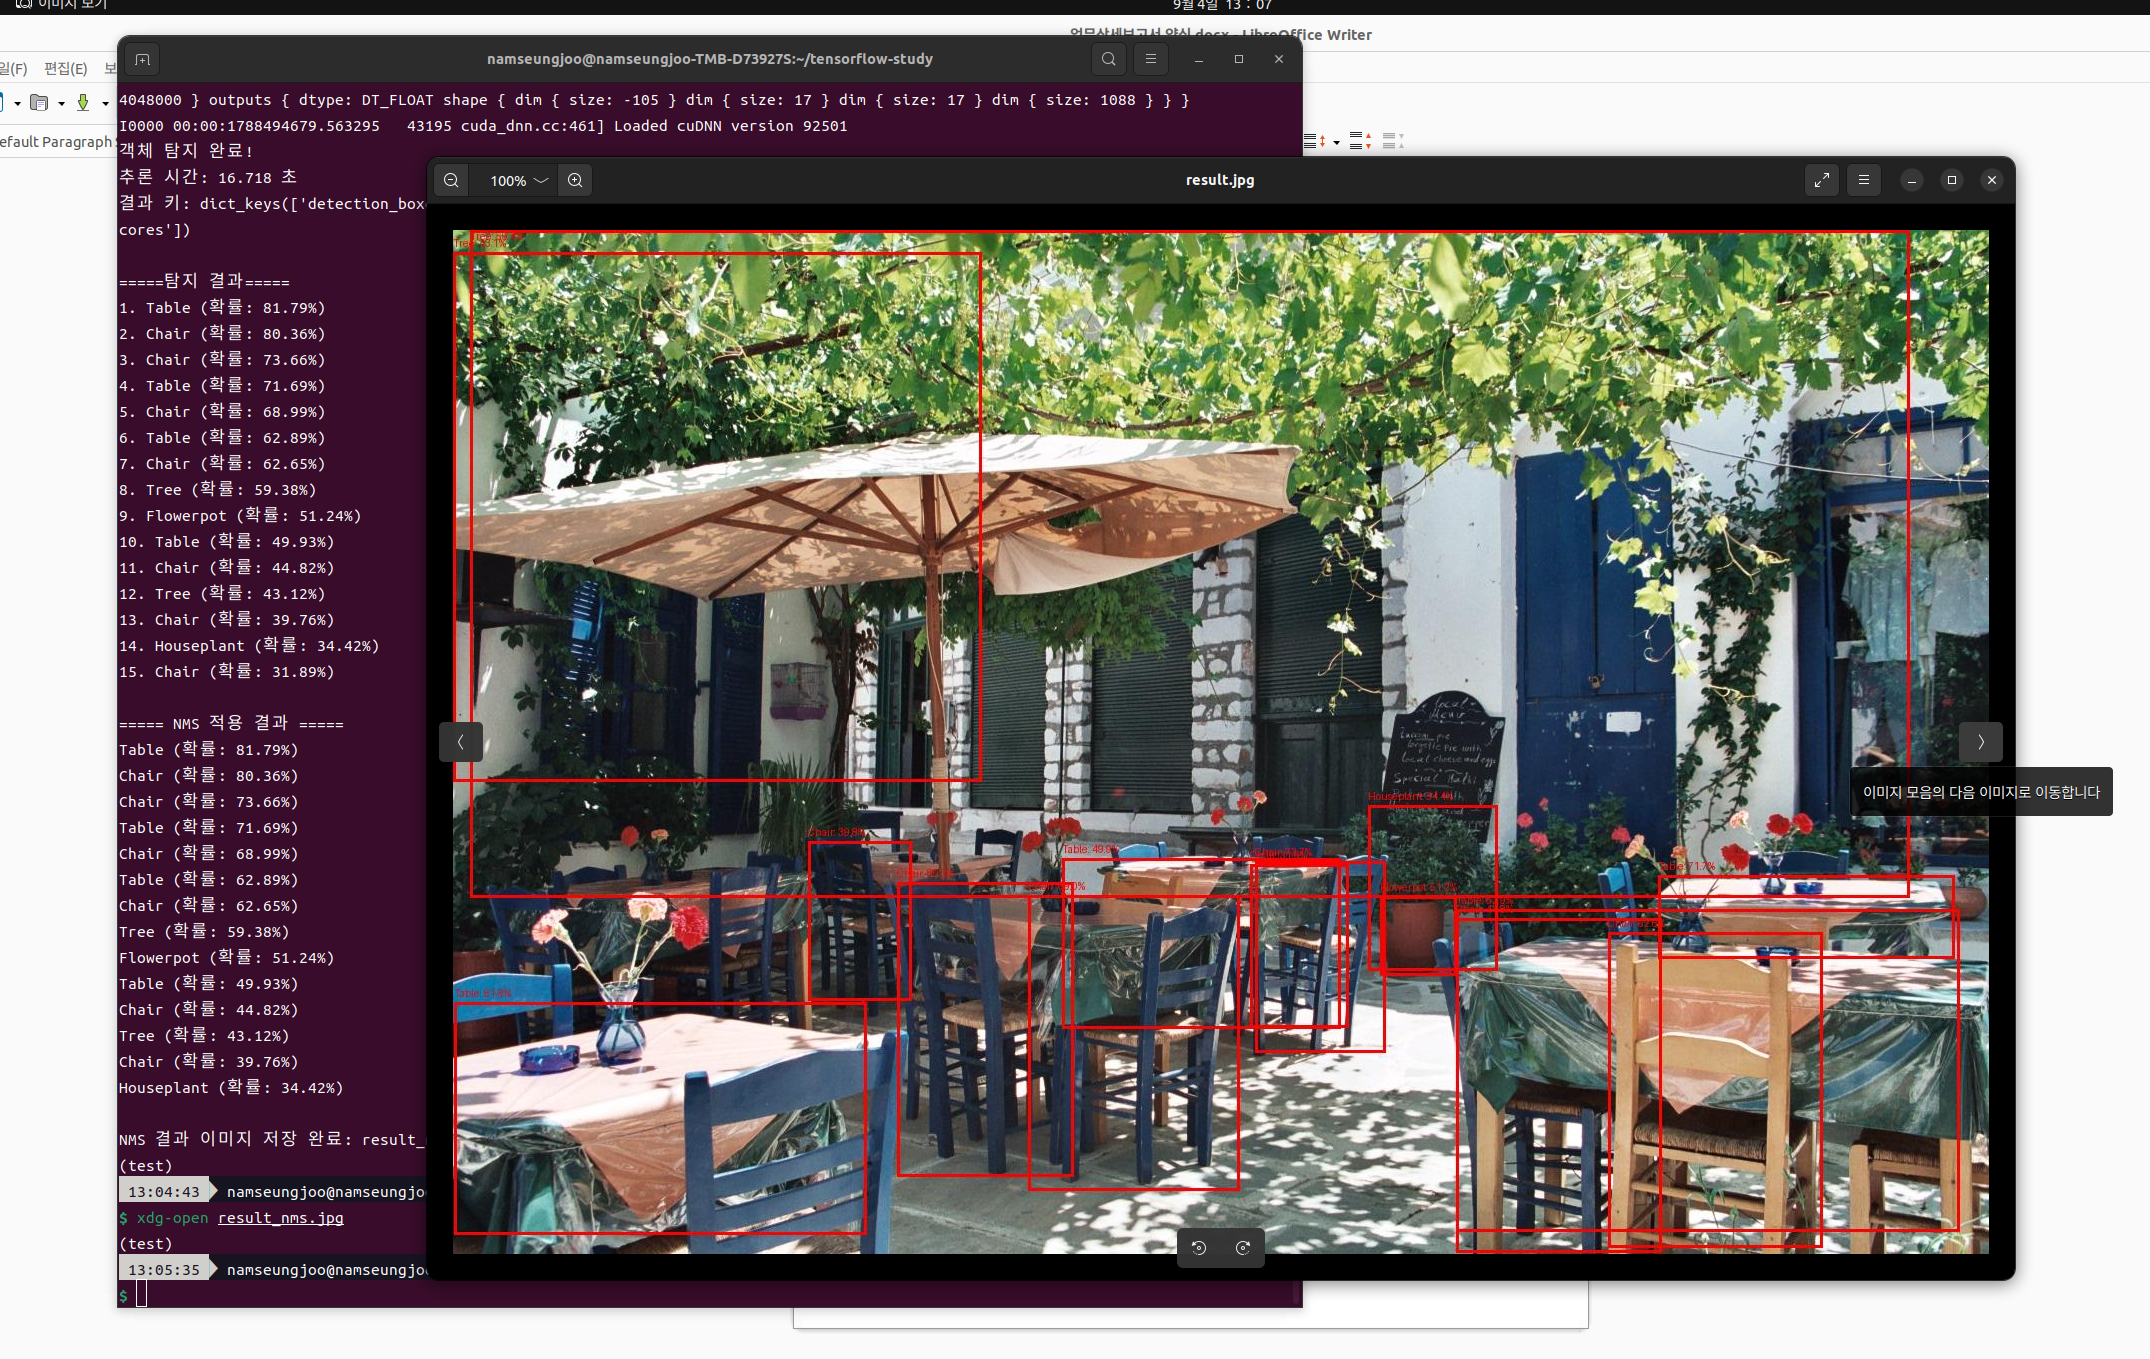
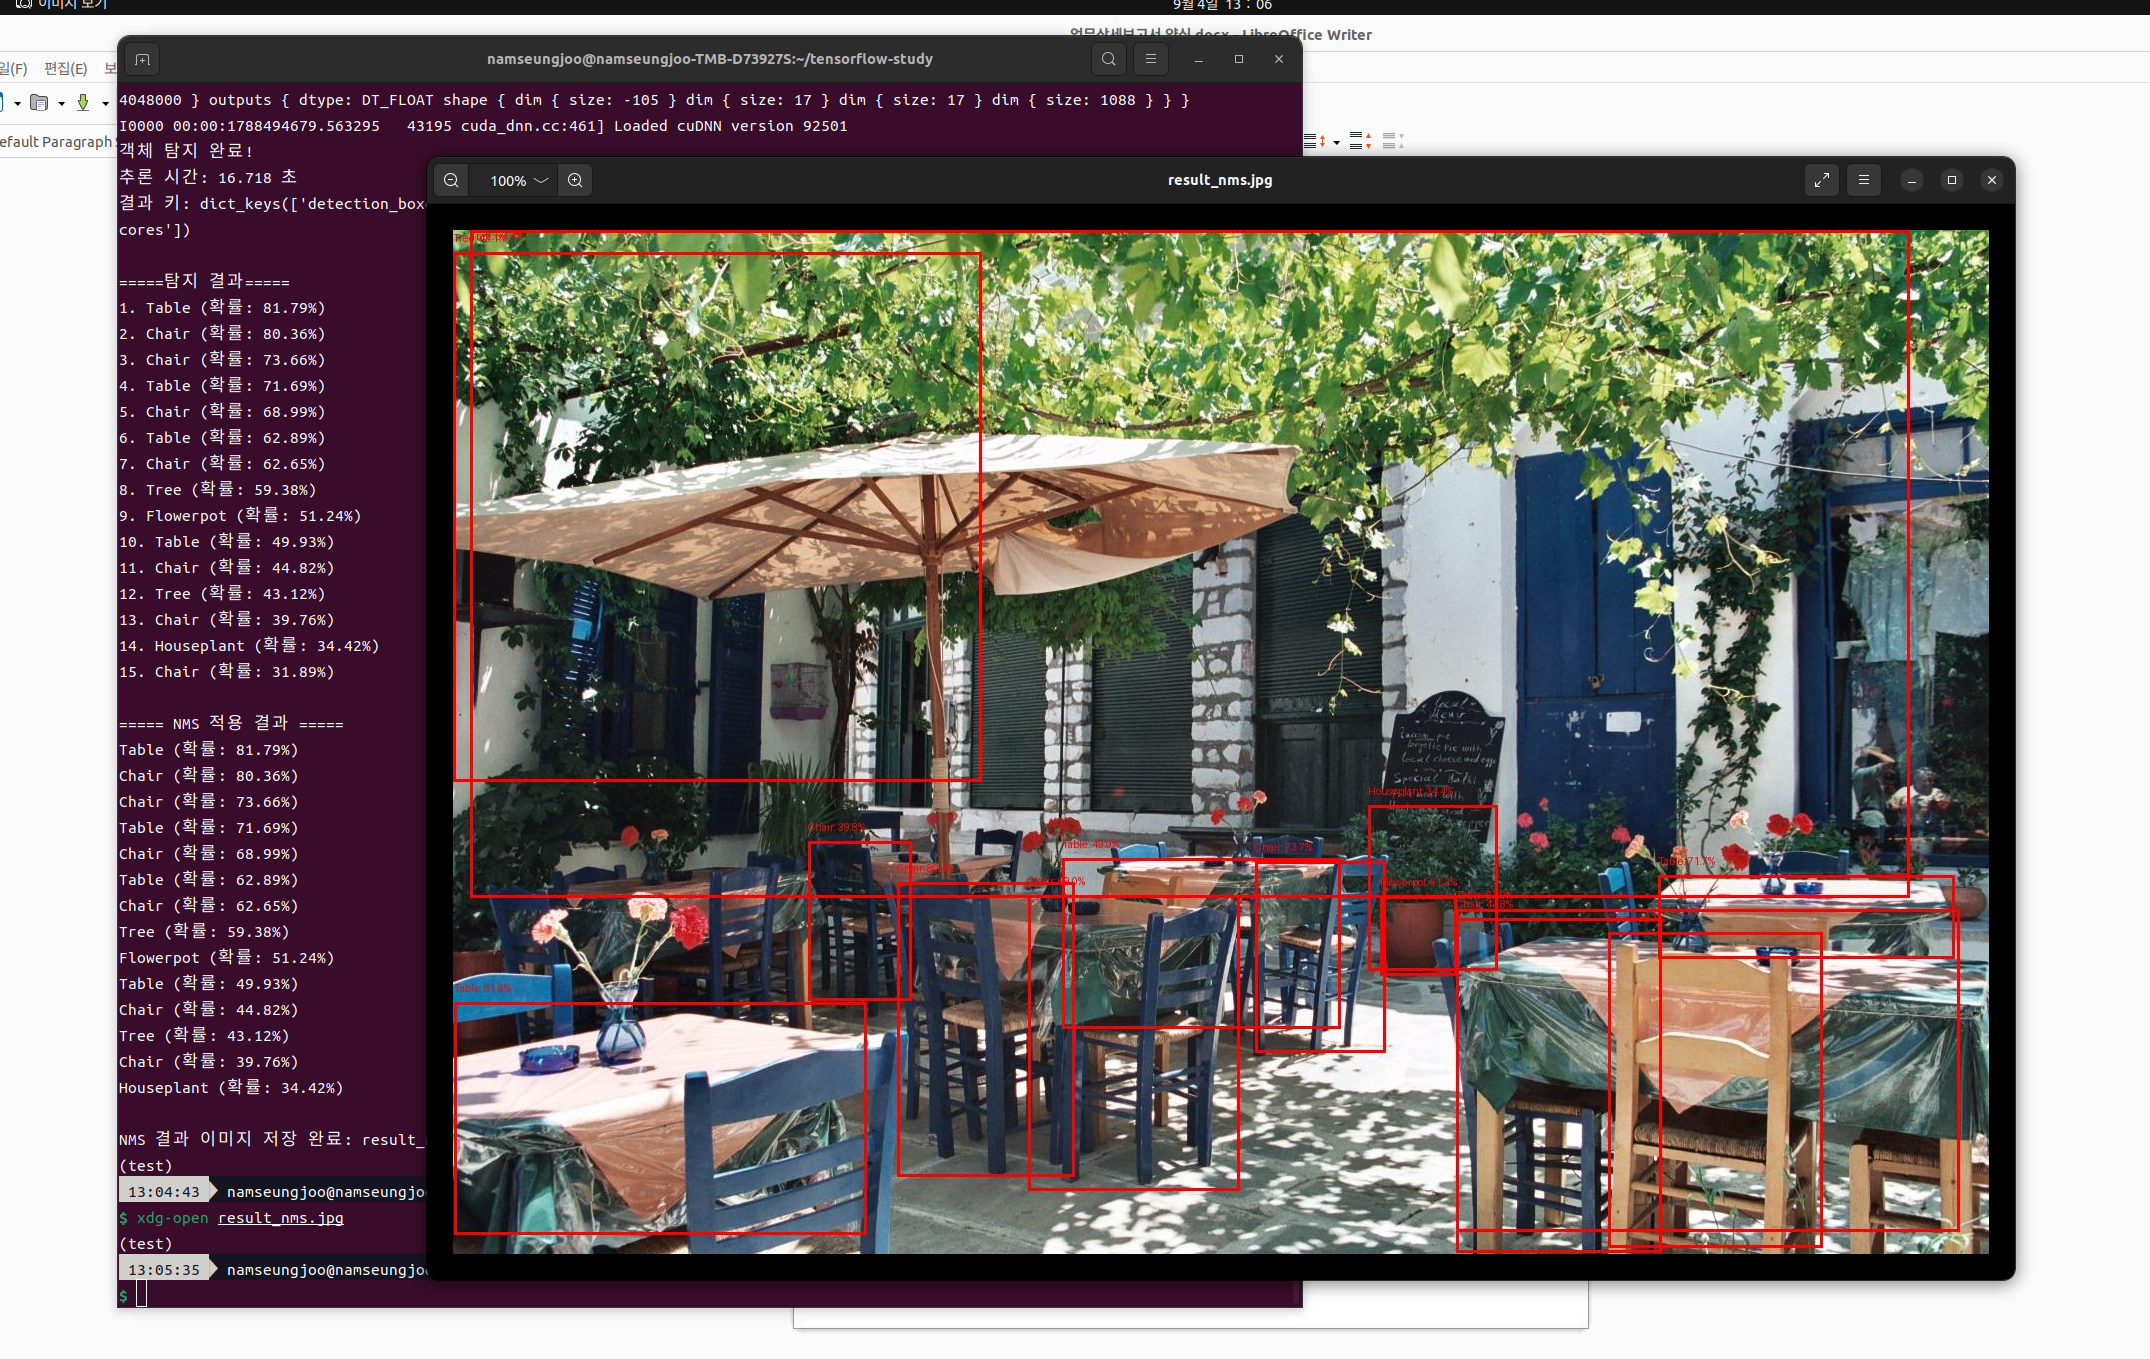
실제 결과 이미지에서도 식당 내부의 의자, 테이블, 나무, 화분 등의 객체가 Bounding Box로 표시되는 것을 확인할 수 있었다.
13. 최종 결과
이번 실습을 통해 TensorFlow Hub에서 제공하는 사전 학습 모델을 이용하여 실제 이미지에서 객체를 탐지해 보았다.
전체 과정은 다음과 같다.
이미지 준비
    ↓
이미지 전처리
    ↓
TensorFlow Hub 모델 로드
    ↓
Faster R-CNN 추론
    ↓
객체 종류 및 확률 확인
    ↓
Bounding Box 생성
    ↓
NMS 적용
    ↓
최종 결과 이미지 저장
특히 기존 MNIST 실습과 달리 이번에는 이미지 전체가 무엇인지 분류하는 것이 아니라 이미지 안에 있는 여러 객체를 각각 찾아내는 과정을 직접 확인할 수 있었다.
또한 RTX 4070 GPU와 TensorFlow 환경이 정상적으로 구성되어 있어 Object Detection 모델의 추론까지 GPU에서 실행되는 것을 확인했다.
