
프로젝트 큰 주제가 AR을 이용한 동물 챗봇이어서 이게 가능하긴 한지 시험을 해보기로 했습니다.
크게 AR 동물 오브젝트 파트와 챗봇 파트로 나누었고 AR쪽도 동물의 움직임을 영상에서 캡쳐해서 적용시키기로 해서 영상에서 움직임을 캡쳐하는 파트와 이 정보를 개발툴로 사용할 Unity로 옮기는 파트로 나누었습니다.
저는 계획대로 모션캡쳐의 결과로 나온 json파일을 3d 오브젝트에 애니메이션으로 적용하려고 합니다.
아무래도 아직 배울게 많아서 이거 아닌데...싶을 부분이 많을 수 있습니다...
하지만 사람은 발전하니깐요!!!
JSON 데이터 분석하기
최종적으로는 동물을 구현할 것이지만 지금은 사람으로 먼저 구현해보려고 합니다!
왜 사람이냐면
- 참고할 수 있는 자료가 많음
- 유니티에서 휴머노이드 애니메이션을 따로 제공(?)
정도가 이유 입니다.
그리고 실제로 추출해낸 데이터를 이용한다면 정말 정말 좋겠지만 여러가지 이유로 인터넷에 공개되어있는 데이터를 이용하게 되었습니다. 사용할 데이터는 AI Hub에서 제공 중인 사람 동작 영상(https://aihub.or.kr/aidata/138)의 샘플 데이터입니다.
그 중 3D JSON 파일인 28-8-Camera 1 (#805316617).json 을 이용하였습니다.
어쩌면 소소한 팁💪
이 파일 처음에 열면

이렇게 무자비하게 한 줄로 나와서 많이 당황스러울 수 있지만 "image" 앞에 엔터 쳐주면
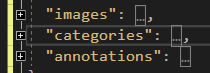
 여전히 무자비하지만 그래도 가독성 있는 파일이 됩니다
해당 파일은 아래와 같이 images, categories, annotations 세 가지로 나누어져 있는데 우리가 집중해서 봐야할 부분은 categories와 annotations입니다.
categories
{
      "supercategory": "person",
      "id": 1,
      "name": "person",
      "keypoints": [ [ "right_ankle_x", "right_ankle_y", "right_ankle_z", "right_ankle_roll", "right_ankle_pitch", "right_ankle_yaw", "right_knee_x", "right_knee_y", "right_knee_z", "right_knee_roll", "right_knee_pitch", "right_knee_yaw", "right_hip_x", "right_hip_y", "right_hip_z", "right_hip_roll", "right_hip_pitch", "right_hip_yaw", "left_hip_x", "left_hip_y", "left_hip_z", "left_hip_roll", "left_hip_pitch", "left_hip_yaw", "left_knee_x", "left_knee_y", "left_knee_z", "left_knee_roll", "left_knee_pitch", "left_knee_yaw", "left_ankle_x", "left_ankle_y", "left_ankle_z", "left_ankle_roll", "left_ankle_pitch", "left_ankle_yaw", "pelvis_x", "pelvis_y", "pelvis_z", "pelvis_roll", "pelvis_pitch", "pelvis_yaw", "throax_x", "throax_y", "throax_z", "throax_roll", "throax_pitch", "throax_yaw", "neck_x", "neck_y", "neck_z", "neck_roll", "neck_pitch", "neck_yaw", "head_top_x", "head_top_y", "head_top_z", "head_top_roll", "head_top_pitch", "head_top_yaw", "right_wrist_x", "right_wrist_y", "right_wrist_z", "right_wrist_roll", "right_wrist_pitch", "right_wrist_yaw", "right_elbow_x", "right_elbow_y", "right_elbow_z", "right_elbow_roll", "right_elbow_pitch", "right_elbow_yaw", "right_shoulder_x", "right_shoulder_y", "right_shoulder_z", "right_shoulder_roll", "right_shoulder_pitch", "right_shoulder_yaw", "left_shoulder_x", "left_shoulder_y", "left_shoulder_z", "left_shoulder_roll", "left_shoulder_pitch", "left_shoulder_yaw", "left_elbow_x", "left_elbow_y", "left_elbow_z", "left_elbow_roll", "left_elbow_pitch", "left_elbow_yaw", "left_wrist_x", "left_wrist_y", "left_wrist_z", "left_wrist_roll", "left_wrist_pitch", "left_wrist_yaw" ] ]
}
여기선 keypoints가 중요하다고 할 수 있는데 이후 annotations에서 나올 keypoints들의 이름, 그니까 그 숫자가 의미하는 바를 여기서 확인할 수 있습니다.
16개의 키포인트에 대한 관절 위치는 AI Hub 페이지 데이터 구조에서 확인할 수 있으며 아래와 같습니다
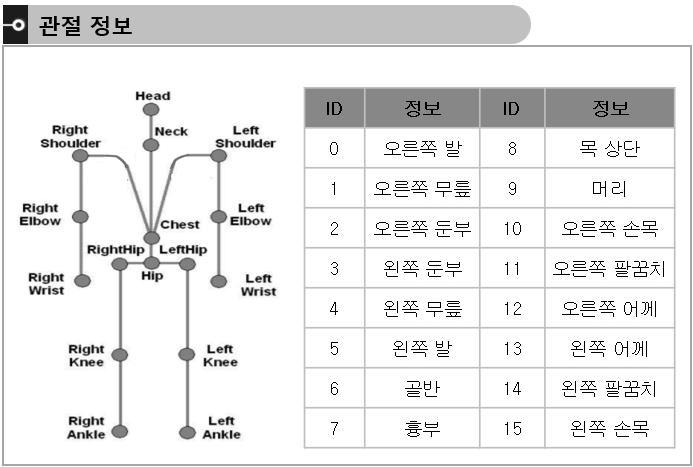
각 관절이 x, y, z, roll(x축 기준 회전), pitch(y축 기준 회전), yaw(z축 기준 회전)값으로 나타나있습니다.
annotations
{
      "img_no": 1391161,
      "person_no": 1,
      "bbox": [ 818.0, 83.0, 1091.0, 774.0 ],
      "keypoints": [ 13.1368, 10.6421, -20.1248, 1.21329, 2.38491, 287.886, 8.53756, 49.7565, -12.7975, 353.733, 10.8046, 297.523, 16.2474, 89.7017, -12.7214, 354.812, 350.372, 297.932, 26.4531, 91.0871, 3.34163, 9.77641, 343.036, 303.589, 20.5305, 52.7399, 15.5676, 12.194, 11.6039, 321.186, 32.0602, 14.3843, 14.7344, 352.634, 13.9739, 311.72, 21.3503, 90.3944, -4.68989, 4.22992, 10.1377, 303.176, 16.6906, 117.394, -5.1048, 8.17853, 22.0415, 305.918, 8.42779, 137.122, -2.89656, 8.80917, 33.5552, 302.338, -0.951876, 148.245, 0.361365, 6.23652, 50.563, 299.047, -10.7839, 77.3379, -26.6089, 79.1431, 351.428, 315.545, -1.99071, 103.634, -24.9799, 72.5517, 352.937, 328.14, 1.01521, 131.985, -17.2493, 78.5132, 11.6541, 336.077, 18.0714, 136.32, 10.9165, 291.342, 19.4485, 267.549, 26.7641, 110.377, 22.0489, 292.78, 350.174, 275.026, 23.3531, 85.1435, 33.1447, 287.622, 345.182, 293.043 ],
      "num_keypoint": 16
}
첫 번째 값만 가져와봤습니다.
이 중 keypoints는 이 프레임에서 위 categories에서 말하는 키포인트의 값이라고 할 수 있습니다. 관절의 위치가 될 소중한 값입니다.
다른 값들은 우선 크게 중요하지 않아보여서 그냥 넘어가겠습니다.
Unity 준비하기
당연한 거겠지만 Unity Hub(다운로드)를 먼저 설치해줍시다.
설치가 끝나면 새 프로젝트 버튼을 눌러서 프로젝트를 생성해줍시다.

일단은 애니메이션 구현이 우선이지만 최종적으로 AR개발을 목표로 하고있기 때문에 저는 언젠가 사용할 AR foundation을 위해(2019.4.3f1 이상이어야 사용가능!) 2020.3.23f1 버전으로 3D프로젝트 생성했습니다.
버전을 잘못 설치한 것 같아도 아래 사진에서 노란 줄로 되어있는 부분을 누르면 버전을 변경할 수 있습니다!

이후 실행하면 휑~한 화면이 나오게 됩니다.
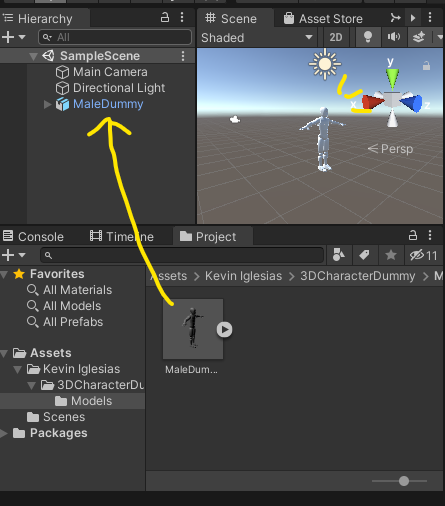
애니메이션을 적용시킬 3D사람모델을 추가해주어야 하는데요, 저는 UnityAsset store에 있는 무료 에셋을 사용하려고 합니다. 해당 에셋
에셋 스토어 페이지에서 로그인한 뒤 '내 에셋에 추가하기'를 한 뒤에 2020.3.23f1 기준 아래와 같은 경로로 현재 프로젝트에 에셋을 추가할 수 있습니다.
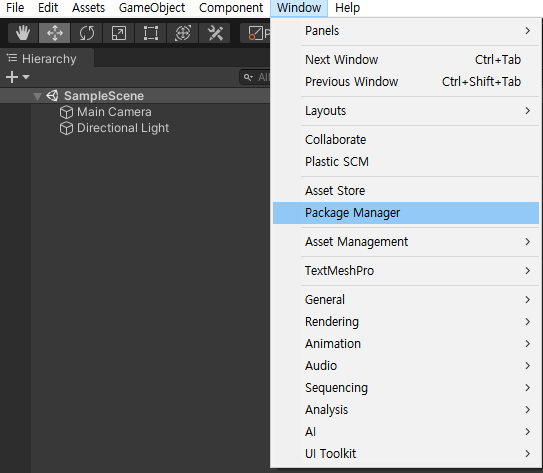
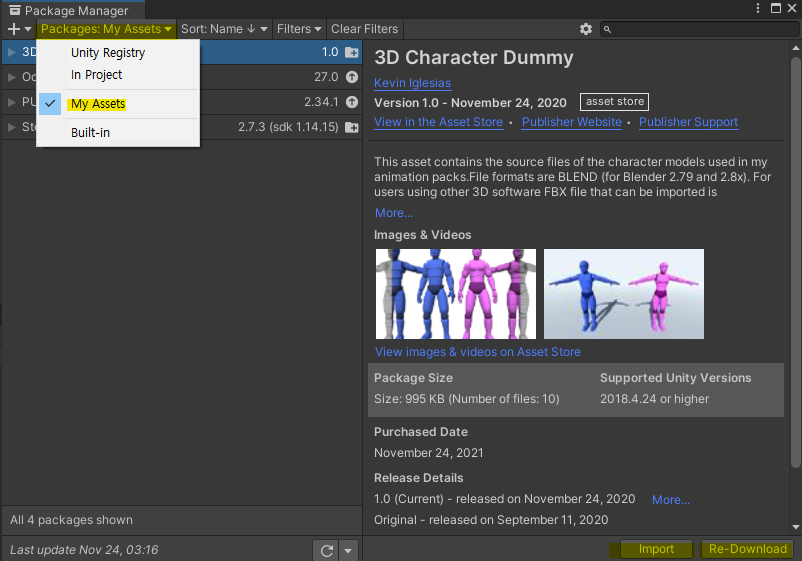
Window→Package Manager→새로 열린 창 왼쪽 상단 Packages 드롭다운→My Assets
Import까지 해주면 project창에 해당 에셋이 뜨게 되고 Models로 들어가 .fbx파일을 Hierarchy창으로 scene에 나타나게 됩니다!
⭐JSON 파일로 만들어진 키프레임으로 실제 애니메이션 만들기
드디어 본론입니다.
아까 그 화면의 project창에서 .fbx 파일은 선택한 뒤 inspector창에서 Rig를 눌러보면 Animation type이 Humaniod로 잘 설정 되어있는 것을 확인할 수 있습니다.
이후 아래의 Configure를 눌러주면
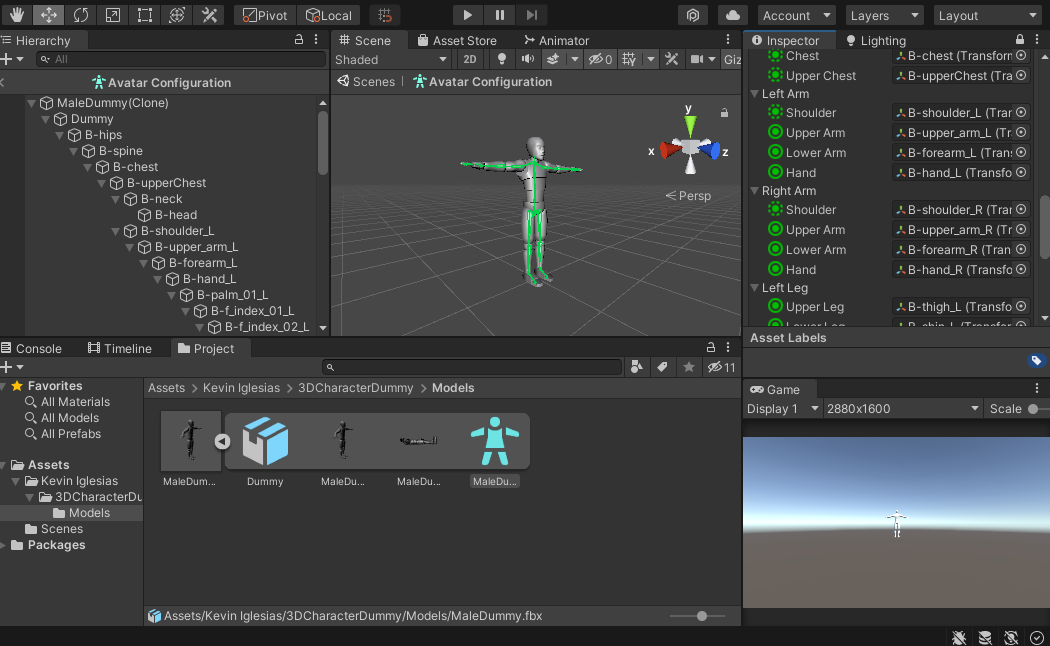
이렇게 화면이 바뀌고 Inspector창에서 각 뼈와 관절들이 3D모델과 잘 매치되어있는 것도 확인할 수 있습니다.
json파일의 데이터와 avatar의 Bone 매칭해주기
저 뼈들과 아까 살펴봤던 json파일의 관절을 짝 지어줘야 하는데 json파일에서 정의내리고 있는 관절들과 아바타의 관절들이 정확이 일치하는 것이 아니기 때문입니다.
저는 아래처럼 짝지어 줬습니다.
| Json | unity avatar |
|---|---|
| right_ankle | RightFoot |
| right_knee | RightLowerLeg |
| right_hip | RightUpperLeg |
| left_hip | LeftUpperLeg |
| left_knee | LeftLowerLeg |
| left_ankle | LeftFoot |
| pelvis(골반) | Hips |
| throax(흉부) | Chest |
| neck | Neck |
| head | Head |
| right_wrist | RightHand |
| right_elbow | RightLowerArm |
| right_shoulder | RightUpperArm |
| left_shoulder | LeftUpperArm |
| left_elbow | LeftLowerArm |
| left_wrist | LeftHand |
이제 위에 작성한 표를 가지고 스크립트를 작성할 차례입니다. C#파일을 생성하고 열어줍니다.
저는 다음과 같은 방법으로 적어주었습니다.
스크립트 작성하기
json파일을 스크립트에서 불러와야하는데 이때 불러온 정보를 담을 오브젝트가 필요합니다.
이때 실제 key값을 그대로 변수명으로 사용해주어야 합니다.
그리고 각 요소를 [System.Serializable]을 통해 직렬화를 해주어야 정보가 제대로 담기게 됩니다.
그렇지 않으면..null어쩌구 오류가 많이 뜹니다...(저도 알고싶진 않았습니다)
위에서 본 json파일을 토대로 아래와같이 만들었습니다.
    // 불러온 정보를 담을 오브젝트 → 직접 사용할 오브젝트
    [System.Serializable]
    public class JsonData
    {
        public Image[] images;
        public Category[] categories;
        public Annotation[] annotations;
    }

    [System.Serializable]
    public class Image
    {
        public int video_no;
        public int img_no;
        public string img_path;
        public int width;
        public int height;
        public int action_category;
    }

    [System.Serializable]
    public class Category
    {
        public string supercategory;
        public int id;
        public string person;
        public string[][] keypoints;
    }

    [System.Serializable]
    public class Annotation
    {
        public int img_no;
        public int person_no;
        public float[] bbox;
        public float[] keypoints;
        public int num_keypoint;
    }
실제로 Json파일을 불러오는 것은 Unity에서 기본으로 제공하는 JsonUtility를 이용하면 됩니다.
JsonUtility.FromJson<T>()는 json의 형태를 가지고 있는 String을 object로 변환해주기 때문에 이를 이용하면 편리합니다.(이 글에서는 위에서 정의한 JsonData타입)
    T LoadJsonFile<T>(string loadPath, string fileName)
    {
        // Json 파일을 열어 내용물을 FileStream에 담음
        FileStream fileStream = new FileStream(string.Format("{0}/{1}.json", loadPath, fileName), FileMode.Open);
        byte[] data = new byte[fileStream.Length];
        fileStream.Read(data, 0, data.Length);
        fileStream.Close();
        // 해당 파일이 한글을 포함하기 때문에 UTF8로 인코딩(깨짐 방지)
        string jData = Encoding.UTF8.GetString(data);
        return JsonUtility.FromJson<T>(jData);
    }
가져온 정보를 토대로 움직임을 적용할 관절들도 scene이 처음 로드될 때 가져올 수 있도록 작성하였습니다. animator.GetBoneTransform(HumanBodyBones.관절이름)을 이용하면 해당 관절에 할당된 object의 transform 컴포넌트를 받아올 수 있습니다.
transform 컴포넌트는 해당 오브젝트의 위치(position)와 회전(rotation) 정보를 포함하고 있어 이를 이용할 것입니다.
    void Start()
    {
        // 사람 Object의 Animator 가져오기
        animator = GetComponent<Animator>();
        if (animator)
        {
            // 아바타의 bone transforms을 가져옴
            humanJoint[0] = animator.GetBoneTransform(HumanBodyBones.RightFoot);

            		-----중략-----

    }
아래는 불러온 데이터를 해당 관절에 적용시키는 코드입니다.
생각보다 별 거 없어서 머쓱하네요^^;
그냥 불러온 그대로 Vector3와 Quaternion 변수에 대입해서 position과 rotation값을 변경해주면 됩니다!
    private void setBoneTransform()
    {
        // 계속 반복해서 frame을 불러옴
        if (frame == jsonAnim.annotations.Length) frame = 0;

        for (int i = 0; i < NUM_JOINT; i++)
        {
            float x = jsonAnim.annotations[frame].keypoints[i * 6];
            float y = jsonAnim.annotations[frame].keypoints[i * 6 + 1];
            float z = jsonAnim.annotations[frame].keypoints[i * 6 + 2];
            float rot_x = jsonAnim.annotations[frame].keypoints[i * 6 + 3];
            float rot_y = jsonAnim.annotations[frame].keypoints[i * 6 + 4];
            float rot_z = jsonAnim.annotations[frame].keypoints[i * 6 + 5];

            Vector3 pos = new Vector3(x, y, z);
            // 사람 model에 비해서 값이 커서 조절
            humanJoint[i].position = pos*0.02f;
            Quaternion rot = Quaternion.Euler(rot_x, rot_y, rot_z);
            humanJoint[i].rotation = rot;
        }
        frame++;
    }
이런식으로 작성한 스크립트를 사람3D모델 object의 컴포넌트로 추가해주면 스크립트를 적용할 수 있습니다!
결과
위는 실제 촬영 영상 중 일부이고 아래가 결과입니다

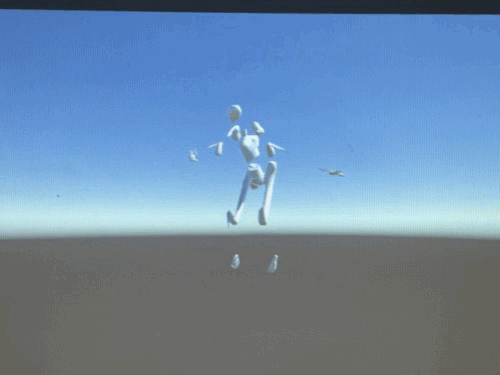 모델이 좀 늘어났고 약간 튀는 부분도 있으며(데이터의 문제인 것 같기도 합니다) 관절들이 다 분리되어있어서 조금 무섭기도 하지만 실제 촬영된 영상과 비슷한 움직임이 나타납니다!
아무래도 json 데이터와 3D 오브젝트가 사람이라는 것 말고는 아예 연관이 없다보니까 이걸 맞추기가 쉽지 않았던 것 같습니다..
그래도 json파일 안의 transform 데이터들을 Unity 애니메이션으로 옮기는 것이 역시 불가능하진 않아보여서 다행인 것 같습니다!
아래는 전체코드입니다.
using System.Collections;
using System.Collections.Generic;
using UnityEngine;
using System.IO;
using System.Text;

public class SetAnimation : MonoBehaviour
{
    [System.Serializable]
    public class JsonData
    {
        public Image[] images;
        public Category[] categories;
        public Annotation[] annotations;
    }

    [System.Serializable]
    public class Image
    {
        public int video_no;
        public int img_no;
        public string img_path;
        public int width;
        public int height;
        public int action_category;
    }

    [System.Serializable]
    public class Category
    {
        public string supercategory;
        public int id;
        public string person;
        public string[][] keypoints;
    }

    [System.Serializable]
    public class Annotation
    {
        public int img_no;
        public int person_no;
        public float[] bbox;
        public float[] keypoints;
        public int num_keypoint;
    }

    public const int NUM_JOINT = 16;
    public JsonData jsonAnim;
    public Animator animator;
    public Transform[] humanJoint = new Transform[NUM_JOINT];
    public int frame = 0;

    void Start()
    {
        // 사람 Object의 Animator 가져오기
        animator = GetComponent<Animator>();
        if (animator)
        {
            // 아바타의 bone transforms을 가져옴
            humanJoint[0] = animator.GetBoneTransform(HumanBodyBones.RightFoot);
            humanJoint[1] = animator.GetBoneTransform(HumanBodyBones.RightLowerLeg);
            humanJoint[2] = animator.GetBoneTransform(HumanBodyBones.RightUpperLeg);
            humanJoint[3] = animator.GetBoneTransform(HumanBodyBones.LeftUpperLeg);
            humanJoint[4] = animator.GetBoneTransform(HumanBodyBones.LeftLowerLeg);
            humanJoint[5] = animator.GetBoneTransform(HumanBodyBones.LeftFoot);
            humanJoint[6] = animator.GetBoneTransform(HumanBodyBones.Hips);
            humanJoint[7] = animator.GetBoneTransform(HumanBodyBones.Chest);
            humanJoint[8] = animator.GetBoneTransform(HumanBodyBones.Neck);
            humanJoint[9] = animator.GetBoneTransform(HumanBodyBones.Head);
            humanJoint[10] = animator.GetBoneTransform(HumanBodyBones.RightHand);
            humanJoint[11] = animator.GetBoneTransform(HumanBodyBones.RightLowerArm);
            humanJoint[12] = animator.GetBoneTransform(HumanBodyBones.RightUpperArm);
            humanJoint[13] = animator.GetBoneTransform(HumanBodyBones.LeftUpperArm);
            humanJoint[14] = animator.GetBoneTransform(HumanBodyBones.LeftLowerArm);
            humanJoint[15] = animator.GetBoneTransform(HumanBodyBones.LeftHand);
        }

        jsonAnim = LoadJsonFile<JsonData>(Application.dataPath, "InfoJsonAnim");
    }


    private float t = 0.0f;
    // 모든 Update함수가 호출된 뒤 호출
    void LateUpdate()
    {
        if (Time.time > t)
        {
            t = Time.time + 1.0f/10;
            setBoneTransform();
        }
    }

    T LoadJsonFile<T>(string loadPath, string fileName)
    {
        FileStream fileStream = new FileStream(string.Format("{0}/{1}.json", loadPath, fileName), FileMode.Open);
        byte[] data = new byte[fileStream.Length];
        fileStream.Read(data, 0, data.Length);
        fileStream.Close();
        string jData = Encoding.UTF8.GetString(data);
        return JsonUtility.FromJson<T>(jData);
    }

    private void setBoneTransform()
    {
        if (frame == jsonAnim.annotations.Length) frame = 0;

        for (int i = 0; i < NUM_JOINT; i++)
        {
            float x = jsonAnim.annotations[frame].keypoints[i * 6];
            float y = jsonAnim.annotations[frame].keypoints[i * 6 + 1];
            float z = jsonAnim.annotations[frame].keypoints[i * 6 + 2];
            float rot_x = jsonAnim.annotations[frame].keypoints[i * 6 + 3];
            float rot_y = jsonAnim.annotations[frame].keypoints[i * 6 + 4];
            float rot_z = jsonAnim.annotations[frame].keypoints[i * 6 + 5];

            Vector3 pos = new Vector3(x, y, z);
            humanJoint[i].position = pos*0.02f;

            Quaternion rot = Quaternion.Euler(rot_x, rot_y, rot_z);
            humanJoint[i].rotation = rot;
        }
        frame++;
    }
}
앞으로의 숙제
실제로 프로젝트를 진행하게 되면 저렇게 튀는 부분도 없어야하는데 보간할 수 있는 방법도 생각해야할 것 같습니다.
또 다양한 각도가 아닌 한 각도에서 찍힌 영상에서 움직임을 추출해 애니메이션으로 구현하게 될 것 같은데....
2D의 움직임을 3D로 실감나게 옮기려면 어떻게 해야하는지 그것도 더 고민해봐야할 것 같습니다.
추가적으로 최종적인 목표를 위해 모바일AR을 개발할 수 있는 환경도 구성해봐야겠습니다.
아무튼 파이팅!
참조
https://docs.unity3d.com/ScriptReference/HumanBodyBones.html
https://answers.unity.com/questions/1744772/how-do-you-make-a-json-animation-file-into-an-anim.html
https://dallcom-forever2620.tistory.com/6
https://wergia.tistory.com/164
(+21.12.01 추가)
json파일 불러오는.. 아래 코드 한줄로 간단히 쓸 수 있습니다...
void Start()
    {

        (중략)

        jsonAnim = LoadJsonFile<JsonData>(Application.dataPath, "InfoJsonAnim");
    }

 (중략)

T LoadJsonFile<T>(string loadPath, string fileName)
    {
        FileStream fileStream = new FileStream(string.Format("{0}/{1}.json", loadPath, fileName), FileMode.Open);
        byte[] data = new byte[fileStream.Length];
        fileStream.Read(data, 0, data.Length);
        fileStream.Close();
        string jData = Encoding.UTF8.GetString(data);
        return JsonUtility.FromJson<T>(jData);
    }
를
jsonAnim = JsonUtility.FromJson<JsonData>(File.ReadAllText(Application.dataPath+"/InfoJsonAnim.json"));로 써도 잘 불러와집니다!

잘 읽었어요~ 김현수교수