Custom Button
버튼을 클릭하면 회전하는 버튼을 만들겠다.
우선 버튼에 대한 함수를 일괄적으로 처리할 클래스를 하나 만들어야한다.
Rotate Button 이라하고, UIButton으로 만든다.
enum Rotatetype {
    case up
    case down
}
열거형으로 업일때, 다운일때를 구분해준다.
class RotateButton: UIButton {

    init() {
        super.init(frame: .zero)             //이니셜라이저 다시 공부
        configure()
    }

    required init?(coder: NSCoder) {
        fatalError("init(coder:) has not been implemented")
    }
    var isUP = Rotatetype.down {
        didSet{
            changeDesign()
        }
    }

    private func configure() {
        self.addTarget(self, action: #selector(selectButton), for: .touchUpInside)
    }

    @objc private func selectButton(){       //외부에서 접근할 필요가 없어서
        if isUP == .up {
            isUP = .down
        }else{
            isUP = .up
        }
    }
그리고 클래스 안에 우선 up일때 버튼을 클릭할 경우 down으로
down일 경우 up으로 변경해주는 것들을 설정해준다.
강의를 들으며 느낀점인데, 이니셜라이저에 대한 감이 잘 오지않는다. 이 부분에 대해서 다시 한번 되돌아 봐야겠다.
위에나온 changeDesign 함수는 아래처럼 정의해준다.
private func changeDesign() {
UIView.animate(withDuration: 1) { //돌아가는 속도 지연
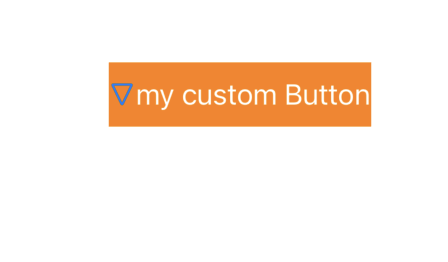
if self.isUP == .up {
self.imageView?.transform = CGAffineTransform(rotationAngle: CGFloat.pi) //CGFloat 타입추론 생략가능
self.backgroundColor = self.backgroundColor?.withAlphaComponent(0.3)
}else{
self.imageView?.transform = .identity //원래의 설정으로 돌아감
self.backgroundColor = self.backgroundColor?.withAlphaComponent(1)
}
}
}
}눌렀을때 생각을 변경하고 회전하게끔한다.
UIView.animate(withDuration: 1)이 부분은 화살이 돌아가는 회전 속도를 정의할 수 있다.
그리고
최종적으로 메인 뷰 컨트롤러 호출 및 크기 및 디자인만 지정만 해주면 된다.
import UIKit
class ViewController: UIViewController {
override func viewDidLoad() {
super.viewDidLoad()
let myButton = RotateButton()
self.view.addSubview(myButton)
myButton.translatesAutoresizingMaskIntoConstraints = false
myButton.centerXAnchor.constraint(equalTo: self.view.centerXAnchor).isActive = true
myButton.centerYAnchor.constraint(equalTo: self.view.centerYAnchor).isActive = true
// myButton.widthAnchor.constraint(equalToConstant: 2000).isActive = true
myButton.heightAnchor.constraint(equalToConstant: 40).isActive = true
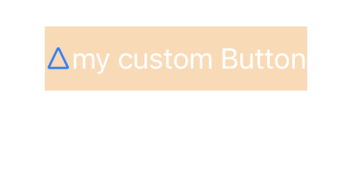
myButton.backgroundColor = UIColor.orange
myButton.setTitle("my custom Button", for: .normal)
myButton.setImage(UIImage(systemName: "arrowtriangle.down"), for: .normal)
}
}
여기서 중요한점은 main 스토리보드를 건드린다면 쉽게 fatal error가 발생해버린다는 점이다.
다음은 스토리보드를 이용한 제작 방법이다.
우선 메인 뷰 컨트롤러 쪽을 모두 주석처리한다.
command+/하면 드래그한 부분이 모두 주석처리 된다.
그리고 fatal error를 제거하기 위해
required init?(coder: NSCoder) {
        fatalError("init(coder:) has not been implemented")
    }
를
required init?(coder: NSCoder) {
        super.init(coder: coder)
        cofigure()
    }
로 바꿔준다.
이미 함수를 모두 구현해둔 상태에서 해서 그런진 몰라도 스토리보드 작업이 훨씬 간단하고 눈에 인터페이스가 보이는 상태로 작업하다보니 원하는 결과물을 얻기 훨씬 쉬운 거 같다.