keras를 활용한 word2vec pre-trained 모델을 로딩하여 IMDB 감정분석 분류문제 해결하기
이 글 많이 참조했습니다.
Customer Position column에 있는 걸로 예를 들겠습니다.
우선 전체적인 구조는
- column에 unique를 찍어봤더니 아래와 같이 비슷해 보이는 애들이 각각 다 다르게 적혀있는 상황
'''
academic coordinator/ post graduate teacher (accountancy, business studies)/ tgt (ict)      1
academic specialist                                                                         1
administrative                                                                              5
architect/consultant                                                                        2
architecture/consult                                                                        1
                                                                                         ...
técnico                                                                                     1
unpaid                                                                                     16
vice president                                                                            492
vicepresident                                                                              11
vp                                                                                          1
Name: position, Length: 117, dtype: int64
'''-
각 단어들이 가진 의미를 기반으로 Clustering을 하고 싶다.
1) / , . ( ) 같은 의미 해석에 방해되는 특수 문자 제거
2) 띄어쓰기 단위로 분리:
academic specialist→['academic', 'specialist']3) 미리 누군가가 학습시켜 둔 모델 불러오기
4) 임베딩 이라고 칭하는 단어별 벡터 추출, 위 예시처럼 두 개 이상의 단어를 가진 경우 평균내기
5) Kmeans로 Clustering
-
PCA, 직접 찍어봐서 잘 됐나 확인하고, 군집 갯수 바꿔보며 그럴듯하게 만들기
1. 데이터 확인
다들 알고있는 value_counts, unique를 쓴다.
이때 뒤에 sort_index를 붙이면 abc 순서, sort_values를 붙이면 많은 순서로 나열된다.
또 너무 많아서 …으로 생략된걸 보고 싶으면 아래 코드 첫줄을 넣어준다.
원래대로 하고싶다면 None 대신 80넣고 실행
# print할 때 보이는 줄 수 설정하기.
# 80이 default라 아무것도 원래 찍히던 만큼을 생각하면 되고
# None을 넣으면 모든 줄이 다 찍힌다.
pd.set_option('display.max_rows', None)
customer['job'].value_counts().sort_index()
2. Clustering 시작
전처리 → 임베딩 추출 → 군집화 순으로 간다.
2-1) 전처리
특수문자 쓰인 게 몇 개 없어서 어렵게 코드 안쓰고 replace 하드 코딩 했다.
for idx,position in enumerate(customer['position'].unique()):
# position이 텍스트
	temp = position.replace('/',' ').replace('(',' ').replace(')',' ').replace('-',' ').replace('.',' ').replace(',',' ')
띄어쓰기 단위로 나눠준다.
position_parsed = temp.split(' ')오타+띄어쓰기 실수가 같이 있는 경우까지 커버 하지 못하지만 시도해 본 것 (궁금한 사람은 해보세요)
-
오타 잡기
수연이가 얘기해 줬던 Textblob을 이용했다.
from textblob import TextBlob
blob = TextBlob('mindenes')
print(blob.correct())
# mindedness
사용 방법은 라이브러리 다운받아서 TextBlob에 오타가 의심되는 단어를 넣고 .correct()를 찍어보면 된다.
-
띄어쓰기 잡기
Word segmentation in a nutshell.
이걸 참조했다.
링크에 있는 segmentation.py를 이용할 것이다.
얘도 다른 사람이 학습 시켜둔 ngram모델을 불러와서 사용한다. ngram모델을 다운 받아야 한다.코드와 모델을 다운 받았다면 코드 맨 아래에 onegrams 세 개 중 본인이 다운 받은 모델 이름을 잘 확인해서 고쳐주면 된다.
이 글에 써둔 파일을 다운 받았다면 아래처럼 쓰면 된다.
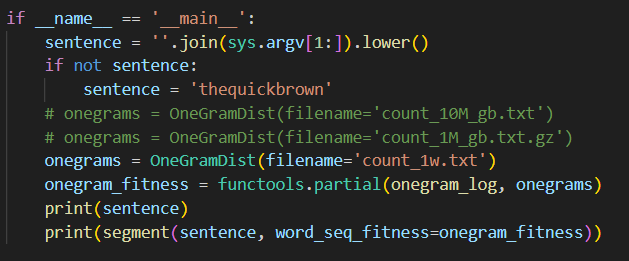
준비는 끝났다. 다시 원래 코드로 돌아와서
```python
from segmentation import OneGramDist,onegram_log,segment
import functools
onegrams = OneGramDist(filename='count_1w.txt')
onegram_fitness = functools.partial(onegram_log, onegrams)
```
!python ~~ 이런식으로 말고 ipynb파일에서 모듈처럼 불러와 사용하기 위해 segmentation.py파일의 main 함수 안에 있던 불러올 애들을 가져온다.
 sentence = 'levelexecutive'
 best = segment(sentence, word_seq_fitness=onegram_fitness)
 print(best)
 '''
 ['e'] -2.996351267959003
 ['v', 'e'] -6.455154678229892
 ['ve'] -4.890746540792021
 ...
 ['levelexecuti', 've'] -26.660215605718577
 ['levelexecutiv', 'e'] -25.76582033288556
 ['levelexecutive'] -23.769469064926557
 ['level', 'executive']
 '''
그러면 모델이 여러 번 쪼개보더니 가장 그럴듯한 녀석으로 쪼개서 알려준다.
2-2) word2vec 모델 불러오기
gensim이라는 라이브러리에 잘 되어 있다.
import gensim
word2vec_model = gensim.models.KeyedVectors.load_word2vec_format('경로/GoogleNews-vectors-negative300.bin', binary=True)
오타나 띄어쓰기 같은거 떄문에 FastText를 사용해봤지만 clustering을 잘 못해서 word2vec 모델 사용.
https://drive.google.com/file/d/0B7XkCwpI5KDYNlNUTTlSS21pQmM/edit
여기 미리 학습시켜둔 모델을 다운받아 사용한다.
아래와 같은 함수들을 사용할 수 있다.
# 두 단어가 얼마나 비슷한지 확률로 알려준다
word2vec_model.similarity("vicepresident","vp")
# 300개의 -1 ~ 1 사이 숫자들로 단어를 변환(임베딩)해 준다.
word2vec_model.get_vector(word)
이제 이걸 이용해서
vectors = pd.DataFrame({'name':[]})
for idx,position in enumerate(customer['position'].unique()):
    position_parsed = 전처리한 단어 리스트
    vec = np.array([0.0]*300)
    cnt=0
    for word in position_parsed:
        if word!=' ' and word!='':
            try:
                vec+=np.array(word2vec_model.get_vector(word))
                cnt+=1
            except:
oob+=1-
데이터들의 임베딩을 저장할 DataFrame을 하나 생성한다.
-
unique() 리스트에서 하나씩 뽑아와 앞에 했던 전처리를 거친 뒤,
-
vec이라는 길이 300짜리 (임베딩의 길이가 300이다) float로 된 array에다가 각 단어의 임베딩을 더해준다.
평균 낼 때 쓰기 위해 cnt변수에 이 데이터가 몇 개의 단어를 포함하는지 저장해 둔다.
-
근데 만약 오타 같은 모델이 모르는 단어가 나왔을 때 OOB(out of bag) 문제가 발생한다.
이거 때문에 try ~ except를 넣어 모르는 단어는 그냥 패스 한다.
if cnt!=0:
        vec /= cnt
else:
    print('no clue',position)
vectors.loc[idx] = [position,*vec]
평균 내고, 만약 데이터에 포함된 단어들 중 하나도 모른다면 뭔지 확인하기 위해 프린트 하나 넣어 줬다.
전체 코드
vectors = pd.DataFrame({'name':[]})
oob=0
for i in range(300):
    vectors[f'vector{i}']=[]
for idx,position in enumerate(customer['position'].unique()):
    temp = position.replace('/',' ').replace('(',' ').replace(')',' ').replace('-',' ').replace('.',' ').replace(',',' ')
    position_parsed = temp.split(' ')
    vec = np.array([0.0]*300)
    cnt=0
    for word in position_parsed:
        if word!=' ' and word!='':
            try:
                vec+=np.array(word2vec_model.get_vector(word))
                cnt+=1
            except:
                oob+=1
    if cnt!=0:
        vec /= cnt
    else:
        print('no clue',position)
    vectors.loc[idx] = [position,*vec]
print(oob)
'''
no clue bulgaria
no clue gerente
no clue tierarzt
no clue exhibitiontv
no clue proprietário(a)
no clue genel müdür
no clue mindenes
no clue főorvos
23
'''
아예 감도 못 잡은 데이터가 8개
oob가 23개 (찍어보니 a, of 보통 불용어 처리 하는 건 모델에 없는 듯 하다.)
나름 준수하게 처리한 것 같다면 다음단계로 가고, 못 찾은게 너무 많다면 전처리나 위의 오타/띄어쓰기 수정을 시도해 보자.
3) Clustering
Kmeans를 이용할 예정이다.
from sklearn.cluster import KMeans
kmeans = KMeans(n_clusters=8, max_iter=1000)
kmeans.fit(vectors.drop(['name'],axis=1))
앞서 만들어 둔 vectors df를 이용할 거고, 임베딩 벡터만 사용할 것이니 이름을 저장했던 name은 떼고 fitting 해 주자.
n_clusters는 이것 저것 시도해 보고 괜찮아 보이는 걸로 하자.
3. 확인
from sklearn.decomposition import PCA
pca = PCA(n_components=2)
pcafit = pca.fit_transform(vectors.drop(['name'],axis=1))
x = pcafit[:,0]
y = pcafit[:,1]
import matplotlib.pyplot as plt
plt.scatter(x,y,marker='.',c=kmeans.labels_[:])
for i,v in enumerate(vectors['name'][:50]):
    plt.annotate(v[:7],xy=(x[i],y[i]))
plt.show()
PCA로 2차원 평면에 점을 찍어 확인해 보자.
PCA로 임베딩(300 차원)을 2차원으로 압축해 준다.
plt scatter로 잘 됐나 확인해 보자. 밑의 반복문은 포인트에 라벨링 해주는 부분인데,
v[:7] 해놓은 이유는 v가 이름인데, 전부다 라벨링 해주면 점들이 너무 많아서 글자가 안보인다. 그러니 반복문 횟수 조절이나 표시하는 글자수 적절히 조절해서 보면 된다.
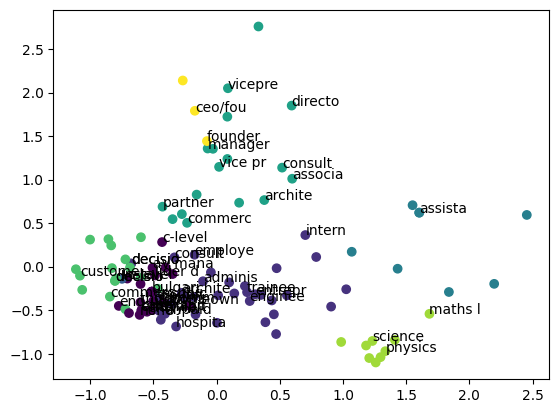
잘 모르겠다면 class마다 찍어서 확인해 보자
vectors[kmeans.labels_==6]['name']
'''
19                      physics teacher
41                      science teacher
67    teacher/middle school coordinator
71             math and physics teacher
73      physics and mathematics teacher
75                             educator
86                    chemistry teacher
89                              teacher
Name: name, dtype: object
'''
확인해 보고 kmeans의 n_cluster를 조정하거나 kmeans말고도 다른 알고리즘을 고민해 보자