sass_iamsteve
sass_velopert
sass_heropy
1.sass에서 자주 쓰이는 팁 3개 이상 공유
- mixin
Sass의 아주 유용한 기능 중 하나로 extend와 비슷하지만 argument(인자)를 받을 수 있다.
선언할 때는 @mixin 이름
사용할 때는 @include 이름
Sass
@mixin headline ($color, $size){
 color: $color;
 font-size: $size;
}

h1 {
 @include headline(green, 12px);
}
CSS
h1 {
  color: green;
  font-size: 12px;
}
mixin 응용
Sass
#{}표현은 문자열을 따로 처리하지 않고 그대로 출력할 때 사용된다.
@content 이름 을 사용하면 나중에 @include 했을 때 그 선택자 내부의 내용들이 @content부분에 나타나게 된다
@mixin media($queryString){
    @media #{$queryString} {
      @content 이름;
    }
}

.container {
    width: 900px;
    @include media("(max-width: 767px)"){
        width: 100%;
    }
}
CSS
.container {
  width: 900px;
}
@media (max-width: 767px) {
  .container {
    width: 100%;
  }
}- animate.sass->animate.css를 기반으로 해서 만들어짐.
사용법
@include animation (fadeIn, .5s, ease, forwards)
gem install animate-sass 설치
require 'animate-sass'를 Cpmpass의 config.rb파일에 더해주기
- 중첩
.container {
   width : 100%;
   h1 {
     color: red;
   }
}- 내장함수
그림자 색
darken()함수 소개
이 함수는 특정 색깔과 얼마나 어둡게 할 지 인자로 던져주면 자동으로 색상을 계산해서 나타내준다.
코드를 입력하세요$buttonColor: #2ecc71;
$buttonDark: darken($buttonColor, 10%);
$buttonDarker: darken($buttonDark, 10%);

button {
  background: $buttonColor;
  border-radius: 3px;
  box-shadow: 0px 5px 0px $buttonDark;
  border: 0;
  color: white;
  font-size: 17px;
  padding: 10px 30px;
  display: inline-block;
  outline: 0;
  &:hover {
    background: $buttonDark;
    box-shadow: 0px 5px 0px $buttonDarker;
  }
  &:active {
    box-shadow: none;
    margin-top: 5px;
  }
}

body {
  text-align: center;
  padding-top: 100px;
}
개인적으로
- 변수 범위
sass변수에는 변수 범위가 있다. 특정 선택자에서 선언하면 그 선택자에서만 접근이 가능하다.
$primary-color: #333;

body {
  $primary-color: #eee;
  background-color: $primary-color;
}

p {
  color: $primary-color;
}
변수를 선언할 때 global하게 설정할 때는 !global 를 사용한다.
$primary-color: #333;

body {
  $primary-color: #eee !global;;
  background-color: $primary-color;
}

p {
  color: $primary-color;
}!default는 해당 변수가 설정되지 않았거나 값이 null일 때 값을 설정한다.
이해 안가.......
1.destructuring(비구조화 할당)이란? 문법알려주기 예제, 리액트에서 자주 쓰이는 패턴 소개
https://poiemaweb.com/es6-destructuring
destructuring은 구조화된 배열 또는 객체를 비구조화, 파괴 하여 개별적인 변수에 할당하는 것이다. 배열 또는 객체 literal에서 필요한 값만을 추출하여 변수에 할당하거나 반환할 때 유용하다.
// ES5
var arr = [1, 2, 3];

var one   = arr[0];
var two   = arr[1];
var three = arr[2];

console.log(one, two, three); // 1 2 3
es6의 배열 destructuring은 배열의 각 요소를 배열로부터 추출하여 변수 리스트에 할당한다. 이때 추출/할당 기준은 배열의 인덱스이다.
// ES6 Destructuring
const arr = [1, 2, 3];

// 배열의 인덱스를 기준으로 배열로부터 요소를 추출하여 변수에 할당
// 변수 one, two, three가 선언되고 arr(initializer(초기화자))가 Destructuring(비구조화, 파괴)되어 할당된다.
const [one, two, three] = arr;
// 디스트럭처링을 사용할 때는 반드시 initializer(초기화자)를 할당해야 한다.
// const [one, two, three]; // SyntaxError: Missing initializer in destructuring declaration

console.log(one, two, three); // 1 2 3
let x, y, z;
[x, y] = [1, 2];
console.log(x, y); // 1 2
[x, y] = [1];
console.log(x, y); // 1 undefined
[x, y] = [1, 2, 3];
console.log(x, y); // 1 2
[x, , z] = [1, 2, 3];
console.log(x, z); // 1 3
// 기본값
[x, y, z = 3] = [1, 2];
console.log(x, y, z); // 1 2 3
[x, y = 10, z = 3] = [1, 2];
console.log(x, y, z); // 1 2 3
// spread 문법
[x, ...y] = [1, 2, 3];
console.log(x, y); // 1 [ 2, 3 ]es6의 배열 destructuring은 배열에서 필요한 요소만 추출하여 변수에 할당하고 싶은 경우에 유용하다. 아래의 코드는 Date객체에서 년도, 월, 일을 추출하는 예제.
const today = new Date(); // Tue May 21 2019 22:19:42 GMT+0900 (한국 표준시)
const formattedDate = today.toISOString().substring(0, 10); // "2019-05-21"
const [year, month, day] = formattedDate.split('-');
console.log([year, month, day]); // [ '2019', '05', '21' ]
객체 destructuring
es5에서 객체의 각 프로퍼티를 객체로부터 destructuring하여 변수에 할당하기 위해서는 프로퍼티 이름(키)을 사용해야 한다.
// ES5
var obj = { firstName: 'Ungmo', lastName: 'Lee' };

var firstName = obj.firstName;
var lastName  = obj.lastName;

console.log(firstName, lastName); // Ungmo Lee
es6의 객체 destructuring은 객체의 각 프로퍼티를 객체로부터 추출하여 변수 리스트에 할당한다. 이때 할당 기준은 프로퍼티 이름(키)이다.
// ES6 Destructuring
const obj = { firstName: 'Ungmo', lastName: 'Lee' };

// 프로퍼티 키를 기준으로 디스트럭처링 할당이 이루어진다. 순서는 의미가 없다.
// 변수 lastName, firstName가 선언되고 obj(initializer(초기화자))가 Destructuring(비구조화, 파괴)되어 할당된다.
const { lastName, firstName } = obj;

console.log(firstName, lastName); // Ungmo Lee
객체 destructuring을 위해서는 할당 연산자 왼쪽에 객체 형태의 변수 리스트가 필요하다.
프로퍼티 키가 prop1인 프로퍼티의 값을 변수 p1에 할당
// 프로퍼티 키가 prop2인 프로퍼티의 값을 변수 p2에 할당
const { prop1: p1, prop2: p2 } = { prop1: 'a', prop2: 'b' };
console.log(p1, p2); // 'a' 'b'
console.log({ prop1: p1, prop2: p2 }); // { prop1: 'a', prop2: 'b' }

// 아래는 위의 축약형이다
const { prop1, prop2 } = { prop1: 'a', prop2: 'b' };
console.log({ prop1, prop2 }); // { prop1: 'a', prop2: 'b' }

// default value
const { prop1, prop2, prop3 = 'c' } = { prop1: 'a', prop2: 'b' };
console.log({ prop1, prop2, prop3 }); // { prop1: 'a', prop2: 'b', prop3: 'c' }
export default
한 파일에 class가 두개 있고 두개를 export하고 싶다면
export {a, b}//a,b 는 클래스 이름
한 파일에 class가 몇개가 있던 한개만 export하고 싶다면
export default a//a는 클래스 이름
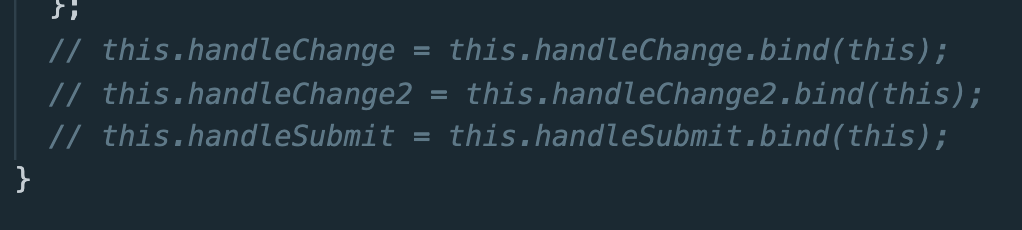
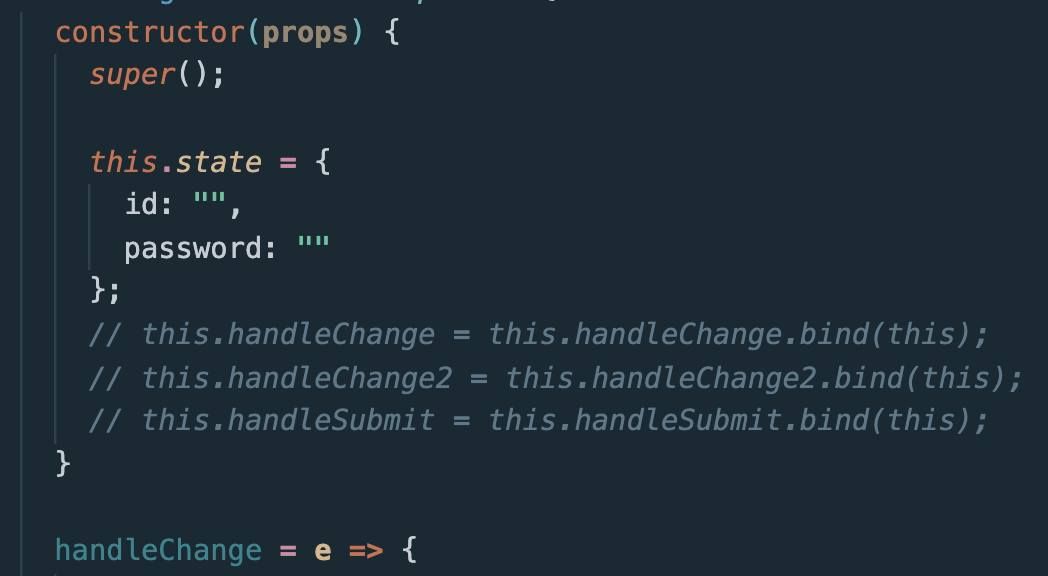
bind
constructor밑에 호출되면 사용할 함수들을 써줬는데 그게 arrow function으로 쓰면 bind를 해주지 않아도 되지만 함수형으로 사용했다면 bind를 써줘야 한다.
이렇게~~!!!!