유닛 테스팅이란?
기능별로 쪼개고 그 기능 내부에서 사용되는 함수도 쪼개고 쪼개어 아주 작은 단위로 테스팅 하는것을 의미한다.
우리가 만든 소프트웨어가 제대로 작동 하는지 테스팅을 하기 위해서 쓰인다. 프로젝트가 커진다면, 매번 코드를 수정/새로 작성할 때마다 모든 작업이 제대로 이뤄지는지 사람이 직접 확인을 한다면 매우 비효율적일 것이다. 이러한 작업을 사람이 아닌, 기계가 하도록 데스트 코드를 작성하여 진행하는 것이다. 이를 테스트 자동화라고 부른다.
나 - 코드 A, B 작성
팀원 - 코드 C, D 작성
내가 G 기능을 구현하면서 C 코드를 아주 조금 수정했는데 의도치 않게 C기능이 고장나버렸다고 하자. 만약 유닛 테스트를 했더라면 C 기능이 고장나버린 것을 코드로 작성하고 바로 발견할 수 있다. 만약 하지 않았더라면 해당 버그를 발견하지 못 할 가능성도 있다.
정리하자면,
유닛 테스팅은 내가 작성한 코드가 다른 코드들을 망가뜨리지 않도록, 적어도 우리가 사전에 정의한 상황속에서 보장하는 역할을 한다.
만약 프로젝트가 혼자서 하는 작업이거나 소규모로 하는 프로젝트라면 오히려 진행 속도를 늦출 수도 있다. 소규모라도 나중에 커질 가능성이 있다면 시작 단계부터 해두면 나중에 시간을 많이 아낄 수 있게 된다.
리액트 컴포넌트 테스팅
리액트 프로젝트 또한, 컴포넌트 단위로 하나하나 테스트 로직을 정해줄 수 있다. 리액트 컴포넌트를 테스팅할 때는 주로 다음과 같은 형식으로 하게된다.
- 특정 props에 따라 컴포넌트가 크래쉬 없이 잘 렌더링 되는지 확인
- 이전에 렌더링 했던 결과와, 지금 렌더링한 결과가 일치하는 지 확인
- 특정 DOM 이벤트를 시뮬레이트 하여, 원하는 변화가 제대로 발생하는지 확인
- 렌더링된 결과물을 이미지로 저장하여 픽셀을 하나하나 확인해서 모두 일치하는지 확인
코드 준비
create-react-app으로 리액트 프로젝트 생성
App.test.js에서 해당 컴포넌트가 크래쉬 없이 제대로 렌더링 되었는지 확인해줘야 하는데 이 확인을 위해서는 터미널로 프로젝트 디렉토리에서 yarn test또는 npm test를 입력해야 한다.
그러면..
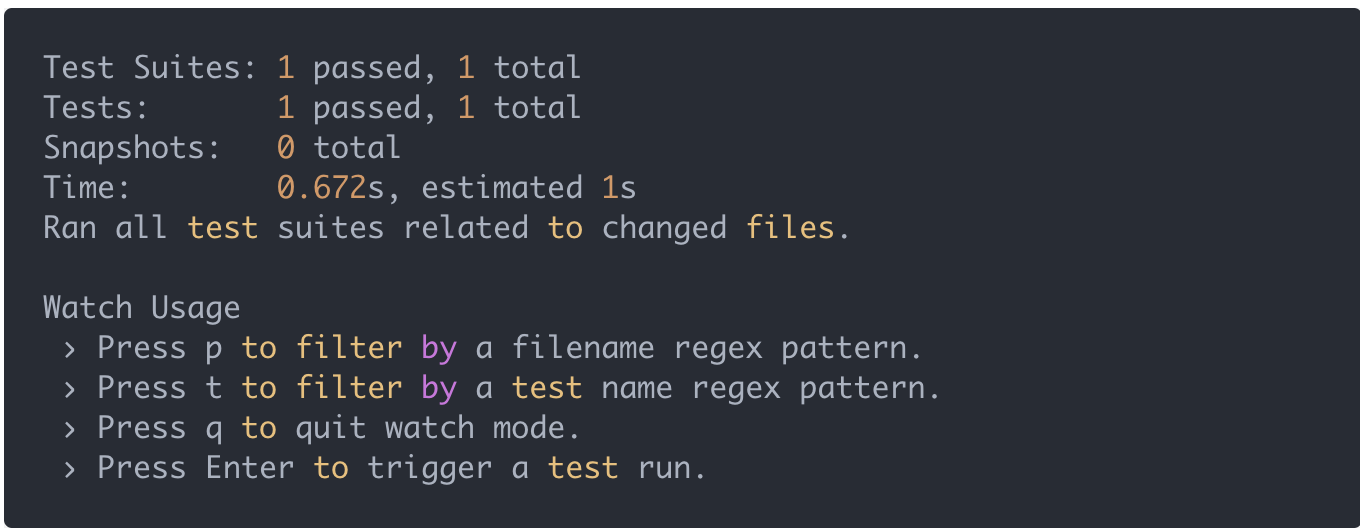
다 잘 됐다고 나타난다.
이 실습을 위해 컴포넌트 3개를 만들어보자.
1. 카운터 컴포넌트
2. NameForm, NameList구현 컴포넌트(name form 에 입력해서 등록하면 name list에 나타나도록 구현)
스냅샷 테스팅
스냅샷 테스팅은, 컴포넌트를 주어진 설정으로 렌더링 하고 그 결과물을 파일로 저장한다. 그리고 다음 테스팅을 진행하게 될 때, 이전의 결과물과 일치하는지 확인한다.
초기 렌더링 결과도 비교할 수 있지만 컴포넌트의 내부 메소드를 호출시키고 다시 렌더링 시켜서 그 결과물도 스냅샷을 저장시켜 각 상황에 모두 이전 렌더링했던 결과와 일치하는지 비교할 수 있다.
스냅샷 테스팅을 위해서는 우선 `react-test-renderer을 설치해줘야 한다.
yarn/npm add --dev react-test-renderer설치를 다 했다면 Counter.js를 위한 테스트 코드를 작성해보겠다.
src/components/Counter.test.js
를 만들어준다.
테스트를 하게 될 때 주요 키워드는 다음과 같다
- describe
- it
- expect
우리가 코드 테스팅 로직을 쪼개고 쪼갤 때, 가장 작은 단위는 it이다.
예를들어,
it('is working', () => {
  expect(something).toBeTruthy();
})
it 내부에서 expect를 통해 특정 값이 우리가 예상한 값이 나왔는지 확인을 할 수 있다. 해당 방법은 다양한데, Jest 매뉴얼
에서 다양한 함수들을 확인할 수 있다.
그리고 여러개의 it을 describe 안에 넣을 수 있게 되며, describe안에는 또 여러개의 describe를 넣을 수 있다.
describe('...', () => {
  describe('...', () => {
    it('...', () => { });
    it('...', () => { });
  });

describe('...', () => {
 it('...', () => { });
 it('...', () => { });
});
});
describe와 it에서 첫 번째 파라미터는 작업의 설명을 넣어주게 되는데, describe에서는 어떤 기능을 확인하는지, 그리고 it부분에서는 무엇을 검사해야 되는지에 대한 설명을 넣으면 된다.
설명을 넣을 때는, 주로 영어로 작성한다. 영어로 작성하는 것이 익숙하지 않다면, 다음과 같이 한글로 작성해도 무방하다.
  describe('Counter', () => {
    let component = null;

    it('초기 렌더링이 문제없이 되야함', ()=> {
      component = renderer.create(<Counter />);
    });

    it('초기 렌더링 스냅샷 일치함', () => {
      const tree = component.toJSON();
      expect(tree).toMatchSnapshot();
    })
  });
테스트 코드를 저장하셨다면, 자동으로 test가 다시 작동하여 (만약 npm test를 껐다면 다시 실행시켜야 한다.) 스냅샷이 생성된다.
스냅샷은 src/components/__snapshots__경로로 저장된다.
하지만..나는
fsevents is not a function이라는 에러가 떴다...
node도 npm도 최신화 시켜도 안됐었는데
npm install fsevents@1.2.11이거 하니까 해결!
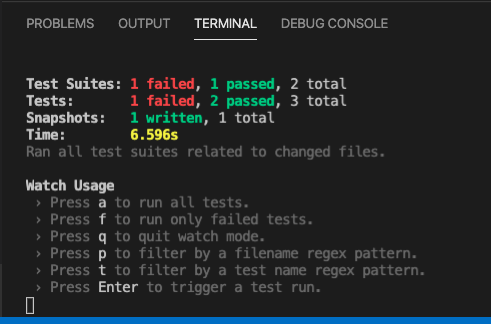
터미널에는 이런식으로 나오고(6.596초나 걸린다니 원래 그런가...?)
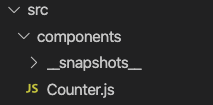
이렇게 자동으로 이 폴더가 생긴다.
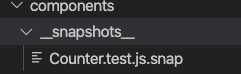
들어가보면
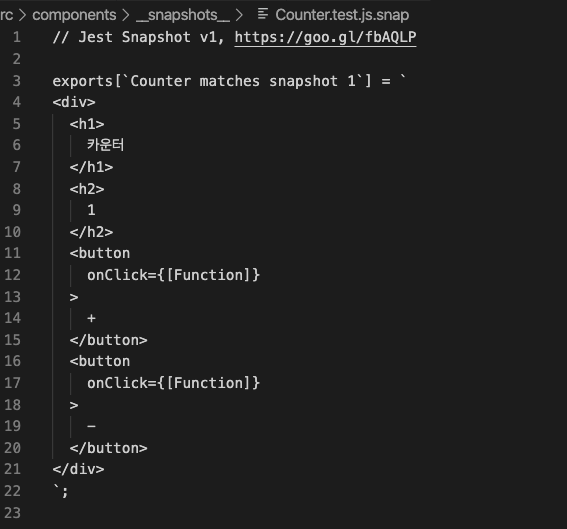
이렇게 렌더링된 결과물이 저장되었다.
(내 스냅 코드 왜이리 못생겼지?ㅜㅜ)
이제 Counter.js컴포넌트안에서
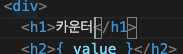
를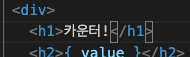
로 바꿔보면 terminal에서
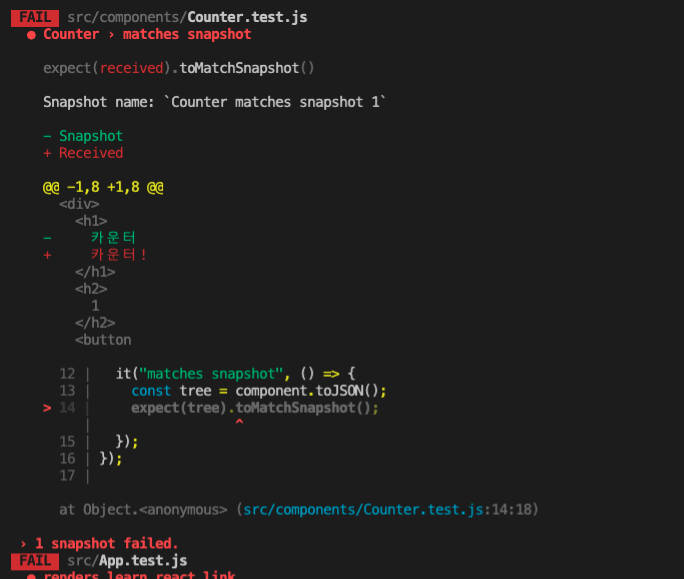
이렇게 뜨면서 스냅샷 비교를 실패했음을 알 수 있다.
터미널 창에서 Enter키를 누르면 테스트를 다시 실행할 수 있고 u키를 누르면 스냅샷을 업데이트 하여 현재 스냅샷을 최신으로 설정하여 오류가 더이상 나지 않게 할 수 있다.
그리고 다시 느낌표 없애기!
내부 메소드 호출 및 state조회
react-test-render를 하면 실제로 컴포넌트가 렌더링되기 때문에 컴포넌트의 state와 메소드에도 접근할 수 있다.
메소드를 실행시켜서 state를 업데이트 시키고, rerendering을 하여 변화에 따라 우리가 의도한 대로 렌더링 되는지 스냅샷을 통해 비교해보자.
increase와 decrease가 잘 되는지 확인하는 snap코드를 쓰기 위해 Counter.test.js에
//increase가 잘 되는지 확인
  it('increase correctly', () => {
      component.getInstance().onIncrease();
      expect(component.getInstance().state.value).toBe(2)//value 값이 2인지 확인
      const tree = component.toJSON() //re-render
      expect(tree).toMatchSnapshot();//스냅샷 비교
  });

  //decrease가 잘 되는지 확인
  it('decrease correctly', () => {
      component.getInstance().onDecrease();
      expect(component.getInstance().state.value).toBe(1)//value 값이 1인지 확인
      const tree = component.toJSON()//re-render
      expect(tree).toMatchSnapshot();//스냅샷 비교
  })
를 써준다.
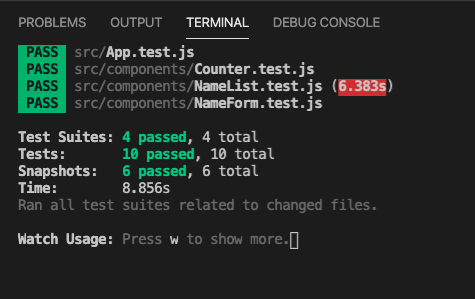
자 이제 나머지 컴포넌트들도 초기 렌더링에 해당하는 부분만 테스트 코드를 작성해보자.
src/components/NameList.test.js

import React from 'react';
import renderer from 'react-test-renderer';
import NameList from './NameList';

describe('NameList', () => {
  let component = null;

  it('renders correctly', () => {
    component = renderer.create(<NameList names={["aerirang","meghan"]} />)
  })

it('matches snapshot', () => {
  const tree = component.toJSON();
  expect(tree).toMatchSnapshot();
});
});src/components/NameForm.test.js
위 세줄은 다 똑같다.
describe('NameForm', () => {
let component = null;
it('renders correctly', () => {
component = renderer.create(<NameForm />);
});
it('matches snapshot', () => {
const tree = component.toJSON();
expect(tree).toMatchSnapshot();
})
})그리고 App.test.js또한 새로 작성해줘야 한다.
import React from 'react';
import renderer from 'react-test-renderer';
import App from './App';

describe('App', () => {
  let component = null;

  it('renders correctly', () => {
    component = renderer.create(<App />);
  })

  it('matches snapshot', () => {
    const tree = component.toJSON();
    expect(tree).toMatchSnapshot();
  })
})
Enzyme을 통한 DOM 시뮬레이션
Enzyme 은 airbnb에서 만든 리액트 컴포넌트 테스팅 도구이다. 이 도구를 사용하면 더욱 세밀한 리액트 컴포넌트 테스팅을 할 수 있게 된다.
Enzyme을 통해 DOM 이벤트를 시뮬레이트 할 수도 있고(ex. 버튼클릭, 인풋 수적, 폼 등록 등), 모든 라이프사이클이 문제없이 돌아가는지도 확인할 수 있다.
설치 및 적용
먼저 설치를 해주자.
yarn/npm add enzyme enzyme-adapter-react-16실패한다면 당황하지 않고 sudo를 붙여 다시 도전!
.
.
그 다음 src디렉토리에 setupTests.js라는 파일에 이것을 추가해준다.(이 파일은 CRA로 만든 프로젝트에서 필요한 테스트 설정이다.)
import { configure } from 'enzyme';
import Adapter from 'enzyme-adapter-react-16';

configure({ adapter: new Adapter() });
그리고 Enzyme에서 스냅샷 테스팅을 하려면 enzyme-to-json이라는 라이브러리를 설치해줘야 한다.
yarn/npm add enzyme-to-json설치해준 뒤 pakage.json파일을 열어서 다음과 같이 jest설정을 넣어주자
. . . 등등 설정 있고
  },
   "jest" : {
    "snapshotSerializers": ["enzyme-to-json/serializer"]
  }
}
.
.
.
다 했으면 그 다음엔 src 디렉토리에 setupTests.js라는 파일을 생성해주자. 이 파일은 cra로만든 프로젝트에서 필요한 테스트 설정이다.
그리고 기존에 실행중이던 yarn/npm test를 종료하고 새로 실행시키자.
NameForm 테스트 코드 에서 react-test-renderer대신 Enzyme을 사용해보자.
import React from "react";
// import renderer from "react-test-renderer";
import { shallow } from 'enzyme';

//shallow말고도 mount도 있고 다른것도 있다.(공식문서 참조)
import NameForm from "./NameForm";

describe("NameForm", () => {
  let component = null;

  it("renders correctly", () => {
    component = shallow(<NameForm />);
  });

  it("matches snapshot", () => {
    const tree = component.toJSON();
    expect(tree).toMatchSnapshot();
  });
});
->위의 예시는 enzyme 중에 shallow를 이용한 것이고. mount는
import React from 'react';
import { mount } from 'enzyme';
import NameList from './NameList';

describe('<NameList />', () => {
  it('matches snapshot', () => {
    const wrapper = mount(<NameList names={["aerirang","647"]} />);
    expect(wrapper).toMatchSnapshot();
  });
});
이렇게 사용하며 mount라는 함수는 Enzyme을 통해 리액트 컴포넌트를 렌더링 해준다. 이를 통해서 만든 wrapper를 통해 props조회, DOM조회, state조회 등을 할 수 있다.
자 이제. 다시 npm test를 하면 또 다른 snapshot폴더와 파일들이 생겼을 것이다.
props접근
Enzyme에서는 컴포넌트 인스턴스에 접근할 수 있다. 새로운 테스트 케이스를 만들어보자.
import React from 'react';
import { mount } from 'enzyme';
import NameList from './NameList';

describe('<NameList />', () => {
  it('matches snapshot', () => {
    const wrapper = mount(<NameList username={["aerirang","647"]} />);
     expect(wrapper).toMatchSnapshot();
  });

  it('renders names', () => {
    const wrapper = mount(<NameList names={같음}/>);
    //expect(wrapper.props().names).toBe(['aerirang', '647']);
     expect(wrapper.props().names).toEqual(['aerirang','647'])
  })
})
toBe와 toEqual의 차이 공부하기
DOM확인
DOM에 우리가 원하는 텍스트가 나타나있는지 확인해보자.
find함수를 사용해서 querySelector처럼 특정 DOM을 선택할 수 있다. css클래스는 find('.my-class') , id는 find('#myid'), 태그는 find('span') 이런식으로 찾을 수 있고 여기에 컴포넌트의 Display Name을 사용하면 특정 컴포넌트의 인스턴스도 찾을 수 있다. find('MyComponent')
import React from 'react';
import { mount } from 'enzyme';
import NameList from './NameList';

describe('<NameList />', () => {
  it('matches snapshot', () => {
    const wrapper = mount(<NameList username={["aerirang","647"]} />);
     expect(wrapper).toMatchSnapshot();
  });

  it('renders names', () => {
    const wrapper = mount(<NameList names={같음}/>);
    expect(wrapper.props().names).toEqual(['aerirang','647'])

    const liElement = wrapper.find('span');
    expect(spanElement.text()).toBe([])
  })
})
이런식으로!
shallow와 mount의 차이
shallow는 컴포넌트 내부에 또다른 리액트 컴포넌트가 있다면 이를 렌더링 하지 않는다. 만약 우리가 Counter컴포넌트에서 다른 컴포넌트를 렌더링 할 경우 shallow의 경우 다음과 같은 결과가 나타난다.
//Jest Snapshot v1, http://goo.gl/

export[`<Counter /> matches snapshot 1`] = `
  <div>
     <h2>
       0
     </h2>
     <button onClick={[Function]}>
       +1
      </button>
      <button onClick={[Function]}>
        -1
       </button>
       <다른 컴포넌트 names={} />
  </div>`
mount의 경우
//Jest Snapshot v1, http://goo.gl/

export[`<Counter /> matches snapshot 1`] = `
<Counter>
  <div>
     <h2>
       0
     </h2>
     <button onClick={[Function]}>
       +1
      </button>
      <button onClick={[Function]}>
        -1
       </button>
       <다른 컴포넌트 names={} >
         <div>
           <p>hi</p>
         </div>
       </다른 컴포넌트>
  </div>
</Counter>
`
이렇게 mount의 경우 안에 컴포넌트까지 전부 렌더링되는 반면 shallow에서는 이 작업이 생략되었다. 또 mount에서는 최상위 요소가 Counter컴포넌트인 반면, shallow에서는 최상위 요소가 div라서 shallow를 할 경우 wrapper.props()를 조회하게 되면 컴포넌트의 props가 나타나는 것이 아니라 div의 props가 나타나게 된다.
컴포넌트의 state를 조회할 때에는
expect(wrapper.state().number).toBe(0);
위와 같이 state()함수를 사용하고
내장 메서드를 호출할 때에는
wrapper.instance().handleIncrease();
instance()함수를 호출하여 인스턴스를 조회 후 메서드를 호출할 수 있다.
DOM 이벤트 시뮬레이트
이번엔 내장 메서드를 직접 호출하는게 아니라 버튼 클릭 이벤트를 시뮬레이트 하여 기능이 잘 작동하는지 확인해보겠다.
import React from 'react';
import { shallow } from 'enzyme';
import Counter from './Counter';

describe('<Counter />', () => {
  it('matches snapshot', () => {
    const wrapper = shallow(<Counter />);
    expect(wrapper).toMatchSnapshot();
  });
  it('has initial number', () => {
    const wrapper = shallow(<Counter />);
    expect(wrapper.state().number).toBe(0);
  });
  it('increases', () => {
    const wrapper = shallow(<Counter />);
    wrapper.instance().handleIncrease();
    expect(wrapper.state().number).toBe(1);
  });
  it('decreases', () => {
    const wrapper = shallow(<Counter />);
    wrapper.instance().handleDecrease();
    expect(wrapper.state().number).toBe(-1);
  });
  it('calls handleIncrease', () => {
    // 클릭이벤트를 시뮬레이트하고, state 를 확인
    const wrapper = shallow(<Counter />);
    const plusButton = wrapper.findWhere(
      node => node.type() === 'button' && node.text() === '+1'
    );
    plusButton.simulate('click');
    expect(wrapper.state().number).toBe(1);
  });
  it('calls handleDecrease', () => {
    // 클릭 이벤트를 시뮬레이트하고, h2 태그의 텍스트 확인
    const wrapper = shallow(<Counter />);
    const minusButton = wrapper.findWhere(
      node => node.type() === 'button' && node.text() === '-1'
    );
    minusButton.simulate('click');
    const number = wrapper.find('h2');
    expect(number.text()).toBe('-1');
  });
});
위에서 findWhere()함수를 사용하여 우리가 원하는 버튼 태그를 선택해주었다.
이 함수를 사용하면 우리가 원하는 조건을 만족하는 태그를 선택할 수 있다.
findWhere을 사용하지 않는다면
const buttons = wrapper.find('button');
const plusButton = buttons.get(0); // 첫번째 버튼 +1
const minusButton = buttons.get(1); // 두번째 버튼 -1
이렇게 써야 한다.
또,
버튼에 이벤트를 시뮬레이트 할 떄에는 원하는 엘리먼트를 찾아서 simulate()함수를 사용한다. 첫 번째 파라미터에는 이벤트 이름을, 두 번째 파라미터에는 이벤트 객체를 넣는다. 예를 들어, input에 change이벤트를 발생시키는 경우엔 다음과 같다.
input.simulate('change', {
  target: {
    value: 'hello world'
  }
});
이렇게 state를 직접 조회하는 방법과 h2태그를 조회해서 값을 확인하는 등 아무거나 사용해도 된다.
대망의 함수형 컴포넌트와 Hooks 테스팅
import React, { useState, useCallback } from 'react';

const HookCounter = () => {
  const [number, setNumber] = useState(0);
  const onIncrease = useCallback(() => {
    setNumber(number + 1);
  }, [number]);
  const onDecrease = useCallback(() => {
    setNumber(number - 1);
  }, [number]);

  return (
    <div>
      <h2>{number}</h2>
      <button onClick={onIncrease}>+1</button>
      <button onClick={onDecrease}>-1</button>
    </div>
  );
};

export default HookCounter;
컴포넌트를 만들고
App.js에
import React from 'react';

import HookCounter from './HookCounter';

function App() {
  return (
    <div>
      <HookCounter />
    </div>
  );
}

export default App;
렌더를 시켜준다.
함수형 컴포넌트에서는 클래스형과 달리 인스턴스 메서드 및 상태를 조회할 방법이 없다. 추가적으로 Hooks를 사용하는 경우 꼭 mount를 써줘야 한다.(shallow말고) 그 이유는, useEffectHook은 shallow에서 작동하지 않고 버튼 엘리먼트에 연결되어있는 함수가 이전 함수를 가르키고 있기 때문이다. +1 버튼 시뮬레이트 2번 해도 결과 값이 2가 아니라 1이 되어있다는 것이다.
HookCounter.test.js로는
import React from 'react';
import { mount } from 'enzyme';
import HookCounter from './HookCounter';

describe('<HookCounter />', () => {
  it('matches snapshot', () => {
    const wrapper = mount(<HookCounter />);
    expect(wrapper).toMatchSnapshot();
  });
  it('increases', () => {
    const wrapper = mount(<HookCounter />);
    let plusButton = wrapper.findWhere(
      node => node.type() === 'button' && node.text() === '+1'
    );
    plusButton.simulate('click');
    plusButton.simulate('click');

    const number = wrapper.find('h2');

    expect(number.text()).toBe('2');
  });
  it('decreases', () => {
    const wrapper = mount(<HookCounter />);
    let decreaseButton = wrapper.findWhere(
      node => node.type() === 'button' && node.text() === '-1'
    );
    decreaseButton.simulate('click');
    decreaseButton.simulate('click');

    const number = wrapper.find('h2');

    expect(number.text()).toBe('-2');
  });
}
이런식으로 쓰면 된다.
끝!

와 ㅠㅠ 너무 어려워요 저도 빨리 이거 공부하고 싶음...