
Java를 사용해 동적 웹 페이지를 구현하던 초기에 Servlet이라는 프로그램을 사용했다.
Servlet
서블릿은 HTTP 프로토콜 기반의 웹 서버와 다양한 언어로 구현된 프로그램 간의 데이터를 교환하는 인터페이스인 Common Gateway Interface 프로그램을 자바로 보완한 인터페이스이다.
필자는 본래 HTML 파일을 렌더링 하는 일은 클라이언트에서만 수행하는 줄 알았는데, 서블릿은 그러한 렌더링을 요청에 따라 서버에서 동적으로 응답하는 기능을 갖고 있다. 이러한 작업을 서버 사이드 렌더링(SSR)이라고 한다.
실행 과정 및 상속 관계
서블릿은 자바로 만들어졌기 때문에 자바의 일반적인 특징을 갖고 있지만 독자적으로 실행되지 못하고 JSP/서블릿 컨테이너에서 실행된다.
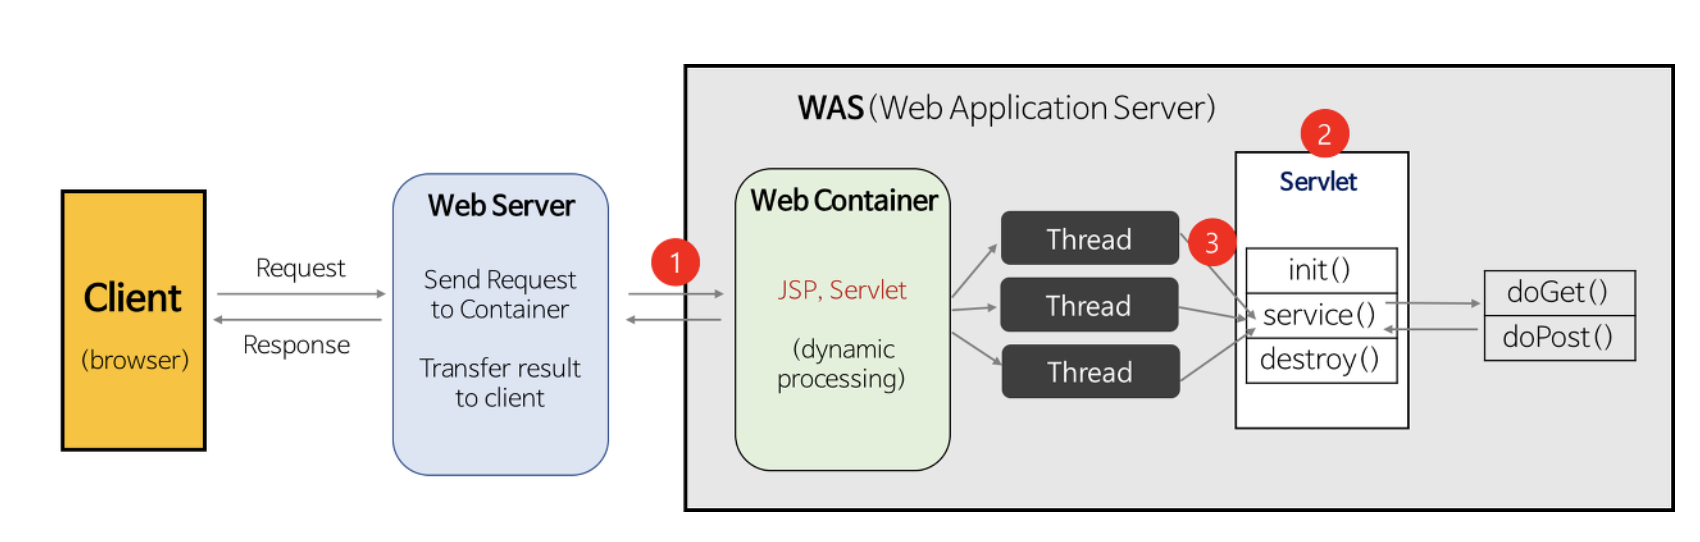
순서는 다음과 같다.
1. 클라이언트에서 요청을 받은 서버는 콘테이너인 웹어플리케이션서버WAS에 요청을 전달한다.
2. 그럼 WAS는 각 요청에 맞는 서블릿에 요청을 주고 실행시킨다.
3. 콘테이너에서 모든 과정은 멀티 스레드 방식으로 실행된다.
4. 호출된 서블릿은 그에 맞는 데이터를 DB에서 입력 혹은 조회한다.
5. 이제 서블릿은 응답을 반환하고, 전달~~해서 클라이언트가 응답받는다.
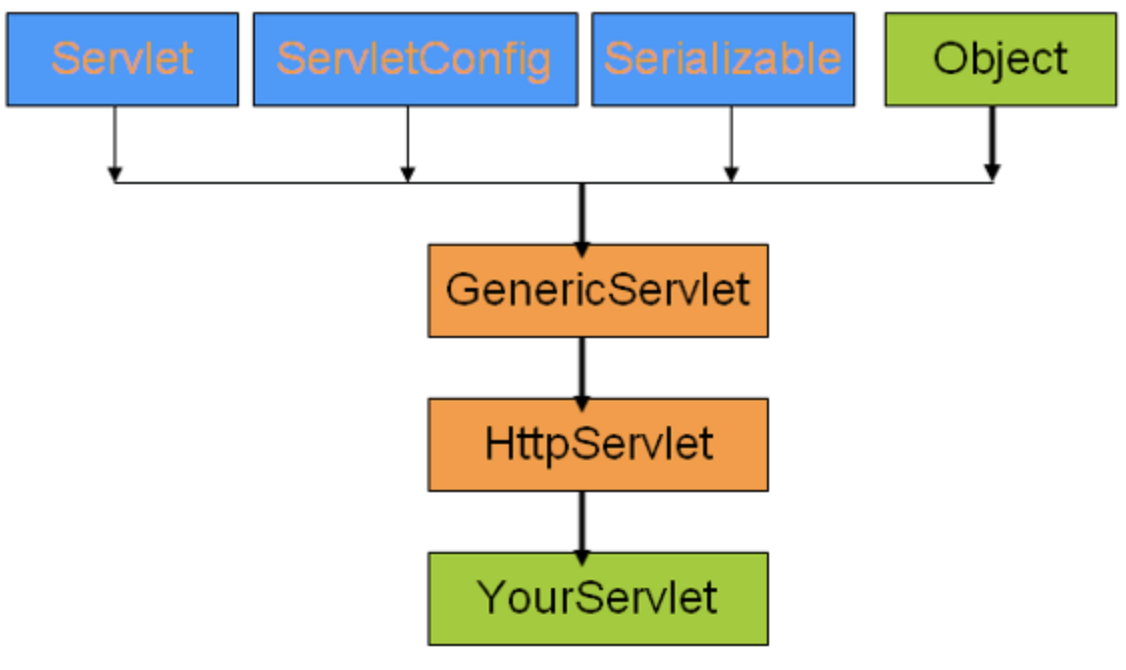
자바처럼 상속 관계를 갖고, 위에 파란색의 인터페이스와 주황색의 클래스로 계층 구조가 이뤄진다.
Life Cycle
서블릿은 다음과 같은 생명주기를 갖고 있다.
| 생명주기 단계 | 메서드 | 특징 |
|---|---|---|
| 초기화 | init() | 서블릿 요청 시 맨 처음에 호출, 초기화 작업 |
| 작업 수행 | doGet(), doPost() | 요청할 때마다 호출 |
| 종료 | destroy() | 서블릿 기능 완료 후 메모리에서 소멸될 때 호출, 마무리 작업 |
Annotation
어노테이션을 활용하면 web.xml 파일을 사용하지 않고 보다 간편하게 서블릿 매핑을 할 수 있다.
@WebServlet("/flow")
public class FlowServlet extends HttpServlet {
	private static final long serialVersionUID = 1L;

	public void init(ServletConfig config) throws ServletException {
		System.out.println("1.init 호출(update)");
	}

	public void destroy() {
		System.out.println("n.destroy 호출");
	}

	protected void doGet(HttpServletRequest request, HttpServletResponse response) throws ServletException, IOException {
		System.out.println("n.doGet 호출");
		response.getWriter().append("Served at: ").append(request.getContextPath());
	}
이렇게 엔드포인트를 어노테이션으로 적용할 수 있다. 이는 express의 라우터와 비슷한 거 같다.
클라이언트 요청 받기
HTML의 form 태그에 값을 서블릿에서 읽어 로직을 구현할 수 있다.
<form action="login" method="get" encType="UTF-8">
  아이디 입력 : <input type="text" name="id" />
  <br />
  암호 입력 : <input type="password" name="pw" />
  <br />
  <select name="title" multiple="multiple">
    <option>웹클라이언트</option>
    <option>웹서버</option>
    <option>데이터베이스</option>
    <option>서비스배포</option>
  </select>
  <input type="submit" value="로그인" />
</form>- form 태그의 method를 통해 get/post 요청을 관리할 수 있다.
- action이 엔드포인트이며, 해당 서블릿에 form 태그의 요청이 닿는다.
- input 태그의 name 속성을 활용해 서블릿과 소통할 수 있다.
protected void doGet(HttpServletRequest request, HttpServletResponse response)
	throws ServletException, IOException {
		String id = request.getParameter("id");
		String pw = request.getParameter("pw");
		String[] title = request.getParameterValues("title");

		response.setContentType("text/html; charset=utf-8;");
		PrintWriter out = response.getWriter();
		out.println("<h1>" + id + " 회원님 환영합니다." + "</h1>");
		out.println("<h1>" + pw + " 회원님 환영합니다." + "</h1>");
		for(String t : title) {
			out.println("<h1>" + t + " 회원님 환영합니다." + "</h1>");
		}
}- 파라미터를 프로퍼티화해서 받는 방식이다. (express 쓸 때 해봤다!)
- getParameterValues 메서드를 활용해 데이터를 배열화하고, 여러 데이터를 하나의 파라미터에 받을 수 있다.
- PrintWriter 타입의 인스턴스를 활용해 브라우저 화면에 값을 띄울 수 있다.
- form 태그의 메소드 속성값이 do이면 doGet메소드를, post면 doPost 메소드를 쓰면 된다
는 건 이제 바로 알아야 한다! - doHandle() 메소드를 활용하면 get/post를 동시에 활용할 수 있다고 한다.
비즈니스 로직 with DAO, DTO
DAO, DTO 같은 Persistence Layer을 활용해 서블릿에서 DB와 연동해 비즈니스 로직을 구현할 수 있다.
우선 member라는 테이블이 있고, DTO는 해당 테이블에 getter/setter 메소드를 가지고 있다고 하자.
그리고, SQL문을 미리 컴파일해 재사용성을 높이는 PreparedStatement 인터페이스를 사용하겠다.
public class MemberDAO {
	Connection con = null;
	PreparedStatement pt = null;
    ResultSet rs = null;

    public MemberDTO getMember(String id, String pw) {
		MemberDTO dto = null;
		try {
			Class.forName(ConnectionInform.DRIVER_CLASS); // db 연결
			con = DriverManager.getConnection(
            	ConnectionInform.JDBC_URL,
                ConnectionInform.USERNAME,
                ConnectionInform.PASSWORD
			);

            String sql = "SELECT * FROM member WHERE id=?";
			pt = con.prepareStatement(sql);
			pt.setString(1, id);
			rs = pt.executeQuery();

            if (rs.next()) { // id 존재시,
				String dbpw = rs.getString("pw");
				if (pw.equals(dbpw)) { // 암호 일치시,
					dto = new MemberDTO(
                    rs.getString("id"),
                    rs.getString("pw"),
                    rs.getString("indate")
                    );
				}
                else {
					dto = new MemberDTO();
					dto.setId(rs.getString("id"));
					System.out.println("암호 맞지 않습니다. 4번 입력하세요");
				}
			} else {
				System.out.println("1번 회원가입부터 하세요");
			}
		}
        catch (Exception e) {...}
        finally {
			try {
				pt.close();
				con.close();
			}
            catch (Exception e) {..}
		}
		return dto;
	}

    public ArrayList<MemberDTO> getMemberList(int page, int memberPerPage) {
		ArrayList<MemberDTO> list = new ArrayList<>();
		try {
			Context ic = new InitialContext();
			DataSource ds = (DataSource) ic.lookup("java:/comp/env/jdbc/mydb");
			con = ds.getConnection();

			String sql = "SELECT " +
            "INSERT(pw, 2, CHAR_LENGTH(pw)-1, REPEAT('*', char_length(pw)-1 )) AS pw,"
					+ " id, indate FROM member ORDER BY indate LIMIT ?, ?";
            pt = con.prepareStatement(sql);
			pt.setInt(1, page);
			pt.setInt(2, memberPerPage);
			rs = pt.executeQuery();

            while (rs.next()) {
				MemberDTO dto = new MemberDTO(
                  rs.getString("id"),
                  rs.getString("name"),
                  rs.getString("indate")
                );
				dto.setPw(rs.getString("pw"));
				list.add(dto);
			}
		}
        catch (Exception e) {...}
        finally {
			try {
				pt.close();
				con.close();
			}
            catch (Exception e) {
			}
		}
		return list;
	}
}
주목할 점은 첫 번째 메소듼 getMember에선 JDBC 드라이버를 직접 호출해 DB와 연동했다.
하지만 위 방법처럼 요청할 때마다 DB에 연결해 작업하면 시간이 오래 걸리고, 당연히 비효율적일 것이다.
Connection Pool
그래서 WAS가 실행됨과 동시에 미리 연결을 설정하도록 DataSource 클래스를 활용해 연결 상태를 유지할 수 있다.
이러한 과정을 Connection Pool이라고 하고, 이 객체가 어플리케이션 실행 시 미리 생성돼 데이터베이스와 연결된다.
필자가 사용한 톰캣 콘테이너는 자체적으로 ConnectionPool 기능을 제공하는데, 웹 어플리케이션 실행 시 ConnectionPool에 접근하기 위해선 JNDI를 이용한다.
Java Naming and Directory Interface는 Map처럼 키/밸류로 저장하고 키로 값을 뽑아오는 방식이다.
- 톰캣 방식의 경우 Servers 디렉토리에 context.xml 파일에 태그 안에 연결할 DB의 정보를 입력한다.
- DAO 클래스에서 DB와 연동시 미리 설정한 JNDI를 활용해 작업한다.
- 이렇게 위 코드에 getMemberList 메소드에서 ConnectionPool을 구현했다.
확장 API
Forward : 하나의 서블릿에서 다른 서블릿이나 JSP에 직접 GET 방식으로 데이터를 전달하는 방식.
대표적인 포워드 방법은 dispatch가 있다.
RequestDispatcher dispatch = req.getRequestDispatcher("포워드할 서블릿, JSP");
dispatch.forward(req, res);
redirect 방식의 sendRedirect 메소드와 달리, 브라우저를 거치지 않고 같은 컨테이너 내부 서버에서 바로 포워딩을 진행하기 때문에 주소창의 url이 변경되지 않는다.
Binding : 대량의 데이터를 다른 서블릿이나 JSP에 전달 및 공유하는 방식.
req.setAttribute("memberList", "dao.getMemberList(1, 2)");
  ....
req.getAttribute("memberList");
  ...
req.removeAttribute("memberList");
Session
import javax.servlet.http.HttpSession 클래스를 활용해 세션 정보를 저장할 수 있다.
protected void doGet(HttpServletRequest request, HttpServletResponse response) throws ServletException, IOException {
		String id = request.getParameter("id");
		String pw = request.getParameter("pw");
		//요청 보낸 브라우저 세션 확인
		// true(두번째이후 요청)이면 이전 생성 session 대체하고 false(최초 요청)이면 session 생성
		HttpSession session = request.getSession();

		session.setAttribute("sessionid", id);

		response.setContentType("text/html;charset=utf-8");
		PrintWriter out = response.getWriter();
		if(id != null && pw != null) {
			out.println("<testh1> 로그인정보 유효 시간 : "
  				+ session.getMaxInactiveInterval() + "</h1>");
		}
		else {
			out.println("<h1>로그한 적이 없습니다</h1>");
		}

	}
Servlet attribute & Scope
| scope name | Servlet attribute | scope |
|---|---|---|
| 애플리케이션 | ServletContext | 애플리케이션 전체 |
| 세션 | HttpSession | 브라우저에서만 |
| 리퀘스트 | HttpServletRequest | 해당 요청/응답 사이클에서만 |
Filter
필터란 브라우저에서 서블릿에 요청/응답할 때 미리 메소드 작업을 처리하는 기능이다. 이는 express에서 라우트 layer에서 index.js 파일에서 모든 요청/응답에서 공통된 로직을 한 번에 처리하는 것과 비슷하다.
애너테이션을 사용해 필터를 매핑한다.
@WebFilter("/*")
public class EncodingFilter extends HttpFilter implements Filter {
	public void destroy() {...}
  	// 필터 소멸 시, 콘테이너에 의해 호출돼 종료 작업 수행.

	public void doFilter(ServletRequest req, ServletResponse res, FilterChain chain)
  		throws IOException, ServletException {...}
  	// req|res 시, 콘테이너에 의해 호출돼 기능 수행.

	public void init() {...}
  	// 필터 생성 시, 콘테이너에 의해 호툴돼 초기화 작업 수행
}
Listner : DOM의 이벤트리스너와 비슷하다. @WebListner 애너테이션과 사용됨.
JSP와 Spring Framework에 들어가기 전 서블릿에 대한 이해는 필수적이다. 서버사이드렌더링 개념을 잘 복습하자.
본 후기는 유데미-웅진씽크빅 취업 부트캠프 3기 백엔드 과정 학습 일지 리뷰로 작성되었습니다.
유데미 바로가기 / STARTERS 취업 부트캠프 공식 블로그 보러가기
🧷 참고 교재
[길벗]자바 웹을 다루는 기술 - 이병승- https://kangdaseul.tistory.com/13
- https://moonheekim-code.tistory.com/75