(Ubuntu 18.04.6 LTS)
2022.03.22.
C++, VS code 사용
프로그래머스 자율주행 데브코스 3기
Geometric transformation
- Translation transformation
단순히 픽셀 값의 위치를 옮기는 연산. 값이 cv::Mat 객체의 최대값을 넘어갔을 때 값이 입력되지 않도록 처리해주어야한다.

#include <iostream>
#include "opencv2/opencv.hpp"
int main()
{
cv::Mat src = cv::imread("./resources/lenna.bmp",cv::IMREAD_GRAYSCALE);
if (src.empty()){
std::cerr << "Image load failed!" << std::endl;
return -1;
}
cv::Mat dst1(src.rows,src.cols,CV_8UC1,cv::Scalar(0));
for (int y=0;y<src.rows;y++){
for (int x=0;x<src.cols;x++){
int x_ = x + 50;
int y_ = y + 100;
if (y_>=dst1.rows || y<0) continue;
if (x_>=dst1.cols || x<0) continue;
dst1.at<uchar>(y_,x_) = src.at<uchar>(y,x);
}
}
cv::Mat dst2(src.rows+100,src.cols+50,CV_8UC1,cv::Scalar(0));
for (int y=0;y<src.rows;y++){
for (int x=0;x<src.cols;x++){
int x_ = x + 50;
int y_ = y + 100;
if (y_>=dst2.rows || y<0) continue;
if (x_>=dst2.cols || x<0) continue;
dst2.at<uchar>(y_,x_) = src.at<uchar>(y,x);
}
}
cv::imshow("src",src);
cv::imshow("dst1",dst1);
cv::imshow("dst2",dst2);
while(cv::waitKey()!=27) continue;
cv::destroyAllWindows();
return 0;
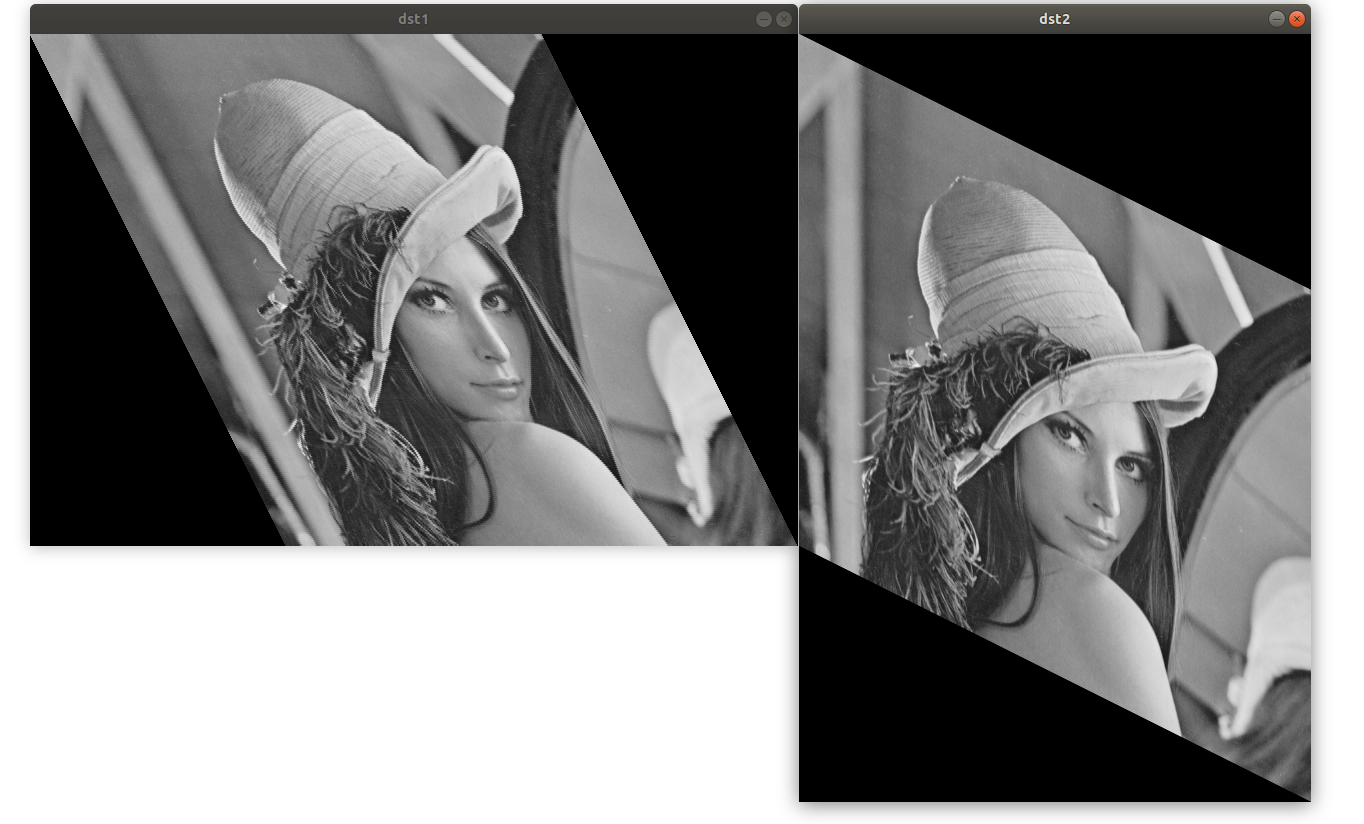
}코드 실행 결과는 아래 이미지에서 확인할 수 있다. dst1에서는 영역밖으로 나가기 때문에 확인하는 코드가 존재한다. dst2는 dst1 창 아래에 존재한다. dst2는 cv::Mat 객체의 크기를 늘렸으며 같은 크기를 평행이동 하여 dst1과 dst2가 겹치는 것을 확인할 수 있다.

- Shear transformation
영상의 한쪽 영역을 밀어주는 연산이다.


#include <iostream>
#include "opencv2/opencv.hpp"

int main()
{
    cv::Mat src = cv::imread("./resources/lenna.bmp",cv::IMREAD_GRAYSCALE);

    if (src.empty()){
        std::cerr << "Image load failed!" << std::endl;
        return -1;
    }
    double m = 0.5;
    cv::Mat dst1(src.rows,src.cols*3/2,CV_8UC1,cv::Scalar(0));
    for (int y=0;y<src.rows;y++){
        for (int x=0;x<src.cols;x++){
            int x_ = int(x+m*y);
            int y_ = y;
            if (y_>=dst1.rows || y<0) continue;
            if (x_>=dst1.cols || x<0) continue;
            dst1.at<uchar>(y_,x_) = src.at<uchar>(y,x);
        }
    }

    cv::Mat dst2;
    float aff_[] = {1,0,0,0.5,1,0};
    cv::Mat aff(2,3,CV_32F,aff_);
    cv::warpAffine(src,dst2,aff,cv::Size(src.cols,src.rows*3/2));

    cv::imshow("src",src);
    cv::imshow("dst1",dst1);
    cv::imshow("dst2",dst2);
    while (cv::waitKey()!=27) continue;
    cv::destroyAllWindows();
    return 0;
}
실행 결과는 아래와 같다. dst2를 만들 때는 warpAffine을 이용해서 만들었는데, 이후 Affine transform에서 내용을 다룬다.
Scale transformation
Scale transformation은 크기를 변환하는 연산이다.

#include <iostream>
#include "opencv2/opencv.hpp"

int main()
{
    cv::Mat src = cv::imread("./resources/lenna.bmp",cv::IMREAD_GRAYSCALE);

    if (src.empty()){
        std::cerr << "Image load failed!" << std::endl;
        return -1;
    }

    cv::Mat dst1(src.rows * 2, src.cols * 2, CV_8UC1, cv::Scalar(0));
    for (int y=0;y<src.rows;y++){
        for (int x=0;x<src.cols;x++){
            int x_ = x * 2;
            int y_ = y * 2;
            dst1.at<uchar>(y_,x_) = src.at<uchar>(y,x);
        }
    }
    cv::Mat dst2 = cv::Mat::zeros(src.rows*2,src.cols*2,CV_8UC1);
    for (int y_=0;y_<dst2.rows;y_++){
        for (int x_=0;x_<dst2.cols;x_++){
            int x = x_ / 2;
            int y = y_ / 2;
            dst2.at<uchar>(y_,x_) = src.at<uchar>(y,x);
        }
    }
    cv::imshow("src",src);
    cv::imshow("dst1",dst1);
    cv::imshow("dst2",dst2);
    while (cv::waitKey()!=27) continue;
    cv::destroyAllWindows();
    return 0;
}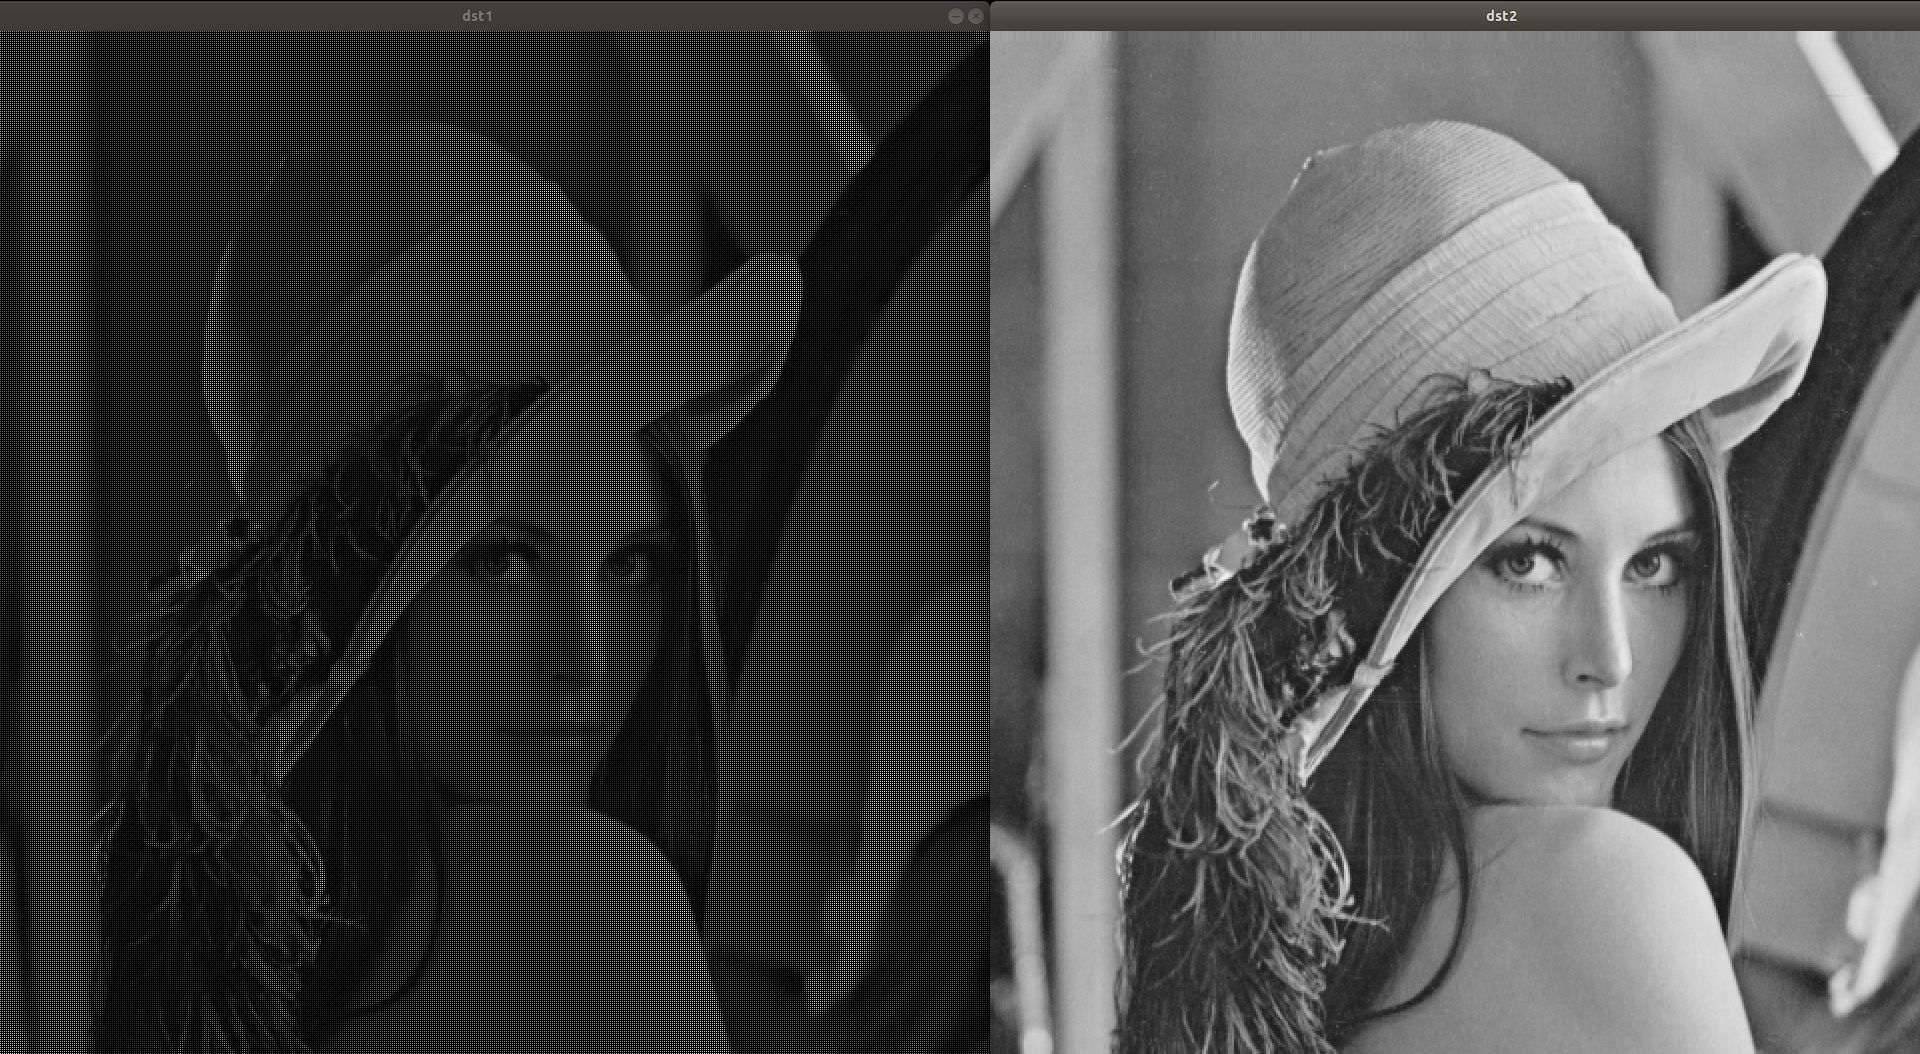
dst1은 src의 이미지를 기준으로 forward mapping한 것이다. 이럴 경우 크기 사이에 있는 부분마다 공백이 발생하며, 위의 경우 검정 밝기로 나타나 사이즈 변화가 제대로 이루어지지 않았다. dst2는 dst2를 기준으로 src 값을 참조하는 backward mapping을 사용했다. 위의 이미지에서 dst1보다 나은 결과를 냄을 확인할 수 있다.
Interpolation
사이즈를 키울 경우에는 위에서 본 것처럼, 빈 픽셀에 대해 어떻게 처리할지를 구현해야한다. 유사하게, 영상 축소 시에도 겹치는 픽셀들 중 사용할 밝기 값을 조정해주어야한다. OpenCV에서는 resize 함수 내에서 보간법을 결정할 수 있다.
void cv::resize 	( 	InputArray  	src,
		OutputArray  	dst,
		Size  	dsize,
		double  	fx = 0,
		double  	fy = 0,
		int  	interpolation = INTER_LINEAR
	)
OpenCV에서는 위와 같은 함수를 제공한다. dsize는 결과 영상의 크기로 cv::Size()로 둘 경우 fx, fy에 의해 결정된다. fx와 fy는 각각 x방향, y방향 scale factor이다. Interpoation은 아래와 같이 존재한다.
- INTER_NEAREST: nearest neighbor interpolation
- INTER_LINEAR: bilinear interpolation
- INTER_CUBIC: bicubic interpolation
- INTER_AREA: resampling using pixel area relation. It may be a preferred method for image decimation, as it gives moire'-free results. But when the image is zoomed, it is similar to the INTER_NEAREST method.
- INTER_LANCZOS4: Lanczos interpolation over 8x8 neighborhood
Linear, cubic, Lanczos로 갈 수록 참조하는 픽셀 수가 증가하며 연산양이 증가해 더욱 부드럽게 확대할 수 있다. 축소하는 경우 area 방식을 이용하는 것이 좋다.
Interpolation 전체 방법은 아래에서 확인할 수 있다.
https://docs.opencv.org/4.x/da/d54/group__imgproc__transform.html#ga5bb5a1fea74ea38e1a5445ca803ff121
#include <iostream>
#include "opencv2/opencv.hpp"

int main()
{
    cv::Mat src = cv::imread("./resources/lenna.bmp",cv::IMREAD_GRAYSCALE);

    cv::Mat dst1,dst2,dst3,dst4;

    cv::resize(src,dst1,cv::Size(),4,4,cv::INTER_NEAREST);
    cv::resize(src,dst2,cv::Size(),4,4,cv::INTER_LINEAR);
    cv::resize(src,dst3,cv::Size(),4,4,cv::INTER_CUBIC);
    cv::resize(src,dst4,cv::Size(),4,4,cv::INTER_LANCZOS4);

    cv::putText(dst1,"INTER_NEAREST",cv::Point(410,540),cv::FONT_HERSHEY_DUPLEX,0.7,cv::Scalar(0),2);
    cv::putText(dst2,"INTER_LINEAR",cv::Point(410,540),cv::FONT_HERSHEY_DUPLEX,0.7,cv::Scalar(0),2);
    cv::putText(dst3,"INTER_CUBIC",cv::Point(410,540),cv::FONT_HERSHEY_DUPLEX,0.7,cv::Scalar(0),2);
    cv::putText(dst4,"INTER_LANCZOS4",cv::Point(410,540),cv::FONT_HERSHEY_DUPLEX,0.7,cv::Scalar(0),2);


    cv::imshow("dst1",dst1(cv::Rect(400,500,400,400)));
    cv::imshow("dst2",dst2(cv::Rect(400,500,400,400)));
    cv::imshow("dst3",dst3(cv::Rect(400,500,400,400)));
    cv::imshow("dst4",dst4(cv::Rect(400,500,400,400)));
    while (cv::waitKey()!=27) continue;
    cv::destroyAllWindows();
    return 0;
}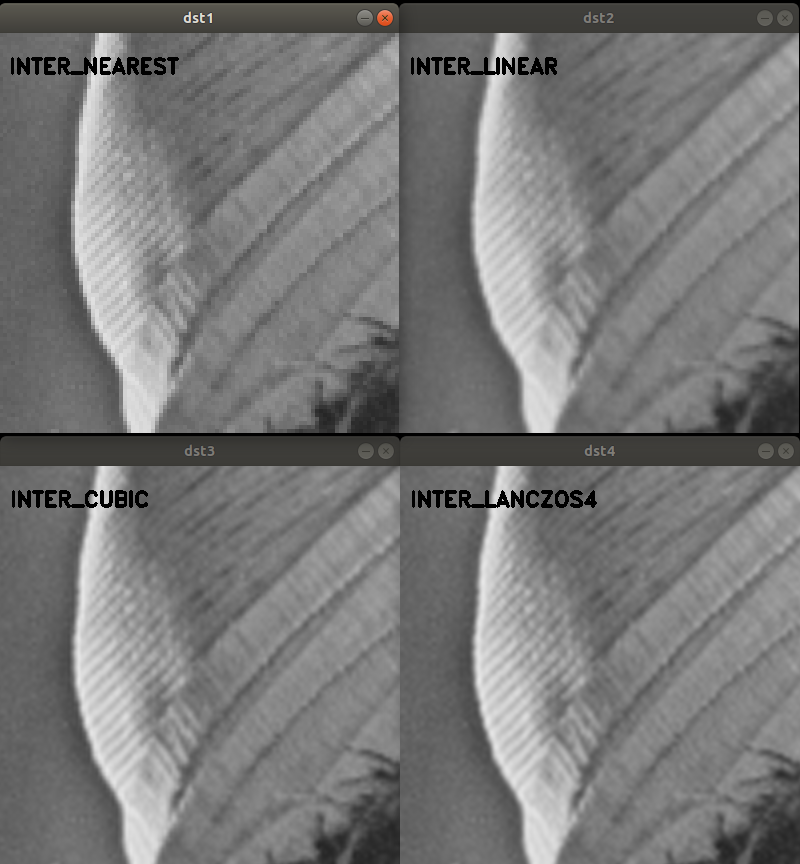
여러 interpolation 방법을 이용 후 4배 확대 이후 일부 영역만 확인하는 코드를 작성하였다. 실행결과를 확인하였을 때, inter_nearest에서 inter_linear로 가는 경우 차이가 쉽게 확인되지만 이후부터는 급격한 차이를 보기는 어려웠다. 화질이 중요한 경우 더 높은 필터를 적용할 수 있겠으나, 보통의 경우 Linear만 사용해도 충분할 것이다.
Rotation transformation
회전 변환은 특정점을 기준으로 회전하는 변환이다. 회전 변환도 공백 픽셀을 피하기 위해서는 backward mapping이나 interpoation을 사용해야한다.

Mat cv::getRotationMatrix2D 	( 	Point2f  	center,
		double  	angle,
		double  	scale
	)
위의 OpenCV 함수에 중심이 되는 점 center, 반시계 방향 회전 각도 angle, 크기 조절을 위한 scale을 입력하면 아래와 같은 형태의 2x3 cv::Mat 객체를 반환한다.


void cv::warpAffine 	( 	InputArray  	src,
		OutputArray  	dst,
		InputArray  	M,
		Size  	dsize,
		int  	flags = INTER_LINEAR,
		int  	borderMode = BORDER_CONSTANT,
		const Scalar &  	borderValue = Scalar()
	)
이후 cv::warpAffine 함수를 이용해서 변환할 수 있다. InputArray M에 2x3 행렬을 입력하면 되며, cv::getRotationMatrix2D 함수의 결과값을 사용할 수 있다. dsize는 결과영상의 크기를 설정하며 cv::Size()로 둘 경우 src와 같으며, flags로 보간법 설정이 가능하다.
#include <iostream>
#include "opencv2/opencv.hpp"
void trackbar_rotate(int pos, void* userdata);
int main()
{
cv::Mat src = cv::imread("./resources/lenna.bmp",cv::IMREAD_COLOR);
if (src.empty()){
std::cerr << "src load failed!" << std::endl;
return -1;
}
cv::namedWindow("dst");
cv::createTrackbar("rotate: ","dst",0,360,trackbar_rotate,(void*)&src);
trackbar_rotate(0,(void*)&src);
cv::waitKey();
cv::destroyAllWindows();
return 0;
}
void trackbar_rotate(int pos, void* userdata){
const cv::Mat& src = *((cv::Mat*)userdata);
cv::Mat dst;
float degree = (float)pos;
cv::Point2f pt(src.cols/2.f,src.rows/2.f);
cv::Mat rot = cv::getRotationMatrix2D(pt,degree,1.0);
cv::warpAffine(src,dst,rot,cv::Size());
cv::imshow("dst",dst);
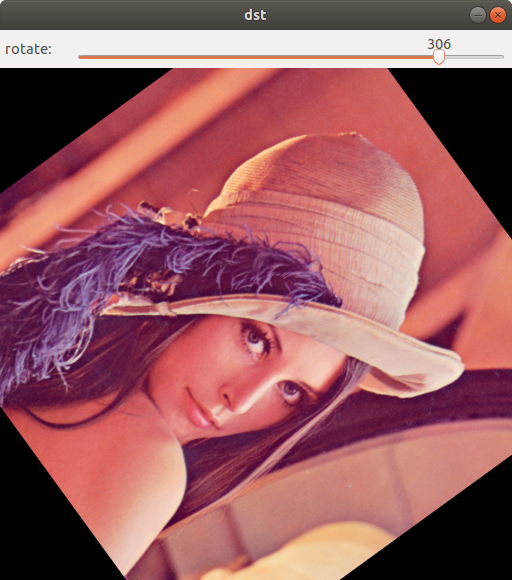
}위의 코드는 영상을 불러와 트랙바를 통해 회전을 구현하는 코드이며, 실행결과는 아래와 같다.
Homogeneous coordinates
이전에 사용되었던 변환은 아래와 같은 형식으로 표현되었다.

회전변환과 크기변환만 사용하는 경우 b가 영벡터가 되어 여러 연산을 거쳐도 행렬의 곱으로만 해당 변환을 표기할 수 있다. 하지만 translation이 추가되면 b가 영벡터가 아니게 되어 행렬의 곱 이외의 항이 생겨 표현의 불편함이 있었다. Homogeneous coordinates는 (x,y)로 좌표를 표현하던 기존 방식 대신 (x,y,1)을 사용하는 방법으로, translation 또한 행렬의 곱 형태로 표현할 수 있다. 아래는 각각의 연산이 새로 정의되는 방식이다.
Translation transform

Shear transfrom


Scale transform

Rotation transform

각각의 연산들은 연속은 행렬들의 곱으로 표현될 수 있게 되며, 이전의 cp::warpAffine 함수는 이러한 연산을 2x3 행렬을 받아 수행할 수 있다.
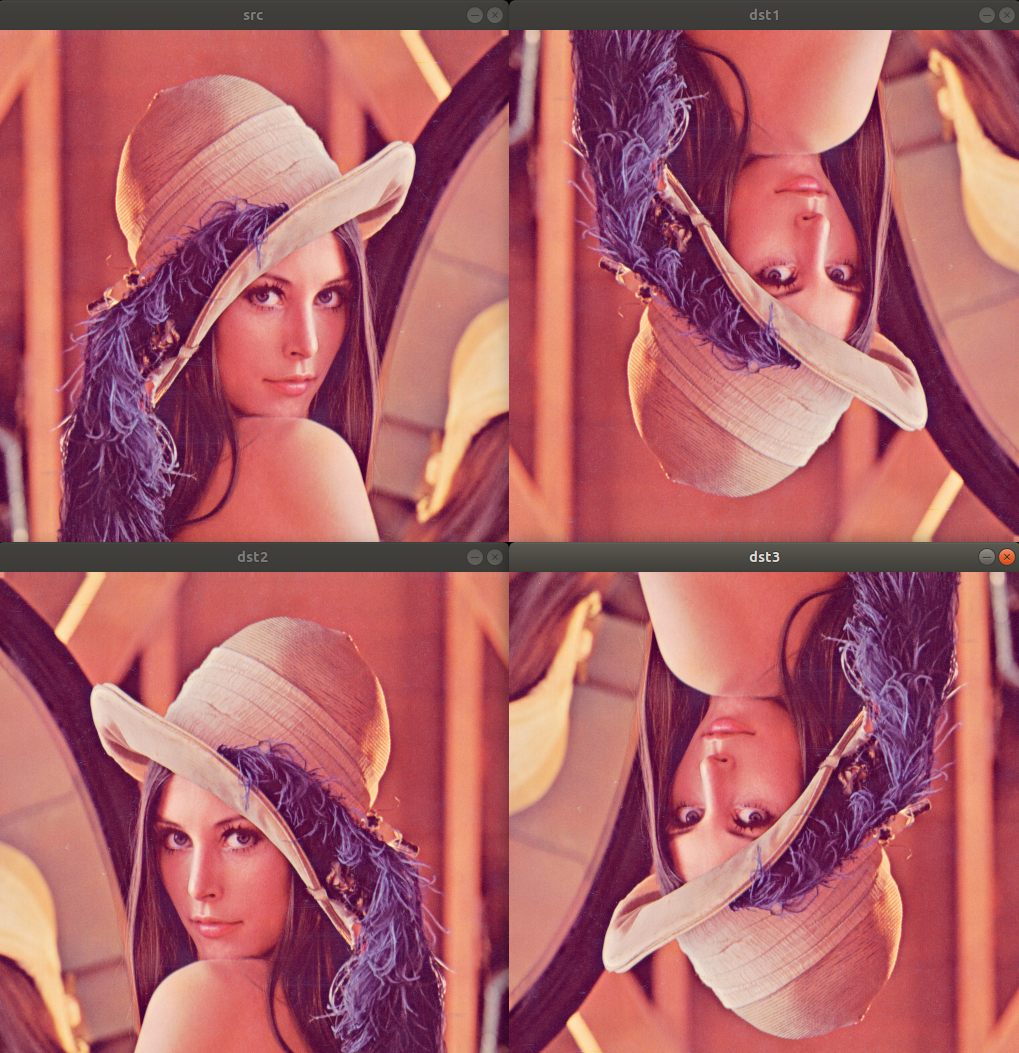
Flip, reflection
void cv::flip 	( 	InputArray  	src,
		OutputArray  	dst,
		int  	flipCode
	)
OpenCV에서는 flip을 위한 함수를 제공하며, flipCode에 따라서 대칭방향이 지정된다.

0이면 상하대칭, 양수이면 좌우 대칭, 음수이면 상하, 좌우 대칭이다.
#include <iostream>
#include "opencv2/opencv.hpp"

int main()
{
    cv::Mat src = cv::imread("./resources/lenna.bmp",cv::IMREAD_COLOR);

    if (src.empty()){
        std::cerr << "src load failed!" << std::endl;
        return -1;
    }

    cv::Mat dst1, dst2, dst3;
    cv::flip(src,dst1,0);
    cv::flip(src,dst2,1);
    cv::flip(src,dst3,-1);
    cv::imshow("src",src);
    cv::imshow("dst1",dst1);
    cv::imshow("dst2",dst1);
    cv::imshow("dst3",dst1);
    while (cv::waitKey()!=27) continue;
    cv::destroyAllWindows();
    return 0;
}
Affine transfromation
Affine transformation은 직선과 평행성을 보존하는 geometric transformation으로, identity, translation, reflection, scale, rotate, shear가 이에 해당한다.
https://en.wikipedia.org/wiki/Affine_transformation
Mat cv::getAffineTransform 	( 	const Point2f  	src[],
		const Point2f  	dst[]
	)

Mat cv::getAffineTransform 	( 	InputArray  	src,
		InputArray  	dst
	)
src와 dst로 세 가지 좌표를 받아 2x3 affine matrix를 취득한다.
cv::Point2f src[3]이나 vector<cv::Point2f> src를 값으로 줄 수 있다.

void cv::warpAffine 	( 	InputArray  	src,
		OutputArray  	dst,
		InputArray  	M,
		Size  	dsize,
		int  	flags = INTER_LINEAR,
		int  	borderMode = BORDER_CONSTANT,
		const Scalar &  	borderValue = Scalar()
	)
Perspective transformation
Perspective transformation은 3차원 공간의 물체를 한 점을 기준으로 2차원 평면에 투영하는 선형 투사법이다.
Mat cv::getPerspectiveTransform 	( 	InputArray  	src,
		InputArray  	dst,
		int  	solveMethod = DECOMP_LU
	)

Mat cv::getPerspectiveTransform 	( 	const Point2f  	src[],
		const Point2f  	dst[],
		int  	solveMethod = DECOMP_LU
	)
위의 getAffineTransfrom과 유사하지만, 4개의 좌표가 필요하다는 차이점있다.

solveMethod는 아래에서 확인할 수 있다.
https://docs.opencv.org/4.x/d2/de8/group__core__array.html#gaaf9ea5dcc392d5ae04eacb9920b9674c
void cv::warpPerspective 	( 	InputArray  	src,
		OutputArray  	dst,
		InputArray  	M,
		Size  	dsize,
		int  	flags = INTER_LINEAR,
		int  	borderMode = BORDER_CONSTANT,
		const Scalar &  	borderValue = Scalar()
	)
InputArray M은 CV_32F 또는 CV_64F타입의 3x3 행렬이며, 이외의 인자들은 이전과 유사하다.
//bird eye view
#include <iostream>
#include "opencv2/opencv.hpp"

int main()
{
    cv::VideoCapture cap("./resources/test_video.mp4");

    if (!cap.isOpened()){
        std::cerr << "video load failed!" << std::endl;
        return -1;
    }

    cv::Mat frame,dst;

    int w=500, h = 260;

    std::vector<cv::Point2f> src_pts(4);
    std::vector<cv::Point2f> dst_pts(4);

	src_pts[0] = cv::Point2f(474, 400);
    src_pts[1] = cv::Point2f(710, 400);
	src_pts[2] = cv::Point2f(866, 530);
    src_pts[3] = cv::Point2f(366, 530);

	dst_pts[0] = cv::Point2f(0, 0);
    dst_pts[1] = cv::Point2f(w-1, 0);
	dst_pts[2] = cv::Point2f(w-1, h-1);
    dst_pts[3] = cv::Point2f(0, h-1);

    std::vector<cv::Point> pts;
    for (auto pt : src_pts){
        pts.push_back(cv::Point(pt.x,pt.y));
    }
    cv::Mat per_mat = cv::getPerspectiveTransform(src_pts,dst_pts);

    while(true){
        cap >> frame;
        if (frame.empty()){
            std::cout << "empty frame" << std::endl;
            break;
        }

        cv::warpPerspective(frame,dst,per_mat,cv::Size(w,h));

        cv::polylines(frame,pts,true,cv::Scalar(255,0,0),2,cv::LINE_AA);

        cv::imshow("frame",frame);
        cv::imshow("dst",dst);

        if(cv::waitKey(10)==27) break;
    }
}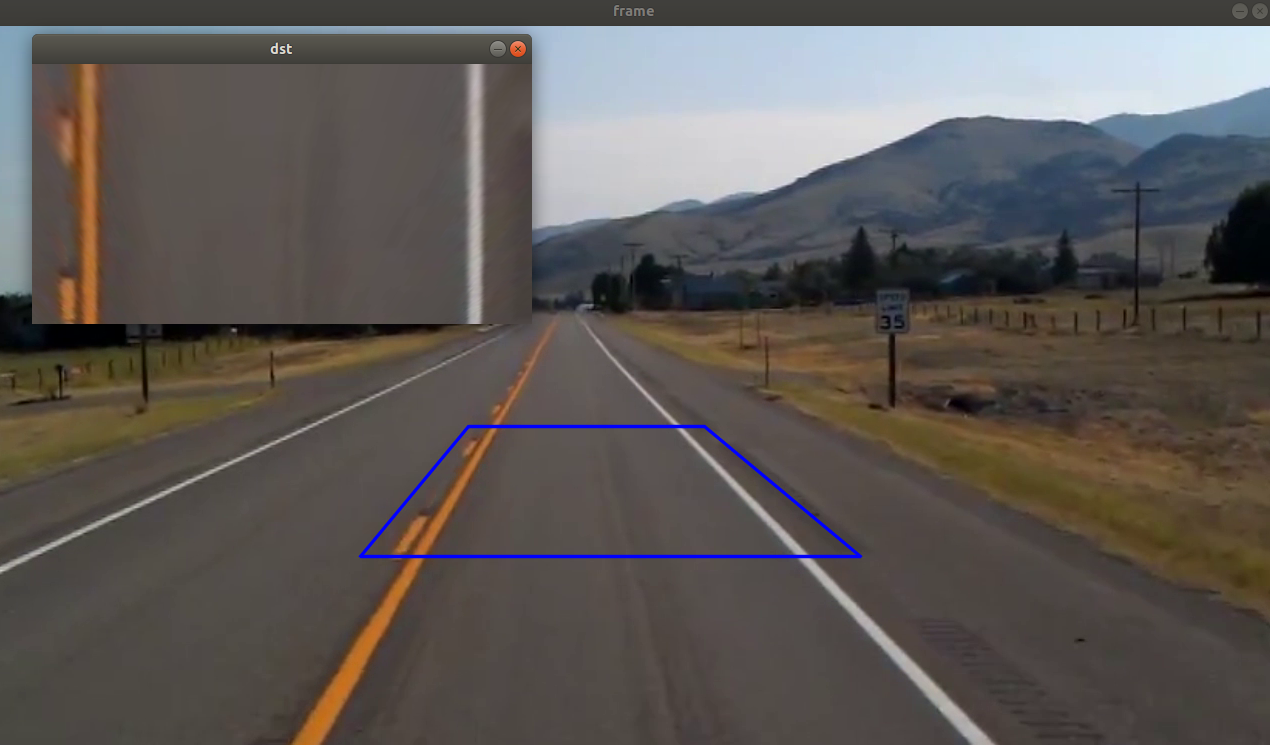
위의 코드는 표시된 사각형을 dst의 직사각형으로 perspective transfrom한 결과이다.
