블로그 내 코드 자료 출처
Node.js 교과서 개정2판(지음이 조현영)
복습
함수 Function()
function()을 사용해서 원하는 결과 반환 하는 방법 return문을 사용한다.
function() {
return x
}
여기서 x에 원하는 값 혹은 식을 넣을 수 있다.
함수를 선언하는 방법은 여러가지가 있다.
화살표 함수라고 부르는 선언 법이다.
1. function add1 (x,y) {};
2. const add2 = (x,y) => {};
3. const add3 = (x,y) => {x,y}
문자열 String
문자열을 이어 붙이는 방법
숫자 타입과 문자 타입을 더하면+ 문자열이 된다.
문자열을 더하는 방법은(이어 붙이는 방법) 두가지가 있다.
1. + 연산자 사용
2. ${문자열 변수명} 사용 이 때, +연산자는 사용하지 않는다.
배열 Array[]
두가지가 있다.
1. let A = new array('1','2'...)
2. const A =['1','2'...]
추천하는 방법은 2번째 const와 대괄호[ ]를 사용하는 방법이다.
관련 함수
1. concat()
2.
객체 Object{}
선언 방법
const 객체명 {};
객체 내용 안에는 속성명과 속성값이 있다. (키값, 키밸류 라고 부르기도 한다.)
형식은 속성명:속성값
속성값은 변수, 상수, 함수, 배열, 객체 등 다양하게 사용할 수 있다.
객체에 접근하는 방법은 객체명.속성명 이다.
- this 명령어
사용방법thisorthis.속성명
뜻, this는 상위변수를 칭한다.(여기서변수는 일반적으로 객체명이다.)
복습.실습
아래 1.~4.번 문제를 실행 시키자.
1. 변수
- 변수 num1에 1(number)을 초기화(initial)하기
- 변수 num1 콘솔에 찍어보기(print)
- 변수 num2에 2(number)를 초기화(initial)하기
- 변수 num2 콘솔에 찍어보기(print)
- 변수 num1, num2를 더한 값을 콘솔에 찍어보기(print)
- 변수 num1, num2를 뺀 값을 콘솔에 찍어보기(print)
- 변수 str1에 "안녕하세요"을 초기화(initial)하기
- 변수 str1 콘솔에 찍어보기(print)
- 변수 str2에 "반갑습니다"를 초기화(initial)하기
- 변수 str2 콘솔에 찍어보기(print)
- 변수 myName에 자신의 이름을 초기화(initial)하기
- 변수 str3 중간에 변수 myName 넣기. "안녕하세요 저는 (myName) 입니다"
- 변수 str3 콘솔에 찍어보기(print)
<html>
  <body>
    211208 오전 복습
  </body>
</html>

<script>
  let num1 = 1
  console.log(num1)

  let num2 = 2
  console.log(num2)
  console.log(num1+num2)
  console.log(num1-num2)

  let str1 = "안녕하세요"
  console.log(str1)
  let str2 = "반갑습니다"
  console.log(str2)

  let myName = "김예찬"
  let str3 = `${str1 } 저는 (${myName}) 입니다`
  console.log(str3)
</script>- 함수
- 콘솔에 "함수 func1 입니다."를 프린트하는 함수 func1 만들기 (function으로 정의)
- 함수 func1 호출하기
- "함수 func2 입니다"를 반환(return)하는 함수 func2 만들기 (변수 = funtion으로 정의)
- 함수 func2 콘솔에 프린트하기
- 숫자20을 반환(return)하는 함수 func3 만들기 (화살표 함수로 정의)
- 숫자10을 반환(return)하는 함수 func4 만들기 (화살표 함수로 정의)
- 함수 func3, func4를 더한 값을 콘솔에 찍어보기
- 함수 func3, func4를 뺀 값을 반환하는 함수 func5 만들기 (화살표 함수로 정의)
- 함수 func5 콘솔에 프린트하기
<script>
  function func1 () {
    console.log("함수 fun1 입니다.")
  }
  func1()

  const func2 = () => {
    const funtion = "함수 func2 입니다"
    console.log(funtion)
    return funtion
  }
  func2()

  const func3 = () => 20
  const func4 = () => 10
  console.log(func3()+func4())

  function func5 () {
    return (func3()-func4())
  }
  console.log(func5())
</script>- 배열
-
변수 arr1에 숫자 1, 2, 3, 4를 초기화하기
-
변수 arr1 콘솔에 프린트하기
-
변수 arr1에 숫자 5 추가하기
-
변수 arr1 콘솔에 프린트하기
-
변수 arr1 맨마지막 아이템 제거하기
-
변수 arr1 콘솔에 프린트하기
-
변수 arr2에 숫자 5, 6, 7, 8를 초기화하기
-
변수 arr2 콘솔에 프린트하기
-
변수 arr2에 숫자 9 추가하기
-
변수 arr2 콘솔에 프린트하기
-
변수 arr2 맨마지막 아이템 제거하기
-
변수 arr2 콘솔에 프린트하기
-
변수 arr3에 arr1, arr2 이어붙인 값 초기화하기
-
변수 arr3 콘솔에 프린트하기
-
변수 arr4에 arr2, arr1 이어붙인 값 초기화하기
-
변수 arr4 콘솔에 프린트하기
<script>
  const arr1 = [1,2,3,4]
  console.log(arr1)
  arr1.push(5)
  console.log(arr1)
  arr1.pop()
  console.log(arr1)

  const arr2 = [5,6,7,8]
  console.log(arr2)
  arr1.push(9)
  console.log(arr2)
  arr1.pop()
  console.log(arr2)

  const arr3 =arr1.concat(arr2)
  console.log(arr3)
  const arr4 =arr2.concat(arr1)
  console.log(arr4)
</script>- 객체
-
객체 person에 이름(name), 나이(age), 생일(birthday) 속성 추가하기
-
객체 person에 "객체안에 함수"을 반환하는 함수 func 추가하기
-
객체 person에 숫자 1, 2, 3이 들어있는 배열 array 속성 추가하기
-
객체 person에 객체 ob 안에 name 속성에 "객체안에 객체" 문자열(string) 넣기
-
객체 person 프린트하기
-
객체 person의 속성 name 프린트하기
-
객체 person의 속성 age 프린트하기
-
객체 person의 속성 birthday 프린트하기
-
객체 person의 속성 array 0번째 인덱스 값 프린트하기
-
객체 person의 속성 array 1번째 인덱스 값 프린트하기
-
객체 person의 속성 array 2번째 인덱스 값 프린트하기
-
객체 person의 속성 func 프린트하기
-
객체 person의 속성 ob 프린트하기
-
객체 person의 속성 ob의 name 프린트하기
<script>
  const person = {
    name : "kim",
    age :"31",
    birthday : "910204",
    func(){
      return"객체안에 함수"
    },
    array:[1,2,3],
    ob:ob={
      name:"객체안에 객체"
    }
  }
  console.log("person : ",person)

  console.log("person name: ",person.name)
  console.log("person age: ",person.age)
  console.log("person birthday: ",person.birthday)

  console.log("person array0: ",person.array[0])
  console.log("person array1: ",person.array[1])
  console.log("person array2: ",person.array[2])

  console.log("person func: ",person.func())
  console.log("person ob: ",person.ob)
  console.log("person ob.name: ",person.ob.name)

</script>
수업
ES2015+
구조분해 할당
array[] 구조분해 할당p.73
let array = ["Baram", "Lee"]
let [firstname,lastname] = array
위와 같이 array라는 배열을 구조분해 할당 한것이다.
아래와 같은 성질을 갖게 되는데, 즉 변수를 선언하여 배열로 초기화한 것이다.
  const firstName = array[0]
const lastName = array[1]- 코드 길이를 줄일 수 있는 장점이 있다.
※배열에서 특정 배열만 구조분해 하고 싶다면, 원하지 않는것은 빈칸으로 두고 작성하면 된다.
let [,lastname] = array
object{} 구조분해 할당p.72
아래 첫 번째 코드역시 객체를 구조분해 할당 하는 방법이다.
  const option = {
    title: "home",
    width: 300,
    height: 500
  }

  const title = option.title
  const width = option.width
  const height = option.height
아래와 같이 작성하면 더욱 간단하게 가능하다.
  const option = {
    title: "home",
    width: 300,
    height: 500
  }

  const {title, width, height} = option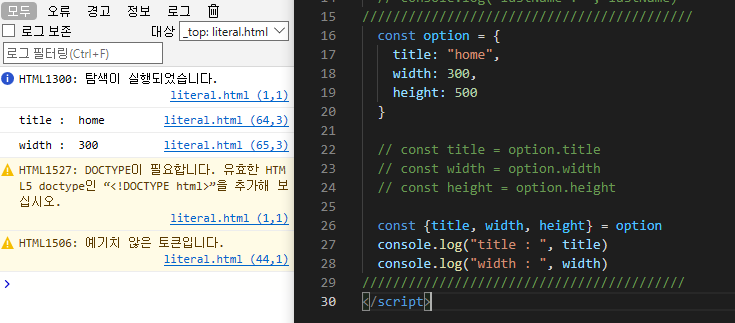
아래와 같이 특수하게 사용 가능하다.
sister:baby 처럼 속성값의 변수를 변경 지정 해줄 수 있고,
grandfather 처럼 속성을 새로 추가할 수가 있다.
  let family = {
    grandmother : "Harrison",
    sister: "Ethan",
    brother: "Austin"
  }
  // const brother = family.brother
  // const baby = family.sister
  // const grandmother = family.father

  const { grandmother, sister:baby,brother, grandfather="Hudson"} = family
  console.log(baby)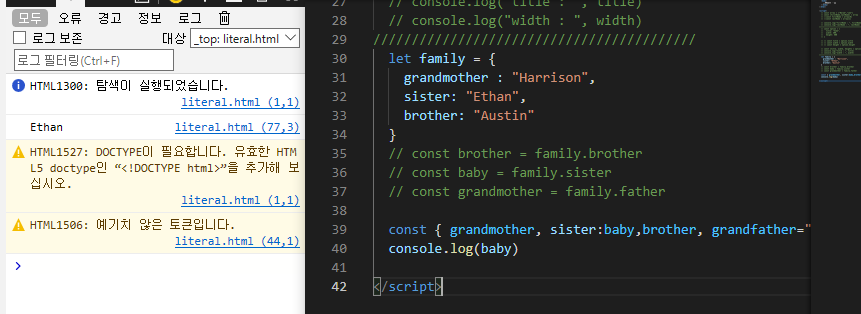
※객체에서 속성 하나만 구조분해 하고 싶다면, 하나만 작성하면 된다.
const { brother } = famaily
프로미스 p.75
JS와 NODEJS에는 주로 비동기를 접한다. 특히 이벤트 리스너를 사용할 때 콜백 함수를 자주 사용한다. ES2015부터 JS와 NODEJS의 API들이 콜백 대신 프로미스(Promise)기반으로 재구성되며, 악명 높은 콜백 지옥(callback hell) 현상을 극복했다는 평가를 받고 있다.
프로미스는 반드시 알아두어야 하는 객체이다.
- callback함수 -> 다시 호출하는 함수
비동기 처리란?
- 특정 연산을 실행하고 끝나기 전에, 다음 코드를 실행시키는 JS의 특징
예)
add1(), add2()함수가 있다.
add1(); //실행 시 소요시간 1분
add2();
위와 같은 순서로 함수를 실행 시키는데, add1()의 연산이 완료되는 시간은 1분이다.
add1()을 실행시키고 add2()를 실행시키는데 걸리는 시간은 단 몇ms이기 때문에
add1()연산 결과가 도출 되기 전에 add2()가 실행되고 어쩌면 add2()가 add1()보다 먼저 결과를 도출 할 수도 있다.
callback이란?
<script>
  const wait_count = (callback) => {
    console.log('ONE')
    setTimeout(()=>{
      console.log('TWO')
      callback()
    } , 1000)
  }
  const count3 = () => console.log('THREE')

  wait_count(count3)
</script>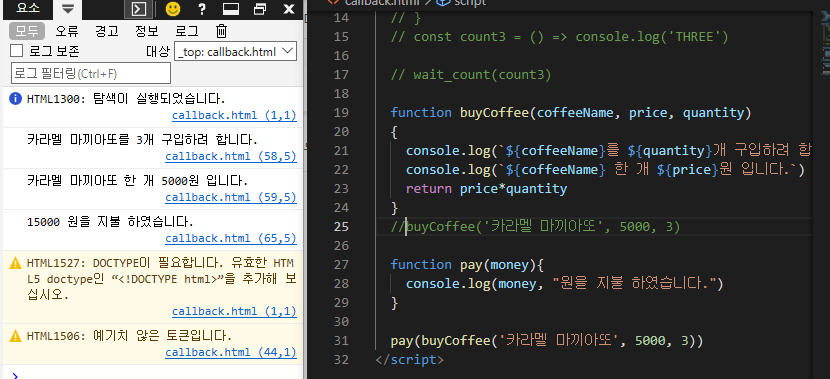
예시 1
  function buyCoffee(coffeeName, price, quantity, callback)
  {
    console.log(`${coffeeName}를 ${quantity}개 구입하려 합니다.`)
    console.log(`${coffeeName} 한 개 ${price}원 입니다.`)
    setTimeout(()=>{
      //return price*quantity
      callback(price*quantity)
    },1000)

  }
  //buyCoffee('카라멜 마끼아또', 5000, 3)

  function pay(money){
    console.log(money, "원을 지불 하였습니다.")
  }

  buyCoffee('카라멜 마끼아또', 5000, 3, pay)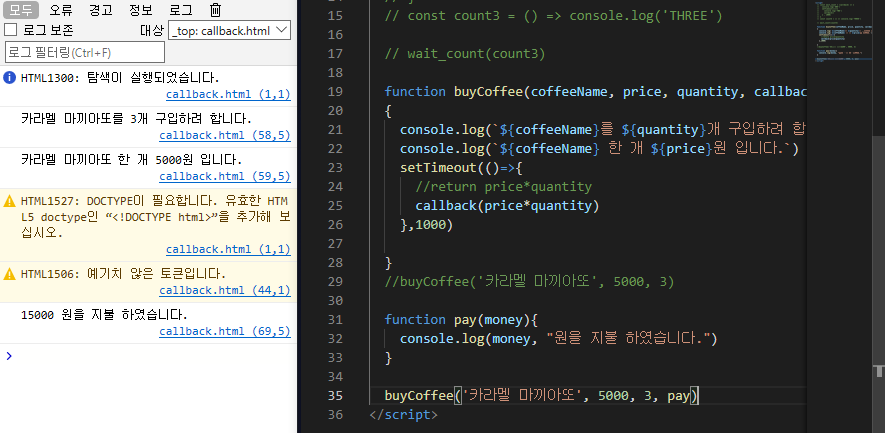
예시2
  function buyCoffee(coffeeName, price, quantity, callback)
  {
    console.log(`${coffeeName}를 ${quantity}개 구입하려 합니다.`)
    console.log(`${coffeeName} 한 개 ${price}원 입니다.`)
    setTimeout(()=>{
      //callback(price*quantity)
      callback(quantity)
    },1000)

  }
  //buyCoffee('카라멜 마끼아또', 5000, 3)

  function pay(money){ //커피값 계산 결과 출력 함수
    console.log(money, "원을 지불 하였습니다.")
  }

  function quantity(num){ //주문 수량 출력 함수
    console.log(`주문하신 수량은 ${num} 개 입니다.`)
  }

  buyCoffee('카라멜 마끼아또', 5000, 3, quantity)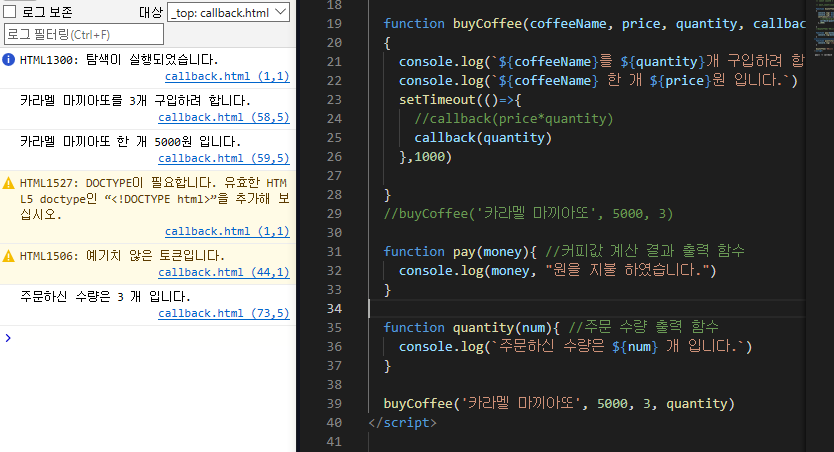
예시1 + 예시2 동시에 출력하기
  function buyCoffee(coffeeName, price, quantity, callback,callback1)
  {
    console.log(`${coffeeName}를 ${quantity}개 구입하려 합니다.`)
    console.log(`${coffeeName} 한 개 ${price}원 입니다.`)
    setTimeout(()=>{
      callback(price*quantity)
      callback1(quantity)
    },1000)

  }
  //buyCoffee('카라멜 마끼아또', 5000, 3)

  function pay(money){ //커피값 계산 결과 출력 함수
    console.log(money, "원을 지불 하였습니다.")
  }

  function quantity(num){ //주문 수량 출력 함수
    console.log(`주문하신 수량은 ${num} 개 입니다.`)
  }

  buyCoffee('카라멜 마끼아또', 5000, 3, pay, quantity)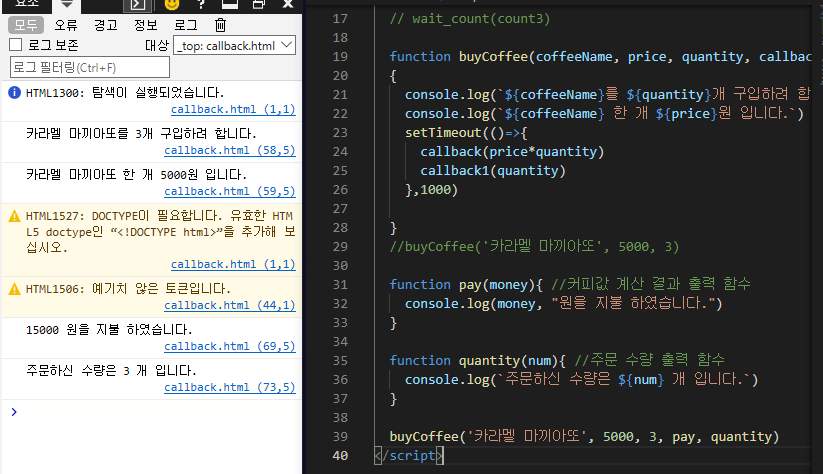
밖에서 정의된 pay()함수를 callback으로 받아서 함수화 시키는 것이다..
callback이라는 함수가 있는데 정의는 밖에서(pay())에서 해라...
  let ramenList = ''

  const addSamyang = (name) => {
    ramenList = name
    console.log(ramenList)
    setTimeout(addShin, 500, '신라면')
  }
  const addShin = (name) => {
    ramenList += ', ' + name
    console.log(ramenList)
    setTimeout(addJin,500,'진라면')
  }

  const addJin = (name) => {
    ramenList += ', ' + name
    console.log(ramenList)
    setTimeout(addNuguri,500,'너구리')
  }

  const addNuguri = (name) => {
    ramenList += ', ' + name
    console.log(ramenList)
  }

  //addSamyang('삼양라면')
  setTimeout(addSamyang, 500,'삼양라면')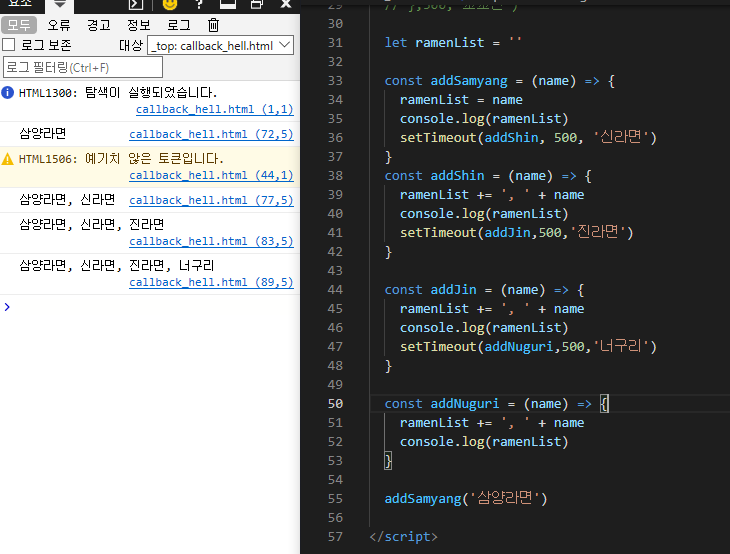
callback_hell
setTimeout() 함수에는 사실 3번째 인자를 입력할 수 있다.
setTimeout((name)=>{console.log(name)},1000,'김예찬'
이렇게 하면 결과는 1초후에 김예찬을 출력한다.
아래는 callback을 이용하여 최초 '꼬꼬면'출력이후 0.5초후 마다 다음 문자열을 출력하게 만드는 코드다.
  setTimeout((name)=>{
    let ramenList =name
    console.log(ramenList)
    setTimeout((name) => {
      ramenList += ', ' + name
      console.log(ramenList)
      setTimeout((name) => {
        ramenList += ', ' + name
        console.log(ramenList)
        setTimeout((name) => {
          ramenList+= ', ' + name
          console.log(ramenList)
        }, 500,'어딜감히 삼양라면');
      },500,'불마왕')
    },500,'신라면')
  },500,'꼬꼬면')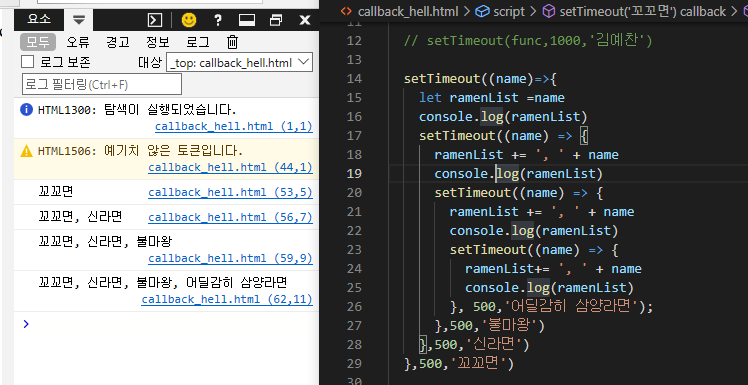
callback 설명 블로그
Promise(promise object)
<html>
  <body>
    promise object
  </body>
</html>

<script>
  new Promise((resolve)=>{
    let name = '삼양라면'
    resolve(name) //여기 name변수가 아래 .then(result로 들어간다)

  })
  .then((result)=>{
    console.log(result)

  })
</script>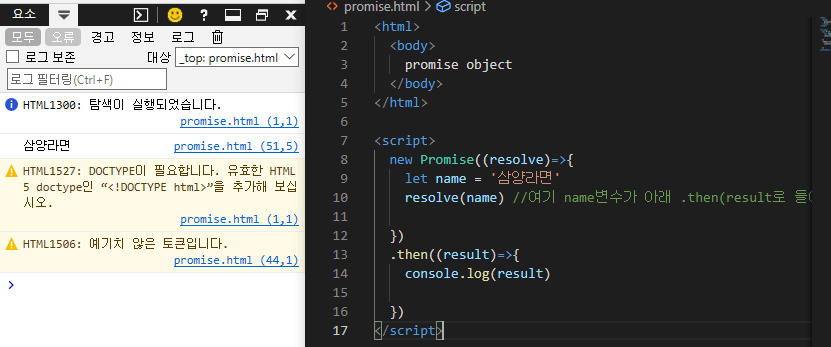
- .then을 한번더 사용하면
undefined가 나온다.
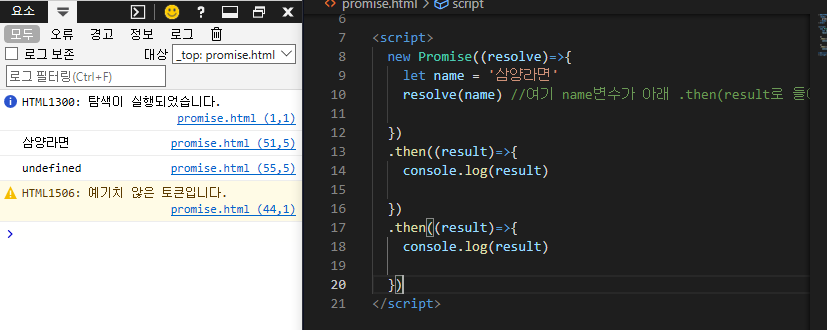
- 상위 .then에서
promise()를 한번더 선언하면 하위 .then에서 사용할 수 있다.
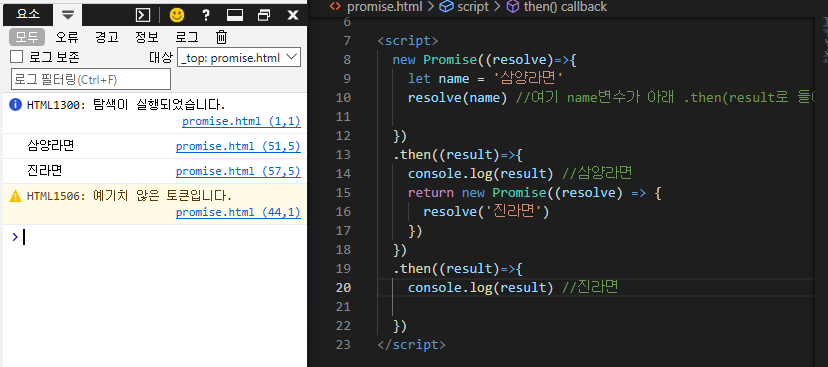
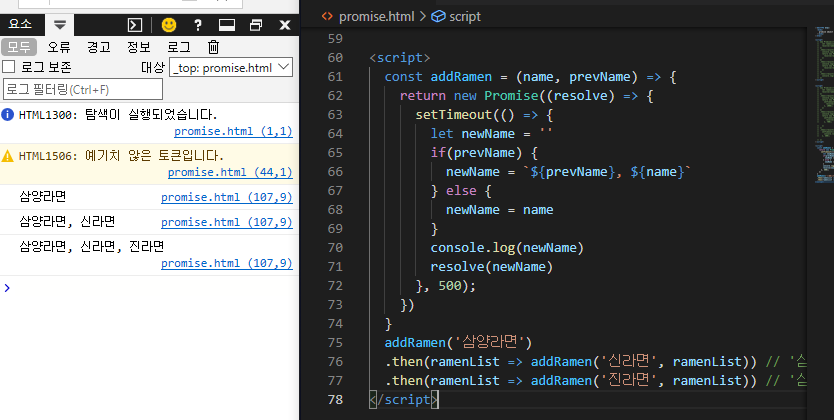
아래는 일반 콜백처럼 setTimeout을 설정했을 때이다.
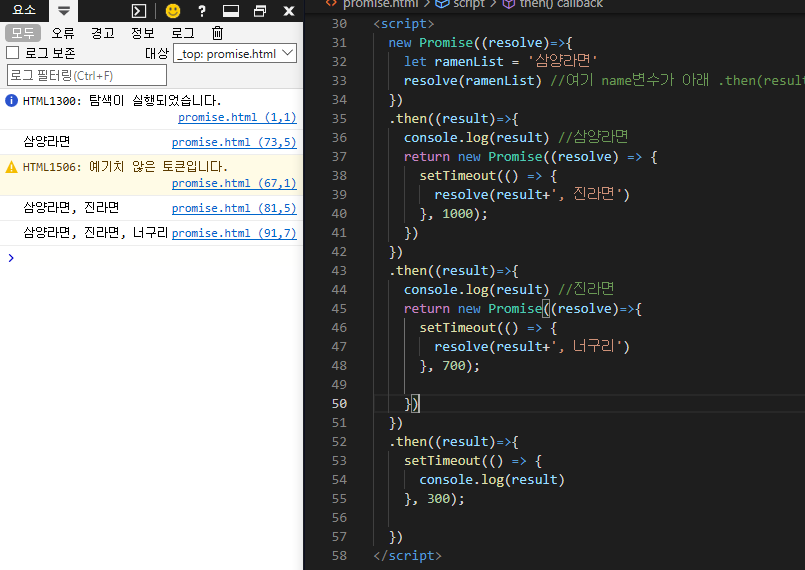
setTimeout을 사용했다 하더라도 일반적인 상황이면 다음.then으로 넘어가야 한다.
하지만 결과는 각각의resolve실행을 완료하고 다음.then으로 넘어갔다.
이유는..Promise()의 고유 기능이다.
Promise()는 해당하는resolve가 실행 될 때까지 기다렸다가 다음 단계로 넘어가는 것이다.
<script>
  const addRamen = (name, prevName) => {
    return new Promise((resolve) => {
      setTimeout(() => {
        let newName = ''
        if(prevName) {
          newName = `${prevName}, ${name}`
        } else {
          newName = name
        }
        console.log(newName)
        resolve(newName)
      }, 500);
    })
  }
  addRamen('삼양라면')
  .then(ramenList => addRamen('신라면', ramenList)) // '삼양라면', '신라면'
  .then(ramenList => addRamen('진라면', ramenList)) // '삼양라면', '신라면', 진라면
</script>