
Ethereum JSON RPC (Remote Procedure Calls)
RPC서버란 외부의 서버컴퓨터에 접속해 제어하는 경우를 말합니다, 이더리움은 클라이언트 프로그램은RPC명령어를JSON형태로 지원합니다. 이것을 Ethereum JSON RPC라고 하는데, 이것을 이용해서 블록체인의 정보를 얻거나Transaction을 발생시키는 명령을 원격으로 할 수 있다.
- Ethereum JSON RPC PostMan 테스트
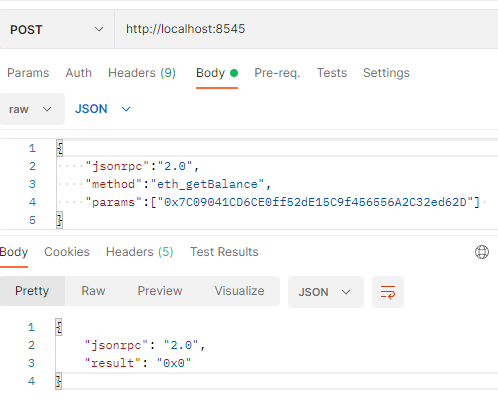
- 위와같이
JSON형태로 요청할method와 해당method의 대한 인자값을params로 같이 요청을 보내 원하는 결과값을 받을 수 있습니다, 이때 응답의result는16진수로 받습니다.
Web3
Web3라이브러리는JSON-RPC프로토콜을 통해Ethereum노드와 통신 할 수 있는 기능을 포함하여Ethereum에서 구축한Javascript라이브러리 입니다.
간단하게 위처럼JSON형태로 이더리움 블록체인과 상호작용 하는것을 더 편하게 할 수 있도록 도와주는 라이브러리입니다.
Web3 테스트 환경 설정
npm init -y
npm install -D jest - 테스팅 라이브러리
npm install web3 - Web3 라이브러리
npm install ethereumjs-tx - Transaction 객체를 Ethereum Client가 이해할 수 있게 만들어주고, Transaction의 서명을 만들어주는 라이브러리
package.json
"script" : {
    "test":"jset"
}
jest.config.js
const config = {
    verbose : true,
    testMatch : ['<rootDir>/**/*.test.js']
}

module.exports = config;
web3.test.js
const Web3 = require('web3');
const ethTx = require('ethereumjs-tx').Transaction;

describe('web3 테스트', () => {
  	let web3;
	let accounts;

	let sender;
	let received;

	it('테스트', () => {
		console.log('hello world');
	});
});
이더리움 단위와 환산표
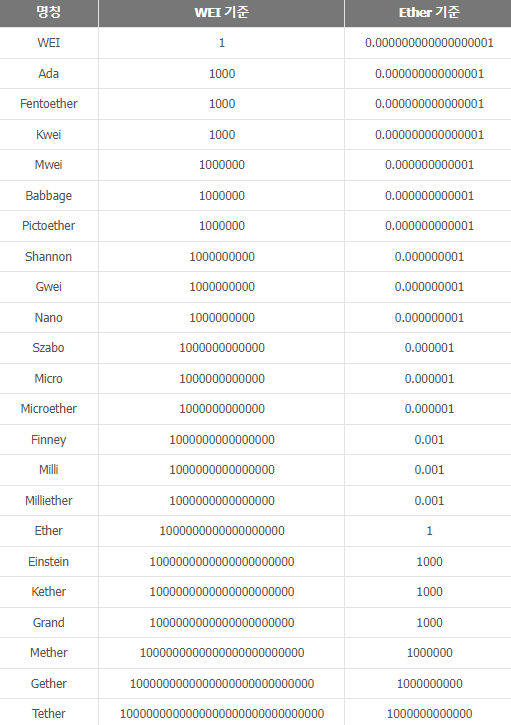
Web3테스트를 하기전에 간단하게 이더리움의 단위와 환산표를 알아보도록 하겠습니다.- 우리가 흔히 사용하는 알고있는
Eth는 10 ** 18 입니다.- 단위가 너무 많으니 우선 가장 많이 사용하는
WeiGweiEther정도라도 알아두고 넘어다록 합시다.
Web3 테스트
지난번에 미리 설치해둔
Ganeche이더리움RPC클라이언트를 이용하여Web3테스트를 해보겠습니다.
- Web3 연결 테스트
web3 provider
it('web3 연결 테스트', () => {
  web3 = new Web3(new Web3.providers.HttpProvider('http://127.0.0.1:8545'));
  console.log(web3);
});
- 테스트 용도로
Ganache를 사용할것이니http에서 동작하는node에 연결하기 위해HttpProveider를 사용해web3객체를 생성해주었습니다.Web3객체안에 다양한eth Methods,Utils Methods가 있는것을 확인할 수 있습니다.
- 참고자료 - Ethereum JSON-RPC Eth Methods
- 참고자료 - Ethereum JSON-RPC Utils Methods
- 최신블록의 number 가져오기
eth.getBlockNumber()
it('Latest Block number 가져오기', async () => {
	const latetstBlock = await web3.eth.getBlockNumber();
	console.log(latetstBlock);
});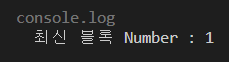
eth의getBlockNumberMethod를 사용하여 가장 최근에 만들어진 블록의 번호를 알 수 있습니다.
- 전체 지갑 정보 가져오기
eth.getAccounts()
it('전체 accounts 가져오기', async () => {
	const accounts = await web3.eth.getAccounts();
	console.log(accounts);
});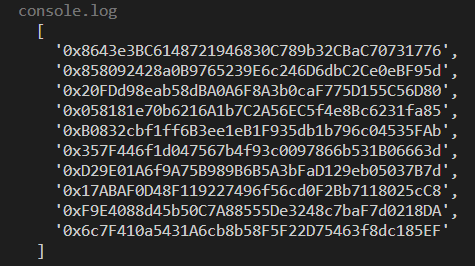
eth의getAccountsMehtod를 사용하여 노드가 관리하고 있는 모든 지갑 주소를 가져올 수 있습니다.
- 첫번째 계정 Balance 가져오기
eth.getBalance()
it('첫번째 계정 Balance 가져오기', async () => {
	const balance = await web3.eth.getBalance(accounts[0]);
	console.log('Wei :', balance);
	console.log('ETH :', balance / 10 ** 18);
});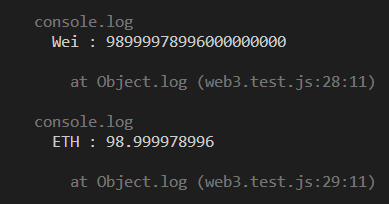
eth의getBalanceMethod를 사용하여 인자값으로 지갑 주소를 넣고 해당 지갑의Balance를 가져올 수 있습니다.return값은wei단위로 나오기때문에10 ** 18을 하면ETH로 구할 수도 있습니다.
- ETH 단위 변경하기
utils.toWei()
it('ETH 단위 변경하기', async () => {
	const gwei = web3.utils.toWei('1', 'gwei');
	console.log('1 Gwei를 Wei단위로 변경 : ', gwei);

	const ether = web3.utils.toWei('1', 'ether');
	console.log('1 Ether를 Wei단위로 변경 : ', ether);
});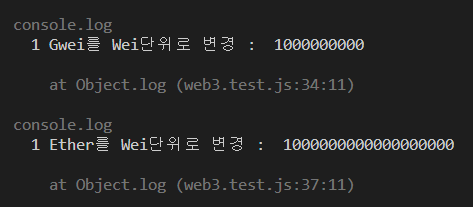
utils의toWelMethods를 사용하여 인자값으로 수량, 단위를 넣고 해당 값을Wei단위로 변환한 값을 가져올 수 있습니다.
- Transaction 발생횟수 구해오기
eth.getTransactionCount(),utils.toHex()
it('Transaction 보낸횟수 구해오기', async () => {
	sender = accounts[0];

	const txCount = await web3.eth.getTransactionCount(sender);
	console.log(txCount);

	// hex로 변환
	const hex = web3.utils.toHex(txCount);
	console.log(hex);
});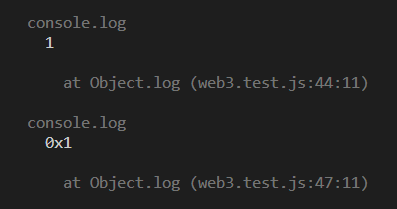
eth의getTransactionCountMethod를 사용하여 인자값으로 지갑주소를 넣어 해당 지갑주소에서 Transaction을 보낸 횟수를 가져올 수 있습니다.utils의toHexMethod를 사용하여 16진수 값으로 변환 시킵니다.
- Transaction 발동하기
it('Transaction 발동하기', async () => {
sender = accounts[0];
received = accounts[1];
const txCount = await web3.eth.getTransactionCount(sender);
const hex = web3.utils.toHex(txCount);
const privateKey = Buffer.from('9767586a0b17fa80eb47ed789f620f5e5bdcaed67c165ee1b112fc6c82a44c9c', 'hex');
const txObject = {
nonce: hex, // Transaction의 발동 횟수
from: sender, // 발신자
to: received, // 수신자
value: web3.utils.toHex(web3.utils.toWei('1', 'ether')), // 보낼 금액을 wei값으로 변경후 변경한 값을 hex로 변경후 보냄
gasLimit: web3.utils.toHex(6721975), // 가스 한도
gasPrice: web3.utils.toHex(web3.utils.toWei('1', 'gwei')) // 가스 가격,
data: web3.utils.toHex(''), // 후에 코드가 들어가 Smart Contract를 발동시킬 것임.
};
const tx = new ethTx(txObject);
tx.sign(privateKey);
console.log(tx);
const serializedTx = tx.serialize();
console.log(serializedTx.toString('hex'));
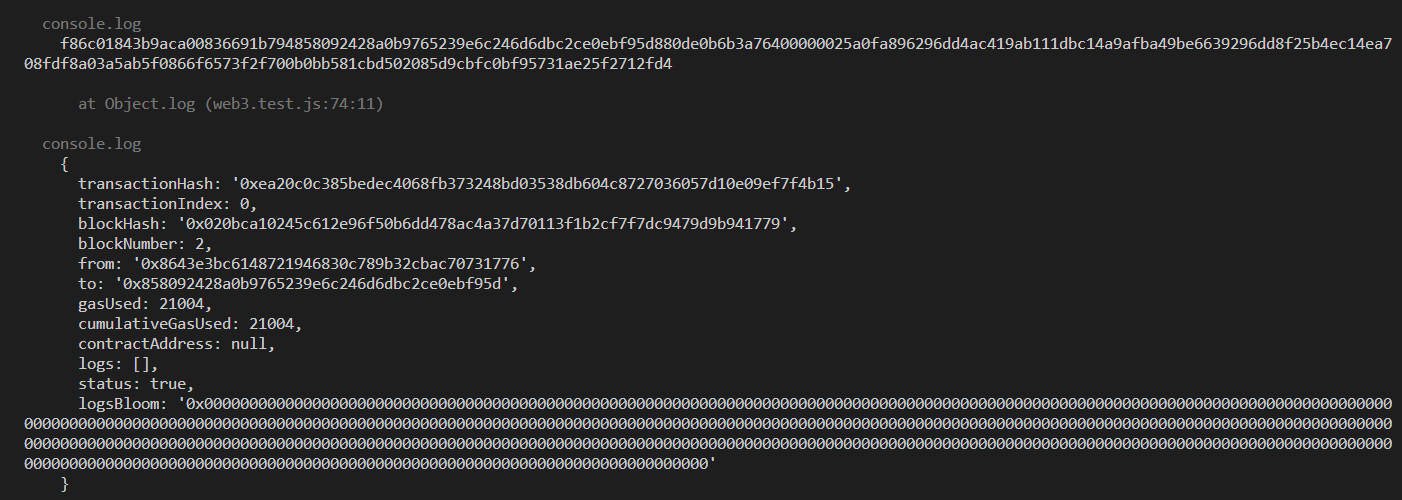
const txHash = await web3.eth.sendSignedTransaction('0x' + serializedTx.toString('hex'));
console.log(txHash);
});
Transaction이 발동될때마다 먼저 일어난Transaction의 순서를 알아야 하니 해당Transaction의 발생횟수를 1씩 올려줘야 하기에getTransactionCount메서드로 보내는 사람의Transaction의 발생횟수 가져오고toHex메서드로 16진수로 변환시켜놓습니다.from,to,value값을 각각 채워준뒤gasLimit은Ganache-cli를 실행하면 나오는GasLimit을 입력하고GasPrice는 임의로1 Gwei로 설정합니다.txObject를 완성했으니 서명을 생성하기위해ethereumjs-tx라이브러리를 사용하여 새로운Transaction객체를 만들고sign메서드로 개인키를 인자값으로 주어 서명을 만들어줍니다.Transaction을 보내기 전에serialize메서드로Transaction객체의 순서를 맞춰줍니다. 사람마다Transaction객체의 순서가 다를 수 있는데 이러면 각각 다른hash값이 나오기때문에 객체의 순서를 맞춰주어야 합니다.
이제 eth의 sendSignedTransaction 메서드로 Transaction을 보내주면 됩니다.
Transaction 내용
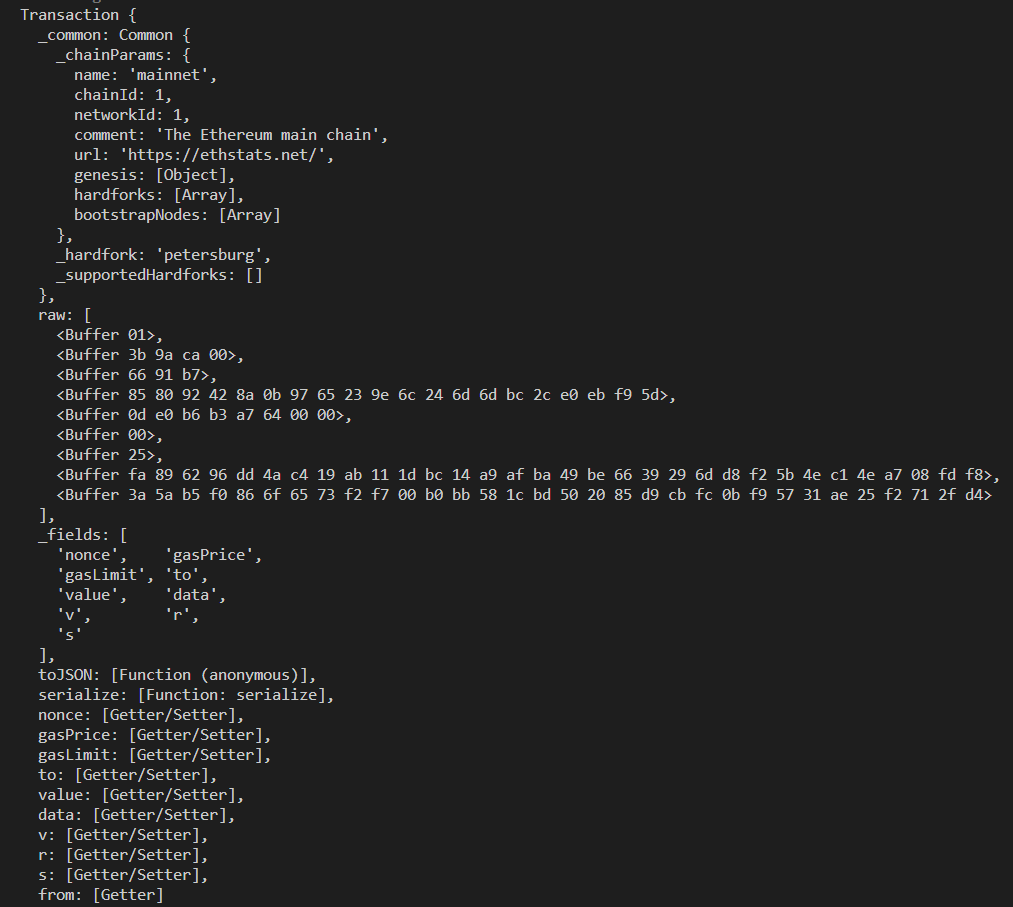
Transaction
- Balance 확인
it('Balance 확인', async () => {
	const SenderBalance = await web3.eth.getBalance(accounts[0]);
	const ReceivedBalance = await web3.eth.getBalance(accounts[1]);

	console.log('Sender :', SenderBalance / 10 ** 18);
	console.log('Received :', ReceivedBalance / 10 ** 18);
});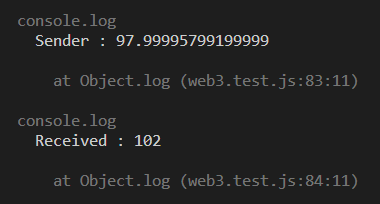
Transaction발생후 송금이 잘 완료되었는지 확인합니다.