개요
🔽CalenderPage.dart
import 'package:flutter/material.dart';
import '/const/colors.dart';
import 'package:intl/intl.dart';
import 'package:syncfusion_flutter_calendar/calendar.dart';
//캘린더페이지
class CalendarPage extends StatefulWidget {
const CalendarPage({super.key});
State<CalendarPage> createState() => CalendarState();
}
class Meeting {
  Meeting({
    required this.eventName,
    required this.from,
    required this.to,
    required this.background,
    required this.isAllDay,
    this.notes,
  });

  String eventName;
  DateTime from;
  DateTime to;
  Color background;
  bool isAllDay;
  String? notes;
}
class MeetingDataSource extends CalendarDataSource {
MeetingDataSource(List<Meeting> source) {
appointments = source;
}
DateTime getStartTime(int index) {
return appointments![index].from;
}
DateTime getEndTime(int index) {
return appointments![index].to;
}
String getSubject(int index) {
return appointments![index].eventName;
}
Color getColor(int index) {
return appointments![index].background;
}
bool isAllDay(int index) {
return appointments![index].isAllDay;
}
Object? convertAppointmentToObject(
Object? customData, Appointment appointment) {
return Meeting(
eventName: appointment.subject,
from: appointment.startTime,
to: appointment.endTime,
background: appointment.color,
isAllDay: appointment.isAllDay,
) as Object?;
}
}
class CalendarState extends State<CalendarPage> {
String? _subjectText = '',
_startTimeText = '',
_endTimeText = '',
_dateText = '',
_timeDetails = '';
Color? _headerColor, _viewHeaderColor, _calendarColor;
List<Meeting> _getDataSource() {
final List<Meeting> meetings = <Meeting>[];
final DateTime today = DateTime.now();
final DateTime startTime =
DateTime(today.year, today.month, today.day, 9, 0, 0);
final DateTime endTime = startTime.add(const Duration(hours: 2));
meetings.add(Meeting(
eventName: '홍대 오렌지',
from: startTime,
to: endTime,
background: const Color(0xFF3974FD),
isAllDay: false,
));
meetings.add(Meeting(
eventName: '건대 오렌지', // 'eventName' 매개변수에 대한 인자를 추가합니다.
from: startTime,
to: endTime,
background: const Color(0xFFFDBE01),
isAllDay: false,
));
return meetings;
}
Widget build(BuildContext context) {
return Scaffold(
appBar: AppBar(
centerTitle: true,
backgroundColor: Colors.white,
title: Text('스케줄'),
elevation: 0,
),
body: SfCalendar(
view: CalendarView.month,
cellBorderColor: Colors.white,
viewHeaderHeight: 53,
todayHighlightColor: purple_100,
headerHeight: 50,
headerStyle: CalendarHeaderStyle(
textAlign: TextAlign.center,
textStyle: TextStyle(fontWeight: FontWeight.bold),
),
headerDateFormat: 'yyyy.MM',
showNavigationArrow: true,
dataSource: MeetingDataSource(_getDataSource()),
monthViewSettings: MonthViewSettings(
appointmentDisplayMode: MonthAppointmentDisplayMode.appointment),
monthCellBuilder:
(BuildContext buildContext, MonthCellDetails details) {
final DateTime date = details.date;
final DateTime visibleMonth =
details.visibleDates.firstWhere((d) => d.day == 1);
final bool isWeekend = date.weekday == DateTime.saturday ||
date.weekday == DateTime.sunday;
final bool isCurrentMonth = date.month == visibleMonth.month;
Color textColor = Colors.black; // 기본 글씨색
// 현재 달인지 확인
if (!isCurrentMonth) {
textColor = Color(0xFF141414); // 이전달이나 다음달 날짜 색상
} else if (isWeekend) {
// 주말에 대한 색상 설정
textColor =
date.weekday == DateTime.saturday ? purple_80 : Colors.red;
}
return Container(
alignment: Alignment.topCenter,
child: Text(
date.day.toString(),
style: TextStyle(color: textColor),
),
);
},
onTap: calendarTapped,
));
}
void calendarTapped(CalendarTapDetails details) {
// 선택된 날짜를 가져옵니다.
final DateTime selectedDate = details.date!;
// 선택된 날짜의 약속들을 필터링합니다.
final List<Meeting> selectedAppointments = _getDataSource()
.where((Meeting meeting) =>
meeting.from.day == selectedDate.day &&
meeting.from.month == selectedDate.month &&
meeting.from.year == selectedDate.year)
.toList();
// 약속 이름만 나열하는 대화상자를 표시합니다.
showDialog(
context: context,
builder: (BuildContext context) {
return AlertDialog(
title: Text(DateFormat('yyyy-MM-dd').format(selectedDate)),
content: Column(
mainAxisSize: MainAxisSize.min,
children: selectedAppointments
.map((meeting) => Text(meeting.eventName))
.toList(),
),
actions: <Widget>[
TextButton(
child: Text('닫기'),
onPressed: () {
Navigator.of(context).pop();
},
),
],
);
},
);
}
}
오늘은.. 이렇게 하드코딩 되어있는 제 코드를 한 번...
MVVM패턴으로 정리를 해보겠습니다 ㅜㅜ
아키텍처의 중요성..⭐⭐
완성본 미리보기
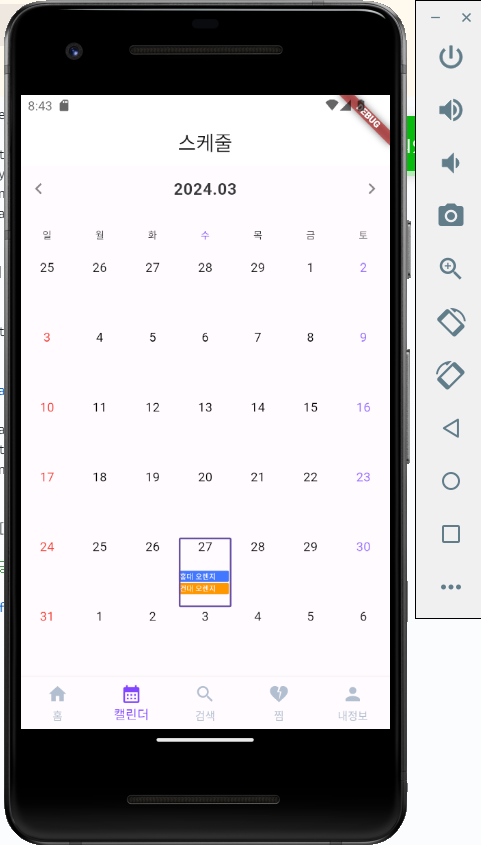
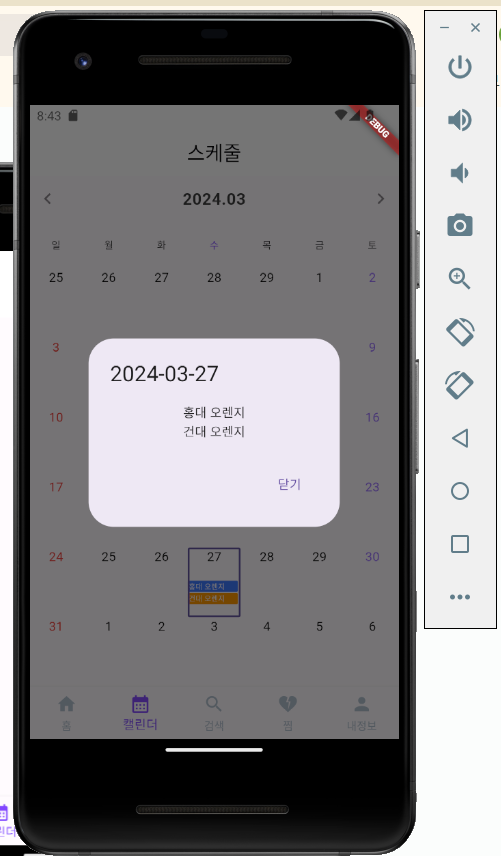
캘린더를 생성하고 날짜셀을 누르면 그 날의 예약들이 리스트업된다.
Model
폴더 분리
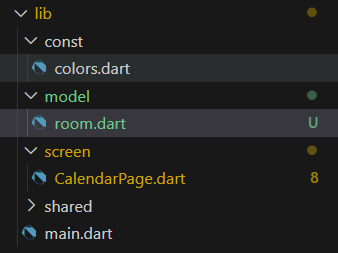
일단 먼저 model 폴더를 생성하고
저는 합주실 예약 정보를 저장할 것이기 때문에...
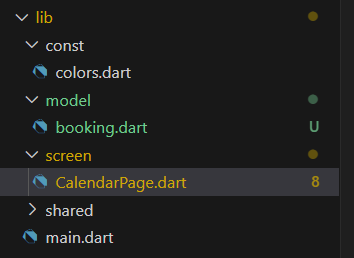
room이라고 했었었는데..음 Booking이라고 바꿔볼게요
^^
model 클래스 작성
🔽기존의 CalenderPage.dart 中 예약 정보 class
class Meeting {
Meeting({
required this.eventName,
required this.from,
required this.to,
required this.background,
required this.isAllDay,
this.notes,
});
String eventName;
DateTime from;
DateTime to;
Color background;
bool isAllDay;
String? notes;
}🔽booking.dart
import 'package:flutter/material.dart';
//Color 클래스때문에 임포트해야함.

class Booking {
  Booking({
    required this.eventName,
    required this.from,
    required this.to,
    required this.background,
    required this.isAllDay,
    this.notes,
  });

  String eventName;
  DateTime from;
  DateTime to;
  Color background;
  bool isAllDay;
  String? notes;
}
booking.dart 에 이렇게 바꿔주겠습니다.
DataSource
폴더 분리
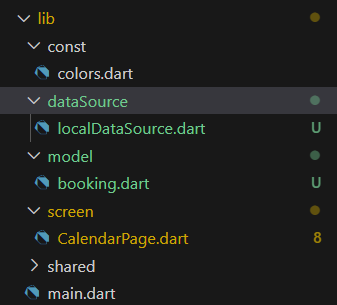
아직은 서버와 연결을 안 해서 localDataSource로 화면에 띄우는 것만 하는 중입니다.
추후를 위해 localDataSource로 파일 이름을 생성합니다
데이터소스 클래스 작성
🔽기존 CalenderPage.dart에 있던 코드
class MeetingDataSource extends CalendarDataSource {
MeetingDataSource(List<Meeting> source) {
appointments = source;
}
DateTime getStartTime(int index) {
return appointments![index].from;
}
DateTime getEndTime(int index) {
return appointments![index].to;
}
String getSubject(int index) {
return appointments![index].eventName;
}
Color getColor(int index) {
return appointments![index].background;
}
bool isAllDay(int index) {
return appointments![index].isAllDay;
}
Object? convertAppointmentToObject(
Object? customData, Appointment appointment) {
return Meeting(
eventName: appointment.subject,
from: appointment.startTime,
to: appointment.endTime,
background: appointment.color,
isAllDay: appointment.isAllDay,
) as Object?;
}
}이 데이터소스 클래스를 분리 시키겠습니다.
🔽localDataSource
import 'package:syncfusion_flutter_calendar/calendar.dart';
import 'package:flutter/material.dart';
import '/model/booking.dart';
class BookingDataSource extends CalendarDataSource {
BookingDataSource(List<Booking> source) {
appointments = source;
}
DateTime getStartTime(int index) {
return appointments![index].from;
}
DateTime getEndTime(int index) {
return appointments![index].to;
}
String getSubject(int index) {
return appointments![index].eventName;
}
Color getColor(int index) {
return appointments![index].background;
}
bool isAllDay(int index) {
return appointments![index].isAllDay;
}
Object? convertAppointmentToObject(
Object? customData, Appointment appointment) {
return Booking(
eventName: appointment.subject,
from: appointment.startTime,
to: appointment.endTime,
background: appointment.color,
isAllDay: appointment.isAllDay,
) as Object?;
}
}
클래스이름도 바꾸고... 무작정 기존 데이터 소스 코드 복붙하는게 아니라
필요한 파일이랑 패키지도 임포트 해줘야합니다!
Repository
폴더분리
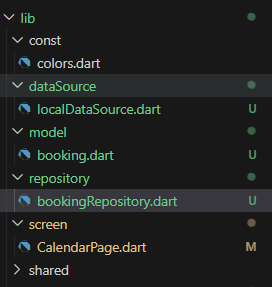
repository 폴더에 bookingRepository.dart를 만들어줬다.
Repository 클래스 작성
🔽 기존 main.dart 코드 中
  List<Meeting> _getDataSource() {
    final List<Meeting> meetings = <Meeting>[];
    final DateTime today = DateTime.now();
    final DateTime startTime =
        DateTime(today.year, today.month, today.day, 9, 0, 0);
    final DateTime endTime = startTime.add(const Duration(hours: 2));
    meetings.add(Meeting(
      eventName: '홍대 오렌지',
      from: startTime,
      to: endTime,
      background: const Color(0xFF3974FD),
      isAllDay: false,
    ));
    meetings.add(Meeting(
      eventName: '건대 오렌지', // 'eventName' 매개변수에 대한 인자를 추가합니다.
      from: startTime,
      to: endTime,
      background: const Color(0xFFFDBE01),
      isAllDay: false,
    ));
    return meetings;
  }
이것을 분리하느라 애 먹었는데..
이게 사실 내가 사용한 캘린더 패키지 예시를 그냥 거의 베껴왔던거라,,
코드가 엉망 ㅎ 이다..
그래서 이제 정리를 해볼건데
일단 MVVM패턴에서
DataSource는 Repository에서 데이터를 가져오는 데 사용되는 실제 데이터의 원본으로, 크게 로컬 파일이나 로컬 DB에서 저장된 정보를 사용하거나 API서버와 같은 원격저장소에 저장된 정보를 접근해서 사용하게 된다.
Repository는 데이터를 가져오거나 저장하는 데 사용된다. Repository는 데이터 액세스에 대한 인터페이스를 제공하며, 실제 데이터 원본에 대한 구현 세부 정보를 숨겨준다.
근데 일단 지금 내 DataSource에는 데이터 원본도 없고.. 접근할 수도 없다
-> 추가해주겠다.
🔽localDataSource.dart에 추가
  Future<List<Booking>> getBookings() async {
    final List<Booking> bookings = [
      Booking(
        eventName: '홍대 오렌지',
        from: DateTime.now(),
        to: DateTime.now().add(Duration(hours: 2)),
        background: Color.fromARGB(255, 67, 120, 255),
        isAllDay: false,
      ),
      Booking(
        eventName: '건대 오렌지',
        from: DateTime.now(),
        to: DateTime.now().add(Duration(hours: 2)),
        background: Colors.orange,
        isAllDay: false,
      ),
    ];
    return bookings;
}localDataSource.dart에 원본데이터를 넣어주고 getBookings()함수로 그것을 받게 해놓았다.
🔽bookingRepository.dart
import '/dataSource/localDataSource.dart';
import '/model/booking.dart';

class BookingRepository {
  final BookingDataSource _dataSource;
  BookingRepository(this._dataSource);

  Future<List<Booking>> getBookings() {
    // LocalDataSource로부터 데이터를 가져오는 로직
    return _dataSource.getBookings();
  }
}
final BookingDataSource _dataSource;
BookingRepository(this._dataSource);BookingRepository클래스에서 BookingDataSource타입의 -dataSource라는 private 멤버 변수 선언하고, 생성사를 통해 이 변수를 초기화 한다.
final 키워드는 _dataSource 변수가 한 번 할당된 후에는 변경할 수 없음을 나타낸다. 즉, BookingRepository 인스턴스가 생성될 때 BookingDataSource 인스턴스가 주입되며, 이후에는 해당 데이터 소스 인스턴스를 변경할 수 없다.
Future<List<Booking>> getBookings() {
    // LocalDataSource로부터 데이터를 가져오는 로직
    return _dataSource.getBookings();
}_dataSource를 사용하여 Booking 데이터 목록을 비동기적으로 가져온다.
Future<List<Booking>>은 비동기 작업을 나타대고, 작업이 완료되면 List<Booking>타입의 결과를 반환한다.
getBookings메서드는 실제로 데이터를 가져오는 로직을 _dataSource.getBookings()호출을 통해 수행하고, 이 메서드가 반환하는 Future<List<Booking>>객체를 그대로 반환한다.
-> BookingRepository는 데이터를 어디서 어떻게 가져오는지에 대한
구체적인 구현 세부사항을 신경쓰지 않고 데이터를 요청. 처리 할 수 있다.
ViewModel
ViewModel은Model로부터 데이터를 가져와서, 이를View에 적합한 형태로 가공하여 제공하는 역할을 한다.- MVVM 패턴에서
ViewModel은View와 Model 사이의 연결 고리 역할을 하며,데이터 바인딩을 통해 View의 데이터를 자동으로 업데이트한다.Flutter에서는ChangeNotifier를 사용하여ViewModel을 구현할 수 있다.ChangeNotifier는 데이터가 변경될 때마다 해당 변경 사항을 구독하고 있는 View에 알려주는 역할을 합니다.
폴더분리
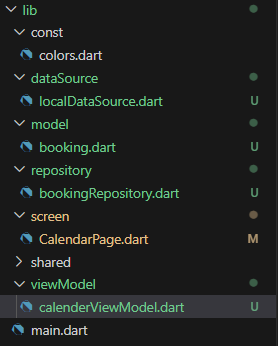
폴더 분리를 해줍니당 ꒰ ᐡᴗ͈ ·̫ ᴗ͈ ꒱♡
ViewModel 작성
import 'package:flutter/material.dart';
import '/model/booking.dart';
import '/repository/bookingRepository.dart';

class calenderViewModel with ChangeNotifier {
  late final BookingRepository _bookingRepository;
  List<Booking> _bookingList = List.empty(growable: true);
  List<Booking> get bookingList => _bookingList;

  calenderViewModel(this._bookingRepository) {
    fetchBookings();
  }

  Future<void> fetchBookings() async {
    _bookingList = await _bookingRepository.getBookings();
    notifyListeners(); // 데이터가 변경되었음을 알려 UI를 업데이트
  }
}
-
Repository로부터 데이터 가져오기
생성자에서 BookingRepository 인스턴스를 받아와서 저장하고, fetchBookings 메서드를 통해 비동기적으로 예약 데이터를 가져온다. -
데이터 변경 알림
가져온 예약 데이터를_bookings 리스트에 저장하고,notifyListeners() 메서드를 호출하여 데이터가 변경되었음을 알린다. 이를 통해 UI가 자동으로 업데이트된다. -
데이터 제공
_bookings 리스트에 대한 getter를 제공하여,View에서 현재 예약 데이터에 접근할 수 있도록 한다.
View
폴더 분리
view 작성
애 많이 먹었다..
import 'package:flutter/material.dart';
import 'package:provider/provider.dart';
import 'package:intl/intl.dart';
import 'package:syncfusion_flutter_calendar/calendar.dart' as sf;
import '/const/colors.dart';
import '/model/booking.dart';
import '/viewModel/calendarViewModel.dart';
import '/dataSource/localDataSource.dart';
import '/repository/bookingRepository.dart';
class CalendarView extends StatelessWidget {
List<Booking> testBookings = [];
Widget build(BuildContext context) {
// Provider를 사용하여 CalendarViewModel에 접근
return ChangeNotifierProvider<CalendarViewModel>(
create: (context) =>
CalendarViewModel(BookingRepository(BookingDataSource(testBookings))),
child: Scaffold(
appBar: AppBar(
centerTitle: true,
backgroundColor: Colors.white,
title: Text('스케줄'),
elevation: 0,
),
body: Consumer<CalendarViewModel>(
builder: (context, viewModel, child) {
// ViewModel에서 데이터를 가져와서 DataSource를 생성합니다.
BookingDataSource dataSource =
BookingDataSource(viewModel.bookingList);
return sf.SfCalendar(
view: sf.CalendarView.month,
cellBorderColor: Colors.white,
viewHeaderHeight: 53,
todayHighlightColor: purple_100,
headerHeight: 50,
headerStyle: sf.CalendarHeaderStyle(
textAlign: TextAlign.center,
textStyle: TextStyle(fontWeight: FontWeight.bold),
),
headerDateFormat: 'yyyy.MM',
showNavigationArrow: true,
dataSource: dataSource, // ViewModel에서 가져온 데이터를 사용합니다.
monthViewSettings: sf.MonthViewSettings(
appointmentDisplayMode:
sf.MonthAppointmentDisplayMode.appointment),
monthCellBuilder:
(BuildContext buildContext, sf.MonthCellDetails details) {
final DateTime date = details.date;
final DateTime visibleMonth =
details.visibleDates.firstWhere((d) => d.day == 1);
final bool isWeekend = date.weekday == DateTime.saturday ||
date.weekday == DateTime.sunday;
final bool isCurrentMonth = date.month == visibleMonth.month;
Color textColor = Colors.black; // 기본 글씨색
// 현재 달인지 확인
if (!isCurrentMonth) {
textColor = Color(0xFF141414); // 이전달이나 다음달 날짜 색상
} else if (isWeekend) {
// 주말에 대한 색상 설정
textColor = date.weekday == DateTime.saturday
? purple_80
: Colors.red;
}
return Container(
alignment: Alignment.topCenter,
child: Text(
date.day.toString(),
style: TextStyle(color: textColor),
),
);
},
onTap: (sf.CalendarTapDetails details) {
// 선택된 날짜를 가져옵니다.
final DateTime selectedDate = details.date!;
// 선택된 날짜의 약속들을 필터링합니다.
final List<Booking> selectedAppointments = viewModel
.bookingList
.where((Booking meeting) =>
meeting.from.day == selectedDate.day &&
meeting.from.month == selectedDate.month &&
meeting.from.year == selectedDate.year)
.toList();
// 약속 이름만 나열하는 대화상자를 표시합니다.
showDialog(
context: context,
builder: (BuildContext context) {
return AlertDialog(
title:
Text(DateFormat('yyyy-MM-dd').format(selectedDate)),
content: Column(
mainAxisSize: MainAxisSize.min,
children: selectedAppointments
.map((meeting) => Text(meeting.eventName))
.toList(),
),
actions: <Widget>[
TextButton(
child: Text('닫기'),
onPressed: () {
Navigator.of(context).pop();
},
),
],
);
},
);
});
},
),
),
);
}
}
사실 아직 이해 못 한 게 많다..
뭐든지 깊게 알수록 더 어려운 거 같다..
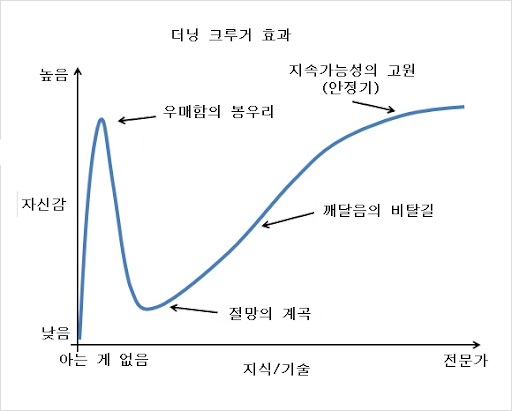
지금 약간 우매함의 절망의 계곡 부분에 빠져있음...
빨리 깨달음의 비탈길 올라가서 성장하자..
이 코드는 계속 발전할 거기 때문에 수정되거나 내가 깨닫는게 있을 때 바로바로 수정.업데이트 하겠다 !!
참고한 글
https://velog.io/@mm723/MVVM-Pattern-in-Flutter-2
https://totally-developer.tistory.com/115
https://ctoahn.tistory.com/13
https://ctoahn.tistory.com/12