| 일수 | 일자 | 교과목 | 내용 | 편성시간 |
|---|---|---|---|---|
| 3 | 24/11/22 | 기반기술 | 소프트웨어공학 | 8 |
[소프트웨어 공학에서 배우는 것]
1. 프로젝트 진행하는 법

2. 프로그램을 잘 만드는 법
- TDD
- 코딩 컨벤션
- Git & Github

3. 아키텍처
- SW 아키텍처
- 시스템 아키텍처 (V)오늘 배울 것
URL과 URI의 차이
uri : 인터넷상의 리소스 "자원 자체"를 식별하는 고유한 문자열 시퀀스
url : 네트워크상에서 통합자원(리소스)의 위치(locate) - 자원 식별자와 위치를 동시에

출처: https://www.elancer.co.kr/blog/detail/74
[시스템 아키텍처]
고가용성 = Hight Availability(HA)
무결성
기밀성
프론트 엔드와 백엔드의 차이
WEB
: 달라는 것만 줌 (코드 실행 x) => 프론트 엔드
Worker Node ( WAS )
: 코드를 실행시키고 그 결과값을 줌 => 백 엔드
프론트엔드와 백엔드를 나누는 기준은 누구의 컴퓨터에서 실행되는 코드인가의 차이이다.
- 프론트엔드 : 클라이언트 컴퓨터에서 실행되는 코드
- 백엔드 : 서버 컴퓨터에서 실행되는 코드
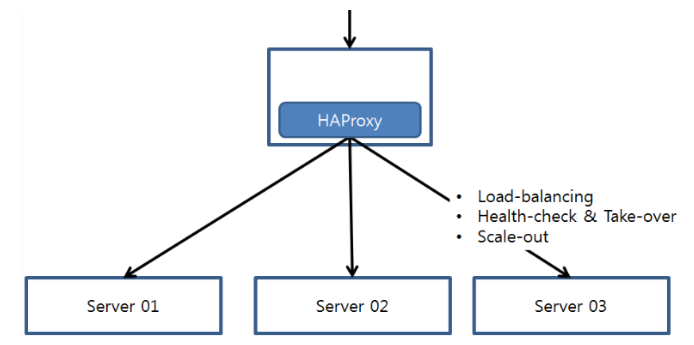
HAProxy
로드 밸런싱 기능 제공
간단하게 말하면 서버 앞단에 존재해 서버로 오는 요청을 대신 받아 뒷단의 서버에 전달하고 결과를 리턴받아 요청한 곳에 다시 전달
출처: https://dev-youngjun.tistory.com/97
[실습]
- 관리자 로그인
su - root - IP 설정
vi /etc/netplan/00-installer-config.yaml
network:
renderer: networkd
  ethernets:
    ens33:
      addresses:
        - 10.10.10.100/24
      nameservers:
        addresses: [8.8.8.8]
      routes:
        - to: default
          via: 10.10.10.2
  version: 2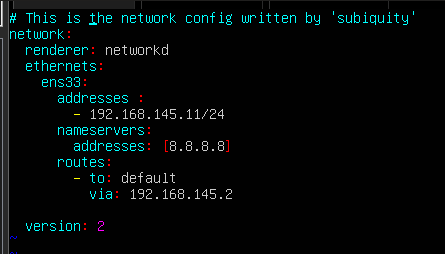
- IP 설정 적용
netplan apply - 레포지토리 목록 갱신
apt update - HAProxy 설치
apt install haproxy - HAProxy 실행
systemctl restart haproxy - HAProxy 설정
vi /etc/haproxy/haproxy.cfg
맨 마지막 줄에 다음 내용 추가
    bind *:9000 #접속 포트 지정
    mode  http
    option dontlog-normal
    stats enable
    stats realm Haproxy\ Statistics #브라우저 타이틀
    stats uri /stats #stat를 제공할 uri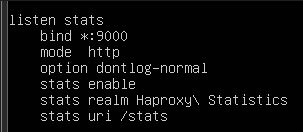
- HAProxy 설정 적용
systemctl restart haproxy - HAProxy 실행 확인
systemctl status haproxy

apt install -y net-tools
netstat -anlp | grep :9000

- HAProxy에 웹 서버 부하분산 설정 추가
vi /etc/haproxy/haproxy.cfg 맨 마지막 줄에 다음 내용 추가
frontend webserver
  bind *:80 #포트번호 주의
  mode http
  default_backend nginx-server

backend nginx-server
  mode http
  balance roundrobin
  option httpchk GET /
  server nginx1 10.10.10.10:80 check
  server nginx2 10.10.10.20:80 check
여기서 만약 현재 서버 리눅스에 만약 ngix가 설치되어있거나 80번 포트를 다른 프로그램이 사용하고 있다면 haproxy가 적용될 수 없으므로 (하나의 프로그램이 여러 포트 번호를 사용하는 것은 가능하나, 이미 사용중인 포트번호를 다른 컴퓨터가 사용하는 건 불가능) 다른 포트 번호로 바꿔준다
- HAProxy 설정 적용
systemctl restart haproxy - HAProxy 실행 확인
systemctl status haproxy
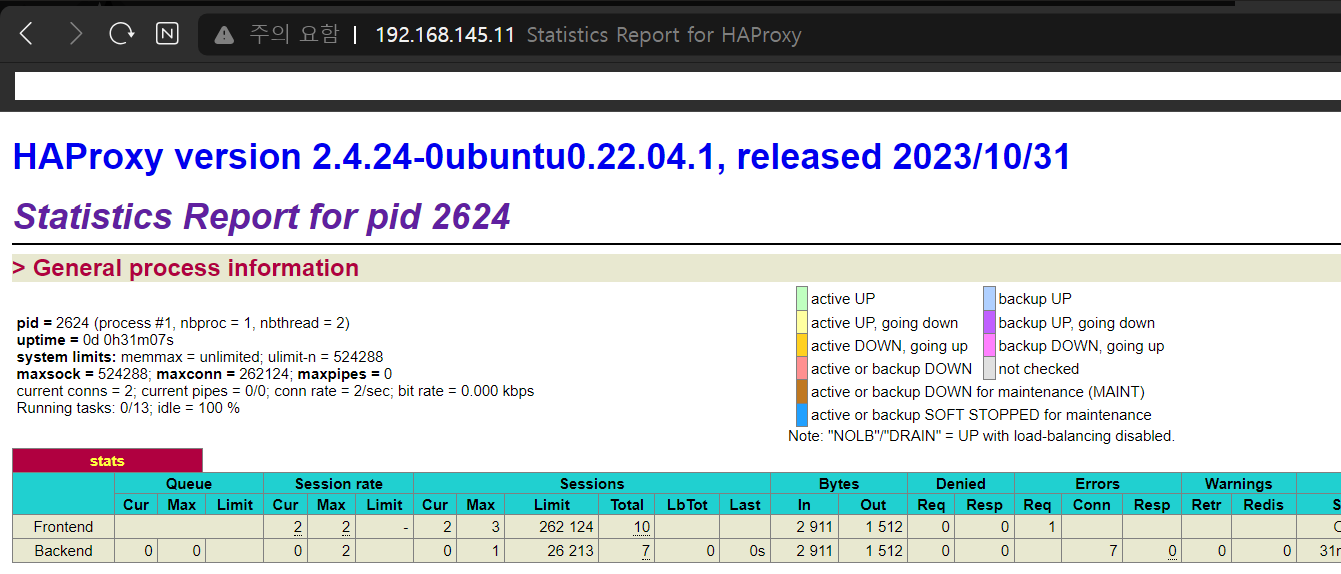
혹은 netstat -anlp | grep :9000 - 윈도우에서 웹 브라우저로 HAProxy 서버의 IP에 9000 포트의 /stats로 접속
http://10.10.10.100:9000/stats
- 윈도우에서 웹 브라우저로 HAProxy 서버의 IP에 80 포트의 /sjb.html로 접속
http://10.10.10.100:80/sjb.html
두 컴퓨터의 khj.html의 내용이 새로고침할 때마다 번갈아서 나온다
[Maria DB 서버 설치 및 설정]
여기서부터는 조퇴로 인해 실습 내용을 보고 집에서 혼자 연습
[실습]
- 관리자 로그인
- IP 설정
- IP 설정 적용
- 레포지토리 목록 갱신
apt update - mariadb 설치
apt install -y mariadb-server
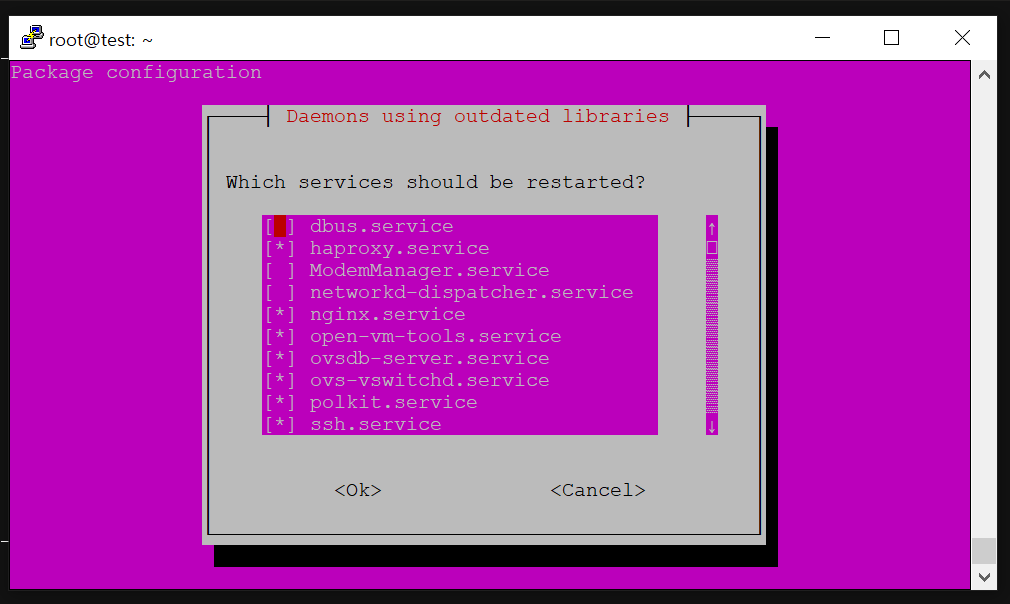
위와 같은 창이 뜬다면 그냥 엔터를 눌러 넘어가면 된다
- mariadb 설정
여기서 잠깐

실습을 위해
vi /etc/mysql/mariadb.conf.d/50-server.cnf
27번 라인에 있는 설정을 다음처럼 변경bind-address = 0.0.0.0 #지정된 주소 없음 (모든 IP 허용)
- mariadb 실행
systemctl restart mariadb - mariadb 실행 확인
systemctl status mariadb
apt install -y net-tools
netstat -anlp | grep :3306
[DB 서버]
(DB 서버가 될 새로운 가상 컴퓨터를 하나 더 생성 후 진행)
- mariadb 클라이언트 프로그램 실행
mariadb - DB 생성
CREATE DATABASE 3tier; - 사용자 생성 및 권한 설정
CREATE USER '이니셜'@'%' IDENTIFIED BY 'qwer1234';	#계정 생성
SELECT user, host FROM mysql.user;			 		#생성 확인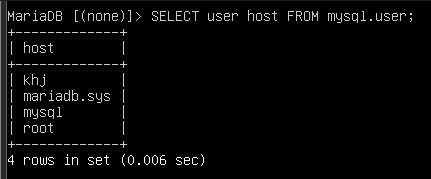
GRANT ALL PRIVILEGES ON 3tier.* TO '이니셜'@'%';	 	#계정에 권한 부여
FLUSH PRIVILEGES;									#권한 적용
[was 서버]
(was서버가 될 새로운 가상 컴퓨터를 하나 더 생성 후 진행)
- 관리자 로그인
- IP 설정
- IP 설정 적용
- 레포지토리 목록 갱신
- 자바 설치
apt install -y openjdk-17-jdk - 자바 설치 확인
java --version - 백엔드 서버 파일 다
wget 연습용파일링크.jar - 환경변수 설정
export DB_URL=jdbc:mariadb://10.10.10.30:3306/3tier #DB 서버의 IP
export DB_USERNAME=이니셜 #DB에서 생성했던 이름
export DB_PASSWORD=qwer1234 - 백엔드 서버 실행
java -jar was-0.0.1-SNAPSHOT.jar
[다시 DB 서버로]
- 데이터 추가
mariadb
USE 3tier;
INSERT INTO 3tier.student VALUES (1, 's01', 10), (2, 's02', 20);
[오늘 최종 확인]
윈도우에서 웹 브라우저로 was 서버의 IP에 8080 포트의 /student/list로 접속
http://[was의 IP]:8080/student/list

web 서버
- nginx 설정 추가
vi /etc/nginx/sites-enabled/default
server { 위 쪽에 다음 내용 추가
upstream backend_servers {
        server 10.10.10.40:8080;
        server 10.10.10.60:8080;
        }
location / { ~ } 아래 쪽에 다음 내용 추가
location /api/ {
            rewrite ^/api(/.*)$ $1 break; # /api 제거
            proxy_pass http://backend_servers; # 백엔드 서버 주소와 포트
            proxy_http_version 1.1;
            proxy_set_header Upgrade $http_upgrade;
            proxy_set_header Connection "upgrade";
            proxy_set_header Host $host;
            proxy_cache_bypass $http_upgrade;
    }
systemctl status nginx
apt install -y net-tools
netstat -anlp | grep :80
윈도우에서 웹 브라우저로 nginx 서버의 IP에 80 포트의 /로 접속
http://10.10.10.100:80/
- nginx 설정 적용
systemctl restart nginx - nginx 실행 확인
systemctl status nginx
apt install -y net-tools
netstat -anlp | grep :80 - 파일 생성
vi /var/www/html/list.html 새로운 파일에 다음 내용 작성
<!DOCTYPE html>
<html lang="en">
<head>
  <meta charset="UTF-8">
  <meta name="viewport" content="width=device-width, initial-scale=1.0">
  <title>Fetch Student List</title>
</head>
<body>
  <button id="fetchButton">학생 리스트 가져오기</button>
  <ul id="studentList"></ul>
<script>
    document.getElementById('fetchButton').addEventListener('click', async () => {
      try {
        const response = await fetch('/api/student/list', {
          method: 'GET',
          headers: {
            'Content-Type': 'application/json'
          }
        });
if (!response.ok) {
          throw new Error(`HTTP error! status: ${response.status}`);
        }
const data = await response.json(); // 서버로부터 받은 데이터
        displayStudentList(data); // 데이터를 화면에 표시
      } catch (error) {
        console.error('Error fetching student list:', error);
      }
    });
function displayStudentList(studentList) {
      const listElement = document.getElementById('studentList');
      listElement.innerHTML = '';
studentList.forEach(student => {
        const listItem = document.createElement('li');
        listItem.textContent = `학생 번호: ${student.idx}, 학생 이름: ${student.name}, 학생 나이: ${student.age}`;
        listElement.appendChild(listItem);
      });
    }
  </script>
</body>
</html>