목차
Ⅰ. 오전 수업
	A. 1교시
		1. 지난 시간 복습
		2. Public 폴더 사용해보기
	B. 2교시
		1. Public 폴더 사용해보기 (cont.)
		2. GET 방식 통신 처리
	C. 3교시
		1. 작성한 코드 문제 찾기

Ⅱ. 오후 수업
	A. 4교시
		1. 지난 시간 복습
		2. LangServe
	B. 5교시
		1. LangServe (cont.)
	C. 6교시
		1. LangServe (cont.)

Ⅲ. CAREER UP
	현직자 특강

Ⅳ. 하루 돌아보기
Ⅰ. 오전 수업
A. 1교시
1. 지난 시간 복습
- Express 프레임워크
- 프레임워크: '틀'을 제공!
- 프레임워크 등장 전: 서버 파일 한 개가 모든 일을 다 함 (요청 데이터 처리, 요청 응답, DB 관리, 페이지 리턴, 페이지 제작, …) → 사용자가 증가하면서 업무 과중화 → 업무 분배 관리 & 코드 통합 구조 (협업에 유리)
- Express의 핵심은 "업무를 분배"한다는 개념 → 서버에 폴더 구조 세팅 필요
- 프레임워크: '틀'을 제공!
- 필수 폴더 구조 & 파일
- config
- 설정에 관련된 파일을 관리
- DB 정보, API key 값 등
- public
- 웹 페이지를 만들 때 쓰는 정적 파일(개발자가 수정하지 않는 이상 절대 바뀌지 않는 파일들) 관리하는 공간
- CSS, JS, image, video, …
- 사용자가 들어왔을 때 항상 동일한 화면
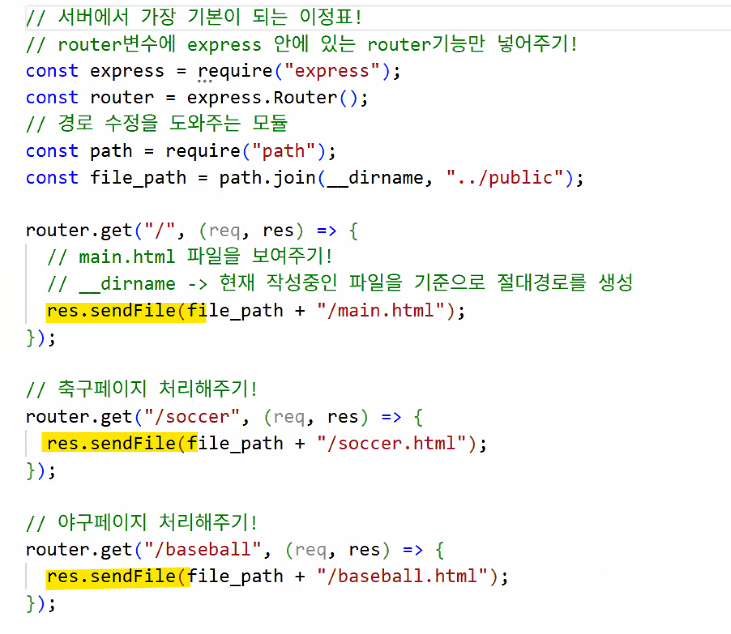
- routes ★★★
- 경로 담당 공간
- 사용자가 어디로 들어왔느냐에 따른 요청 처리 역할
- 서버에서 매우 중요한 핵심 개념 → router(라우터): 분배기
- views
- 동적 웹 페이지 관리 공간
- 예: 로그인 후 아이디마다 새 페이지 보여주는 경우(□□님 환영합니다~ → 서버가 동적으로 id 부분(□□부분)만 내용 바꿔줌)
- app.js
- 실제 서버 담당 파일
- 서버 생성, 제작된 기능 관리, 업무 설정 등
- 위에서 소개한 일꾼들을 관제하는 컨트롤 타워
- index.js, server.js 등 다양한 명칭으로 씀 → 핵심은 이 파일이 '서버'를 담당 & 컨트롤 타워 역할을 한다는 것
- config
- Express 사용법
- 워크스페이스(→ 프로젝트 폴더) 생성
- express 설치:
npm i express- express 모듈에는 url, querystring, fs 모듈 등의 기능이 다 들어가 있음
- 폴더 구성
- app.js 작성
- node_modules 폴더
- 모듈의 양이 많아지면 용량이 엄청 증가함
- 프로젝트 파일 완성 후 공유할 때는 이거 빼고 공유
- 대신 package.json 파일을 반드시 넣기 (절대 지우거나 건들지 마시오)
TIP: MPA vs. SPA
Express → MPA
REACT, VUE → SPA → views 폴더가 필요 없음!
- app.js
- express 모듈 데려오기
- 모듈 호출해서 app이라는 변수에 할당하기
- cf. crawling 시간에 나온 driver 생각하면 쉬움(
driver = wb.Chrome())
- cf. crawling 시간에 나온 driver 생각하면 쉬움(
- 서버 만들기: get, post 따로 관리함
- 매개 변수: ("/경로",실행함수)
- 경로 "/": 메인 페이지로 방문했을 때
- 사용자에게 값 돌려주기: send(), sendFile()
- send(): 사용자에게 간단한 값을 하나만 돌려주는 경우
- sendFile(): 미리 만들어 둔 정적 파일이나 생성된 파일을 돌려주는 경우
- sendFile() 쓸 때 주의사항: Express에서 경로를 사용할 경우 모든 경로는 반드시 절대경로를 활용해야 함
- Express의 목표: "누구나 똑같이 개발할 수 있게" 하자 → 절대경로 사용
- 그런데 절대경로는 사람마다 다르잖아요… → 컴퓨터가 알아서 바뀌는 절대경로를 동적으로 수정하게 하자!
- 통합해서 쓰기 위해
__dirname키워드(환경변수) 사용- 컴퓨터가 알아서 app.js 파일이 있는 위치의 절대경로를 가져옴
__dirname: 현재 작업 중인 파일을 포함하는 폴더까지가 기준
2. Public 폴더 사용해보기
복습
a 태그 → href 속성
img 태그 → src 속성
link 태그 → href 속성 (CSS 연결)
script 태그 → src 속성 (JS 연결)
- main.html에 public 폴더 안에 있는 img.jpg 넣어보기
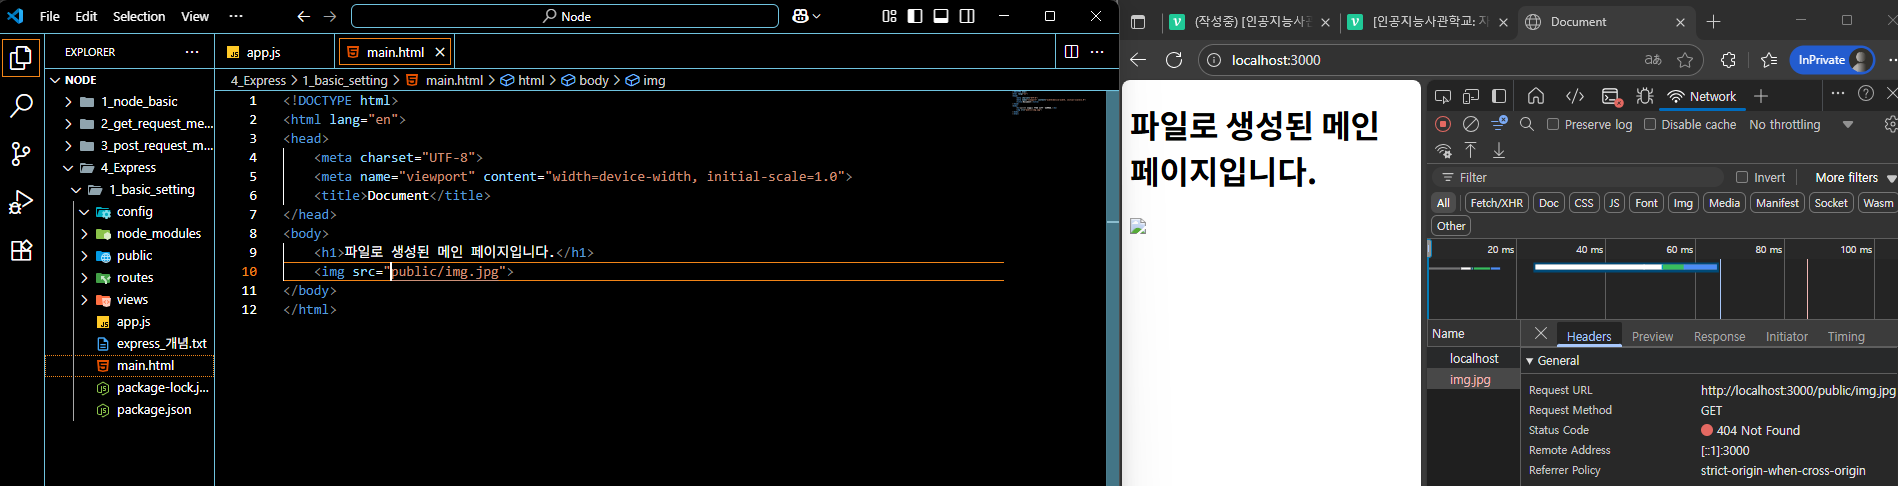
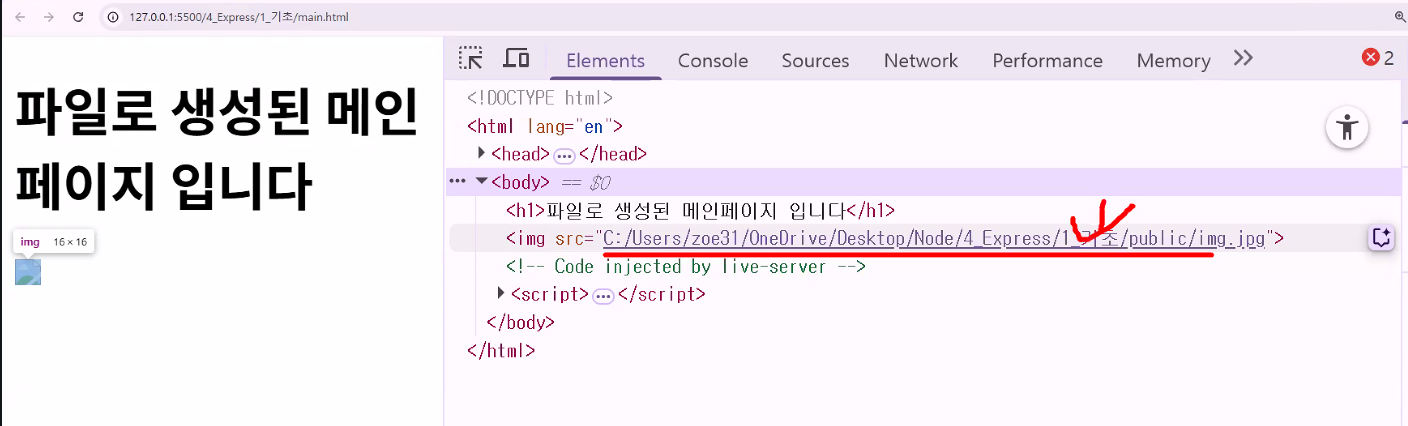
- 왜 이미지가 안 뜰까? → html은 로컬 컴퓨터 절대경로 사용 X
- 보안 문제 때문!
- 컴퓨터의 경로가 그대로 노출되는 문제 때문에 처음부터 HTML 페이지에서 로컬 컴퓨터로 직접적으로 접근하는 걸 막아두었다고 한다.
- 컴퓨터의 경로가 그대로 노출되는 문제 때문에 처음부터 HTML 페이지에서 로컬 컴퓨터로 직접적으로 접근하는 걸 막아두었다고 한다.
- 보안 문제 때문!
"로컬 PC 절대경로는 브라우저에서 직접 접근할 수 없어 웹상에서는 직접적인 사용이 불가능합니다."
Web browsers are designed with security in mind and, by default, prevent websites from directly accessing your local file system. This is a fundamental security measure to protect user privacy and prevent malicious websites from reading, modifying, or deleting your personal files without your explicit permission.
☞ Here's why this restriction exists:
Security:
Without this restriction, a malicious website could potentially access sensitive information on your computer, such as documents, passwords, or personal data, and transmit it to an attacker.
Privacy:
It prevents websites from tracking your activities or gathering information about your local environment without your consent.
Malware Prevention:
Direct file system access could be exploited to install or execute malware on your system.
☞ How websites can interact with local files (with user permission):
While direct access is blocked, websites can interact with local files through specific user-initiated actions and browser APIs:
File Input Element (<input type="file">):
This HTML element allows users to select files from their local system, which can then be uploaded to a server or processed by client-side JavaScript (e.g., using FileReader to read file content).
File System Access API:
Modern browsers offer APIs like the File System Access API, which allows web applications to request permission from the user to read or write specific files or directories on their local system. This access is granted on a per-file/directory basis and requires explicit user consent.
Drag and Drop:
Users can drag and drop files from their local system into a web application, triggering events that allow the website to process the dropped files.
- 그럼 어떻게 하죠?
- 미들웨어 등록: app.use()
- app에게 뭔가를 등록할 때는
.use()사용 → 기능 설정, 제한 설정, 룰 설정, …
- app에게 뭔가를 등록할 때는
- 정적인 파일을 가져다가 쓰려면 무조건 퍼블릭 폴더로 가라고 설정하기
- 미들웨어 등록: app.use()
B. 2교시
1. Public 폴더 사용해보기 (cont.)
RULE 1. 모든 경로는 반드시 절대경로를 활용: __dirname
RULE 2. 정적인 파일들은 무조건 public에 경유하게 세팅: app.use(express.static("public"));
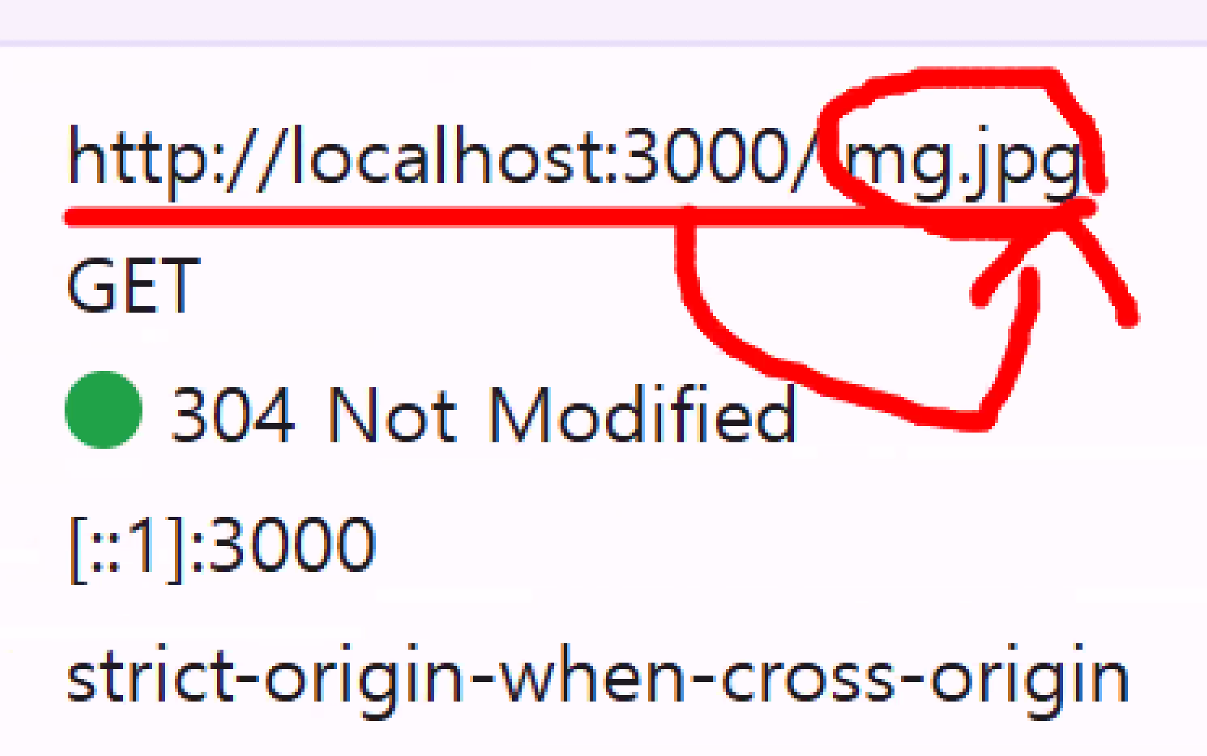
- 경로에 public 폴더 안에 있는 것만 적으면 됨:
<img src="img.jpg">- public 파일끼리 참조 시
- 내가 만든 파일이 내가 만든 이미지를 참조 → 컴퓨터 경로도 나오지 않으면서 이미지가 잘 전달됨
- 내가 만든 파일이 내가 만든 이미지를 참조 → 컴퓨터 경로도 나오지 않으면서 이미지가 잘 전달됨
- link 이용 → 경로 이동 시
- public 파일끼리 참조 시
cf. sendFile은 참조(or경로 전달) 아닌 파일을 보내주는 거라 그냥 절대경로 씀
tip: HTML 파일에서
<html lang="en">표시하는 이유
SEO(검색 엔진 최적화) → lang="en"이면 검색 엔진이 외국 사이트라고 판단함
lang="ko"로 하면 한국 검색 엔진에 잘 잡힘
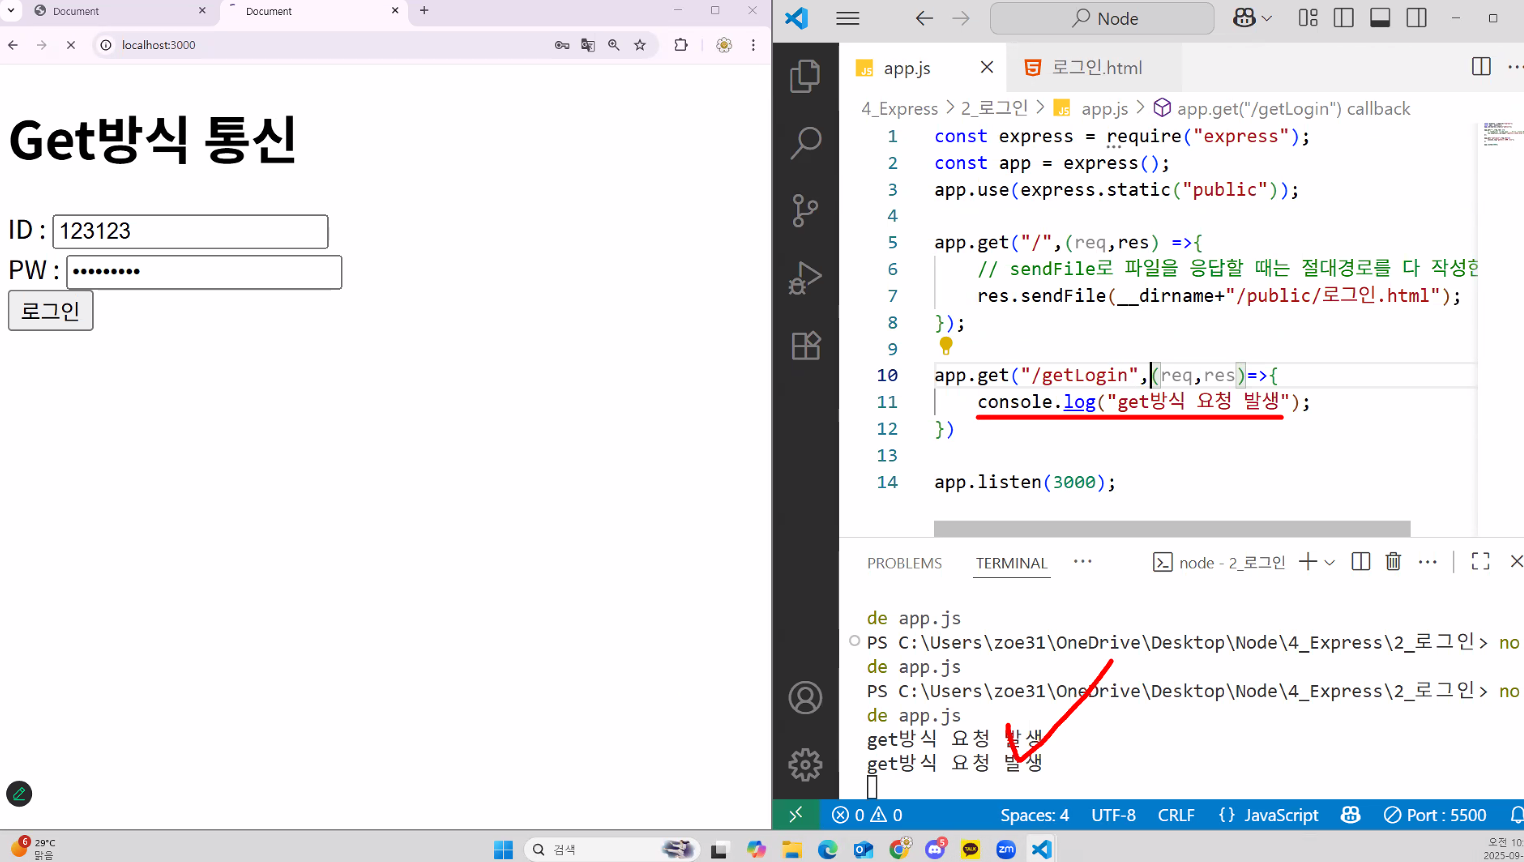
2. GET 방식 통신 처리
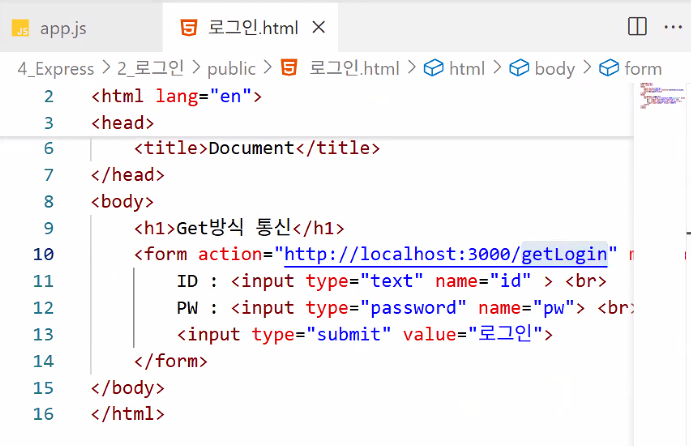
- 로그인.html에서 입력한 id, pw 받기
const express = require("express");
const app = express();
app.use(express.static("public")); // 지금 실습에서 필요하진 않지만 기본 구조라 생각하고 무조건 적기

app.get("/",(req,res)=>{
    res.sendFile("/로그인.html")
});- 실행 결과

- 왜 안 나오죠? →
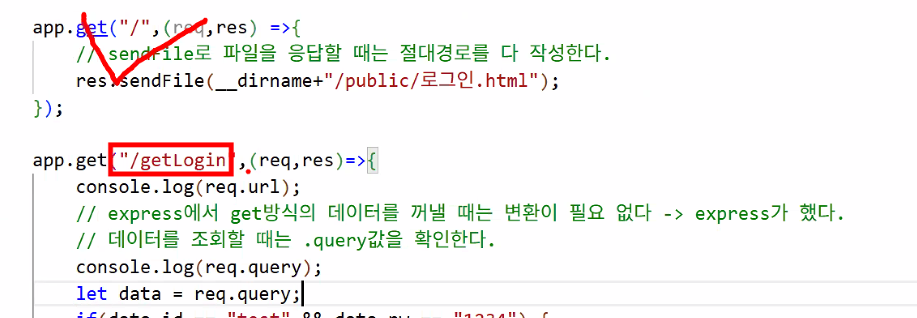
sendFile()의 특징 때문!- sendFile로 파일을 응답할 때는 절대경로를 다 작성해야 함:
res.sendFile(__dirname+"/public/로그인.html")
- sendFile로 파일을 응답할 때는 절대경로를 다 작성해야 함:
- 로그인 버튼을 누를 때마다 콘솔창(터미널)에 'get방식 요청'이 뜸
- 왜 안 나오죠? →
로그인 성공/실패 화면 이동하기
- 로그인 정보를 메인 페이지로 보내면 무한 순환 오류 → 새로운 경로로 보내야 함
- 왜 무한 루프인가요?
- 클라이언트가 값을 메인에 보내면 발생하는 문제:
action="http://localhost:3000/"→ "3000번 포트에 누가 왔어요!" (app.listen(3000);) → 사용자가 어디로 들어왔나요? → 포트 번호 뒤에 아무것도 없는 메인으로 왔어요:app.get("/",(req,res)=>{res.sendFile("/로그인.html")});친구가 계속 메인 페이지를 다시 돌려줌 (값에 대한 처리가 없음) → "3000번 포트에 누가 왔어요!" → 메인 이동 → … → 계속 빙글빙글 돌고만 있음
- 클라이언트가 값을 메인에 보내면 발생하는 문제:
- 즉, '값을 보내는 게' 잘못된 상태
- 왜 무한 루프인가요?
값을 "어디로" 보내느냐가 중요!
👩💻: 저희 데이터 보내려고 하는데 어디에다 보내야 해요?
👨💻: (아직 준비가 안 되어 있는데…)
👩💻: 저희 "http://localhost:3000/getLogin" 경로에 데이터 보낼게요~
👨💻: (getLogin 경로로 보낸 정보를 받아줄 새로운 업무를 서버에 추가해야겠다!)
- 역할 분리: "/"(메인 페이지 방문 시 페이지 응답 공간) & "/getLogin"(get 방식 데이터 처리 공간)
- 장점: 관리하기 편함
- 장점: 관리하기 편함
- 조건문 추가하기

C. 3교시
1. 작성한 코드 문제 찾기
- 우리가 작성한 코드에는 사실 치명적인 문제가 있음 → 새로 고침을 누를 때마다 로그인이 계속 됨😮
- 결제라고 생각한다면 매우 큰 문제 → 새로 고침될 때마다 결제가 이루어진다는 의미
- 이게 바로 sendFile의 치명적인 문제!
- 결제라고 생각한다면 매우 큰 문제 → 새로 고침될 때마다 결제가 이루어진다는 의미
- sendFile의 특징
- 단순하게 파일만 바꿔치기 (페이지만 전환) → url이 변하지 않는다!
- 문제점: 사이트가 새로 고침이 되면 똑같은 url이 재실행 → 로직도 재실행됨(회원 가입, 로그인, 결제 등 DB 값을 변경하는 로직이 들어 있는 경우 큰 문제 발생)
- 새로 고침을 누를 때 url이 안 바뀜 == 해당 url의 로직이 매번 반복된다는 뜻
- 따라서 사용자가 입력한 데이터를 가지고 활용하거나 값을 처리해야 하는 곳에서는 절대 sendFile 쓰면 안 됨!
- 값을 가지고 페이지를 이동하는 경우 sendFile 쓰지 말자 (해당 코드가 있는 곳의 로직이 무한 반복될 위험 때문)
- 해결책: 사이트가 변할 때 url도 같이 변화 → 경로 자체를 바꾸는 응답 방식을 쓰자!: public 폴더 이용 → public 폴더의 img.jpg를 파일명으로 호출했던 원리를 가져오기
- express 응답 방식 2가지
res.sendFile()(파일 전송): 특정 파일을 클라이언트로 전송하여 브라우저에 직접 보여주는 방식- 서버에 있는 특정 파일을 읽어 클라이언트에게 그대로 전송
- 클라이언트는 응답으로 받은 파일의 내용을 웹 페이지처럼 직접 표시하거나 다운로드
- 요청한 URL이 변경되지 않고 그대로 유지
- 정적인 HTML, CSS, 이미지 파일 등을 제공할 때 사용
res.redirect()(리디렉션): 클라이언트의 브라우저에게 다른 URL로 재요청하라는 응답(HTTP 30x 리디렉션)을 보내는 방식- 클라이언트의 브라우저에게 새로운 URL로 다시 요청하라고 지시 → 경로 자체를 변경
- 브라우저는 서버로부터 30x 리디렉션 응답을 받아, 지정된 다른 URL로 새로운 요청을 보냄
- 클라이언트의 브라우저 URL이 지정된 새 주소로 변경
- 게시글 등록 후 해당 게시글 페이지로 이동하거나, 로그인 후 메인 페이지로 이동하는 등 사용자를 다른 페이지로 안내할 때 사용
| 구분 | res.sendFile() | res.redirect() |
|---|---|---|
| 기능 | 파일 전송 | URL 이동 (재요청) |
| 클라이언트 동작 | 파일 내용 표시/다운로드 | 새로운 URL로 재요청 |
| URL 유지 여부 | 유지됨 | 변경됨 |
| 사용 예시 | index.html 파일 제공 | 게시글 등록 후 상세 페이지 이동 |
- tip 1: url에는 되도록 파일명도 숨기는 게 좋음
- tip 2: 메인 페이지로 돌아갈 때
res.redirect("/");- app.js의
app.get("/",(req,res)=>{…})로직이 동작함
- app.js의
res.redirect("/index.html");http://localhost:3000/index.html파일로 바로 이동- app.js의
app.get("/",(req,res)=>{…})로직이 동작하지 않음 (코드 재사용이 안 됨)
- 따라서
res.redirect("/");를 사용해 기존 코드를 사용 & 역할군을 확실히 나눠야 함!

const express = require("express");
const app = express();
app.use(express.static("public"));

app.get("/",(req,res)=>{
    res.sendFile(__dirname+"/public/login.html")
});

app.get("/getLogin",(req,res)=>{
    let data = req.query;
    if(data.id=="test"&&data.pw=="1234"){
        res.redirect("/");
    }else{
        res.redirect("/fail.html");
    }
});

app.listen(3000);- sendFile
- 메인 페이지 or 파일 바꿔야 할 때만 쓰기
- 예시: 단순 페이지 처리
GET 방식의 데이터 처리 ★★★
- express에서 GET 데이터는 req.query에 객체 형태로 자동 저장된다.
- form 태그에서 값을 보낼 때는 항상 메인이 아닌 특정 url 경로로 보낸다.
- e.g. login.html의 form 태그
action="http://localhost:3000/getLogin"- 사용자가 보낸 값이
http://localhost:3000/getLogin뒤에 붙어서 전달됨:http://localhost:3000/getLogin?id=test&pw=1234
- 사용자가 보낸 값이
- Frontend에서 새로운 경로로 보내면, Backend에서는 반드시 받는 로직을 작성해야 함
- e.g. app.js의
app.get("/getLogin",(req,res)=>{…})
- e.g. app.js의
- e.g. login.html의 form 태그
- (중요) sendFile vs. redirect 차이점
- sendFile: URL이 변하지 않고 파일만 바꿔치기 → 새로 고침이 되면 그 전의 로직이 다시 실행
- 값이 변하는 로직이 없는 경우 사용
- redirect: URL의 경로 자체를 변경 → public 폴더의 파일을 직접 찾아간다. → 새로 고침이 돼도 로직이 실행되지 않음!
- 값이 변하는 로직이 포함된 경우 사용
- sendFile: URL이 변하지 않고 파일만 바꿔치기 → 새로 고침이 되면 그 전의 로직이 다시 실행
Ⅱ. 오후 수업
A. 4교시
1. 지난 시간 복습
- RAG 기술을 활용한 이미지 검색
- MultiModal 모듈 불러오기
- OpenAI SDK 사용하기
- base64 인코딩 모델 사용 필요
- OCR 기능 구현해보기
로컬 환경에서 LLM 사용하기: LangServe, Ollama
2. LangServe
- Jupyter Notebook 설치하기
- Anaconda distribution download
- Anaconda Navigator에서 Notebook 선택
- 안 되면 Anaconda Prompt 열고 jupyter notebook 실행
주피터 노트북 단축키
- mode
- command 모드: 셀자체에 설정 (esc)
- 셀 추가 -> 아래 셀 추가 (B), 위 셀 추가 (A)
- 셀 삭제 (dd)
- 마크다운 모드 (M)
- 셀 모드 (Y)
- edit 모드: 셀 내에 코드를 작성할 때 (enter)
- command 모드: 셀자체에 설정 (esc)
FastAPI로 LangChain 서버 구동하기
- API: 프로그램과 프로그램이 서로 대화할 수 있도록 도와주는 통로
- FastAPI: Python 웹 프레임워크(FastAPI, Flask, Django 등이 모두 Python 웹 프레임워크임)
- uvicorn: FastAPI를 실제로 구동시키는 엔진
- FastAPI를 실행하려면 웹 서버가 필요한데, 그 역할을 하는 게 Uvicorn
# FastAPI, uvivcorn 설치
!pip install -q fastapi uvicorn
!pip install -q openai langchain-openai langchain langchain_community
!pip install -q langchain-teddynote
!pip install -q langserve[all]

# 파일에서 API 키 읽기
with open("./key/.openai_api_key", "r") as f:
    api_key = f.read().strip()

os.environ["OPENAI_API_KEY"] = api_key
LangChain 구성하기
from langchain_openai import ChatOpenAI
from langchain.prompts import ChatPromptTemplate
from langchain_core.output_parsers import StrOutputParser

def langchain_fun(query):
    # LLM 모델 생성
    llm = ChatOpenAI(
        model="gpt-4o-mini"
        , temperature=0
        , max_tokens=500
    )

    # 프롬프트 작성
    prompt=ChatPromptTemplate.from_template("{input}")

    # 체인 구성
    chain=prompt | llm | StrOutputParser()

    # 체인 실행
    answer = chain.invoke(query)

    # 결과값 반환
    return answer
B. 5교시
1. LangServe (cont.)
FastAPI를 활용하여 서버 구축
from fastapi import FastAPI # Python에서 API 서버를 쉽게 만드는 프레임워크.
import nest_asyncio # 주피터노트북 같은 환경에서 이벤트 루프 충돌을 막아주는 패키지.
import uvicorn # FastAPI 앱을 실행시켜주는 서버 엔진(ASGI 서버).
app = FastAPI() # app: 서버의 본체 역할 → API routes를 붙여 나감
nest_asyncio.apply() # 충돌 방지
@app.get("/{query}")
# LangChain 구동 함수
async def index(query):
return langchain_fun(query)
if __name__ == "__main__":
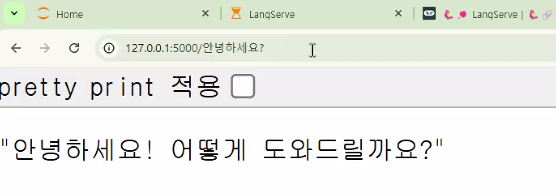
uvicorn.run(app, host="127.0.0.1", port=5000) # 서버 실행 (로컬 5000번 포트)INFO: Started server process [17956]
INFO: Waiting for application startup.
INFO: Application startup complete.
INFO: Uvicorn running on http://127.0.0.1:5000 (Press CTRL+C to quit)
INFO: 127.0.0.1:64474 - "GET / HTTP/1.1" 404 Not Found
INFO: 127.0.0.1:64474 - "GET /favicon.ico HTTP/1.1" 200 OK
INFO: 127.0.0.1:65314 - "GET /%EC%95%88%EB%85%95%ED%95%98%EC%84%B8%EC%9A%94 HTTP/1.1" 200 OK
INFO: 127.0.0.1:65314 - "GET /favicon.ico HTTP/1.1" 200 OK
INFO: 127.0.0.1:60672 - "GET /.well-known/appspecific/com.chrome.devtools.json HTTP/1.1" 404 Not Found
INFO: 127.0.0.1:62460 - "GET /%EB%8B%B4%EA%B3%B0%EC%9D%B4%20%EC%95%84%EC%8B%9C%EB%82%98%EC%9A%94 HTTP/1.1" 200 OK
INFO: 127.0.0.1:62460 - "GET /.well-known/appspecific/com.chrome.devtools.json HTTP/1.1" 404 Not Found
INFO: 127.0.0.1:62460 - "GET /favicon.ico HTTP/1.1" 200 OK
INFO: Shutting down
INFO: Waiting for application shutdown.
INFO: Application shutdown complete.
INFO: Finished server process [17956]- '안녕하세요?'라고 입력했을 때
LangServe
- LangChain을 API를 통하여 배포하기 위한 라이브러리
- LangChain 체인을 REST API로 배포 → GitHub
- FastAPI와 통합이 되어 있어 사용하기 편리
- LangServe docs
# FastAPI에 라우터를 추가하는 함수
from langserve import add_routes

# FastAPI 객체 생성
app = FastAPI()
nest_asyncio.apply()

# LLM 모델 생성
llm = ChatOpenAI(
    model="gpt-4o-mini"
    , temperature=0
    , max_tokens=1000
)

# 목적에 맞는 chain 2개 생성하기: Prompt 별도 정의
prompt_1 = ChatPromptTemplate.from_template("나에게 {topic}에 대해서 농담해 줘")
prompt_2 = ChatPromptTemplate.from_messages([
    ("system","너는 여행 전문가이다")
    , ("human", "{region}의 {target} 3군데를 알려주세요")
    , ("ai", """출력은 다음과 같은 양식을 사용해주세요
    [명칭1] 설명
    [명칭2] 설명
    [명칭3] 설명
    """)
])
C. 6교시
1. LangServe (cont.)
- LangServe.ipynb
# LangChain 서버 라우터 설정
# 방법 1: 모델만 정의하고 프롬프트는 클라이언트에서 재정의하여 사용하기 위함
add_routes(app,llm,path="/llm_model")

# 방법 2: 서버에서 prompt_1과 LLM으로 이어지는 체인 연결
# 클라이언트가 topic(입력값)만 작성하면 서버에 고정된 프롬프트가 적용
add_routes(app,prompt_1|llm,path="/chain_1")
add_routes(app,prompt_2|llm,path="/chain_2")

if __name__ == "__main__":
uvicorn.run(app, host="127.0.0.1", port=5000)- 서버가 잘 열렸는지 확인해보는 법:
/docs확인해보기
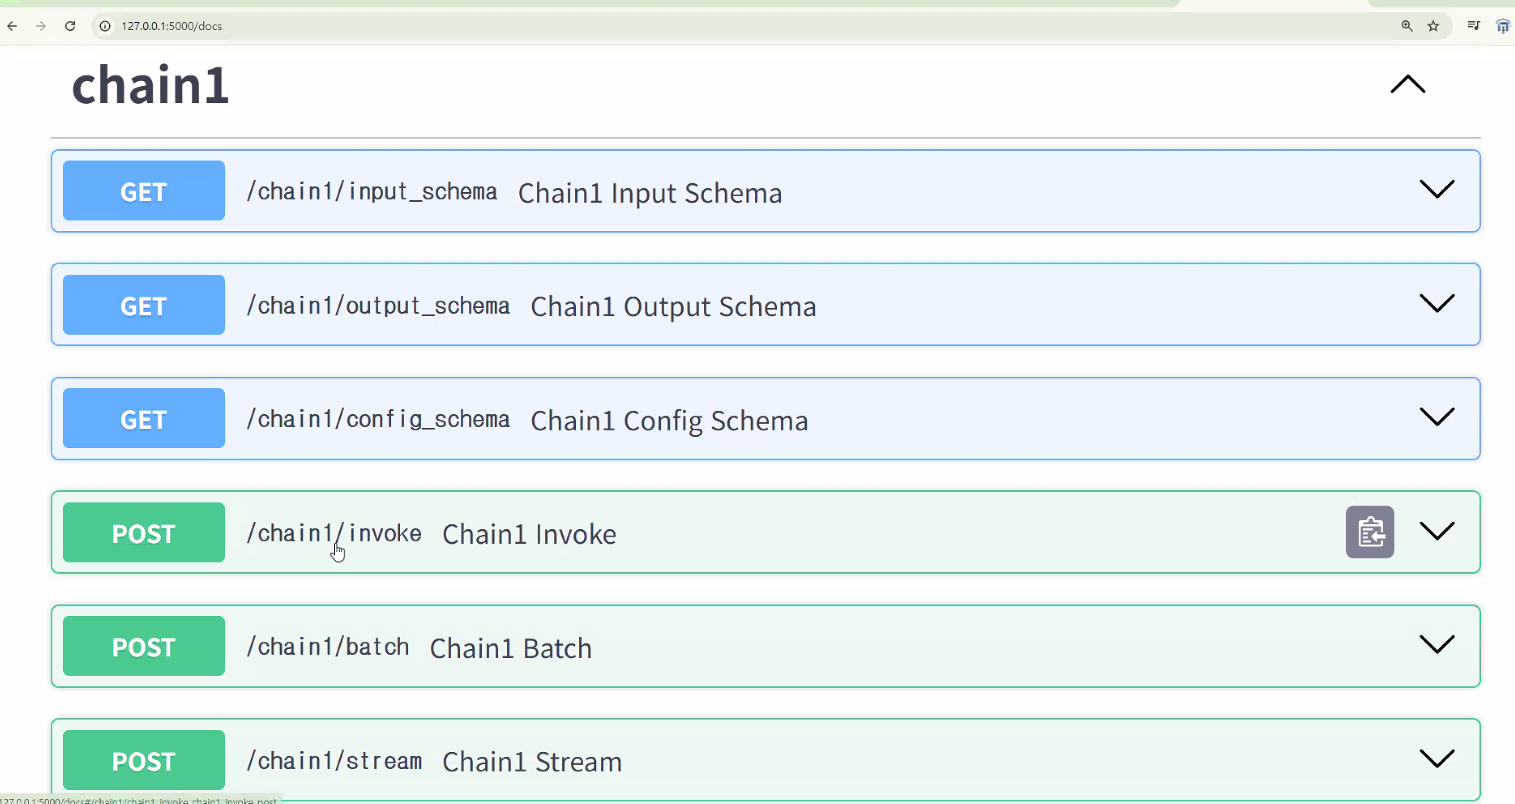
- 잘 되는지 예시를 통해 시험해볼 수도 있음
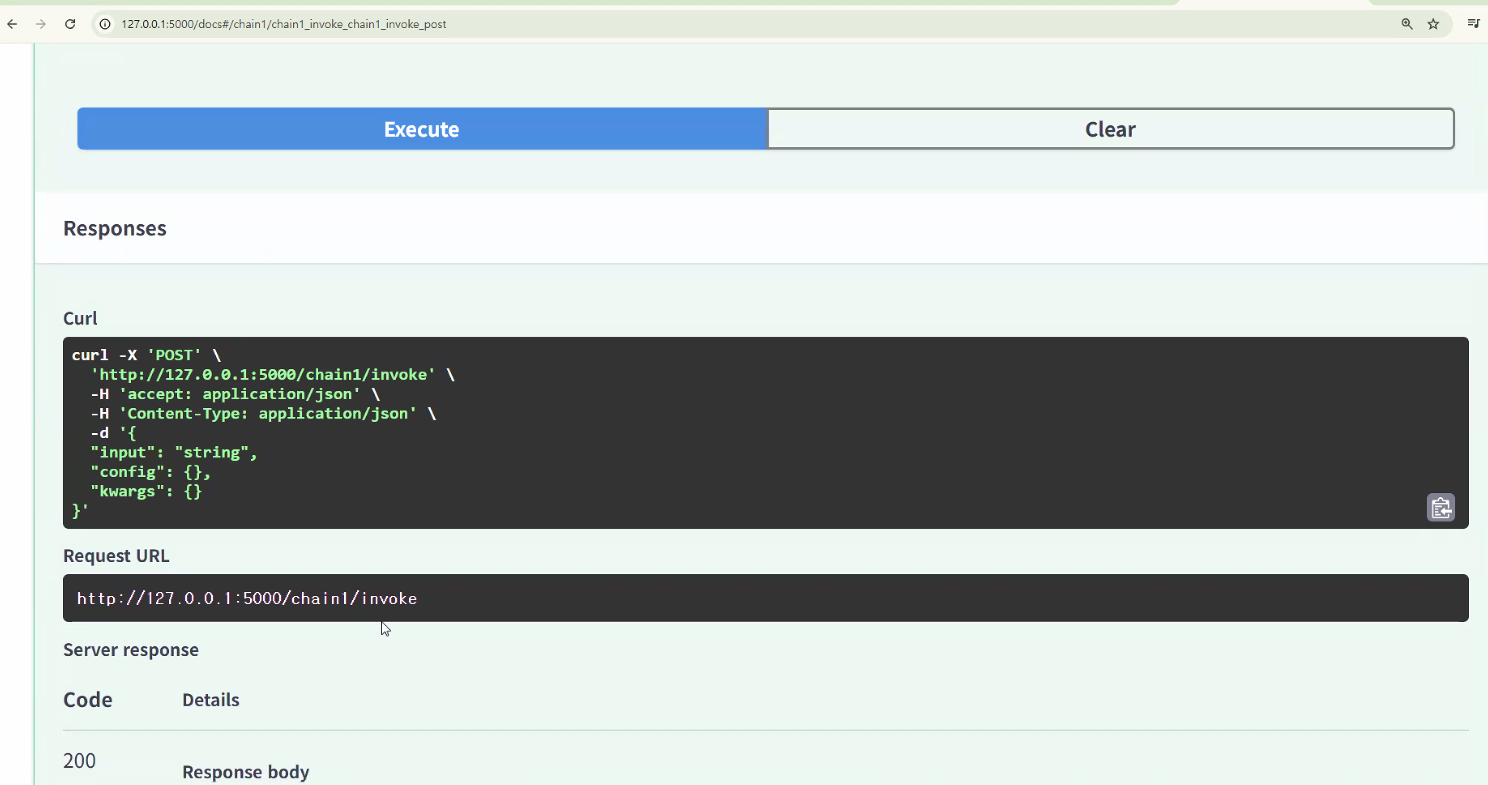
- 잘 되는지 예시를 통해 시험해볼 수도 있음
클라이언트 만들기
- client.ipynb
from langchain.prompts import ChatPromptTemplate
from langchain.schema.runnable import RunnableMap
from langserve import RemoteRunnable- RunnableMap (= RunnableParallel)
- 여러 작업을 동시에 실행할 수 있음
- 시퀀스 내에서 하나의 Runnable의 출력을 다음 Runnable의 입력 형식에 맞게 조작하는 데 유용하게 사용
- 단순 모델을 요청해서 사용
- 서버에서 모델만 가져오고 체인은 클라이언트에서 생성
- 서버에 있는 llm 가져오기 위해 필요한 두 가지:
RemoteRunnable,RunnableMap
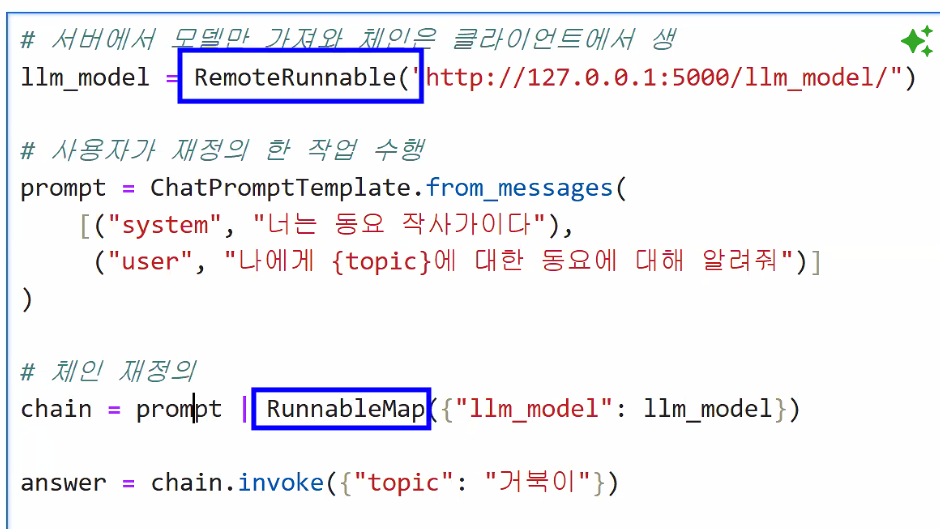
RemoteRunnable("http://127.0.0.1:5000/llm_model/")→ 로컬 서버에 있는 llm 모델 가져오기RunnableMap({"llm_model": llm_model})→ 서버에서 가져온 모델을 연결해 사용하겠다는 의미
llm_model = RemoteRunnable("http://127.0.0.1:5000/llm_model/")

# 사용자가 재정의한 프롬프트 작업 작업 수행
prompt = ChatPromptTemplate.from_messages(
    [("system", "너는 동요 작사가이다"),
     ("user", "나에게 {topic}에 대한 동요에 대해 알려줘")]
)

# 체인 재정의
chain = prompt | RunnableMap({"llm_model": llm_model})

answer = chain.invoke({"topic": "거북이"})

print(answer["llm_model"].content)
물론이죠! 거북이에 대한 동요를 만들어볼게요. 아래는 간단한 동요의 예시입니다.
---
**거북이의 느린 걸음**
(1절)
거북이, 거북이, 느리게 가요,
작은 발로 뚜벅뚜벅, 길을 가요.
햇살 아래서, 풀밭을 지나,
천천히 걸어, 꿈을 찾아가요.
(후렴)
거북이, 거북이, 느리게 가도,
소중한 걸음, 멈추지 않아요.
작은 세상 속, 큰 꿈을 안고,
거북이처럼, 나도 나아가요.
(2절)
거북이, 거북이, 친구가 되어,
서로의 이야기를 나누어요.
바람이 불어, 나뭇잎 흔들려,
함께 노래해, 즐거운 하루예요.
(후렴)
거북이, 거북이, 느리게 가도,
소중한 걸음, 멈추지 않아요.
작은 세상 속, 큰 꿈을 안고,
거북이처럼, 나도 나아가요.
---
이런 식으로 거북이의 느린 걸음과 소중한 친구 관계를 담아보았습니다. 아이들이 쉽게 따라 부를 수 있도록 리듬감 있게 만들어 보았어요!chain.invoke({"topic": "거북이"})하면 chain으로 딕셔너리 값이 들어감 → 맨 처음에 있는 prompt 안에 topic으로 거북이가 들어감 → 거북이가 들어간 prompt가 RunnableMap을 통해 llm_model로 들어감 → 로컬 서버 위치로 이동해 모델 실행
- 서버에 고정된 프롬프트를 사용
- 클라이언트는 입력값만 정의
# prompt_1, chain_1
chain_1=RemoteRunnable("http://127.0.0.1:5000/chain_1")

# 비동기 방식 진행
answer = await chain_1.ainvoke({"topic":"거북이"})

print(answer.content)
물론이죠! 여기 거북이에 대한 농담 하나 있어요:
왜 거북이는 항상 컴퓨터를 잘 못 다룰까요?
너무 느려서 마우스를 잡을 수가 없거든요! 🐢💻
재미있으셨나요?# prompt_2, chain_2 직접 구동해보기 → 비동기 방식으로 진행
chain_2=RemoteRunnable("http://127.0.0.1:5000/chain_2")
# 비동기 방식 진행
answer = await chain_2.ainvoke({"region":"싱가포르", "target":"맛집"})
print(answer.content)[치킨 라이스] - 싱가포르의 대표적인 요리로, 부드러운 닭고기와 향긋한 쌀밥이 함께 제공됩니다. 보통 고수와 함께 간장 소스를 곁들여 먹으며, 현지의 다양한 식당에서 맛볼 수 있습니다.
[락사] - 매콤한 코코넛 밀크 국물에 쌀국수와 해산물, 두부가 들어간 인기 있는 국수 요리입니다. 다양한 종류의 락사가 있지만, 특히 카통 락사가 유명합니다.
[칠리 크랩] - 싱가포르의 대표 해산물 요리로, 신선한 꽃게를 매콤한 칠리 소스와 함께 조리한 요리입니다. 빵과 함께 소스를 찍어 먹는 것이 일반적이며, 현지 식당에서 꼭 시도해볼 만한 메뉴입니다.- 비동기 방식: await - ainvoke/astream/abatch
Ⅲ. CAREER UP
현직자 특강
클라우드 계정에서의 보안성
- IAM 계정 (Sub Account)
- 철저한 보안
- 권한 부여
- RBAC(Role Based Access Control)
하루 돌아보기
👍 잘한 점
- 수업 시간 대답&질문 많이 함
👎 아쉬웠던 점
- 내가 쓰는 노트북에서 아나콘다 오류가 많이 남😭
🔬 개선점
- 아직까지는 실습 따라갈 수 있어서 해보다가 정 안되면 노트북 초기화해야할듯?