다들 한번씩은 만들어보는 TODO 리스트.
Drag and Drop으로 구현해보는 것이 FE 개발자로서의 로망 아닌가 싶다.
그렇다면 한번 뽀개보도록 하자!
우선 라이브러리를 통해서 어떻게 구현하고 어떻게 동작하는지를 알고
라이브러리 없이 한번 구현해보도록 하자.

야너두 할 수 있어!
바쁘신 분들은 바로 최종 코드로 🚀
react-beautiful-dnd
TL;DR
create beautiful drag and drop for lists that anyone can use.
Atlassian에서 만든 React DND 라이브러리이다.
Trello, Jira를 만든 회사이니 근본력은 설명 필요없이 그저 믿고 쓰면 된다!
https://github.com/atlassian/react-beautiful-dnd
예시도 많고 github star도 많지만 개인적으로 공식문서는 조금 진입장벽이 있었다.
친절하지만 '그래서 어떻게 해?'하는 느낌?..이었다.
우선 내가 생각한 공식문서의 핵심을 정리해보았다.
- ✨ 부드러운 에니메이션이 탑재되어 있다!
That what makes you beautiful 🎶 - 접근성이 보장된다. (터치스크린, 키보드, 스크린리더 호환)
- 순서가 있는 리스트에서의 DND 스타일링, 이벤트를 커스터마이징할 수 있다.
- 특별한 DND 이벤트를 구현할 경우 react-dnd를 사용하는 것을 권장한다.
NextJS에서 환경세팅
TL;DR
라이브러리를 구성하는데 생각보다 삽질을 많이 했다 🥲
- strictMode 끄기
- requestAnimationFrame 실행 후 컴포넌트 마운트하기
우선, 라이브러리를 설치하도록 하자.
yarn add react-beautiful-dnd
yarn add -D @types/react-beautiful-dnd
아직 React18과 아직 호환이 잘 안된다.
https://github.com/atlassian/react-beautiful-dnd/issues/2399#issuecomment-1111169234
https://github.com/atlassian/react-beautiful-dnd/issues/2350
React18에서는 strictMode를 꺼서 사용하라고 권장하고 있다.
분명히 시키는 대로 했는데 droppable-id를 계속 인식하지 못한다는 에러가 떴었다.
진짜 미치는 줄 같았다.. 😡
next.config.js에서 이를 쉽게 설정할 수 있다.
/** @type {import('next').NextConfig} */
const nextConfig = {
  reactStrictMode: false,
  swcMinify: true,
};

module.exports = nextConfig;
그리고 requestAnimationFrame이 호출된 이후에 DND 컴포넌트를 렌더링하자.
잘은 모르겠지만, 브라우저가 부드러운 애니메이션을 렌더링할 준비되고 앱을 실행한다고 생각하고 넘어가면 될 것 같다.
https://github.com/atlassian/react-beautiful-dnd/issues/2399#issuecomment-1175638194
  const [enabled, setEnabled] = useState(false);

  useEffect(() => {
    const animation = requestAnimationFrame(() => setEnabled(true));

    return () => {
      cancelAnimationFrame(animation);
      setEnabled(false);
    };
  }, []);

  if (!enabled) {
    return null;
  }
컴포넌트 이해하기
3가지 컴포넌트를 활용하여 DND가 이뤄진다.
| 컴포넌트 이름 | 설명 |
|---|---|
| DragDropContext | ContextAPI의 Provider처럼 DND의 상태를 제공해주는 녀석이라고 보면 될 것 같다. 여기서 onDragEnd 등 다양한 DND 이벤트를 등록 해준다. |
| Droppable | DROP할 수 있는 영역으로 명시한다. |
| Draggable | DRAG할 수 있게 컴포넌트를 감싸준다. |
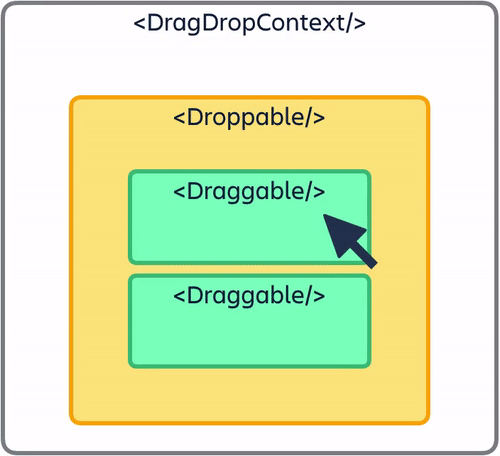
이름이 좀 헷갈리지만 아주 깔끔한 것 같다.
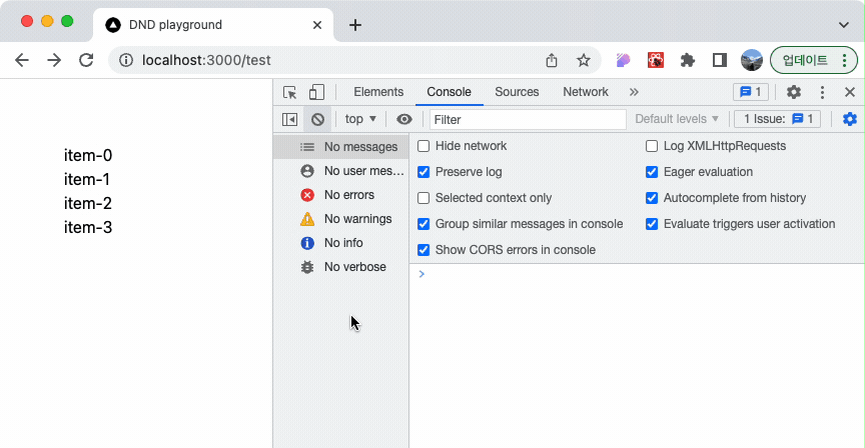
그렇다면, 스타일 없이 아주 간단한 페이지를 만들어 동작을 살펴보도록 하자. 코드는 깔끔하지 않다..
쉽게 커스텀할 수 있기 위해서인지 제공되는 API가 좀 복잡하다.
이를 잘 구분하고 본인 프로젝트에 맞게 조립해서 사용해야 한다.
import { useEffect, useState } from 'react';
import { DragDropContext, Draggable, Droppable, DropResult } from 'react-beautiful-dnd';
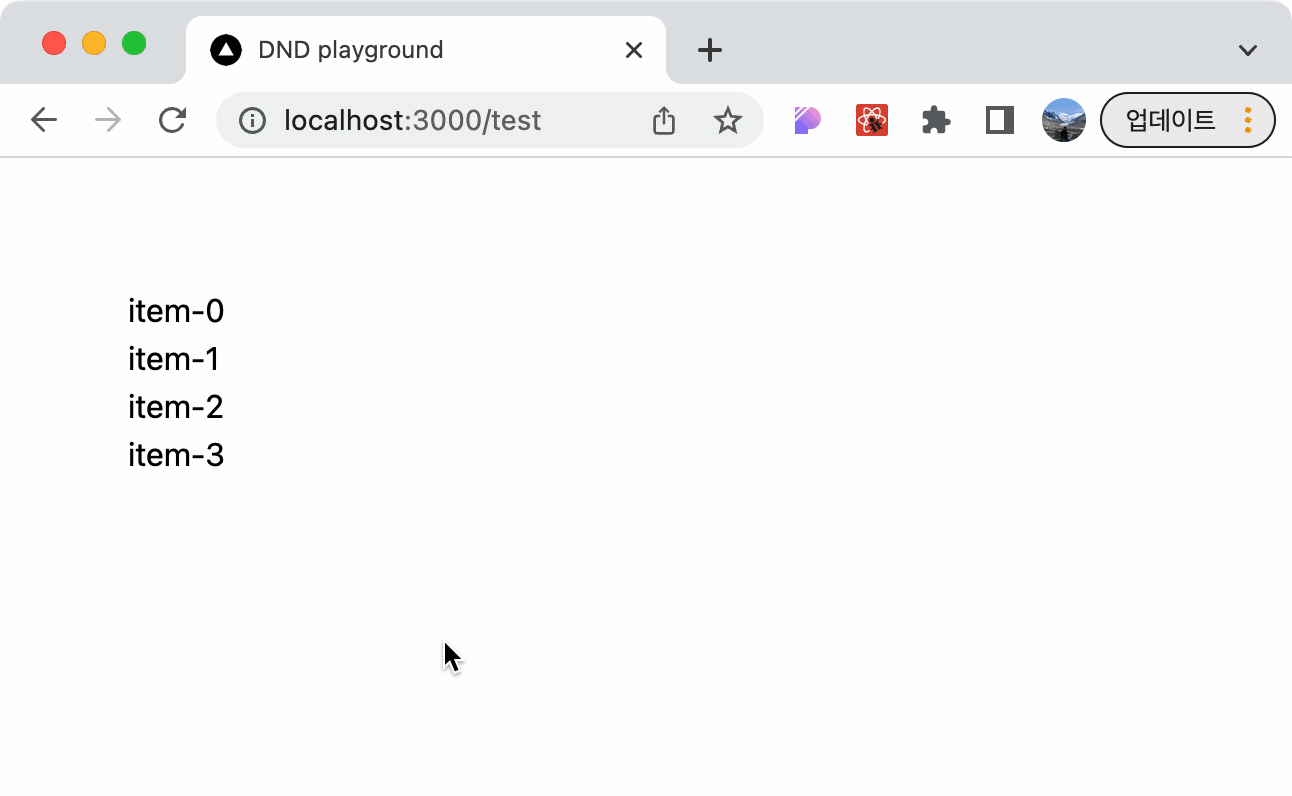
export default function App() {
// --- Mock 데이터
const items = [...Array(4)].map((_, i) => ({ id: `${i}${i}${i}`, content: `item-${i}` }));
// --- Draggable이 Droppable로 드래그 되었을 때 실행되는 이벤트
const onDragEnd = ({ source, destination }: DropResult) => {
console.log('>>> source', source);
console.log('>>> destination', destination);
};
// --- requestAnimationFrame 초기화
const [enabled, setEnabled] = useState(false);
useEffect(() => {
const animation = requestAnimationFrame(() => setEnabled(true));
return () => {
cancelAnimationFrame(animation);
setEnabled(false);
};
}, []);
if (!enabled) {
return null;
}
// --- requestAnimationFrame 초기화 END
return (
<DragDropContext onDragEnd={onDragEnd}>
<Droppable droppableId="droppable">
{(provided) => (
<div ref={provided.innerRef} {...provided.droppableProps}>
{items.map((item, index) => (
<Draggable key={item.id} draggableId={item.id} index={index}>
{(provided) => (
<div
ref={provided.innerRef}
{...provided.draggableProps}
{...provided.dragHandleProps}
>
{item.content}
</div>
)}
</Draggable>
))}
{provided.placeholder}
</div>
)}
</Droppable>
</DragDropContext>
);
}체크 포인트
- 각 컴포넌트에 유닉한 id를 지정해줘야 한다.
key와droppableId,draggableId는 같아야 한다!Droppable의provided와Draggable의provided는 다른 녀석임을 유의해야 한다.
아래 내용들은 그냥 넘어가도 무방합니다.
Droppable 파헤치기
<Droppable droppableId="droppable">
  {(provided, snapshot) => (
    <div ref={provided.innerRef} {...provided.droppableProps}>
      {...}
      {provided.placeholder}
    </div>
  )}
</Droppable>
droppableId
- 드롭 가능한 영역을 구분할 id를 표시한다.
ex) todo, doing, done - ID가 유닉하지만 재활용된다면 버그를 일으킬 수 있다.
provided
- 참고
provided.innerRef- 라이브러리에서 우리 컴포넌트 DOM을 조작하기 위해서 필수로 등록해줘야 한다.
provided.droppableProps- It currently contains data attributes that we use for styling and lookups.
- 그냥 우리가 전달한
props를 라이브러리에서 사용할 수 있는 형태로 DOM data에 등록시켜주는 것 같다. 
provided.placeholder- This is used to create space in the as needed during a drag.
- drop될 때 공간을 만들기 위해서 필요하다고 한다.
없어도 동작은 되는 것 같긴하다...
snapshot
- 참고
snapshot.isDraggingOver- 이름 그대로, 이를 통해서 아이템을 올려놀 수 있을 때 스타일을 추가할 수 있다.
  {(provided, snapshot) => (
    <div
        ref={provided.innerRef}
        {...provided.droppableProps}
        style={{ background: snapshot.isDraggingOver ? 'red' : 'blue' }}
    >
      {...}
      {provided.placeholder}
    </div>
  )}
- 이름 그대로, 이를 통해서 아이템을 올려놀 수 있을 때 스타일을 추가할 수 있다.
draggingOverWith- id of the draggable that is dragging over the Droppable.
draggingFromThisWith- id of the draggable that is dragging from this list.
isUsingPlaceholder- Whether or not the placeholder is actively being used. (useful with virtual lists)
Draggable 파헤치기
{items.map((item, index) => (
  <Draggable key={item.id} draggableId={item.id} index={index}>
    {(provided, snapshot) => (
      <div
        ref={provided.innerRef}
        {...provided.draggableProps}
        {...provided.dragHandleProps}
        >
        {item.content}
      </div>
    )}
  </Draggable>
))}
draggableId
- droppableId와 같다.
index
- 리스트의 순서대로 입력해야 한다.
⛔️ [1,2,4,8]
provided
- 참고
provided.innerRef- droppable와 같다.
provided.draggableProps- contains a data attribute and an inline style.
- drag 스타일을 등록해주는 역할이다. 이게 없다면 엘리먼트가 움직이지 않을 것이다.
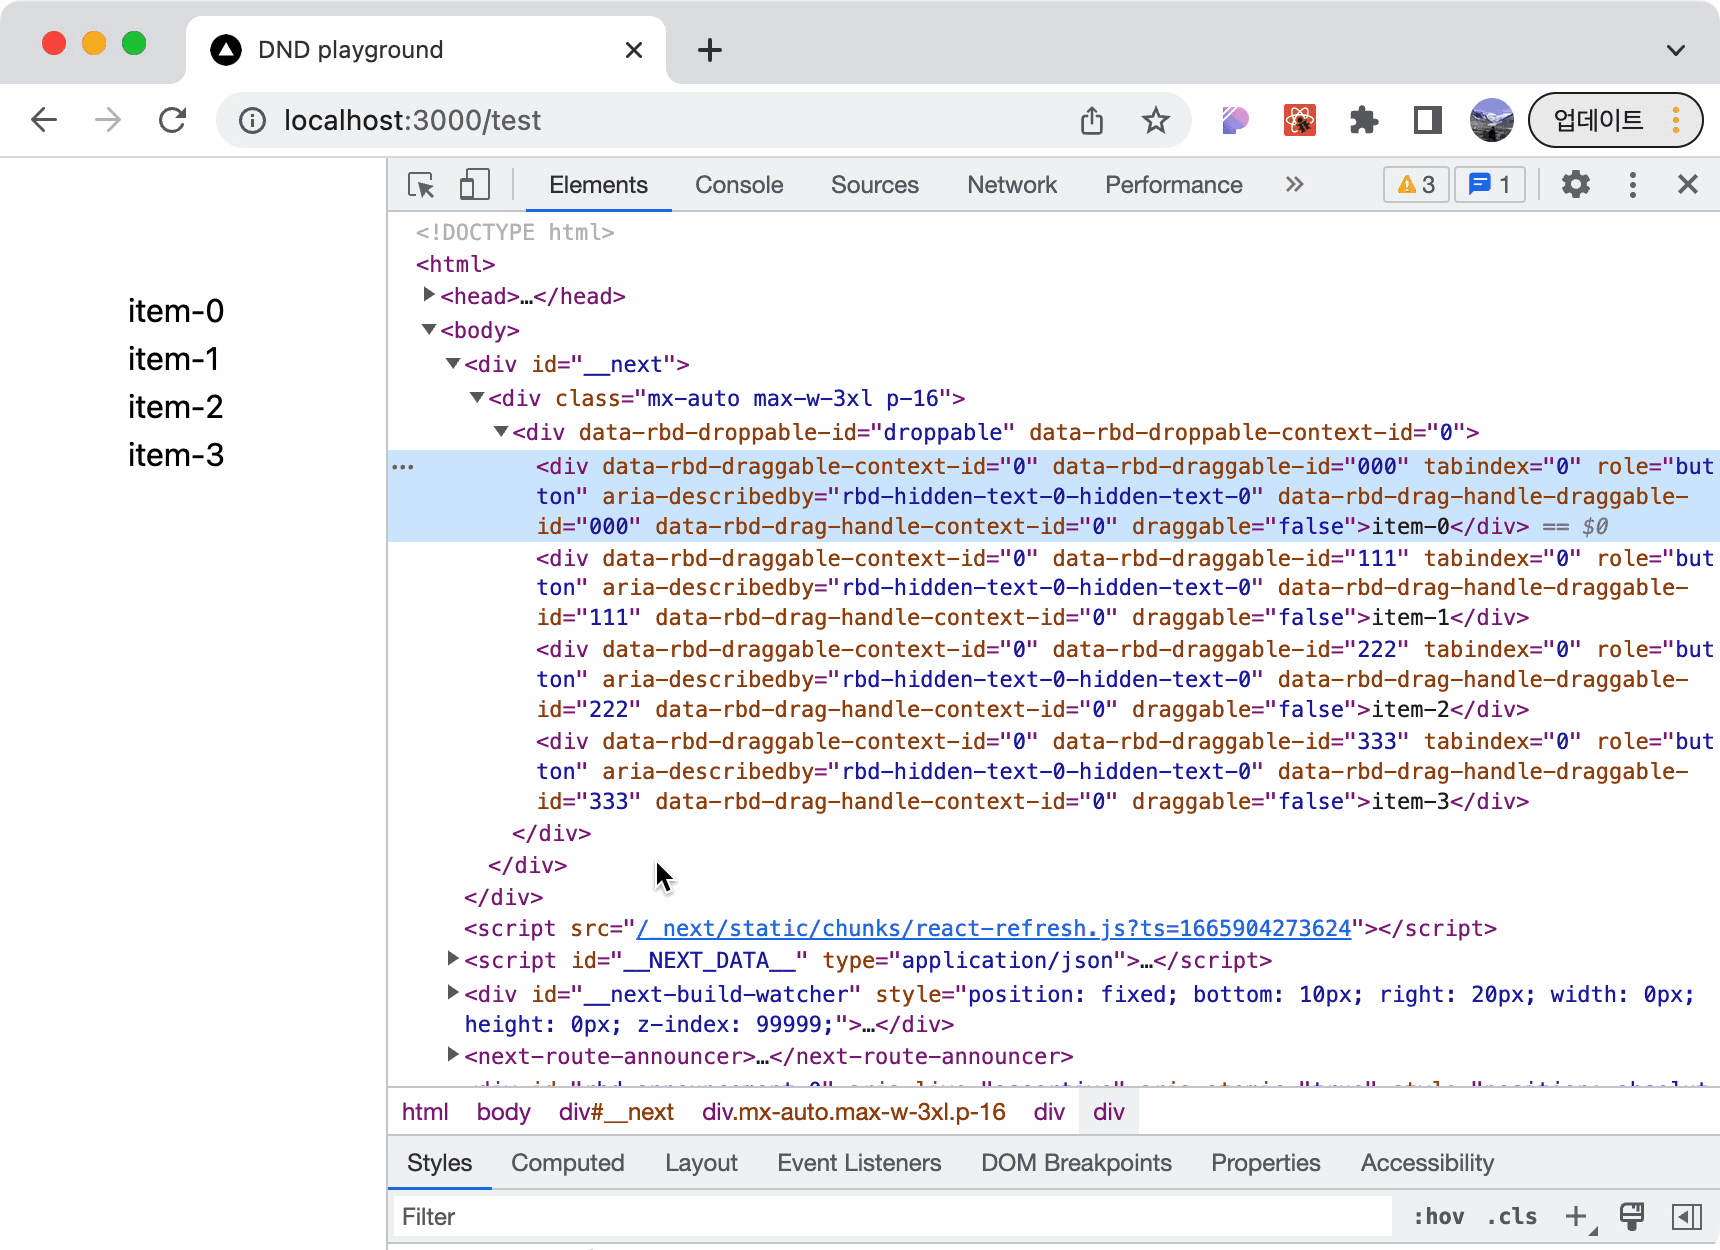
provided.dragHandleProps- drag handle를 등록해주는 인자인데 살펴보면 내부로직이 어떻게 구현했는지 조금 힌트를 얻을 수 있다.
data-rbd-drag-handle-draggable-iddata-rbd-drag-handle-context-idaria-labelledby- screen reader가 연관된 엘리먼트를 읽을 수 있도록 해준다.
tabIndex- 키보드 탭으로 엘리먼트를 접근할 수 있게 해준다.
draggableonDragStart- onDragStart를 통해서 이벤트를 등록해준다.
snapshot
- 참고
snapshot.isDragging- 인라인으로 스타일을 수정시
provided.draggableProps.style도 넣어주는 것을 잃지 말자.{(provided, snapshot) => ( <div ref={provided.innerRef} {...provided.draggableProps} {...provided.dragHandleProps} style={{ backgroundColor: snapshot.isDragging ? 'blue' : 'grey', ...provided.draggableProps.style, }} > {item.content} </div> )} - Generally this is the only property you will be using
- 보통 이 속성만 사용하게 될 것이라고 한다.
- 그렇다면 나머지는 공식문서를 참고하자...
- 인라인으로 스타일을 수정시
snapshot.isDropAnimatingsnapshot.dropAnimationsnapshot.draggingOversnapshot.combineWithsnapshot.combineTargetForsnapshot.mode
onDragEnd 파헤치기
보면 source, destination가 인자로 전달 받는다.
이상한 곳으로 드래그하면 destination이 null로 응답을 받는다.
여기서 특이한 점은 draggableId는 없고 index와 droppableId만 있다.
이것을 활용해 우리가 알아서 상태를 변경시켜야 한다.
splice를 활용하면 이를 쉽게 구현할 수 있다.
const [items, setItems] = useState(
  [...Array(4)].map((_, i) => ({ id: `${i}${i}${i}`, content: `item-${i}` })),
);

const onDragEnd = ({ source, destination }: DropResult) => {
  if (!destination) return;

  // 깊은 복사
  const _items = JSON.parse(JSON.stringify(items)) as typeof items;
  // 기존 아이템 뽑아내기
  const [targetItem] = _items.splice(source.index, 1);
  // 기존 아이템을 새로운 위치에 삽입하기
  _items.splice(destination.index, 0, targetItem);
  // 상태 변경
  setItems(_items);
};
애니메이션 파헤치기
라이브러리에서는 어떻게 엘리먼트에 이동하는 효과를 줄까?
- 기존 drag된 엘리먼트에
position: fixed를 두고 절대적 위치를 지정해준다. - drag의 움직임에 따라서
transition: translate(x, y)스타일을 수정해준다. - drag의 움직임에 따라 밀리게 되는 엘리먼트는
transition: translate(0, y)를 줘서 움직이게 한다. onDropEnd에서 인자 바탕으로 우리가 DOM을 조작해줘야 한다.
스타일링하는 원리는 단순한데 내부적으로 위치를 계산하는 로직은 뭔가 복잡할 것 같다..
+ 추가로 알게된 접근성 TMI
마크업 하단에 보면 helptext가 숨겨져 있는 것을 볼 수 있다.
아마 스크린리더에게 도움을 주기 위함인 것 같다.
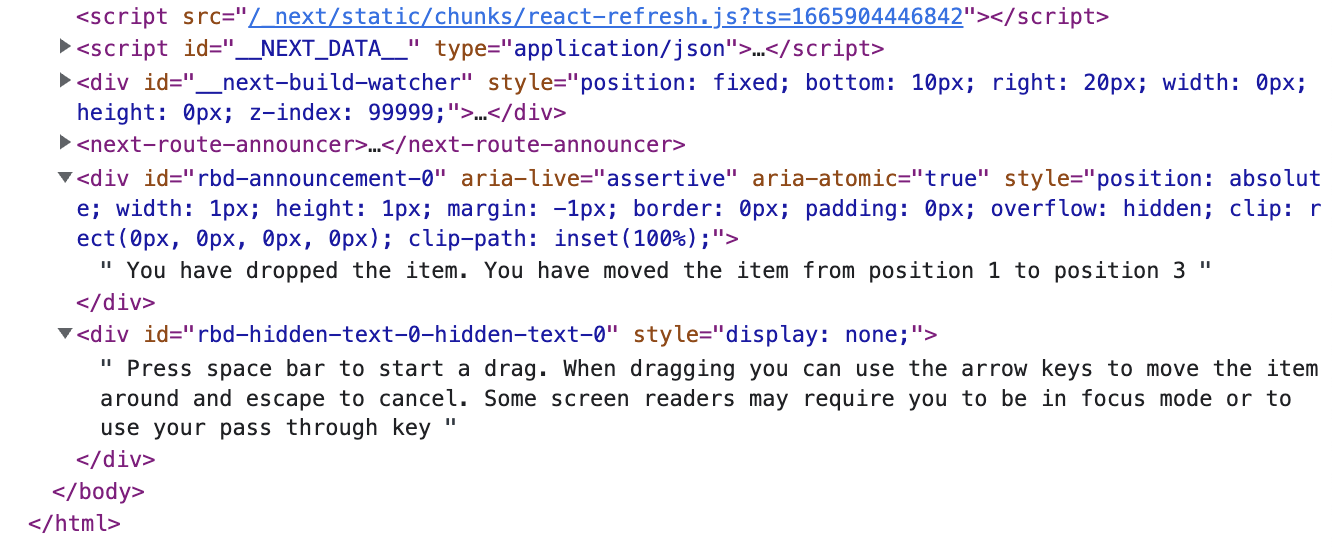
친절하게 어떤 DND 동작을 수행했는지 알려주며 키보드로 어떻게 동작을 시킬 수 있는지 알려준다.
그래서 덕분에 키보드로 DND를 하게 되었다!!
tab으로 원하는 엘리먼트 접근 한다.space로 해당 엘리먼트를 잡는다.- 키보드를 통해서 엘리먼트를 이동시킨다.
- 다시
space를 눌러 해당 엘리먼트를 놓다 준다. 만약esc를 누르면 동작이 취소 된다.
역시 대기업!!
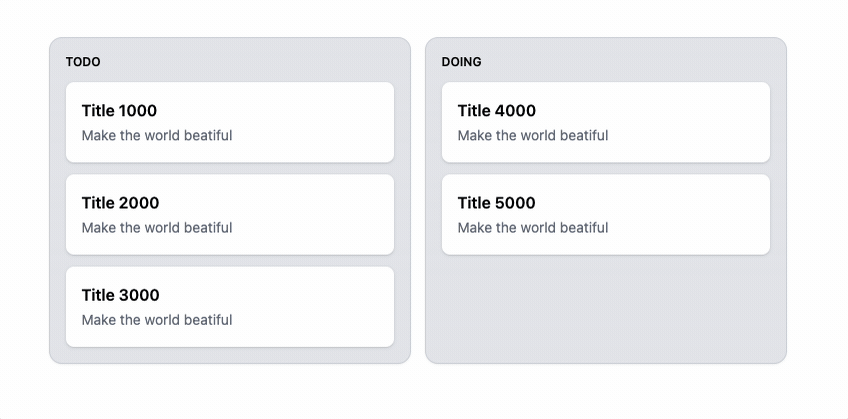
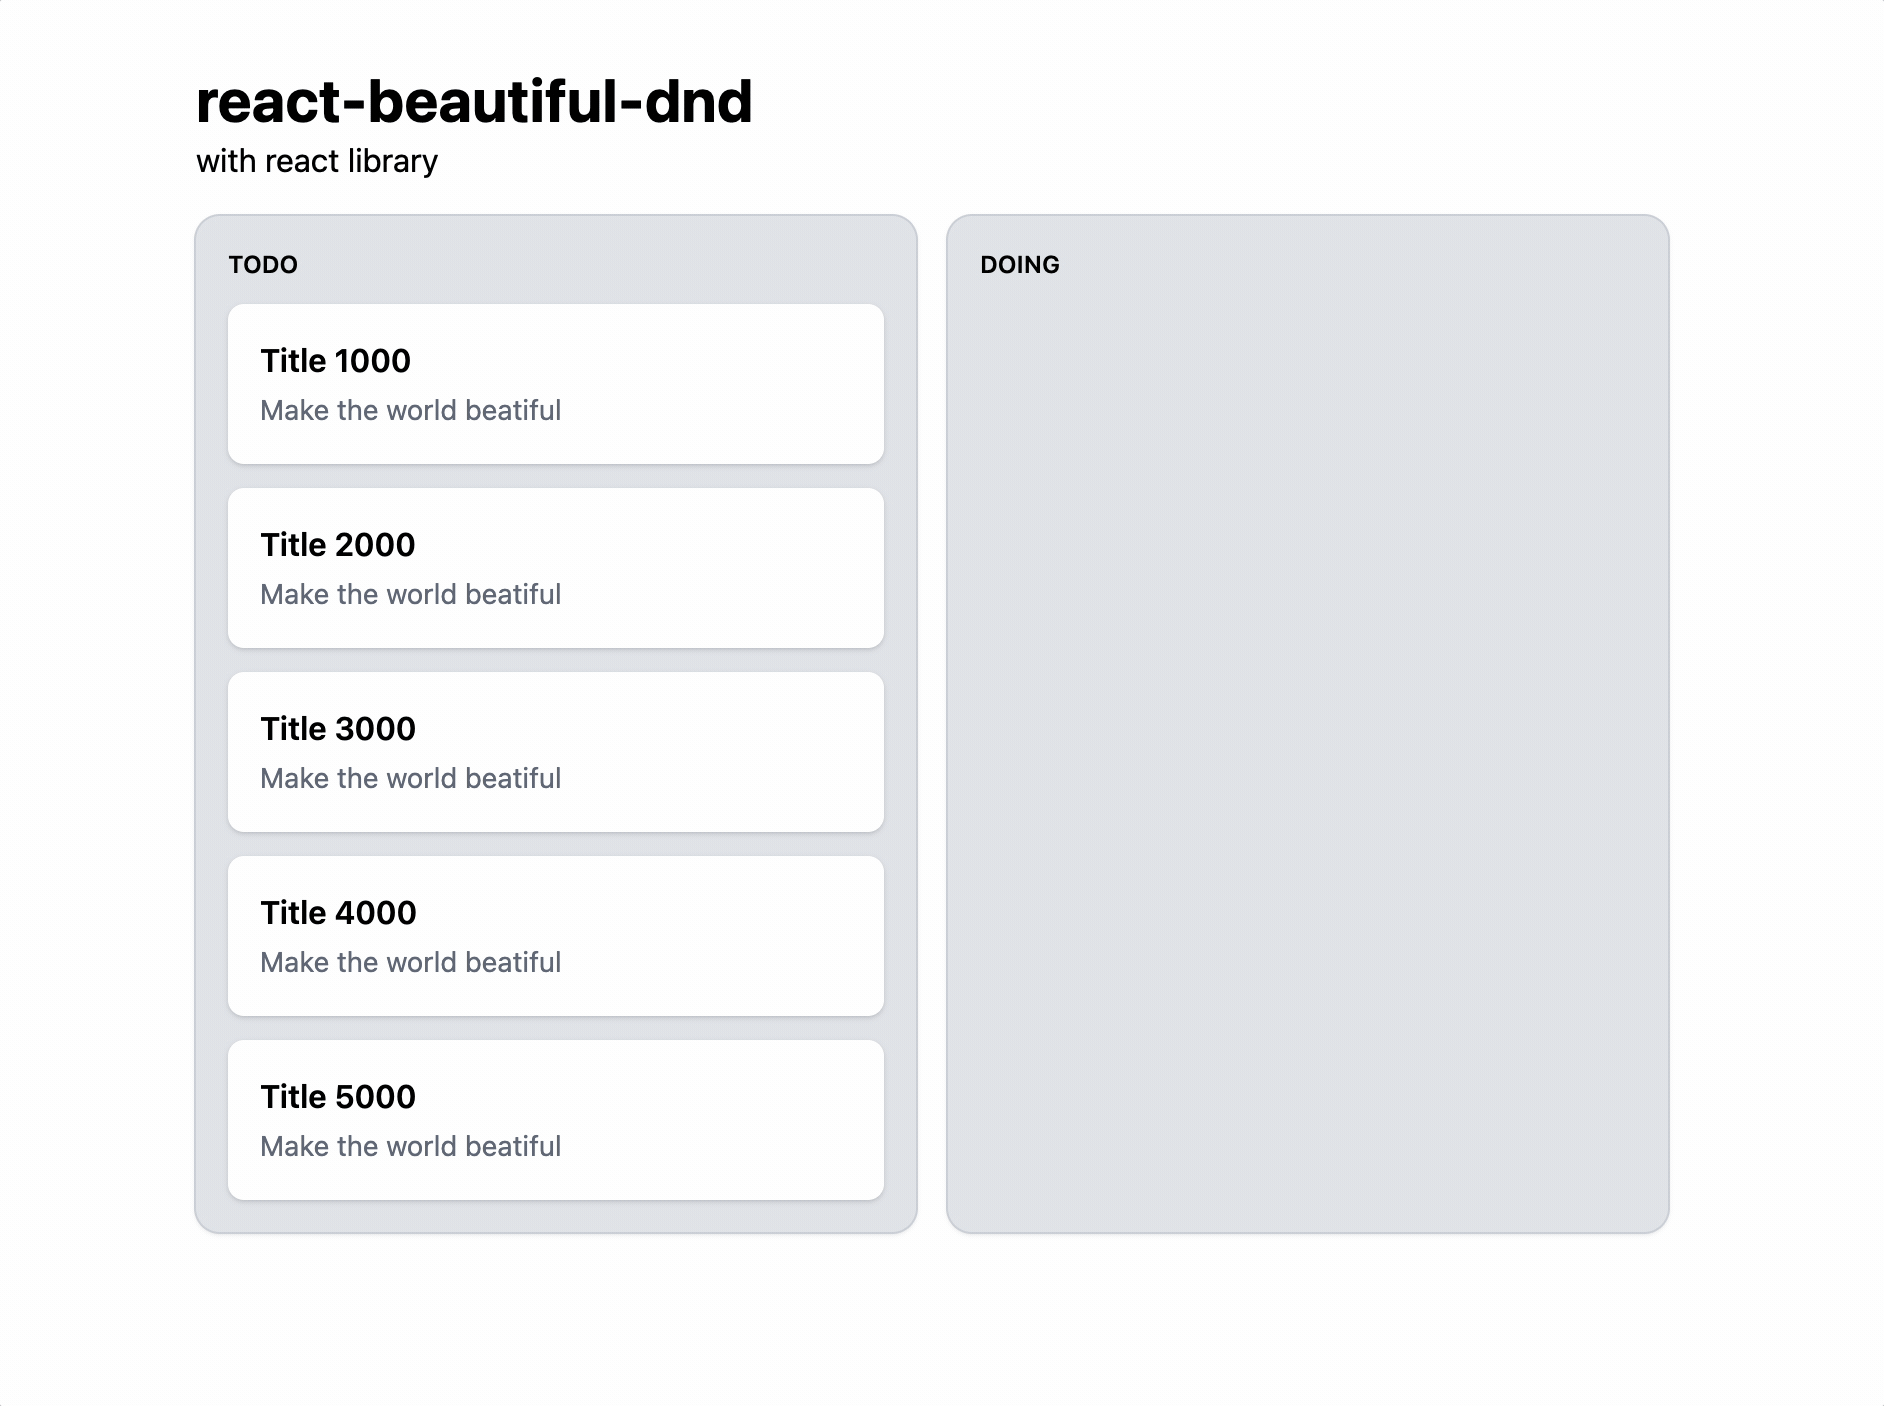
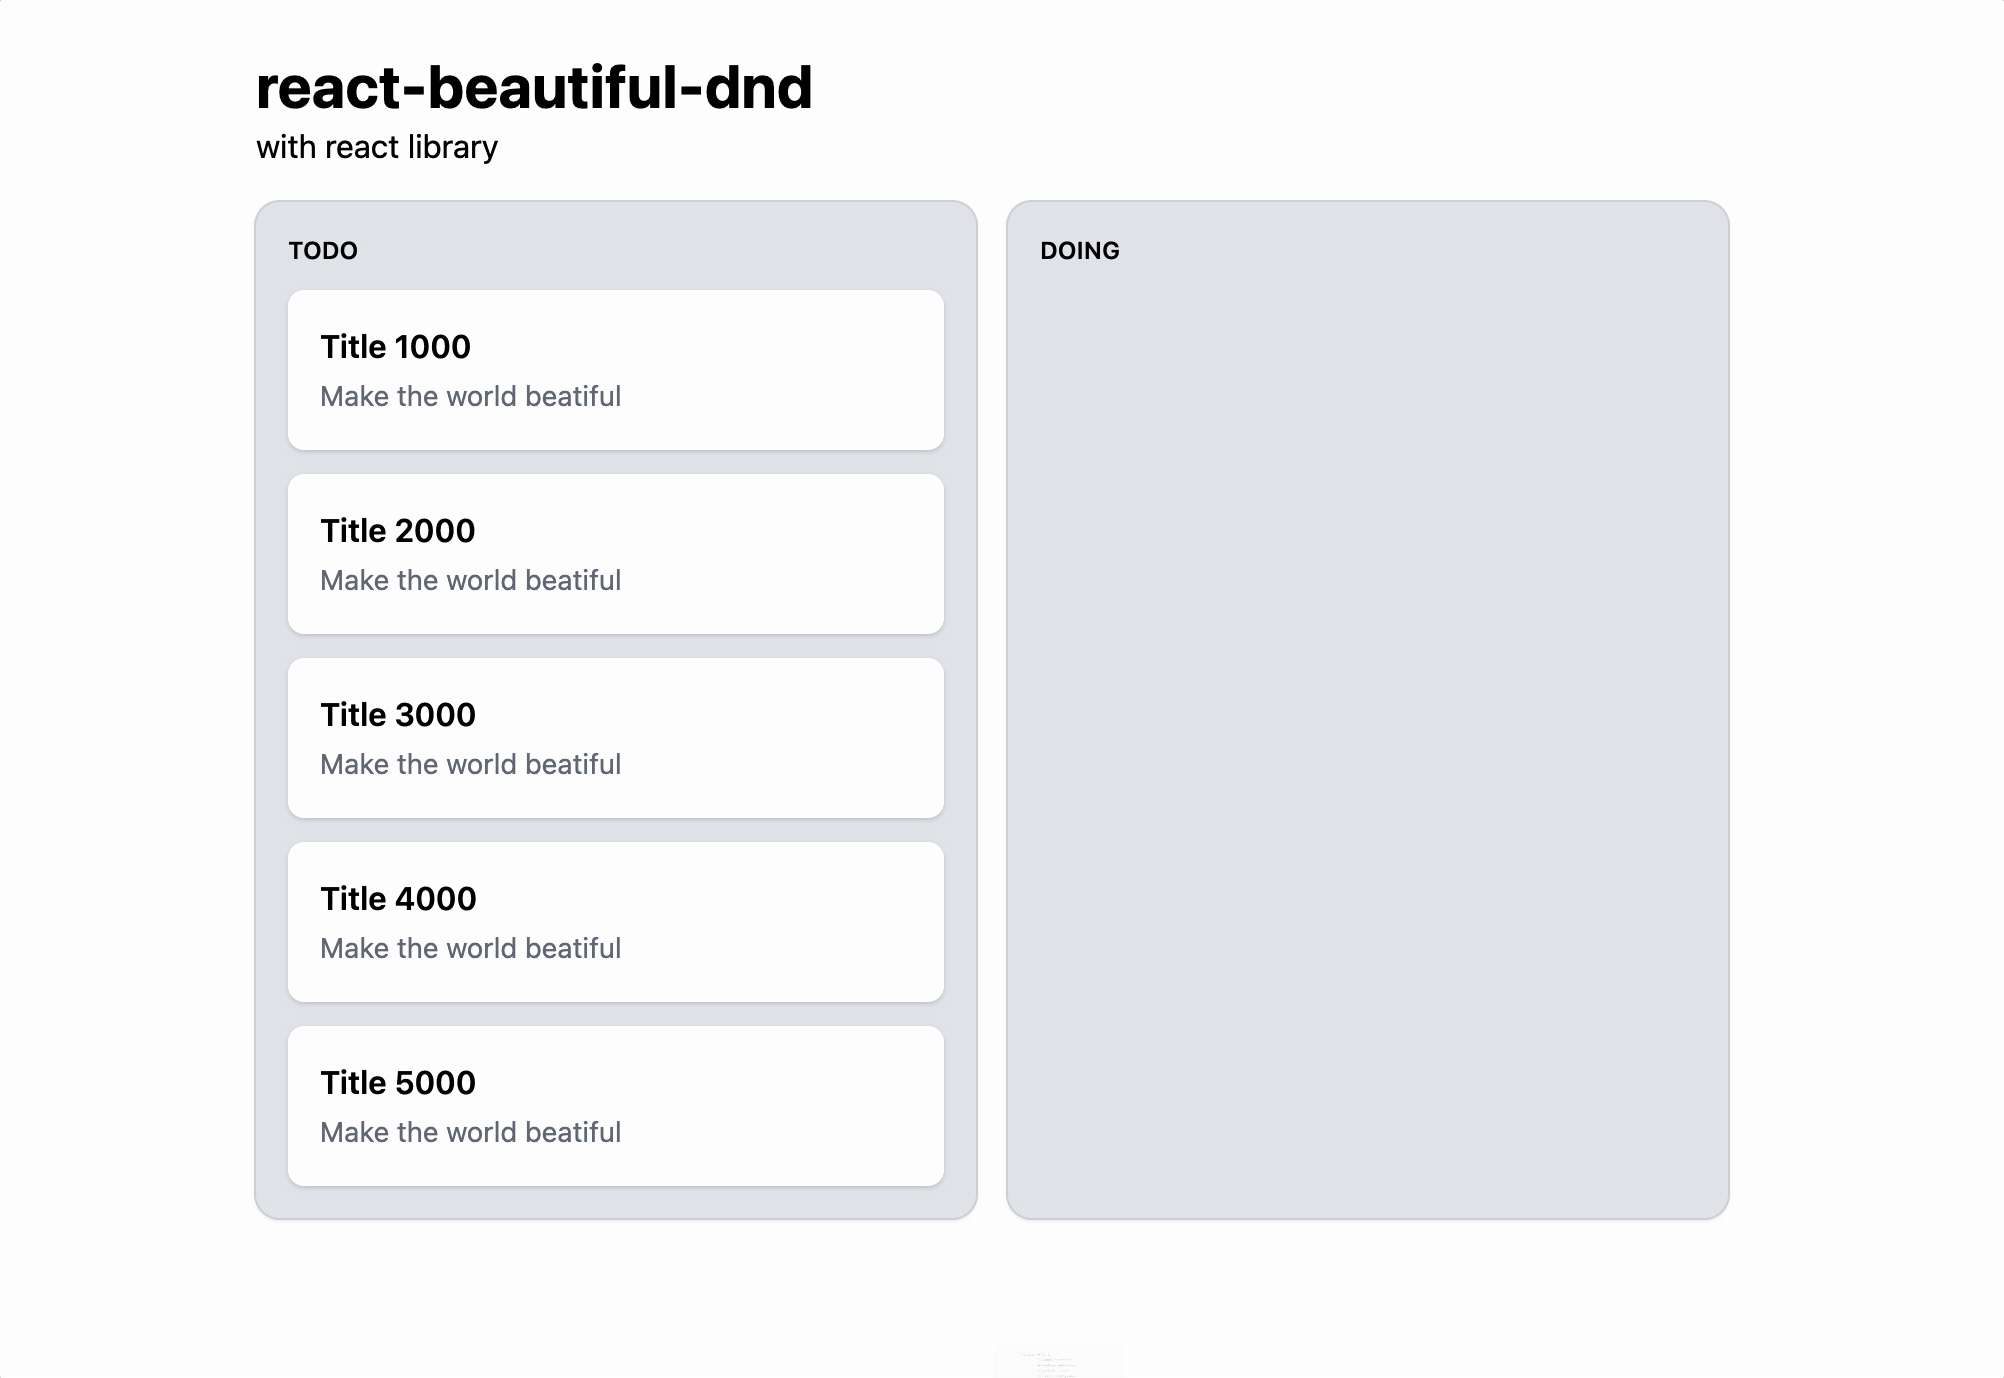
TODO 칸반 만들기
서론이 참 길었다...
이제 본격적으로 TODO 칸반을 만들어 보자!!
데이터 상태 정의
먼저 기존 상태를 정의해보도록 하자.
export type TItemStatus = 'todo' | 'doing';

export type TItem = {
  id: string;
  status: TItemStatus;
  title: string;
};

export type TItems = {
  [key in TItemStatus]: TItem[];
};

export default function TodoPage() {
  const [items, setItems] = useState<TItems>({
    todo: [...Array(5)].map((_, i) => ({
      id: `${i}${i}${i}`,
      title: `Title ${i + 1}000`,
      status: 'todo',
    })),
    doing: [],
  });

  return (
    <>
      <TodoLibraryExample items={items} setItems={setItems} />
    </>
  );
}
개발 편의상 아래와 같은 자료형을 넘겨주도록 하자.
{
	todo: [],
    doing: [],
}
마크업 정의
todo, doing 별로 Droppable 보드를 만들어 주고
각 보드마다 대응되는 Draggable 리스트를 만들어 준다.
<DragDropContext>
  <div className="...">
    {Object.keys(items).map((key) => (
      <Droppable key={key} droppableId={key}>
        {(provided, snapshot) => (
          <div
            ref={provided.innerRef}
            {...provided.droppableProps}
          >
            {items[key as TItemStatus].map((item, index) => (
              <Draggable key={item.id} draggableId={item.id} index={index}>
                {(provided, snapshot) => (
                  <div
                    ref={provided.innerRef}
                    {...provided.draggableProps}
                    {...provided.dragHandleProps}
                  >
                    <h5>{item.title}</h5>
                  </div>
                )}
              </Draggable>
            ))}
            {provided.placeholder}
          </div>
        )}
      </Droppable>
    ))}
  </div>
</DragDropContext>
드래그 상태에 따라 스타일링
Drop 가능한 보드위에 Drag시 찐한 shadow를 추가해준다.
<Droppable key={key} droppableId={key}>
  {(provided, snapshot) => (
    <div
      ref={provided.innerRef}
      {...provided.droppableProps}
      className={'기존 스타일 ' + (snapshot.isDraggingOver ? 'shadow-lg' : 'shadow')}
    >
      ...
    </div>
>
</Droppable>
Drag시 해당 아이템에 찐한 shadow를 추가해준다.
<Draggable key={item.id} draggableId={item.id} index={index}>
  {(provided, snapshot) => (
    <div
      ref={provided.innerRef}
      {...provided.draggableProps}
      {...provided.dragHandleProps}
      className={
        '기존 스타일 ' +
          (snapshot.isDragging
           ? 'bg-opacity-90 shadow-2xl shadow-gray-400'
           : 'shadow')
      }
    >
      ...
    </div>
 </Draggable>
드래그 완료시 상태 변경
splice는 배열에서 아이템 첨삭할 때 유용한 친구이다.
꼭 직접 다뤄보길 바란다.
const onDragEnd = ({ source, destination }: DropResult) => {
  // 유효하지 않는 곳으로 drag시 이벤트를 종료한다.
  if (!destination) return;

  // 타입스크립트 호환되도록 타입을 지정해준다.
  const scourceKey = source.droppableId as TItemStatus;
  const destinationKey = destination.droppableId as TItemStatus;

  // 깊은 복사
  const _items = JSON.parse(JSON.stringify(items)) as typeof items;
  // drag를 시작한 리스트에서 drag한 아이템을 뺀다.
  const [targetItem] = _items[scourceKey].splice(source.index, 1);
  // drop되는 리스트에 알맞는 위치에 아이템을 추가해준다.
  _items[destinationKey].splice(destination.index, 0, targetItem);

  // 상태를 변경해준다.
  setItems(_items);
};

return <>
  <DragDropContext onDragEnd={onDragEnd}>
    ...
  </DragDropContext>
</>
최종 코드
스타일은 tailwind css를 활용했다.
./page/todo.tsx
import TodoLibraryExample from '@/components/todo/TodoLibraryExample';
import { useState } from 'react';

export type TItemStatus = 'todo' | 'doing';

export type TItem = {
  id: string;
  status: TItemStatus;
  title: string;
};

export type TItems = {
  [key in TItemStatus]: TItem[];
};

export default function TodoPage() {
  const [items, setItems] = useState<TItems>({
    todo: [...Array(5)].map((_, i) => ({
      id: `${i}${i}${i}`,
      title: `Title ${i + 1}000`,
      status: 'todo',
    })),
    doing: [],
  });

  return (
    <>
      <TodoLibraryExample items={items} setItems={setItems} />
    </>
  );
}
./components/todo/TodoLibraryExample.tsx
import { TItems, TItemStatus } from '@/pages/todo';
import { $ } from '@/utils';
import { useEffect, useState } from 'react';
import { DragDropContext, Draggable, Droppable, DropResult } from 'react-beautiful-dnd';

export default function TodoLibraryExample({
  items,
  setItems,
}: {
  items: TItems;
  setItems: (items: TItems) => void;
}) {
  const onDragEnd = ({ source, destination }: DropResult) => {
    if (!destination) return;

    const scourceKey = source.droppableId as TItemStatus;
    const destinationKey = destination.droppableId as TItemStatus;

    const _items = JSON.parse(JSON.stringify(items)) as typeof items;
    const [targetItem] = _items[scourceKey].splice(source.index, 1);
    _items[destinationKey].splice(destination.index, 0, targetItem);
    setItems(_items);
  };

  // --- requestAnimationFrame 초기화
  const [enabled, setEnabled] = useState(false);

  useEffect(() => {
    const animation = requestAnimationFrame(() => setEnabled(true));

    return () => {
      cancelAnimationFrame(animation);
      setEnabled(false);
    };
  }, []);

  if (!enabled) {
    return null;
  }
  // --- requestAnimationFrame 초기화 END

  return (
    <div className="p-4">
      <div className="mb-2">
        <h1 className="text-3xl font-bold">react-beautiful-dnd</h1>
        <span>with react library</span>
      </div>

      <div className="mt-4 flex">
        <DragDropContext onDragEnd={onDragEnd}>
          <div className="grid flex-1 select-none grid-cols-2 gap-4 rounded-lg">
            {Object.keys(items).map((key) => (
              <Droppable key={key} droppableId={key}>
                {(provided, snapshot) => (
                  <div
                    ref={provided.innerRef}
                    {...provided.droppableProps}
                    className={$(
                      'flex flex-col gap-3 rounded-xl bg-gray-200 p-4 ring-1 ring-gray-300 transition-shadow dark:bg-[#000000]',
                      snapshot.isDraggingOver ? 'shadow-lg' : 'shadow',
                    )}
                  >
                    <span className="text-xs font-semibold">{key.toLocaleUpperCase()}</span>
                    {items[key as TItemStatus].map((item, index) => (
                      <Draggable key={item.id} draggableId={item.id} index={index}>
                        {(provided, snapshot) => (
                          <div
                            ref={provided.innerRef}
                            {...provided.draggableProps}
                            {...provided.dragHandleProps}
                            className={$(
                              'rounded-lg bg-white p-4 transition-shadow dark:bg-[#121212]',
                              snapshot.isDragging
                                ? 'bg-opacity-90 shadow-2xl shadow-gray-400'
                                : 'shadow',
                            )}
                          >
                            <h5 className="font-semibold">{item.title}</h5>
                            <span className="text-sm text-gray-500">Make the world beatiful</span>
                          </div>
                        )}
                      </Draggable>
                    ))}
                    {provided.placeholder}
                  </div>
                )}
              </Droppable>
            ))}
          </div>
        </DragDropContext>
      </div>
    </div>
  );
}
생각보다 코드 길이는 짧다 ✨✨
키보드로 조작한다면?
다음 세션에서 이를 라이브러리 없이 구현해보자!!
참고 자료
- https://stackoverflow.com/questions/60029734/react-beautiful-dnd-i-get-unable-to-find-draggable-with-id-1
- https://velog.io/@seohee0112/React-beautiful-dnd
- https://codesandbox.io/s/react-drag-and-drop-react-beautiful-dnd-forked-d44ub5?file=/src/index.js
실제 동작은 아래 링크에서 볼 수 있습니다.
전체 코드는 아래 깃허브 링크에서 살펴보면 됩니다.
글 이전