1. HTML : 기초
1) 단락,제목요소
<!DOCTYPE html>
<html lang="en">
<head>
    <meta charset="UTF-8">
    <meta http-equiv="X-UA-Compatible" content="IE=edge">
    <meta name="viewport" content="width=device-width, initial-scale=1.0">
    <title>Chickens </title>
</head>

<body>
       <h1>Chickens</h1>

    <p><The <b>chicken</b> (Gallus domesticus) is a domesticated junglefowl species,
        with attributes of wild species such as the grey and the Ceylon junglefowl[1]
        that are originally from Southeastern Asia. Rooster or cock is a term for an adult male bird,
        and a younger male may be called a cockerel. A male that has been castrated is a capon.
         An adult female bird is called a hen and a sexually immature female is called a pullet.</p>

    <p>Originally raised for cockfighting or for special ceremonies,
        chickens were not kept for food until the Hellenistic period
        (4th–2nd centuries BC).[2][3] Humans now keep chickens primarily
        as a source of food (consuming both their meat and eggs) and as pets.</p>

    <h2>Terminology</h2>
    <p>Lorem ipsum dolor sit amet consectetur adipisicing elit. Dignissimos consequuntur officia quod, dolorum molestias similique in modi voluptatum optio beatae numquam enim at pariatur. Ab aliquam et placeat saepe fuga.
        Lorem ipsum dolor sit amet consectetur adipisicing elit. Dignissimos consequuntur officia quod, dolorum molestias similique in modi voluptatum optio beatae numquam enim at pariatur. Ab aliquam et placeat saepe fuga.
        Lorem ipsum dolor sit amet consectetur adipisicing elit. Dignissimos consequuntur officia quod, dolorum molestias similique in modi voluptatum optio beatae numquam enim at pariatur. Ab aliquam et placeat saepe fuga.
        Lorem ipsum dolor sit amet consectetur adipisicing elit. Dignissimos consequuntur officia quod, dolorum molestias similique in modi voluptatum optio beatae numquam enim at pariatur. Ab aliquam et placeat saepe fuga.
        Lorem ipsum dolor sit amet consectetur adipisicing elit. Dignissimos consequuntur officia quod, dolorum molestias similique in modi voluptatum optio beatae numquam enim at pariatur. Ab aliquam et placeat saepe fuga.


    </p>
    <h2>General biology and habitat</h2>
    <h3>Behavior</h3>
    <h4>Social Behavior</h4>
    <h4>Broodiness</h4>
    <p>Lorem ipsum dolor sit amet consectetur adipisicing elit. Dignissimos consequuntur officia quod, dolorum molestias similique in modi voluptatum optio beatae numquam enim at pariatur. Ab aliquam et placeat saepe fuga.
        Lorem ipsum dolor sit amet consectetur adipisicing elit. Dignissimos consequuntur officia quod, dolorum molestias similique in modi voluptatum optio beatae numquam enim at pariatur. Ab aliquam et placeat saepe fuga.
        Lorem ipsum dolor sit amet consectetur adipisicing elit. Dignissimos consequuntur officia quod, dolorum molestias similique in modi voluptatum optio beatae numquam enim at pariatur. Ab aliquam et placeat saepe fuga. </p>
    <h2>Breeds of Chickens</h2>

</body>
</html>- h 태그를 크기조정을 위해 사용하면 안됨.
텍스트 크기조절은 css통해서. - head 하나당 body 하나.
2) 목록요소
 <ul>
        <li>Bantom
            <ul>
                <li>Silkie</li>
                <li>Polish</li>
            </ul>
        </li>
        <li>Standard
            <ul>
                <li>Easter Egger</li>
                <li>Rhode Island Red</li>
            </ul>
        </li>

 </ul>
- 순서 매기고 싶을 때 : ol
단순 bullet point 로 만들 때 : ul
ul 이든 ol이든 태그걸어줬으면 li 태그로 리스트 표시해줘야함.
3) 앵커태그

- 같은 폴더안에 있는 html끼리의 이동도 가능.
- href = hypertext reference
- href 와같은걸 attribute라 칭함.
4) 이미지

-
img attribute : src
-
width와같은 속성은 css 통해서 해결.
-
닫기태그 없음. just img

-
해당 사진이 다른 폴더안에 있을경우 ' 폴더명/ ' 앞에 붙여주기.

- alt attribute: 사진의 이름을 잘못 입려한 경우나 같은 폴더에 존재하지 않을때 폴더 경로를 입력하지 않았을경우 차선의 방법(대쳬) 으로 문구 나타내기
2. HTML : Semantics
1) 블록 vs 인라인요소 - Div 와 Span
- div : 무언가를 잡아두는 또는 요소를 그룹화하는 제네릭 컨테이너이자 블록 요소.
따라서, div 태그를 어떠한 컨텐츠에 달 경우 전체블록을 차지할것이며 위아래의 컨텐츠를 밀어낼 것이다.
즉, 하나의 덩어리처럼 여러가지 요소들을 그룹화해 일괄적으로 적용하고싶은 스타일을 한번에 적용시키는 것이다.
- span : 작은 덩어리? (인라인요소)
div와 비교했을때 div가 여러가지 요소들을 한데 불러모아 큰 박스?안에 담아두었더라면 span은 그 안에 들어가는 개별적인 요소가 될 수 있다.
2) 기타요소모음 - hr, br, sup, sub
2-1) hr
<h1>Chickens</h1>
<hr>
- chickens 밑에 생긴 줄.
- 닫는태그 없음.
2-2) br
- 줄을 바꿔주는 기능.
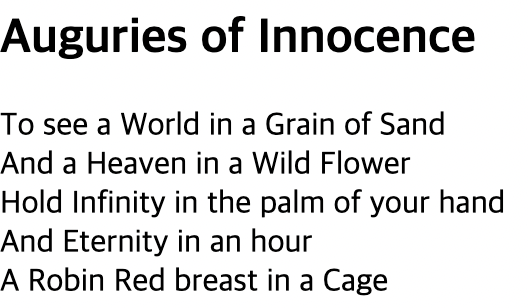
- 아래와 같이 여러개의 문장을 일렬로 쓰지않고 한줄씩 띄어서 쓰고싶을때 모든 문장을 p태그로 묶지않고 br 태그를 사용해서 줄을 띄어준다.
 		<p>
           To see a World in a Grain of Sand <br>
           And a Heaven in a Wild Flower <br>
           Hold Infinity in the palm of your hand <br>
           And Eternity in an hour <br>
           A Robin Red breast in a Cage <br>
        </p>
2-3) sup (윗첨자) - exponent 표시할때 유용
Ceylon junglefowl <sup>[1]</sup> H<sub>2</sub>O
<p>1/<sub>2</sub> + 1/<sub>2</sub> = 1</p>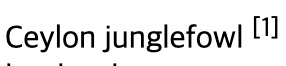
2-4) sub - 화학기호 표시할때 유용
       H<sub>2</sub>O
       <p><sup>1</sup>/<sub>2</sub> +<sup>1</sup>/<sub>2</sub> = 1</p>
3. 엔티티 코드
1) '<' 표시
<h1> 1 < 6 </h1> (x)
<h1> 1 < 6 </h1> (o)2) '>' 표시
<h1> 6 > 5 </h1> (x)
<h1> 6 > </h1> (o)3) '&' 표시
<h1> one & two & three </h1> (x)
<h1> one & two & three </h1> (o)4) 'snowman' 표시
<h1> Chickens ☃ </h1>
5) ' registerd trademark ' 표시
<h1> Chickens <sup>®</sup>
4. 시맨틱 마크업 (Semantic Markup)
- 개발자들이 코드를 보고ㄹ 무슨의도와 목적으로 만들었는지 단번에 알 수 있음
1) main
- represents the dominant content of the body tag document.
- 페이지의 주요내용 의미.
- 페이지에 계속적으로 반복되는 내용은 제외. (ex. 사이드바, nav, 링크, 저작권정보, 로고검색형식)
2) nav
- represents a section of a page whose purpose is to provide navigation links.
3) section
- represents a standalone section - which doesn't have a more specific semantic element to represent it.
- 웹사이트의 독립적인 부분.
- 브라우저상에서 달라지는건 없고 구별하기 쉽게 마크업하기 위한것.
<section>
 <h2>Terminology</h2>
    <p>Lorem ipsum dolor sit amet consectetur adipisicing elit. Dignissimos consequuntur officia quod, dolorum molestias similique in modi voluptatum optio beatae numquam enim at pariatur. Ab aliquam et placeat saepe fuga.
        Lorem ipsum dolor sit amet consectetur adipisicing elit. Dignissimos consequuntur officia quod, dolorum molestias similique in modi voluptatum optio beatae numquam enim at pariatur. Ab aliquam et placeat saepe fuga.
        Lorem ipsum dolor sit amet consectetur adipisicing elit. Dignissimos consequuntur officia quod, dolorum molestias similique in modi voluptatum optio beatae numquam enim at pariatur. Ab aliquam et placeat saepe fuga.
        Lorem ipsum dolor sit amet consectetur adipisicing elit. Dignissimos consequuntur officia quod, dolorum molestias similique in modi voluptatum optio beatae numquam enim at pariatur. Ab aliquam et placeat saepe fuga.
        Lorem ipsum dolor sit amet consectetur adipisicing elit. Dignissimos consequuntur officia quod, dolorum molestias similique in modi voluptatum optio beatae numquam enim at pariatur. Ab aliquam et placeat saepe fuga.
</section>
4) article
-
represents a self-contained composition in a document page.
-
독립적으로 나뉠 수 있거나 다시사용할 수 있을 때 사용.
5) asdie
- represents a portion of document whose content is only indirectly related to the document main.
6) header, footer (형식 동일)
<footer>
        <p>This is my Webpage.
            <ul>
                <li><a href="asd">Content</a> </li>
                <li><a href="asd">Help Me</a></li>
            </ul>
        </p>
</footer>
7) time
<p><time datetime="2000-07-07">My birthday is July 7</time></p>- 기계판독 가능한 포맷에서는 datetime 속성을 입력해야함. (역시 시멘틱요소)
8) figure
- represents self-contained content.
- 일러스트나 다이어그램에 사용.
9) abbr
10) data
3. HTML : 폼과 테이블
1) 테이블: TR, TD, Th
1) TD : Table Data cell or Table Data (데이터를 포함하는 표 안에 있는 단일 셀).
2) TR: Table row: 표안에 있는 셀들이 모인 행.
3) Th : 표의 헤더.
    <table>
        <tr>   -> 표 헤더 설정법.
            <th>Animal</th>
            <th>Average mass [kg (lb)]</th>
            <th>Maximum mass [kg (lb)]</th>
            <th>Flighted</th>
        </tr>
      <tr>
        <td>Ostrich</td>
        <td>104(230)</td>
        <td>156.8(200)</td>
        <td>No</td>
      </tr>

      <tr>
        <td>Somali Ostrich</td>
        <td>104(230)</td>
        <td></td>
        <td>No</td>
      </tr>

      <tr>
          <td>Wild Turkey</td>
          <td>13.5(200)</td>
          <td>39(96)</td>
          <td>Yes</td>
      </tr>
    </table>
2) 테이블: Thead, Tbody, Tfoot
<thead>
        <tr>
          <th>Animal</th>
          <th>Average mass [kg (lb)]</th>
          <th>Maximum mass [kg (lb)]</th>
          <th>Flighted</th>
        </tr>
</thead>
<tbody>
      <tr>
        <td>Ostrich</td>
        <td>104(230)</td>
        <td>156.8(200)</td>
        <td>No</td>
      </tr>

      <tr>
        <td>Somali Ostrich</td>
        <td>104(230)</td>
        <td></td>
        <td>No</td>
      </tr>

      <tr>
        <td>Wild Turkey</td>
        <td>13.5(200)</td>
        <td>39(96)</td>
        <td>Yes</td>
      </tr>
</tbody>
</table>- thead -> 각 열의 제목들의 집합
- tbodt -> 헤데를 제외한 나머지부분.
3) 테이블: Colspan & Rowspan
 <h2>V2</h2>
    <table>
      <thead>
        <tr>
          <th rowspan="2">Animal</th>
          <th colspan="2">Average Mass</th>
          <th rowspan="2">Flighted</th>
        </tr>
        <tr>
          <th>KG</th>
          <th>LB</th>
        </tr>
      </thead>
      <tbody>
        <tr>
          <td>Ostrich</td>
          <td>104</td>
          <td>230</td>
          <td>No</td>
        </tr>

        <tr>
          <td>Somali Ostrich</td>
          <td>104</td>
          <td>110</td>
          <td>No</td>
        </tr>

        <tr>
          <td>Wild Turkey</td>
          <td>13.5</td>
          <td>200</td>
          <td>Yes</td>
        </tr>
      </tbody>
    </table>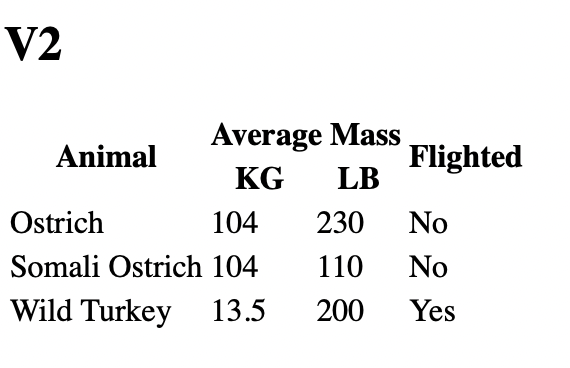
4) 폼(Form)
- form : represents a document section containing interactive controls for submitting information.
1) 일반적인 입력방식.
    <h1>Forms Demo</h1>
    <form action="type">
        <input type="text" placeholder="username" >
        <input type="password" placeholder="password">
        <input type="color" >
        <input type="month" >
        <input type="number" placeholder="Enter a number">
        <input type="time" >


    </form>
- 비밀번호 'type=pasword not type'
2) 레이블
   <form action="type">
      <p>
        <label for="username">Enter a username:</label>
        <input id="username" type="text" placeholder="username" />
      </p>
      <p>
        <label for="password">Enter a password:</label>
        <input id="password" type="password" placeholder="password" />
      </p>
      <p>
        <label for="color">Choose your Color</label>
        <input id="color" type="color" />
      </p>
      <p>
        <label for="number">Enter your Number</label>
        <input id="number" type="number" placeholder="Enter a number" />
      </p>
      <input type="time" />
</form>- for -> input의 id 를 위한~ label
- 각각의 input,label 쌍을 p태그로 묶어주기
3) HTML 버튼
- form 안에 button 태그가 있으면 기본값으로 해당값을 '제출'한다.
밖에 존재하면 무용지물. (버튼 태그가 form 안에 있으면 기본값: 제출(submit)) - 그러나 form 안에서 'type=button' 으로 해줄경우 제출목적이 아니라 단순 클릭목적으로 변한다.
- 그냥 아예 form 밖에다 button 태그하면 아무동작 x
4) 이름속성
- name : 데이터를 서버로 전송할때 서버가 찾으려는 값 (name = 'value')
   <p>
        <label for="username">Enter a username:</label>
        <input id="username" type="text" placeholder="username" name="username"/>
        <button>Submit</button>
</p>-
username 에 value 입력해서 제출시
ex) google.com/serarch/?name=jincheol 과 같이 주소창에 뜨게됨. -
여기서 serach 부분은 form의 action 속성이 뭐냐에 따라서 달라짐.
-
name이 위 코드에서 name = "" 으로 지정해준것.
-
jinchoel 은 사용자가 입력한 value.
5) 구글과 레딧 검색하기.
<form action="https://wwww.reddit.com/search">
      <input tpye="text" name="q" />
      <button>Search Reddit</button>
</form> <form action="https://www.google.com/search">
<input tpye="text" name="q" />
<button>Search Google</button>
</form> <form action="https://www.youtube.com/results">
<input tpye="text" name="search_query" />
<button>Search Youtube</button>
</form>- name 은 서버,개발자에 따라 다 다름.
6) 라디오버튼, 체크박스와 선택창
1) 체크박스
   <form action="/birds">
     <input id="agree" name="agree_tos" type="checkbox" />
     <label for="agree">I agree to everything</label>
</form>- label 위치가 checkbox가 생성되는 위치 (input 전? 후?)
- 체크박스 체크 후 전달시 주소창에 'agree_tos=on'으로 뜸. (name기준)

2) 라디오버튼
<form>
  <p>
        <label for="xs">XS</label>
        <input type="radio" name="size" id="xs" value="xs" />

        <label for="m">M</label>
        <input type="radio" name="size" id="m"  value="m"/>

        <label for="lg">LG</label>
        <input type="radio" name="size" id="lg"  value="lg"/>

</p>
      <button>Submit</button>
</form>- 같은 name으로 설정해줘야 하나만 체크가능.
- value를 설정해줘야 주소창에 'size=체크한것' 처럼 뜸.

3) 선택창
<p>
          <label for="meal">Please Select an Entree</label>
          <select name="meal" id="meal">
            <option value="">--Please Choose an option--</option>
            <option value="fish">Fish</option>
            <option value="veg">vegeterian</option>
            <option value="steak">steak</option>
            <option value="No food">No food</option>
        </select>

</p>- 선택시 제출하면 ' select 태그의 name = value '로 제출(ex. meal = steak)

7) 범위 및 텍스트영역
1) 범위
  <p>
        <label for="range">Choose your range</label>
        <input type="range" id="range" min="1" max="10" name="range" />
</p>- min, max로 선택범위 조절가능.
- 항상 name,id 잊지말고 기입.

2) 텍스트영역
 <p>
        <label for="request">Any Special request? </label>
        <br />
        <textarea
          id="request"
          name="request"
          rows="5"
          cols="20"
          placeholder="Type Something here..."
        ></textarea>
</p>- input사용하지않고 textarea 태그사용

8) 유효성검사
1)
<h2>Validations Demo</h2>
    <form action="/dummy">
      <label for="username">Enter your name</label>
      <input type="text" id="username" name="username" />

      <p>
        <label for="password">Enter your password</label>
        <input
          type="password"
          id="password"
          name="password"
          minlength="3"
          maxlength="7"
          required
        />
        <button>Submit</button>
</p>- required 붙으면 반드시 입력해야함.
- minlength , maxlength 로 최소,최대입력글자수 설정가능.
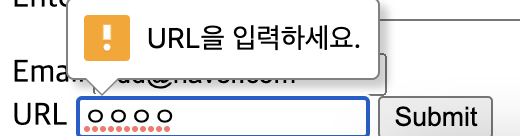
2) 패턴검사
<form>
        <label for="url">URL</label>
        <input type="url" id="url" required />
        <button>Submit</button>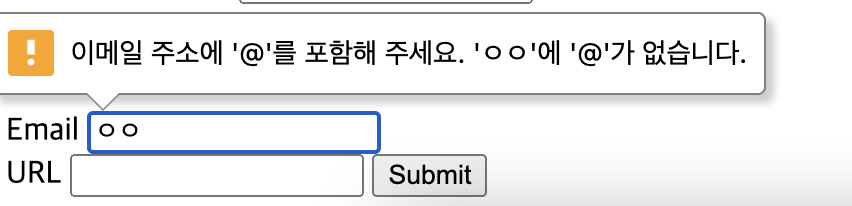
</form>- 해당 패턴에 맞게 입력하지않을경우 오류문구발생.
마라톤 선수 등록양식 만들기
<!DOCTYPE html>
<html lang="en">
  <head>
    <meta charset="UTF-8" />
    <meta http-equiv="X-UA-Compatible" content="IE=edge" />
    <meta name="viewport" content="width=device-width, initial-scale=1.0" />
    <title>Document</title>
  </head>
  <body>
    <h1>Race Registration!</h1>
    <form action="/dummy">
      <div>
        <label for="first">Frist Name</label>
        <input type="text" id="first" name="firstname" required />
        <label for="last">Last Name</label>
        <input type="password" id="password" name="lastname" required />
      </div>
      <p>Select a Race:</p>
      <div>
        <input type="radio" name="race" vaule="funrun" id="funrun" />
        <label for="funrun">Fun Run 5k</label>
      </div>
      <div>
        <input type="radio" name="race" value="half" id="half" />
        <label for="half">Half Marathon</label>
      </div>
      <div>
        <input type="radio" name="race" value="full" id="full" />
        <label for="full">Full Marathon</label>
      </div>
      <div>
        <label for="email">Email</label>
        <input type="email" id="email" required />
        <label for="password">Password</label>
        <input type="password" id="password" required />
      </div>

      <div>
        <label for="division">Select Age Group</label>
        <select name="division" id="divison">
          <option value="kids">under18</option>
          <option value="ya">18-30</option>
          <option value="adults">31-50</option>
          <option value="seniors">50+</option>
        </select>
      </div>
      <button>Register!</button>
    </form>
  </body>
</html>
- label은 필수 !!