LifeSports Application(ReactNative & Nest.js) - 5. PostScreen
#1 PostScreen
PostScreen은 스택 네비게이션으로 만들도록 하겠습니다. 첫 번째 스택에는 게시글 리스트를 확인할 수 있는 스크린, 두 번째 스택에는 게시글을 작성할 수 있는 스크린으로 구현을 진행해보겠습니다. 그리고 추후에 이 스택 네비게이션을 이용하여 스크린을 추가로 구현하도록 하겠습니다.
#2 게시글 네비게이션
PostScreen의 헤더를 다음의 옵션을 주어 없애도록 하겠습니다.
- BottomNavigation.js
...
const BottomNavigation = ({ route }) => {
return(
...
<Tab.Screen
name="Post"
options={{
headerShown: false,
}}
children={
() => <PostStackNavigation />
}
/>
...
);
};
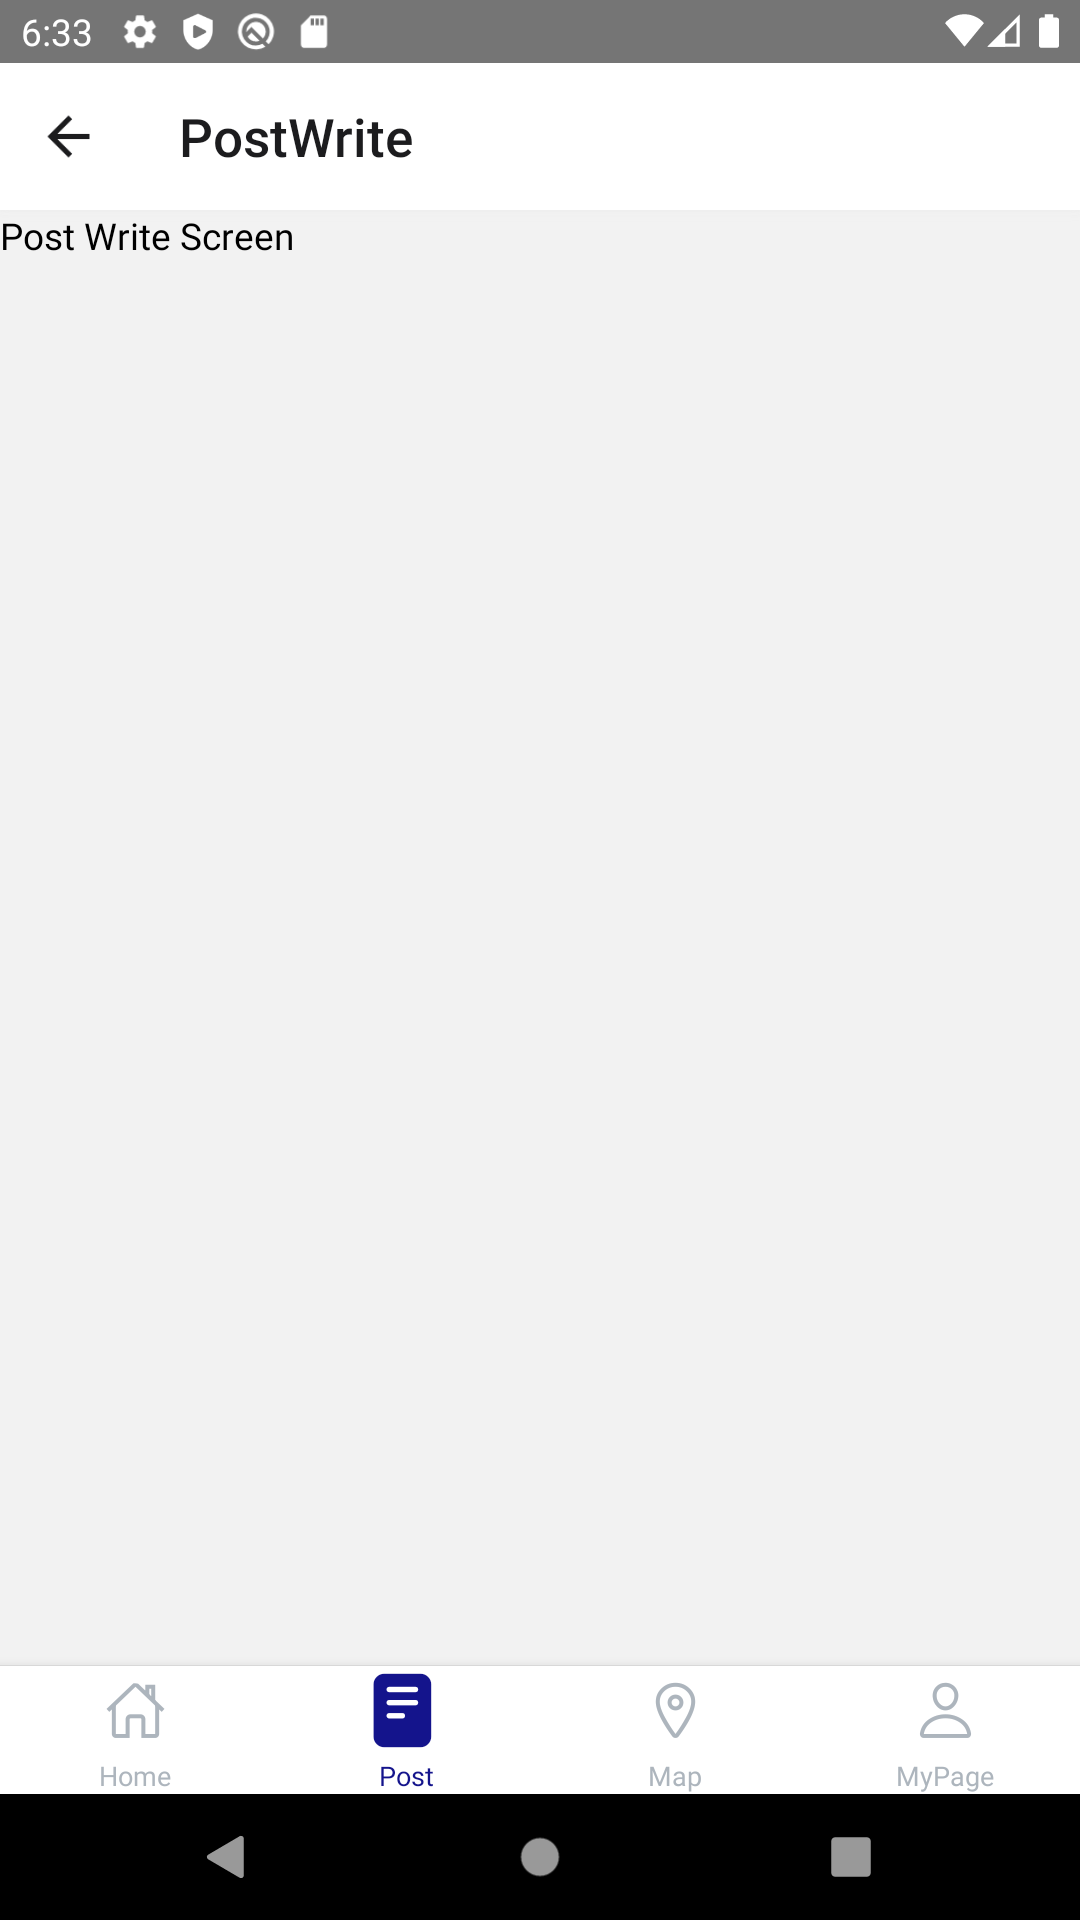
export default BottomNavigation;앞서 설명드린대로 초기에는 post에는 2가지의 스크린이 들어갈 예정입니다. 게시글 리스트를 볼 수 있는 PostScreen, 게시글을 등록하는 PostWriteScreen인데 PostScreen은 구현을 해두었으니 PostWriteScreen을 만들어 보도록 하겠습니다.
- /pages/post/PostWriteScreen.js
import React from 'react';
import {
    StyleSheet,
    ScrollView,
    Text
} from 'react-native';

const PostWriteScreen = () => {
    return(
        <ScrollView style={ styles.container }>
            <Text>Post Write Screen</Text>
        </ScrollView>
    );
};

const styles = StyleSheet.create({
    container: {
        flex: 1,
    },
});

export default PostWriteScreen;
그 후 navigator 디렉토리에 post 디렉토리를 만들어 여기에 post관련 navigation 컴포넌트를 만들도록 하겠습니다.
- /navigator/post/PostStackNavigator
import 'react-native-gesture-handler';
import * as React from 'react';
import { createStackNavigator } from '@react-navigation/stack';
import PostScreen from '../../pages/post/PostScreen';
import PostWriteScreen from '../../pages/post/PostWriteScreen';

const Stack = createStackNavigator();

const PostStackNavigation = () => {
    return(
        <Stack.Navigator>
            <Stack.Screen
                name="Post"
                children={
                    () => <PostScreen />
                }
                options={{
                    headerShown: false,
                }}
            />
            <Stack.Screen
                name="PostWrite"
                children={
                    () => <PostWriteScreen />
                }
            />
        </Stack.Navigator>
    );
};

export default PostStackNavigation;
여기까지 완료가 되었다면 스택에 PostWriteScreen을 두어 원할 때마다 네비게이션 기능으로 해당 페이지로 이동할 수 있습니다. 그러면 PostScreen을 완성시키고 여기서 PostWriteScreen으로 이동할 수 있는 네비게이션 버튼을 완성시키도록 하겠습니다.
첫 째로 PostHeader 부분을 만들겠습니다. 이 컴포넌트에는 SearchBar가 들어가서 원하는 검색어를 입력하고 그 검색어에 맞는 게시글을 볼 수 있도록 하는 기능을 수행합니다.
- post/components/PostHeader.js
import React from 'react';
import {
    StyleSheet,
    View,
    TextInput,
    TouchableOpacity,
} from 'react-native';
import palette from '../../../styles/palette';
import Icon from 'react-native-vector-icons/Ionicons';

const PostHeader = () => {
    const onPress = e => {
        e.preventDefault();
    };

    return (
        <View style={ styles.container }>
            <View style={ styles.searchBox }>
                <TextInput style={ styles.input } />
                <TouchableOpacity onPress={ onPress }>
                    <Icon
                        name={ 'ios-search-outline' }
                        size={ 19 }
                        color={ palette.white[0] }
                    />
                </TouchableOpacity>
            </View>
        </View>
    );
};

const styles = StyleSheet.create({
    container: {
        width: '100%',
        height: 70,
        backgroundColor: palette.blue[5],
        justifyContent: 'center',
        alignItems: 'center'
    },
    searchBox: {
        flexDirection: 'row',
        justifyContent: 'center',
        alignItems: 'center',
        width: 350,
        height: 50,
        backgroundColor: palette.blue[7],
        borderRadius: 30,
    },
    input: {
        flexDirection: 'row',
        justifyContent: 'center',
        width: 300,
        height: 50,
        backgroundColor: palette.blue[7],
        borderRadius: 30,
        color: palette.white[0],
        fontWeight: '400',
        fontSize: 16
    },
});

export default PostHeader;
그리고 글쓰기 버튼을 만들어 PostWriteScreen으로 이동할 수 있는 네비게이션 버튼을 만들도록 하겠습니다.
- post/component/PostNav.js
import React from 'react';
import {
    StyleSheet,
    View,
    TouchableOpacity,
    Text
} from 'react-native';
import palette from '../../../styles/palette';
import { useNavigation } from '@react-navigation/core';

const PostNav = () => {
    const navigation = useNavigation();
    const onPress = e => {
        navigation.navigate(
            'PostWrite', {
                name: 'PostWrite'
            }
        );
    };

    return(
        <View style={ styles.container }>
            <TouchableOpacity
                style={ styles.writeButton }
                onPress={ onPress }
            >
                <Text style={ styles.text }>
                    글쓰기
                </Text>
            </TouchableOpacity>
        </View>
    );
};

const styles = StyleSheet.create({
    container: {
        width: 420,
        height: 50,
        backgroundColor: palette.white[0],
        borderBottomColor: palette.gray[3],
        borderBottomWidth: 1,
        justifyContent: 'center',
        alignItems: 'flex-end',
        paddingRight: 30
    },
    writeButton: {
        width: 100,
        height: 40,
        justifyContent: 'center',
        alignItems: 'center',
        borderRadius: 30,
        borderColor: palette.blue[4],
        borderWidth: 3,
        backgroundColor: palette.white[0],
    },
    text: {
        color: palette.blue[4],
        fontSize: 16,
        fontWeight: 'bold'
    },
});

export default PostNav;
const navigation = useNavigation()는 import { useNavigation } from '@react-navigation/core'에서 라이브러리를 불러와 컴포넌트에서 네비게이션을 수행할 수 있게 하는 훅입니다.
다음의 코드는 PostScreen의 내용을 담당할 컴포넌트입니다. 즉, 게시글 리스트를 담을 하나의 커다란 컴포넌트이죠.
- post/components/PostContent.js
import React from 'react';
import {
    StyleSheet,
    View
} from 'react-native';
import palette from '../../../styles/palette';
import PostContentFragment from './PostContentFragment';

const PostContent = () => {
    return(
        <View style={ styles.container }>
            <PostContentFragment text={ "함께해요" } />
            <PostContentFragment text={ "도와주세요" }/>
        </View>
    );
};

const styles = StyleSheet.create({
    container: {
        flex: 1,
        backgroundColor: palette.white[0],
    },
});

export default PostContent;
저는 게시글 타입을 총 2가지로 만들 것이기 때문에 각기 다른 게시글 리스트를 담을 수 있는 fragment 파일을 만들도록 하겠습니다.
- post/components/PostContentFragment.js
import React from 'react';
import {
    StyleSheet,
    View,
    Text,
    TouchableOpacity
} from 'react-native';
import palette from '../../../styles/palette';

const PostContentFragment = ({ text }) => {
    const onPress = e => {
        e.preventDefault();
    };

    return(
        <View style={ styles.container }>
            <Text style={ styles.titleFont }>
                { text }
            </Text>
            <View style={ styles.content }>
                {/* PostList 추가 */}
            </View>
            <View style={ styles.footer }>
                <TouchableOpacity onPress={ onPress }>
                    <Text>
                        전체 보기
                    </Text>
                </TouchableOpacity>
            </View>
        </View>
    );
};

const styles = StyleSheet.create({
    container: {
        width: '100%',
        height: '50%',
        borderBottomColor: palette.gray[3],
        borderBottomWidth: 1,
        backgroundColor: palette.white[0]
    },
    titleFont: {
        fontWeight: 'bold',
        fontSize: 15,
        paddingLeft: 20,
        paddingTop: 20,
    },
    content: {
        width: '100%',
        height: '70%',
        backgroundColor: palette.white[0]
    },
    footer: {
        alignItems: 'flex-end',
        width: '100%',
        height: '10%',
        paddingRight: 20,
        backgroundColor: palette.white[0],
    },
});

export default PostContentFragment;
여기까지해서 Post의 골격부분을 대략적으로 완성했습니다. 완성된 화면을 보도록 하겠습니다.
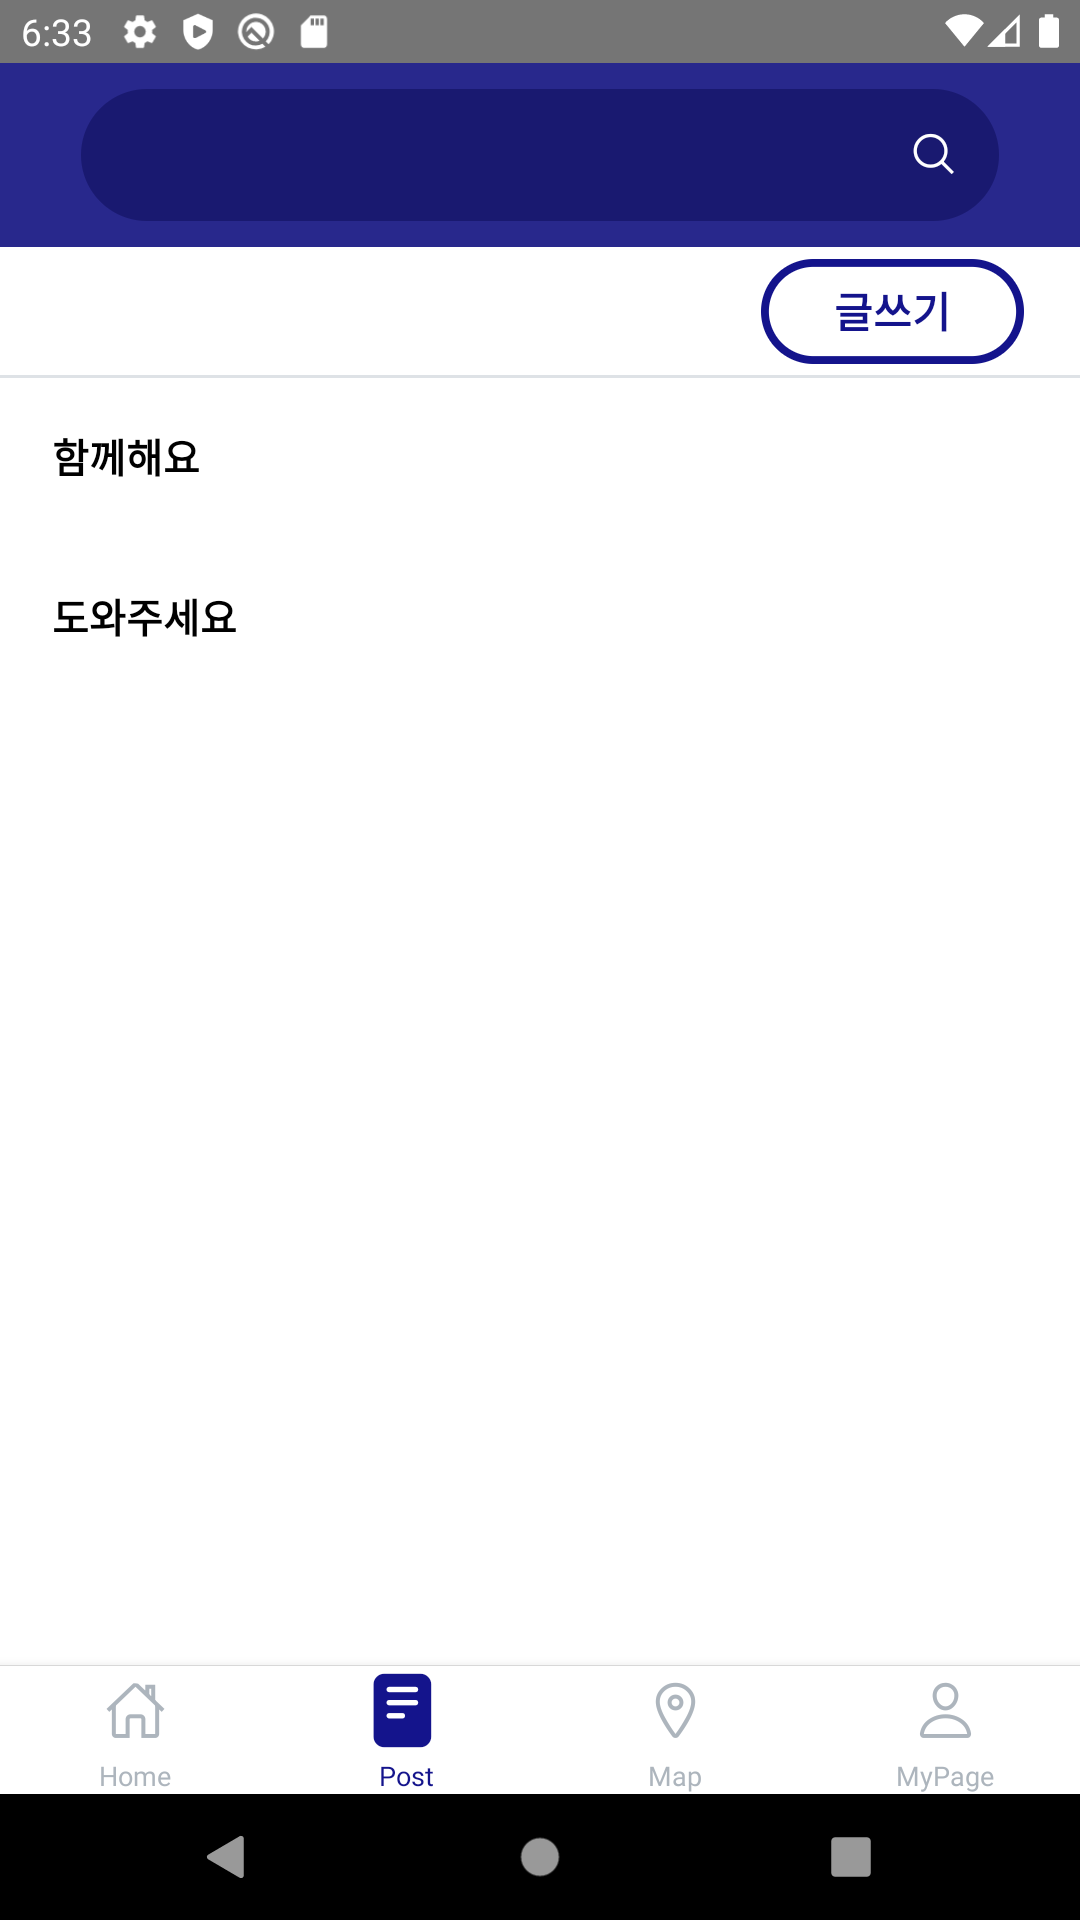
잘 작동하는 모습을 볼 수 있습니다. 우선은 바텀네비게이션의 4가지 스크린에 관한 네비게이션 기능을 만들고, 이 기능들이 완성이 되면 redux와 node.js 마이크로서비스를 구현하면서 스크린의 자세한 부분을 구성하도록 하겠습니다.
