
🧇 개념 이해하기
Vue3의 컴포넌트 구조
- Vue = 컴포넌트 기반 프레임워크
- 컴포넌트: Vue 앱을 구성하는 독립적이고 재사용 가능한 코드 단위
- ex. 버튼, 리스트, 카드 등
- 부모 컴포넌트: 다른 컴포넌트를 포함하는 컴포넌트
- 자식 컴포넌트: 부모 컴포넌트에 포함된 컴포넌트
Vue에서 데이터 전송이란?
- 부모 -> 자식: 데이터 전달 시 props 사용
- 자식 -> 부모:데이터 전달 시 emit 사용
Props
부모 -> 자식
- 부모는 자식에게 데이터를 전달
- 자식 컴포넌트는 props로 전달받은 데이터를 읽기 전용으로 사용 가능
예시 코드
Parent.vue
<template>
  <ChildComponent message="안녕하세요!" />
</template>

<script>
import ChildComponent from './ChildComponent.vue'; // 자식 컴포넌트 임포트
export default {
  components: { ChildComponent }, // 자식 컴포넌트를 등록
};
</script>
- 데이터를 속성으로 넘겨줌
ChildComponent.vue
<template>
  <p>{{ message }}</p> // 전달받은 props를 화면에 표시
</template>

<script>
export default {
// 부모로부터 받을 props를 정의
  props: {
    message: String,
  },
};
</script>
- 부모로부터 받을 데이터의 이름과 자료형을 props 옵션으로 정의
주의사항
- 자식 컴포넌트에서 받은 props는 수정 불가능!
- 자료형 지정
- 기본값 설정 가능
emit
자식 -> 부모
- 자식 컴포넌트는 emit를 통해 이벤트 트리거
- 부모 컴포넌트는 해당 이벤트를 듣고 동작 수행
예시 코드
ChildComponent.vue
<template>
  <button @click="sendData">데이터 보내기</button>
</template>

<script>
export default {
  methods: {
    sendData() {
    // 'customEvent'라는 이벤트를 발생시키고 데이터를 전달
      this.$emit('customEvent', '안녕하세요!');
    },
  },
};
</script>
- 버튼 클릭 시 sendData 메서드 호출
- 버튼 클릭 이벤트: @click
- sendData 메서드: $emit('customEvent', '안녕하세요!)로 이벤트 발생 / 메시지로 데이터로 전달
- $emit 메서드: 이벤트를 발생시키는 역할
- 첫 번째 매개변수: 이벤트 이름
- 두 번째 매개변수: 전달 데이터
Parent.vue
<template>
  <ChildComponent @customEvent="handleData" />
</template>

<script>
import ChildComponent from './ChildComponent.vue';
export default {
  components: { ChildComponent },
  methods: {
    handleData(message) {
      console.log('받은 메시지:', message);
    },
  },
};
</script>-
customEvent 듣고 있기(@customEvent="handleData")
-
이벤트 발생 -> handleData 메서드 실행 -> 전달받은 메시지 처리
- 자식 컴포넌트에서 전달된 데이터가 message 매개변수로 들어옴
Mitt
Component 간 데이터 전송
Mitt: Vue의 외부 라이브러리 / 이벤트 버스를 구현하여 Component 간 데이터 전송
사용 흐름
- Mitt를 설치하고 이벤트 버스 생성
- 한 컴포넌트에서 이벤트를 트리거 / 다른 컴포넌트에서 이를 들음
Vuex
Vue 앱의 상태를 중앙에서 관리하는 라이브러리
- 전역 상태 저장소에서 모든 컴포넌트가 데이터 공유 가능
- Vuex를 사용하면 복잡한 데이터 전송이 간단해짐
🧇 실습해보기
props, emit 활용해서 데이터 전송하기
- 뷰 실행
vue create data-transfer-practice
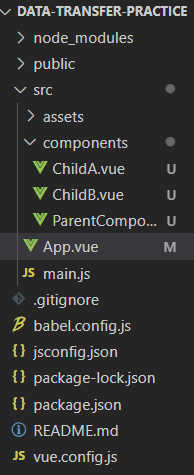
- 만들어야 하는 컴포넌트 구조
- ParentComponent.vue: 부모 컴포넌트
- ChildA.vue: 자식 A 컴포넌트 - 버튼
- ChildB.vue: 자식 B 컴포넌트 - 결과 표시
- 컴포넌트 구현
-
3가지 컴포넌트 파일 생성
-
최상위 파일인 App.vue에서 ParentComponent를 등록해서 화면에 표시되도록 설정
<template>
  <img alt="Vue logo" src="./assets/logo.png">
  <HelloWorld msg="Welcome to Your Vue.js App"/>
</template>

<script>
import HelloWorld from './components/ParentComponent.vue'

export default {
  name: 'App',
  components: {
    HelloWorld
  }
}
</script>

<style>
#app {
  font-family: Avenir, Helvetica, Arial, sans-serif;
  -webkit-font-smoothing: antialiased;
  -moz-osx-font-smoothing: grayscale;
  text-align: center;
  color: #2c3e50;
  margin-top: 60px;
}
</style>
ParentComponent.vue
데이터 관리 / 자식 컴포넌트와의 연결 고리 역할
<template>
  <div>
    <h1>부모 컴포넌트</h1>
    <!-- 자식 A 컴포넌트 -->
    <ChildA @send-result="updateResult" />
    <!-- 자식 B 컴포넌트 -->
    <ChildB :result="result" />
  </div>
</template>

<script>
import ChildA from './ChildA.vue';
import ChildB from './ChildB.vue';

export default {
  components: {
    ChildA,
    ChildB,
  },
  data() {
    return {
      result: '', // A 컴포넌트에서 받은 데이터를 저장
    };
  },
  methods: {
    updateResult(value) {
      this.result = value; // 자식 A로부터 받은 데이터를 result에 저장
    },
  },
};
</script>
-
<ChildA @send-result="updateResult" />- ChildA 컴포넌트를 부모 컴포넌트 안에 삽입
- @: 이벤트 수신 시 사용
- send-result: 자식 컴포넌트에서 발생시키는 이벤트 이름
- updateResult: 보멩서 실행할 메서드
=> ChildA가 이벤트를 발생시키면, 부모 컴포넌트가 이를 듣고 updateResult 메서드를 실행
-
<ChildB :result="result" />:result="result"- :는 데이터를 바인딩할 때 사용
- result는 부모 컴포넌트의 data 속성
- 부모의 result 데이터를 childB의 props로 전달
-
export default{}
- 항상 기본 내보내기 형식으로 작성
- 이 안에 컴포넌트의 구성요소를 정의
-
components: {}
- 부모 컴포넌트에서 사용할 자식 컴포넌트 드록
-
data(){ return { result: '' } }
- 컴포넌트가 사용하는 상태 정의
- result는 부모 컴포넌트에서 관리하는 데이터. 초기값은 빈 문자열로 설정
-
methods: { updateResult(value) { ... } }
- 부모 컴포넌트에서 실행할 메서드 정의
- updateResult(value) : 자식 A 컴포넌트에서 이벤트와 함께 데이터를 전달하면, 이 메서드가 실행되어 result 값 갱신
ChildA.vue
<template>
  <div>
    <h2>자식 A 컴포넌트</h2>
    <button @click="sendData('O')">O</button>
    <button @click="sendData('X')">X</button>
  </div>
</template>

<script>
export default {
  methods: {
    sendData(value) {
      // 'send-result'라는 이벤트를 부모에게 전달
      this.$emit('send-result', value);
    },
  },
};
</script>
-
<button @click="sendData('O')">0
- @click: 버튼이 클릭될 때 실행할 메서드 지정
-
methods: {}
- 실행할 메서드 정의
-
sendData(value)
- $emit: 이벤트를 발생시키는 메서드
- send-result라는 이벤트를 부모 컴포넌트로 보냄
- value는 이벤트와 함께 전달되는 데이터
ChildB.vue
<template>
  <div>
    <h2>자식 B 컴포넌트</h2>
    <p>결과: {{ result }}</p>
  </div>
</template>

<script>
export default {
  props: {
    result: {
      type: String, // 문자열 타입
      required: true, // 필수 props
    },
  },
};
</script>
-
<p>결과: {{ result }}</p>- {{}} : 데이터 바인딩 문법
-
props: {}: 부모 컴포넌트로부터 받을 데이터 정의
-
result: {type: String, required: true}
- result는 문자열 타입이어야 하고, 반드시 전달되어야 함
결과 화면


Mitt Library를 활용해서 Component 간 데이터 전송하기
Mitt로 ChildA에서 발생한 데이터를 ChildB로 전송
ㄴ 이때 부모 컴포넌트를 거치지 않음!
1. 프로젝트 폴더에 Mitt 설치
npm install mitt
2. Mitt 설정 - 중앙에서 Mitt를 관리하도록
- eventBus.js 파일 생성 in src 폴더
// src/eventBus.js
import mitt from 'mitt';
const eventBus = mitt(); // Mitt 객체 생성
export default eventBus; // 다른 파일에서 사용할 수 있도록 export
3. 컴포넌트 구현
[ParentComponent.vue]
<template>
    <div>
        <h1>Mitt 사용 예제</h1>
        <!-- 자식 A 컴포넌트 -->
        <ChildA />
        <!-- 자식 B 컴포넌트 -->
        <ChildB />
    </div>
</template>

<script>
import ChildA from './ChildA.vue';
import ChildB from './ChildB.vue';

export default {
    components: {
        ChildA,
        ChildB,
    },
};
</script>
[ChildA.vue]
<template>
    <div>
        <h2>자식 A 컴포넌트</h2>
        <button @click="sendData('O')">O</button>
        <button @click="sendData('X')">X</button>
    </div>
</template>

<script>
import eventBus from '../eventBus.js'; // Mitt 이벤트 버스 가져오기

export default {
    methods: {
        sendData(value) {
            // 'custom-event'라는 이벤트와 데이터를 발생시킴
            eventBus.emit('custom-event', value);
        },
    },
};
</script>
[ChildB.vue]
<template>
    <div>
        <h2>자식 B 컴포넌트</h2>
        <p>결과: {{ result }}</p>
    </div>
</template>

<script>
import eventBus from '../eventBus.js'; // Mitt 이벤트 버스 가져오기

export default {
    data() {
        return {
            result: '', // 수신한 데이터를 저장할 변수
        };
    },
    mounted() {
        // 'custom-event'를 수신하고 데이터 처리
        eventBus.on('custom-event', (value) => {
            this.result = value; // 데이터를 result에 저장
        });
    },
};
</script>
코드 흐름
- childA에서 Mitt의 emit 메서드로 이벤트 발생
- childB에서 Mitt의 on 메서드로 이벤트 수신
ㄴ Mitt는 중앙에서 이벤트와 데이터 관리
Mitt의 장점
- 독립적인 데이터 전송
- 간단한 설정
- 유연한 이벤트 처리
- 여러 컴포넌트가 동일한 이벤트를 수신하거나 특정 조건에 따라 데이터 처리 가능
=> Mitt는 데이터를 중앙에서 관리하고, 앱 전체에서 컴포넌트들이 데이터를 쉽게 주고받을 수 있는 이벤트 허브 역할을 함
특정 컴포넌트 간 제한 없이 자유롭게 데이터를 전달하거나 수신할 수 있는 점이 가장 큰 강점!
결과 화면


Vuex를 통해서 데이터 전송하기
Vuex: Vue의 중앙 상태 관리 도구
Mitt와 달리 데이터를 중앙 Store에서 관리 -> 모든 컴포넌트가 이 데이터를 공유
1. Vuex 설치
npm install vuex@4
2. Vuex 설정
-
Store 생성
- src/stroe/index.js 파일 생성
// src/store/index.js import { createStore } from 'vuex'; const store = createStore({ state: { result: '', // 공유할 데이터 }, mutations: { updateResult(state, payload) { state.result = payload; // result 값을 업데이트 }, }, actions: { setResult({ commit }, payload) { commit('updateResult', payload); // mutations 호출 }, }, getters: { getResult(state) { return state.result; // result 값 반환 }, }, }); export default store;- store: 앱 데이터 저장 장소
- mutations: state를 변경하는 메서드
- actions: 비동기 작업을 처리한 뒤 mutations 호출
- getters: state 데이터를 읽기 위한 메서드
-
Store 등록 in src/main.js
import { createApp } from 'vue';
import App from './App.vue';
import store from './store'; // Store 가져오기

const app = createApp(App);

app.use(store); // Vue 앱에 Store 등록
app.mount('#app');
3. 컴포넌트 구현
[ParentComponent.vue]
<template>
  <div>
    <h1>Vuex 사용 예제</h1>
    <!-- 자식 A 컴포넌트 -->
    <ChildA />
    <!-- 자식 B 컴포넌트 -->
    <ChildB />
  </div>
</template>

<script>
import ChildA from './ChildA.vue';
import ChildB from './ChildB.vue';

export default {
  components: {
    ChildA,
    ChildB,
  },
};
</script>
[ChildA.vue]
<template>
  <div>
    <h2>자식 A 컴포넌트</h2>
    <button @click="sendData('O')">O</button>
    <button @click="sendData('X')">X</button>
  </div>
</template>

<script>
import { mapActions } from 'vuex';

export default {
  methods: {
    ...mapActions(['setResult']), // Vuex 액션 연결
    sendData(value) {
      this.setResult(value); // 액션 호출
    },
  },
};
</script>
[ChildB.vue]
<template>
  <div>
    <h2>자식 B 컴포넌트</h2>
    <p>결과: {{ result }}</p>
  </div>
</template>

<script>
import { mapGetters } from 'vuex';

export default {
  computed: {
    ...mapGetters(['getResult']), // Vuex Getter 연결
    result() {
      return this.getResult; // Vuex의 상태 값 가져오기
    },
  },
};
</script>
Vuex 데이터 흐름
-
ChildA -> Store
- sendData(value)에서 Vuex 액션(setResult) 호출
- setResult는 Vuex 뮤테이션(updateResult)을 호출해 state 변경
-
Store -> ChildB
- ChildB는 Vuex Getter(getResult)를 통해 state 읽음
- 변경된 데이터는 ChildB에서 자동 반영됨
Vuex의 장점
- 중앙 관리
- 비동기 처리 가능
- actions를 통해 API 호출 등 비동기 작업을 처리하고 결과를 mutations로 전달 가능
- 데이터 반응성
- state가 변경되면 이를 사용하는 모든 컴포넌트 자동 업데이트
Mitt와의 차이점
| 특징 | Mitt | Vuex |
|---|---|---|
| 구조 | 이벤트 기반, 느슨한 연결 | 중앙 데이터 관리 구조 |
| 데이터 흐름 | 이벤트 발생 시 실시간 데이터 전달 | 상태를 중앙에서 관리하며 반응형 업데이트 |
| 복잡도 | 간단하고 가볍다 | 상대적으로 설정이 복잡하다 |
| 사용 사례 | 단순한 데이터 전송, 이벤트 처리 | 상태를 공유하고 관리해야 하는 복잡한 앱 |
결과 화면


🧇 정리하기
with 비유
Props & Emit
컴포넌트 간 계층적 관계일 때
- like 집안 가족 간의 대화
- 부모 -> 자식: 부모가 자식에게 돈을 건넴
- 자식 -> 부모: 자식이 부모에게 다 썼다고 요청
Mitt
컴포넌트 간 자유로운 데이터 전달
- like 회사 단톡방
- 이벤트 발생: 한 사람이 단톡방에 메시지를 보냄
- 이벤트 수신: 단톡방에 들어있는 사람들은 메시지를 읽음. 모두 동시에 알림 받을 수 있음
Vuex
전체 상태를 중앙에서 관리할 때
- like 마을 공용 창고
- 상태(state): 창고에 있는 물건들
- 데이터 수정: 창고 관리인(mutation)에게 물건을 바꿔 달라고 요청
- 데이터 읽기: 창고에 있는 물건을 열어봄(getter)
| 특징 | Props/Emit | Mitt | Vuex |
|---|---|---|---|
| 구조 | 부모-자식 관계 | 이벤트 버스를 통한 느슨한 연결 | 중앙 상태 관리 구조 |
| 데이터 흐름 | 부모 → 자식 (props), 자식 → 부모 (emit) | 이벤트 발생 시 실시간 데이터 전달 | 상태를 중앙에서 관리하며 반응형 업데이트 |
| 복잡도 | 간단하고 기본적 | 적당히 간단함 | 상대적으로 설정이 복잡함 |
| 사용 사례 | 부모-자식 간 데이터 전송 | 형제 컴포넌트 간 데이터 전송 | 복잡한 앱 상태를 공유하고 관리해야 할 때 |