
최주호 강사님의 인프런 강좌 정리 및 실습한 기록
목표
- jwt authorization filter 를 등록한다.
구현에 필요한 내용
- JwtAuthorizationFilter 의 필요성
- 403 에러를 처리할 예외 객체 생성
- SecurityConfig 에 filter 등록
- 구현한 내용 테스트
JwtAuthorizationFilter
access token 을 검증합니다.
access token 은 스프링부트가 돌아가는 서버에서 직접 만들수도 있고, 인가 서버를 통해 인증 및 인가 프로세스를 분리시킬 수도 있습니다.
해당 강의에서는 학습이 목적이기 때문에 리소스서버(= 스프링부트가 돌아가는 서버) 에서 직접 토큰을 생성합니다.
해당 강의 수강 후, Okta 를 이용해서 인가서버를 분리해서 인증 및 인가 과정을 위임해서 MSA 를 구현하는 강의를 정리합니다.
토큰 생성에 필요한 정보
토큰 생성에 필요한 정보는 .yml 파일에서 건네주거나, 클라우드 환경에서 구동한다면 인자를 미리 설정해서 서버에 넘길 수 있습니다.
해당 강의에서는 이 부분은 중요하게 다루지 않았고, 인터페이스를 생성해서 정보를 담아두었습니다.
public interface JwtVO {

    public static final String SECRET = "metacoding";
    public static final int EXPIRATION_TIME = 1000 * 60 * 60 * 24 * 7;
    public static final String TOKEN_PREFIX = "Bearer ";
    public static final String HEADER = "Authorization";

}
filter
token 을 검증하는 로직이 작성되는 필터 입니다.
BasicAuthenticationFilter 를 상속받습니다.
인가에 관한 필터는 BasicAuthenticationFilter 를 상속받아서 받습니다. 해당 객체에 대한 내용을 살펴보면 다음과 같습니다.
Processes a HTTP request's BASIC authorization headers, putting the result into the SecurityContextHolder.
For a detailed background on what this filter is designed to process, refer to RFC 1945, Section 11.1 . Any realm name presented in the HTTP request is ignored.
앞선 인가에 관한 필터도 마찬가지로 이미 스프링 시큐리티가 구현해놓은 클래스를 상속받아서 구현합니다.
BasicAuthenticationFilter 는 생성자로 AuthenticationManager 를 전달해주어야 합니다. 해당 객체는 2개의 생성자가 있는데 모두 AuthenticationManager 가 필요하기 때문입니다.
public JwtAuthorizationFilter(AuthenticationManager authenticationManager) {
        super(authenticationManager);
}
그럼 실제로 필터가 동작하는 doFilterInternal 을 작성해보겠습니다. 로직은 유효한 토큰이 검증되는 경우에 동작하게끔 작성되어 있습니다.
@Override
protected void doFilterInternal(HttpServletRequest request, HttpServletResponse response, FilterChain chain) throws IOException, ServletException {
    // 유효한 토큰이라면
    if (isHeaderVerify(request, response)) {
        String token = request.getHeader(JwtVO.HEADER).replace(JwtVO.TOKEN_PREFIX, "");
        LoginAppUser loginAppUser = JwtProcess.verify(token);

        // 임시 세션
        // 패스워드는 모르기 때문에 null
        // (학습을 위해 강제로 토큰을 생성하는 것, 임시코드)
        // UserDetails or username 둘중에 하나를 넣을 수 있다.
        // 현재까지 구현한 코드로는 .getUsername() 은 null 이기 때문에
        // UserDetails 를 그대로 집어넣는다. (리팩토링 필요)
        Authentication authentication = new UsernamePasswordAuthenticationToken(loginAppUser, null, loginAppUser.getAuthorities());
        SecurityContextHolder.getContext().setAuthentication(authentication);
    }

    // 다음 필터로 req, res 를 넘긴다.
    chain.doFilter(request, response);
}
위의 코드에서 isHeaderVerify 를 작성해보겠습니다. 토큰의 유효성을 검증하는 코드입니다. 해당 강의는 시큐리티에 몰빵한 강의는 아니므로 아주 간단하게 작성되어 있습니다.
oauth2.0 + auth server 조합으로 토큰을 발급받는 경우
expiration time, issuer, refresh token 등이 넘어옵니다.
따라서 좀 더 상세하게 인증 및 인가 처리가 가능하지만
현재 강의는 기본적인 jwt 세팅 후 Transaction 을 JUnit5 로 테스트 하는 것이 목표이기 때문에 생략합니다.
private boolean isHeaderVerify(HttpServletRequest request, HttpServletResponse response) {
    // header 에 'Authorization' 이 포함되어 있는지 확인한다.
    String header = request.getHeader(JwtVO.HEADER);
    // 'Authorization' 이 없거나, 'Bearer ' 로 시작하지 않는다면 유효하지 않은 토큰이므로 false 를 리턴한다.
    // access token, refresh token 을 고려한다면 유효기간, 토큰 재발급 등의 로직이 필요하나 여기선 생략한다.
    return header != null && !header.startsWith(JwtVO.TOKEN_PREFIX);
}
filter 등록
spring security 가 버전이 올라감에 따라서, filter chain 을 직접 구현해야 합니다. 따라서 @Bean 에 직접 등록해주어야 하며 등록 방법은 한가지만 있는것이 아니지만, 강의 내용을 그대로 따라갑니다.
filter manager 에 등록
filter 를 n개 등록할 것이므로 manager 를 생성해서 manager 에 등록합니다.
public static class CustomSecurityFilterManager extends AbstractHttpConfigurer<CustomSecurityFilterManager, HttpSecurity> {
    @Override
    public void configure(HttpSecurity builder) throws Exception {
        // 필터 동작을 위해서 authenticationManager 가 필요하므로 호출해서 필터에 넘겨준다.
        AuthenticationManager authenticationManager = builder.getSharedObject(AuthenticationManager.class);
        // Authentication 을 처리할 filter 를 등록한다.
        builder.addFilter(new JwtAuthenticationFilter(authenticationManager));
        // Authorization 을 처리할 filter 를 등록한다.
        builder.addFilter(new JwtAuthorizationFilter(authenticationManager));
        super.configure(builder);
    }
}
config 에 등록
여러개의 커스텀 필터가 등록된 manager 를 SecurityFilterChain 에 등록해줍니다.
// .apply 메서드를 사용한다.
http.apply(new CustomSecurityFilterManager());
SecurityFilterChain 내에서 인증 및 인가에 실패했을 때 어떻게 처리할 것인지도 등록합니다.
각 경우에 에러 메세지를 파싱없이 그대로 string 으로 넘기면 일관성이 없고 프론트에 전달하거나 로그를 남길 때 불편한 상황이 발생합니다.
따라서 에러 처리를 담당할 객체를 생성해줍니다.
// 인증 실패
http.exceptionHandling(exceptionHandling -> {
            exceptionHandling
                    .authenticationEntryPoint((request, response, authenticationException) -> {
                                CustomResponseUtil.fail(response, "로그인이 필요합니다.", HttpStatus.UNAUTHORIZED);
                            }
                    );
        }
);

// 인가 실패
http.exceptionHandling(exceptionHandling -> {
            exceptionHandling
                    .accessDeniedHandler((request, response, accessDeniedException) -> {
                        CustomResponseUtil.fail(response, "권한이 없습니다.", HttpStatus.FORBIDDEN);
                    });
        }
);
CustomResponseUtil
인증 및 인가 과정에서 에러 발생 시, response 에 내가 원하는 값을 넣는다.
항상 고정된 형태로 error 를 확인할 수 있다.
public static void fail(HttpServletResponse response, String msg, HttpStatus httpStatusCode) {

    try {
        ObjectMapper mapper = new ObjectMapper();
        ResponseDTO<?> responseDTO = new ResponseDTO<>(-1, msg, null);
        response.setContentType("application/json; charset=UTF-8");
        response.setStatus(httpStatusCode.value());
        response.getWriter().write(mapper.writeValueAsString(responseDTO));
    } catch (Exception e) {
        logger.error("서버 파싱 에러, " + e.getMessage());
    }

}
ResponseDTO
java 객체에 담고, ObjectMapper 를 이용해 JSON 형태로 바꿔서 response 에 저장될 때 사용되는 객체입니다.
@Getter
@RequiredArgsConstructor
public class ResponseDTO<T> {

    private final Integer code;
    private final String msg;
    private final T data;

}
CustomExceptionHandler
위에 작성된 filter 에 관한 내용과는 다르게 @Controller 까지 전달이 된 경우 예외처리에 관한 내용입니다.
@Controller, @Service 레이어에서 문제가 터진 경우
filter 와 마찬가지로 exception 을 파싱해서 원하는 형태로 에러를 전달합니다.
@RestControllerAdvice
public class CustomExceptionHandler {

    private static final Logger logger = LoggerFactory.getLogger(CustomExceptionHandler.class);


    @ExceptionHandler(CustomApiException.class)
    public ResponseEntity<?> apiException(CustomApiException e) {
        logger.error(e.getMessage());
        return new ResponseEntity<>(new ResponseDTO<>(
                -1,
                e.getMessage(),
                null
        ), HttpStatus.BAD_REQUEST);
    }

    @ExceptionHandler(CustomForbiddenException.class)
    public ResponseEntity<?> forbiddenException(CustomForbiddenException e) {
        logger.error(e.getMessage());
        return new ResponseEntity<>(new ResponseDTO<>(
                -1,
                e.getMessage(),
                null
        ), HttpStatus.FORBIDDEN);
    }

    @ExceptionHandler(CustomValidationException.class)
    // @ResponseStatus(HttpStatus.BAD_REQUEST)
    public ResponseEntity<?> validationApiException(CustomValidationException e) {
        logger.error(e.getMessage());
        return new ResponseEntity<>(new ResponseDTO<>(
                -1,
                e.getMessage(),
                e.getErrorMap()
        ), HttpStatus.BAD_REQUEST);
    }

}
@ExceptionHandler 어노테이션을 통해 해당 에러가 발생하는 경우 작동하게 할 수 있습니다. 현재 인가에 관한 내용을 진행하고 있으므로, 권한이 부족한 403 (FORBIDDEN) 에러를 넣어줍니다.
CustomForbiddenException
exception 클래스는 간단히 RuntimeException 만 상속받도록 생성합니다.
public class CustomForbiddenException extends RuntimeException {

    public CustomForbiddenException(String message) {
        super(message);
    }

}
JwtProcess
로그인을 시도한 유저의 정보를 바탕으로 JWT 를 생성하는 역할을 맡는 클래스입니다.
해당 강의에서는 토큰의 생성, 검증을 한 클래스에서 진행합니다 (최대한 간단하지만 기본만 훑어보는 게 목적)
토큰 생성
JWT 를 생성합니다.
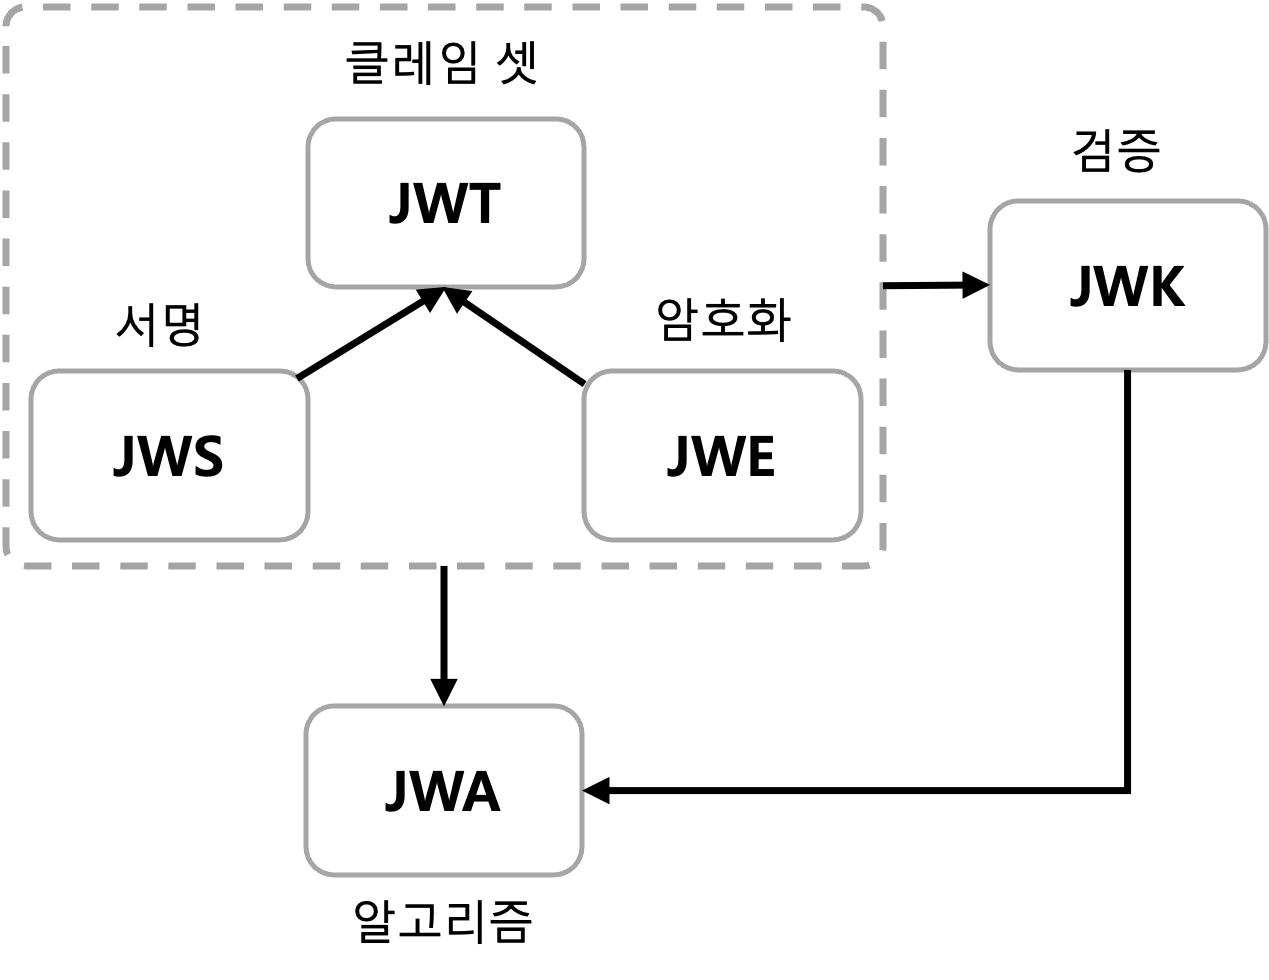
JWT 는 Claims 의 집합체를 나타내는 인터페이스이고
서명 후 암호화 된 JWS 을 이용한다고 볼 수 있다.
public static String create(LoginAppUser loginAppUser) {
    String jwtToken = JWT.create()
            .withSubject("test-token-name")
            .withExpiresAt(new Date(System.currentTimeMillis() + JwtVO.EXPIRATION_TIME))
            .withClaim("id", loginAppUser.getAppUser().getId())
            .withClaim("role", loginAppUser.getAppUser().getRole().name())
            .sign(Algorithm.HMAC512(JwtVO.SECRET));

    return JwtVO.TOKEN_PREFIX + jwtToken;
}
토큰 검증
JWT 를 decode 한 뒤 검증한다.
계속 보면 알겠지만 뼈대가 되는 기본 개념만을 훑고 지나가는 느낌이다.
RSA 에 아닌, 대칭키 방식인 HMAC512 로 작성한다.
OAuth2.0 와 OIDC 등을 사용한다면 NimbusJwtDecoder 등을 사용한 몇 가지 설정이 추가되어야 한다.
// 리턴되는 loginAppUser 객체를 강제로 시큐리티 세션에 주입한다. (= 강제 로그인)
public static LoginAppUser verify(String token) {
    // 토큰 생성, 검증을 한곳에서 하는 상황
    // 대칭키여도 상관없다.
    DecodedJWT decodedJWT = JWT.require(Algorithm.HMAC512(JwtVO.SECRET)).build().verify(token);

    Long id = decodedJWT.getClaim("id").asLong();
    String role = decodedJWT.getClaim("role").asString();
    // Enum 타입으로 변환
    AppUser appUser = AppUser.builder().id(id).role(AppUserEnum.valueOf(role)).build();

    return new LoginAppUser(appUser);
}
토큰이 유효한 토큰으로 판명되면
JwtAuthorizationFilter 에서는 SecuriyContextHodler 에 세션을 생성해서 Authentication 객체를 저장한다.
테스트
토큰 생성
토큰을 생성한다.
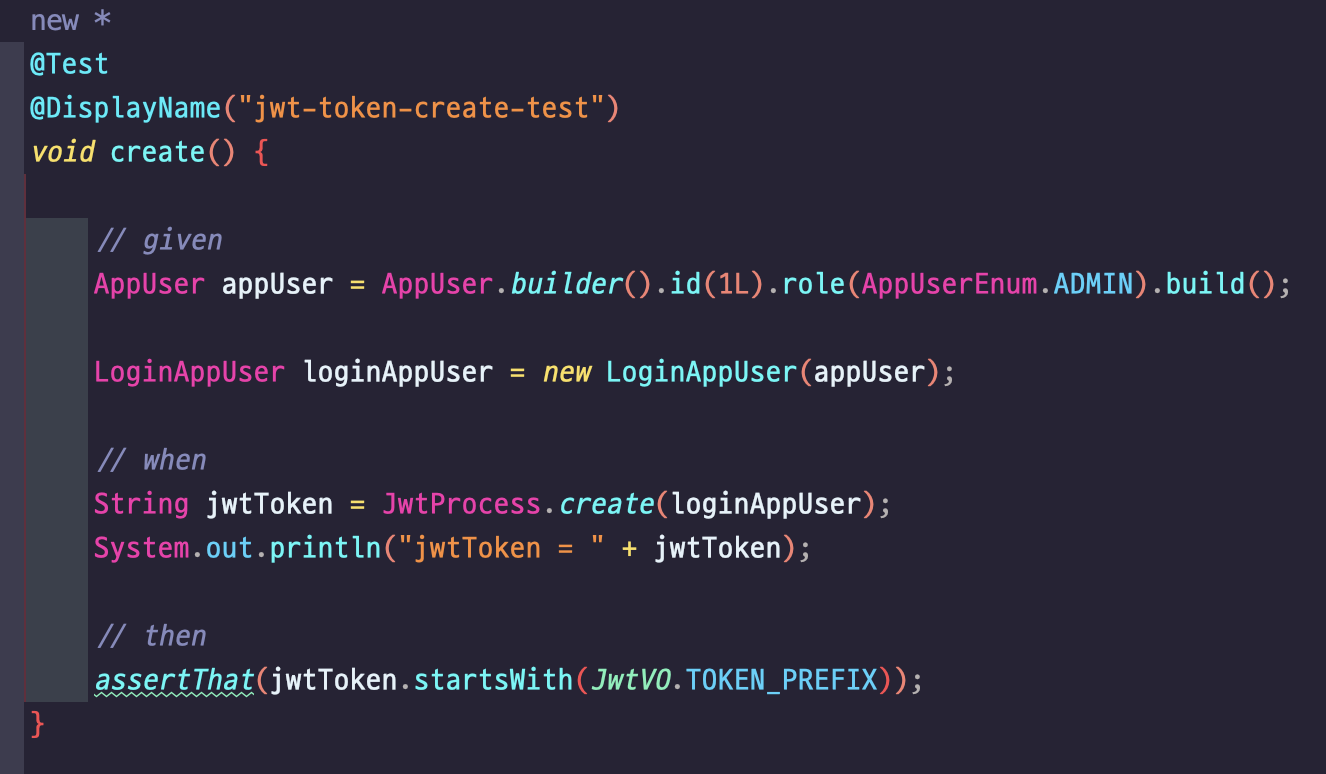
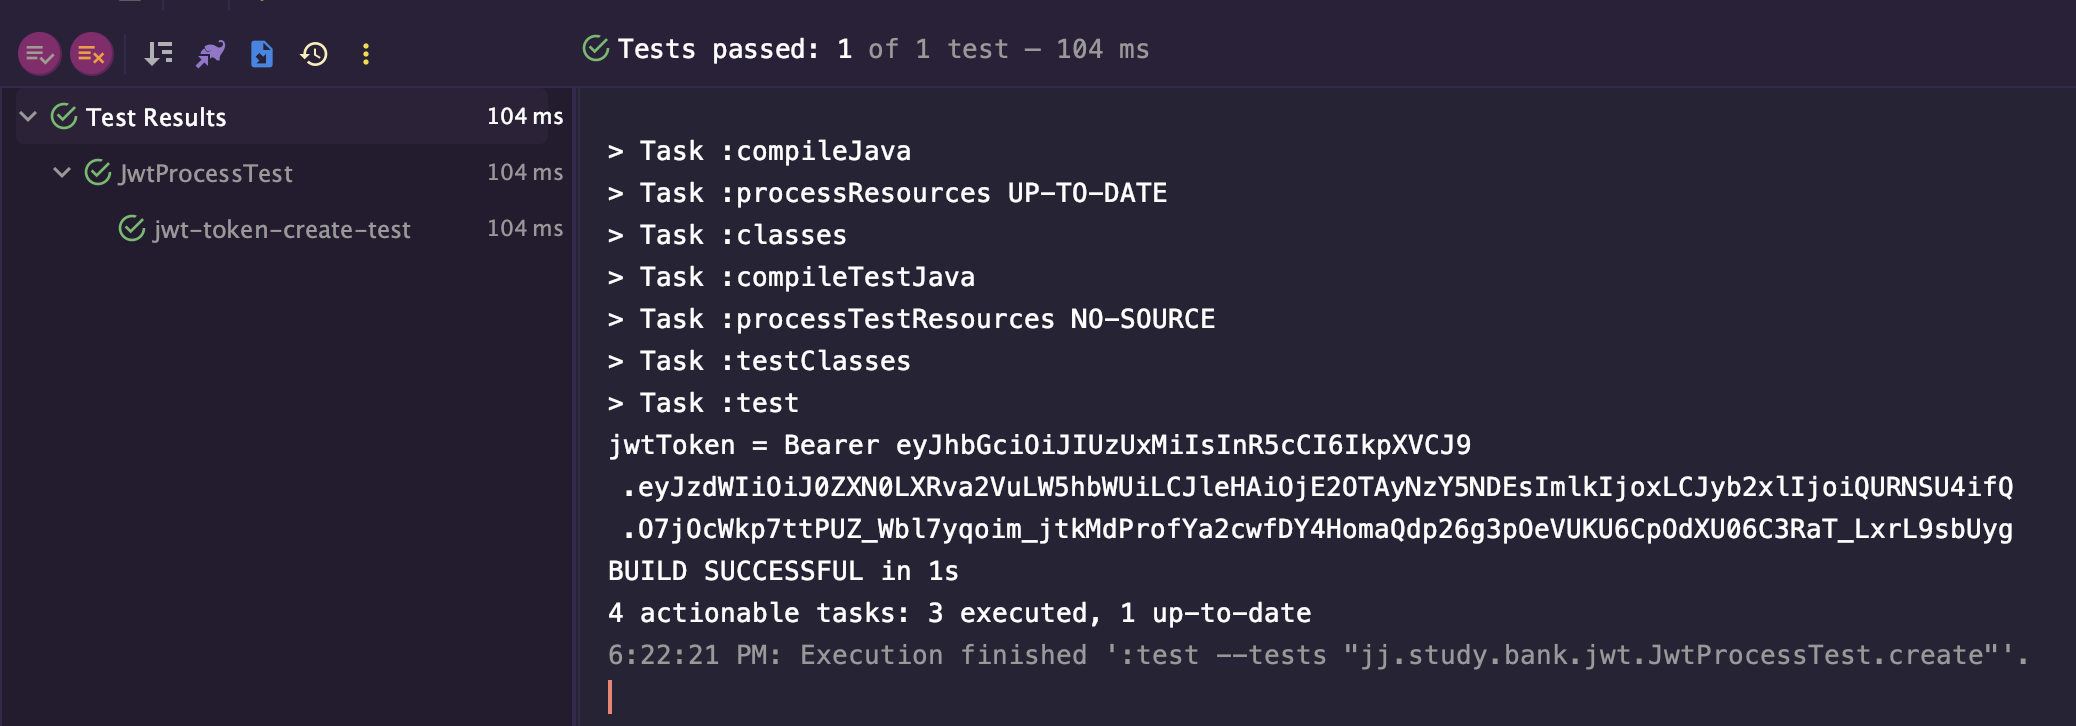
Bearer 로 시작하는 토큰이 잘 생성되었다. JwtProcess 에서 create() 메서드에 의해 생성된 결과이다.
jwt.io 사이트에서 확인해보았다.
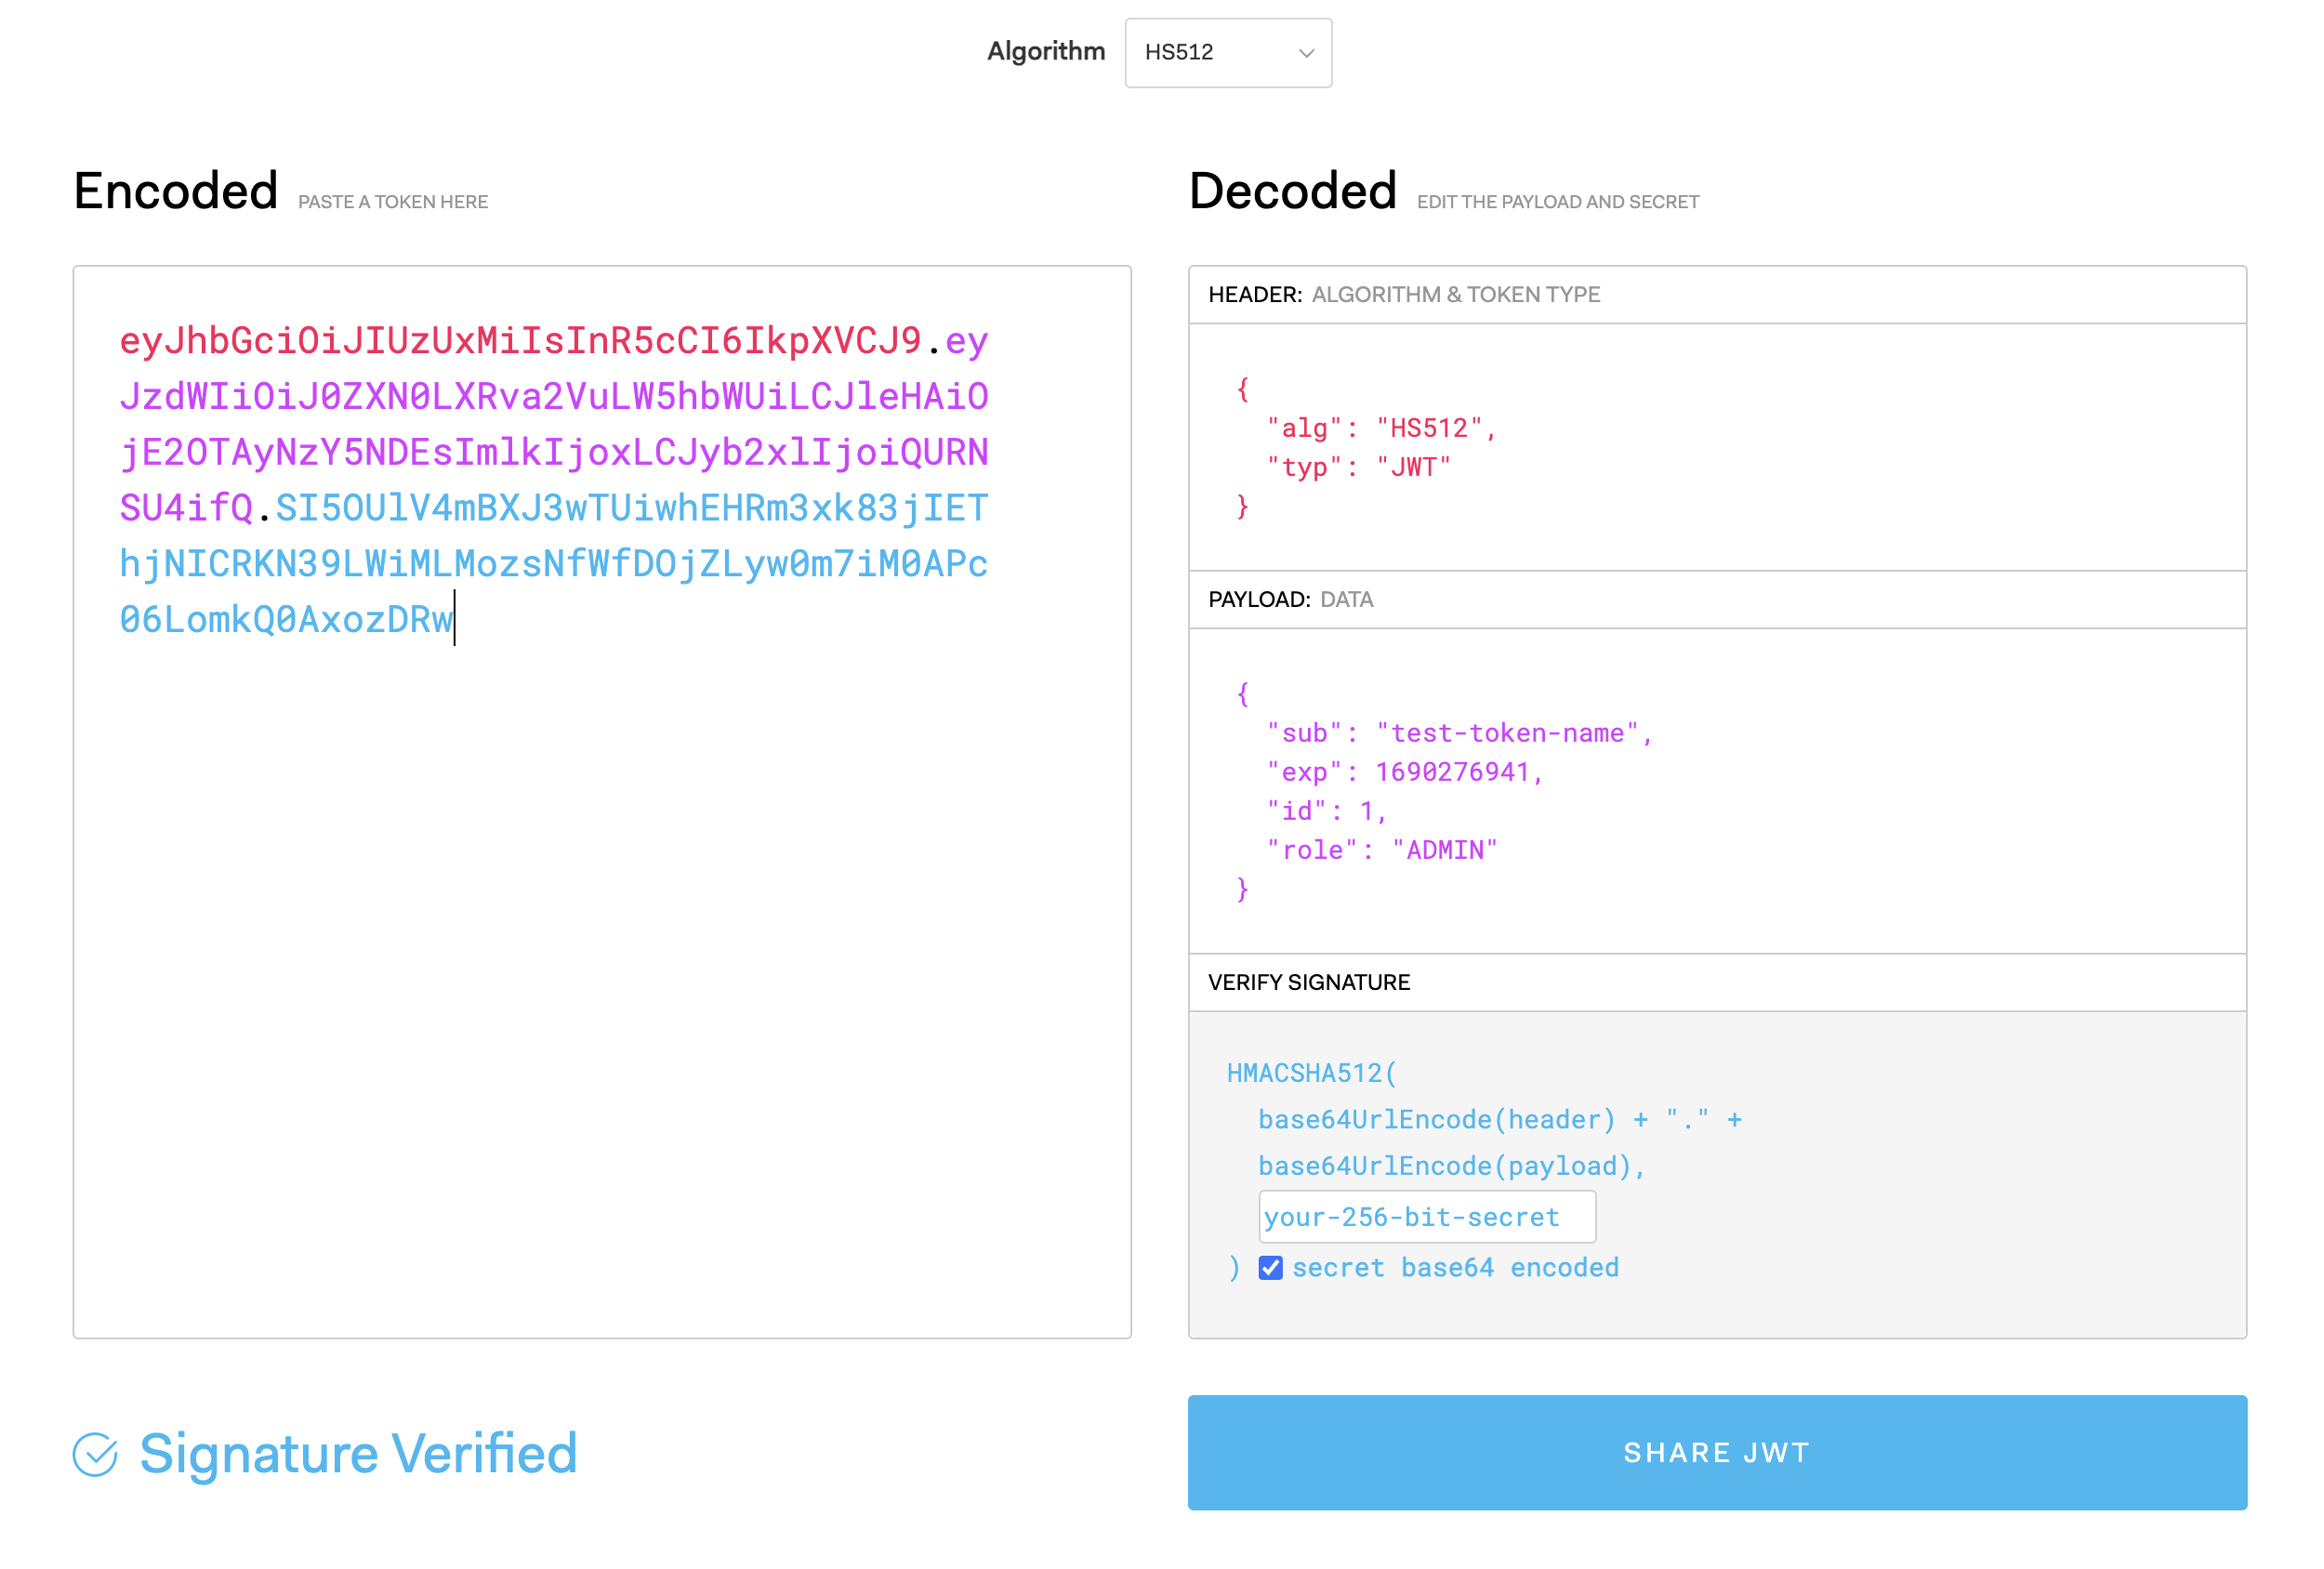
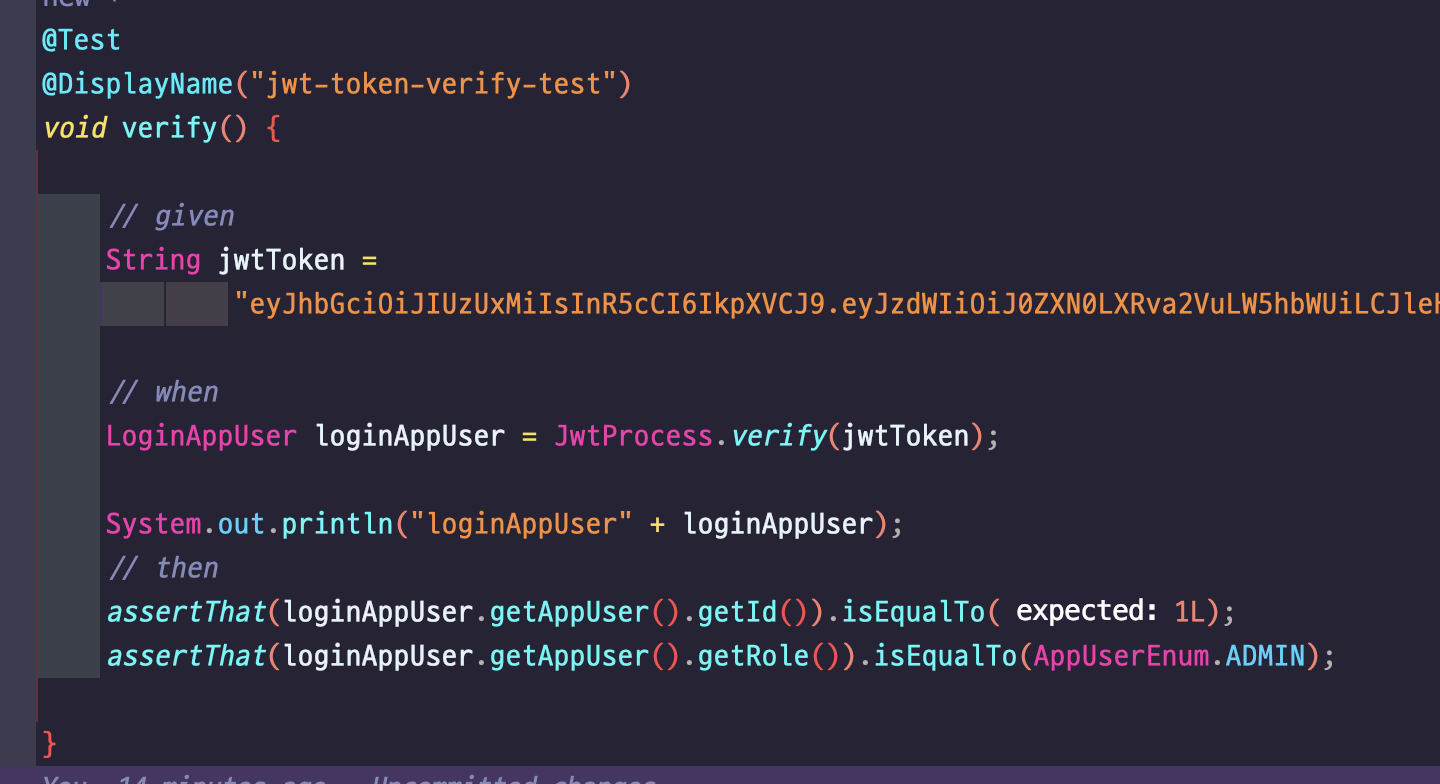
토큰 검증
토큰 생성 테스트에서 생성된 토큰값을 복사, 붙여넣기 해서 확인한다.
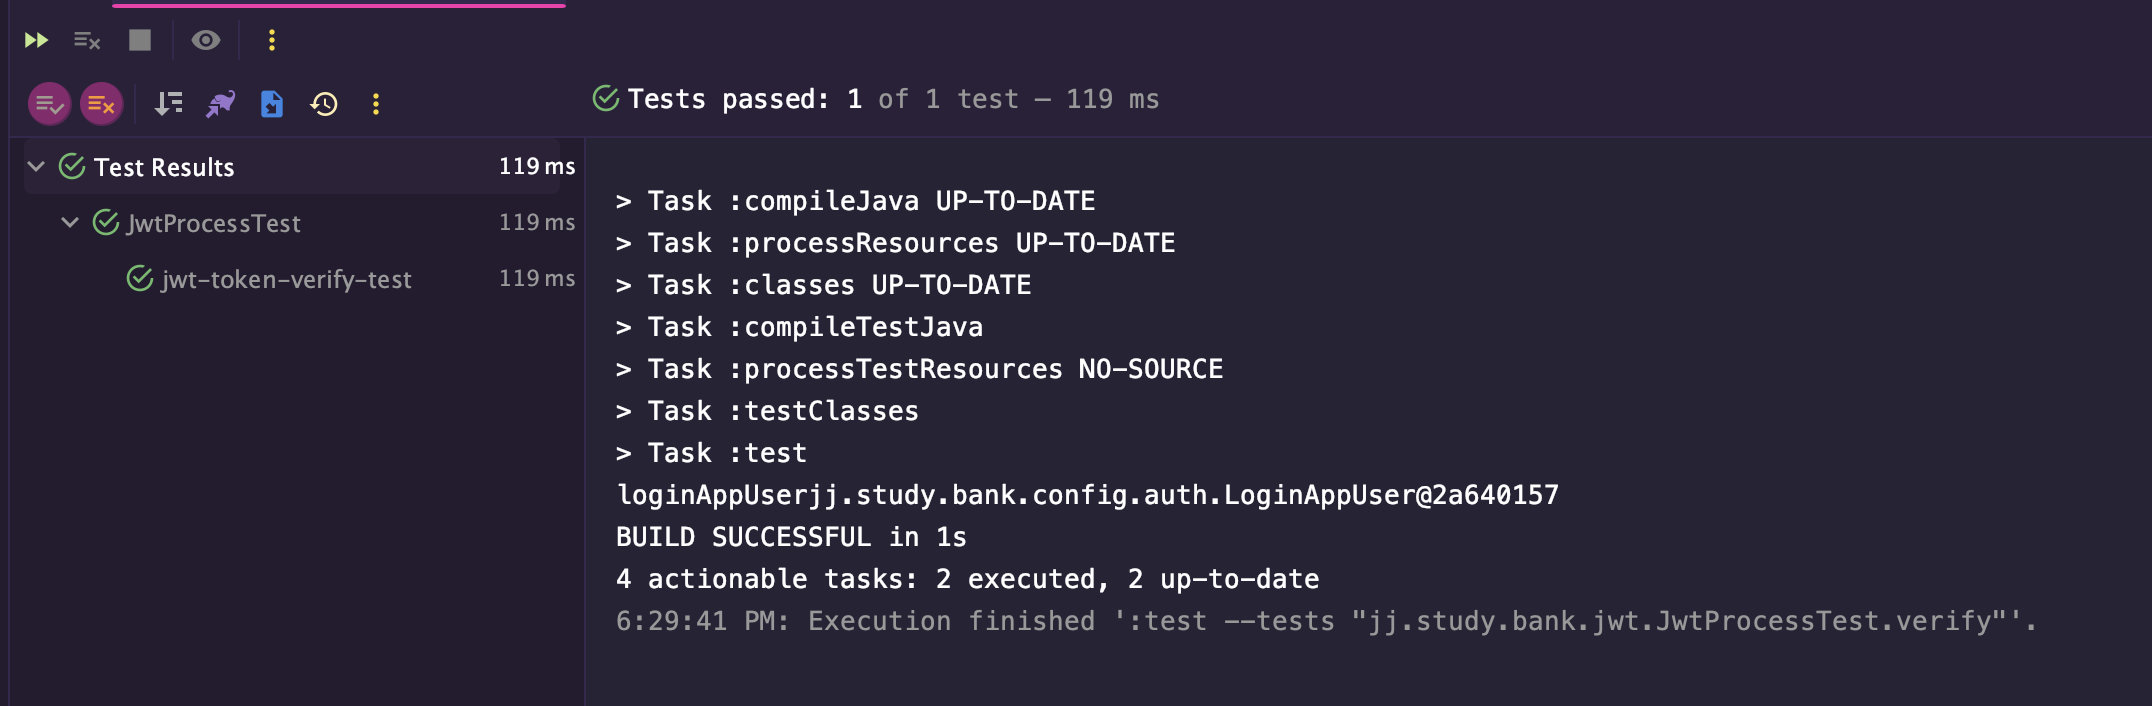
테스트 결과

잘 봤습니다. 좋은 글 감사합니다.