
최주호 강사님의 인프런 강좌 정리 및 실습한 기록
목적
- 세션이 아닌 JWT 활용한 강제 로그인
- 로그인이 잘 되는지 테스트
로그인 구현
구현에 필요한 내용
- 특정 url 을 처리할 filter 구현
-JwtAuthenticationFilter - filter 를
SecurityFilterChain에 등록 UserDetailsService를 상속받은@Service구현- 로그인 시도 시 사용할
DTO작성
- 날짜 파싱에 사용할 util 클래스 작성 - 구현한 내용 테스트
filter
client 의 request 는 dispatcher servlet 을 타기 전에 filter 에서 먼저 처리된다.
controller 단으로 전달되기 전에 사전에 인증, 인가 등의 작업을 한다.
권한이 없는 사람을 resource 에 접근하지 못하도록 하고, db 까지 탈 이유가 없는 요청을 필터에서 먼저 처리해서 자원 낭비를 막을 수 있다.
생성자
AuthenticationManager 가 필요하다. 실제 인증은 manager 가 제공하는 AuthenticationProvider 가 하게된다.
filter 의 생성자로 AuthenticationManager 를 사용하므로, filter 를 등록하는 config 클래스 내에서 호출해야한다.
    private final AuthenticationManager authenticationManager;

    public JwtAuthenticationFilter(AuthenticationManager authenticationManager) {
        super(authenticationManager);
        // UsernamePasswordAuthenticationFilter 에 등록된 default url 을 변경한다.
        // /api/login 경로로 들어오는 경우 해당 filter 가 동작한다.
        setFilterProcessesUrl("/api/login");
        this.authenticationManager = authenticationManager;
    }
인증을 시도하는 경우
attemptAuthentication 메서드를 @Override 한다.
@Override
public Authentication attemptAuthentication(HttpServletRequest request, HttpServletResponse response) throws AuthenticationException {

    try {
        ObjectMapper objectMapper = new ObjectMapper();
        LoginRequestDTO loginRequestDTO = objectMapper.readValue(request.getInputStream(), LoginRequestDTO.class);
        // 강제 로그인을 위한 토큰 생성
        UsernamePasswordAuthenticationToken authenticationToken
                = new UsernamePasswordAuthenticationToken(
                loginRequestDTO.getUsername(),
                loginRequestDTO.getPassword()
        );
        // 강제 로그인
        // UserDetailsService 의 loadUserByUsername 메서드 호출
        return authenticationManager.authenticate(authenticationToken);
    } catch (Exception e) {
        // authenticationEntryPoint 에서 걸린다.
        // controller advice 로 넘길수가 없다.(= filter 기 때문에)
        throw new InternalAuthenticationServiceException(e.getMessage());
    }
}
인증에 성공한 경우
successfulAuthentication 을 @Override 한다.
@Override
protected void successfulAuthentication(HttpServletRequest request, HttpServletResponse response, FilterChain chain, Authentication authResult) throws IOException, ServletException {
    LoginAppUser loginAppUser = (LoginAppUser) authResult.getPrincipal();
    String jwtToken = JwtProcess.create(loginAppUser);
    response.addHeader(JwtVO.HEADER, jwtToken);

    LoginResponseDTO loginResponseDTO = new LoginResponseDTO(loginAppUser.getAppUser());
    CustomResponseUtil.success(response, loginResponseDTO);
}
filter 등록
// SecurityConfig.java 에서 등록할 필터 객체를 생성한다.
public static class CustomSecurityFilterManager extends AbstractHttpConfigurer<CustomSecurityFilterManager, HttpSecurity> {
    @Override
    public void configure(HttpSecurity builder) throws Exception {
        // 필터 동작을 위해서 authenticationManager 가 필요하므로 호출해서 필터에 넘겨준다.
        AuthenticationManager authenticationManager = builder.getSharedObject(AuthenticationManager.class);
        builder.addFilter(new JwtAuthenticationFilter(authenticationManager));
        super.configure(builder);
    }
}


// SecurityFilterChain 에 필터를 등록한다.
http.apply(new CustomSecurityFilterManager());
service
@Service
@RequiredArgsConstructor
public class LoginService implements UserDetailsService {

    private final AppUserRepository appUserRepository;


    // Spring Security 로 로그인이 될 때,
    // 해당 메서드를 실행해서 username 이 db 에 존재하는지 체크한다.
    // db 에 존재하지 않으면, 에러 발생
    // db 에 존재하면, security context 에 session 이 생성된다.
    @Override
    public UserDetails loadUserByUsername(String username) throws UsernameNotFoundException {
        AppUser appUserPS = appUserRepository.findByUsername(username).orElseThrow(
                () -> new InternalAuthenticationServiceException("사용자 인증에 실패하였습니다.")
        );

        return new LoginAppUser(appUserPS);
    }
}
UserDetails 를 상속받는 객체
Spring Security 에서 User 라는 이름의 객체를 사용하기 때문에, 혼선을 방지하고자 AppUser 라고 이름을 붙였다.
UserDetails 를 상속받아야 Authentication 객체에 자유롭게 접근할 수 있다.
실제 운영 서비스에서 인증, 인가가 중요하다면 해당 부분이 굉장히 복잡하겠지만 여기서는 테스트 목적이므로 간단하게 생성한다.
@RequiredArgsConstructor
@Getter
public class LoginAppUser implements UserDetails {

    private final AppUser appUser;


    @Override
    public Collection<? extends GrantedAuthority> getAuthorities() {
        Collection<GrantedAuthority> authorities = new ArrayList<>();
        authorities.add(() -> "ROLE_" + appUser.getRole());
        return authorities;
    }

    @Override
    public String getPassword() {
        return appUser.getPassword();
    }

    @Override
    public String getUsername() {
        return appUser.getUsername();
    }

    @Override
    public boolean isAccountNonExpired() {
        return true;
    }

    @Override
    public boolean isAccountNonLocked() {
        return true;
    }

    @Override
    public boolean isCredentialsNonExpired() {
        return true;
    }

    @Override
    public boolean isEnabled() {
        return true;
    }
}
response DTO 생성
DTO.java 클래스 내에서 static class 를 계속 추가해나간다.
public class AppUserResponseDTO {

    @Getter @Setter
    public static class LoginResponseDTO {
        private Long id;
        private String username;
        private String createdAt;

        public LoginResponseDTO(AppUser appUser) {
            this.id = appUser.getId();
            this.username = appUser.getUsername();
            this.createdAt = CustomDateUtil.toStringFormat(appUser.getCreatedAt());
        }
    }

}
date 파싱을 담당할 util 클래스 생성
public class CustomDateUtil {

    public static String toStringFormat(LocalDateTime localDateTime) {
        return localDateTime.format(DateTimeFormatter.ofPattern("yyyy-MM-dd HH:mm:ss"));
    }


}
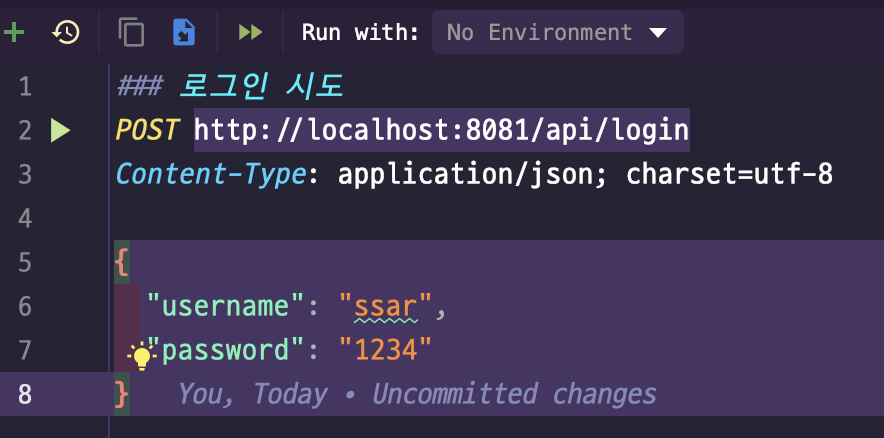
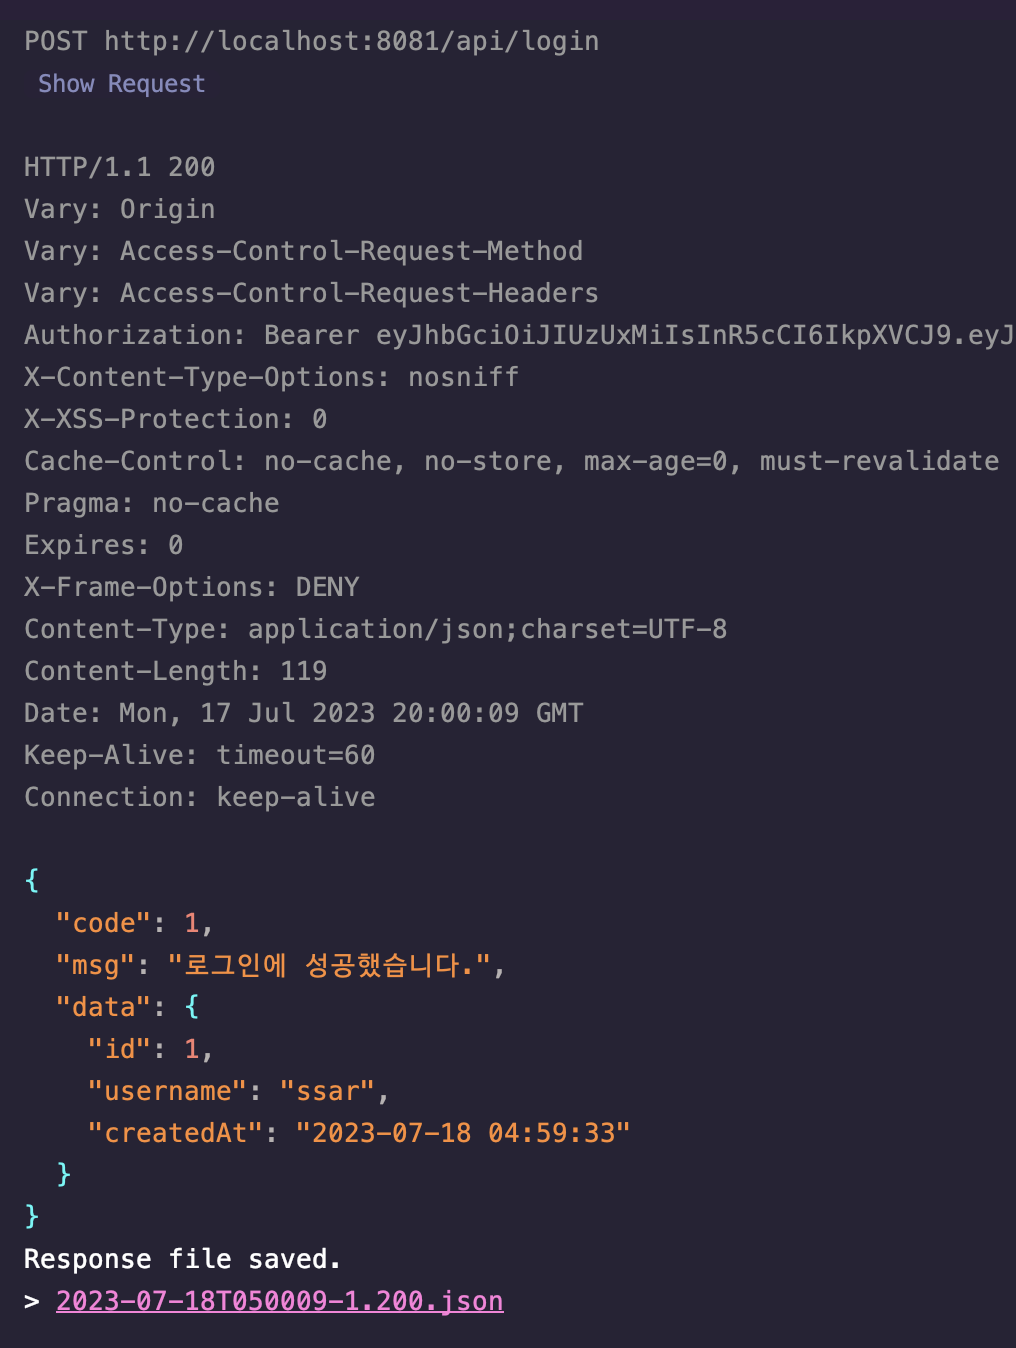
테스트
postman 을 이용하지 않고, 인텔리제이에서 제공하는 기능을 이용해 간단하게 테스트 해본다.
로그인 시 생성되는 token 을 환경변수에 저장하여, 반복적으로 token 값 복사 + 붙여넣기 하는 수고를 줄여볼 예정이다.
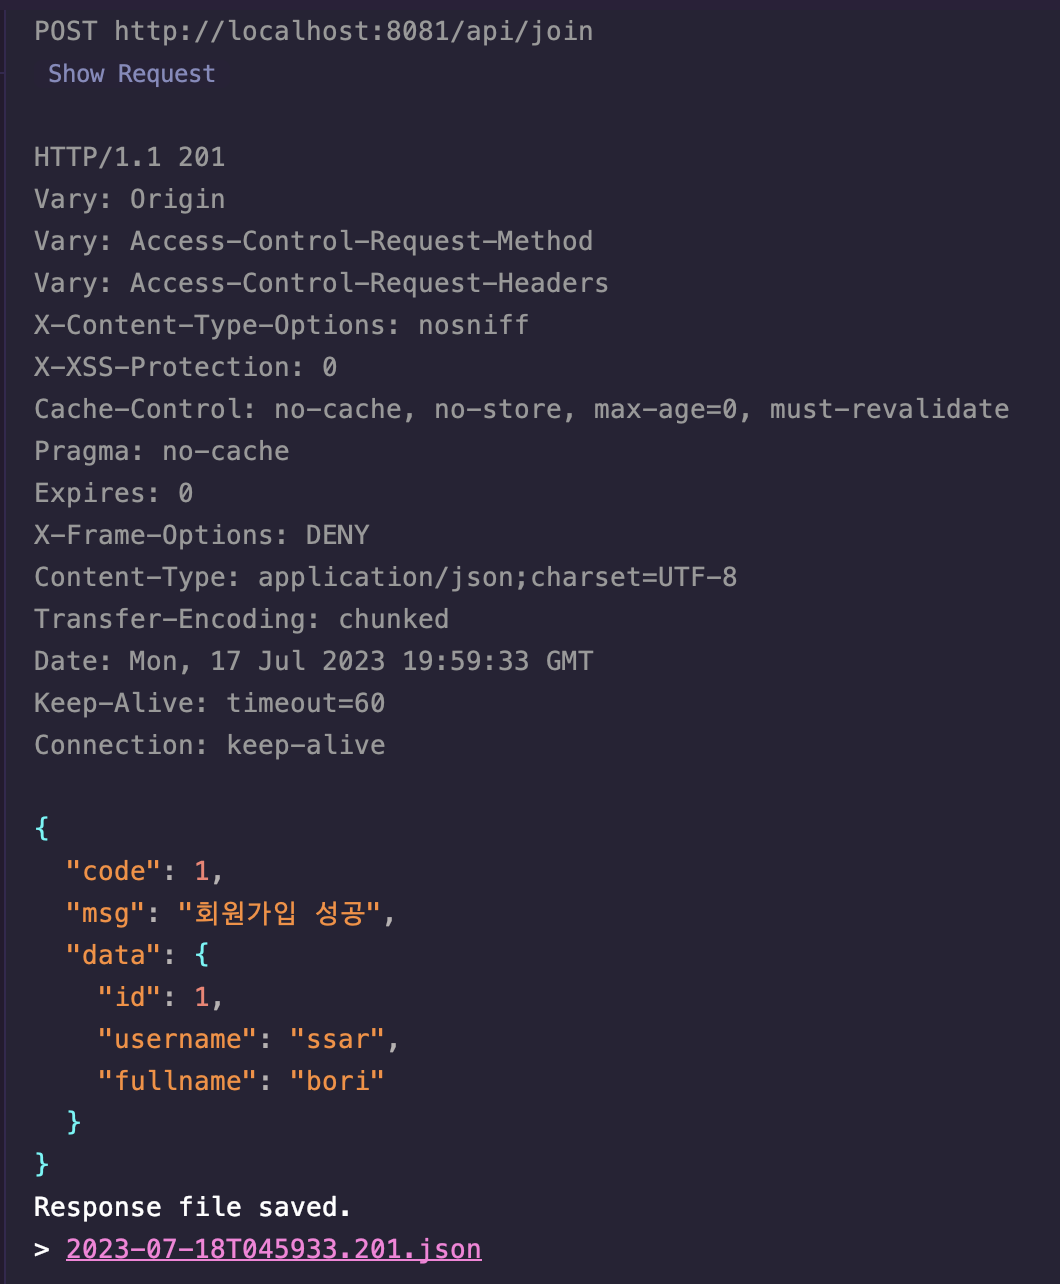
회원가입

로그인


훌륭한 글이네요. 감사합니다.