안드로이드 자동 배포를 위한 fastlane 작업 후 문서로 작성합니다.
https://thecodingmachine.github.io/react-native-boilerplate/docs/BetaBuild/#android
위의 링크를 참고하여 작업을 진행했습니다.
작업하기 전 체크사항
- 구글 플레이스토어 어드민 계정이 필요합니다 ✅
- Google Play Console에 앱을 등록해야합니다 ✅
- android 폴더에 알맞는 .gitignore 파일을 생성해야 합니다. ✅
# fastlane specific
fastlane/report.xml

# deliver temporary files
fastlane/Preview.html

# snapshot generated screenshots
fastlane/screenshots

# scan temporary files
fastlane/test_output

# Fastlane builds
builds/*- Google Credential 을 발급받습니다
- react native dependency를 설치합니다. ✅
Google Credential 발급받기 ✅
- Google Play Console을 접속합니다.
- 설정 -> API 액세스를 들어갑니다.
- Google Cloud Platform에 등록한 서비스계정 없다면 아래 순서로 키를 생성합니다.
- GoogleCloud Platform 을 접속합니다
- 서비스 계정 만들기를 클릭합니다
- 서비스 계정 액세스 권한부여에는 [서비스 계정 사용자] 를 선택합니다.
- 완료 버튼을 클릭합니다
- 키 -> 키 추가 -> JSON 형태로 키를 생성합니다
- 생성한 키를 잘 보관합니다.
- 등록된 서비스계정에 권한을 부여할 앱을 선택합니다.
- 액세스권한을 주면 API 키를 활용해 fastlane 배포를 할수 있습니다.
작업하기 전 체크사항읆 모두 진행하였다면, fastlane 으로 배포를 할수 있도록 작업합니다.
프로젝트의 안드로이드 폴더로 이동하여 init을 합니다.
cd my-project/android
fastlane init- app/bundle.gradle 에 있는 package name을 입력합니다.
- metadata 셋팅은 google play console 파일을 아직 등록하지 않아 스킵
fastlane 폴더가 생성되고 Appfile과 Fastfile이 생긴것을 확인할수 있습니다.
Appfile
fastlane이 사용할 정보들을 입력합니다. 예를들면 애플ID, bundle identifier를 넣을수 있습니다.
Fastfile
fastlane의 action을 정의합니다.
아까 설치했던 구글클라우드 플랫폼 API 키를 android 폴더에 옮겨줍니다.
deploy lane에 대한 예지 fastfile 입니다.
 desc "Submit a new Beta Build to Play Store"
  lane :beta do
    store_password = prompt(text: "Signing Store Password: ", secure_text: true)
    key_password = prompt(text: "Alias Key Password: ", secure_text: true)
    releaseFilePath = File.join(Dir.pwd, "..", "my-release-key.keystore")
    gradle(task: 'clean')
    gradle(
      task: 'assemble',
      build_type: 'Release',
      print_command: false,
      properties: {
        "android.injected.signing.store.file" => releaseFilePath,
        "android.injected.signing.store.password" => store_password,
        "android.injected.signing.key.alias" => "my-key-alias",
        "android.injected.signing.key.password" => key_password,
      }
    )
    upload_to_play_store(
      track: 'internal'
    )
lane 은 어떤 action을 실행할지에 관한 분기문입니다.
prompt 에서 입력을 받습니다 (store_password, key_password)
android 폴더에 인증키 경로를 가져옵니다.
- gradle(task: clean)
gradle의 clean명령을 실행합니다. 빌드에 있는 것들을 제거합니다.
- gradle( task: asemble, build_type: Release, properties: { ... })
asembleRelease 빌드를 수행합니다.
properties에는 빌드에 필요한 정보들을 입력합니다.
오류 케이스
APKs are not allowed for this application.
APK로 빌드하여 올리는 문제로, aab파일로 빌드하면 된다.
assemble을 bundle로 바꿔주면 aab파일로 빌드된다.
Google Api Error: Invalid request - Only releases with status draft may be created on draft app.
바로 업로드하여 배포가 안되므로 release_status를 draft로 설정해줍니다.
draft로 설정을 할경우 play store console에서 직접 배포를 해주어야 하나, 바로 배포되는것보단 더 안전할것 같습니다.
위의 작업으로 끝낼경우 android stuido를 열어서 매번 빌드하기전 빌드버전코드를 수정해줘야하는 번거로움이 있다.
https://www.runway.team/blog/how-to-build-the-perfect-fastlane-pipeline-for-android
이 블로그를 참고해 increment_version_code 라는 fastlane plugin을 설치했다.
fastlane add_plugin increment_version_codeFastFile에 버전을 하나 증가시키는 코드를 빌드하는 라인 전에 추가한다.
 increment_version_code(
       gradle_file_path: "./app/build.gradle",
 )
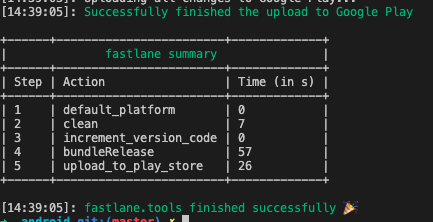
아래처럼 성공적으로 업로드를 할수이는걸 볼수있다.

