Ollama 캐릭터는 다시 봐도 넘 귀엽다...
시작하기 전에 확실히 할 부분은, RAG 구현에 있어서 LangChain을 반드시 사용하진 않아도 된다는 것이다. 앞서 실습에서 Ollama와 ChromaDB를 통해 간단하게 구현했듯 각각의 모델들을 불러와서 사용해도 된다. 다만 LangChain을 사용하면 좀 더 많은 모듈들을 쉽게 결합하고 확장할 수 있으며, 사용하기 편리하다는 장점이 있다. 예를 들어 구현한 모델을 바로 웹에서 사용하려면 Streamlit이나 Chainlit같은 패키지를 붙이면 된다. 한마디로 개발이 더 쉽고 편해서 쓰는거다.
본 실습은 Ollama GitHub Tutorial과 LangChain Ollama 문서의 코드를 사용하며, 글 하단에 남긴 각종 블로그 및 포스트를 참고하여 진행하였다.
설치 및 기본 실행
pip install ollama
pip install chromadb
pip install langchain
우선 필요한 모듈들을 전부 설치한다.
## 1. 기본 채팅
from langchain_community.llms import Ollama

llm = Ollama(model="llama2")
llm.invoke("Tell me a joke")
model에 본인이 설치한 Ollama model 중에서 사용하고자 하는 것을 입력하고 llm.invoke뒤에 바로 input prompt를 작성하면 된다. vanilla Ollama로 했을 때보다 코드가 짧아진 것을 확인할 수 있다. 기본 채팅은 invoke로 실행하는데, invoke없이 냥 llm만 써주면 뒷 문장을 완성시켜주는 것 같다.
## 2. 문장 완성하기
llm = Ollama(model="mistral")
llm("The first man on the summit of Mount Everest, the highest peak on Earth, was ...")
위 코드를 실행하면 이렇게 전체 문장을 완성한 결과를 출력해준다.
>> The first person to reach the summit of Mount Everest was Sir Edmund Hillary from New Zealand and Tenzing Norgay, a Sherpa from Nepal. They reached the summit on May 29, 1953. However, there's a misconception that only Sir Edmund Hillary reached the summit, but Tenzing Norgay was an integral part of the team that made this historic achievement possible.## 3. 실시간 답변 출력하기
from langchain.callbacks.manager import CallbackManager
from langchain.callbacks.streaming_stdout import StreamingStdOutCallbackHandler
llm = Ollama(
model="mistral", callback_manager=CallbackManager([StreamingStdOutCallbackHandler()])
)
llm("The first man on the summit of Mount Everest, the highest peak on Earth, was ...")LangChain의 StreamingStdOutCallbackHandler를 사용하면 실시간으로 생성되는 답변을 볼 수 있다.
문서 임베딩 + 검색(with ChromaDB)
다음으로 문서를 임베딩하고, ChromaDB에 저장하며, 다시 검색하서 답변을 생성하는 (이전 실습과 동일한 메커니즘) 실습을 LangChain을 활용해서 진행해보겠다.
from langchain.document_loaders import WebBaseLoader
loader = WebBaseLoader("https://www.gutenberg.org/files/1727/1727-h/1727-h.htm")
data = loader.load()
임베딩하는 문서는 LangChain에서 기본적으로 제공하고 있는 '오디세이' 소설 데이터를 사용하였다. 영어문서이고 양이 상당하다.
from langchain.text_splitter import RecursiveCharacterTextSplitter

text_splitter=RecursiveCharacterTextSplitter(chunk_size=500, chunk_overlap=0)
all_splits = text_splitter.split_documents(data)
Vamilla Ollama와 ChromaDB를 썼을 때와의 차이점은 chunk 단위를 조정한다는 것이다. 이전에는 한 문장을 하나의 chunk로 넣었다면 여기서는 이 한 묶음의 사이즈를 직접 조정하고, overlap되는 수준도 정할 수 있다. overlap을 많이 하면 할 수록 여러번 embedding되는 것이기 때문에 성능이 좋아질 수도, overfitting될 수도 있으므로 적절한 수준을 잘 찾아야 한다. (LangChain의 Textsplit와 관련된 자세한 내용은 이 문서에서 확인할 수 있다) 이 실습에서는 chunk_size를 500으로, overlap을 0으로 진행했는데, 공식 문서 하단에 overlap을 20으로 했을 때 성능이 더 좋았다고 언급한다.
from langchain.embeddings import OllamaEmbeddings
from langchain.vectorstores import Chroma
oembed = OllamaEmbeddings(base_url="http://localhost:11434", model="mistral")
vectorstore = Chroma.from_documents(documents=all_splits, embedding=oembed)
이후 chunk단위로 embedding 한 vector를 ChromaDB에 저장한다. embedding model은 mistral을 사용했다. 이 과정에서 시간이 약 40분 정도로 상당히 오래 걸렸는데, 아무래도 데이터 양이 많아서 임베딩 하는 데만 해도 오래걸렸을 것이라 생각한다. 한편으로는, 이정도 양도 로컬에서 런타임 안끊기고 돌아가서 신기했다. 추후에 최대로 돌아가는 양을 확인해볼 필요가 있다.
question="What's the name of main character?"
docs = vectorstore.similarity_search(question)
print(len(docs))
print(docs)
DB에 저장이 끝나면 질문을 하고 답변이 있는 chunk부분을 가져올 수 있다. docs를 출력하면 다음과 같이 4개의 chunk를 가져온 결과를 볼 수 있다.
>> Document(page_content='beach till daybreak.', metadata={'language': 'en', 'source': 'https://www.gutenberg.org/files/1727/1727-h/1727-h.htm', 'title': 'The Project Gutenberg eBook of The Odyssey, by Homer'}),
>> Document(page_content='to try and drive him out of his own house.', metadata={'language': 'en', 'source': 'https://www.gutenberg.org/files/1727/1727-h/1727-h.htm', 'title': 'The Project Gutenberg eBook of The Odyssey, by Homer'}),
>> Document(page_content='like a shield on the horizon.', metadata={'language': 'en', 'source': 'https://www.gutenberg.org/files/1727/1727-h/1727-h.htm', 'title': 'The Project Gutenberg eBook of The Odyssey, by Homer'}),
>> Document(page_content='stature and prowess.', metadata={'language': 'en', 'source': 'https://www.gutenberg.org/files/1727/1727-h/1727-h.htm', 'title': 'The Project Gutenberg eBook of The Odyssey, by Homer'})
from langchain.llms import Ollama
from langchain.chains import RetrievalQA
ollama = Ollama(base_url='http://localhost:11434', model="gemma")
qachain=RetrievalQA.from_chain_type(ollama, retriever=vectorstore.as_retriever())
qachain.invoke({"query": question})
이 결과를 기반으로 LangChain RetrievalQA를 통해 답변을 생성하면 된다. 위에서 선언한 llm을 넣어주고 (model은 llama2) 실행하면 다음과 같은 답변이 출력된다.
{'query': "What's the name of main character?",
'result': 'Based on the context provided, I believe the name of the main character is "he".'}
주인공의 이름이 he 라구... overlap을 높이고 chunk size를 조절하면 결과는 달라질테지만 embedding하는 시간이 넘 기니까 테스트는 여기까지만 하겠다.
vanilla Ollama와 ChromaDB와 똑같은 프로세스로 진행했지만, 이전에는 뭔가 좀 더 날것(?)의 코드였다면, LangChain에서는 이미 존재하는 여러 라이브러리와 모듈들을 사용해서 쫌더 정제된 코드를 생성할 수 있었다.
Multi-modal
Ollama에서 지원하는 model 중에는 multi-model 모델도 존재한다. bakllava와 llava가 있는데 성능 비교를 위해 둘 다 테스트 해보았다. 이때 multi-modal을 지원한다는 것을 처음에는 image generate도 되나? 생각했지만, 아직 그건 안되고 이미지를 가져와서 이미지에 대한 이해를 기반으로 prompt-answer 기능이 된다는 의미였다. 코드는 [LangChain Ollama]에서 가져왔다.
ollama.pull('llava')
ollama.pull('bakllava')
from langchain_community.llms import Ollama
llava = Ollama(model="llava")
bakllava = Ollama(model="bakllava")두 모델을 모두 가져오고 LangChain을 통해서 선언한다.
import base64
from io import BytesIO

from IPython.display import HTML, display
from PIL import Image


def convert_to_base64(pil_image):
    """
    Convert PIL images to Base64 encoded strings

    :param pil_image: PIL image
    :return: Re-sized Base64 string
    """

    buffered = BytesIO()
    pil_image.save(buffered, format="JPEG")  # You can change the format if needed
    img_str = base64.b64encode(buffered.getvalue()).decode("utf-8")
    return img_str


def plt_img_base64(img_base64):
    """
    Display base64 encoded string as image

    :param img_base64:  Base64 string
    """
    # Create an HTML img tag with the base64 string as the source
    image_html = f'<img src="data:image/jpeg;base64,{img_base64}" />'
    # Display the image by rendering the HTML
    display(HTML(image_html))


file_path = "pets_sample_img.jpg"
pil_image = Image.open(file_path)
image_b64 = convert_to_base64(pil_image)
plt_img_base64(image_b64)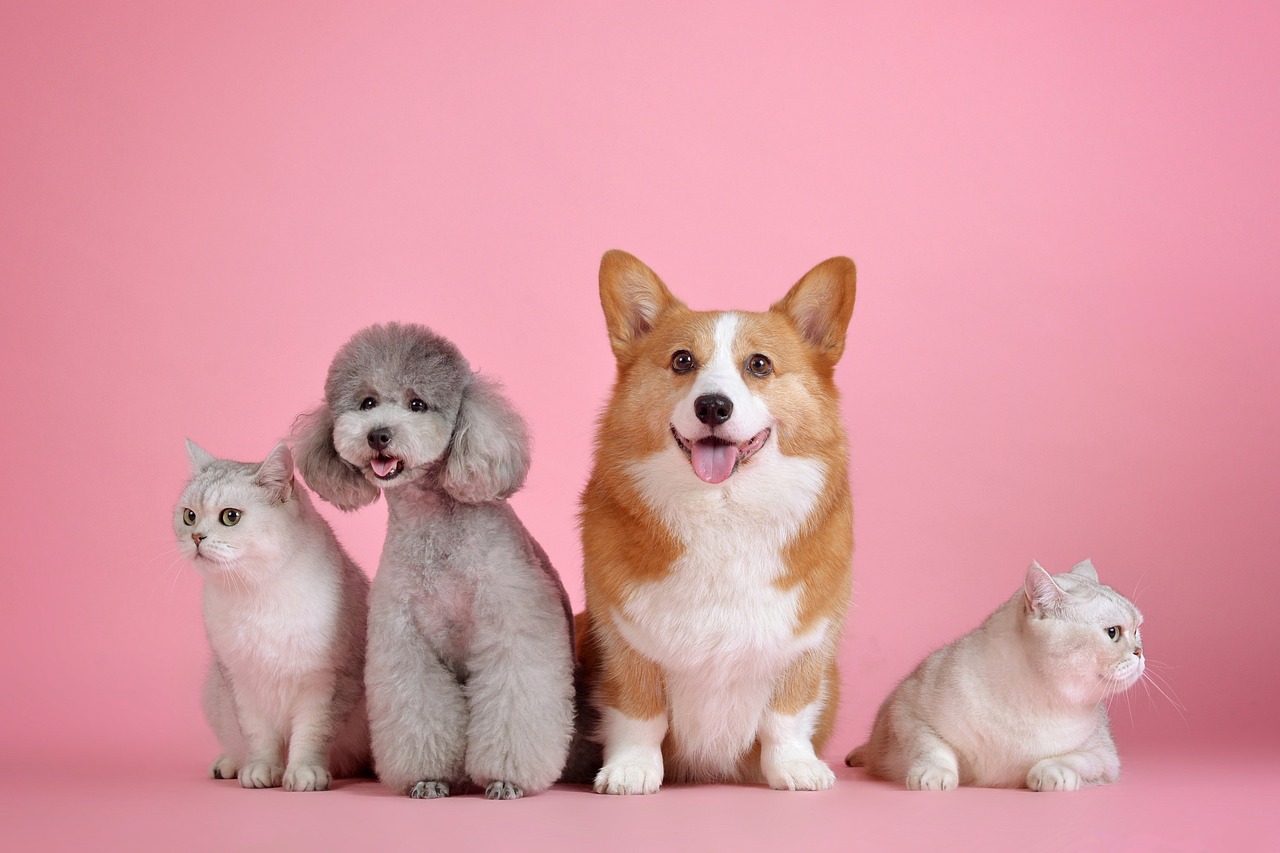
이미지는 pixabay에서 최대한 단순한 무료 이미지를 가져왔다.
llm_with_image_context = llava.bind(images=[image_b64])

llm_with_image_context.invoke("How many pets are in the image?")
llm_with_image_context.invoke("How many cats are in the image?")
llm_with_image_context.invoke("How many dogs are in the image?")
세 가지의 질문을 각각 llava와 bakllava에게 했을 때 다음과 같은 답변을 출력했다.
## llava
>> There are three pets in the image: a dog, two cats.
>> There are two cats in the image.
>> There are three dogs in the image.

## bakllava
>> 3
>> 2
>> 2
둘 다 이미지를 제대로 이해하지 못한 것 같다. bakllava는 굉장히 심플(?)하게 답변을 해서 놀랐다. (ㅋㅋㅋ) YOLO와 같이 image detection에 특화된 모델을 사용하면 성능이 어떻게 나올지도 궁금했다.
.
.
.
추후에 더 해봐야 할 작업들은 이 정도가 있을 것 같다.
1. 한국어는 어느 정도 성능이 나올지?
2. 한국어로 fine-tuning된 모델 (HuggingFace에서 가져오는?)의 성능이 multi-language 모델보다 나을지?
3. Multi-modal 모델을 사용할 수 있는 최적화된 이미지는?
참고자료