What is BERT?
BERT (introduced in this paper) stands for Bidirectional Encoder Representations from Transformers.
- Bidirectional - to understand the text you're looking you'll have to look back (at the previous words) and forward (at the next words)
- Transformers - The Attention Is All You Need paper presented the Transformer model. The Transformer reads entire sequences of tokens at once. The attention mechanism allows for learning contextual relations between words (e.g.
hisin a sentence refers to Jim). - (Pre-trained) contextualized word embeddings - The ELMO paper introduced a way to encode words based on their context. Nails has multiple meanings - fingernails and metal nails.
BERT was trained by masking 15% of the tokens with the goal to guess them. An additional objective was to predict the next sentence. Let's look at examples of these tasks:
Masked Language Modeling (Masked LM)
The objective of this task is to guess the masked tokens. Let's look at an example, and try to not make it harder than it has to be:
That's [mask] she [mask] -> That's what she said
Next Sentence Prediction (NSP)
Given a pair of two sentences, the task is to say whether or not the second follows the first (binary classification). Let's continue with the example:
Input = [CLS] That's [MASK] she [MASK]. [SEP] Hahaha, nice! [SEP]
Label = IsNext
Input = [CLS] That's [MASK] she [MASK]. [SEP] Dwight, you ignorant [MASK]! [SEP]
Label = NotNext
The training corpus was comprised of two entries: Toronto Book Corpus (800M words) and English Wikipedia (2,500M words). While the original Transformer has an encoder (for reading the input) and a decoder (that makes the prediction), BERT uses only the encoder.
BERT is simply a pre-trained stack of Transformer Encoders. How many Encoders? We have two versions - with 12 (BERT base) and 24 (BERT Large).
Is This Thing Useful in Practice?
The BERT paper was released along with the source code and pre-trained models.
The best part is that you can do Transfer Learning (thanks to the ideas from OpenAI Transformer) with BERT for many NLP tasks - Classification, Question Answering, Entity Recognition, etc. You can train with small amounts of data and achieve great performance!
Contents
- Sentiment Analysis with BERT: I'll show you the fine-tuning process using the Huggingface package.
1. Sentiment Analysis with BERT
In this section, you'll learn how to fine-tune BERT for sentiment analysis. You'll do the required text preprocessing (special tokens, padding, and attention masks) and build a Sentiment Classifier using the Transformers library by Hugging Face!
You'll learn how to:
- Intuitively understand what BERT is
- Preprocess text data for BERT and build PyTorch Dataset (tokenization, attention masks, and padding)
- Use Transfer Learning to build Sentiment Classifier using the Transformers library by Hugging Face
- Evaluate the model on test data
- Predict sentiment on raw text
Setup
We'll need the Transformers library by Hugging Face:
!pip install transformersLooking in indexes: https://pypi.org/simple, https://us-python.pkg.dev/colab-wheels/public/simple/
Collecting transformers
Downloading transformers-4.27.3-py3-none-any.whl (6.8 MB)
[2K [90m━━━━━━━━━━━━━━━━━━━━━━━━━━━━━━━━━━━━━━━━[0m [32m6.8/6.8 MB[0m [31m45.0 MB/s[0m eta [36m0:00:00[0m
[?25hCollecting huggingface-hub<1.0,>=0.11.0
Downloading huggingface_hub-0.13.3-py3-none-any.whl (199 kB)
[2K [90m━━━━━━━━━━━━━━━━━━━━━━━━━━━━━━━━━━━━━━[0m [32m199.8/199.8 KB[0m [31m18.5 MB/s[0m eta [36m0:00:00[0m
[?25hRequirement already satisfied: packaging>=20.0 in /usr/local/lib/python3.9/dist-packages (from transformers) (23.0)
Requirement already satisfied: pyyaml>=5.1 in /usr/local/lib/python3.9/dist-packages (from transformers) (6.0)
Requirement already satisfied: regex!=2019.12.17 in /usr/local/lib/python3.9/dist-packages (from transformers) (2022.10.31)
Requirement already satisfied: filelock in /usr/local/lib/python3.9/dist-packages (from transformers) (3.10.1)
Requirement already satisfied: requests in /usr/local/lib/python3.9/dist-packages (from transformers) (2.27.1)
Collecting tokenizers!=0.11.3,<0.14,>=0.11.1
Downloading tokenizers-0.13.2-cp39-cp39-manylinux_2_17_x86_64.manylinux2014_x86_64.whl (7.6 MB)
[2K [90m━━━━━━━━━━━━━━━━━━━━━━━━━━━━━━━━━━━━━━━━[0m [32m7.6/7.6 MB[0m [31m70.0 MB/s[0m eta [36m0:00:00[0m
[?25hRequirement already satisfied: numpy>=1.17 in /usr/local/lib/python3.9/dist-packages (from transformers) (1.22.4)
Requirement already satisfied: tqdm>=4.27 in /usr/local/lib/python3.9/dist-packages (from transformers) (4.65.0)
Requirement already satisfied: typing-extensions>=3.7.4.3 in /usr/local/lib/python3.9/dist-packages (from huggingface-hub<1.0,>=0.11.0->transformers) (4.5.0)
Requirement already satisfied: idna<4,>=2.5 in /usr/local/lib/python3.9/dist-packages (from requests->transformers) (3.4)
Requirement already satisfied: certifi>=2017.4.17 in /usr/local/lib/python3.9/dist-packages (from requests->transformers) (2022.12.7)
Requirement already satisfied: urllib3<1.27,>=1.21.1 in /usr/local/lib/python3.9/dist-packages (from requests->transformers) (1.26.15)
Requirement already satisfied: charset-normalizer~=2.0.0 in /usr/local/lib/python3.9/dist-packages (from requests->transformers) (2.0.12)
Installing collected packages: tokenizers, huggingface-hub, transformers
Successfully installed huggingface-hub-0.13.3 tokenizers-0.13.2 transformers-4.27.3#Setup & Config
import transformers
from transformers import BertModel, BertTokenizer, AdamW, get_linear_schedule_with_warmup
import torch
import numpy as np
import pandas as pd
import seaborn as sns
from pylab import rcParams
import matplotlib.pyplot as plt
from matplotlib import rc
from sklearn.model_selection import train_test_split
from sklearn.metrics import confusion_matrix, classification_report
from collections import defaultdict
from textwrap import wrap
from torch import nn, optim
from torch.utils.data import Dataset, DataLoader
import torch.nn.functional as F
import warnings
warnings.filterwarnings(action='ignore')
%matplotlib inline
%config InlineBackend.figure_format='retina'
sns.set(style='whitegrid', palette='muted', font_scale=1.2)
HAPPY_COLORS_PALETTE = ["#01BEFE", "#FFDD00", "#FF7D00", "#FF006D", "#ADFF02", "#8F00FF"]
sns.set_palette(sns.color_palette(HAPPY_COLORS_PALETTE))
rcParams['figure.figsize'] = 12, 8
RANDOM_SEED = 42
np.random.seed(RANDOM_SEED)
torch.manual_seed(RANDOM_SEED)
device = torch.device("cuda:0" if torch.cuda.is_available() else "cpu")
devicedevice(type='cuda', index=0)Data Exploration
We'll load the Google Play app reviews dataset, that we've put together in the previous part:
여기서는 content와 score만 사용한다.
!wget https://www.dropbox.com/s/kt16vthpeyddscz/reviews.csv
df = pd.read_csv("reviews.csv")
df.head()
--2023-03-26 04:56:30-- https://www.dropbox.com/s/kt16vthpeyddscz/reviews.csv
Resolving www.dropbox.com (www.dropbox.com)... 162.125.3.18, 2620:100:6018:18::a27d:312
Connecting to www.dropbox.com (www.dropbox.com)|162.125.3.18|:443... connected.
HTTP request sent, awaiting response... 302 Found
Location: /s/raw/kt16vthpeyddscz/reviews.csv [following]
--2023-03-26 04:56:30-- https://www.dropbox.com/s/raw/kt16vthpeyddscz/reviews.csv
Reusing existing connection to www.dropbox.com:443.
HTTP request sent, awaiting response... 302 Found
Location: https://uc7f5561769dd872da79fb70a65a.dl.dropboxusercontent.com/cd/0/inline/B48BFTloPiiswBOSrfTXsQb1YcFbut_lGWQSvzypBKoq8iqubgiT4dFtYvzgUx91uEZKSIBJZq6r-f9aCQbkVfjpbPak9J-6eXABigslDeoFQCFNkjzuZWsPmi6QLnHG9HdBbW6s3l06TY2Sbkfifuhldytrb2sC4PlTjmk6UhRjsw/file# [following]
--2023-03-26 04:56:30-- https://uc7f5561769dd872da79fb70a65a.dl.dropboxusercontent.com/cd/0/inline/B48BFTloPiiswBOSrfTXsQb1YcFbut_lGWQSvzypBKoq8iqubgiT4dFtYvzgUx91uEZKSIBJZq6r-f9aCQbkVfjpbPak9J-6eXABigslDeoFQCFNkjzuZWsPmi6QLnHG9HdBbW6s3l06TY2Sbkfifuhldytrb2sC4PlTjmk6UhRjsw/file
Resolving uc7f5561769dd872da79fb70a65a.dl.dropboxusercontent.com (uc7f5561769dd872da79fb70a65a.dl.dropboxusercontent.com)... 162.125.64.15, 2620:100:601b:15::a27d:80f
Connecting to uc7f5561769dd872da79fb70a65a.dl.dropboxusercontent.com (uc7f5561769dd872da79fb70a65a.dl.dropboxusercontent.com)|162.125.64.15|:443... connected.
HTTP request sent, awaiting response... 200 OK
Length: 6451055 (6.2M) [text/plain]
Saving to: ‘reviews.csv’
reviews.csv 100%[===================>] 6.15M 5.83MB/s in 1.1s
2023-03-26 04:56:32 (5.83 MB/s) - ‘reviews.csv’ saved [6451055/6451055]| reviewId | userName | userImage | content | score | thumbsUpCount | reviewCreatedVersion | at | replyContent | repliedAt | sortOrder | appId | |
|---|---|---|---|---|---|---|---|---|---|---|---|---|
| 0 | gp:AOqpTOEhZuqSqqWnaKRgv-9ABYdajFUB0WugPGh-SG-... | Eric Tie | https://play-lh.googleusercontent.com/a-/AOh14... | I cannot open the app anymore | 1 | 0 | 5.4.0.6 | 2020-10-27 21:24:41 | NaN | NaN | newest | com.anydo |
| 1 | gp:AOqpTOH0WP4IQKBZ2LrdNmFy_YmpPCVrV3diEU9KGm3... | john alpha | https://play-lh.googleusercontent.com/a-/AOh14... | I have been begging for a refund from this app... | 1 | 0 | NaN | 2020-10-27 14:03:28 | Please note that from checking our records, yo... | 2020-10-27 15:05:52 | newest | com.anydo |
| 2 | gp:AOqpTOEMCkJB8Iq1p-r9dPwnSYadA5BkPWTf32Z1azu... | Sudhakar .S | https://play-lh.googleusercontent.com/a-/AOh14... | Very costly for the premium version (approx In... | 1 | 0 | NaN | 2020-10-27 08:18:40 | NaN | NaN | newest | com.anydo |
| 3 | gp:AOqpTOGFrUWuKGycpje8kszj3uwHN6tU_fd4gLVFy9z... | SKGflorida@bellsouth.net DAVID S | https://play-lh.googleusercontent.com/-75aK0WF... | Used to keep me organized, but all the 2020 UP... | 1 | 0 | NaN | 2020-10-26 13:28:07 | What do you find troublesome about the update?... | 2020-10-26 14:58:29 | newest | com.anydo |
| 4 | gp:AOqpTOHls7DW8wmDFzTkHwxuqFkdNQtKHmO6Pt9jhZE... | Louann Stoker | https://play-lh.googleusercontent.com/-pBcY_Z-... | Dan Birthday Oct 28 | 1 | 0 | 5.6.0.7 | 2020-10-26 06:10:50 | NaN | NaN | newest | com.anydo |
<svg xmlns="http://www.w3.org/2000/svg" height="24px"viewBox="0 0 24 24"
width="24px">
  <script>
    const buttonEl =
      document.querySelector('#df-aafedc8e-a81b-4f10-a512-6450e2f3a1c2 button.colab-df-convert');
    buttonEl.style.display =
      google.colab.kernel.accessAllowed ? 'block' : 'none';

    async function convertToInteractive(key) {
      const element = document.querySelector('#df-aafedc8e-a81b-4f10-a512-6450e2f3a1c2');
      const dataTable =
        await google.colab.kernel.invokeFunction('convertToInteractive',
                                                 [key], {});
      if (!dataTable) return;

      const docLinkHtml = 'Like what you see? Visit the ' +
        '<a target="_blank" href=https://colab.research.google.com/notebooks/data_table.ipynb>data table notebook</a>'
        + ' to learn more about interactive tables.';
      element.innerHTML = '';
      dataTable['output_type'] = 'display_data';
      await google.colab.output.renderOutput(dataTable, element);
      const docLink = document.createElement('div');
      docLink.innerHTML = docLinkHtml;
      element.appendChild(docLink);
    }
  </script>
</div>df.shape(12495, 12)df.info()<class 'pandas.core.frame.DataFrame'>
RangeIndex: 12495 entries, 0 to 12494
Data columns (total 12 columns):
# Column Non-Null Count Dtype
--- ------ -------------- -----
0 reviewId 12495 non-null object
1 userName 12495 non-null object
2 userImage 12495 non-null object
3 content 12495 non-null object
4 score 12495 non-null int64
5 thumbsUpCount 12495 non-null int64
6 reviewCreatedVersion 10333 non-null object
7 at 12495 non-null object
8 replyContent 5818 non-null object
9 repliedAt 5818 non-null object
10 sortOrder 12495 non-null object
11 appId 12495 non-null object
dtypes: int64(2), object(10)
memory usage: 1.1+ MBsns.countplot(x=df["score"])
plt.xlabel('review score');
We're going to convert the dataset into negative, neutral and positive sentiment:
def to_sentiment(rating):
  rating = int(rating)
  if rating <= 2:
    return 0
  elif rating == 3:
    return 1
  else:
    return 2

df['sentiment'] = df.score.apply(to_sentiment)
class_names = ['negative', 'neutral', 'positive']ax = sns.countplot(x=df["sentiment"])
plt.xlabel('review sentiment')
ax.set_xticklabels(class_names);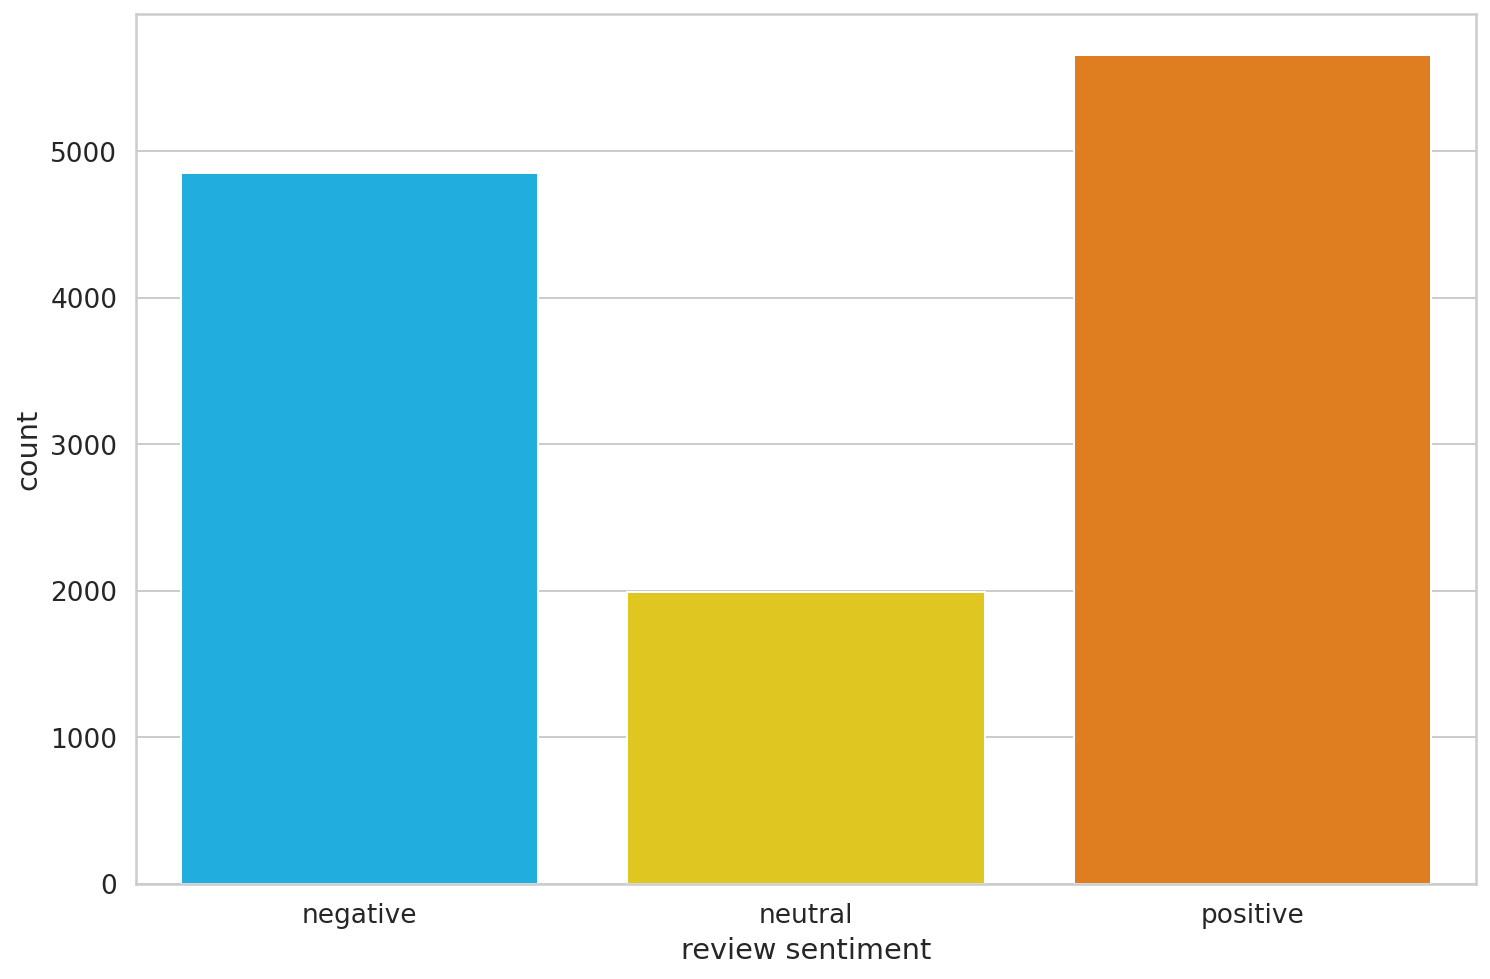
The balance was (mostly) restored!
Data Preprocessing
You might already know that Machine Learning models don't work with raw text. You need to convert text to numbers (of some sort). BERT requires even more attention. Here are the requirements:
- Add special tokens to separate sentences and do classification
- Pass sequences of constant length (introduce padding)
- Create array of 0s (pad token) and 1s (real token) called attention mask
The Transformers library provides a wide variety of Transformer models (including BERT).
PRE_TRAINED_MODEL_NAME = 'bert-base-cased' #"bert-base-uncased"# cased : ["A"] and ["a"] is differently recognized
# uncased : ["A"] and ["a"] is same for the modelYou can use a cased and uncased version of BERT and tokenizer. In this task, the cased version works better. Intuitively, that makes sense, since "BAD" might convey more sentiment than "bad".
Let's load a pre-trained BertTokenizer:
tokenizer = BertTokenizer.from_pretrained(PRE_TRAINED_MODEL_NAME)Downloading (…)solve/main/vocab.txt: 0%| | 0.00/213k [00:00<?, ?B/s]
Downloading (…)okenizer_config.json: 0%| | 0.00/29.0 [00:00<?, ?B/s]
Downloading (…)lve/main/config.json: 0%| | 0.00/570 [00:00<?, ?B/s]We'll use this text to understand the tokenization process:
sample_txt = 'Nice to meet you. How are you?'Some basic operations can convert the text to tokens and tokens to unique integers (ids):
There is two steps to tokenize.
- change the text -> chunks ["nice", "to", "meet"]
- change every subwords to id
tokens = tokenizer.tokenize(sample_txt)
token_ids = tokenizer.convert_tokens_to_ids(tokens)

print(f' Sentence: {sample_txt}')
print(f'   Tokens: {tokens}')
print(f'Token IDs: {token_ids}') # You have to input this to model.
Sentence: Nice to meet you. How are you?
Tokens: ['Nice', 'to', 'meet', 'you', '.', 'How', 'are', 'you', '?']
Token IDs: [8835, 1106, 2283, 1128, 119, 1731, 1132, 1128, 136]# You can just do it by once
tokenizer(sample_txt)
# 이 함수를 쓰면 it automatically put special tokens.{'input_ids': [101, 8835, 1106, 2283, 1128, 119, 1731, 1132, 1128, 136, 102], 'token_type_ids': [0, 0, 0, 0, 0, 0, 0, 0, 0, 0, 0], 'attention_mask': [1, 1, 1, 1, 1, 1, 1, 1, 1, 1, 1]}101 : special token that expains to the model that it is the beginning of the sentence.
102 : special token that expains to the model that it is the end of the sentence.
BERT에서는 항상 이 special token을 이용해야한다.
sample_txt1 = "Hi"
sample_txt2 = "My name is SJ"
tokenizer(sample_txt1, sample_txt2)
{'input_ids': [101, 8790, 102, 1422, 1271, 1110, 156, 4538, 102], 'token_type_ids': [0, 0, 0, 1, 1, 1, 1, 1, 1], 'attention_mask': [1, 1, 1, 1, 1, 1, 1, 1, 1]}Special Tokens
[SEP] - marker for ending of a sentence
tokenizer.sep_token, tokenizer.sep_token_id('[SEP]', 102)[CLS] - we must add this token to the start of each sentence, so BERT knows we're doing classification
tokenizer.cls_token, tokenizer.cls_token_id('[CLS]', 101)There is also a special token for padding:
tokenizer.pad_token, tokenizer.pad_token_id('[PAD]', 0)BERT understands tokens that were in the training set. Everything else can be encoded using the [UNK] (unknown) token:
tokenizer.unk_token, tokenizer.unk_token_id('[UNK]', 100)All of that work can be done using the encode_plus() method:
encoding = tokenizer.encode_plus(
  sample_txt,
  truncation = True, # Length가 다르면 truncate, 다른 option으로 pad가  있다.
  max_length=32, # 32보다 긴 sequence가 들어오면 truncate하여 length를 32로 맞춘다. Hyperparameter
  add_special_tokens=True, # Add '[CLS]' and '[SEP]' or '[PAD]'
  return_token_type_ids=False,
  pad_to_max_length=True, # Length가 20이면 32로 만들기 위해 pad를 12개 넣는다.
  return_attention_mask=True,
  return_tensors='pt',  # Return PyTorch tensors
)

encoding.keys()
# trucation=True
dict_keys(['input_ids', 'attention_mask'])The token ids are now stored in a Tensor and padded to a length of 32:
# pad를 넣어 length를 32로 맞춘다.
print(len(encoding['input_ids'][0]))
encoding['input_ids'][0]
32
tensor([ 101, 8835, 1106, 2283, 1128, 119, 1731, 1132, 1128, 136, 102, 0,
0, 0, 0, 0, 0, 0, 0, 0, 0, 0, 0, 0,
0, 0, 0, 0, 0, 0, 0, 0])The attention mask has the same length:
# You don't have to make attention at padding mask.
print(len(encoding['attention_mask'][0]))
encoding['attention_mask'][0]
32
tensor([1, 1, 1, 1, 1, 1, 1, 1, 1, 1, 1, 0, 0, 0, 0, 0, 0, 0, 0, 0, 0, 0, 0, 0,
0, 0, 0, 0, 0, 0, 0, 0])We can inverse the tokenization to have a look at the special tokens:
tokenizer.convert_ids_to_tokens(encoding['input_ids'][0])['[CLS]',
'Nice',
'to',
'meet',
'you',
'.',
'How',
'are',
'you',
'?',
'[SEP]',
'[PAD]',
'[PAD]',
'[PAD]',
'[PAD]',
'[PAD]',
'[PAD]',
'[PAD]',
'[PAD]',
'[PAD]',
'[PAD]',
'[PAD]',
'[PAD]',
'[PAD]',
'[PAD]',
'[PAD]',
'[PAD]',
'[PAD]',
'[PAD]',
'[PAD]',
'[PAD]',
'[PAD]']Choosing Sequence Length
BERT works with fixed-length sequences. We'll use a simple strategy to choose the max length. Let's store the token length of each review:
token_lens = []

for txt in df.content:
  tokens = tokenizer.encode(txt, truncation = True, max_length=512)
  token_lens.append(len(tokens))
and plot the distribution:
sns.distplot(token_lens)
plt.xlim([0, 256]);
plt.xlabel('Token count');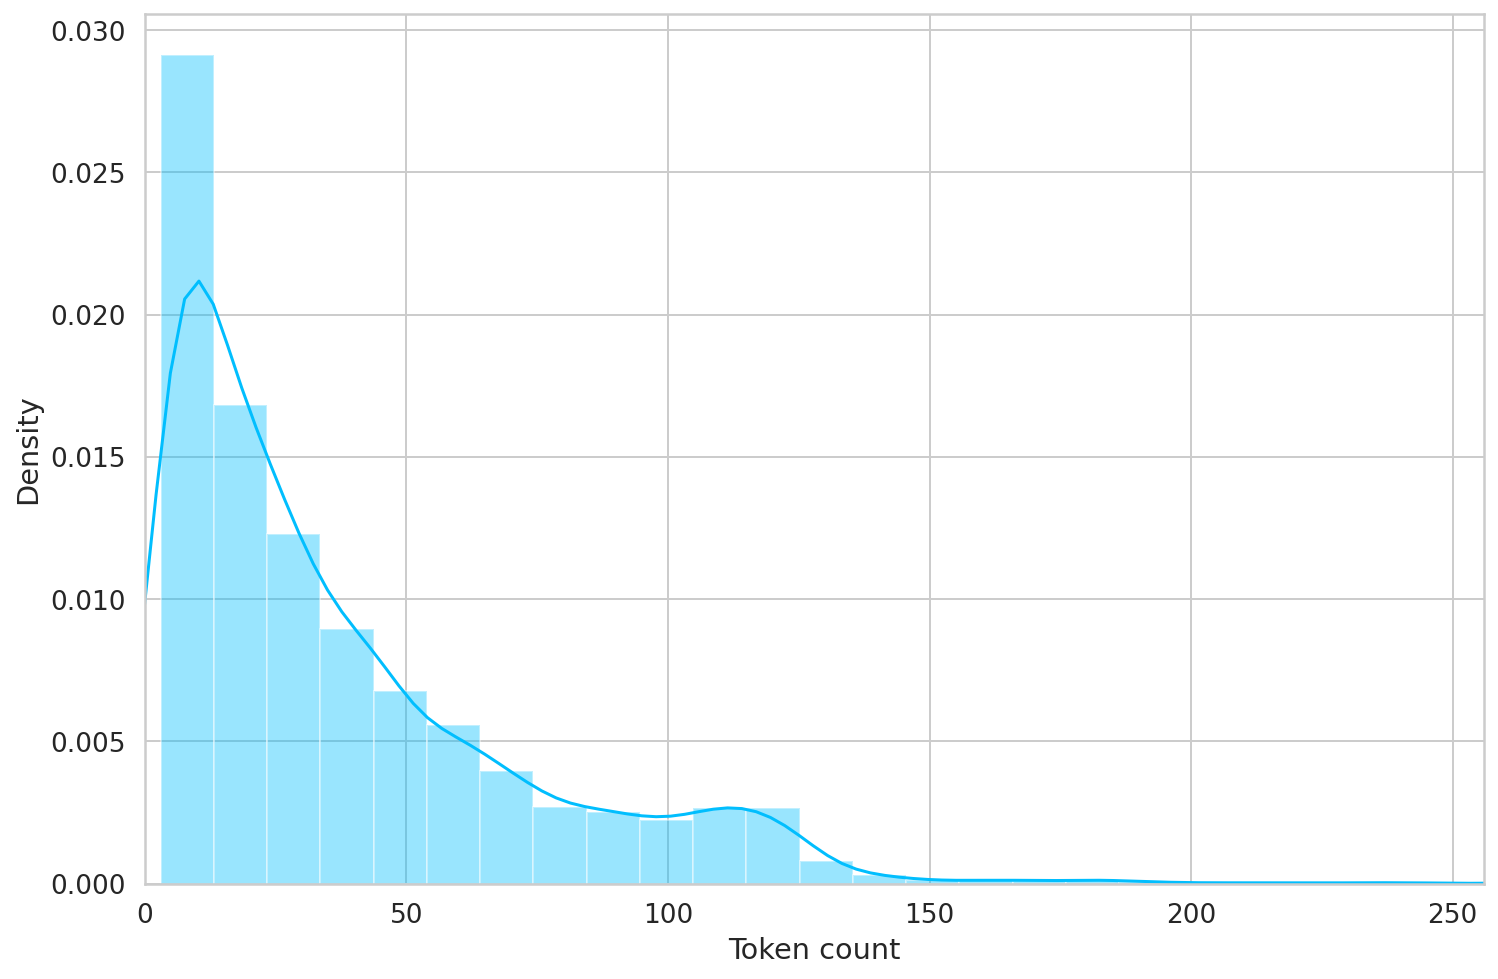
Most of the reviews seem to contain less than 128 tokens, but we'll be on the safe side and choose a maximum length of 160.
MAX_LEN = 160We have all building blocks required to create a PyTorch dataset. Let's do it:
class GPReviewDataset(Dataset):

  def __init__(self, reviews, targets, tokenizer, max_len):
    self.reviews = reviews
    self.targets = targets
    self.tokenizer = tokenizer
    self.max_len = max_len

  def __len__(self):
    return len(self.reviews)

  def __getitem__(self, item):
    review = str(self.reviews[item])
    target = self.targets[item]

    encoding = self.tokenizer.encode_plus(
      review,
      add_special_tokens=True,
      max_length=self.max_len,
      return_token_type_ids=False,
      pad_to_max_length=True,
      return_attention_mask=True,
      return_tensors='pt',
    )

    return {
      'review_text': review,
      'input_ids': encoding['input_ids'].flatten(),               # flatten(): [1, 160] -> [160]
      'attention_mask': encoding['attention_mask'].flatten(),
      'targets': torch.tensor(target, dtype=torch.long)
    }
### For your understanding
ds = GPReviewDataset(
reviews=df.content.to_numpy(), # df.content.to_numpy().shape: (15746,)
targets=df.sentiment.to_numpy(), # df.sentiment.to_numpy().shape: (15746,)
tokenizer=tokenizer,
max_len=160
)ds.__len__()12495ds.__getitem__(0)['review_text']Truncation was not explicitly activated but `max_length` is provided a specific value, please use `truncation=True` to explicitly truncate examples to max length. Defaulting to 'longest_first' truncation strategy. If you encode pairs of sequences (GLUE-style) with the tokenizer you can select this strategy more precisely by providing a specific strategy to `truncation`.
'I cannot open the app anymore'ds.__getitem__(0)['targets']tensor(0)ds.__getitem__(0)['input_ids'] # size(): [160]tensor([ 101, 146, 2834, 1501, 1103, 12647, 4169, 102, 0, 0,
0, 0, 0, 0, 0, 0, 0, 0, 0, 0,
0, 0, 0, 0, 0, 0, 0, 0, 0, 0,
0, 0, 0, 0, 0, 0, 0, 0, 0, 0,
0, 0, 0, 0, 0, 0, 0, 0, 0, 0,
0, 0, 0, 0, 0, 0, 0, 0, 0, 0,
0, 0, 0, 0, 0, 0, 0, 0, 0, 0,
0, 0, 0, 0, 0, 0, 0, 0, 0, 0,
0, 0, 0, 0, 0, 0, 0, 0, 0, 0,
0, 0, 0, 0, 0, 0, 0, 0, 0, 0,
0, 0, 0, 0, 0, 0, 0, 0, 0, 0,
0, 0, 0, 0, 0, 0, 0, 0, 0, 0,
0, 0, 0, 0, 0, 0, 0, 0, 0, 0,
0, 0, 0, 0, 0, 0, 0, 0, 0, 0,
0, 0, 0, 0, 0, 0, 0, 0, 0, 0,
0, 0, 0, 0, 0, 0, 0, 0, 0, 0])ds.__getitem__(0)['attention_mask'] # size(): [160]tensor([1, 1, 1, 1, 1, 1, 1, 1, 0, 0, 0, 0, 0, 0, 0, 0, 0, 0, 0, 0, 0, 0, 0, 0,
0, 0, 0, 0, 0, 0, 0, 0, 0, 0, 0, 0, 0, 0, 0, 0, 0, 0, 0, 0, 0, 0, 0, 0,
0, 0, 0, 0, 0, 0, 0, 0, 0, 0, 0, 0, 0, 0, 0, 0, 0, 0, 0, 0, 0, 0, 0, 0,
0, 0, 0, 0, 0, 0, 0, 0, 0, 0, 0, 0, 0, 0, 0, 0, 0, 0, 0, 0, 0, 0, 0, 0,
0, 0, 0, 0, 0, 0, 0, 0, 0, 0, 0, 0, 0, 0, 0, 0, 0, 0, 0, 0, 0, 0, 0, 0,
0, 0, 0, 0, 0, 0, 0, 0, 0, 0, 0, 0, 0, 0, 0, 0, 0, 0, 0, 0, 0, 0, 0, 0,
0, 0, 0, 0, 0, 0, 0, 0, 0, 0, 0, 0, 0, 0, 0, 0])Let's split the dataset:
df_train, df_test = train_test_split(df, test_size=0.1, random_state=RANDOM_SEED)
df_val, df_test = train_test_split(df_test, test_size=0.5, random_state=RANDOM_SEED)df_train.shape, df_val.shape, df_test.shape((11245, 13), (625, 13), (625, 13))We also need to create a couple of data loaders. Here's a helper function to do it:
def create_data_loader(df, tokenizer, max_len, batch_size):
  ds = GPReviewDataset(
    reviews=df.content.to_numpy(),        # df.content.to_numpy().shape: (15746,)
    targets=df.sentiment.to_numpy(),      # df.sentiment.to_numpy().shape: (15746,)
    tokenizer=tokenizer,
    max_len=max_len
  )

  return DataLoader(ds, batch_size=batch_size, num_workers=4)
BATCH_SIZE = 16
train_data_loader = create_data_loader(df_train, tokenizer, MAX_LEN, BATCH_SIZE)
val_data_loader = create_data_loader(df_val, tokenizer, MAX_LEN, BATCH_SIZE)
test_data_loader = create_data_loader(df_test, tokenizer, MAX_LEN, BATCH_SIZE)Let's have a look at an example batch from our training data loader:
sample_batched = next(iter(train_data_loader))
sample_batched.keys()
dict_keys(['review_text', 'input_ids', 'attention_mask', 'targets'])print(sample_batched['input_ids'].shape)
print(sample_batched['attention_mask'].shape)
print(sample_batched['targets'].shape)torch.Size([16, 160])
torch.Size([16, 160])
torch.Size([16])Sentiment Classification with BERT and Hugging Face
There are a lot of helpers that make using BERT easy with the Transformers library. Depending on the task you might want to use BertForQuestionAnswering or something else.
We'll use the basic BertModel and build our sentiment classifier on top of it. Let's load the model:
bert_model = BertModel.from_pretrained(PRE_TRAINED_MODEL_NAME)Downloading pytorch_model.bin: 0%| | 0.00/436M [00:00<?, ?B/s]
Some weights of the model checkpoint at bert-base-cased were not used when initializing BertModel: ['cls.predictions.transform.dense.weight', 'cls.predictions.decoder.weight', 'cls.seq_relationship.weight', 'cls.seq_relationship.bias', 'cls.predictions.bias', 'cls.predictions.transform.dense.bias', 'cls.predictions.transform.LayerNorm.weight', 'cls.predictions.transform.LayerNorm.bias']
- This IS expected if you are initializing BertModel from the checkpoint of a model trained on another task or with another architecture (e.g. initializing a BertForSequenceClassification model from a BertForPreTraining model).
- This IS NOT expected if you are initializing BertModel from the checkpoint of a model that you expect to be exactly identical (initializing a BertForSequenceClassification model from a BertForSequenceClassification model).And try to use it on the encoding of our sample text:
# pooled_output: last_hidden_state's first token([CLS]) -> nn.Linear(config.hidden_size, config.hidden_size) -> nn.Tanh()
last_hidden_state, pooled_output = bert_model(
  input_ids=encoding['input_ids'],
  attention_mask=encoding['attention_mask'],
  return_dict=False # Whether your output in dictionary format or tuple format
)
The last_hidden_state is a sequence of hidden states of the last layer of the model. Obtaining the pooled_output is done by applying the BertPooler on last_hidden_state:
last_hidden_state.size() # [batch size, seq_len, hidden size]. -> output of all sequencestorch.Size([1, 32, 768])pooled_output.size() # [batch size, hidden size] -> summarize version of sequencestorch.Size([1, 768])We have the hidden state for each of our 32 tokens (the length of our example sequence). But why 768? This is the number of hidden units in the feedforward-networks. We can verify that by checking the config:
bert_model.config.hidden_size768You can think of the pooled_output as a summary of the content, according to BERT.
So, we'll use pooled_output for the sentiment analysis.
We can use all of this knowledge to create a classifier that uses the BERT model:
class SentimentClassifier(nn.Module):

  def __init__(self, n_classes): # 3(negative, neutral, positive)
    super(SentimentClassifier, self).__init__()
    self.bert = BertModel.from_pretrained(PRE_TRAINED_MODEL_NAME)
    self.drop = nn.Dropout(p=0.3)
    self.out = nn.Linear(self.bert.config.hidden_size, n_classes) # 768 -> 3

  # inupt_ids shape : [batch_size, seq len], attention_mask : [bas, seq_len]
  def forward(self, input_ids, attention_mask):

    # pooled_output size : [bs, hidden size : 768]
    _, pooled_output = self.bert(
      input_ids=input_ids,
      attention_mask=attention_mask,
      return_dict=False
    )
    # output [bs, 768]
    output = self.drop(pooled_output)
    # final [bs, 3]
    return self.out(output)
This should work like any other PyTorch model. Let's create an instance and move it to the GPU:
model = SentimentClassifier(len(class_names))       # len(class_names): 3
model = model.to(device)
Some weights of the model checkpoint at bert-base-cased were not used when initializing BertModel: ['cls.predictions.transform.dense.weight', 'cls.predictions.decoder.weight', 'cls.seq_relationship.weight', 'cls.seq_relationship.bias', 'cls.predictions.bias', 'cls.predictions.transform.dense.bias', 'cls.predictions.transform.LayerNorm.weight', 'cls.predictions.transform.LayerNorm.bias']
- This IS expected if you are initializing BertModel from the checkpoint of a model trained on another task or with another architecture (e.g. initializing a BertForSequenceClassification model from a BertForPreTraining model).
- This IS NOT expected if you are initializing BertModel from the checkpoint of a model that you expect to be exactly identical (initializing a BertForSequenceClassification model from a BertForSequenceClassification model).We'll move the example batch of our training data to the GPU:
sample_batched : first trainloader data
input_ids = sample_batched['input_ids'].to(device)
attention_mask = sample_batched['attention_mask'].to(device)

print(input_ids.size()) # (batch size, seq length)
print(attention_mask.size()) # (batch size, seq length)
torch.Size([16, 160])
torch.Size([16, 160])model(input_ids, attention_mask).size()torch.Size([16, 3])To get the predicted probabilities from our trained model, we'll apply the softmax function to the outputs:
F.softmax(model(input_ids, attention_mask), dim=1)tensor([[0.2760, 0.1217, 0.6023],
[0.2006, 0.3834, 0.4161],
[0.2855, 0.4293, 0.2852],
[0.2841, 0.1516, 0.5643],
[0.2012, 0.2806, 0.5182],
[0.3768, 0.1981, 0.4251],
[0.2384, 0.2322, 0.5294],
[0.1960, 0.3460, 0.4580],
[0.1293, 0.3093, 0.5614],
[0.3491, 0.1459, 0.5050],
[0.2676, 0.3425, 0.3898],
[0.3252, 0.3556, 0.3192],
[0.3714, 0.2184, 0.4102],
[0.1565, 0.2902, 0.5532],
[0.3139, 0.2157, 0.4704],
[0.3096, 0.1814, 0.5090]], device='cuda:0', grad_fn=<SoftmaxBackward0>)################################# Doing yourself from here #################################
Training
To reproduce the training procedure from the BERT paper, we'll use the AdamW optimizer provided by Hugging Face. It corrects weight decay, so it's similar to the original paper. We'll also use a linear scheduler with no warmup steps:
EPOCHS = 10

optimizer = AdamW(model.parameters(), lr=2e-5, correct_bias=False)
total_steps = len(train_data_loader) * EPOCHS

scheduler = get_linear_schedule_with_warmup(
  optimizer,
  num_warmup_steps=0,
  num_training_steps=total_steps
)

loss_fn = nn.CrossEntropyLoss().to(device)
How do we come up with all hyperparameters? The BERT authors have some recommendations for fine-tuning:
- Learning rate (Adam): 5e-5, 3e-5, 2e-5
- Number of epochs: 2, 3, 4
We're going to ignore the number of epochs recommendation but stick with the rest.
Let's continue with writing a helper function for training our model for one epoch:
from tqdm import tqdmdef train_epoch(model, data_loader, loss_fn, optimizer, device, scheduler, n_examples):
model = model.train()
losses = []
correct_predictions = 0
for d in tqdm(data_loader):
input_ids = d["input_ids"].to(device)
attention_mask = d["attention_mask"].to(device)
targets = d["targets"].to(device)
outputs = model(
input_ids=input_ids,
attention_mask=attention_mask
)
# outputs.size : [bs,3]
# (max value, max indices)
_, preds = torch.max(outputs, dim=1)
loss = loss_fn(outputs, targets)
correct_predictions += torch.sum(preds == targets)
losses.append(loss.item())
loss.backward()
nn.utils.clip_grad_norm_(model.parameters(), max_norm=1.0)
optimizer.step()
scheduler.step()
optimizer.zero_grad()
return correct_predictions.double() / n_examples, np.mean(losses)We're avoiding exploding gradients by clipping the gradients of the model using clipgrad_norm.
Let's write another one that helps us evaluate the model on a given data loader:
def eval_model(model, data_loader, loss_fn, device, n_examples):
  model = model.eval()

  losses = []
  correct_predictions = 0

  with torch.no_grad():
    for d in data_loader:
      input_ids = d["input_ids"].to(device)
      attention_mask = d["attention_mask"].to(device)
      targets = d["targets"].to(device)

      outputs = model(
        input_ids=input_ids,
        attention_mask=attention_mask
      )
      _, preds = torch.max(outputs, dim=1)

      loss = loss_fn(outputs, targets)

      correct_predictions += torch.sum(preds == targets)
      losses.append(loss.item())

  return correct_predictions.double() / n_examples, np.mean(losses)
Using those two, we can write our training loop. We'll also store the training history:
%%time

history = defaultdict(list)
best_accuracy = 0

for epoch in range(EPOCHS):

  print(f'Epoch {epoch + 1}/{EPOCHS}')
  print('-' * 10)

  train_acc, train_loss = train_epoch(
    model,
    train_data_loader,
    loss_fn,
    optimizer,
    device,
    scheduler,
    len(df_train)
  )

  print(f'Train loss {train_loss} accuracy {train_acc}')

  val_acc, val_loss = eval_model(
    model,
    val_data_loader,
    loss_fn,
    device,
    len(df_val)
  )

  print(f'Val   loss {val_loss} accuracy {val_acc}')
  print()

  history['train_acc'].append(train_acc)
  history['train_loss'].append(train_loss)
  history['val_acc'].append(val_acc)
  history['val_loss'].append(val_loss)

  if val_acc > best_accuracy:
    torch.save(model.state_dict(), 'best_model_state.bin')
    best_accuracy = val_acc
Epoch 1/10
----------
100%|██████████| 703/703 [04:59<00:00, 2.35it/s]
Train loss 0.6832128376786095 accuracy 0.7349933303690529
Val loss 0.6144151780754328 accuracy 0.7792
Epoch 2/10
----------
100%|██████████| 703/703 [05:00<00:00, 2.34it/s]
Train loss 0.5081887244012413 accuracy 0.8016896398399289
Val loss 0.6623971339315176 accuracy 0.752
Epoch 3/10
----------
100%|██████████| 703/703 [05:00<00:00, 2.34it/s]
Train loss 0.36325316916446426 accuracy 0.8676745220097821
Val loss 0.8253826837986707 accuracy 0.7552
Epoch 4/10
----------
100%|██████████| 703/703 [05:00<00:00, 2.34it/s]
Train loss 0.26808875773279567 accuracy 0.911871943085816
Val loss 1.1060538308694958 accuracy 0.736
Epoch 5/10
----------
100%|██████████| 703/703 [05:00<00:00, 2.34it/s]
Train loss 0.19976882993443676 accuracy 0.9414851044908848
Val loss 1.2405602341517805 accuracy 0.7312000000000001
Epoch 6/10
----------
100%|██████████| 703/703 [04:59<00:00, 2.35it/s]
Train loss 0.14366274302017876 accuracy 0.9616718541574033
Val loss 1.5486727885901928 accuracy 0.7216
Epoch 7/10
----------
100%|██████████| 703/703 [05:00<00:00, 2.34it/s]
Train loss 0.11555484184484589 accuracy 0.9699421965317919
Val loss 1.7143308155238628 accuracy 0.7344
Epoch 8/10
----------
100%|██████████| 703/703 [05:00<00:00, 2.34it/s]
Train loss 0.10088874613415784 accuracy 0.9755446865273455
Val loss 1.6809080086648465 accuracy 0.7472000000000001
Epoch 9/10
----------
100%|██████████| 703/703 [05:00<00:00, 2.34it/s]
Train loss 0.08409326554757608 accuracy 0.9798132503334815
Val loss 1.7753508403897285 accuracy 0.7408
Epoch 10/10
----------
100%|██████████| 703/703 [04:59<00:00, 2.35it/s]
Train loss 0.07661894097914959 accuracy 0.9804357492218764
Val loss 1.815287072211504 accuracy 0.728
CPU times: user 33min 45s, sys: 16min 8s, total: 49min 54s
Wall time: 51min 2sNote that we're storing the state of the best model, indicated by the highest validation accuracy.
We can look at the training vs validation accuracy:
history['train_acc'] = [value.cpu() for value in history['train_acc']]
history['val_acc'] = [value.cpu() for value in history['val_acc']]plt.plot(history['train_acc'], label='train accuracy')
plt.plot(history['val_acc'], label='validation accuracy')
plt.title('Training history')
plt.ylabel('Accuracy')
plt.xlabel('Epoch')
plt.legend()
plt.ylim([0, 1]);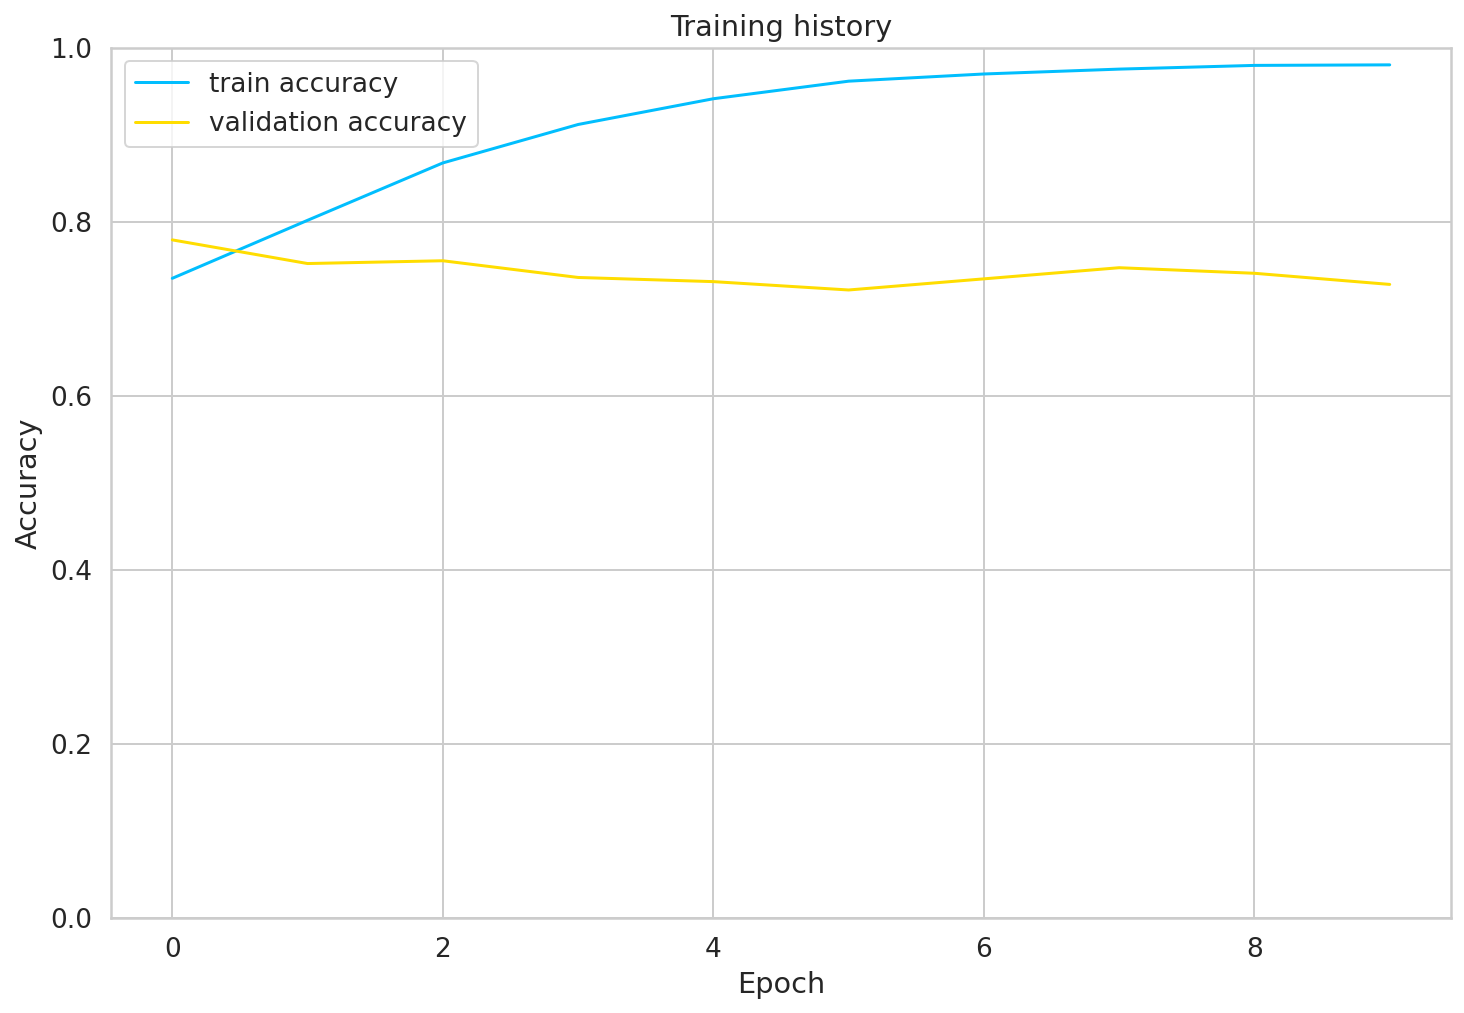
The training accuracy starts to approach 100% after 10 epochs or so. You might try to fine-tune the parameters a bit more, but this will be good enough for us.
Don't want to wait? download my trained model:
Evaluation
Let's start by calculating the accuracy on the test data:
test_acc, _ = eval_model(
  model,
  test_data_loader,
  loss_fn,
  device,
  len(df_test)
)

test_acc.item()0.736Our model seems to generalize well.
We'll define a helper function to get the predictions from our model:
def get_predictions(model, data_loader):
  model = model.eval()

  review_texts = []
  predictions = []
  prediction_probs = []
  real_values = []

  with torch.no_grad():
    for d in data_loader:

      texts = d["review_text"]
      input_ids = d["input_ids"].to(device)
      attention_mask = d["attention_mask"].to(device)
      targets = d["targets"].to(device)

      outputs = model(
        input_ids=input_ids,
        attention_mask=attention_mask
      )
      _, preds = torch.max(outputs, dim=1)

      probs = F.softmax(outputs, dim=1)

      review_texts.extend(texts)
      predictions.extend(preds)
      prediction_probs.extend(probs)
      real_values.extend(targets)

  predictions = torch.stack(predictions).cpu()
  prediction_probs = torch.stack(prediction_probs).cpu()
  real_values = torch.stack(real_values).cpu()
  return review_texts, predictions, prediction_probs, real_values
This is similar to the evaluation function, except that we're storing the text of the reviews and the predicted probabilities (by applying the softmax on the model outputs):
y_review_texts, y_pred, y_pred_probs, y_test = get_predictions(model, test_data_loader)print(classification_report(y_test, y_pred, target_names=class_names)) precision recall f1-score support
negative 0.81 0.78 0.79 242
neutral 0.44 0.41 0.42 125
positive 0.80 0.86 0.83 258
accuracy 0.74 625
macro avg 0.68 0.68 0.68 625
weighted avg 0.73 0.74 0.73 625Looks like it is hard to classify neutral (3 stars) reviews.
We'll continue with the confusion matrix:
def show_confusion_matrix(confusion_matrix):
  hmap = sns.heatmap(confusion_matrix, annot=True, fmt="d", cmap="Blues")
  hmap.yaxis.set_ticklabels(hmap.yaxis.get_ticklabels(), rotation=0, ha='right')
  hmap.xaxis.set_ticklabels(hmap.xaxis.get_ticklabels(), rotation=30, ha='right')
  plt.ylabel('True sentiment')
  plt.xlabel('Predicted sentiment');

cm = confusion_matrix(y_test, y_pred)
df_cm = pd.DataFrame(cm, index=class_names, columns=class_names)
show_confusion_matrix(df_cm)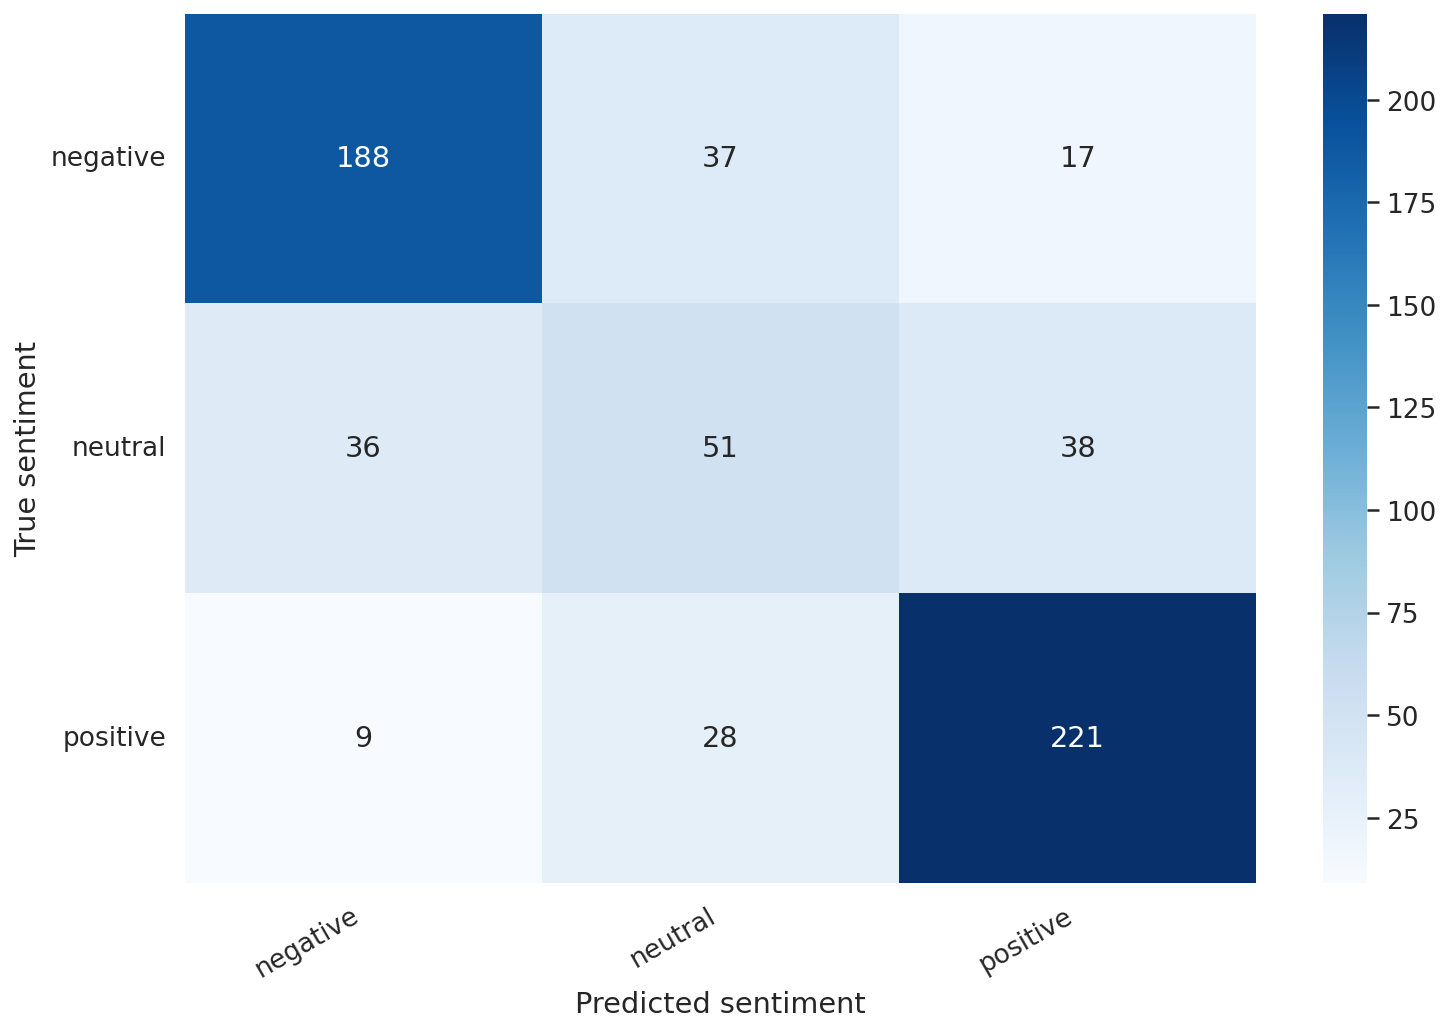
This confirms that our model is having difficulty classifying neutral reviews. It mistakes those for negative and positive at a roughly equal frequency.
Predicting on Raw Text
Let's use our model to predict the sentiment of some raw text:
review_text = "well, not bad"We have to use the tokenizer to encode the text:
encoded_review = tokenizer.encode_plus(
  review_text,
  max_length=MAX_LEN,
  add_special_tokens=True,
  return_token_type_ids=False,
  pad_to_max_length=True,
  return_attention_mask=True,
  return_tensors='pt',
)
Let's get the predictions from our model:
input_ids = encoded_review['input_ids'].to(device)
attention_mask = encoded_review['attention_mask'].to(device)

output = model(input_ids, attention_mask)
_, prediction = torch.max(output, dim=1)

print(f'Review text: {review_text}')
print(f'Sentiment  : {class_names[prediction]}')
Review text: well, not bad
Sentiment : positiveReferences
- Sentiment Analysis with BERT and Transformers by Hugging Face using PyTorch and Python
- BERT: Pre-training of Deep Bidirectional Transformers for Language Understanding
- L11 Language Models - Alec Radford (OpenAI)
- The Illustrated BERT, ELMo, and co.
- BERT Fine-Tuning Tutorial with PyTorch
- How to Fine-Tune BERT for Text Classification?
- Huggingface Transformers
- BERT Explained: State of the art language model for NLP
- BERT implementation
Reference
- AI504: Programming for AI Lecture at KAIST AI