1. 사전 작업
- 로그인을 요청할 때 나의 증명을 구글이나 네이버 같은 다른 사이트에서 대신 해주는 것이다. 그 과정에서 해당 사이트에 등록된 정보들을 넘겨준다
https://velog.io/@max9106/OAuth2 에서 참고할 것
spring:
  security:
    oauth2:
      client:
        registration:
          google:
            client-id: 206953837148-dm9jtkhr2t78ieem4co1a3qrgo166bk0.apps.googleusercontent.com
            // restApiKey
            client-secret: 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
            scope:  // 구글에 요청하는 유저정보
              -profile
              -email
1-1 개념
-
Resource Owner
▪ 웹 서비스를 이용하려는 유저, 자원(개인정보)을 사용자 -
Resource Server
▪ (Google, Facebook, Kakao 등) 회사 서버
▪ Client는 Token을 이 서버로 넘겨 개인정보를 응답 받을 수 있다. -
Client server, 3th party server
▪ 자사 또는 개인이 만든 애플리케이션 서버 -
Authorization Server
▪ 사용자는 이 서버로 ID, PW를 넘겨 Authorization Code를 발급 받을 수 있다.
▪ Client는 이 서버로 Authorization Code을 넘겨 Token을 받급 받을 수 있다. -
Authorized redirect URIs(승인된 리다이렉션)
▪ client에 권한을 부여하는 과정에서 나중에Authorized code를 전달하는 통로다.
▪ 즉, 예를들어 네이버 서버가 사용자의 개인정보를 콜백할 주소를 적는 곳이다. -
scope
▪ 로그인 되었다면, 그 서비스 안에서 사용할 수 있는 모든 기능
2. Oauth2 service 구현
2-1 Configuration
 private final Oauth2Service oauth2Service;

 http.
     oauth2Login()
     // OAuth2 로그인 설정 시작점
     .userInfoEndpoint()
     // OAuth2 로그인 성공 이후 사용자 정보를 가져오기 위한 설정
     .authorizationEndpoint().baseUri("/oauth2/authorize")
     // 로그인 요청이 이 url로 로그인이 요청됨
     .userService(oauth2Service)
     // OAuth2 로그인 성공 시, 작업을 처리할 UserService 인터페이스 구현체 등록
2-2 UserService인터페이스 구현
OAuth2UserService<OAuth2UserRequest, OAuth2User>를 implements 하여 loadUser 메서드를 재정의한다. 여기서
<OAuth2UserRequest, OAuth2User>는 이미 만들어져 있으므로 따로 생성할 필요없다.
DefaultOAuth2UserService는 OAuth2UserService의 구현체로 userRequest에 있는 정보를 가지고 온다
userRequest에는 userRequest에는 구글에 요청하는 어플리케이션의 요청값들인 application.yml에서 읽도록 설정한 유저의
registrationIdclientIdclientSecretscope + 알파값들등이 들어있다.
 @Override
    public OAuth2User loadUser(OAuth2UserRequest userRequest) throws OAuth2AuthenticationException {

        DefaultOAuth2UserService oauth2 = new DefaultOAuth2UserService();

        String registrationId = userRequest.getClientRegistration().getRegistrationId();
        // 어떤 소셜서비스인지 구분하는 문자열
        String userNameAttributeName = userRequest.getClientRegistration().getProviderDetails()
                .getUserInfoEndpoint().getUserNameAttributeName();
                // 소셜서비스의 pk 값

        OAuth2User oAuth2User = oauth2.loadUser(userRequest);
        // 모든 사용자 정보들

        Map<String, Object> attributes = oAuth2User.getAttributes();

        Oauth2MemberDto memberDto = Member.of(registrationId, userNameAttributeName, attributes);
       // 전달 받은 정보로 Dto를 만든다 -> 엔티티로 바꾸고 repository에 저장한다 -> 세션에는 요구되는 정보만 저장한다

        Member member = saveOrUpdate(memberDto);
        session.setAttribute("member", new SessionMemberDto(member));

        return new DefaultOAuth2User(Collections.singleton(new SimpleGrantedAuthority(member.getRoleKey())),
                attributes, userNameAttributeName);
    }
- OAuth2 서비스에서 사용하는 함수들
-
userRequest.getClientRegistration().getRegistrationId(); //registrationId로 현재 로그인 진행 중인 서비스를 구분((github, naver, google) 구글만 registrationId를 사용 중이다. -
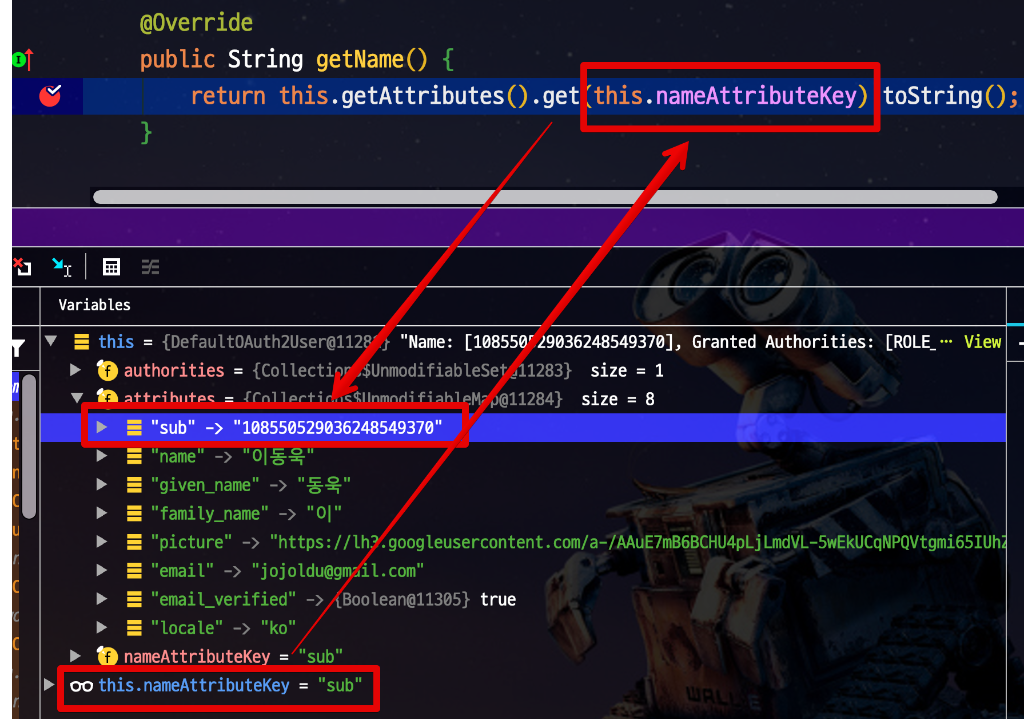
userRequest.getClientRegistration().getProviderDetails() .getUserInfoEndpoint().getUserNameAttributeName(); // 서비스(구글,네이버,카카오 등)마다 가지고 있는 pk를 찾고 그 값을 가지고 온다. (구글서비스의 경우 sub를 반환 .. ) -
OAuth2User oAuth2User = defaultOAuth2UserService.loadUser(userRequest); // OAuth 서비스(github, google, naver)에서 가져온 유저 정보 전체를 담고있음 -
Map<String, Object> attributes = oAuth2User.getAttributes();
// OAuth 서비스의 유저 정보들을 하나씩 담고 있음
- 엔티티 클래스에 service로 찾아온 유저 정보를 dto로 변환하는 정적 팩토리 메서드를 생성
소셜 플랫폼은 아이디와 비밀번호를 제공하는것이 아니라 AccessToken을 발급해준다. 그리고 가입하고자하는
서비스에서 사용하려고 하는 일부 정보에만 접근할 수 있도록 허용한다
registrationId
userNameAttributeName
attributes 를 가지고 오고
이를 바탕으로 유저Dto를 만든다 그리고 DB에 있으면 업데이트 없으면 저장한다
public class Member {
	public static OAuthDto of(String registrationId,
                              String userNameAttributeName,
                              Map<String, Object> attributes) {
        return ofGoogle(userNameAttributeName, attributes);
        // registrationId, user의 pk , OAuth 서비스의 유저 정보들
    }

    private static OAuthDto ofGoogle(String userNameAttributeName,
                                     Map<String, Object> attributes) {
        return OAuthDto.builder()
                .name((String) attributes.get("name"))
                .email((String) attributes.get("email"))
                .picture((String) attributes.get("picture"))
                .attributes(attributes)
                .nameAttributeKey(userNameAttributeName)
                .build();
    }
}- 저장된 정보가 있으면 업데이트 없으면 저장하는 메서드 생성하고 저장
@Service
@RequiredArgsConstructor
public class Oauth2Service implements OAuth2UserService<OAuth2UserRequest, OAuth2User>{

 public Member saveOrUpdate(Oauth2MemberDto memberDto) {
        Member member = repository.findMemberByEmail(memberDto.getEmail())
                .map(entity -> entity.update(memberDto.getName(), memberDto.getPicture()))
                .orElse(Member.toMember(memberDto));
        return repository.save(member);
    }


 Oauth2MemberDto memberDto = Member.of(registrationId, userNameAttributeName, attributes);

        Member member = saveOrUpdate(memberDto);

        return new DefaultOAuth2User(Collections.singleton(new SimpleGrantedAuthority(member.getRoleKey())),
                attributes, userNameAttributeName);
}- 전체 진행과정
-
유저가 서비스 선택
-
로그인을 요청하는
userRequest정보가 넘어감 - -
userRequest를 바탕으로
registrationId,userNameAttributeName,oAuth2User가 만들어짐 -
찾아온 registrationId, userNameAttributeName, oAuth2User 정보를 서비스에 세팅한 dto를 만들고 dto 정보를 DB에 저장
-
세션 dto를만들어서 세션에도 저장(로그인?)
-
DefaultOAuth2User반환 (Collections.singleton)
필요한 클래스들 : registrationId, userNameAttributeName, attribute,서비스 값을 세팅한 dto,세션에 넣을 값을 세팅한 dto
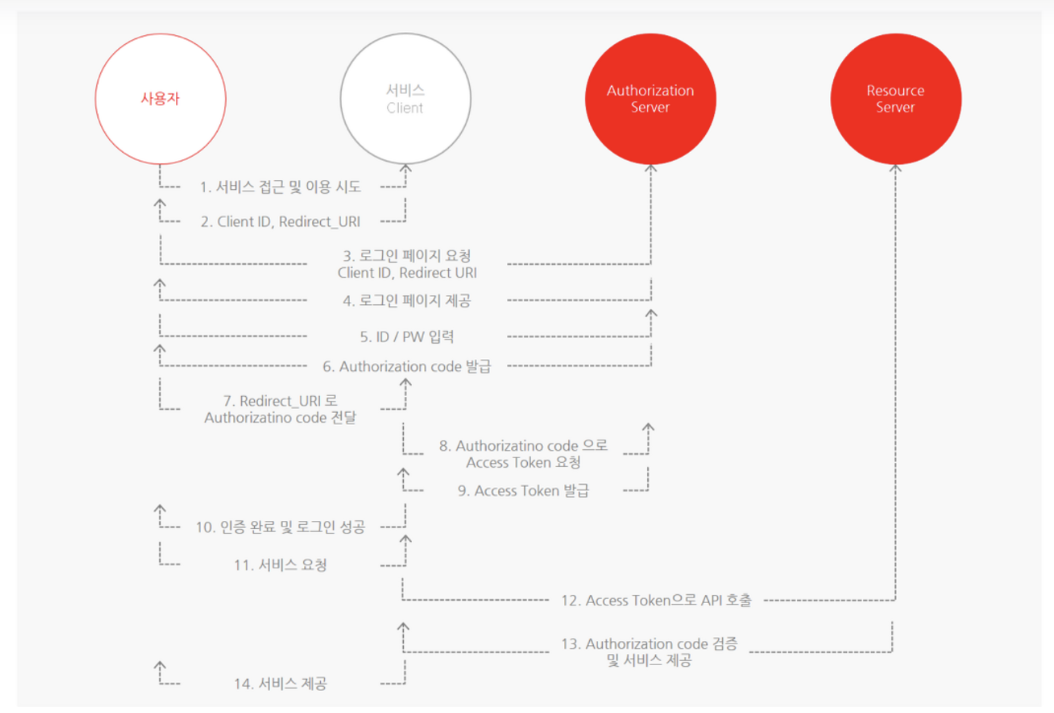
3. Oauth2 작동과정
-
사용자(Resource Owner)는 서비스(client)를 이용하기 위해 로그인 페이지에 접근한다.
-
그럼 서비스(client)는 사용자(Resource Owner)에게 로그인 페이지를 제공하게 된다. 로그인 페이지에서 사용자는 "페이스북/구글 으로 로그인" 버튼을 누른다.
-
만일 사용자가 Login with Facebook 버튼을 클릭하게 되면, 특정한 url 이 페이스북 서버쪽으로 보내지게 된다. 브라우저 응답(response) 헤더를 확인하면 다음 url내용을 확인 할 수 있다.
https://resource.server/?client_id=1&scope=B,C&redirect_uri=https://client/callback원래는 사용자가 직접 페이스북으로 이동해서 로그인을 입력해야 하는데, 저 링크가 대신 로그인으로 이동 하게끔 도와주는 것이다.
https://resource.server/? # 리소스 서버(네이버, 카카오 사이트 url)
client_id=1 # 어떤 client인지를 id를 통해 Resouce Owner에게 알려주는 부분
&scope=B,C # Resource Owner가 사용하려는 기능, 달리 말해 client가 자신 서비스에서 사용하려는 Resource Server 기능을 표현한 부분
&redirect_uri=https://client/callback # 개발자 홈페이지에 서비스 개발자가 입력한 응답 콜백.- 리소스 서버에서
Redirect Url와Authrorization 코드를 발급받아 전달, 콜백 주소로 리다이렉트 되면서 임시비밀번호인 Authorization code를 제공한다.
https://localhost:8080/auth/google/callback?code=코드정보- 이 Authrorization 코드를 oauth2 서버에 전달하여 토큰을 요구
- 앱 서버는 response로
access, refresh토큰을 전달받음 - 앱 서버가 허용된 scope내의 oauth2서버의 api를 유저대신 이용
4. SNS별 설정
  security:
    oauth2:
      client:
        registration:
          naver:
            client-id: yMJEfNDXyQ0I0byQIZMW
            client-secret: 8ll3tK7SGV
            redirect-uri: \"{baseUrl}/{action}/oauth2/code/{registrationId}\"
            authorization-grant-type: authorization_code
            scope:
              - name
              - email
              - profile
            client-name: Naver
          kakao:
            client-id: 2022979f07151d28c3bbce96953c633e
            client-secret: E2tl5BIIUCkTXbNwkORukKE1GQHsqYEf
            redirect-uri: \"{baseUrl}/{action}/oauth2/code/{registrationId}\"
            authorization-grant-type: authorization_code
            scope:
              - profile_nickname
              - account_email
              - profile_image
            client-name: Kakao
          google:
            client-id: 146514603607-hcha6j15ngcn2oneg07m1cqqs34e80pr.apps.googleusercontent.com
            client-secret: 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
            redirect-uri: \"{baseUrl}/{action}/oauth2/code/{registrationId}\"
            authorization-grant-type: authorization_code
            scope:
              - name
              - email
              - profile
        provider:
          naver:
            authorization-uri: https://nid.naver.com/oauth2.0/authorize
            token-uri: https://nid.naver.com/oauth2.0/token
            user-info-uri: https://openapi.naver.com/v1/nid/me
            user-name-attribute: response
          kakao:
            authorization-uri: https://kauth.kakao.com/oauth/authorize
            token-uri: https://kauth.kakao.com/oauth/token
            user-info-uri: https://kapi.kakao.com/v2/user/me
            user-name-attribute: id
4-1 Naver response
- 사용하고 싶은 정보만 꺼내어 사용하면 된다.
{
  "resultcode": "00",
  "message": "success",
  "response": {
    "email": "openapi@naver.com",
    "nickname": "OpenAPI",
    "profile_image": "https://ssl.pstatic.net/static/pwe/address/nodata_33x33.gif",
    "age": "40-49",
    "gender": "F",
    "id": "32742776",
    "name": "오픈 API",
    "birthday": "10-01"
  }
}
4-2 kakao의 response
{
    "id":123456789,
    "connected_at": "2022-04-11T01:45:28Z",
    "kakao_account": {
        // 프로필 또는 닉네임 동의 항목 필요
        "profile_nickname_needs_agreement": false,
        // 프로필 또는 프로필 사진 동의 항목 필요
        "profile_image_needs_agreement	": false,
        "profile": {
            // 프로필 또는 닉네임 동의 항목 필요
            "nickname": "홍길동",
            // 프로필 또는 프로필 사진 동의 항목 필요
            "thumbnail_image_url": "http://yyy.kakao.com/.../img_110x110.jpg",
            "profile_image_url": "http://yyy.kakao.com/dn/.../img_640x640.jpg",
            "is_default_image":false
        },
        // 이름 동의 항목 필요
        "name_needs_agreement":false,
        "name":"홍길동",
        // 카카오계정(이메일) 동의 항목 필요
        "email_needs_agreement":false,
        "is_email_valid": true,
        "is_email_verified": true,
        "email": "sample@sample.com",
        // 연령대 동의 항목 필요
        "age_range_needs_agreement":false,
        "age_range":"20~29",
        // 출생 연도 동의 항목 필요
        "birthyear_needs_agreement": false,
        "birthyear": "2002",
        // 생일 동의 항목 필요
        "birthday_needs_agreement":false,
        "birthday":"1130",
        "birthday_type":"SOLAR",
        // 성별 동의 항목 필요
        "gender_needs_agreement":false,
        "gender":"female",
        // 카카오계정(전화번호) 동의 항목 필요
        "phone_number_needs_agreement": false,
        "phone_number": "+82 010-1234-5678",
        // CI(연계정보) 동의 항목 필요
        "ci_needs_agreement": false,
        "ci": "${CI}",
        "ci_authenticated_at": "2019-03-11T11:25:22Z",
    },
    "properties":{
        "${CUSTOM_PROPERTY_KEY}": "${CUSTOM_PROPERTY_VALUE}",
        ...
    }
}
4-3 Google의 response
{
   "sub": "식별값",
   "name": "name",
   "given_name": "given_name",
   "picture": "https//lh3.googleusercontent.com/~~",
   "email": "email",
   "email_verified": true,
   "locale": "ko"
}