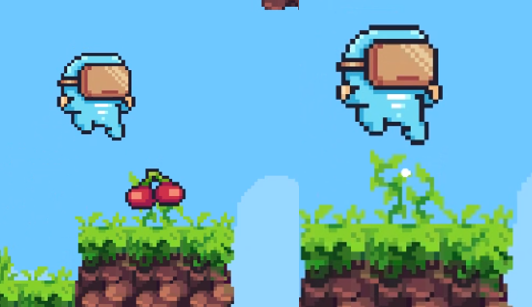
오늘은 Platfomer Game 완성하는 날이다.
먼저 개인적으로 추가한 몇 가지 기능과, 강의중 다뤘던 내용을 복기 하기 위해서 작성하게 되었다.
개인적으로 추가한것
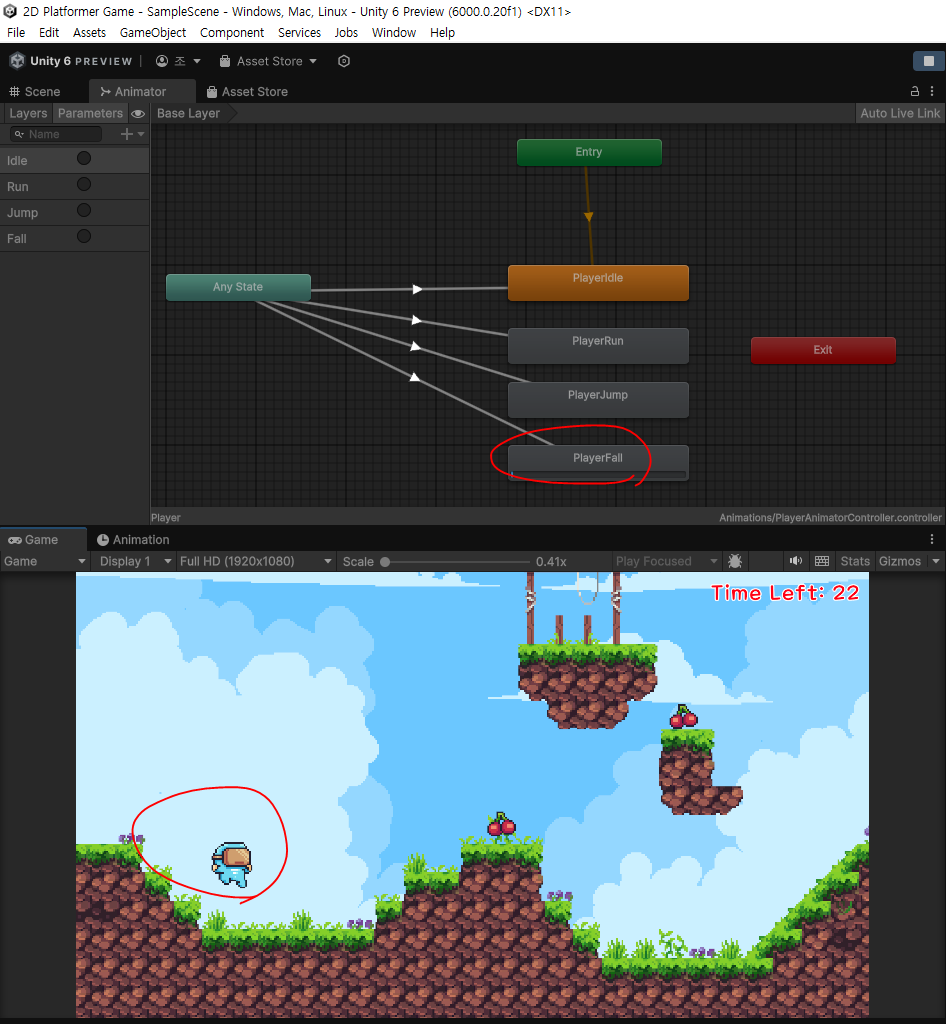
플레이어 낙하 애니메이션
else if (vy < 0)
{
    GetComponent<Animator>().SetTrigger("Fall");
}
플레이어 코드 중 해당 부분 일부
vy값이 0보다 높아지면 점프를 하는 것이므로, 0보다 값이 작아지면 낙하하는 모션을 취한다.
일시적 점프력 증가
- 점프를 할 때 윗 방향키와 함께 누르면 점프 부스트가 작동
public float BoostedJumpSpeed = 14; // 윗방향 키 같이 눌렀을 때, 점프 증가

 if (Input.GetButtonDown("Jump") && grounded)
{
    vy = JumpSpeed;
    if (Input.GetKey(KeyCode.UpArrow))
    {
        vy = BoostedJumpSpeed;
    }
}
PlayerController.cs 에 위 소스코드를 추가해서 구현했다.
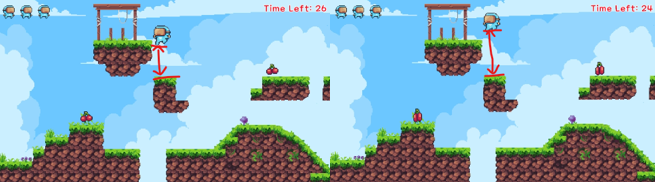
벽 슬라이딩, 벽 점프
- 벽에 붙으면 천천히 슬라이딩
- 벽에 붙어있을때 점프를 하면 벽 올라감
using System.Collections.Generic;
using UnityEditor.ShaderGraph.Internal;
using UnityEngine;

public class PlayerController : MonoBehaviour
{
    enum State
    {
        Playing,
        Dead
    }
    public float Speed = 10;
    public float JumpSpeed = 12;
    public float BoostedJumpSpeed = 14; // 윗방향 키 같이 눌렀을 때, 점프 증가

    public float WallSlideSpeed = 2;
    public float WallJumpSpeed = 10;

    public Collider2D BottomCollider;
    public CompositeCollider2D TerrainCollider;
    public Collider2D LeftWallCollider;
    public Collider2D RightWallCollider;

    // 멤버 변수
    float vx = 0;
    bool grounded;
    float preVx = 0;
    bool onWall;
    bool wallJumping;

    Vector2 originalPosition;
    State state;


    void Start()
    {
        originalPosition = transform.position;
        state = State.Playing;
    }

    public void Restart()
    {
        GetComponent<Rigidbody2D>().constraints = RigidbodyConstraints2D.FreezeRotation;
        GetComponent<Rigidbody2D>().angularVelocity = 0;
        GetComponent<BoxCollider2D>().enabled = true;

        transform.eulerAngles = Vector3.zero;
        transform.position = originalPosition;
        GetComponent<Rigidbody2D>().linearVelocity = Vector2.zero;  // 떨어지고 있을때의 속도 초기화
        state = State.Playing;
    }

    void Update()
    {
        if (state != State.Playing) return;

        vx = Input.GetAxisRaw("Horizontal") * Speed;
        float vy = GetComponent<Rigidbody2D>().linearVelocityY;

        //캐릭터 왼쪽,오른쪽 벽 확인
        onWall = LeftWallCollider.IsTouching(TerrainCollider) || RightWallCollider.IsTouching(TerrainCollider);

        if (onWall && !grounded && vx != 0)
        {
            // 벽에 붙어 있을 때 중력 효과 약화 (미끄러짐)
            vy = Mathf.Max(vy, -WallSlideSpeed);

            if (Input.GetButtonDown("Jump"))
            {
                wallJumping = true; // 벽 점프 중
                vy = JumpSpeed; // 점프시 세로 속도 설정

                // 벽에서 반대 방향으로 점프
                if (LeftWallCollider.IsTouching(TerrainCollider))
                {
                    vx = WallJumpSpeed; // 오른쪽으로 점프
                }
                else if (RightWallCollider.IsTouching(TerrainCollider))
                {
                    vx = -WallJumpSpeed; // 왼쪽으로 점프
                }
            }
        }
        // 벽 점프 후 일정 시간 동안 벽에 다시 붙지 않도록 설정
        if (wallJumping)
        {
            // 일정 시간 후 다시 벽에 붙을 수 있게끔 설정
            Invoke("StopWallJump", 0.3f);
        }


        if (vx < 0)
        {
            GetComponent<SpriteRenderer>().flipX = true;
        }

        if (vx > 0)
        {
            GetComponent<SpriteRenderer>().flipX = false;
        }

        // 애니메이션 처리
        if (BottomCollider.IsTouching(TerrainCollider)) // 지금 바닥에 붙어있었습니다.
        {
            grounded = true;
            wallJumping = false;

            if (!grounded)          // 지금은 땅에 붙었는데, 아까는 안붙어있었음
            {
                if (vx == 0)           // 가로방향으로 멈춘 상태에서 착지
                {
                    GetComponent<Animator>().SetTrigger("Idle");
                }
                else                // 가로방향으로 이동하면서 착지
                {
                    GetComponent<Animator>().SetTrigger("Run");
                }
            }
            else
            {                       // 땅에 계속 붙어있었음.
                if (vx != preVx)
                {
                    if (vx == 0)    // 멈춰있음
                    {
                        GetComponent<Animator>().SetTrigger("Idle");
                    }
                    else            // 달리기 시작
                    {
                        GetComponent<Animator>().SetTrigger("Run");
                    }
                }
            }
        }
        else
        {
            grounded = false;
            if (grounded)            // 지금은 땅에 안붙어있지만, 아까는 붙어있었음.
            {
                GetComponent<Animator>().SetTrigger("Jump");
            }
            if (vy < 0)
            {
                // vy값은 jumpspeed 값이니까, jump스피드가 -로 내려가면 Fall 애니메이션 동작
                GetComponent<Animator>().SetTrigger("Fall");
            }
        }

        //위에 grounded는 현재와 아까 상태를 비교하는 것

        // 점프 구현 (땅에 붙어 있을 때 점프)
        grounded = BottomCollider.IsTouching(TerrainCollider); //

        // 윗 키 누르면 점프 속도 업
        if (Input.GetButtonDown("Jump") && grounded)
        {
            vy = JumpSpeed;
            if (Input.GetKey(KeyCode.UpArrow))
            {
                vy = BoostedJumpSpeed;
            }
        }
        preVx = vx;             // 이전 속도

        GetComponent<Rigidbody2D>().linearVelocity = new Vector2(vx, vy);
    }
    void StopWallJump()
    {
        wallJumping = false;
    }


    private void OnCollisionEnter2D(Collision2D collision)
    {
        if (collision.gameObject.tag == "Enemy")
        {
            Die();
        }
    }
    void Die()
    {
        state = State.Dead;
        GetComponent<Rigidbody2D>().constraints = RigidbodyConstraints2D.None;
        GetComponent<Rigidbody2D>().angularVelocity = 720;
        GetComponent<Rigidbody2D>().AddForce(new Vector2(0, 10), ForceMode2D.Impulse);
        GetComponent<BoxCollider2D>().enabled = false;

        GameMangerController.Instance.Die();
    }
}
전체 스크립트가 너무 길다...
오늘 배운 것
아이템 먹기
- 아이템 먹으면 애니메이션, OnDestroy사용해서 몇 초 이후 오브젝트 제거
- 게임 끝 포인트 만들기

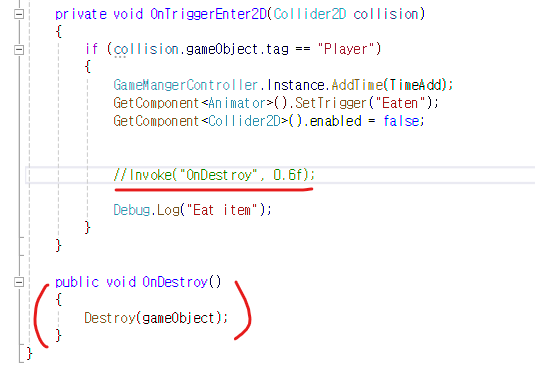
Invoke("OnDestroy", 0.6f);
Invoke를 사용했을때는, 애니메이션 실행되고 0.6초 후 오브젝트가 사라졌는데
animation Event를 사용하면 OnDestroy()까지 애니메이션이 되었기 때문에
한번에 같이 사라진다.
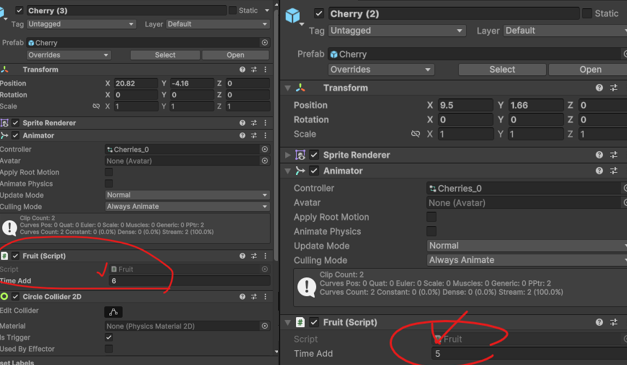
프리팹을 인스턴스 값 수정 시, 프리팹 원본과의 값 차이가 있기에 Bold 처리 밑 옆 라인 추가됨
수정한 것을 프리팹에도 적용시키기 위해서는 overrides를 누르고 Apply All / 되돌리기 위해선 Revert All
SetActive()메소드 / enabled 속성
SetActive()메소드
- 게임 오브젝트 내 컴포넌트를 활성화 or 비활성화 시키는 메소드
- 게임 오브젝트가 비활성화 되면 그 오브젝트에 연결된 모든 컴포넌트, 자식 오브젝트도 함께 비활성화 된다.
enabled속성
- 스크립트(Component)의 경우, 비활성화되면 Update, FixedUpdate, OnTriggerEnter 등 그 스크립트의 메서드만 호출 X
- 하지만 해당 게임 오브젝트와 다른 컴포넌트는 여전히 활성화된 상태로 존재
차이점
SetActive()
전체 게임 오브젝트를 비활성화/활성화하며, 자식 오브젝트와 모든 컴포넌트가 영향을 받습니다.
비활성화된 오브젝트는 씬에서 더 이상 존재하지 않는 것처럼 행동
enabled
특정 컴포넌트만 비활성화/활성화하며, 게임 오브젝트와 다른 컴포넌트는 계속 활성화 된 상태일 수 있음
비활성화된 컴포넌트는 자신의 기능을 멈추지만, 오브젝트는 여전히 씬에 존재
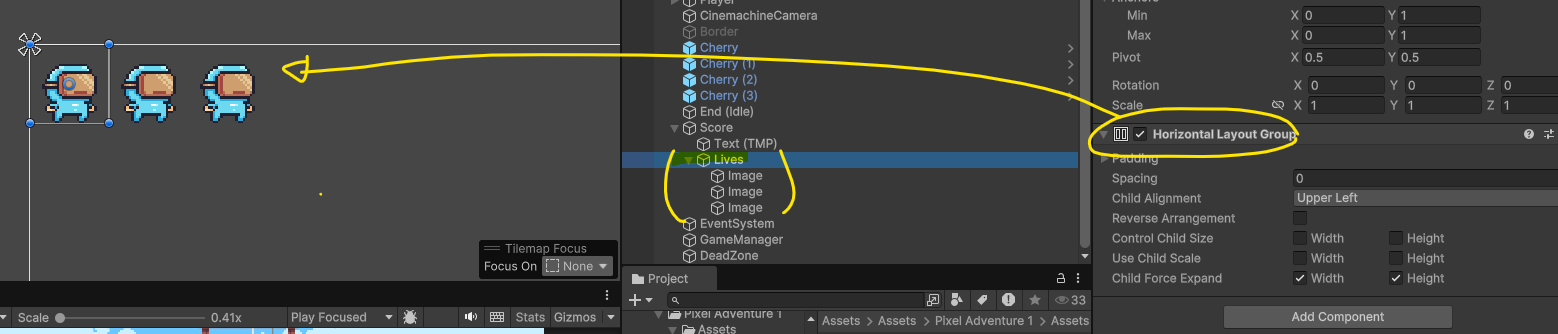
Horizontal Layout Group
- 수평 레이아웃 그룹 컴포넌트는 자식 레이아웃 요소를 바로 옆에 서로 붙여 놓는다.
- 다음 모델에 따라 각각의 선호되는, 유연한 최소 너비에 맞추어 자식 레이아웃의 너비가 결정한다.
코딩테스트는 진짜 못하겠어요 ㅠㅠ