HTML요소에 접근하기
getElementById()
- ID로 HTML요소 찾기 → document.getElementById(”~”)
- 값 가져오기 → var v = document.getElementById(”~”).value;
- 값 넣어주기 → document.getElementById(”~”).value=”홍길동”;
- id를 이용한 요소의 접근 → getElementbyId()
- id는 unique하기 때문에 단일요소가 검색되므로 Element
<body>

	<h1 id="hd"> this is heading </h1>
	<!-- <input button = "button" onclick="fn()">스타일 변경 / 내용변경</button>  -->
	<input type = "button" id="btn" onclick="fn()" value= "스타일 변경 / 내용변경">

<script>
	function fn() {
		var v_headTag = document.getElementById('hd');
		//console.log(v_headTag.innerHTML);
		v_headTag.innerHTML = "내용변경...";
		v_headTag.style.color = "red";
		var v_btn = document.getElementById('btn');
		//console.log(v_btn.value);
		v_btn.value = "button change";
	}

</script>

</body>
GET&SET
- 요소의 값을 읽어오기 / 설정하기 (value, innerHTML, innerText, textContent)
value
- 입력요소 < input >의 초기값을 명시할때 사용된다.
- 입력요소의 type에 따라 용도가 다르게 사용된다.
- button, reset, submit : 버튼 내 텍스트 정의
- hidden, password, text : 입력필드의 초기값 정의
- checkbox, radio : 필드 선택시 서버로 제출되는 값 정의
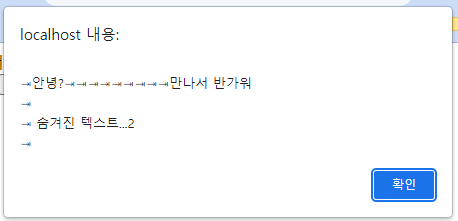
innerHTML
- 읽어오는 값에 태그가 포함되므로 보안에 취약한 담점이 존재
때문에 HTML5에서는 innerHTML이 삽입된 태그르 실행하지 않도록 가정= 보안점검을 거치는 프로젝트의 경우 코드 거부 가능성이 있으므로 특별한 경우를 제외하고 사용을 권장하지 않음
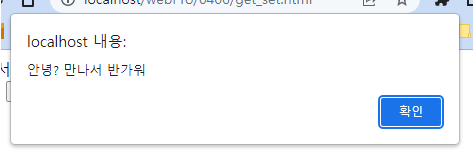
innerText
- 사용자에게 보여지는 텍스트값을 읽어옴
- 연속되는 공백은 무시된다 (= 하나의 공백으로 처리)
- 원시 텍스트의 랜더링 된 상태(= 스타일 적용 후의 모습)를 보여줌
textContent
- 해당 노드의 텍스트값(=원시텍스트)를 읽어옴
- 표현된 공백을 그대로 가져오며 숨겨진 텍스트도 출력함
- 노드의 내부 콘텐츠를 text/plain으로 파싱(분석/해석)한 경과값 (= 해당 요소의 원시텍스트(raw text)표현)
<script>
	// 공통으로 사용하기 위해 전역변수로
	var v_d1 = document.getElementById('d1');


	function fn1(){
		alert(v_d1.innerHTML);
	}
	function fn2(){
		alert(v_d1.innerText);
	}
	function fn3(){
		alert(v_d1.textContent);
	}
fn1()
fn2()
fn3()
이런 예제...
<!DOCTYPE html>
<html>
<head>
<meta charset="UTF-8">
<title>Insert title here</title>
<link rel = "stylesheet" href ="../css/outStyle.css">
</head>
<style>
/*span {
display : none;
}*/
</style>
<body>
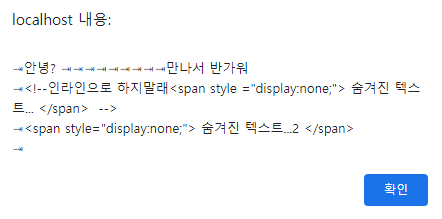
<div id = "d1">
안녕? 만나서 반가워
<!--인라인으로 하지말래<span style ="display:none;"> 숨겨진 텍스트... </span> -->
<span style ="display:none;"> 숨겨진 텍스트...2 </span>
</div>
<input type ="button" value="innerHTML" onclick="fn1()">
<input type ="button" value="innerTEXT" onclick="fn2()">
<input type ="button" value="textContent" onclick="fn3()">
<input type ="button" value="value" onclick="fn4()">
<div id="result">
</div>
<script>
// 공통으로 사용하기 위해 전역변수로
var v_d1 = document.getElementById('d1');
var v_rst = document.getElementById('result');
function fn1(){
alert(v_d1.innerHTML);
v_rst.innerHTML ="<p style='color:green'> 나는 innerHTML입니다 </p>";
}
function fn2(){
alert(v_d1.innerText);
v_rst.innerText ="<p style='color:green'> 나는 innerText입니다 </p>";
}
function fn3(){
alert(v_d1.textContent);
v_rst.textContent ="<p style='color:green'> 나는 textContent입니다 </p>";
}
function fn4(){
var v_btn = document.getElementsByTagName('input')[3];
alert(v_btn.value);
v_btn.value="value_change";
}
</script>
</body>
</html>getElementsByTagname()
- getElementsByTagname('요소/태그명')[n]
getElementsByClassname()
- getElementsByClassname('클래스명')[n]
- 요소의 n번째를 선택
- 요소(태그)와 클래스는 여러요소에 접근(=elements)
querySelector()
- querySelectorAll('#id명' 또는 '.class명' 또는 tag명)
- 모든요소 선택
querySelectorAll()
ES6에서 나온 새로운 방법! (ES2에서 나온 getElementId()가 더 효율적)
- querySelector('#id명' 또는 '.class명' 또는 tag명)
- 첫번째 요소만 선택
<!DOCTYPE html>
<html>
<head>
<meta charset="UTF-8">
<title>Insert title here</title>
<link rel = "stylesheet" href ="../css/outStyle.css">
<style>
div {
	border : 1px solid black;
	width : 200px;
	height : auto;
	margin : 10px;
	padding: 10px;
}

p{
	border : 1px solid gray;
}
</style>
</head>
<body>
<script>
	function getCN() {

		// 1) 클래스네임이 p인것의 길이 띄우기
		var v_pTag= document.getElementsByClassName('p');
		alert(v_pTag.length);

		// 2) 클래스네임이 p인것중 인덱스가 3번인것의 색을 빨갛게 바꾼다
		// JS는 이런거 할때 딱 하나의 요소만 지정해줘야 돌아감
 		var v_pTag= document.getElementsByClassName('p')[3];
		v_pTag.style.color ="red";

		// 즉 여러개의개체에 대해 스타일을 적용 할 때 for문을 사용한다
		// 3) 클래스네임이 p인것들의 border스타일을 바꾼다
 		var v_pArr= document.getElementsByClassName('p');
		for(var i=0; i<v_pArr.length; i++){
			v_pArr[i].style.border = "1px solid red";
		}

		// 4) 쿼리셀렉터All도 for문 사용
 		var v_pArr = document.querySelectorAll('.p');
 		for(var i=0; i<v_pArr.length; i++){
			v_pArr[i].style.color ="orange";
		}

		// 5) .p의 내용물을 오렌지색으로 바꾼다
		// 쿼리셀렉터는 가장 첫번째 항목만을 선택
 		var v_pTag = document.querySelector('.p');
		v_pTag.style.color ="pink";


	}

	function getTN(){
		//getElementsByTagName을 이용해 div스타일 적용하기
		var v_pTN = document.getElementsByTagName('div');
		for(var i=0; i<v_pTN.length; i++){
			v_pTN[i].style.border = "5px dotted blue";
		}
	}
</script>

	<div class="d"> 첫번째 div1
		<p class ="p">첫번째 p1</p>
		<p class ="p">p2</p>
		<p class ="p">p3</p>
		<p class ="p">p4</p>
	</div>
	<div class="d">div2</div>
	<div class="d">div3</div>
	<div class="d">div4</div>

	<input type = "button" value="classNm" onClick="getCN()">
	<input type = "button" value="tagNm" onClick="getTN()">

</body>
</html>