YOLO 시리즈 신작 YOLO-NAS에 대해 간략히 알아보고, 코드로 적용해 보자.
- yolo-NAS official github
https://github.com/Deci-AI/super-gradients- deci official documents
https://docs.deci.ai/super-gradients/documentation/source/welcome.html
모델(yolo-NAS) 소개
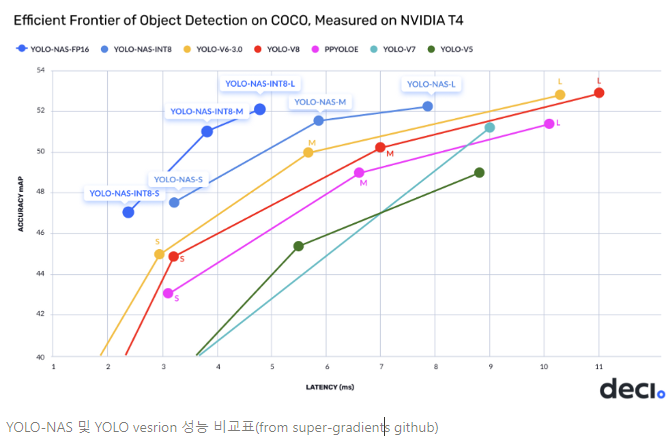
YOLO-NAS는 2023년 5월 Deci에서 공개되었다. YOLO-NAS는 작은 객체를 탐지하고, localization 정확도를 향상시키며, performance-per-compute ratio를 향상시켜 edge-device application에 실시간으로 적용하고자 했다.
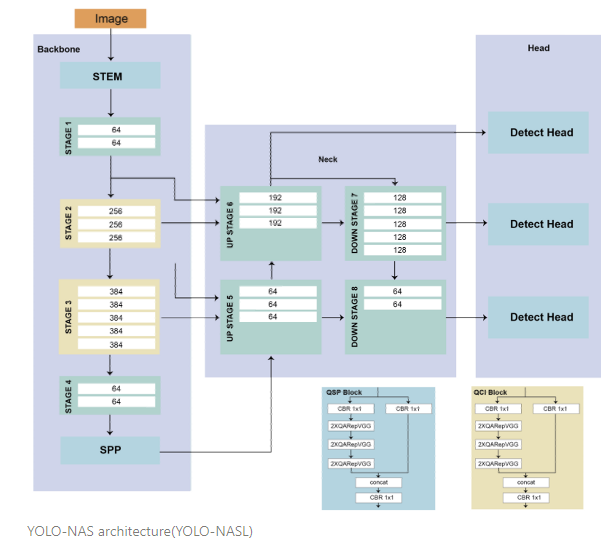
YOLO-NAS의 구조는 AutoNAC라고 불리우는 Neural Architecture Search (NAS) system을 통해 automatic하게 설계되었다. AutoNAC의 사용은 latency(시간 단위, 작업이 걸리는 시간)와 throughput(일 단위, 초당 처리하는 작업의 수)의 밸런스를 맞추기 위함이다.
YOLO-NAS에는 YOLO-NASS, YOLO-NASM, YOLO-NASL (small, medium, large) 3개의 구조가 있으며, QSP와 QCI 블록들의 위치 및 깊이에 따라 다르다.
- 참고
한정된 프로세서 자원 내에서 latency를 낮추고자 한다면, 처리하고자 하는 작업에 최대한의 자원을 투자해야 한다(low latency). → 그러나 특정 작업에 자원이 몰리게 되면 한 번에 수행할 수 있는 작업의 갯수는 줄어든다. → throughput에 영향을 준다(줄어듦).
결국, latency와 throughput은 일종의 trade-off 관계에 있다.- https://gaussian37.github.io/c-linux-latency_and_throughput/
사전훈련된 가중치 불러오기
# Load model with pretrained weights
from super_gradients.training import models
from super_gradients.common.object_names import Models

model = models.get(Models.YOLO_NAS_S, pretrained_weights="coco").cuda()
모델 예측
# make prediction
results = model.predict("./image.jpg") # single image
results = model.predict(["./image1.jpg", "./image2.jpg"]) # multiple images
results = model.predict("./vid.mp4", iou=0.5, conf=0.7) # video file
# show option
results.show(box_thickness=2, show_confidence=True)
# save option
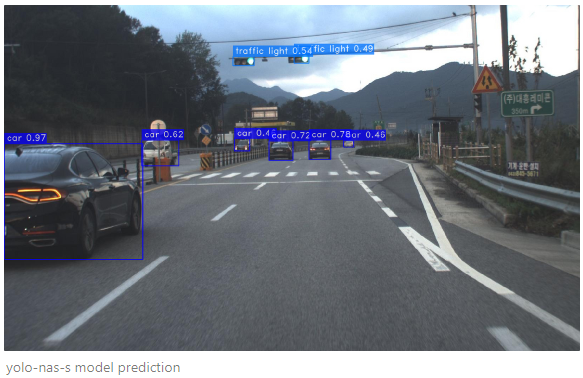
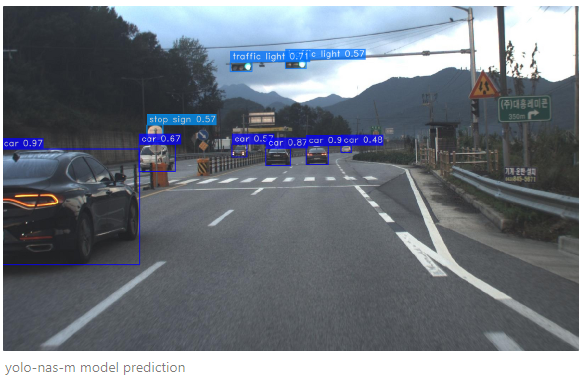
results.save(output_folder="path/", box_thickness=2, show_confidence=True)- yolo-nas-s model prediction
- yolo-nas-m model prediction
- yolo-nas-l model prediction
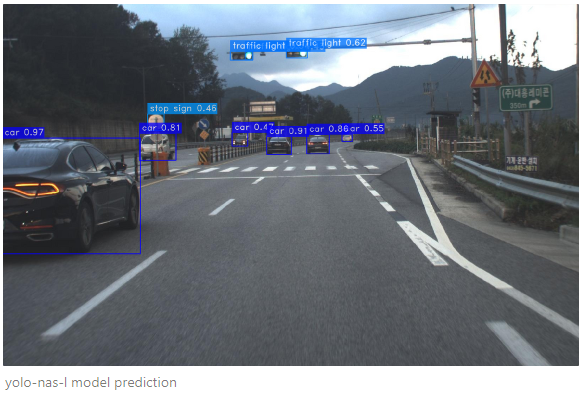
셋팅 환경 기준으로 video file prediction 실행하였을 때(실시간x), S 모델은 초당 100.76 프레임, M 모델은 78.09 프레임, L 모델은 63.18 프레임이 나왔다. ㄷㄷ
Detection 정보 추출(conf, label, bbox)
for result in results :
	class_names = result.class_names
	labels = result.prediction.labels
	confidence = result.prediction.confidence
	bboxes = result.prediction.bboxes_xyxy

	for i, (label, conf, bbox) in enumerate(zip(labels, confidence, bboxes)):
	    print("prediction: ", i)
	    print("label_id: ", label)
	    print("label_name: ", class_names[int(label)])
	    print("confidence: ", conf)
	    print("bbox: ", bbox)
	    print("--" * 10)
Detection image 구현 및 detection result publish
- label, conf, bbox 값 가져와서 Detection result 직접 구현
from super_gradients.common.object_names import Models
from super_gradients.training import models
import random
import cv2
import numpy as np
import time
import torch

model = models.get(Models.YOLO_NAS_S, pretrained_weights="coco").cuda()
model.eval()

global label_colors
global names

cap = cv2.VideoCapture("blackbox_rain.mp4")
while cap.isOpened() :
    ret, frame = cap.read()
    if ret == True :
        first_frame = True
        frame = cv2.resize(frame, (0, 0), fx=0.5, fy=0.5)
        outputs = model.predict(frame, conf=0.4, iou=0.4) #
        output = outputs[0]
        bboxes = output.prediction.bboxes_xyxy
        confs = output.prediction.confidence
        labels = output.prediction.labels
        class_names = output.class_names

        if first_frame :
            random.seed(0)
            labels = [int(l) for l in list(labels)]
            label_colors = [tuple(random.choices(np.arange(0, 256), k=3))
            				for i in range(len(class_names))]
            names = [class_names[int(label)] for label in labels]
            first_frame = False

        for idx, bbox in enumerate(bboxes):
            bbox_left = int(bbox[0])
            bbox_top = int(bbox[1])
            bbox_right = int(bbox[2])
            bbox_bot = int(bbox[3])

            text = f"{names[idx]} {confs[idx]:.2f}"
            text_size, _ = cv2.getTextSize(text, cv2.FONT_HERSHEY_PLAIN, 1, 1)
            text_w, text_h = text_size
            colors = tuple(int(i) for i in label_colors[labels[idx]])
            cv2.rectangle(frame, (bbox_left, bbox_top),
            (bbox_left + text_w, bbox_top - text_h), colors, -1)
            cv2.putText(frame, text, (bbox_left, bbox_top),
            cv2.FONT_HERSHEY_PLAIN,1, (255, 255, 255), 1)
            cv2.rectangle(frame, (bbox_left, bbox_top), (bbox_right, bbox_bot),
color=colors, thickness=2) - detection result publish
from super_gradients.common.object_names import Models
from super_gradients.training import models
import random
import cv2
import numpy as np
import time
import torch
import rclpy
from rclpy.node import Node
from sensor_msgs.msg import Image
from cv_bridge import CvBridge

bridge = CvBridge()

model = models.get(Models.YOLO_NAS_S, pretrained_weights="coco").cuda()
model.eval()

global label_colors
global names

class yoloNASPublisher(Node) :
  def __init__(self) :
    super().__init__('nas_publisher')
    self.publisher = self.create_publisher(Image, 'video_detect', 10)
    time_period = 0.01
    self.timer = self.create_timer(time_period, self.time_callback)
    self.cap = cv2.VideoCapture('blackbox_rain.mp4')

  def time_callback(self) :
    ret, frame = self.cap.read()

    if ret == True :
      first_frame = True
    if ret :
        frame = cv2.resize(frame, (0, 0), fx=0.5, fy=0.5)
        outputs = model.predict(frame, conf=0.4, iou=0.4) #
        output = outputs[0]
        bboxes = output.prediction.bboxes_xyxy
        confs = output.prediction.confidence
        labels = output.prediction.labels
        class_names = output.class_names

        if first_frame :
            random.seed(0)
            labels = [int(l) for l in list(labels)]
            label_colors = [tuple(random.choices(np.arange(0, 256), k=3))
            				for i in range(len(class_names))]
            names = [class_names[int(label)] for label in labels]

        for idx, bbox in enumerate(bboxes):
            bbox_left = int(bbox[0])
            bbox_top = int(bbox[1])
            bbox_right = int(bbox[2])
            bbox_bot = int(bbox[3])

            text = f"{names[idx]} {confs[idx]:.2f}"
            text_size, _ = cv2.getTextSize(text, cv2.FONT_HERSHEY_PLAIN, 1, 1)
            text_w, text_h = text_size
            colors = tuple(int(i) for i in label_colors[labels[idx]])
            cv2.rectangle(frame, (bbox_left, bbox_top),
            (bbox_left + text_w, bbox_top - text_h), colors, -1)
            cv2.putText(frame, text, (bbox_left, bbox_top), cv2.FONT_HERSHEY_PLAIN, 1,
            (255, 255, 255), 1)
            cv2.rectangle(frame, (bbox_left, bbox_top),
            (bbox_right, bbox_bot), color=colors, thickness=2)

        # object detection part

        fra = bridge.cv2_to_imgmsg(frame)
        self.publisher.publish(fra)
        self.get_logger().info('Publishing Detection Image')


def main(args=None) :
  rclpy.init(args=args)
  node = yoloNASPublisher()
  try :
    rclpy.spin(node)
  except KeyboardInterrupt :
    node.get_logger().info('Publish Stopped')
  finally :
    node.destroy_node()
    rclpy.shutdown()

if __name__ == '__main__' :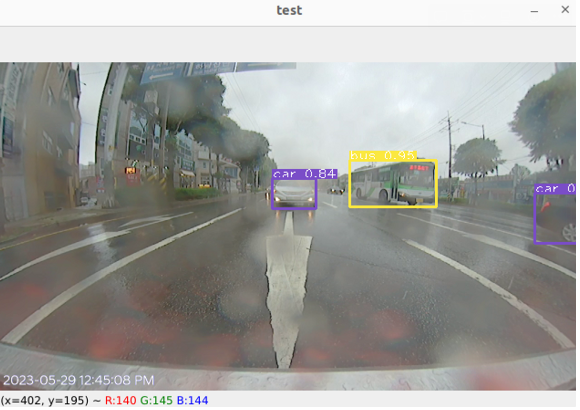
main()- 직접 구현 결과
bounding box, conf, label값을 직접 받아서 프레임마다 처리하려고 하니 속도가 확연히 느려졌다. S 모델 기준 초당 15 frame 정도.. cam test도 한 번 해봐야겠다.

AI에 대체되지 않는 인재가 되자