비록 express 로 서버를 만들고는 있지만 가능한 간편하게 하기 위해서 frontend 선에서 인증 기능을 구현하기로 했다.
더불어 내가 인증 기능을 만들긴 싫어서 Google OAuth를 쓰기로 한다.
오늘의 목표 📋
☑️ Vue3에 Google OAuth2.0 붙이기
☑️ 로그인 후 사용자 정보 받아오기
☑️ 로그아웃 구현하기
Google API에 내 사이트 등록 하기
사전에 Google API에 들어가서 신규 프로젝트 생성 후 토큰과 비밀키를 발급받아야 한다.
이 부분은 친절한 블로그에 잘 정리가 되어있으니 따라하자.
마지막에 발급 받은 클라이언트 ID와 비밀키는 .env 파일을 만들어서 저장한다.
Vue는 dotenv를 설치하지 않아도 자동으로 .env 파일을 읽어들인다.
단! 환경변수 이름이 무조건 VUE_APP_ 으로 시작해야 한다.
프로젝트 루트 경로에 .env파일을 만들고 클라이언트 키를 저장해두자.
VUE_APP_OAUTH_CLIENT=비밀이지롱내 프론트엔드에 OAuth 붙이기
진짜 감사하게도 유명한 라이브러리가 있다
https://www.npmjs.com/package/vue-google-oauth2
Vue, google oauth 등으로 검색하면 99%는 위 모듈을 가져다 쓰는 샘플이다.
검색하면 샘플도 적잖이 있어서 맘편하게 가져다 쓰기로.
npm install vue-google-oauth2패키지를 설치해준 다음 frontend/src/main.js 파일을 열어 사용 설정을 해준다.
import GAuth from 'vue-google-oauth2'

app.use(GAuth, {
  clientId: process.env.VUE_APP_OAUTH_CLIENT, // 아까 .env 파일에 저장해둔 그것임
  scope: 'profile email https://www.googleapis.com/auth/plus.login'
});
로그인 페이지 만들기
다음은 테스트용 로그인 페이지이다.
frontend/src/views/Login.vue파일을 열어서 테스트 코드를 써주었다.
<template>
  <div>
    로그인 테스트 화면입니다
    <button
      @click="handleLogin"
    >
      Google ID로 로그인
    </button>
  </div>
</template>
<script>
export default {
  name: 'Login',
  data: () => ({
  }),
  methods: {
    async handleLogin() {
      try {
        const GoogleUser = await this.$gAuth.signIn();
        console.log(GoogleUser);
      } catch (e) {
        console.error(e);
      }
    },
  },
};
</script>
그런 다음 화면을 띄워보면?

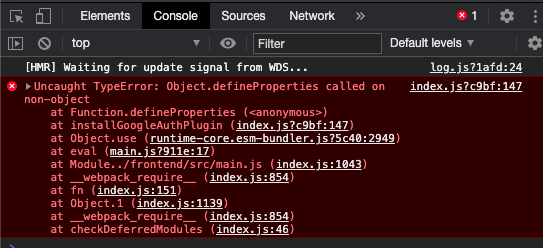
☠️ 에러가 난다.
시키는 대로 했는데 왜...!

소스를 까봤더니 아니나 다를까 😊 Vue3로 업그레이드 한 것이 문제가 된 것이다.
Vue3에서 전역모듈을 삽입하는 방법이 바뀐 덕분에 제대로 코드가 돌아가지 않고 있었다.
이제와서 다운그레이드 할 생각은 없고 vue-google-oauth2 코드를 참조해서 새로 모듈을 작성하기로 했다.
다시 시도 하기🔥
쓰지 못하는 모듈의 전체 소스가 길지 않아 카피해왔다.
npm uninstall vue-google-oauth2기존 것은 지워주고
frontend/src/authentification.js 파일을 만들어서
기존 vue-google-oauth2의 코드를 복사해온 다음 Vue3에 맞게 변형한다.
var googleAuth = (function () {
  function installClient() {
    var apiUrl = 'https://apis.google.com/js/api.js'
    return new Promise((resolve) => {
      var script = document.createElement('script')
      script.src = apiUrl
      script.onreadystatechange = script.onload = function () {
        if (!script.readyState || /loaded|complete/.test(script.readyState)) {
          setTimeout(function () {
            resolve()
          }, 500)
        }
      }
      document.getElementsByTagName('head')[0].appendChild(script)
    })
  }

  function initClient(config) {
    return new Promise((resolve, reject) => {
      window.gapi.load('auth2', () => {
        window.gapi.auth2.init(config)
          .then(() => {
            resolve(window.gapi)
          }).catch((error) => {
            reject(error)
          })
      })
    })

  }

  function Auth() {
    if (!(this instanceof Auth))
      return new Auth()
    this.GoogleAuth = null /* window.gapi.auth2.getAuthInstance() */
    this.isAuthorized = false
    this.isInit = false
    this.prompt = null
    this.isLoaded = function () {
      /* eslint-disable */
      console.warn('isLoaded() will be deprecated. You can use "this.$gAuth.isInit"')
      return !!this.GoogleAuth
    };

    this.load = (config, prompt) => {
      installClient()
        .then(() => {
          return initClient(config)
        })
        .then((gapi) => {
          this.GoogleAuth = gapi.auth2.getAuthInstance()
          this.isInit = true
          this.prompt = prompt
          this.isAuthorized = this.GoogleAuth.isSignedIn.get()
        }).catch((error) => {
          console.error(error)
        })
    };

    this.signIn = (successCallback, errorCallback) => {
      return new Promise((resolve, reject) => {
        if (!this.GoogleAuth) {
          if (typeof errorCallback === 'function') errorCallback(false)
          reject(false)
          return
        }
        this.GoogleAuth.signIn()
          .then(googleUser => {
            if (typeof successCallback === 'function') successCallback(googleUser)
            this.isAuthorized = this.GoogleAuth.isSignedIn.get()
            resolve(googleUser)
          })
          .catch(error => {
            if (typeof errorCallback === 'function') errorCallback(error)
            reject(error)
          })
      })
    };

    this.getAuthCode = (successCallback, errorCallback) => {
      return new Promise((resolve, reject) => {
        if (!this.GoogleAuth) {
          if (typeof errorCallback === 'function') errorCallback(false)
          reject(false)
          return
        }
        this.GoogleAuth.grantOfflineAccess({ prompt: this.prompt })
          .then(function (resp) {
            if (typeof successCallback === 'function') successCallback(resp.code)
            resolve(resp.code)
          })
          .catch(function (error) {
            if (typeof errorCallback === 'function') errorCallback(error)
            reject(error)
          })
      })
    };

    this.signOut = (successCallback, errorCallback) => {
      return new Promise((resolve, reject) => {
        if (!this.GoogleAuth) {
          if (typeof errorCallback === 'function') errorCallback(false)
          reject(false)
          return
        }
        this.GoogleAuth.signOut()
          .then(() => {
            if (typeof successCallback === 'function') successCallback()
            this.isAuthorized = false
            resolve(true)
          })
          .catch(error => {
            if (typeof errorCallback === 'function') errorCallback(error)
            reject(error)
          })
      })
    };
  }

  return new Auth()
})();

export default googleAuth;
Vue에 설치하는 부분을 제거했을 뿐이다.
그 다음 frontend/src/main.js 를 재수정한다.
이전 코드는 전부 지워버려라. 💧
// import GAuth from 'vue-google-oauth2'; // 아래 모듈로 대체된다
import googleAuth from './authentification';

import App from './App.vue'

// Create Vue Instance
const app = createApp(App);

...

app.use(GAuth, {
  clientId: process.env.VUE_APP_OAUTH_CLIENT,
  scope: 'profile email https://www.googleapis.com/auth/plus.login'
});

// set auth config
const prompt = 'select_account'
const GoogleAuthConfig = Object.assign({ scope: 'profile email' }, {
  clientId: process.env.VUE_APP_OAUTH_CLIENT,
  scope: 'profile email https://www.googleapis.com/auth/plus.login',
});

// Install Vue plugin
app.config.globalProperties.$gAuth = googleAuth;
app.config.globalProperties.$gAuth.load(GoogleAuthConfig, prompt)

// ... 생략
이건 나중에 기존 프로젝트 포크따서 올려둬야겠다.
Vue3 공식 홈페이지를 참조해서 후에 this.$gAuth를 사용할 수 있게 전역 모듈을 등록한 것이다.
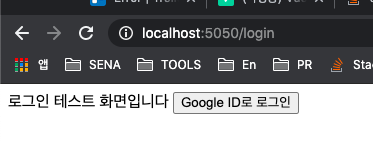
여기까지 해주었다면 로그인 페이지를 다시 열어보자.

에러없이 화면이 잘 떴다. 🌟
Google ID로 로그인 버튼을 누르면 새로운 팝업에 구글 로그인 화면이 뜨고 로그인 할 수 있다!
사용자 정보 받아오기
로그인을 했으면 했다고 떴으면 좋겠다.
화면을 조금 변경해보자.
frontend/src/views/Login.vue
<template>
	...

    <button
      :disabled="signedIn"
      @click="handleLogin"
    >
      Google ID로 로그인
    </button>

    <div>
      <p> 로그인 여부: {{signedIn}}</p>
      <img :src="userImage" width="50" height="50"/>
      <p> 로그인 사용자 이름: {{ userName }} </p>
      <p> 로그인 사용자 이메일: {{ userEmail }} </p>
    </div>
    ...
</template>
<script>
export default {
  name: 'Login',
  data: () => ({
    signedIn: false,
    userName: null,
    userEmail: null,
    userImage: null,
  }),
  methods: {
    clear() {
      this.signedIn = null;
      this.userName = null;
      this.userImage = null;
      this.userEmail = null;
    },

    async handleLogin() {
      try {
        const GoogleUser = await this.$gAuth.signIn();
        if (!GoogleUser.isSignedIn()) throw new Error('로그인에 실패했습니다.');

        this.signedIn = GoogleUser.isSignedIn();
        this.userName = GoogleUser.getBasicProfile().getName();
        this.userImage = GoogleUser.getBasicProfile().getImageUrl();
        this.userEmail = GoogleUser.getBasicProfile().getEmail();
      } catch (e) {
        console.error(e);
      }
    },
  },
};
</script>
GoogleUser에서 받아올 수 있는 정보는 공식 홈페이지를 보고 따왔다.
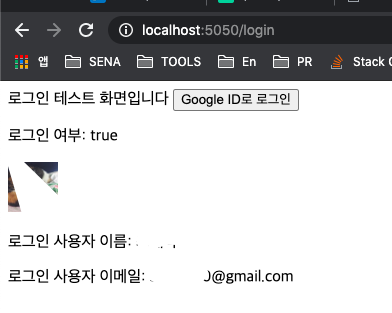
다시 로그인 페이지로 돌아가서 로그인을 해보자.

짠! 구글에서 받아온 프로필 이미지, 이름, 이메일 주소 등이 정상적으로 출력된다.
초간단 로그아웃
frontend/src/views/Login.vue
로그아웃 버튼과 로그아웃 함수, 정보 클리어 함수를 구현한다.
...
    <button
      :disabled="!token"
      @click="handleLogout"
    >
      로그아웃
    </button>
...
methods: {
    clear() {
      this.signedIn = null;
      this.userName = null;
      this.userImage = null;
      this.userEmail = null;
    },

    ...

    async handleLogout() {
      try {
        await this.$gAuth.signOut();
        this.clear();
      } catch (e) {
        console.error(e);
      } finally {
        this.$router.push('/');
      }
    }
로그아웃 버튼을 눌러 동작을 확인한다.
안될리가 없지 😏 잘 된다.
다만 여기까지 했을 때의 문제점은 이 화면에 들어올 때 마다 로그인을 다시 해야 한다 는 것이다.
그러니 토큰 매니저를 만들어서 브라우저의 쿠키를 사용하자.
.. 는 내일하자.
끝


이까지 하고 보니 vue-google-oauth2 개발자분이 vue3를 위해 새로운 버전을 릴리즈 하셨던걸 뒤늦게 발견했다 ^^ 후... 서치좀 잘하자 나자신....
저처럼 고생하지 마세요 => https://github.com/guruahn/vue3-google-oauth2