Pod Scheduling에 대해 공부한 내용을 정리한 글입니다.
이번 포스팅에서는 Node Selector, Node Affinity, Pod Affinity, Taint & Toleration에 대해 정리했습니다.
쿠버네티스 공식 홈페이지 - Assigning Pods to Nodes
(https://kubernetes.io/docs/concepts/scheduling-eviction/assign-pod-node/)를 참고하여 진행하였습니다.
또한, 마스터 노드1, 워커노드 2로 실습 진행하였습니다.
🤣🤩😊CKA 자격증 준비 및 쿠버네티스 공부 정리입니다.
관리자가 직접 특정 Worker Node에 Pod가 배포되도록 스케줄링해줄 수 있습니다!
Node Selector
node selector는 특정 라벨이 있는 노드로 포드를 제한하는 가장 간단한 방법입니다.
- 쿠버네티스 클러스터를 구성하는 default Label확인하기
$ kubectl get nodes --show-labels
각 node의 CPU, OS, host name이 labeling 되어 있는 것을 알 수 있었습니다.
특이점은 ControlPlane Node에는 node-role.kubernetes.io/controlplane= Label이 등록되어 있습니다.
- node에 labeling 해보기
$ kubectl label nodes node01 key=worker1
$ kubectl get node node01 --show-labels
key=worker1이라는 label이 잘 할당되었습니다!
Node Selector를 사용해서 특정 Node에 Pod 배포
deployment를 하나 만들어서 labeling된 node로 pod들을 할당해보겠습니다.
# my-nginx.yaml 작성
apiVersion: apps/v1
kind: Deployment
metadata:
  labels:
    app: my-nginx
  name: my-nginx
spec:
  replicas: 3
  selector:
    matchLabels:
      app: my-nginx
  template:
    metadata:
      labels:
        app: my-nginx
    spec:
      nodeSelector:			# `spec.template.spec.`에 위치합니다!
        key: worker1
      containers:
      - image: nginx
        name: nginx
        ports:
        - containerPort: 80

key=worker1의 라벨링이된 node01로 pod들이 할당된 것을 알 수 있습니다.
node의 라벨 삭제하는법
kubectl label nodes [Node name] [key]-
$ kubectl label nodes node01 key-Affinity
선호도라는 뜻으로 Pod를 배치함에 있어 선호하는 Node나 Pod를 설정할 수 있게 하는 리소스이다.
nodeSelector의 경우 label naming을 기준으로 Pod를 특정 노드 또는 특정 노드 그룹에 배포하는 방식을 사용하였다면, affinity는 다양한 조건을 제시할 수 있고 유연하게 처리할 수 있습니다.
- node affinity: 노드 기준
- pod affinitiy: 다른 파드가 배포된 노드를 기준
Node Affinity/Anti-Affinity

node affinity의 두가지 유형
requiredDuringSchedulingIgnoredDuringExecution(강제)preferredDuringSchedulingIgnoredDuringExecution(반강제)
required는 파드가 스케줄링 되기 위해서는 반드시 규칙을 만족해야하고, preferred는 가급적 규직을 만족하는 것이 좋지만 강제 사항은 아니다.
- 어피니티는 파드가 실행 중일때 규칙이 적용되는 것이 아니라 스케줄링 중에 적용된다. 따라서 실행 중에 파드를 수정하여 어피니티를 만족하지 않더라도 다른 노드로 이동시키지 않는다.
- 한 Pod에 다수의 Node Affinity를 적용할 수 있다.
node01에는 key=worker1, comet=value1
node02에는 key=worker1, comet=value2

node affinity 시나리오
required node affinity로 key=worker1를 만족하지만, prefered node affinity로 comet=value2에 점수를 더 주어 우선순위를 바꿔보겠습니다.
# required.yaml 작성
apiVersion: apps/v1
kind: Deployment
metadata:
  labels:
  name: node-affinity-required
spec:
  replicas: 3
  selector:
    matchLabels:
      app: node-affinity-required
  template:
    metadata:
      name: node-affinity-required
      labels:
        app: node-affinity-required
    spec:
      containers:
      - image: nginx
        name: nginx
        ports:
        - containerPort: 80
          protocol: TCP
      affinity:
        nodeAffinity:
          requiredDuringSchedulingIgnoredDuringExecution: # 무조건 만족해야함
            nodeSelectorTerms:
            - matchExpressions:
              - key: key
                operator: In 	# or 연산
                values:
                - worker1
          preferredDuringSchedulingIgnoredDuringExecution: # 무조건으로 만족 안해도 됨.
          											#하지만, 가중치에 따라 우선순위가 변경됨.
          - weight: 10			# 가중치 (1~100)
            preference:
              matchExpressions:
              - key: comet
                operator: In
                values:
                - value2

[이유]
두 노드 모두 무조건 필요한 조건인 requiredDuringSchedulingIgnoredDuringExecution
을 만족하지만, preferredDuringSchedulingIgnoredDuringExecution에서 comet=value2의 라벨을 가지고 있는 node02가 가중치를 더 얻어서 할당이 된 것을 알 수 있습니다.
[포인트]
- operator(연산자)로는
In, NotIn, Exists, DoesNotExist, Gt, Lt등을 활용할 수 있습니다. In은 or 연산자로 생각하시면 됩니다. - 그 말은 key - value 값에서 여러 value를 or 연산으로 진행이 가능하다는 점입니다.
- preferred affinity의
weight은 1~100의 값을 가질 수 있습니다.
Anti Node Affinity
Node Affinity 개념에서 반대의 개념을 가지고 있습니다.
부정 연산자(Not In, DoesNotExist)를 사용하여 달성할 수 있습니다.
pod가 comet=value1의 라벨을 가진 node를 피하게 만들어보겠습니다.
# anti-required.yaml 작성
apiVersion: apps/v1
kind: Deployment
metadata:
  labels:
  name: anti-node-affinity-required
spec:
  replicas: 3
  selector:
    matchLabels:
      app: anti-node-affinity-required
  template:
    metadata:
      name: anti-node-affinity-required
      labels:
        app: anti-node-affinity-required
    spec:
      containers:
      - image: nginx
        name: nginx
        ports:
        - containerPort: 80
          protocol: TCP
      affinity:
        nodeAffinity:
          requiredDuringSchedulingIgnoredDuringExecution:
            nodeSelectorTerms:
            - matchExpressions:
              - key: comet
                operator: NotIn		 # 부정연산자 사용
                values:
                - value1
Pod Affinity / Anti-Affinity
- 이미 실행 중인 다른 Pod를 참고하여 스케줄링하는 방법
- Pod의 Label을 기준으로 조건을 만족하는 경우 pod를 기동하는 방식
- pod Affinity는 상당한 양의 데이터 처리가 필요하므로 대규모 클러스터의 예약속도가 크게 느려질 수 있습니다. 대규모의 클러스터에서는 지양됩니다.
- pod의 anti-affinity를 위해서는 모든 노드에 일관되게 라벨이 지정되어야 합니다.
(topology key)
Node Affinity와 유사하게 두가지 유형이 존재합니다.
requiredDuringSchedulingIgnoredDuringExecutionpreferredDuringSchedulingIgnoredDuringExecution
node affinity - pod affinity 차이점
- Topology Key: 노드의 레이블 key를 설정하며, 보통 3가지의 key를 사용합니다.
- 노드 단위: kubernetes.io/hostname
- Zone 단위: topology.kubernetes.io/zone
- Region 단위: topology.kubernetes.io/region
Zone(AZ: Availablity Zone - 가용영역)
Region(Seoul, Us..)
Pod Affinity 테스트를 위해 특정 node에 Pod를 하나 띄울 필요가 있습니다.
# nginx.yaml 작성
apiVersion: v1
kind: Pod
metadata:
  labels:
    app: nginx
  name: nginx
spec:
  containers:
  - image: nginx
    name: nginx
    ports:
    - containerPort: 80
- pod-affinity를 사용해보겠습니다. (Required)
# pod-required.yaml작성
apiVersion: apps/v1
kind: Deployment
metadata:
  name: pod-affinity-required
spec:
  replicas: 3
  selector:
    matchLabels:
      app: hello
  template:
    metadata:
      name: hello
      labels:
        app: hello
    spec:
      containers:
      - name: nginx
        image: nginxdemos/hello:plain-text
        ports:
        - name: http
          containerPort: 80
          protocol: TCP
      affinity:
        podAffinity:
          requiredDuringSchedulingIgnoredDuringExecution:
          - labelSelector:
              matchExpressions:
              - key: app 	# 이미 존재하는 pod의 key값 명세
                operator: In
                values:
                - nginx		# 이미 존재하는 pod의 key에 맞는 value
            topologyKey: kubernetes.io/hostname 	# 노드 단위로 범위설정

app=nginx의 라벨을 가진 nginx pod가 node01에 존재하므로 pod affinity를 통해 pod-required.yaml로 배포된 pod들이 node01에 할당되는 것을 알 수 있었습니다.
- preferred
apiVersion: apps/v1
kind: Deployment
metadata:
  name: pod-affinity-preferred
spec:
  replicas: 3
  selector:
    matchLabels:
      app: hello
  template:
    metadata:
      name: hello
      labels:
        app: hello
    spec:
      containers:
      - name: nginx
        image: nginxdemos/hello:plain-text
        ports:
        - name: http
          containerPort: 80
          protocol: TCP
      affinity:
        podAntiAffinity:
          preferredDuringSchedulingIgnoredDuringExecution:
          - weight: 50
            podAffinityTerm:
              labelSelector:
                matchExpressions:
                - key: app
                  operator: In  # nodeAffinity와는 다르게 podAntiAffinity일 경우 In을 쓰면
                  #매치되는 라벨을 가진 파드의 노드에 할당되지 않는다.

                  values:
                  - nginx
              topologyKey: kubernetes.io/hostname

app=nginx의 라벨을 가지는 nginx pod가 node01에 존재하므로 podAntiAffinity를 설정하고 연산자를 IN으로 하였을 때 node01에 할당되지 않는 것을 확인 할 수 있었습니다.
Taints & Tolerations
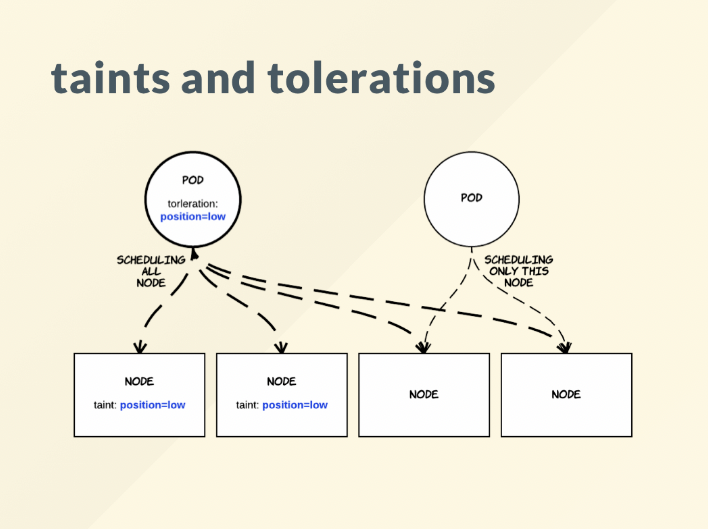
위에서 살펴본 nodeSelector와 Affinity종류들과는 다른 속성을 가지고 있습니다.
오염과 관용이라는 뜻으로 오염된 노드에는 pod를 배치할 수 없는 개념입니다.
Taint는 반대로 노드가 일련의 pod를 밀어낼 수 있도록 해줍니다.
Toleration은 Pod에 적용되어 스케줄러가 일치하는 Taint로 Pod를 예약할 수 있습니다.
taint와 toleration은 함께 작동하여 Pod가 부적절한 노드에 예약되지 않도록 합니다.
쉽게 설명하면
- taint : 노드마다 설정할 수 있으며, 설정한 노드에는 pod가 스케줄되지 않음, 노드에 동시에 여러개의 taint 설정 가능
- toleration : pod에 설정되며, taint를 무시할 수 있음, pod에 동시에 여러개의 toleration 설정 가능
주로 노드가 지정된 역할만 하게 만들 때 사용됩니다.
예를 들어서,
- GPU가 있는 클러스터에서는 GPU를 사용하지 않는 pod들을 밀어낸다
- 노드에 문제가 있을 경우 pod별로 구성 가능한 제거 동작할 때 사용
(다음 포스팅에 다룰 예정입니다!)
Taint
taint의 사용할 수 있는 3가지 옵션
- NoSchedule : toleration이 없으면 pod이 스케쥴되지 않음, 기존 실행되던 pod에는 적용 안됨
- PreferNoSchedule : toleration이 없으면 pod을 스케줄링안하려고 하지만 필수는 아님, 클러스터내에 자원이 부족하거나 하면 taint가 걸려있는 노드에서도 pod이 스케줄링될 수 있음
- NoExecute : toleration이 없으면 pod이 스케줄되지 않으며 기존에 실행되던 pod도 toleration이 없으면 종료시킴.-
taint의 형식은 다음과 같습니다.
Label과 같이 key-value 형식을 지원하지만, taint는 option이 붙습니다.
$kubectl taint nodes {nodename} {key}={value}:{option}Taint 예시
taint 할당 명령어
$kubectl taint node node01 key1=value1:NoScheduletaint 할당 해제 명령어
# key1=value1:NoSchedule 제거
$kubectl taint node node01 key1=value1:NoSchedule-

# key1 키를 가진 모든 Taint 제거
$ kubectl taint node node01 key1-
node01에 key1=value1:NoSchedule이라는 taint를 부여해보겠습니다.

이처럼, 이미 node01에 할당되어 있는 pod들은 그대로 실행중에 놓여있습니다. node01의 상태를 확인해보겠습니다.
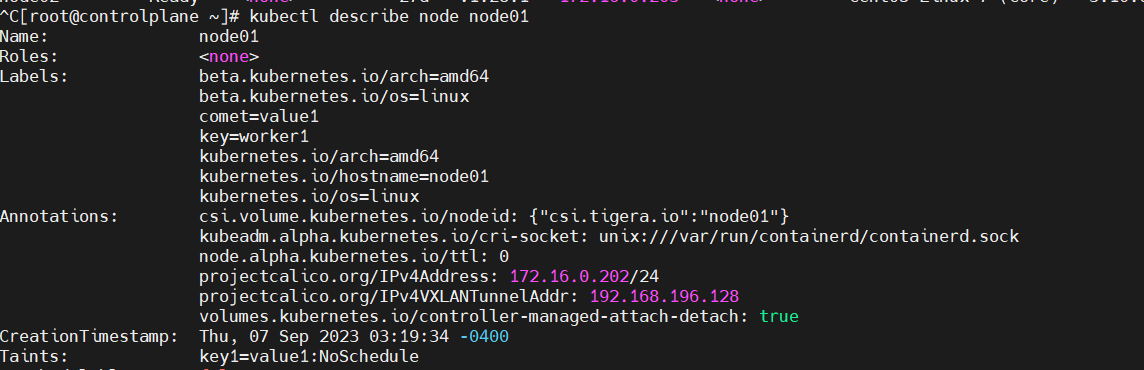
Taint의 상태가 NoSchedule로 잡혀있는 것을 확인할 수 있었습니다.
node01에 pod를 할당해보겠습니다.

위에서 실습내용 중에 pod-required.yaml이 node01로 할당하는 실습이 존재했었는데요, taint된 node01에서 확인해보기 위해서
$ kubectl delete -f pod-required.yaml

$ kubectl create -f pod-required.yaml
을 진행하여, 기존의 pod를 지우고, 새로 만들어 보았습니다.
Taint 실습 중 에러

그런데 문제가 발생했습니다. 예상대로, node01에 할당되어야 할 pod들은 pending상태로 머물러 있는 것을 확인하였지만, 기존의 pod들은 삭제되지 않고 머물러 있는 것이었습니다.
시간이 지나면 없어지겠지..? 하는 중에 시간이 어느정도 지나도 지워지지 않았습니다..
해당 pod를 describe로 열어보니,..

이유를 정확하게 찾을 수가 없어서 강제삭제하는 명령어를 찾아보았다.
$ kubectl -n <namespace> delete pods --grace-period=0 --force <pod_name>
강제 삭제에 성공했다! 구글링하면서 알아본 것인데, 이렇게 terminating 상태가 안 없어 지는 경우가 종종 있다고..
만약, pod의 상태가 Unknown상태로 남아있게 된다면 아래 방법을 사용해보자.
$ kubectl patch pod <pod> -p '{"metadata":{"finalizers":null}}'Toleration 설정 방법
Toleration은 Pod에 정의가되며,
.spec아래tolerations:로 기록된다.
toleration은 여러개를 동시에 가질 수 있다.
spec:
....
  template:
....
  spec:
    tolerations:
    - key: "key1"
      operator: "Equal"
      value: "value1"
      effect: "NoExecute"
      tolerationSeconds: 3600
toleration은 operator라는 속성을 가지고 있다.
- Equal: key/value/effect 매개변수가 일치해야합니다. 이는 기본값입니다.
- Exists: key/effect 매개변수가 일치해야합니다. 일치하는 빈 value 매개변수를 남겨 두어야합니다.
Exists는 값을 확인하지 않고 필요하지도 않습니다. 실제로도 operation에 Exists을 주고 value를 포함해서 적용하려고 하면 에러가 납니다. 또한 키, 효과 값을 주지 않고 Exists옵션만 줄수도 있는데 이러면 모든 키와 효과에 적용되서 어떤 taint가 걸려있던 상관없이 스케쥴링되서 포드가 실행됩니다.
toleration 예시
kubectl taint nodes node1 key1=value1:NoSchedule
kubectl taint nodes node1 key1=value1:NoExecute
kubectl taint nodes node1 key2=value2:NoSchedule
위와 같이 노드에 여러개의 taint 설정을 하였습니다.
그리고 pod에는 다음과 같이 두가지 toleration이 존재합니다.
tolerations:
- key: "key1"
  operator: "Equal"
  value: "value1"
  effect: "NoSchedule"
- key: "key1"
  operator: "Equal"
  value: "value1"
  effect: "NoExecute"
이 경우, 세 번째 taint와 일치하는 toleration이 없기 때문에 pod는 노드에 스케줄되지 않습니다. 하지만, 세 번째 taint가 NoSchedule이기 때문에, taint가 추가 될 때 노드에서 이미 실행 중이었을 경우, pod는 계속 실행할 수 있습니다.
tolerationSeconds
일반적으로, NoExcute가 있는 taint가 노드에 추가되면, 그에 맞는 toleration이 없는 pod의 경우, 바로 할당이 풀린고 종료시킵니다. 하지만, NoExecute 이펙트가 있는 톨러레이션은 테인트가 추가된 후 파드가 노드에 바인딩된 시간을 지정하는 선택적 tolerationSeconds 필드를 지정할 수 있다. 예를 들어,
apiVersion: v1
kind: Pod
metadata:
  labels:
    run: nginx
  name: toleration-nginx
spec:
  containers:
  - image: nginx
    name: nginx
  tolerations:
  - key: "key1"
    operator: "Equal"
    value: "value1"
    effect: "NoExecute"
    tolerationSeconds: 3600
위의 내용은 pod가 실행 중이고, 일치하는 taint가 노드에 추가되면 3600초 동안 바인딩 된 후, 방출됨을 의미합니다. 그 전에 taint를 제거하면, pod가 방출되지 않습니다.
node01에 할당된 toleration-nginx pod가 존재하는 중, taint를 설정해보겠습니다.
$ kubectl taint node node01 key1=value1:NoExcute
위와 같이 node01에 할당된 nginx pod는 toleration이 설정되어 있지 않기 때문에 terminating이 되는 것을 확인할 수 있었고, 3600초 뒤에 toleration-nginx도 terminating 될 것입니다.
정리
위에 포스팅한 것과 같이 pod-scheduling의 3가지 방법에 대해 알아보았습니다.
- nodeselector : label을 통해 pod 스케줄링
- affinity : 다양한 조건을 통한 pod 스케줄링
- taint & toleration : affinity와 비슷하지만 기본적으로 taint를 통해 node를 아예 사용하지 못하게 하며 toleration을 통해 허용해주는 형식
affinity, taint&toleration 그림 예시
위의 내용으로 확인해 보았을 때,
taint는 주로 노드 관리용, affinity는 주로 pod scheduling에 초점이 맞춰져 있다는 것을 확인하였습니다.
다음 포스팅은 taint와 연관된 cordon & drain에 대해 다뤄보겠습니다.