
프로젝트를 진행하면서, 기존에는 수동으로 DI를 구현하고 있었습니다.
하지만 시간이 지나고 DI에 대해 깊게 학습하게 되었고,
Hilt나 Koin과 같은 DI 라이브러리(또는 프레임워크)를 사용할 수 있게 되었습니다.
이에 따른 마이그레이션 과정을 글로 작성하고자 합니다.
Hilt를 고른 이유
첫 번째로, 안드로이드 공식 문서에서 권장하고 있습니다.
Hilt는 Android에서 종속 항목을 삽입하기 위한 Jetpack의 권장 라이브러리입니다. Hilt는 프로젝트의 모든 Android 클래스에 컨테이너를 제공하고 수명 주기를 자동으로 관리함으로써 애플리케이션에서 DI를 실행하는 표준 방법을 정의합니다.
Hilt는 Dagger가 제공하는 컴파일 시간 정확성, 런타임 성능, 확장성 및 Android 스튜디오 지원의 이점을 누리기 위해 인기 있는 DI 라이브러리인 Dagger를 기반으로 빌드되었습니다.
공식적으로 지원하는 만큼, Jetpack의 다른 라이브러리와 호환성이 높습니다.
(WorkManager, ViewModel 등..)
두 번째로, 어노테이션을 통해 컴파일 타임에 의존성을 주입합니다.
이는 타입 안정성을 제공하며, Koin과 가장 큰 차이점이라고 생각합니다.
마지막 이유는 개인적으로 Hilt가 Koin에 비해 보일러플레이트 코드도 적고,
러닝 커브도 조금 더 낮다고 생각합니다.
이러한 이유로 저희는 Hilt를 택했습니다.
물론 KMP를 염두에 두고 있다면 Koin이나 Metro와 같은 순수 코틀린으로 만들어진 라이브러리를 사용해야 합니다.
의존성 추가
libs.versions.toml
hilt = "2.57.2"
androidx-hilt = "1.3.0"
javax = "1"
ksp = "2.0.21-1.0.28"

[libraries]
hilt-android = { group = "com.google.dagger", name = "hilt-android", version.ref = "hilt" }
hilt-compiler = { group = "com.google.dagger", name = "hilt-compiler", version.ref = "hilt" }
androidx-hilt-compiler = { group = "androidx.hilt", name = "hilt-compiler", version.ref = "androidx-hilt" }
androidx-hilt-work = { group = "androidx.hilt", name = "hilt-work", version.ref = "androidx-hilt" }
javax-inject = { module = "javax.inject:javax.inject", version.ref = "javax" }

[plugins]
hilt-android = { id = "com.google.dagger.hilt.android", version.ref = "hilt" }
ksp = { id = "com.google.devtools.ksp", version.ref = "ksp" }
기존에는 kapt를 사용하고 있었기 때문에, 더 최적화된 ksp로 변경했습니다.
ksp 버전은 코틀린 버전에 따라 달라지기 때문에, 깃허브에서 본인의 프로젝트에 맞는 ksp 버전을 찾아서 적용하시면 되겠습니다.
build.gradle.kts
plugins {
    alias(libs.plugins.ksp) apply false
    alias(libs.plugins.hilt.android) apply false
}
app/build.gradle.kts
plugins {
    alias(libs.plugins.ksp)
    alias(libs.plugins.hilt.android)
}

dependencies {
    ksp(libs.hilt.compiler)
    ksp(libs.androidx.hilt.compiler)
    implementation(libs.hilt.android)
    implementation(libs.androidx.hilt.work)
}
data/build.gradle.kts
plugins {
    alias(libs.plugins.ksp)
    alias(libs.plugins.hilt.android)
}

dependencies {
    ksp(libs.hilt.compiler)
    implementation(libs.hilt.android)
}
domain/build.gradle.kts
dependencies {
	implementation(libs.javax.inject)
}
저와 같은 멀티 모듈 환경이라면, 도메인 모듈에 javax.inject 의존성을 꼭 추가해야 합니다.
이거 없어서 계속 오류가 났었습니다..🥲
di/build.gradle.kts
plugins {
    alias(libs.plugins.ksp)
    alias(libs.plugins.hilt.android)
}

dependencies {
    ksp(libs.hilt.compiler)
    implementation(libs.hilt.android)
}
presentation/build.gradle.kts
plugins {
    alias(libs.plugins.ksp)
    alias(libs.plugins.hilt.android)
}

dependencies {
    ksp(libs.hilt.compiler)
    ksp(libs.androidx.hilt.compiler)
    implementation(libs.hilt.android)
    implementation(libs.androidx.hilt.work)
}
이제 기본적인 환경 설정은 끝났습니다.
Hilt 적용
Application
가장 먼저 기존의 Application 클래스에 어노테이션을 추가합니다.
@HiltAndroidApp
class BottariApplication : Application(), Configuration.Provider {
    @Inject
    lateinit var workerFactory: HiltWorkerFactory

    override val workManagerConfiguration: Configuration
        get() =
            Configuration
                .Builder()
                .setWorkerFactory(workerFactory)
                .build()

    override fun onCreate() {
        super.onCreate()
        BottariLogger.init(this)
        BottariLogger.global(APPLICATION_INIT_MESSAGE)
    }

    companion object {
        private const val APPLICATION_INIT_MESSAGE = "BOTTARI APPLICATION INIT"
    }
}
Application 클래스에 @HiltAndroidApp 어노테이션을 추가하면,
최상위 컴포넌트인 SingletonComponent가 생성됩니다.
SingletonComponent는 최상위 수준의 DI 컨테이너이며,
여기서 필요한 인스턴스를 생성하고 제공하게 됩니다.
또한 SingletonComponent는 앱 자체의 생명 주기와 연결되어 있습니다.
그 외에 Worker와 관련된 부분은 나중에 다시 설명하겠습니다.
Activity, Fragment
액티비티나 프래그먼트는 안드로이드의 클래스이며,
우리는 해당 인스턴스를 생성할 때 직접 생성자를 만들지 않습니다.
결국 안드로이드 프레임워크가 생명 주기에 맞춰 인스턴스를 생성합니다.
때문에 액티비티나 프래그먼트에서 필요한 의존성을 Hilt에게 주입해달라고 해야 합니다.
이 때 @AndroidEntryPoint라는 어노테이션을 붙여서 Hilt에게 알립니다.
@AndroidEntryPoint
class MainActivity : BaseActivity<ActivityMainBinding>(ActivityMainBinding::inflate) {
// by viewModels()를 통해 ViewModel 생성을 Hilt에게 위임한다.
// ViewModel에게도 자동으로 의존성을 주입한다.
private val viewModel: MainViewModel by viewModels()
// 필드 주입이 필요한 경우 아래와 같이 작성하면 된다.
// private 키워드를 추가하면 오류가 발생한다.
@Inject
lateinit var foo: Foo
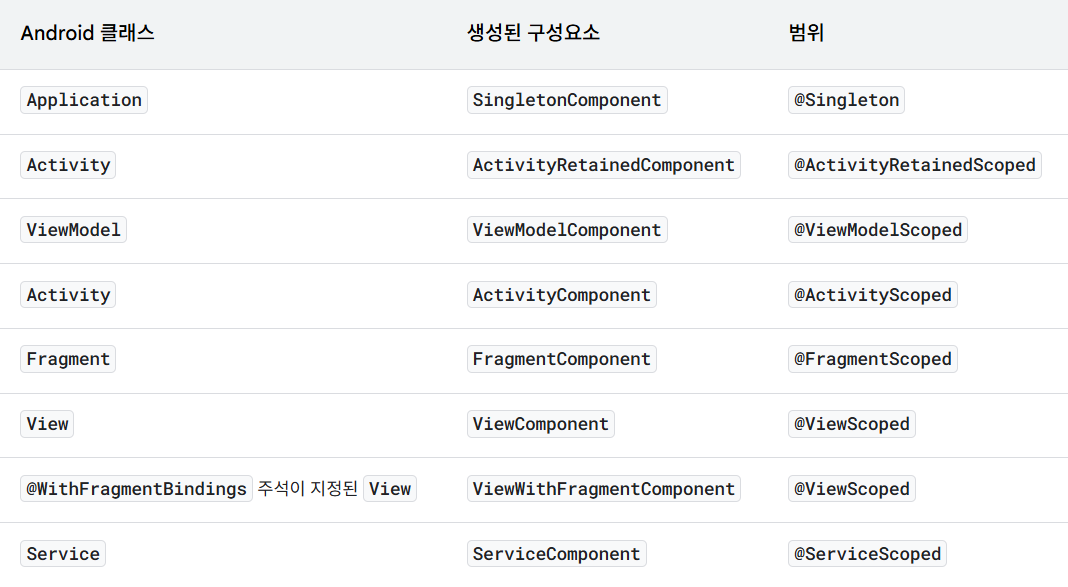
}어노테이션을 붙이면 자신만의 컴포넌트(DI 컨테이너)를 갖게 됩니다.
(액티비티의 경우 ActivityComponent, 프래그먼트의 경우는 FragmentComponent)
해당 컴포넌트들은 각각의 생명주기를 가지며, 상위 컴포넌트에서 의존성을 주입받을 수 있습니다.
@AndroidEntryPoint 어노테이션이 지원되는 클래스는 다음과 같습니다.
- Activity (
ComponentActivity) - Fragment
- View
- Service
- BroadcastReceiver
참고로 BroadcastReceiver는 별도의 처리가 필요합니다.
이 또한 아래에서 다시 설명드리겠습니다.
ViewModel
위의 안드로이드 클래스들과 마찬가지로, ViewModel 또한 직접 인스턴스를 생성하지 않고 생성을 위임하는 방식으로 코드를 작성해왔습니다. (ViewModelProvider)
만약 ViewModel이 다른 객체에 의존하고 있다면 안드로이드 프레임워크에서는 그 의존성을 어떻게 주입해주어야 할지 모릅니다.
그래서 우리는 ViewModelFactory를 사용해왔습니다.
val Factory: ViewModelProvider.Factory =
	viewModelFactory {
		initializer {
			val savedStateHandle = createSavedStateHandle()
			MyBottariViewModel(
				savedStateHandle = savedStateHandle,
				fetchBottariesUseCase = UseCaseProvider.FetchBottariesUseCase,
                        ..
			)
		}
	}
하지만 이 방법은 ViewModel을 생성할 때마다 보일러플레이트 코드가 늘어나며,
심지어 의존성 관리 또한 수동으로 처리하고 있었습니다.
Hilt에서는 이러한 문제를 해결할 수 있습니다.
@HiltViewModel
class MyBottariViewModel @Inject constructor(
    private val fetchBottariesUseCase: FetchBottariesUseCase,
    private val fetchTeamBottariesUseCase: FetchTeamBottariesUseCase,
)
먼저 @HiltViewModel 어노테이션을 추가하고, 그 다음 생성자에 @Inject 어노테이션을 추가합니다.
이에 따른 동작을 순서대로 살펴보겠습니다.
- Hilt가
@Inject어노테이션이 붙은 생성자를 인식합니다. - Hilt 컴파일러가
MyBottariViewModel팩토리를 생성합니다. - 해당 ViewModel을
ViewModelComponent에 등록합니다.
이제 액티비티나 프래그먼트에서 by viewModels()를 호출하면
Hilt가 생성한 팩토리를 통해 의존성이 주입된 다음 뷰모델이 생성됩니다.
만약 뷰모델이 의존하는 인스턴스들이 이미 상위 컴포넌트에 등록되어 있다면,
생성된 인스턴스를 가져와서 사용하게 됩니다.
예를 들어 위의 유즈케이스 인스턴스가 SingletonComponent에 등록되어 있는 경우,
ViewModelComponent가 SingletonComponent에 해당 인스턴스를 요청합니다.
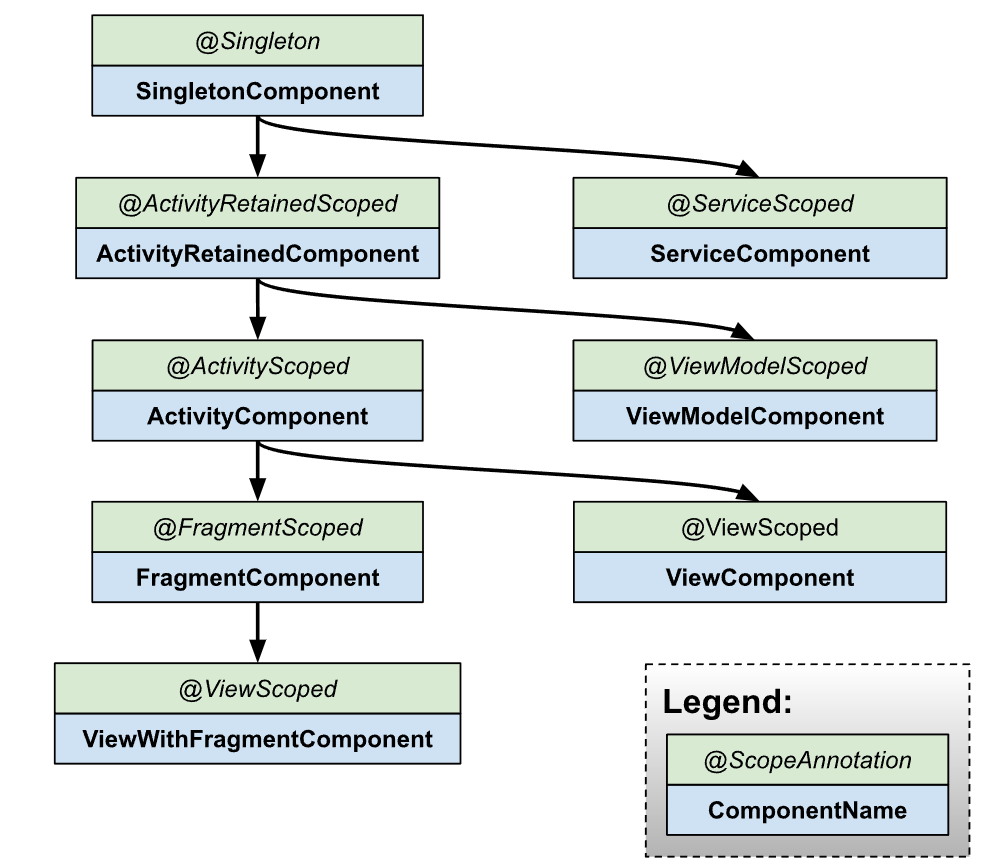
위에서도 잠깐 언급했듯이, 하위 컴포넌트는 상위 컴포넌트를 참조할 수 있고
그 역방향은 불가능합니다.
이 의존성 그래프는 Hilt 동작 원리를 이해하는 데 중요하므로
눈에 익혀두시면 좋을 것 같습니다.
모듈
이제 우리는 뷰모델에 필요한 인스턴스를 제공해야 합니다.
잠시 예를 들어보겠습니다.
class AlarmScheduler @Inject constructor() 위의 AlarmScheduler의 경우에는 @Inject 어노테이션만 추가해도
Hilt에서 자동으로 생성할 수 있습니다.
만약 아래와 같은 경우여도 마찬가지일 것입니다.
class DateFormatter @Inject constructor(
	// 해당 어노테이션을 통해 컨텍스트를 주입받을 수 있다.
	@ApplicationContext context: Context,
)
하지만 뷰모델에 인터페이스를 주입하려면 이러한 방법은 사용할 수 없습니다.
인터페이스는 여러 클래스가 상속받을 수 있기 때문에,
Hilt는 어떤 인스턴스를 주입해야 하는지 알 수 없기 때문입니다.
이러한 경우 우리는 모듈을 생성해서 문제를 해결할 수 있습니다.
모듈은 Hilt가 스스로 생성 방법을 알지 못하는 객체들의 생성 방법을 알려주는 설명서입니다.
만약 뷰모델에서 API를 호출한다고 가정해보겠습니다.
ViewModel (Presentation)
	↓
 UseCase (Domain)
	↓
Repository (Domain)
	↑
Repository 구현체 (Data)
	↓
DataSource (Data)
	↓
Retrofit 클라이언트
이러한 클린 아키텍쳐 구조에서 Repository, DataSource는 인터페이스이고
Retrofit 클라이언트는 외부 라이브러리의 인스턴스입니다. (빌더 패턴으로 생성)
이 상황에서 Hilt는 각 인스턴스의 생성 방법을 알지 못하기 때문에
모듈이라는 형태로 개발자가 직접 제공해 주어야 합니다.
모듈은 보통 object 혹은 abstract class로 생성합니다.
또한 object일 때는 @Provides를 사용하고, 추상 클래스에서는 @Binds를 사용합니다.
이 둘의 차이점을 제가 이해한 방식대로 서술하면 다음과 같습니다.
@Provides: 외부 라이브러리 인스턴스, 빌더 패턴과 같이 복잡한 생성 방식을 가진 인스턴스, 인터페이스가 없는 구현체를 제공할 때 사용@Binds: 인터페이스를 반환하되, Hilt가 해당 구현체 생성 방법을 알 수 있을 때 사용
코드를 보면서 자세히 살펴보겠습니다.
@Provides
@Module
@InstallIn(SingletonComponent::class)
object DatabaseModule
Room 데이터베이스 인스턴스를 제공하는 모듈입니다.
우선 @Module 어노테이션과 @InstallIn 어노테이션을 추가합니다.
@Module은 해당 클래스가 생성 방법을 제공하는 클래스라는 것을 Hilt에게 알려주며,
@InstallIn은 생성된 인스턴스를 특정 컴포넌트에 설치하라는 것을 의미합니다.
위의 경우는 SingletonComponent에 설치하게끔 코드를 작성했습니다.
@Provides
@Singleton
fun provideBottariDatabase(
	@ApplicationContext context: Context,
): BottariDatabase = BottariDatabase.create(context)
다음으로 해당 인스턴스를 반환하는 메소드들을 작성합니다.
이렇게 하면 Hilt가 SingletonComponent에서 위 인스턴스들을 싱글톤으로 관리하게 됩니다.
위처럼 생성 방식이 복잡하거나(위에서는 데이터베이스의 팩토리 메소드로 복잡한 생성 로직을 감춤) 인터페이스가 없는 구현체의 경우 object와 @Provides를 통해 모듈을 구성하게 됩니다.
@Binds
다음은 추상 클래스를 사용하는 경우를 살펴보겠습니다.
@Module
@InstallIn(SingletonComponent::class)
abstract class DataSourceModule
이전과 마찬가지로 @Module과 @InstallIn 어노테이션을 추가합니다.
@Binds
@Singleton
abstract fun bindBottariLocalDataSource(
	impl: BottariLocalDataSourceImpl
): BottariLocalDataSource
제공하는 메소드 또한 추상 메소드가 되어야 합니다.
그리고 해당 메소드는 인터페이스를 반환하며 인자로 구현체를 받습니다.
이러한 코드가 가능한 이유는 구현체 생성 방식을 Hilt가 알고 있기 때문입니다.
class BottariLocalDataSourceImpl @Inject constructor(
    private val database: BottariDatabase,
) : BottariLocalDataSource
구현체에 @Inject를 추가해두어야 합니다.
물론 위 코드를 @Provides로 대체할 수는 있지만,
@Binds를 사용할 수 있을 때는 사용하는 것이 성능 상 이점을 챙길 수 있습니다.
Qualifier
만약 Retrofit 클라이언트를 주입받아야 하는데,
통신 방식에 따라 다른 클라이언트를 주입받아야 하는 경우가 있습니다.
그럴 때는 Qualifier를 사용할 수 있습니다.
@Qualifier
annotation class SSEClientType

@Qualifier
annotation class MainClientType
먼저 @Qualifier를 추가한 어노테이션 클래스를 선언합니다.
@Provides
@Singleton
@MainClientType
fun provideOkHttpClient(
	loggingInterceptor: HttpLoggingInterceptor,
	authInterceptor: AuthInterceptor,
): OkHttpClient =
	OkHttpClient
		.Builder()
		.addInterceptor(loggingInterceptor)
		.addInterceptor(authInterceptor)
		.build()

@Provides
@Singleton
@SSEClientType
fun provideOkHttpSSEClient(
	authInterceptor: AuthInterceptor,
): OkHttpClient =
	OkHttpClient
		.Builder()
		.addInterceptor(authInterceptor)
		.connectTimeout(0, TimeUnit.MILLISECONDS)
		.readTimeout(0, TimeUnit.MILLISECONDS)
		.retryOnConnectionFailure(true)
		.build()
그 다음 모듈에서 각 클라이언트 생성 방식을 제공합니다.
이 때 위에서 선언한 어노테이션을 위에 추가해야 합니다.
이렇게 하면 메인 클라이언트가 필요한 곳에서는 @MainClientType을,
SSE 클라이언트가 필요한 곳에서는 @SSEClientType을 추가하면
Hilt가 자동으로 그에 해당하는 인스턴스를 제공합니다.
@Provides
@Singleton
fun provideRetrofitClient(
	// 일반적인 HTTP Client가 필요한 경우
	@MainClientType okHttpClient: OkHttpClient,
): RetrofitClient = RetrofitClient(okHttpClient)

@Provides
@Singleton
fun provideSSEClient(
	// SSE Client가 필요한 경우
	@SSEClientType okHttpClient: OkHttpClient,
): SSEClient = SSEClientImpl(okHttpClient)WorkManager에 Hilt 적용하기
기존에는 각 Worker에 대한 생성 방식을 팩토리를 통해 제공하고 있었습니다.
class NotificationWorkerFactory(
    private val fetchNotificationsUseCase: FetchNotificationsUseCase,
) : WorkerFactory() {
    override fun createWorker(
        appContext: Context,
        workerClassName: String,
        workerParameters: WorkerParameters,
    ): ListenableWorker? =
        when (workerClassName) {
            NotificationWorker::class.qualifiedName ->
                NotificationWorker(
                    context = appContext,
                    workerParams = workerParameters,
                    fetchNotificationsUseCase = fetchNotificationsUseCase,
                )

            else -> null
        }
}
이러한 방식 또한 의존성을 수동으로 관리해야 하고,
Worker가 늘어날 수록 보일러플레이트 코드가 증가하게 됩니다.
Hilt를 적용하면서 이러한 문제를 해결할 수 있게 되었습니다.
@HiltWorker
class NotificationWorker @AssistedInject constructor(
    @Assisted context: Context,
    @Assisted workerParams: WorkerParameters,
    private val fetchNotificationsUseCase: FetchNotificationsUseCase,
    private val alarmScheduler: AlarmScheduler,
)
먼저 Worker 클래스에 @HiltWorker 어노테이션을 추가하고,
생성자에 @AssistedInject 어노테이션을 추가합니다.
@HiltWorker를 추가하면 Hilt가 자동으로 WorkerFactory를 생성합니다.
또한 해당 작업을 작업 큐에 추가할 때 설정한 조건이 부합하게 되면,
WorkManager는 WorkerFactory에게 인스턴스를 생성하라고 요청합니다.
이 과정에서 Hilt가 생성했던 WorkerFactory가 작동하게 되는데,
Context나 WorkerParameters는 Hilt의 컨테이너에 없기 때문에 주입할 수 없습니다.
때문에 @Assisted를 추가하여 Hilt가 아닌 외부에서 주입한다는 것을 명시해야 합니다.
고로 @Assisted가 붙은 두 인자는 WorkManager가 직접 주입하게 됩니다.
override val workManagerConfiguration: Configuration
	get() {
		val workerFactory =
			DelegatingWorkerFactory().apply {
				addFactory(
					NotificationWorkerFactory(
						fetchNotificationsUseCase = CommonUseCaseProvider.fetchNotificationsUseCase,
                    ),
                )
            }
		return Configuration
				.Builder()
                .setWorkerFactory(workerFactory)
                .build()
	}
그리고 기존에는 Application이 Configuration.Provider를 상속받게 한 다음
미리 구현한 WorkerFactory를 전달하여 해당 팩토리를 통해 작업을 생성하게끔 했습니다.
하지만 Hilt를 적용하게 되면 이러한 코드를 작성하지 않아도 됩니다.
@Inject
lateinit var workerFactory: HiltWorkerFactory

override val workManagerConfiguration: Configuration
	get() =
		Configuration
			.Builder()
			.setWorkerFactory(workerFactory)
			.build()
이제 WorkerFactory도 모두 Hilt가 자동으로 생성하기 때문에,
HiltWorkerFactory를 주입받은 다음 전달하면 됩니다.
<provider
	android:name="androidx.startup.InitializationProvider"
	android:authorities="${applicationId}.androidx-startup"
	android:exported="false"
	tools:node="merge">
	<meta-data
 		android:name="androidx.work.WorkManagerInitializer"
		android:value="androidx.startup"
		tools:node="remove" />
</provider>
참고로 AndroidManifest.xml에서 위와 같이 설정해야 정상 작동합니다.
Service
Service는 액티비티, 프래그먼트와 마찬가지로 Hilt에서 의존성 주입을 지원합니다.
// FirebaseMessagingService는 Service를 상속받음
@AndroidEntryPoint
class ReminderMessagingService : FirebaseMessagingService() {
    @Inject
    lateinit var saveFcmTokenUseCase: SaveFcmTokenUseCase

    @Inject
    lateinit var notificationHelper: NotificationHelper
}
때문에 @AndroidEntryPoint를 추가하고 의존성을 주입받아야 하는 객체에 @Inject를 붙이면 자동으로 의존성이 주입됩니다.
BroadcastReceiver
BroadcastReceiver 또한 다른 컴포넌트와 마찬가지로 공식 지원하고 있습니다.
고로 아래와 같이 변경하면 되겠습니다.
@AndroidEntryPoint
class AlarmReceiver : BroadcastReceiver() {
    @Inject
    lateinit var alarmScheduler: AlarmScheduler

    @Inject
    lateinit var notificationHelper: NotificationHelper

    override fun onReceive(
    	context: Context?,
        intent: Intent?,
    ) { .. }
만약 안된다면..
여러 자료를 찾아봤는데, 된다는 사람도 있고 안된다는 사람도 있었습니다.
그렇다면 해결 방법은 간단합니다.
abstract class HiltBroadcastReceiver : BroadcastReceiver() {
    @CallSuper
    override fun onReceive(
        context: Context?,
        intent: Intent?,
    ) {
    }
}
위와 같은 추상 클래스를 선언합니다.
그리고 위 클래스를 상속받게끔 구현하면 됩니다.
@AndroidEntryPoint
class AlarmReceiver : HiltBroadcastReceiver() {
    @Inject
    lateinit var alarmScheduler: AlarmScheduler

    @Inject
    lateinit var notificationHelper: NotificationHelper

    override fun onReceive(
        context: Context?,
        intent: Intent?,
    ) {
    	// 반드시 호출해야 함
        super.onReceive(context, intent)
    }
이렇게 하지 않았을 때 의존성 주입이 안됐던 이유는 다음과 같습니다.
원래 Hilt가 의존성을 주입할 때 트리거가 존재하는데 (액티비티는 super.onCreate())
BroadcastReceiver의 super.onReceive()는 추상 메소드이기 때문에
아무런 호출도 하지 않았다고 합니다.
그래서 위의 HiltBroadcastReceiver같은 래퍼 클래스를 생성하고
@CallSuper를 통해 강제로 super.onReceive()를 호출하는 방식을 사용했습니다.
이 문제는 Hilt 버전이 올라감에 따라 해결된 것 같습니다.
만약 낮은 버전을 사용해야 한다면 위 방법을 사용하면 되겠습니다.
고려해야 할 점
꼭 싱글톤으로 관리할 필요는 없다
SingletonComponent에 인스턴스를 넣는다고 해서 싱글톤으로 관리되지는 않습니다.
인스턴스를 싱글톤으로 관리하려면 @Singleton 어노테이션을 추가해야 합니다.
(스코프를 지정하지 않으면 매번 인스턴스를 생성함)
하지만 싱글톤으로 관리할 필요가 없는데도 스코프를 지정하는 것은 지양해야 합니다.
Hilt 공식 문서에는 컴포넌트 사용에 대해 다음과 같이 서술하고 있습니다.
Scoping a binding has a cost on both the generated code size and its runtime performance so use scoping sparingly. The general rule for determining if a binding should be scoped is to only scope the binding if it’s required for the correctness of the code. If you think a binding should be scoped for purely performance reasons, first verify that the performance is an issue, and if it is consider using @Reusable instead of a component scope.
즉 스코프를 지정하는 것은 많은 비용을 필요로 하며,
정확성을 보장해야 하는 경우에만 @Singleton을 사용하라는 것입니다.
또한 성능때문에 스코프를 지정하는 경우에는 @Reusable 사용을 고려해보라고 합니다.
이 부분에 대한 정답은 없기 때문에, 자신의 상황에 맞게 사용해야 할 것 같습니다.
컴포넌트에 맞는 스코프를 지정해야 한다
만약 아래와 같은 코드가 있다면 어떻게 될까요?
@Module
@InstallIn(ViewModelComponent::class)
object MyModule {
	@Singleton
    @Provides
    fun provideRepository(): MyRepository = MyRepository()
}
실행하면 컴파일 에러가 발생합니다.
그 이유는 설치된 컴포넌트와 스코프가 일치하지 않기 때문입니다.
이 문제에 대한 답은 공식 문서에도 나와 있습니다.
Note: When scoping a binding within an @InstallIn module, the scope on the binding must match the scope of the component. For example, a binding within an @InstallIn(ActivityComponent.class) module can only be scoped with @ActivityScoped.
굳이 모듈을 만들 필요는 없다
모듈은 Hilt가 생성 방식을 알지 못하는 객체에 대해 생성 방법을 제공하는 것입니다.
그렇기 때문에 모든 인스턴스에 대해 모듈을 만들 필요는 없습니다.
class AlarmScheduler @Inject constructor(
    @ApplicationContext private val context: Context,
)
가령 이런 클래스가 있다면, @Inject를 붙이는 것만으로도 Hilt가 생성할 수 있기 때문에 모듈을 만들지 않아도 됩니다.
ViewModel에 값을 전달하려면?
만약 생성자로 초기값(예: 아이디)을 넘겨주어야 한다면?
바로 @AssistedInject를 사용하면 됩니다.
@HiltViewModel(assistedFactory = MyBottariViewModel.ViewModelFactory::class)
class MyBottariViewModel @AssistedInject constructor(
	@Assisted private val bottariId: Long,
    private val fetchBottariesUseCase: FetchBottariesUseCase,
    private val fetchTeamBottariesUseCase: FetchTeamBottariesUseCase,
)
모듈이 아닌 외부에서 AssistedFactory를 통해 주입받을 객체에 @Assisted를 추가합니다.
또한 @HiltViewModel의 assistedFactory에 아래에서 생성할 팩토리를 전달합니다.
@AssistedFactory
interface MyBottariViewModelFactory {
	fun create(bottariId: Long): MyBottariViewModel
}
그 다음 뷰모델 팩토리를 인터페이스로 선언합니다.
companion object {
	fun provideFactory(
    	viewModelFactory: MyBottariViewModelFactory,
        bottariId: Long,
    ): ViewModelProvider.Factory = viewModelFactory {
    	initializer {
        	viewModelFactory.create(bottariId)
        }
    }
}
이전에 하던 것처럼 뷰모델 생성을 구현합니다.
@Inject
lateinit var viewModelFactory: MyBottariViewModel.MyBottariViewModelFactory

private val viewModel: MyBottariViewModel by viewModels {
	MyBottariViewModel.provideFactory(viewModelFactory, bottariId)
}
이렇게 하면 기존의 UseCase는 DI 컨테이너에서 주입받고,
그 외의 값은 런타임에 주입받게 됩니다.
Compose 환경에서도 위와 같은 방법을 사용할 수는 있지만,
Navigation의 hiltViewModel()을 사용하는 방법이 더 좋을 것 같습니다.
val viewModel = hiltViewModel<MyBottariViewModel, MyBottariViewModel.MyBottariViewModelFactory> { factory ->
	factory.create(bottariId)
}
결론
지금까지 Hilt 적용 과정에 대해 알아봤습니다.
사실 아직도 Hilt에 대해 이해하지 못한 부분이 종종 있기 때문에,
최소한 돌아가는 정도로만 코드를 작성한 느낌이 없지 않아 있습니다.
특히 Compose에서 Hilt 활용법은 익숙하지 않기에,
충분히 학습하고 나서 코드에 적용해야 할 것 같습니다.
궁금하거나 문제가 있는 부분은 댓글로 알려주세요.
긴 글 읽어 주셔서 감사합니다.