Next.js + TS | Kakao 지도 API 프로젝트에 사용하기 #2 지도 띄우기
1탄에서 받아온 App Key를 이용해 Next.js + TS 프로젝트에 Kakao 지도 띄워보기!
Next.js에서 KaKao 지도를 띄우기 위한 방법에는
기본적으로 Map 컴포넌트를 만들어 활용할 수 있지만,
나는 다음과 같은 이유로 Provider로 만들어 지도를 띄우기로 했다.
- Provider를 통해 지도를 쉽게 초기화하고 관리
- 필요한 페이지에만 지도를 불러오기
- useMap 훅으로 만들고 Context API를 통해 지도 객체, 마커 클러스터, 오버레이, 위치 등의 상태를 전역적으로 관리하기
- 상태 관리와 로직을 분리해 자식 컴포넌트들이 필요한 상태에 쉽게 접근하고 수정 가능
그리고 이를 위한 설정 방법을 다룰 예정이다.
🗂️ 프로젝트 환경
npx create-next-app@latest (프로젝트 명) --typescript
cd (프로젝트 명)
현재 진행 중인 프로젝트는
위와 같이 Next.js +TS의 프로젝트 환경이며 app router 방식을 사용하고 있다.
(+ Tailwind CSS)
🗂️ 환경변수 설정
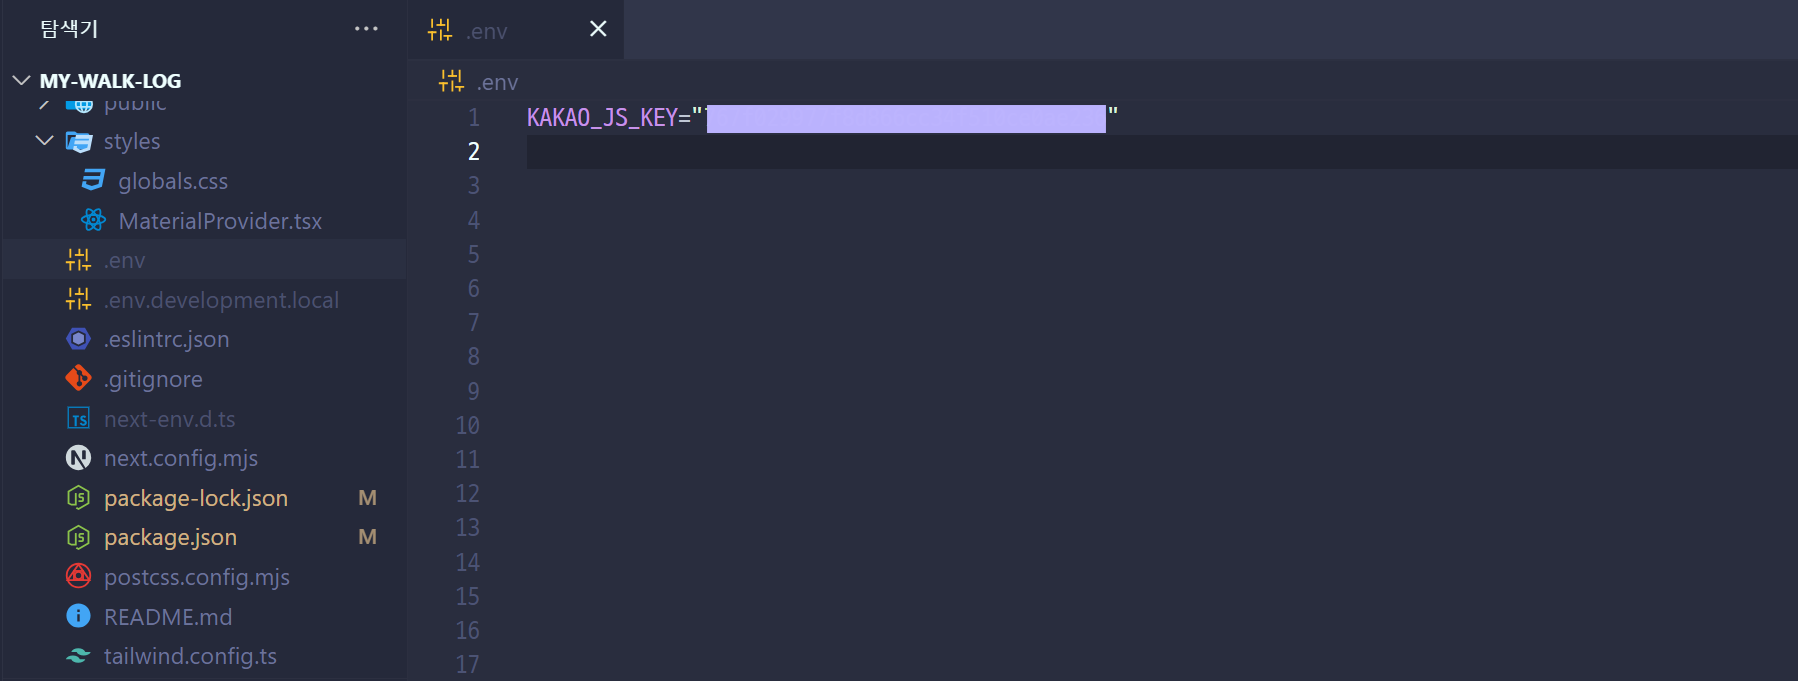
발급한 App Key를 .env파일에 저장한다.
🗂️ app/layout.tsx
layout.tsx 파일을 수정하여 Kakao 지도 스크립트를 로드한다.
import type { Metadata } from 'next';
import Script from 'next/script';

import { Noto_Sans_KR } from 'next/font/google';

import '../styles/globals.css';

export const metadata: Metadata = {
  title: '나의 프로젝트',
  description: '나의 프로젝트 - my project',
};

const font = Noto_Sans_KR({
  subsets: ['latin'],
});
export default async function RootLayout({
  children,
}: Readonly<{
  children: React.ReactNode;
}>) {
  return (
    <html lang='en'>
      <body className={font.className}>
        <Script
          async
          type='text/javascript'
          src={`//dapi.kakao.com/v2/maps/sdk.js?appkey=${process.env.KAKAO_JS_KEY}&libraries=services,clusterer&autoload=false`}
        ></Script>
   		{children}
      </body>
    </html>
  );
}
가이드에 따르면 스크립트 태그는 반드시 실행 코드보다 먼저 선언되어야 한다고 되어 있다.
그렇기 때문에 다른 컴포넌트들이 렌더링 되는children보다 위쪽에 배치하자.
-
기본적으로
//dapi.kakao.com/v2/maps/sdk.js?appkey=발급받은 APP KEY를 삽입 -
libraries- 라이브러리 불러오기Kakao 지도 API 는 아래와 같이 지도와 함께 사용할 수 있는 라이브러리를 지원하고 있다.
clusterer: 마커를 클러스터링 할 수 있는 클러스터러 라이브러리services: 장소 검색 과 주소-좌표 변환 을 할 수 있는 services 라이브러리drawing: 지도 위에 마커와 그래픽스 객체를 쉽게 그릴 수 있게 그리기 모드를 지원
(프로젝트에서 클러스터러와 장소 검색 기능을 사용하기 떄문에
services,clusterer를 불러왔다.) -
autoload- Kakao 지도 API 스크립트를 로드할 때 자동으로 지도를 초기화할지 여부autoload=true(기본값) - Kakao 지도 API 스크립트가 로드되면 자동으로 지도 관련 리소스를 초기화autoload=false- 스크립트가 로드된 후,kakao.maps.load()함수를 호출해야만 지도 관련 리소스가 초기화됨
false로 설정 시 스크립트가 로드된 후 지도를 초기화하는 시점을 제어할 수 있고, 필요하지 않을 때에도 지도가 초기화 되는 것을 막을 수 있다.
(Provider를 통해
kakao.maps.load()로 지도를 불러올 예정이기 때문에false로 설정해 두었다.)
🛠️ MapProvider 만들기
MapProvider 파일을 생성한다.
나의 경우 app\shared\contexts\Map.tsx와 같은 파일 경로로 생성해 주었다.
📍 1. Context 생성
// Map.tsx

'use client';

// ...import

interface IMapContextValue {
  mapData: kakao.maps.Map | null;
  // 아래는 그 외 상태 관리가 필요한 데이터들을 추가한 것
  markerClusterer: kakao.maps.MarkerClusterer | null;
  setMarkerClusterer: (markers: kakao.maps.MarkerClusterer | null) => void;
  overlays: kakao.maps.CustomOverlay[];
  setOverlays: (markers: kakao.maps.CustomOverlay[]) => void;
  places: IPlace[];
  setPlaces: React.Dispatch<React.SetStateAction<IPlace[]>>;
  prevKeyword: string[];
  setPrevKeyword: React.Dispatch<React.SetStateAction<string[]>>;
  currLocation: kakao.maps.LatLng | null;
  setCurrLocation: React.Dispatch<
    React.SetStateAction<kakao.maps.LatLng | null>
  >;
  prevLocation: kakao.maps.LatLng | null;
  setPrevLocation: React.Dispatch<
    React.SetStateAction<kakao.maps.LatLng | null>
  >;
}

const MapContext = createContext<IMapContextValue | null>({
  mapData: null,
  // 아래는 그 외 상태 관리가 필요한 데이터들을 추가한 것
  markerClusterer: null,
  setMarkerClusterer: () => {},
  overlays: [],
  setOverlays: () => {},
  places: [],
  setPlaces: () => {},
  prevKeyword: [],
  setPrevKeyword: () => {},
  currLocation: null,
  setCurrLocation: () => {},
  prevLocation: null,
  setPrevLocation: () => {},
});
먼저 지도의 상태와 관련 상태를 업데이트하는 역할의 컨텍스트 객체 MapContext를 만들어 준다.
- 초기값으로는 모든 상태와 함수를 빈 값으로 설정한다.
- 처음에는
mapData만 담으면 되고, 그 외에는 위 코드와 같이 필요할 때마다 상태 관리가 필요한 데이터들을 추가하면 된다.
Map 객체를 포함한 다른 지도 관련 데이터 type 정의 시에는 kakao.maps.~ 와 같이 지정된 타입을 불러와 사용한다.
📍 2. MapProvider 컴포넌트
그 다음 MapProvider 컴포넌트를 만들어 주어야 한다.
1) 변수 생성
// Map.tsx

// ...MapContext 코드

interface MapProps {
  children?: React.ReactNode;
}

const MapProvider: React.FC<MapProps> = ({ children }) => {
  const location = { latitude: 37.5665, longitude: 126.9780 }; // 임의의 위도와 경도
먼저 지도를 불러올 때의 중심 위치를 설정한다.
이해를 위해 임의의 좌표 값으로 설정해둔 상태이고, 프로젝트에서는 사용자의 현재 위치를 불러오는 훅을 만들어 사용하고 있다.
(3탄에 사용자 현재 위치 불러오기 구현 방법을 다룰 예정!)
// Map.tsx

const MapProvider: React.FC<MapProps> = ({ children }) => {
  const location = { latitude: 37.5665, longitude: 126.9780 }; // 임의의 위도와 경도

  const mapRef = useRef<HTMLDivElement>(null);
  const [map, setMap] = useState<kakao.maps.Map | null>(null);
  const [markerClusterer, setMarkerClusterer] = useState<kakao.maps.MarkerClusterer | null>(null);
  const [overlays, setOverlays] = useState<kakao.maps.CustomOverlay[]>([]);
  const [prevKeyword, setPrevKeyword] = useState<string[]>([]);
  const [places, setPlaces] = useState<IPlace[]>([]);
  const [prevLocation, setPrevLocation] = useState<kakao.maps.LatLng | null>(null);
  const [currLocation, setCurrLocation] = useState<kakao.maps.LatLng | null>(null);

  //...

  return ();
};

export default MapProvider;- mapRef -
useRef로 지도 DOM 요소를 참조하기 위함 useState훅을 사용해 지도 객체(Map), 그 외 마커 클러스터러, 오버레이 목록, 이전 검색어, 장소 목록, 이전 위치, 현재 위치 등의 상태를 관리하는 변수를 생성한다.
2) 지도 초기화 및 설정
// Map.tsx

 const MapProvider: React.FC<MapProps> = ({ children }) => {
 	// ...변수 세팅

  useEffect(() => {
    const { kakao } = window;

    kakao?.maps.load(() => {
      const mapElement = mapRef.current;
      // 컴포넌트 mount 후 DOM 요소에 접근
      if (mapElement) {
        const options = {
          center: new kakao.maps.LatLng(
            location?.latitude as number,
            location?.longitude as number,
          ),
          level: 3,
          smooth: true,
          tileAnimation: false,
        };
        // 지도 생성
        const kakaoMap = new kakao.maps.Map(mapElement, options);

        // 현재 중심좌표 값 갱신
        kakao.maps.event.addListener(kakaoMap, 'dragend', function () {
          const latlng = kakaoMap.getCenter();
          setCurrLocation(latlng);
        });

        // 줌 컨트롤
        let zoomControl = new kakao.maps.ZoomControl();
        kakaoMap.addControl(zoomControl, kakao.maps.ControlPosition.RIGHT);
        setMap(kakaoMap);
      }
    });
  }, [location?.latitude, location?.longitude]);

  	// ...

  return (

  );
};-
Kakao Maps API 로드
const { kakao } = window; kakao?.maps.load(() => { // 지도 초기화 및 설정 내용 });- window 객체에서
kakao속성을 가져와 Kakao Maps API를 사용 kakao?.maps.load()는 Kakao Maps API가 로드되었을 때 실행되는 콜백 함수
- window 객체에서
-
지도 초기화
const mapElement = mapRef.current; if (mapElement) { const options = { center: new kakao.maps.LatLng(location?.latitude as number, location?.longitude as number), level: 3, smooth: true, tileAnimation: false, }; const kakaoMap = new kakao.maps.Map(mapElement, options); //... }mapElement가 존재하는 경우, Kakao Maps API를 사용하여 지도를 생성한다.이전에 이 부분 관련 에러 핸들링으로 다뤘던 글 참고
⚛️React | 카카오맵 api - Cannot read properties of null (reading 'currentStyle')options- (필수)
center: 지도의 중심 좌표, kakao.maps.LatLng 객체를 사용해 위도와 경도 지정 level: 지도의 확대 레벨 (1~10) (기본값: 3)smooth: 지도 줌/팬 애니메이션을 부드럽게 설정tileAnimation: 지도 타일 애니메이션 설정 여부 (기본값: true)그 외 옵션 참고 API Docs - Map
https://apis.map.kakao.com/web/documentation/#Map
- (필수)
-
(그 외) 지도 이벤트 리스너 등록하기
여기 부터는 프로젝트를 위해 따로 추가한 기능이라 참고로 보면 좋을 것 같다.
API Docs를 보면 등록할 수 있는 다양한 이벤트가 존재하는데,API Docs - Map Events
https://apis.map.kakao.com/web/documentation/#Map_Events프로젝트에서 지도를 움직일 때마다 '현재 위치 기준 재검색' 하는 기능을 구현하기 위해
dragend이벤트로 지도가 드래그 될 때마다(=지도의 위치가 움직일 때마다) 계속해서 현재 위치를 갱신해 저장하고 있다.kakao.maps.event.addListener(kakaoMap, 'dragend', function () { const latlng = kakaoMap.getCenter(); setCurrLocation(latlng); }); -
(그 외) 줌 컨트롤 띄우기
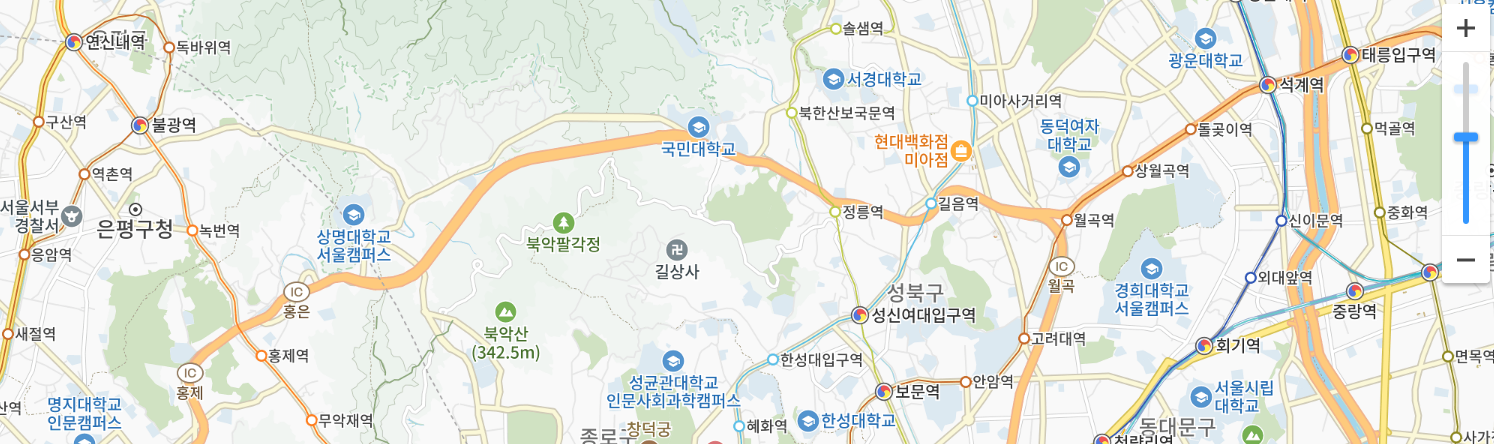 지도를 불러올 때 아래 설정을 추가해 사진과 같은 줌 컨트롤을 띄울 수 있다.
let zoomControl = new kakao.maps.ZoomControl(); kakaoMap.addControl(zoomControl, kakao.maps.ControlPosition.RIGHT);kakao.maps.ZoomControl객체를 생성kakao.maps.ControlPosition.RIGHT: 줌 컨트롤을 지도의 오른쪽에 배치그 외 컨트롤 배치 위치 참고 API Docs - ControlPosition
https://apis.map.kakao.com/web/documentation/#ControlPosition
3) 메모이제이션
// Map.tsx
const MapProvider: React.FC<MapProps> = ({ children }) => {
// ...변수 세팅
// ...useEffect 훅
const values: IMapContextValue = useMemo(
() => ({
currLocation,
setCurrLocation,
prevLocation,
setPrevLocation,
mapData: map,
markerClusterer,
setMarkerClusterer,
overlays,
setOverlays,
places,
setPlaces,
prevKeyword,
setPrevKeyword,
}),
[
currLocation,
prevLocation,
map,
markerClusterer,
overlays,
places,
prevKeyword,
],
);
return ();
};
export default MapProvider;
export const useMap = () => useContext(MapContext);
useMemo로 컨텍스트에 제공할 값을 메모이제이션한다.
의존성 배열에 있는 값들이 변경될 때만 재계산된다.
4) 컨텍스트 프로바이더와 지도 렌더링
return (
<>
{location && (
<MapContext.Provider value={values}>
<div className='flex h-full w-full'>
{children}
<div id='map' ref={mapRef} className='h-full w-full'></div>
</div>
</MapContext.Provider>
)}
</>
);
};- 위치 정보가 있을 때만 MapContext.Provider를 렌더링한다.
values객체를 컨텍스트 값으로 전달한다.children을 렌더링하고<div id='map' ref={mapRef} className='h-full w-full'></div>지도가 표시되는 영역
5) useMap 훅 정의
마지막으로 useMap 훅을 정의하여 컨텍스트를 쉽게 사용할 수 있도록 해주면 MapProvider 설정 끝!
export const useMap = () => useContext(MapContext);MapProvider 전체 코드
'use client';
import React, {
createContext,
useContext,
useEffect,
useMemo,
useRef,
useState,
} from 'react';
import { IPlace } from '@/app/shared/types/map';
interface MapProps {
children?: React.ReactNode;
}
interface IMapContextValue {
mapData: kakao.maps.Map | null;
// 아래는 그 외 상태 관리가 필요한 데이터들을 추가한 것
markerClusterer: kakao.maps.MarkerClusterer | null;
setMarkerClusterer: (markers: kakao.maps.MarkerClusterer | null) => void;
overlays: kakao.maps.CustomOverlay[];
setOverlays: (markers: kakao.maps.CustomOverlay[]) => void;
places: IPlace[];
setPlaces: React.Dispatch<React.SetStateAction<IPlace[]>>;
prevKeyword: string[];
setPrevKeyword: React.Dispatch<React.SetStateAction<string[]>>;
currLocation: kakao.maps.LatLng | null;
setCurrLocation: React.Dispatch<
React.SetStateAction<kakao.maps.LatLng | null>
>;
prevLocation: kakao.maps.LatLng | null;
setPrevLocation: React.Dispatch<
React.SetStateAction<kakao.maps.LatLng | null>
>;
}
const MapContext = createContext<IMapContextValue | null>({
mapData: null,
// 아래는 그 외 상태 관리가 필요한 데이터들을 추가한 것
markerClusterer: null,
setMarkerClusterer: () => {},
overlays: [],
setOverlays: () => {},
places: [],
setPlaces: () => {},
prevKeyword: [],
setPrevKeyword: () => {},
currLocation: null,
setCurrLocation: () => {},
prevLocation: null,
setPrevLocation: () => {},
});
const MapProvider: React.FC<MapProps> = ({ children }) => {
const { location } = useGeolocation();
const mapRef = useRef<HTMLDivElement>(null);
const [map, setMap] = useState<kakao.maps.Map | null>(null);
const [markerClusterer, setMarkerClusterer] =
useState<kakao.maps.MarkerClusterer | null>(null);
const [overlays, setOverlays] = useState<kakao.maps.CustomOverlay[]>([]);
const [prevKeyword, setPrevKeyword] = useState<string[]>([]);
const [places, setPlaces] = useState<IPlace[]>([]);
const [prevLocation, setPrevLocation] = useState<kakao.maps.LatLng | null>(
null,
);
const [currLocation, setCurrLocation] = useState<kakao.maps.LatLng | null>(
null,
);
useEffect(() => {
const { kakao } = window;
kakao?.maps.load(() => {
const mapElement = mapRef.current;
// 컴포넌트 mount 후 DOM 요소에 접근
if (mapElement) {
const options = {
center: new kakao.maps.LatLng(
location?.latitude as number,
location?.longitude as number,
),
level: 3,
smooth: true,
tileAnimation: false,
};
// 지도 생성
const kakaoMap = new kakao.maps.Map(mapElement, options);
// 현재 중심좌표 값 갱신
kakao.maps.event.addListener(kakaoMap, 'dragend', function () {
  const latlng = kakaoMap.getCenter();
  setCurrLocation(latlng);
});
// 줌 컨트롤
let zoomControl = new kakao.maps.ZoomControl();
kakaoMap.addControl(zoomControl, kakao.maps.ControlPosition.RIGHT);
setMap(kakaoMap);
}
});
}, [location?.latitude, location?.longitude]);
const values: IMapContextValue = useMemo(
() => ({
currLocation,
setCurrLocation,
prevLocation,
setPrevLocation,
mapData: map,
markerClusterer,
setMarkerClusterer,
overlays,
setOverlays,
places,
setPlaces,
prevKeyword,
setPrevKeyword,
}),
[
currLocation,
prevLocation,
map,
markerClusterer,
overlays,
places,
prevKeyword,
],
);
return (
    <>
      {location && (
        <MapContext.Provider value={values}>
          <div className='flex h-full w-full'>
            {children}
            <div id='map' ref={mapRef} className='h-full w-full'></div>
          </div>
        </MapContext.Provider>
      )}
    </>
  );
};
export default MapProvider;
export const useMap = () => useContext(MapContext);
🗺️ 지도 띄우기
자 이제 길었던 MapProvider 설정 얘기는 끝...!
지도를 띄우는 방법은 간단하다.
MapProvider를 사용할 때
페이지마다 전역으로 띄우는 방법과 일부 페이지에서만 띄우는 방법이 있다.
전역(모든 페이지)
처음 스크립트 태그를 설정했던 app/layout.tsx 페이지에서
children에 MapProvider를 감싸주면 모든 페이지에 지도를 띄울 수 있다.
//app/layout.tsx
import type { Metadata } from 'next';
import Script from 'next/script';

import { Noto_Sans_KR } from 'next/font/google';

import '../styles/globals.css';

import MapProvider from './shared/contexts/Map';

export const metadata: Metadata = {
  title: '나의 산책 일기',
  description: '나의 산책 일기 - my walk log',
};

const font = Noto_Sans_KR({
  subsets: ['latin'],
});
export default async function RootLayout({
  children,
}: Readonly<{
  children: React.ReactNode;
}>) {
  return (
    <html lang='en'>
      <body className={font.className}>
        <Script
          async
          type='text/javascript'
          src={`//dapi.kakao.com/v2/maps/sdk.js?appkey=${process.env.KAKAO_JS_KEY}&libraries=services,clusterer&autoload=false`}
        ></Script>
        <MapProvider>{children}</MapProvider>
      </body>
    </html>
  );
}
일부 페이지만 띄우기
만약 페이지별로 다른 레이아웃을 지정해 사용하고 있다면
지도를 사용할 페이지의 layout 컴포넌트에 MapProvider를 불러온다.
-
예시
app\(search)\layout.tsx'use client'; import MapProvider from '@/app/shared/contexts/Map'; export interface layoutProps { children: React.ReactNode; } const SearchLayout = ({ children }: layoutProps) => { return ( <MapProvider> {children} </MapProvider> ); }; export default SearchLayout;
Container 사용하기
지도를 일부 페이지에서만 불러오되 Header와 같은 다른 요소들도 항상 같이 불러오려면?
Container 컴포넌트를 만들고 이렇게 MapProvider를 활용할 수 있다.
// Container.tsx

'use client';

import { ReactNode } from 'react';

import Header from './Header';
import MapProvider from '@/app/shared/contexts/Map';

interface ContainerProps {
  children: ReactNode;
}

const Container = ({ children }: ContainerProps) => {
  return (
    <>
      <MapProvider>
        <div className='z-10 flex bg-white shadow-2xl'>
          <Header />
          <div className='relative flex w-80 min-w-80 flex-col gap-4 bg-white'>
            {children}
          </div>
        </div>
      </MapProvider>
    </>
  );
};

export default Container;
// `app\(search)\layout.tsx`
'use client';
import Container from '@/app/_component/common/Container';
export interface layoutProps {
children: React.ReactNode;
}
const SearchLayout = ({ children }: layoutProps) => {
return (
<Container>
{children}
</Container>
);
};
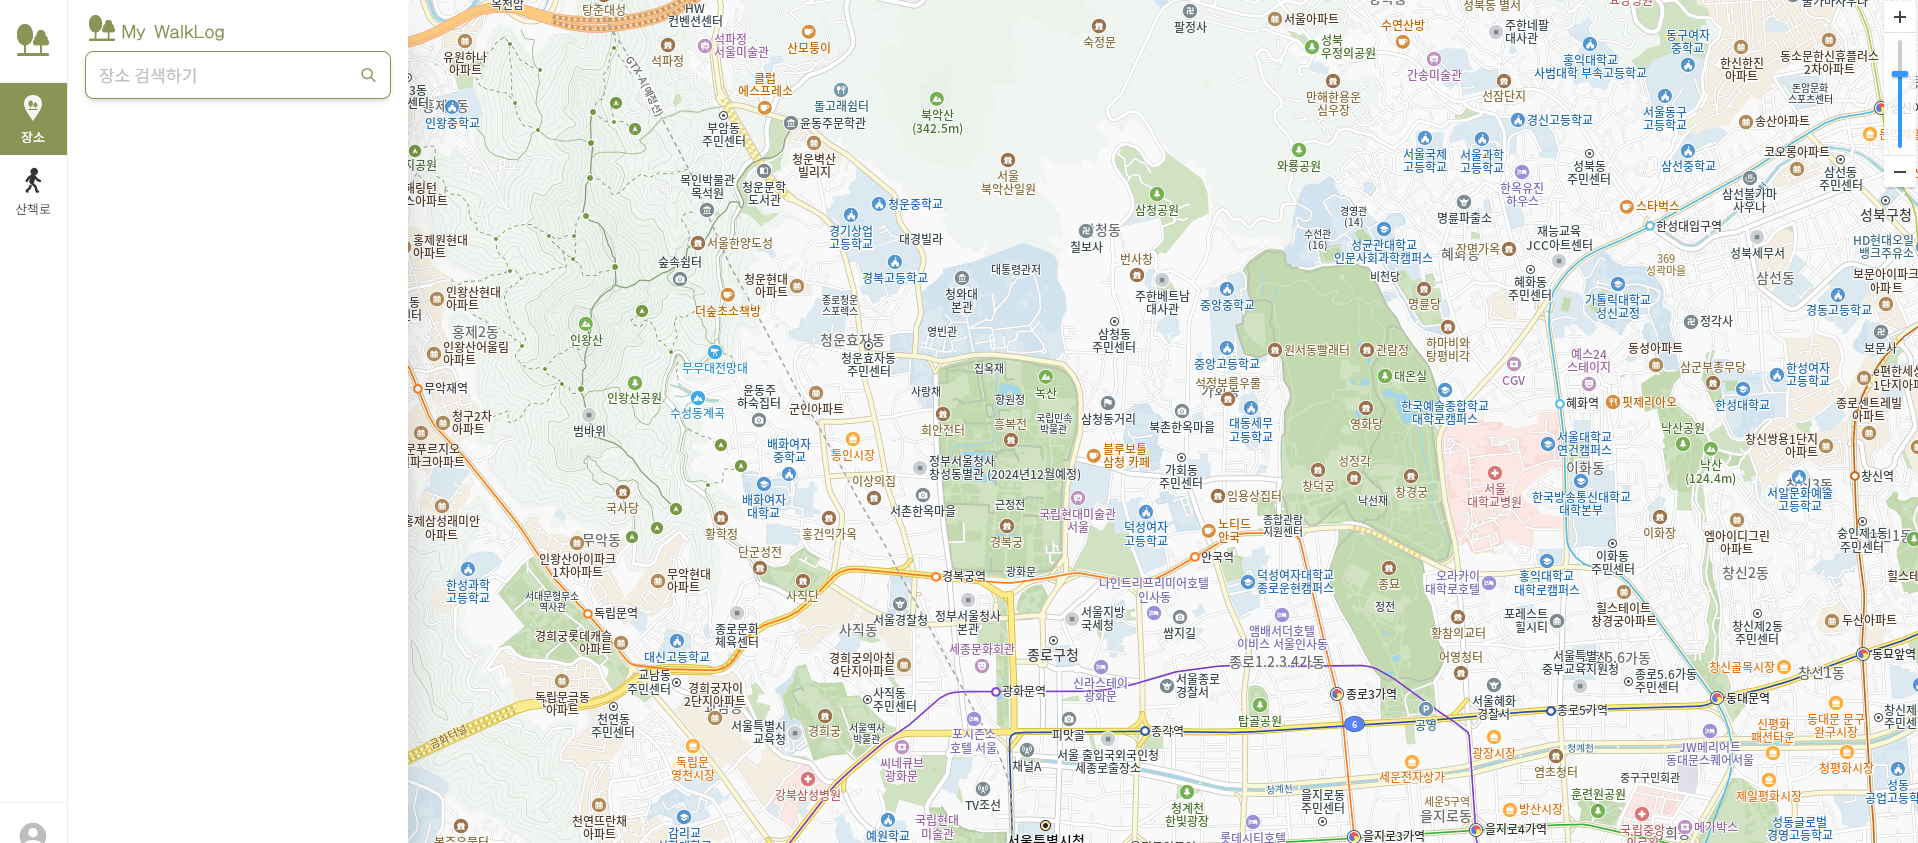
export default SearchLayout;🔍 결과