수업을 듣다가 VGG Net의 head에는 GAP(Gloabal Average Pooling)이 적용되어 있다는 설명을 들었다.
실제 VGG16의 pretrained model 구조를 출력해보면 확인이 가능하다.
----------------------------------------------------------------
        Layer (type)               Output Shape         Param #
================================================================
            Conv2d-1           [-1, 64, 32, 32]           1,792
              ReLU-2           [-1, 64, 32, 32]               0
            Conv2d-3           [-1, 64, 32, 32]          36,928
              ReLU-4           [-1, 64, 32, 32]               0
         MaxPool2d-5           [-1, 64, 16, 16]               0
            Conv2d-6          [-1, 128, 16, 16]          73,856
              ReLU-7          [-1, 128, 16, 16]               0
            Conv2d-8          [-1, 128, 16, 16]         147,584
              ReLU-9          [-1, 128, 16, 16]               0
        MaxPool2d-10            [-1, 128, 8, 8]               0
           Conv2d-11            [-1, 256, 8, 8]         295,168
             ReLU-12            [-1, 256, 8, 8]               0
           Conv2d-13            [-1, 256, 8, 8]         590,080
             ReLU-14            [-1, 256, 8, 8]               0
           Conv2d-15            [-1, 256, 8, 8]         590,080
             ReLU-16            [-1, 256, 8, 8]               0
        MaxPool2d-17            [-1, 256, 4, 4]               0
           Conv2d-18            [-1, 512, 4, 4]       1,180,160
             ReLU-19            [-1, 512, 4, 4]               0
           Conv2d-20            [-1, 512, 4, 4]       2,359,808
             ReLU-21            [-1, 512, 4, 4]               0
           Conv2d-22            [-1, 512, 4, 4]       2,359,808
             ReLU-23            [-1, 512, 4, 4]               0
        MaxPool2d-24            [-1, 512, 2, 2]               0
           Conv2d-25            [-1, 512, 2, 2]       2,359,808
             ReLU-26            [-1, 512, 2, 2]               0
           Conv2d-27            [-1, 512, 2, 2]       2,359,808
             ReLU-28            [-1, 512, 2, 2]               0
           Conv2d-29            [-1, 512, 2, 2]       2,359,808
             ReLU-30            [-1, 512, 2, 2]               0
        MaxPool2d-31            [-1, 512, 1, 1]               0
AdaptiveAvgPool2d-32            [-1, 512, 7, 7]               0
           Linear-33                 [-1, 4096]     102,764,544
             ReLU-34                 [-1, 4096]               0
          Dropout-35                 [-1, 4096]               0
           Linear-36                 [-1, 4096]      16,781,312
             ReLU-37                 [-1, 4096]               0
          Dropout-38                 [-1, 4096]               0
           Linear-39                 [-1, 1000]       4,097,000
================================================================
Total params: 138,357,544
Trainable params: 138,357,544
Non-trainable params: 0
----------------------------------------------------------------
Input size (MB): 0.01
Forward/backward pass size (MB): 4.84
Params size (MB): 527.79
Estimated Total Size (MB): 532.65
----------------------------------------------------------------
보면 Linear-33 바로 위에 AdaptiveAvgPool2d가 있고, 512 7 7의 output을 생성하는것도 확인이 가능하다.
근데...아무리 이미지 정보가 sparse하다 해도, convolution layer를 모두 거치고 나온 feature map의 채널 하나를 global average pooling 해버려도 괜찮은걸까? 하는 궁금증이 생겼다.
교수님한테 여쭤보니, 직접 해보라는 답변을 들어서, 직접 해보았다.
원래 VGG16에서는 conv layer 13장, fc layer 3장으로 구성하는데, 코랩 하루 용량제한이 걱정돼서 conv layer 11장, fc layer 3장,
그리고 gap사이즈를 (7) → (2) 로 줄여서 코드를 작성했다.
랜덤시드를 고정하고 하나는 gap를 적용해서, 다른 하나는 gap 없이 conv의 출력을 바로 fc에 연결해서 결과를 비교해보았다.
데이터셋을 CIFAR-10이다.
아래는 코드와 결과물이다.
1. VGG_with_gap(2)
import torch
import numpy as np
import random
import torch.nn as nn
import torch.optim as optim
import torch.nn.functional as F
from torchvision import transforms, datasets, utils
from torchsummary import summary
import matplotlib.pyplot as plt

#randomseed 고정
np.random.seed(42)

# DEVICE 설정
USE_CUDA = torch.cuda.is_available()
DEVICE = torch.device("cuda" if USE_CUDA else "cpu")

# Parameter 설정
EPOCHS = 10
BATCH_SIZE = 64
LR = 0.0001

# Transform 설정
transform_CIFAR10 = transforms.Compose([
    transforms.ToTensor(),
    transforms.Normalize(mean=(0.485, 0.456, 0.406), std=(0.229, 0.224, 0.225)),
])

# Dataset 설정
train_dataset = datasets.CIFAR10(root = '../data',
                                         train = True,
                                         download = True,
                                         transform = transform_CIFAR10)

test_dataset = datasets.CIFAR10(root = '../data',
                                train = False,
                                download = True,
                                transform = transform_CIFAR10)

train_loader = torch.utils.data.DataLoader(dataset = train_dataset,
                                           batch_size = BATCH_SIZE,
                                           shuffle=True)

test_loader = torch.utils.data.DataLoader(dataset = test_dataset,
                                          batch_size = BATCH_SIZE,
                                          shuffle=True)
CIFAR-10 이미지 데이터셋을 받아주고, 배치, LR, EPOCH, Random.seed를 설정해주었다.
# Model 구현
class Custom_VGG(nn.Module):
    def __init__(self):
        super(Custom_VGG, self).__init__()

        self.conv11 = nn.Conv2d(3, 64, kernel_size = 3, padding = 1)
        self.conv12 = nn.Conv2d(64, 64, kernel_size=3, padding = 1)

        self.conv21 = nn.Conv2d(64, 128, kernel_size=3, padding=1)
        self.conv22 = nn.Conv2d(128, 128, kernel_size=3, padding=1)
        self.conv23 = nn.Conv2d(128, 128, kernel_size=3, padding=1)

        self.conv31 = nn.Conv2d(128, 256, kernel_size=3, padding = 1)
        self.conv32 = nn.Conv2d(256, 256, kernel_size=3, padding = 1)
        self.conv33 = nn.Conv2d(256, 256, kernel_size=3, padding = 1)

        self.conv41 = nn.Conv2d(256, 512, kernel_size=3, padding = 1)
        self.conv42 = nn.Conv2d(512, 512, kernel_size=3, padding = 1)
        self.conv43 = nn.Conv2d(512, 512, kernel_size=3, padding = 1)

        self.pool = nn.MaxPool2d(2)
        self.avgpool = nn.AdaptiveAvgPool2d(2)
        self.drop_out = nn.Dropout(p=0.2)

        self.fc1 = nn.Linear(2*2*512, 4096)
        self.fc2 = nn.Linear(4096, 4096)
        self.fc3 = nn.Linear(4096,10)


    def forward(self, x):

        x = F.relu(self.conv11(x))
        x = self.pool(F.relu(self.conv12(x)))

        x = F.relu(self.conv21(x))
        x = F.relu(self.conv22(x))
        x = self.pool(F.relu(self.conv23(x)))

        x = F.relu(self.conv31(x))
        x = F.relu(self.conv32(x))
        x = self.pool(F.relu(self.conv33(x)))

        x = F.relu(self.conv41(x))
        x = F.relu(self.conv42(x))
        x = self.pool(F.relu(self.conv43(x)))

        x = self.avgpool(x)
        x = x.view(-1, 512*2*2)

        x = F.relu(self.fc1(x))
        x = F.relu(self.fc2(x))
        x = self.drop_out(x)
        x = self.fc3(x)


        return x
model = Custom_VGG().to(DEVICE)
summary(model, (3,32,32))
비교를 위해 먼저 GAP가 있는 코드를 작성 후 train을 시켜봤다.
optimizer = optim.Adam(model.parameters(), lr=LR)optimzer는 아담...
# Train 구현 -> AVG Pooling이 있는 VGG모델
def train_one_epoch(model, train_loader, optimizer, epoch):
    model.train()
    for batch_idx, (data, target) in enumerate(train_loader):
        data, target = data.to(DEVICE), target.to(DEVICE)
        optimizer.zero_grad()
        # print(data[0])
        output = model(data)
        # print(output[0])
        loss = F.cross_entropy(output, target)
        loss.backward()
        optimizer.step()

        if batch_idx % 200 == 0:
            print('Train Epoch: {} [{}/{} ({:.0f}%)]\tLoss: {:.6f}'.format(
                epoch, batch_idx * len(data), len(train_loader.dataset),
                100. * batch_idx / len(train_loader), loss.item()))

# Evaluation 구현
def evaluate(model, test_loader):
    model.eval()
    test_loss = 0
    correct = 0
    with torch.no_grad():
        for data, target in test_loader:
            data, target = data.to(DEVICE), target.to(DEVICE)
            output = model(data)

            # 배치 오차를 합산
            test_loss += F.cross_entropy(output, target,
                                         reduction='sum').item()

            # 가장 높은 값을 가진 인덱스가 바로 예측값
            pred = output.max(1, keepdim=True)[1]
            correct += pred.eq(target.view_as(pred)).sum().item()

    test_loss /= len(test_loader.dataset)
    test_accuracy = 100. * correct / len(test_loader.dataset)
    return test_loss, test_accuracy

for epoch in range(1, EPOCHS + 1):
    train_one_epoch(model, train_loader, optimizer, epoch)
    test_loss, test_accuracy = evaluate(model, test_loader)

    print('[{}] Test Loss: {:.4f}, Accuracy: {:.2f}%'.format(
          epoch, test_loss, test_accuracy))
loss로는 cross_entropy를 사용했다.
이 모델의 결과는 이렇게 나왔다.
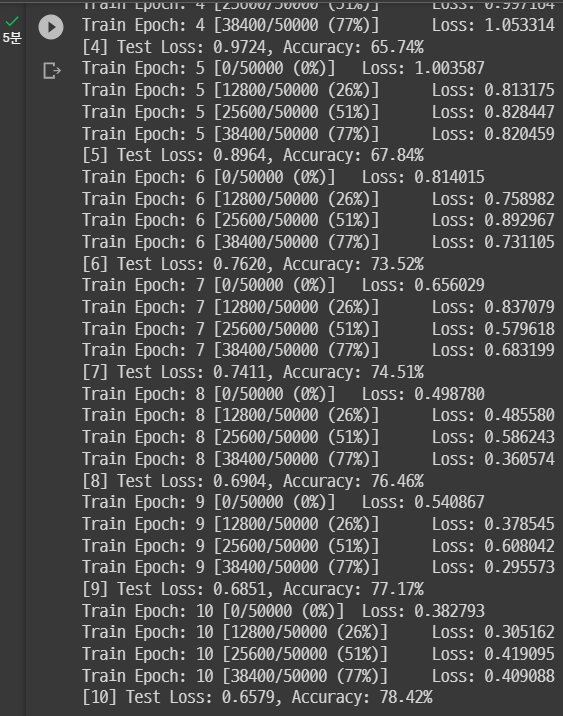
마지막 Epoch에서 Accuracy 78.42%. 그렇다면 gap없이 돌리면 어떨까?
2. VGG_without_gap
다른부분은 모두 동일하고 모델 내부 함수부분만 다르니 그쪽만 코드를 보자.
# Model 구현
class Custom_VGG(nn.Module):
    def __init__(self):
        super(Custom_VGG, self).__init__()

        self.conv11 = nn.Conv2d(3, 64, kernel_size = 3, padding = 1)
        self.conv12 = nn.Conv2d(64, 64, kernel_size=3, padding = 1)

        self.conv21 = nn.Conv2d(64, 128, kernel_size=3, padding=1)
        self.conv22 = nn.Conv2d(128, 128, kernel_size=3, padding=1)
        self.conv23 = nn.Conv2d(128, 128, kernel_size=3, padding=1)

        self.conv31 = nn.Conv2d(128, 256, kernel_size=3, padding = 1)
        self.conv32 = nn.Conv2d(256, 256, kernel_size=3, padding = 1)
        self.conv33 = nn.Conv2d(256, 256, kernel_size=3, padding = 1)

        self.conv41 = nn.Conv2d(256, 512, kernel_size=3, padding = 1)
        self.conv42 = nn.Conv2d(512, 512, kernel_size=3, padding = 1)
        self.conv43 = nn.Conv2d(512, 512, kernel_size=3, padding = 1)

        self.pool = nn.MaxPool2d(2)
        self.drop_out = nn.Dropout(p=0.2)

        self.fc1 = nn.Linear(512*2*2, 4096)
        self.fc2 = nn.Linear(4096, 4096)
        self.fc3 = nn.Linear(4096,10)


    def forward(self, x):

        x = F.relu(self.conv11(x))
        x = self.pool(F.relu(self.conv12(x)))

        x = F.relu(self.conv21(x))
        x = F.relu(self.conv22(x))
        x = self.pool(F.relu(self.conv23(x)))

        x = F.relu(self.conv31(x))
        x = F.relu(self.conv32(x))
        x = self.pool(F.relu(self.conv33(x)))

        x = F.relu(self.conv41(x))
        x = F.relu(self.conv42(x))
        x = self.pool(F.relu(self.conv43(x)))

        x = x.view(-1, 512*2*2)

        x = F.relu(self.fc1(x))
        x = F.relu(self.fc2(x))
        x = self.drop_out(x)
        x = self.fc3(x)

        return x
model = Custom_VGG().to(DEVICE)
summary(model, (3,32,32))
이 모델을 다시 돌려보면...!
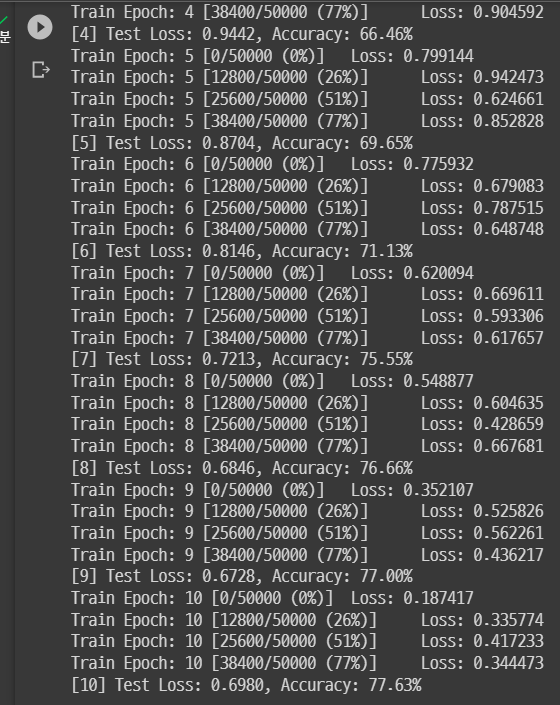
마지막 epoch에서의 Accuracy 77.63%가 나온걸 확인했다.
3. 분석
: 78.42%
: 77.63%
0.79%p 차이가 나는 것을 확인할 수 있었다.
쓰고 안쓰고의 차이를 지금의 실험으로는 확인할 수 없었다.
아무래도 gap를 실행하기 전 output 자체가 512 2 2 사이즈인 것이 쓰고 안쓰고의 차이를 거의 없게 만들지 않았나 싶다....
결국은 CIFAR-10의 데이터셋 자체가 32 32라서 conv layer를 다 거치고 나면 2 2가 된 것이 원인이지 싶다.
추후에 실험을 다시 해본다면 더 큰 데이터셋인 ImageNet으로 돌려봐야겠다.
GAP를 쓰는 이유는 결국 feature map의 정보는 가져가되 연산량을 줄이기 위해서 쓰는건데, 내가 진행한 실험에서는 유의미한 연산량 차이가 거의 없었기 때문에, 이 부분을 다르게 만들 수 있다면 결과를 얻을 수 있을 것 같다.
실험을 추가로 해보지 않고 예측을 하자면, gap를 쓰는 경우 parameter 수가 확 줄어드는 반면, gap를 안쓰면 parameter 수가 비교적 많음에도 불구하고 성능자체는 비슷하게 나올 것 같다.