1) Javascript 복습
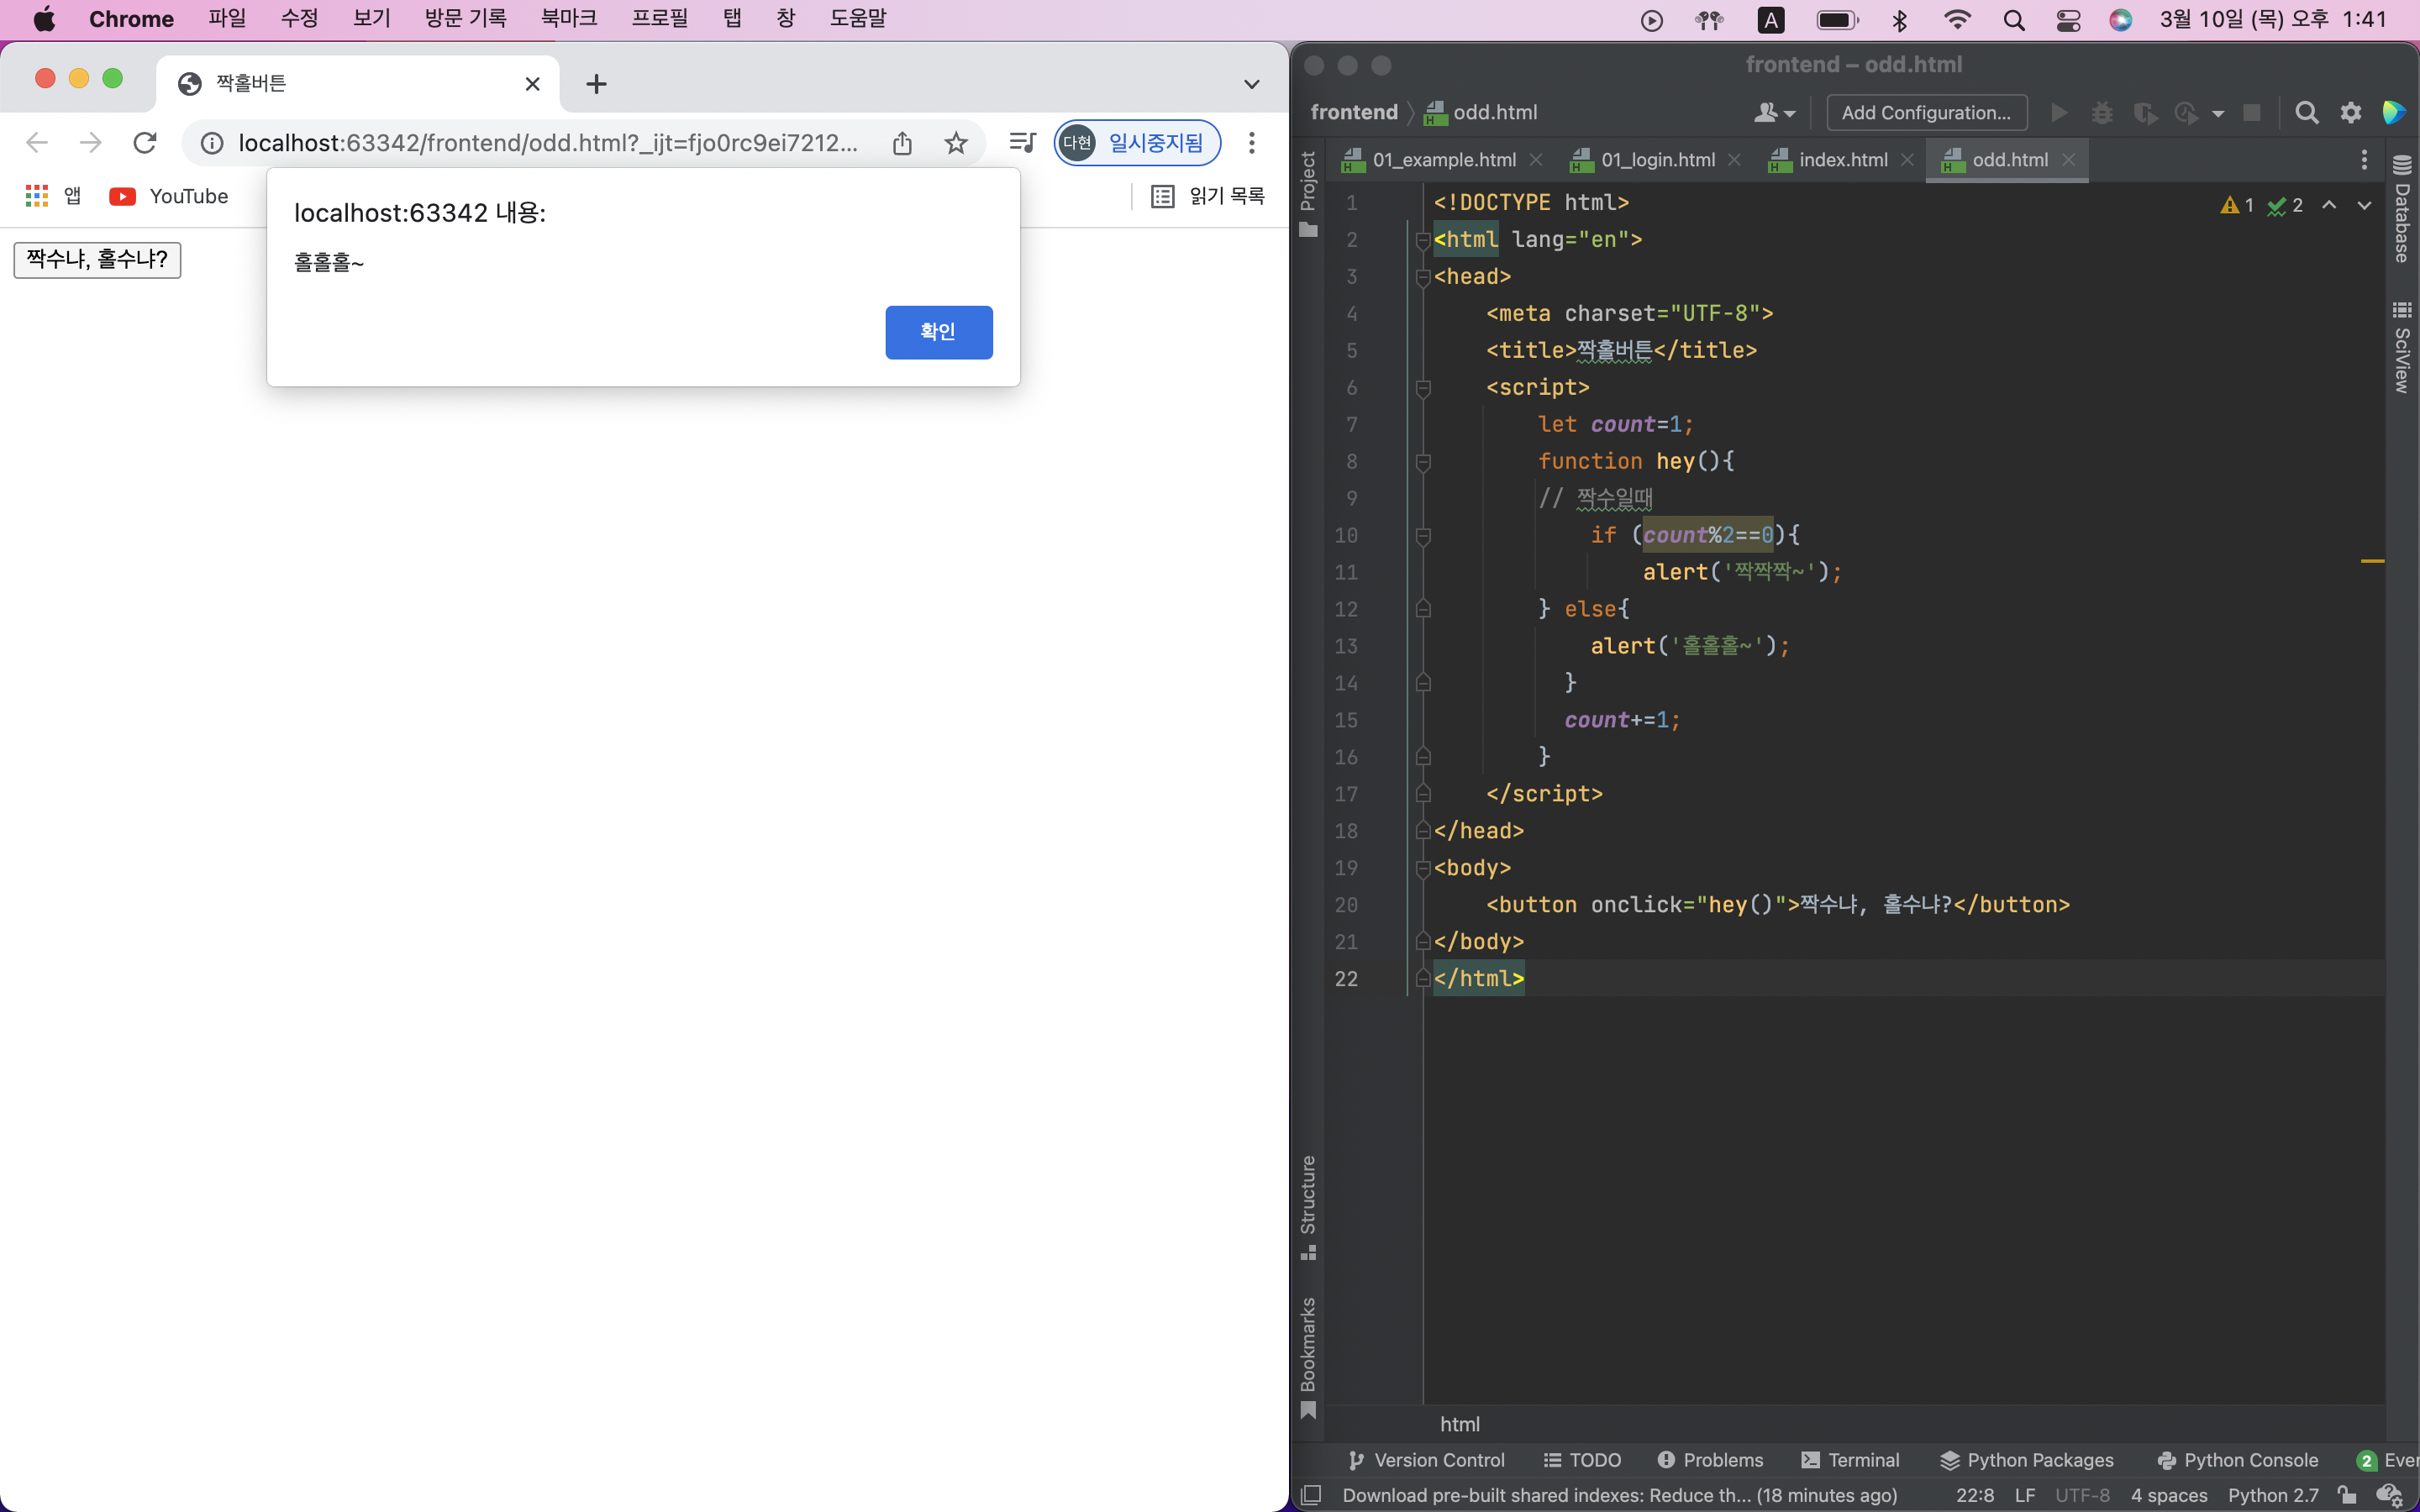
Q) 클릭 수가 짝수, 홀수임에 따라 다른 alert를 띄우는 onclick 함수를 만드세요.
2) JQuery
JQuery란?
: HTML의 요소들을 조작하는, 편리한 Javascript를 미리 작성해둔 라이브러리!
즉, jQuery는 Javascript와 다른 특별한 소프트웨어가 아니라 미리 작성된 Javascript 코드!
임포트를 안하면 쓸수가 없으니, 맨 위에다 임포트를 하고 사용해야한다!
임포트 : 미리 작성된 js코드를 가져오는 것
남이 짜둔 자바스크랩트 코드라고 생각하기!
jQuery CDN에서 Google CDN 복사한 후 <head>안에 붙여넣기!
<script src="https://ajax.googleapis.com/ajax/libs/jquery/3.5.1/jquery.min.js"></script>부트스트랩 템플릿에는 이미 임포트 되어있음!
따라서 부트스트랩 템플릿을 사용하지 않은 경우에만, 저 코드를 넣어줘야함
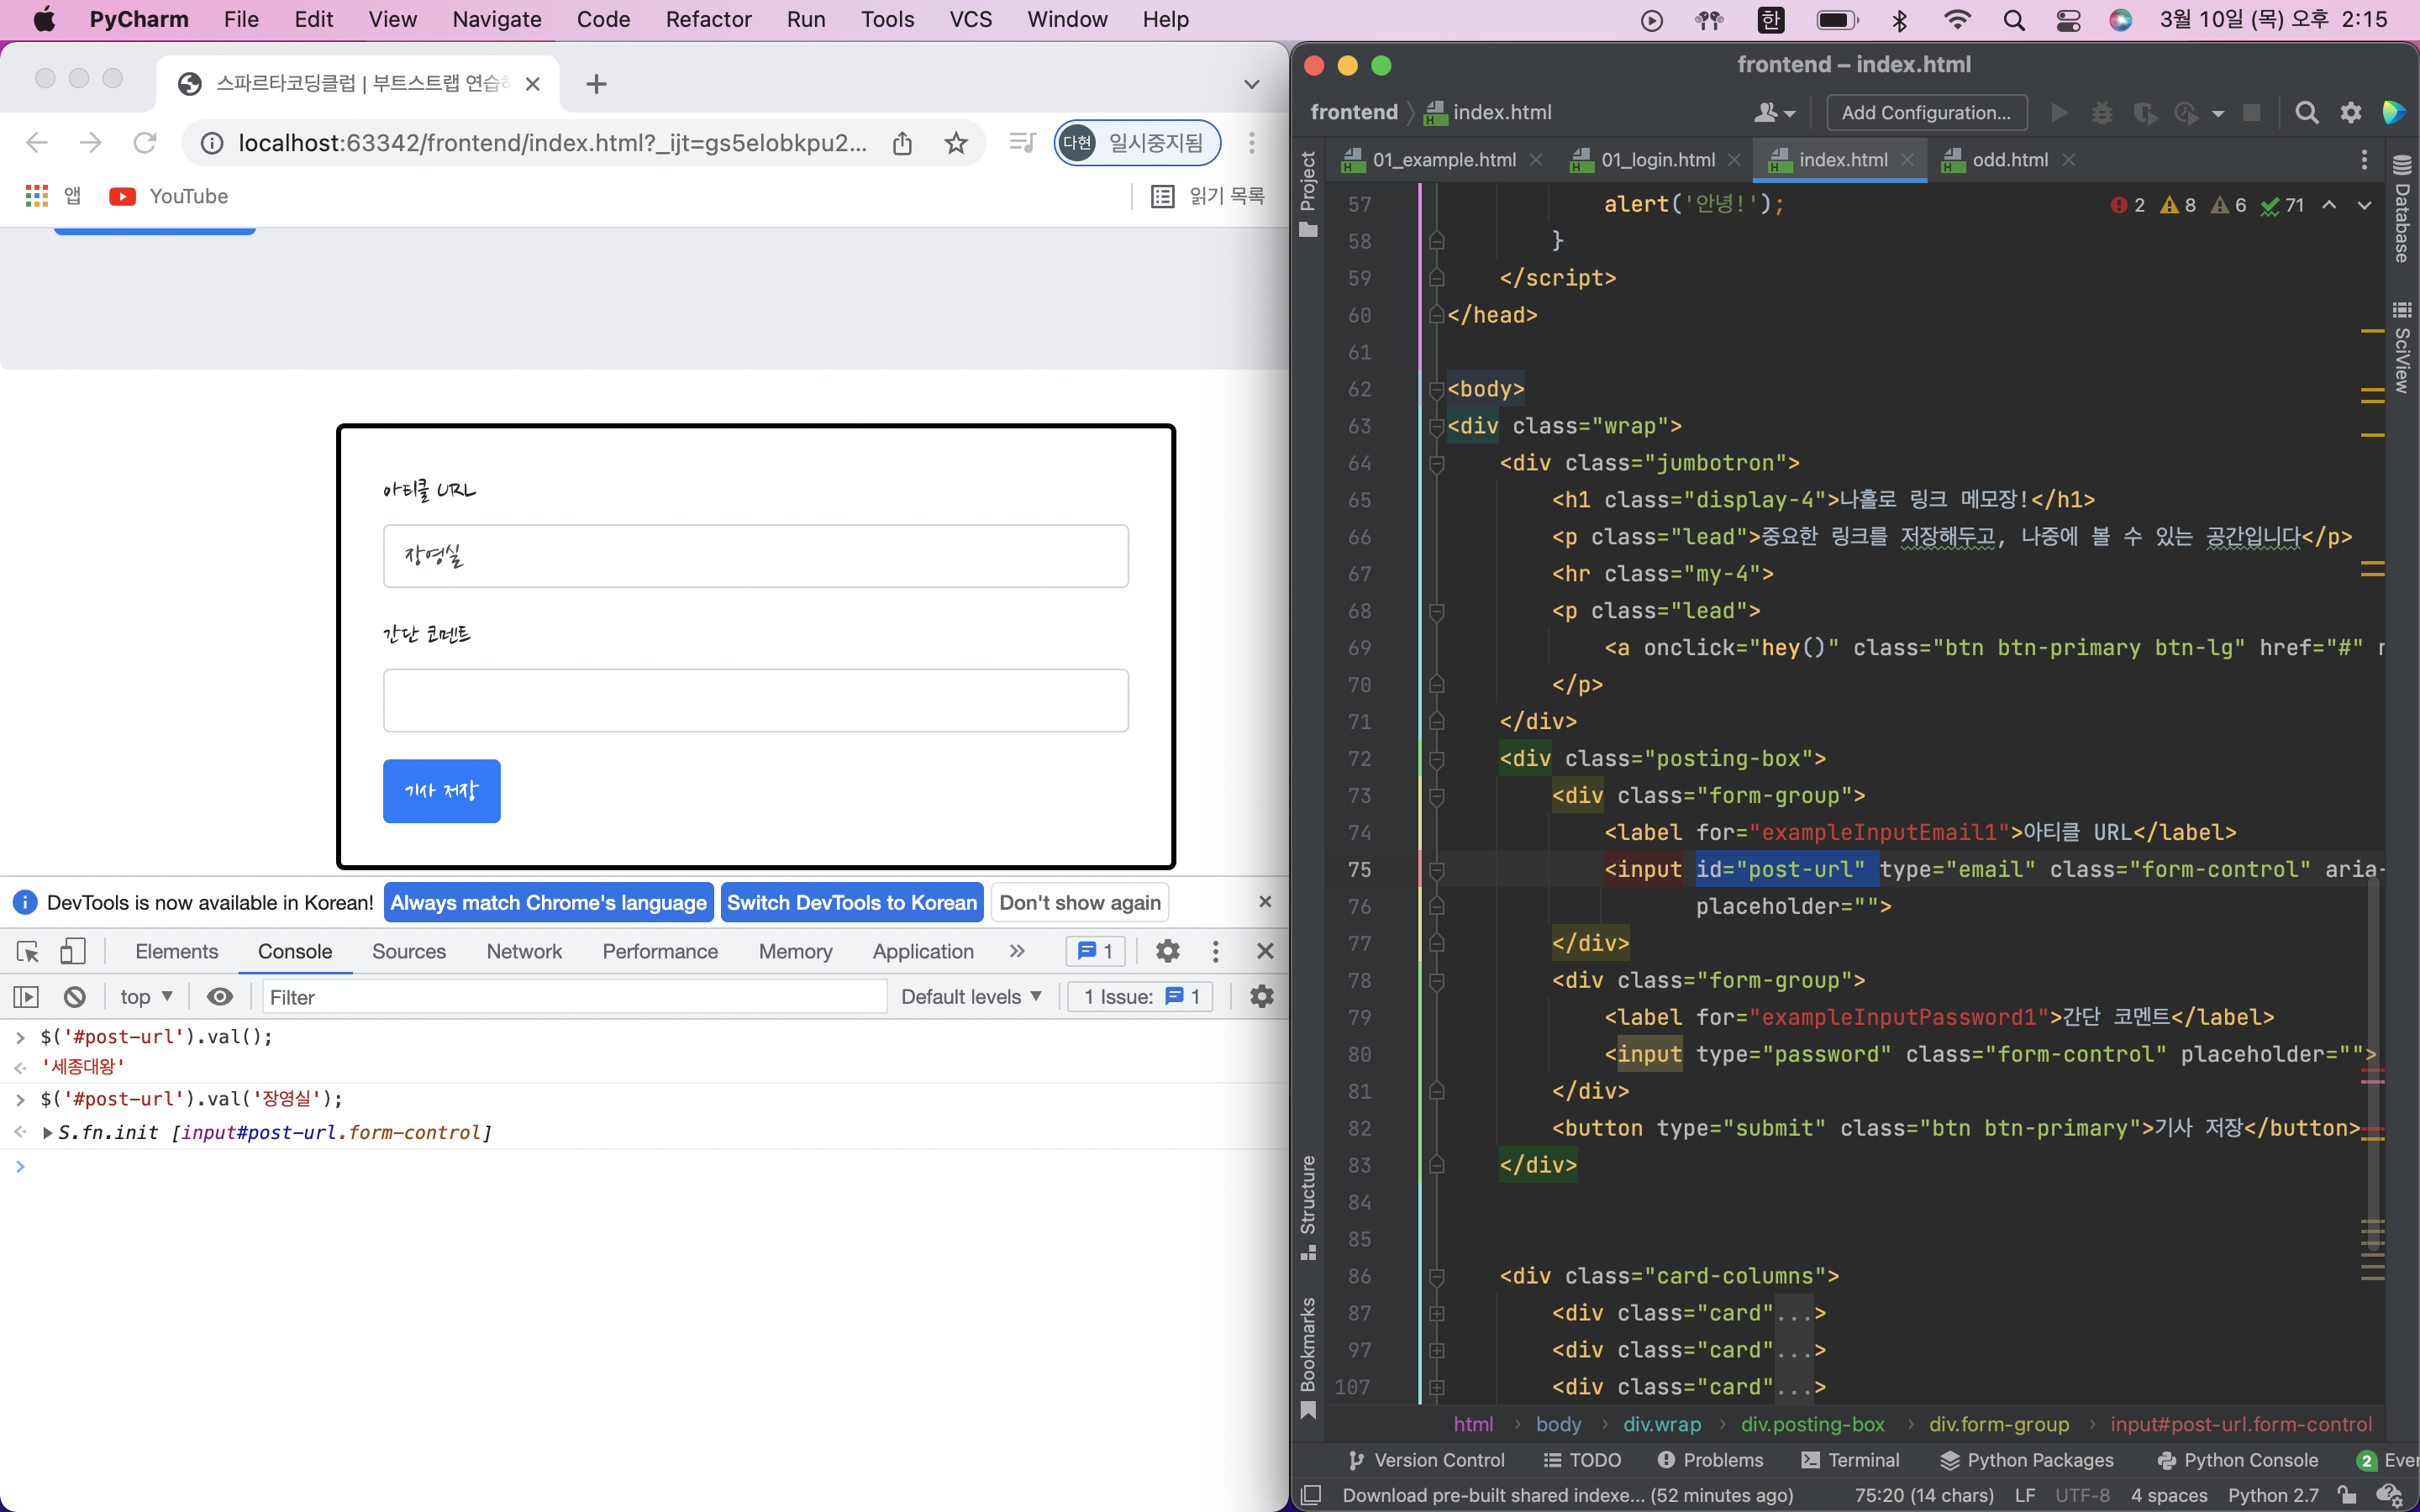
1. input 박스의 값을 가져와보기
//값가져오기
$('#id이름').val();

//값넣기
$('#id이름').val('넣을값');
2. div 보이기/숨기기
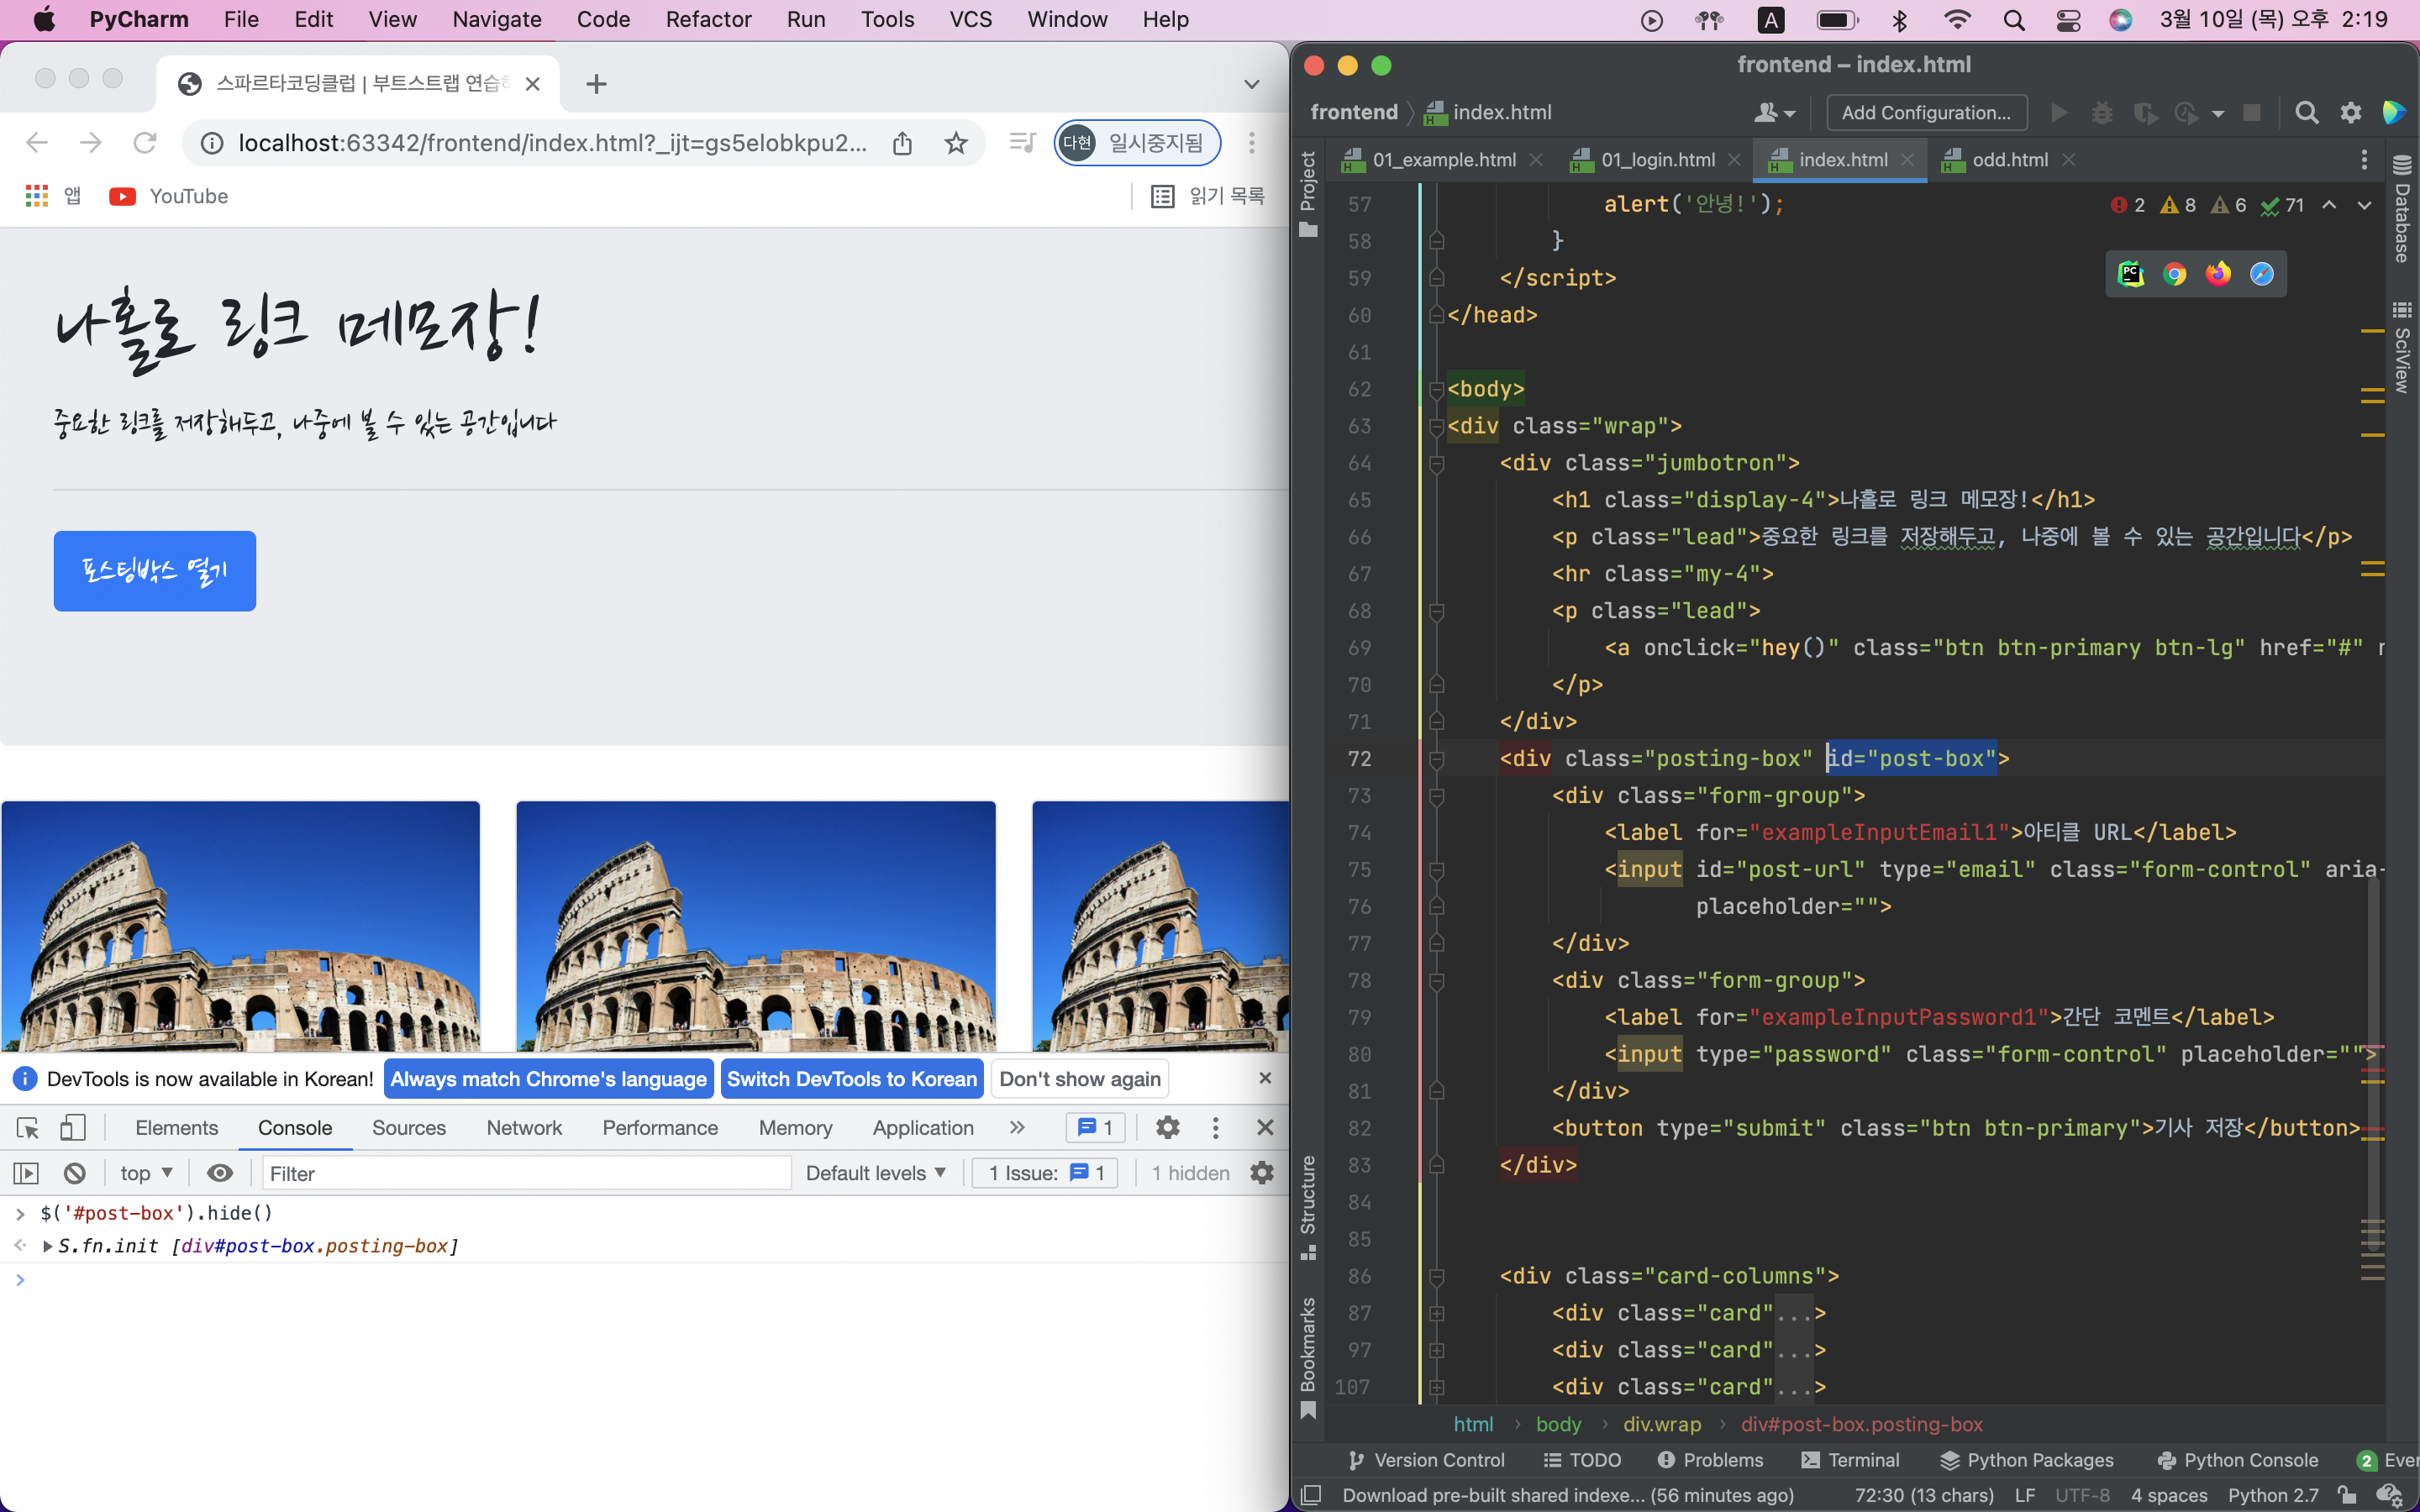
- div 숨기기
- div 보이기
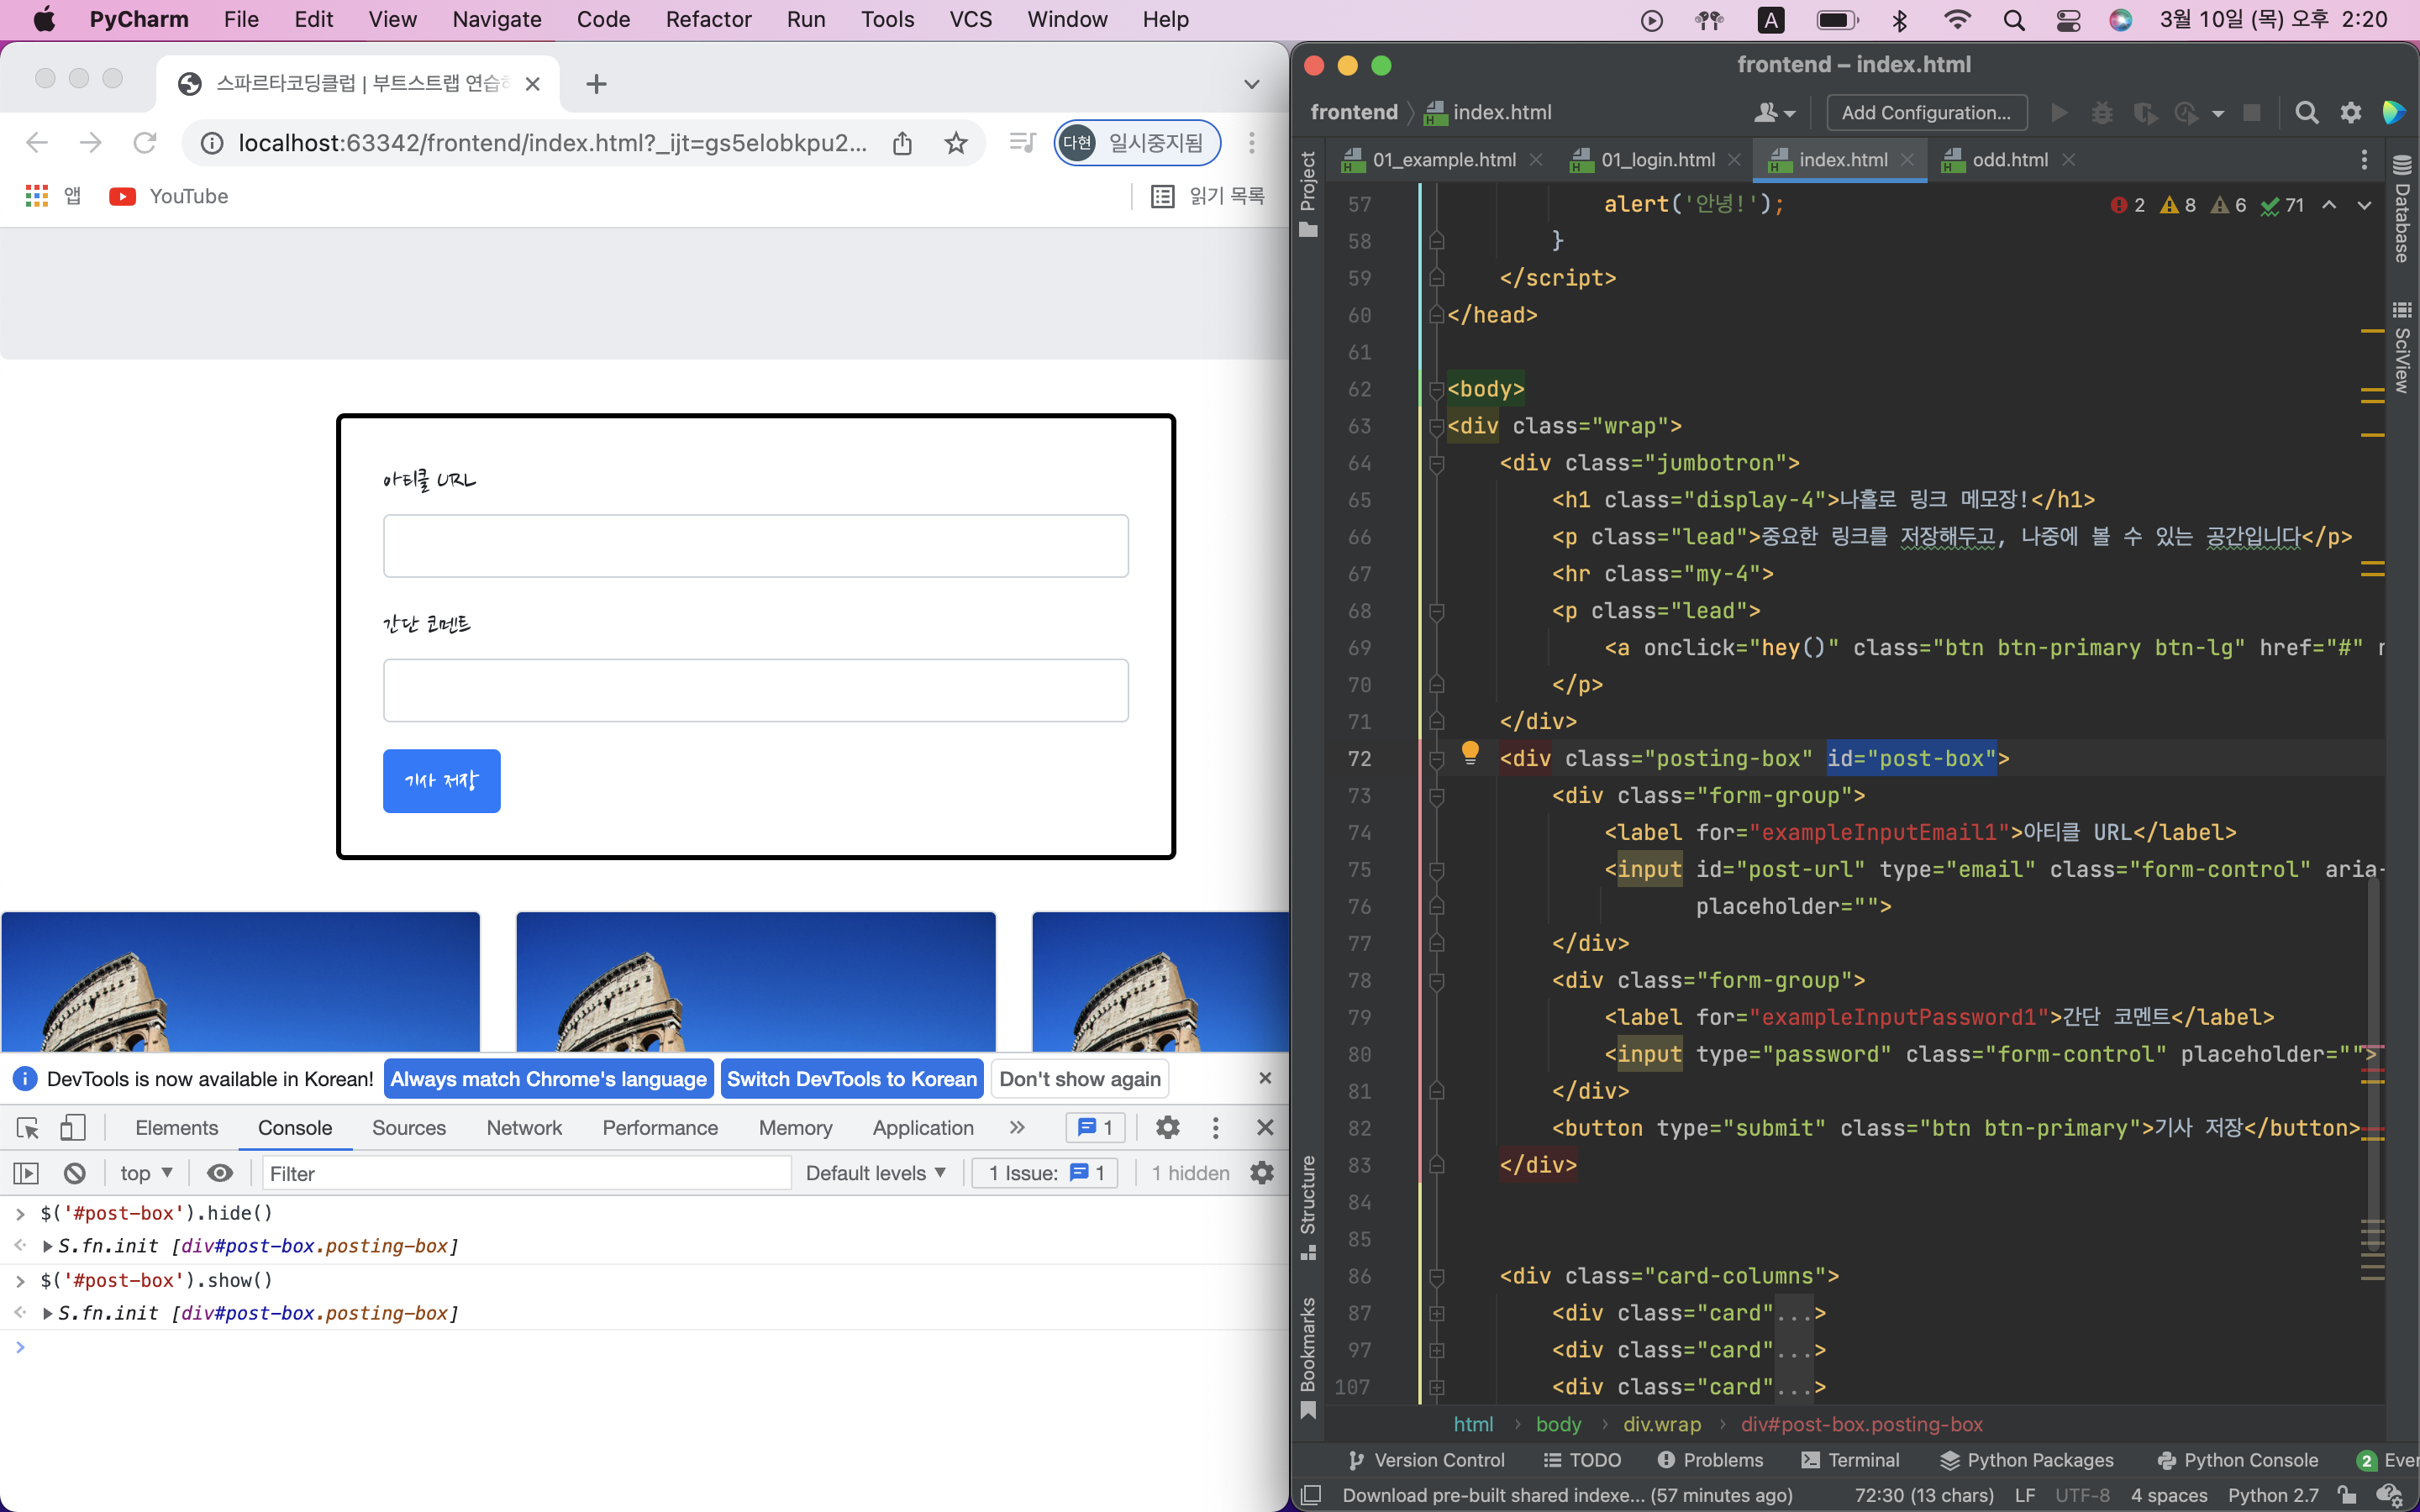
// 크롬 개발자도구 콘솔창에 쳐보기
// id 값이 post-box인 곳을 가리키고, hide()로 안보이게 한다.(=css의 display 값을 none으로 바꾼다)
$('#post-box').hide();

// show()로 보이게 한다.(=css의 display 값을 block으로 바꾼다)
$('#post-box').show();
3. css의 값 가져와보기
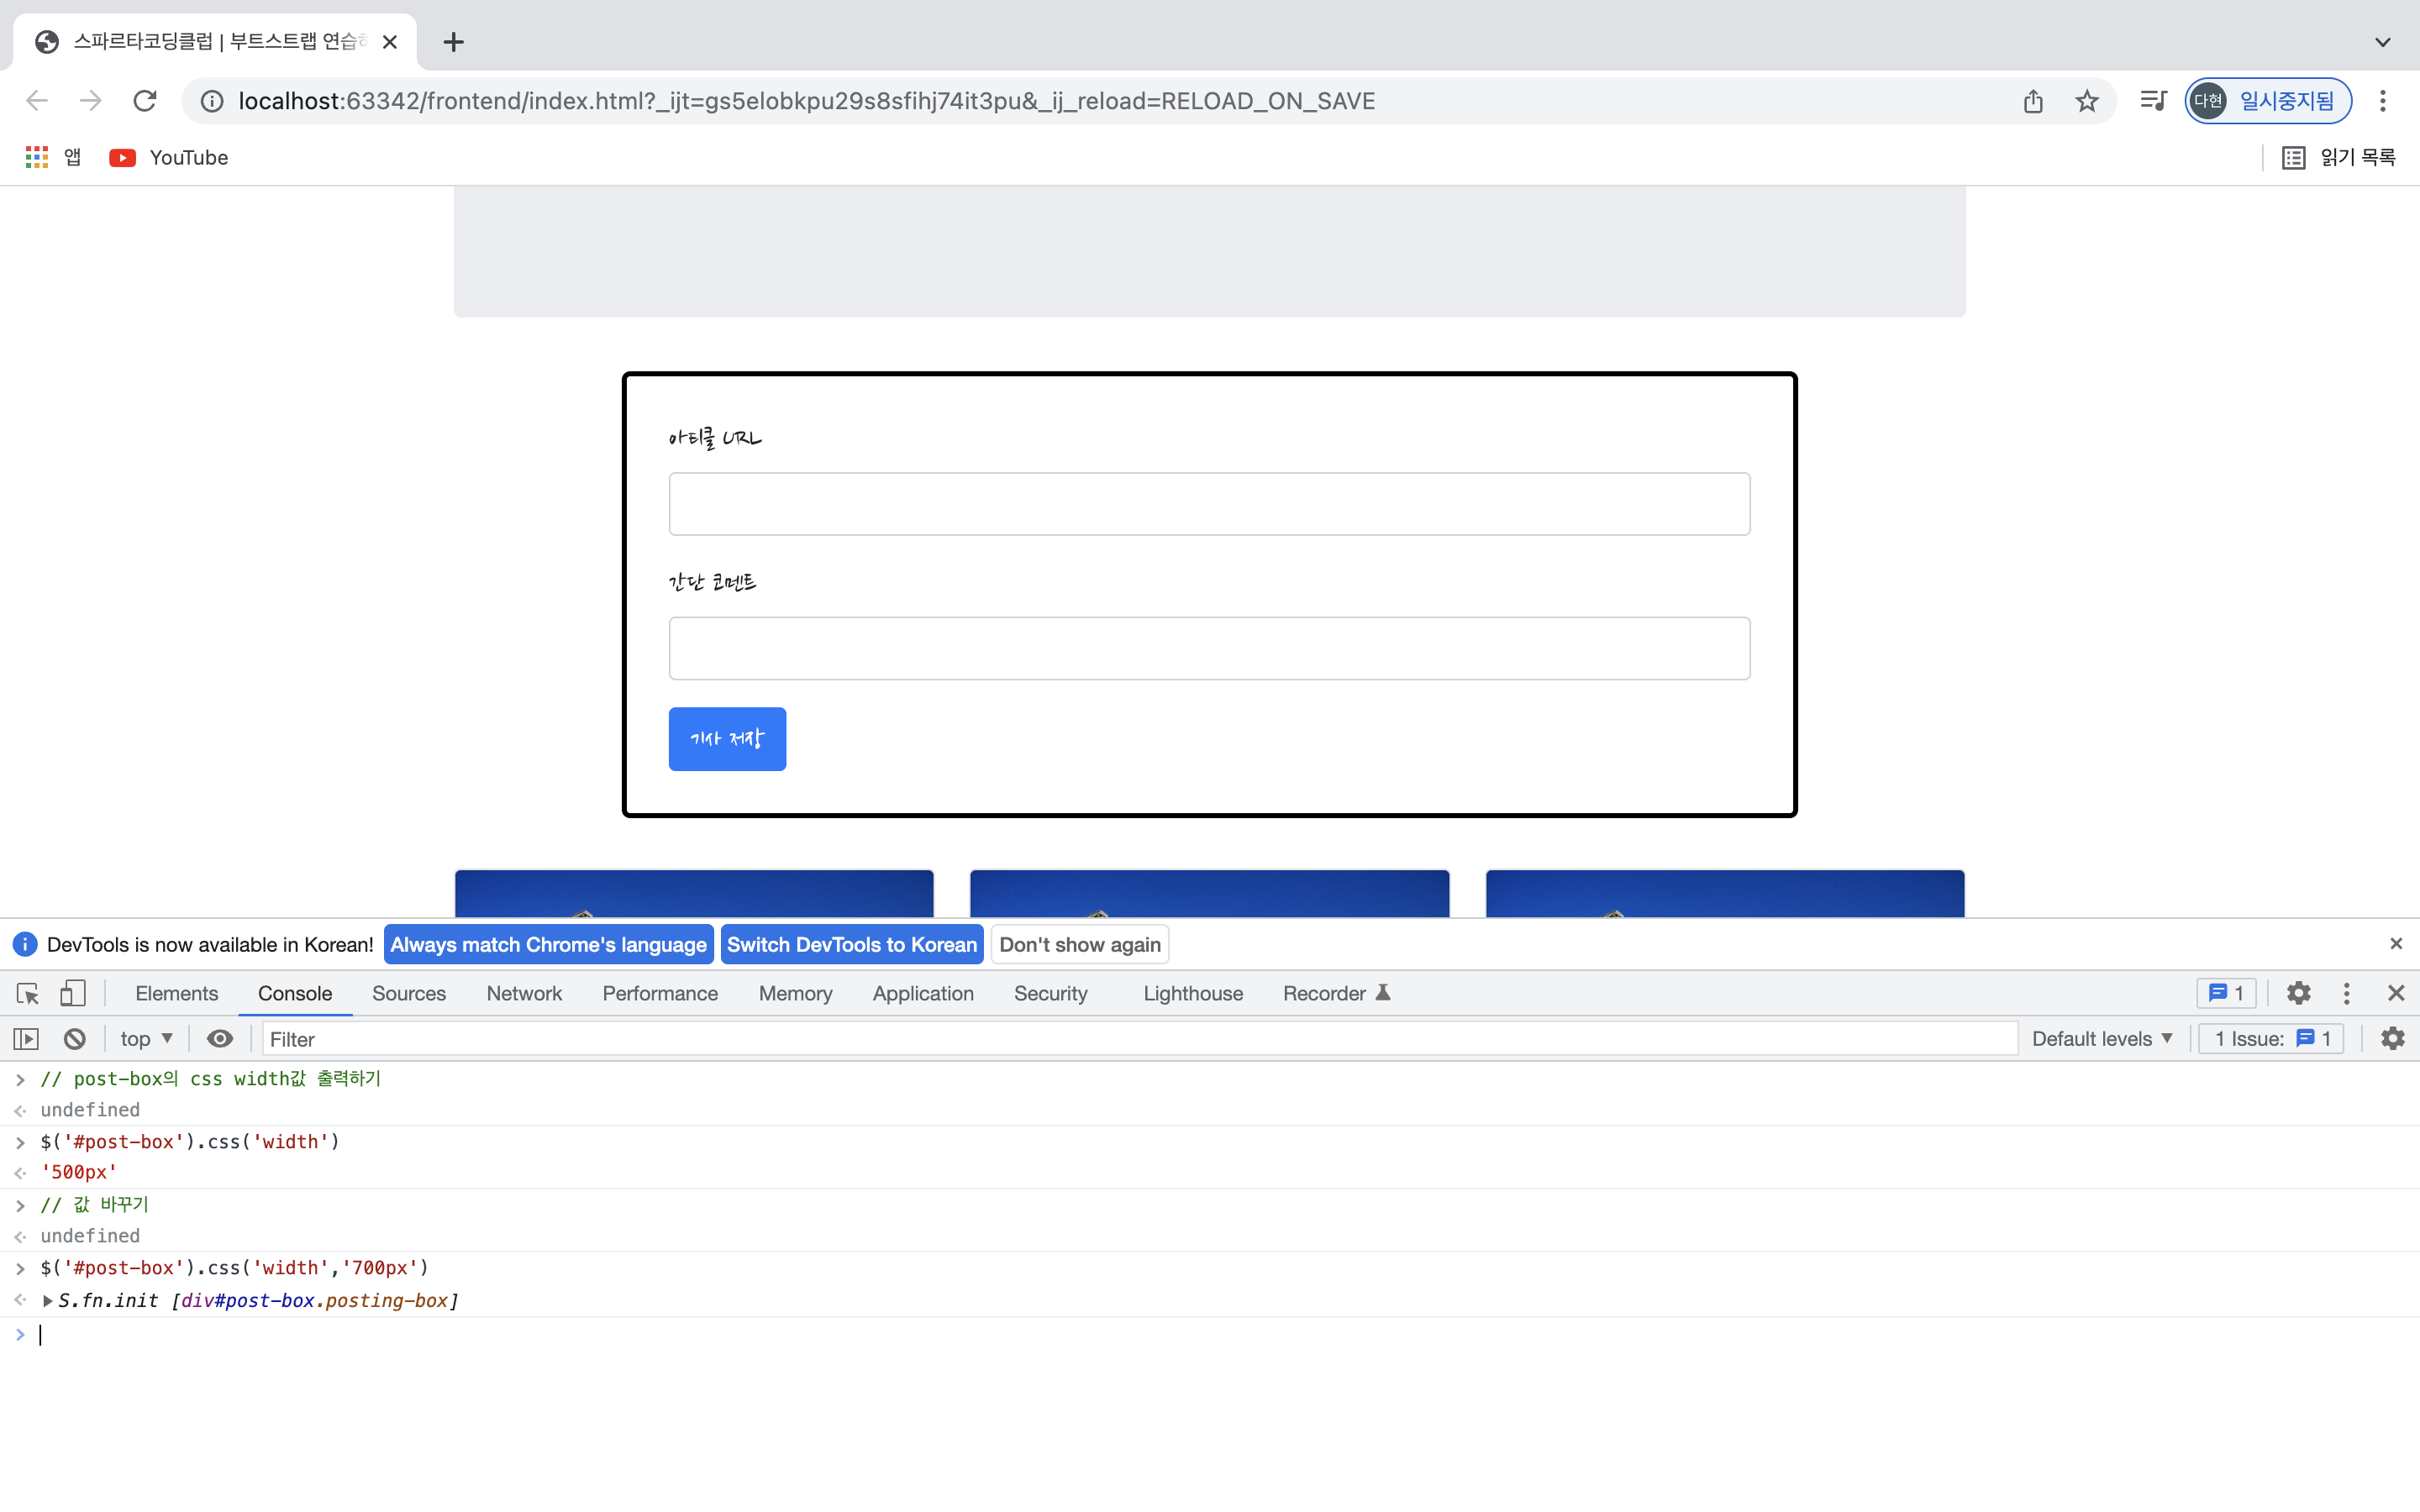
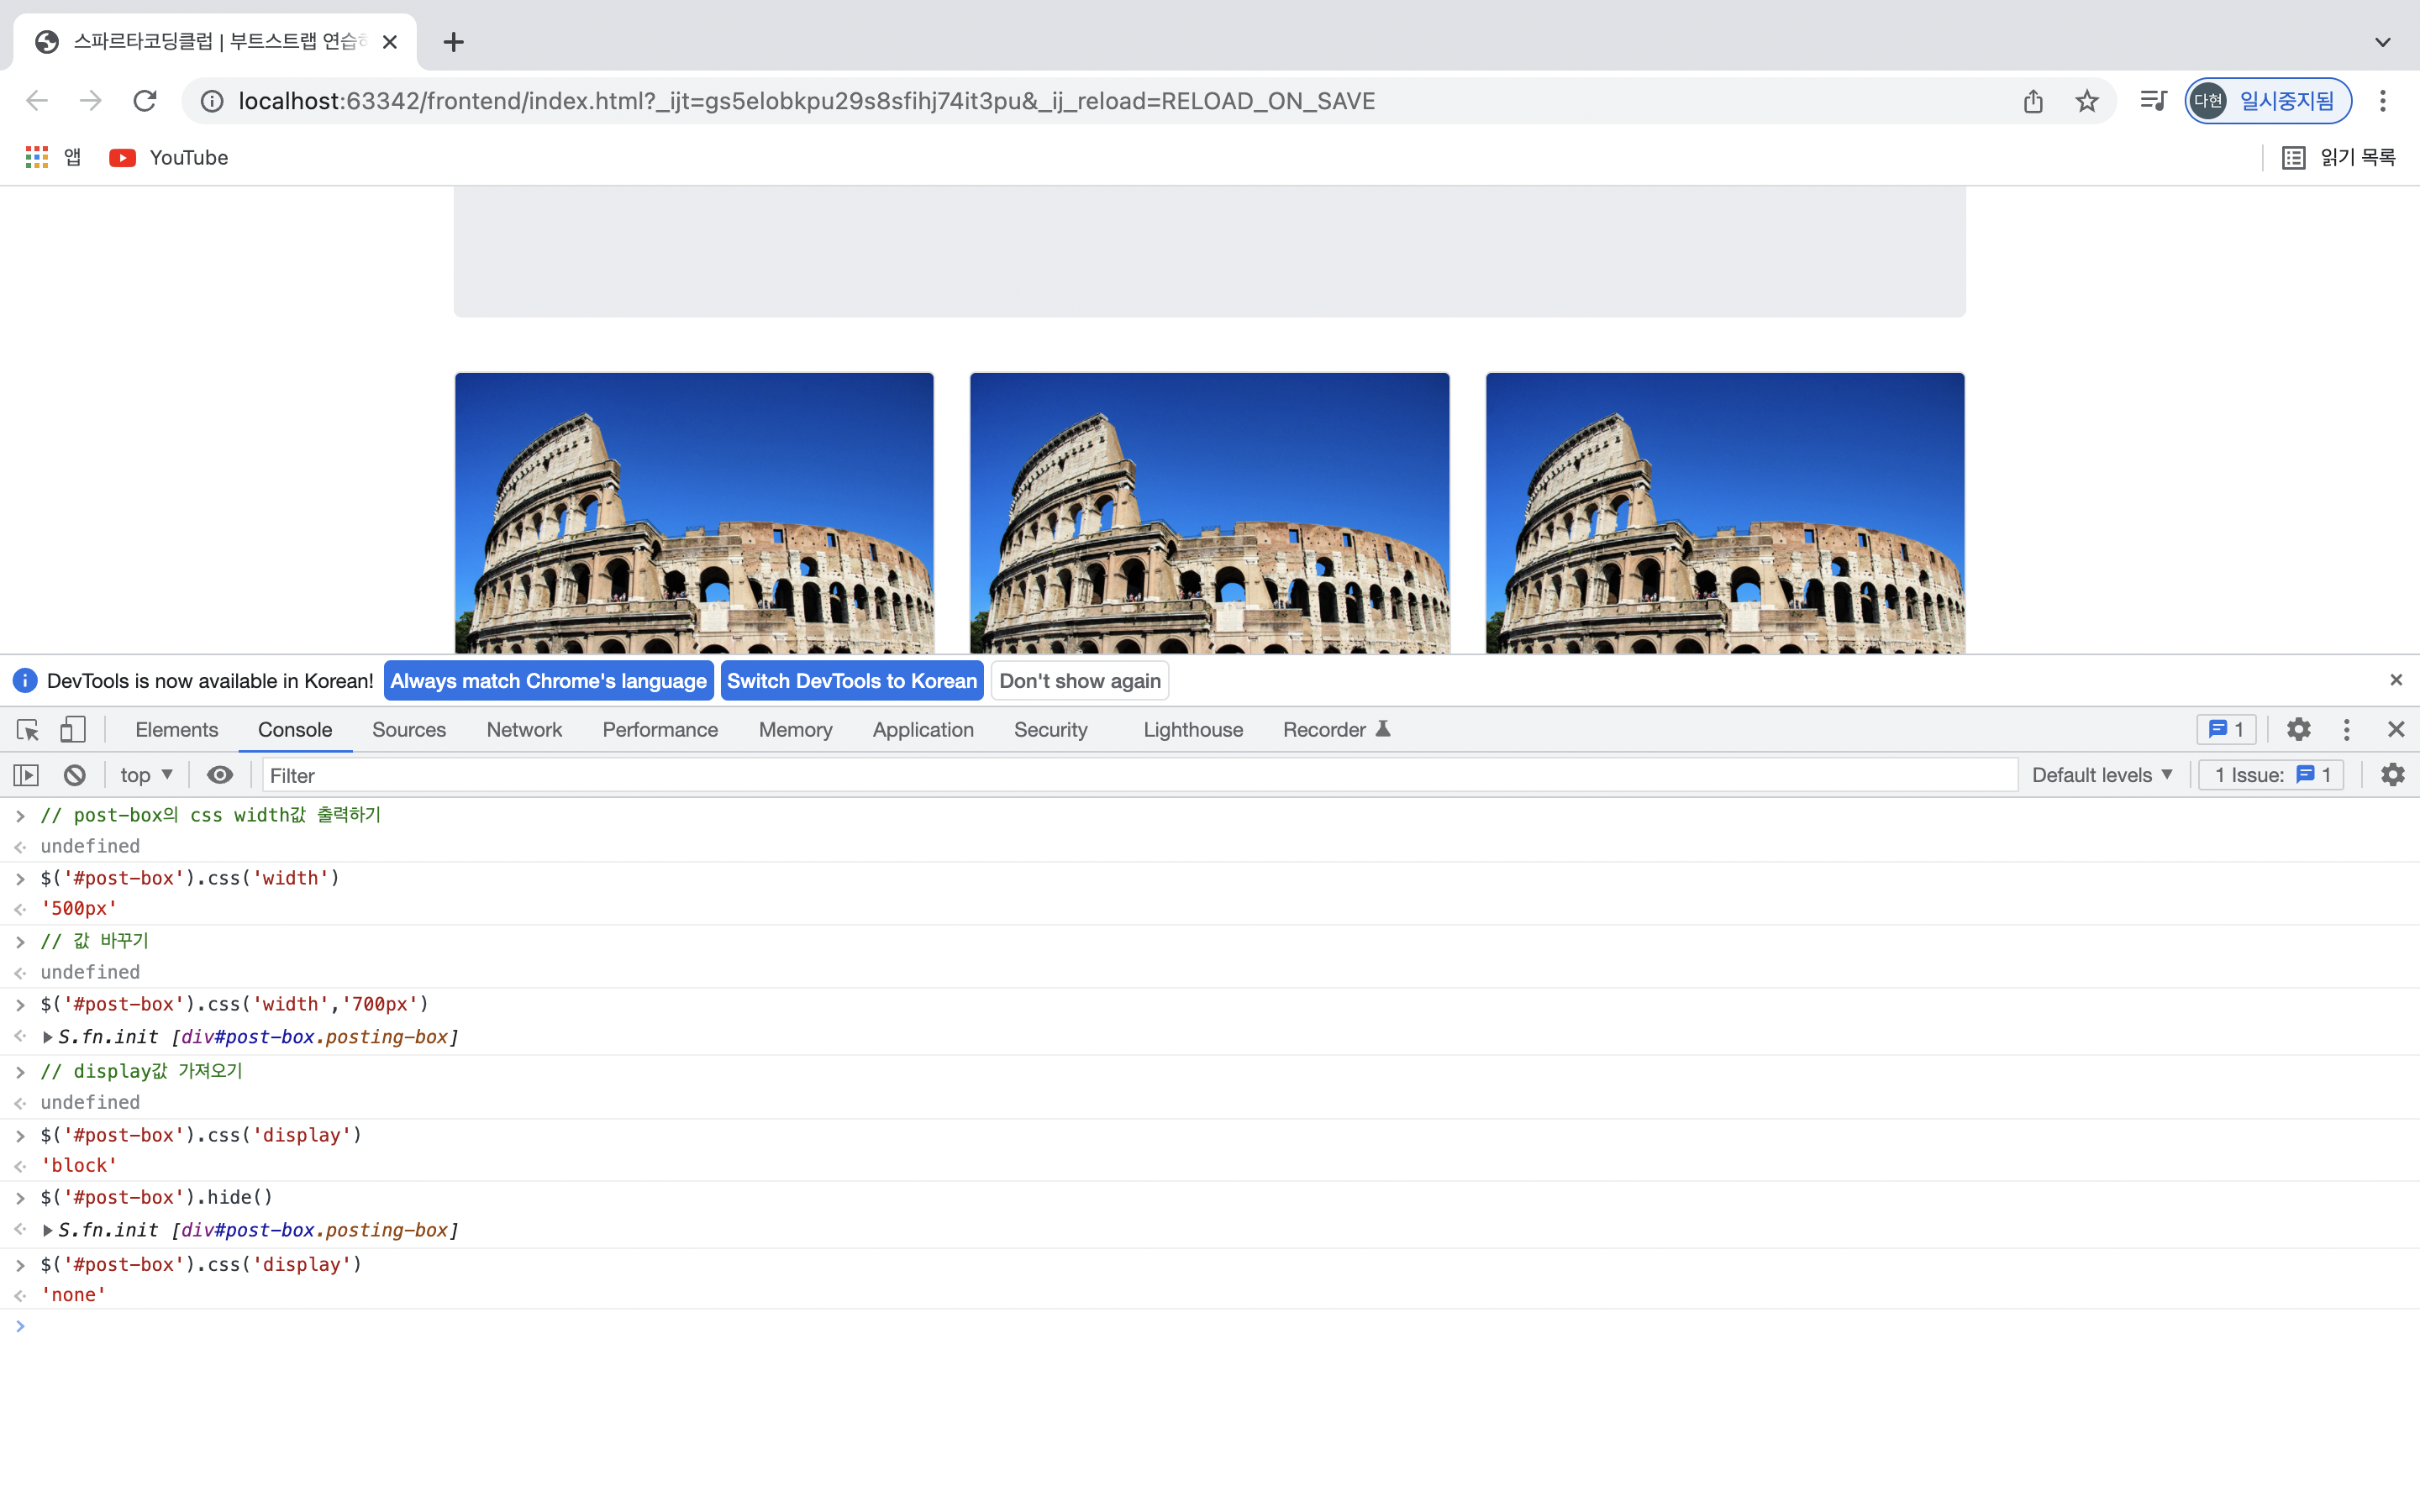
$('#post-box').hide();
$('#post-box').css('display');

$('#post-box').show();
$('#post-box').css('display');
4. 태그 내 텍스트 입력하기
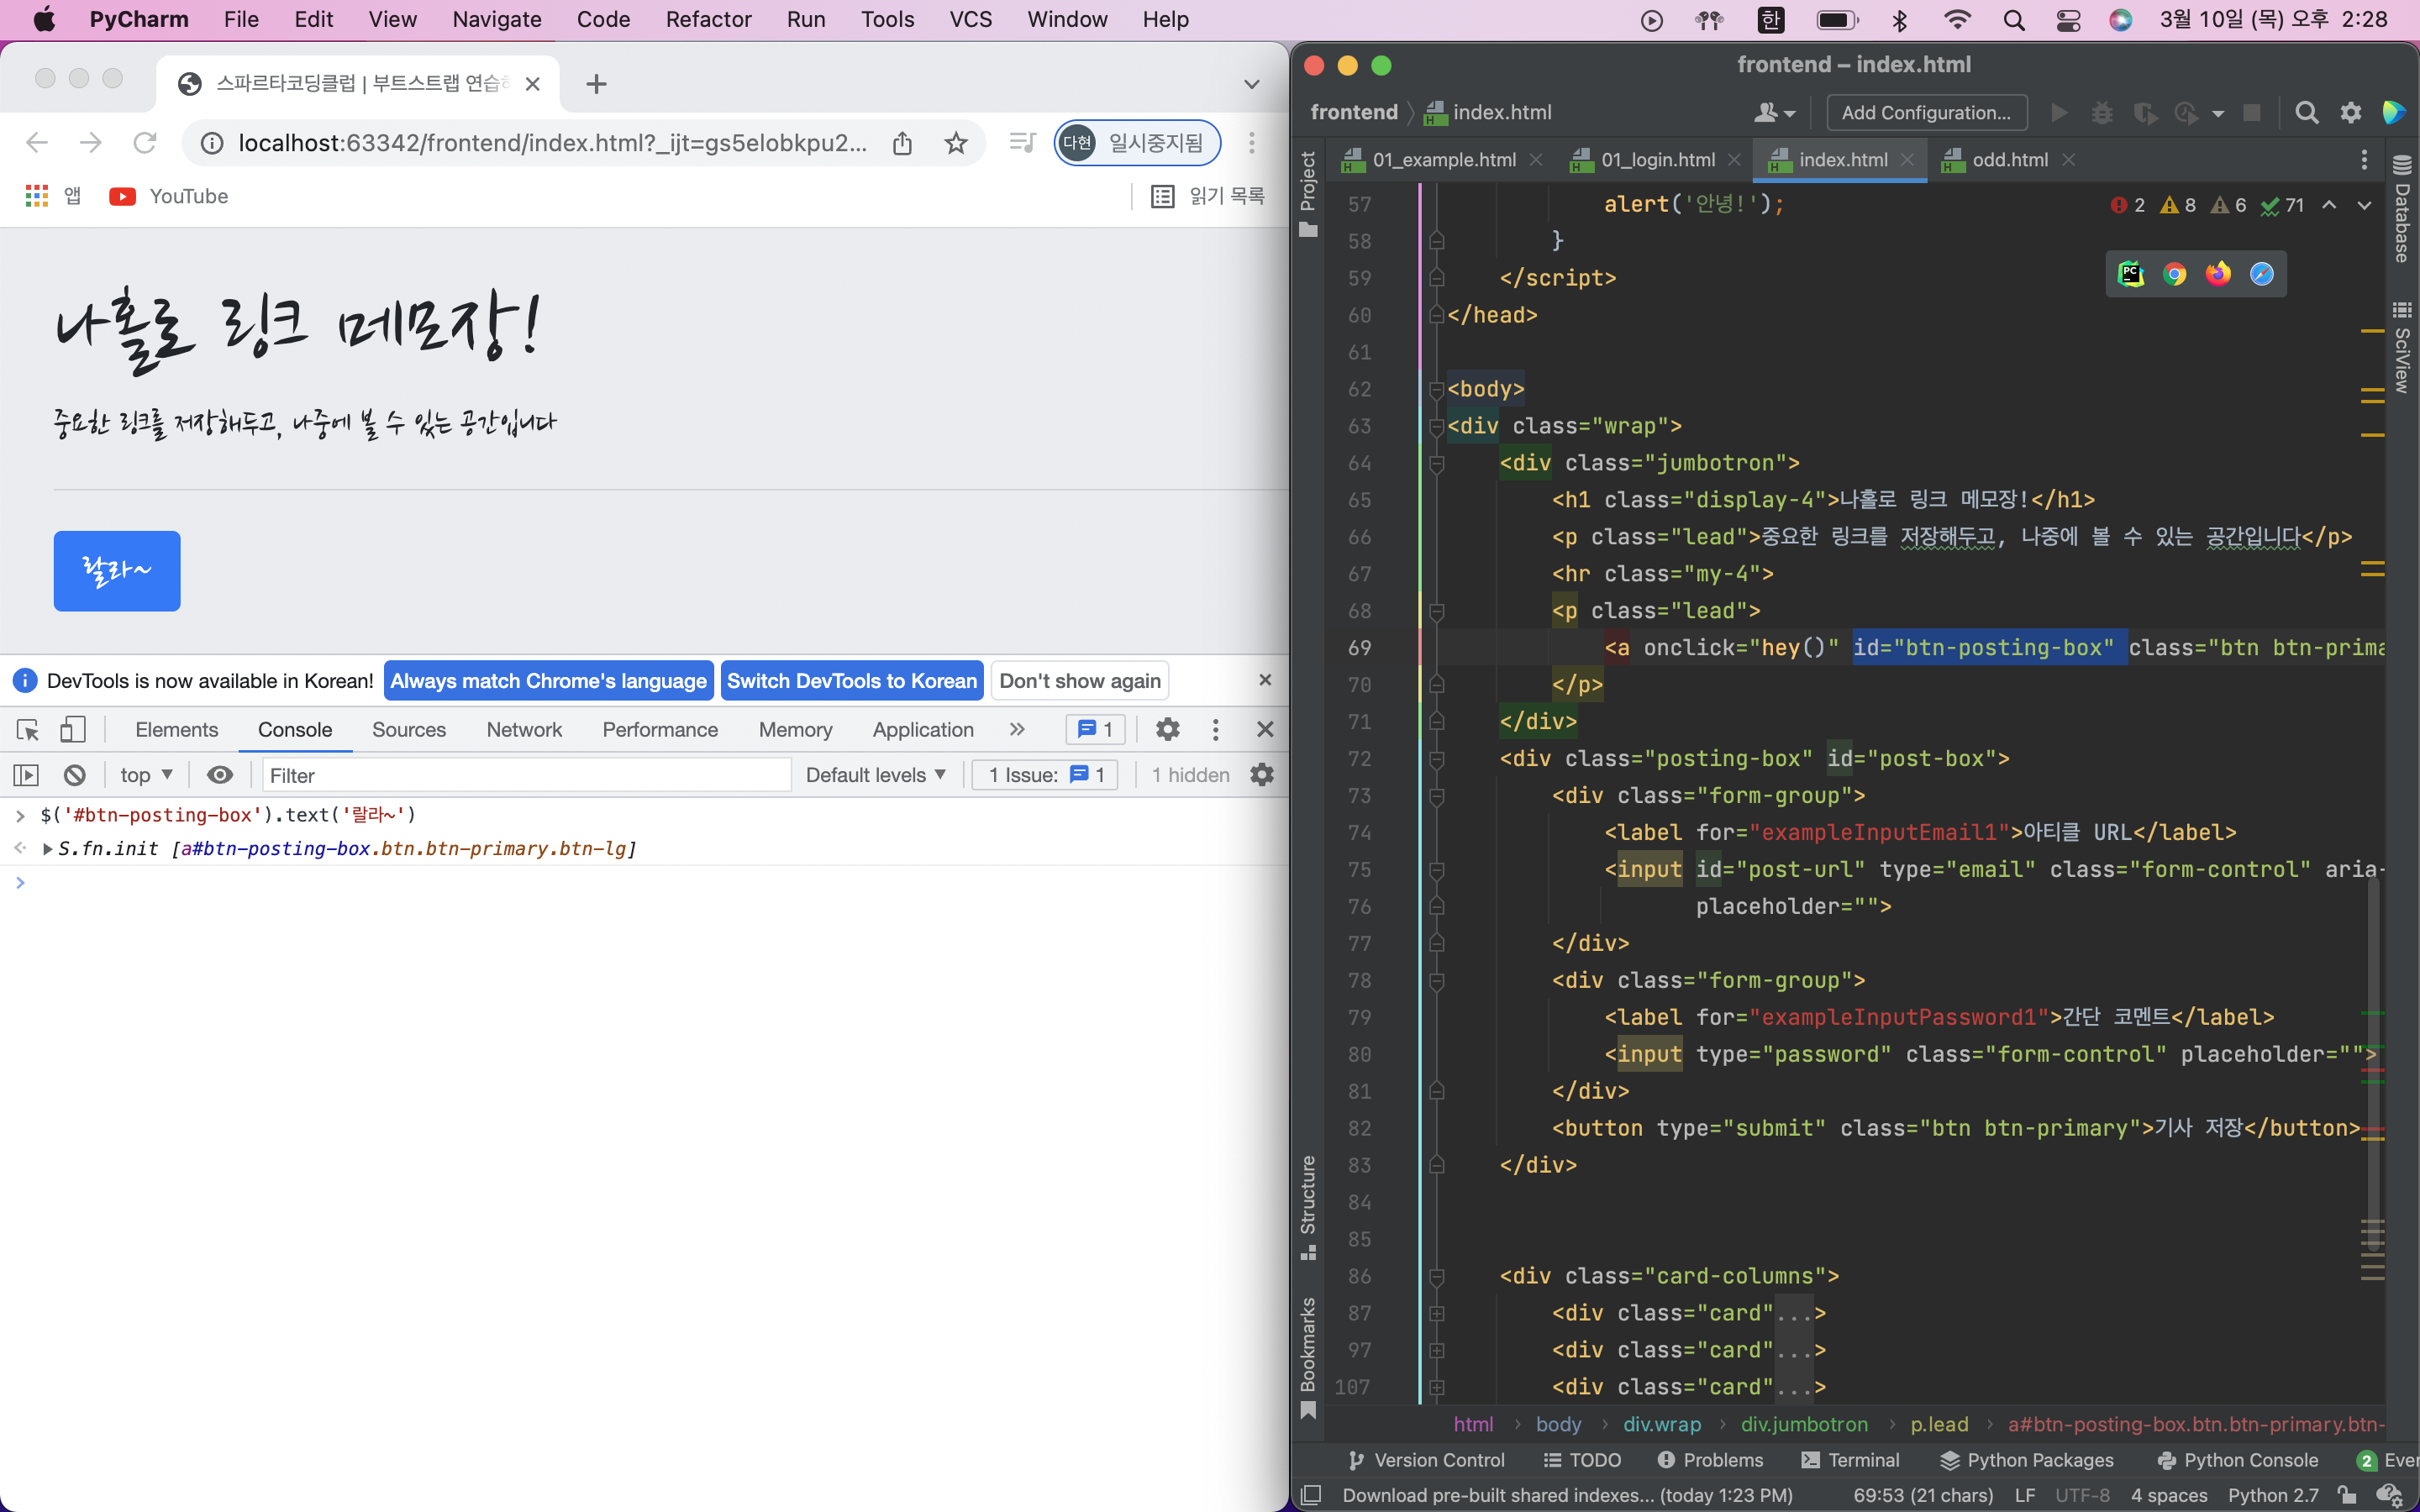
- input box의 경우
$('#post-url').val('여기에 텍스트를 입력하면!');- 그 외의 경우 ex.버튼의 텍스트 바꾸기
// 가리키고 싶은 버튼에 id 값을 준다음
<button id="btn-posting-box" type="button" class="btn btn-primary">포스팅 박스 열기</button>

//콘솔창에 입력하기
$('#btn-posting-box').text('랄라~');
5. 태그 내 html 입력하기
- 버튼 추가
let temp_html = '<button>나는 추가될 버튼이다!</button>';
$('#cards-box').append(temp_html);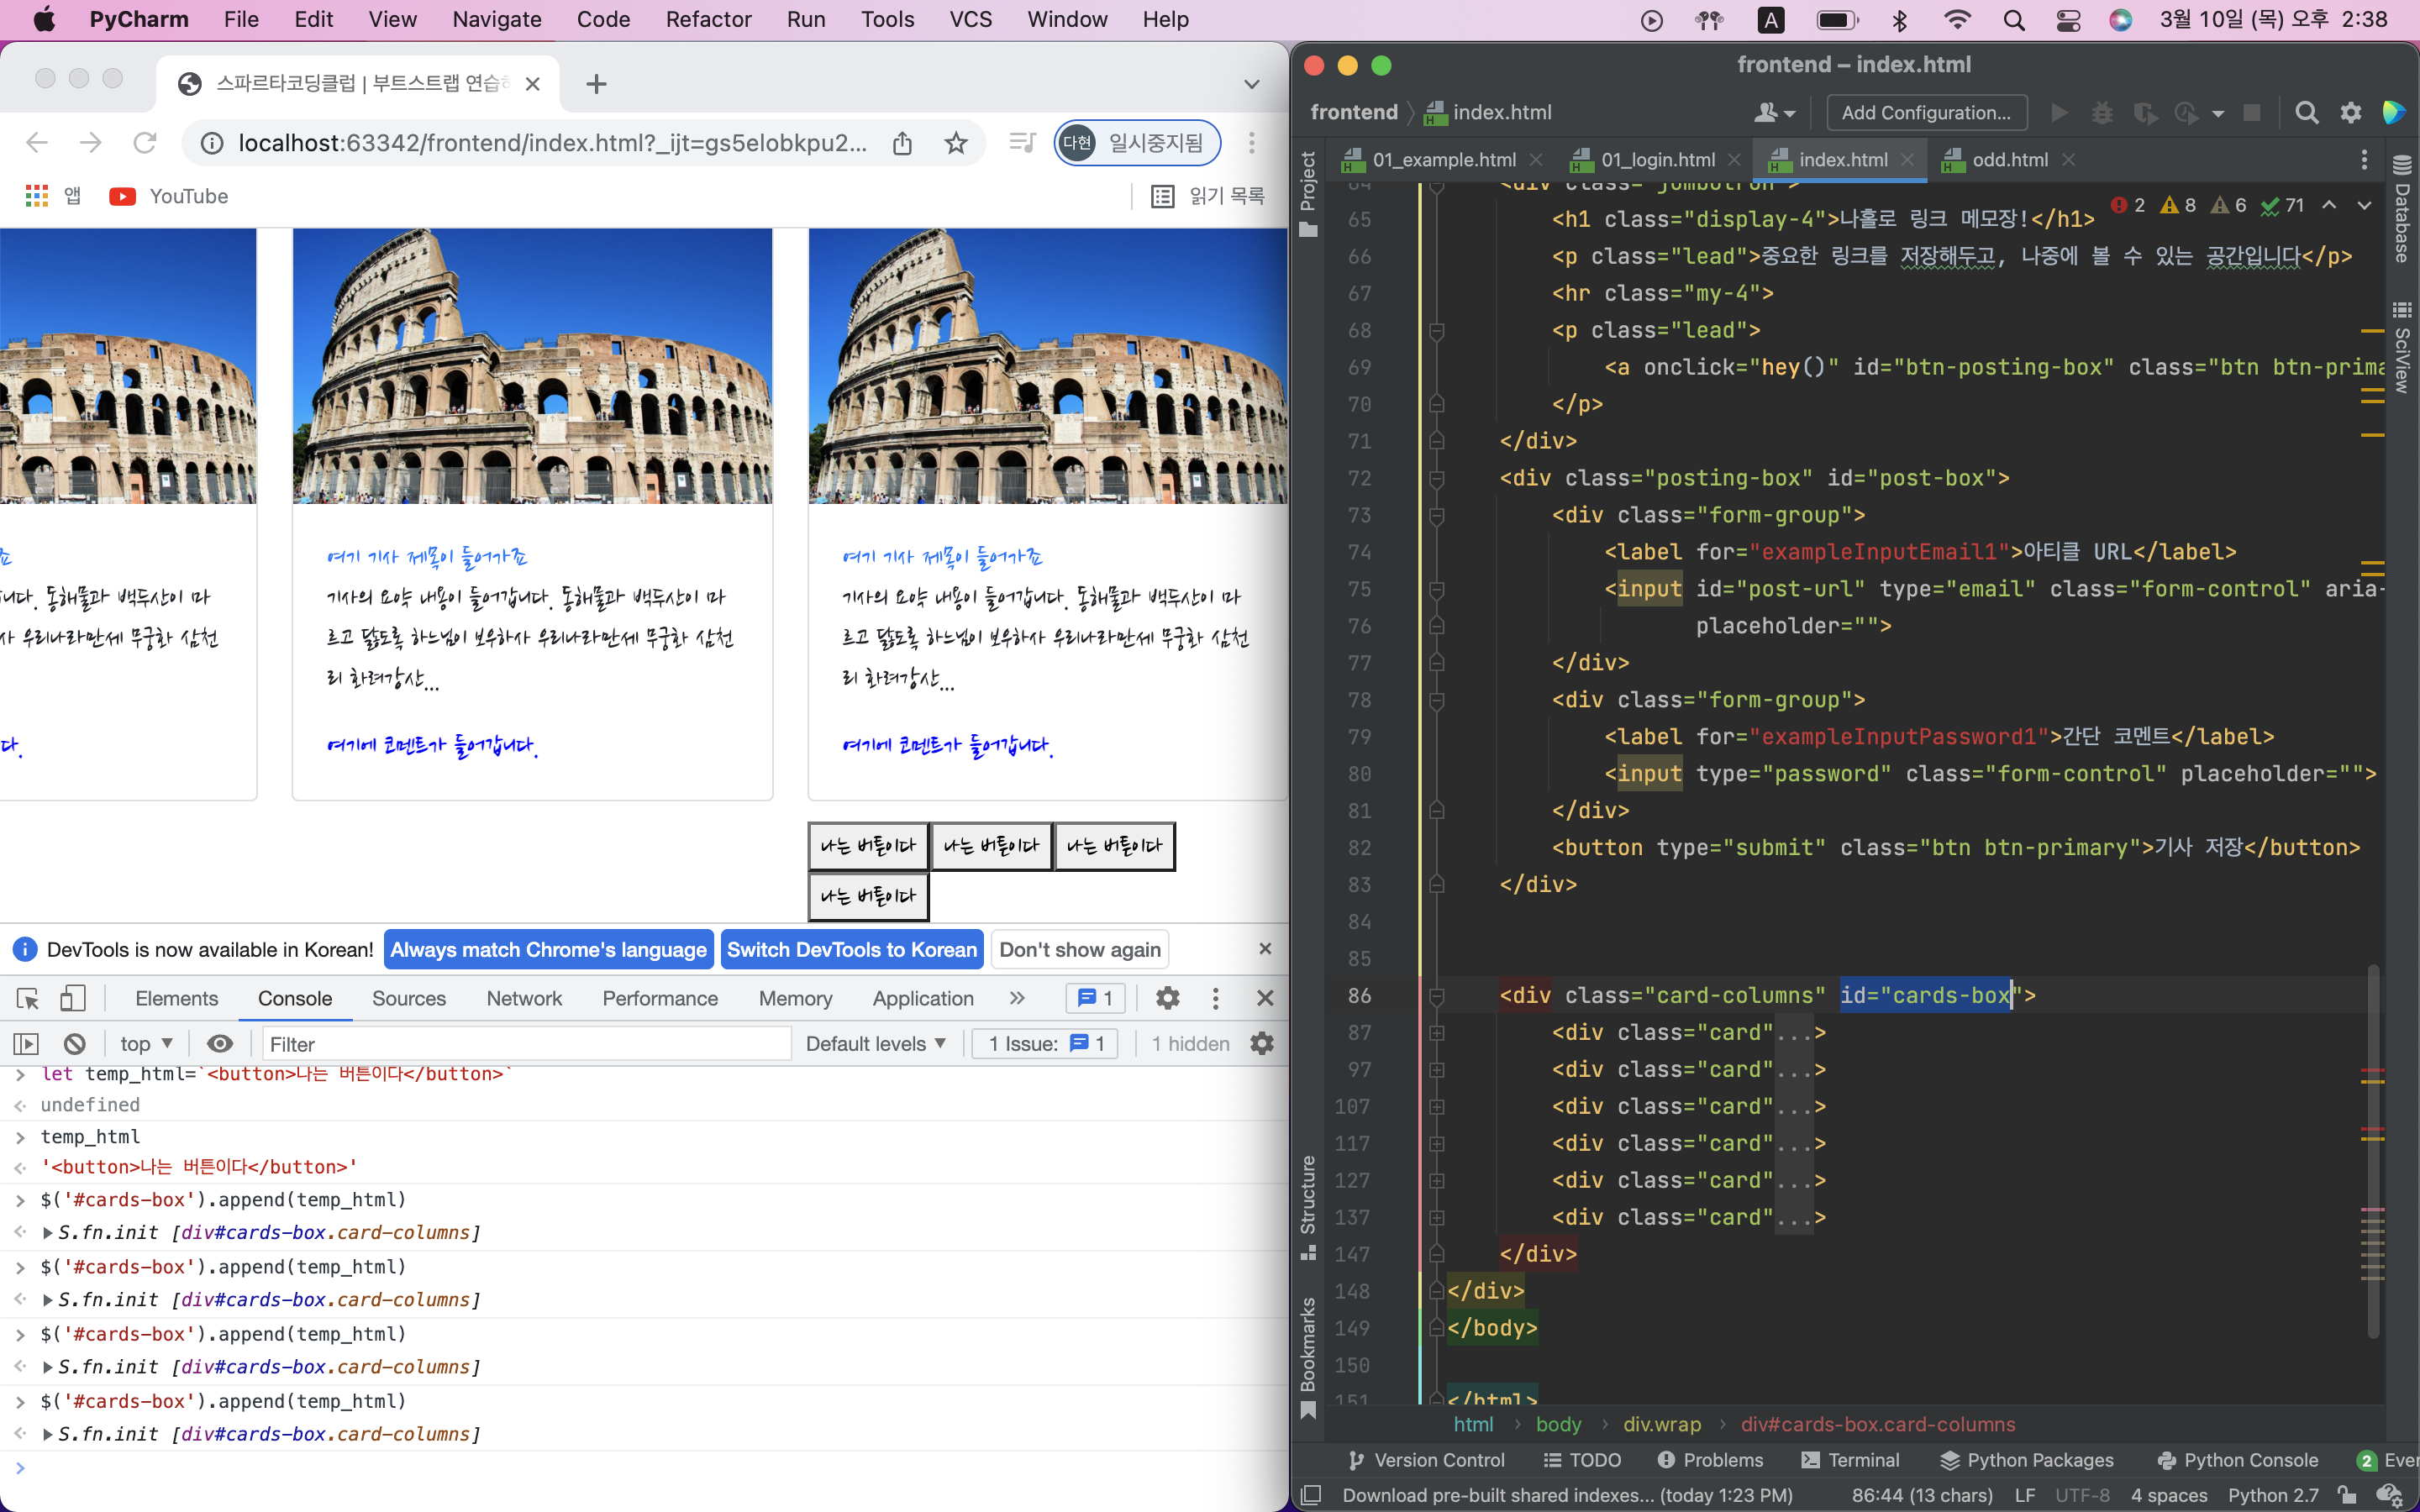
- 카드 추가
// 주의: 홑따옴표(')가 아닌 backtick(`)으로 감싸야 합니다.
// 숫자 1번 키 왼쪽의 버튼을 누르면 backtick(`)이 입력됩니다.
// backtick을 사용하면 문자 중간에 Javascript 변수를 삽입할 수 있습니다.
let img_url = 'https://www.eurail.com/content/dam/images/eurail/Italy%20OCP%20Promo%20Block.adaptive.767.1535627244182.jpg';
let link_url = 'https://naver.com/';
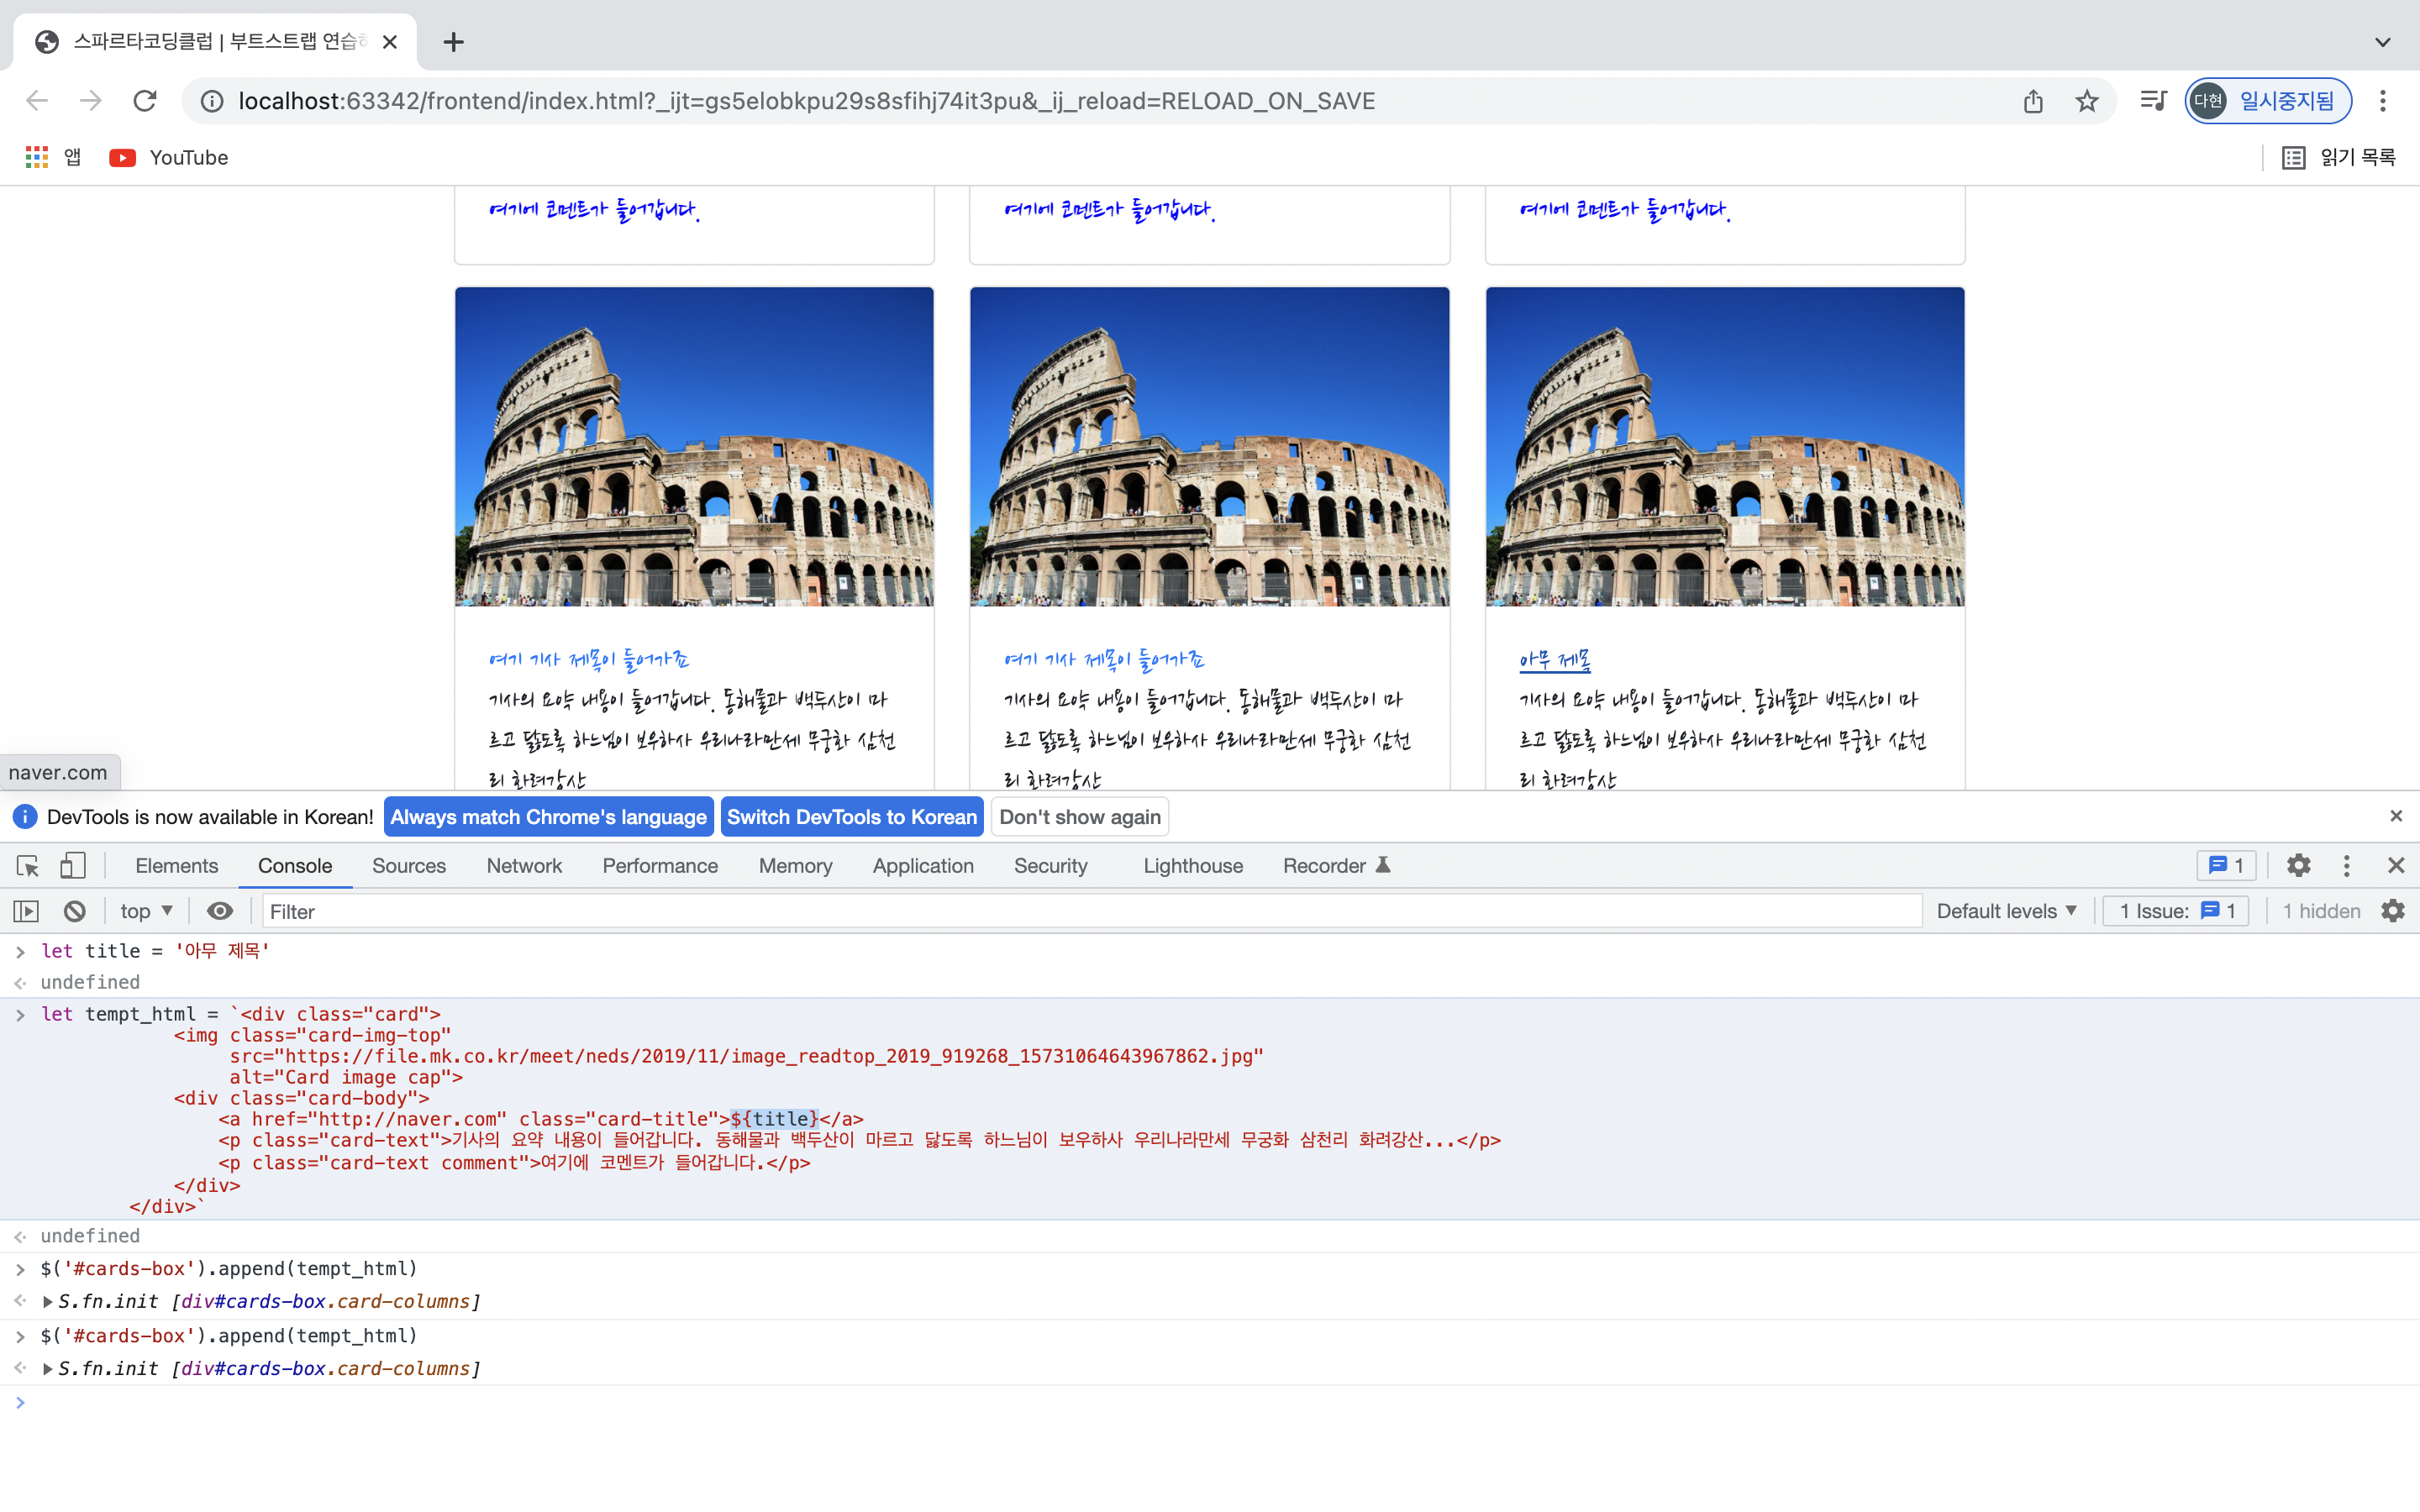
let title = '여기 기사 제목이 들어가죠';
let desc = '기사의 요약 내용이 들어갑니다. 동해물과 백두산이 마르고 닳도록 하느님이 보우하사 우리나라만세 무궁화 삼천리 화려강산...';
let comment = '여기에 코멘트가 들어갑니다.';

let temp_html = `<div class="card">
                    <img class="card-img-top"
                        src="${img_url}"
                        alt="Card image cap">
                    <div class="card-body">
                        <a href="${link_url}" class="card-title">${title}</a>
                        <p class="card-text">${desc}</p>
                        <p class="card-text comment">${comment}</p>
                    </div>
                </div>`;
$('#cards-box').append(temp_html);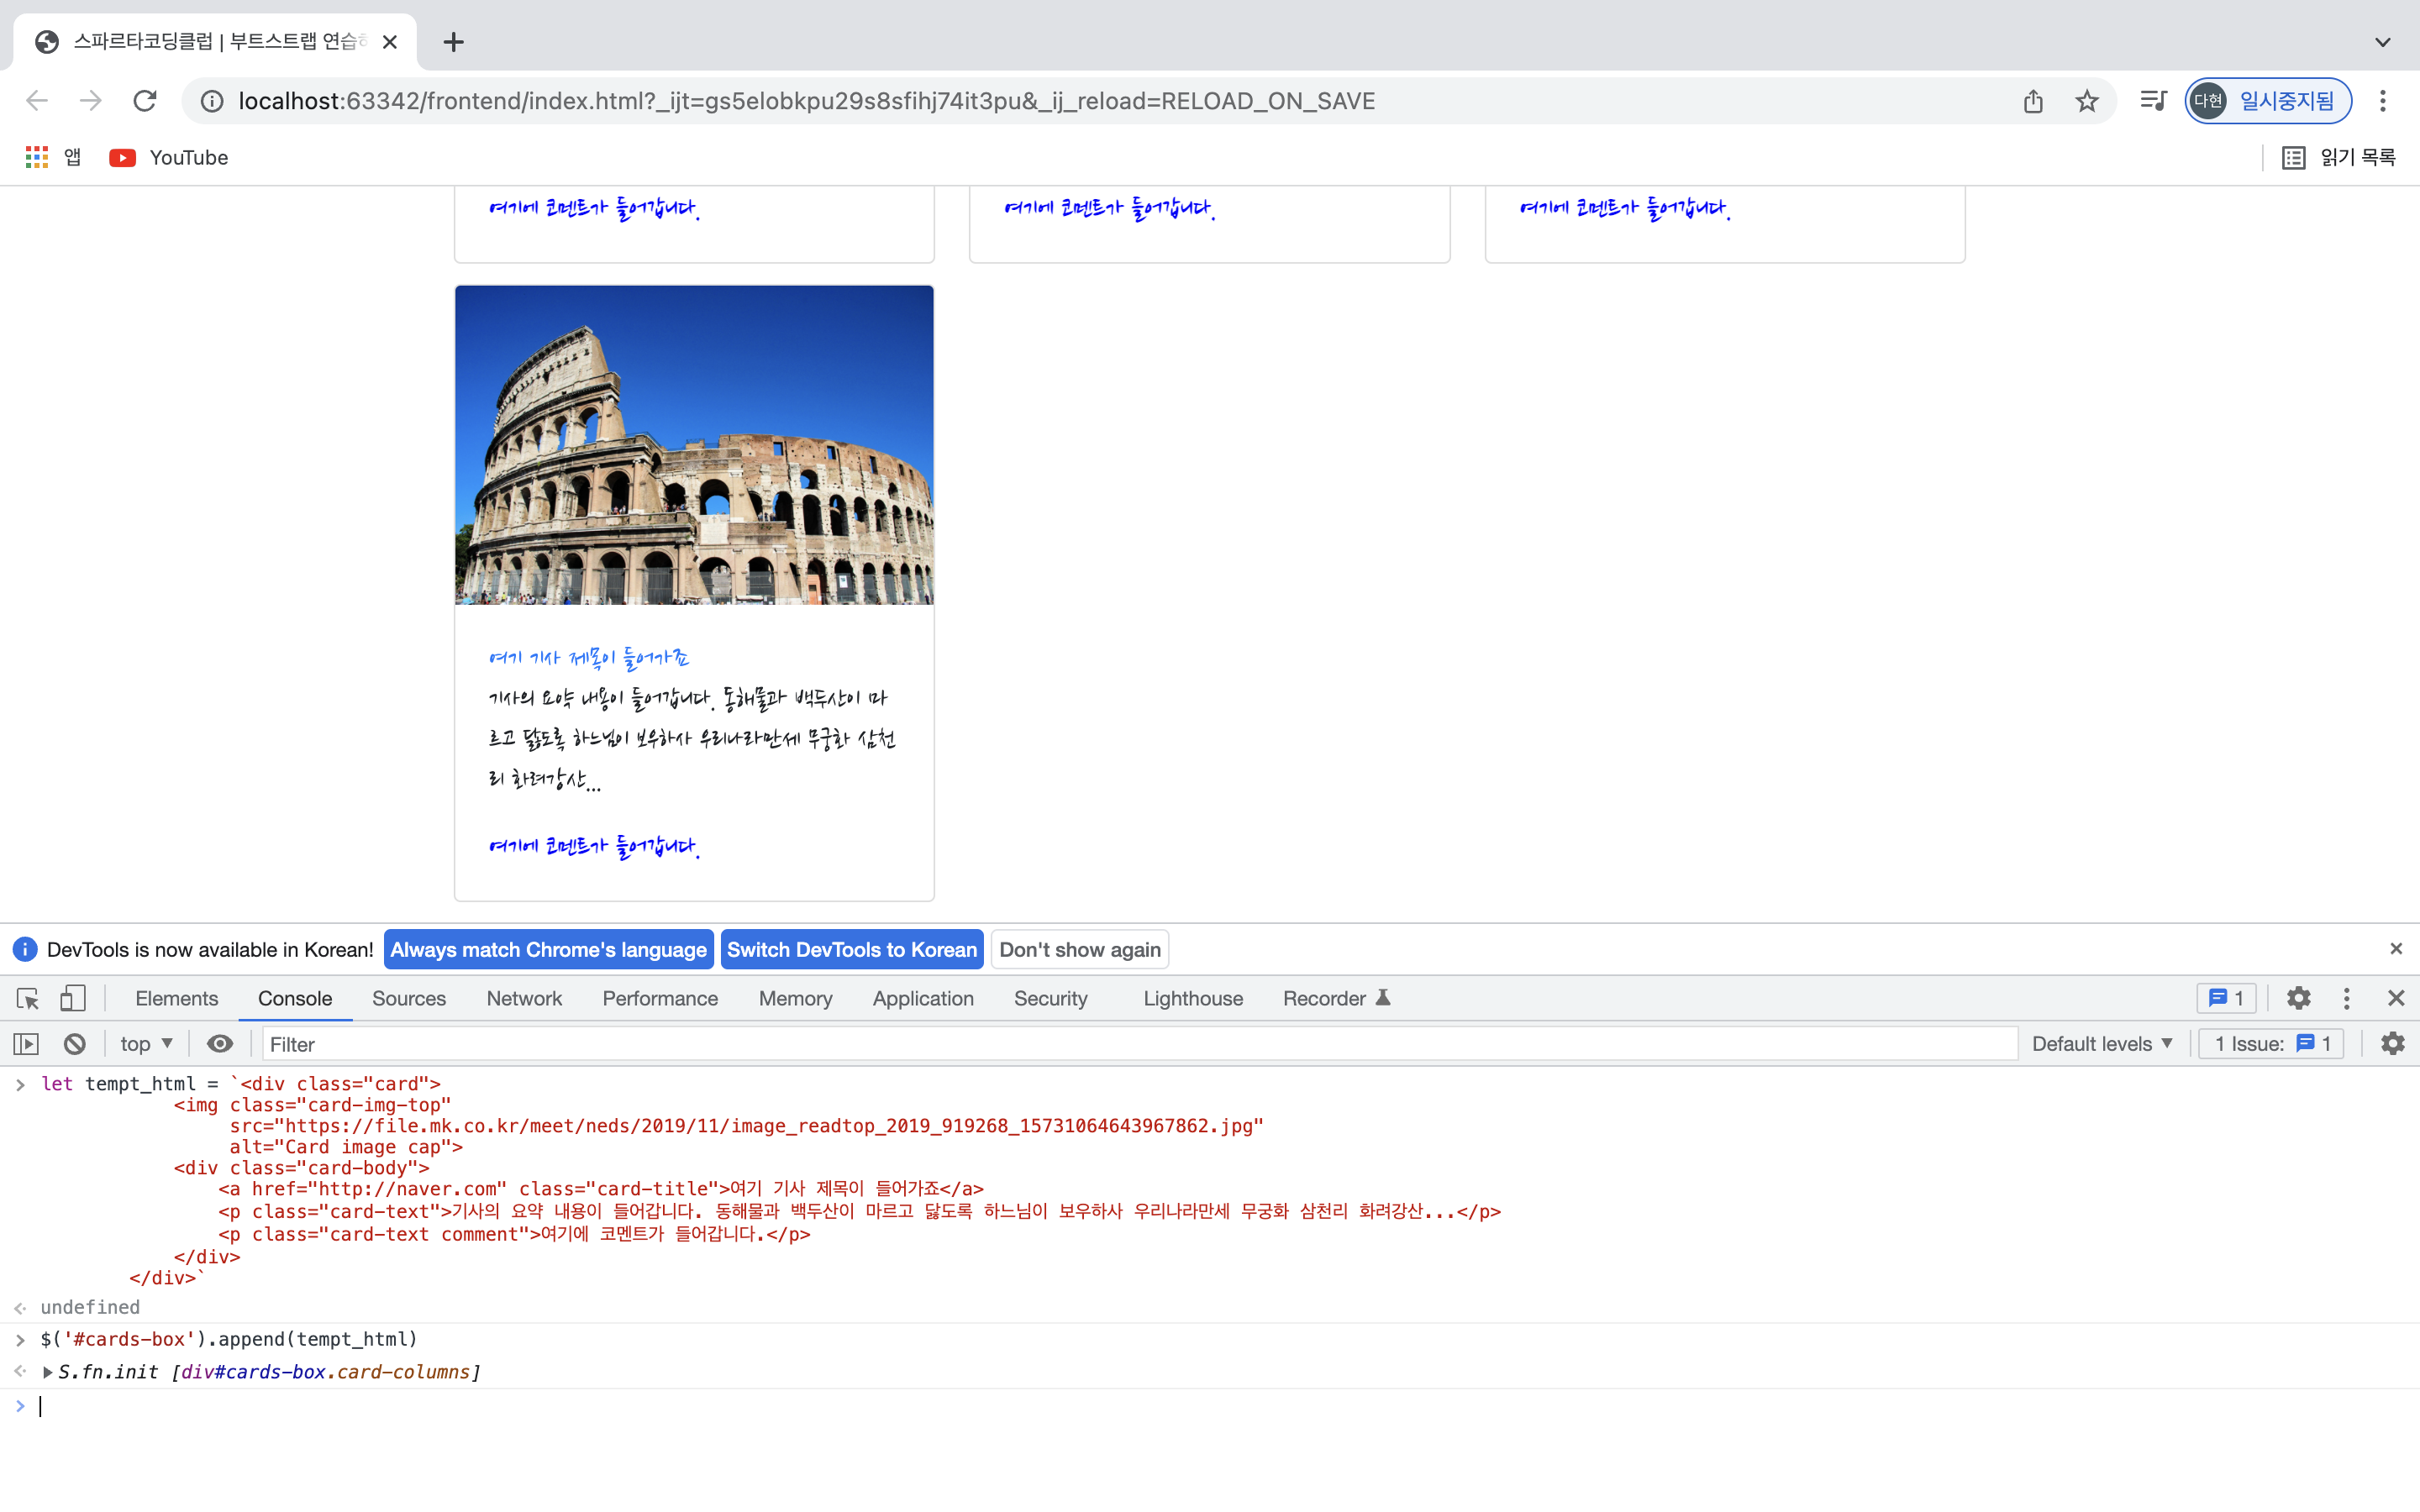
- 제목 바꾸기
3) JQuery 적용하기(나홀로메모장_실습)
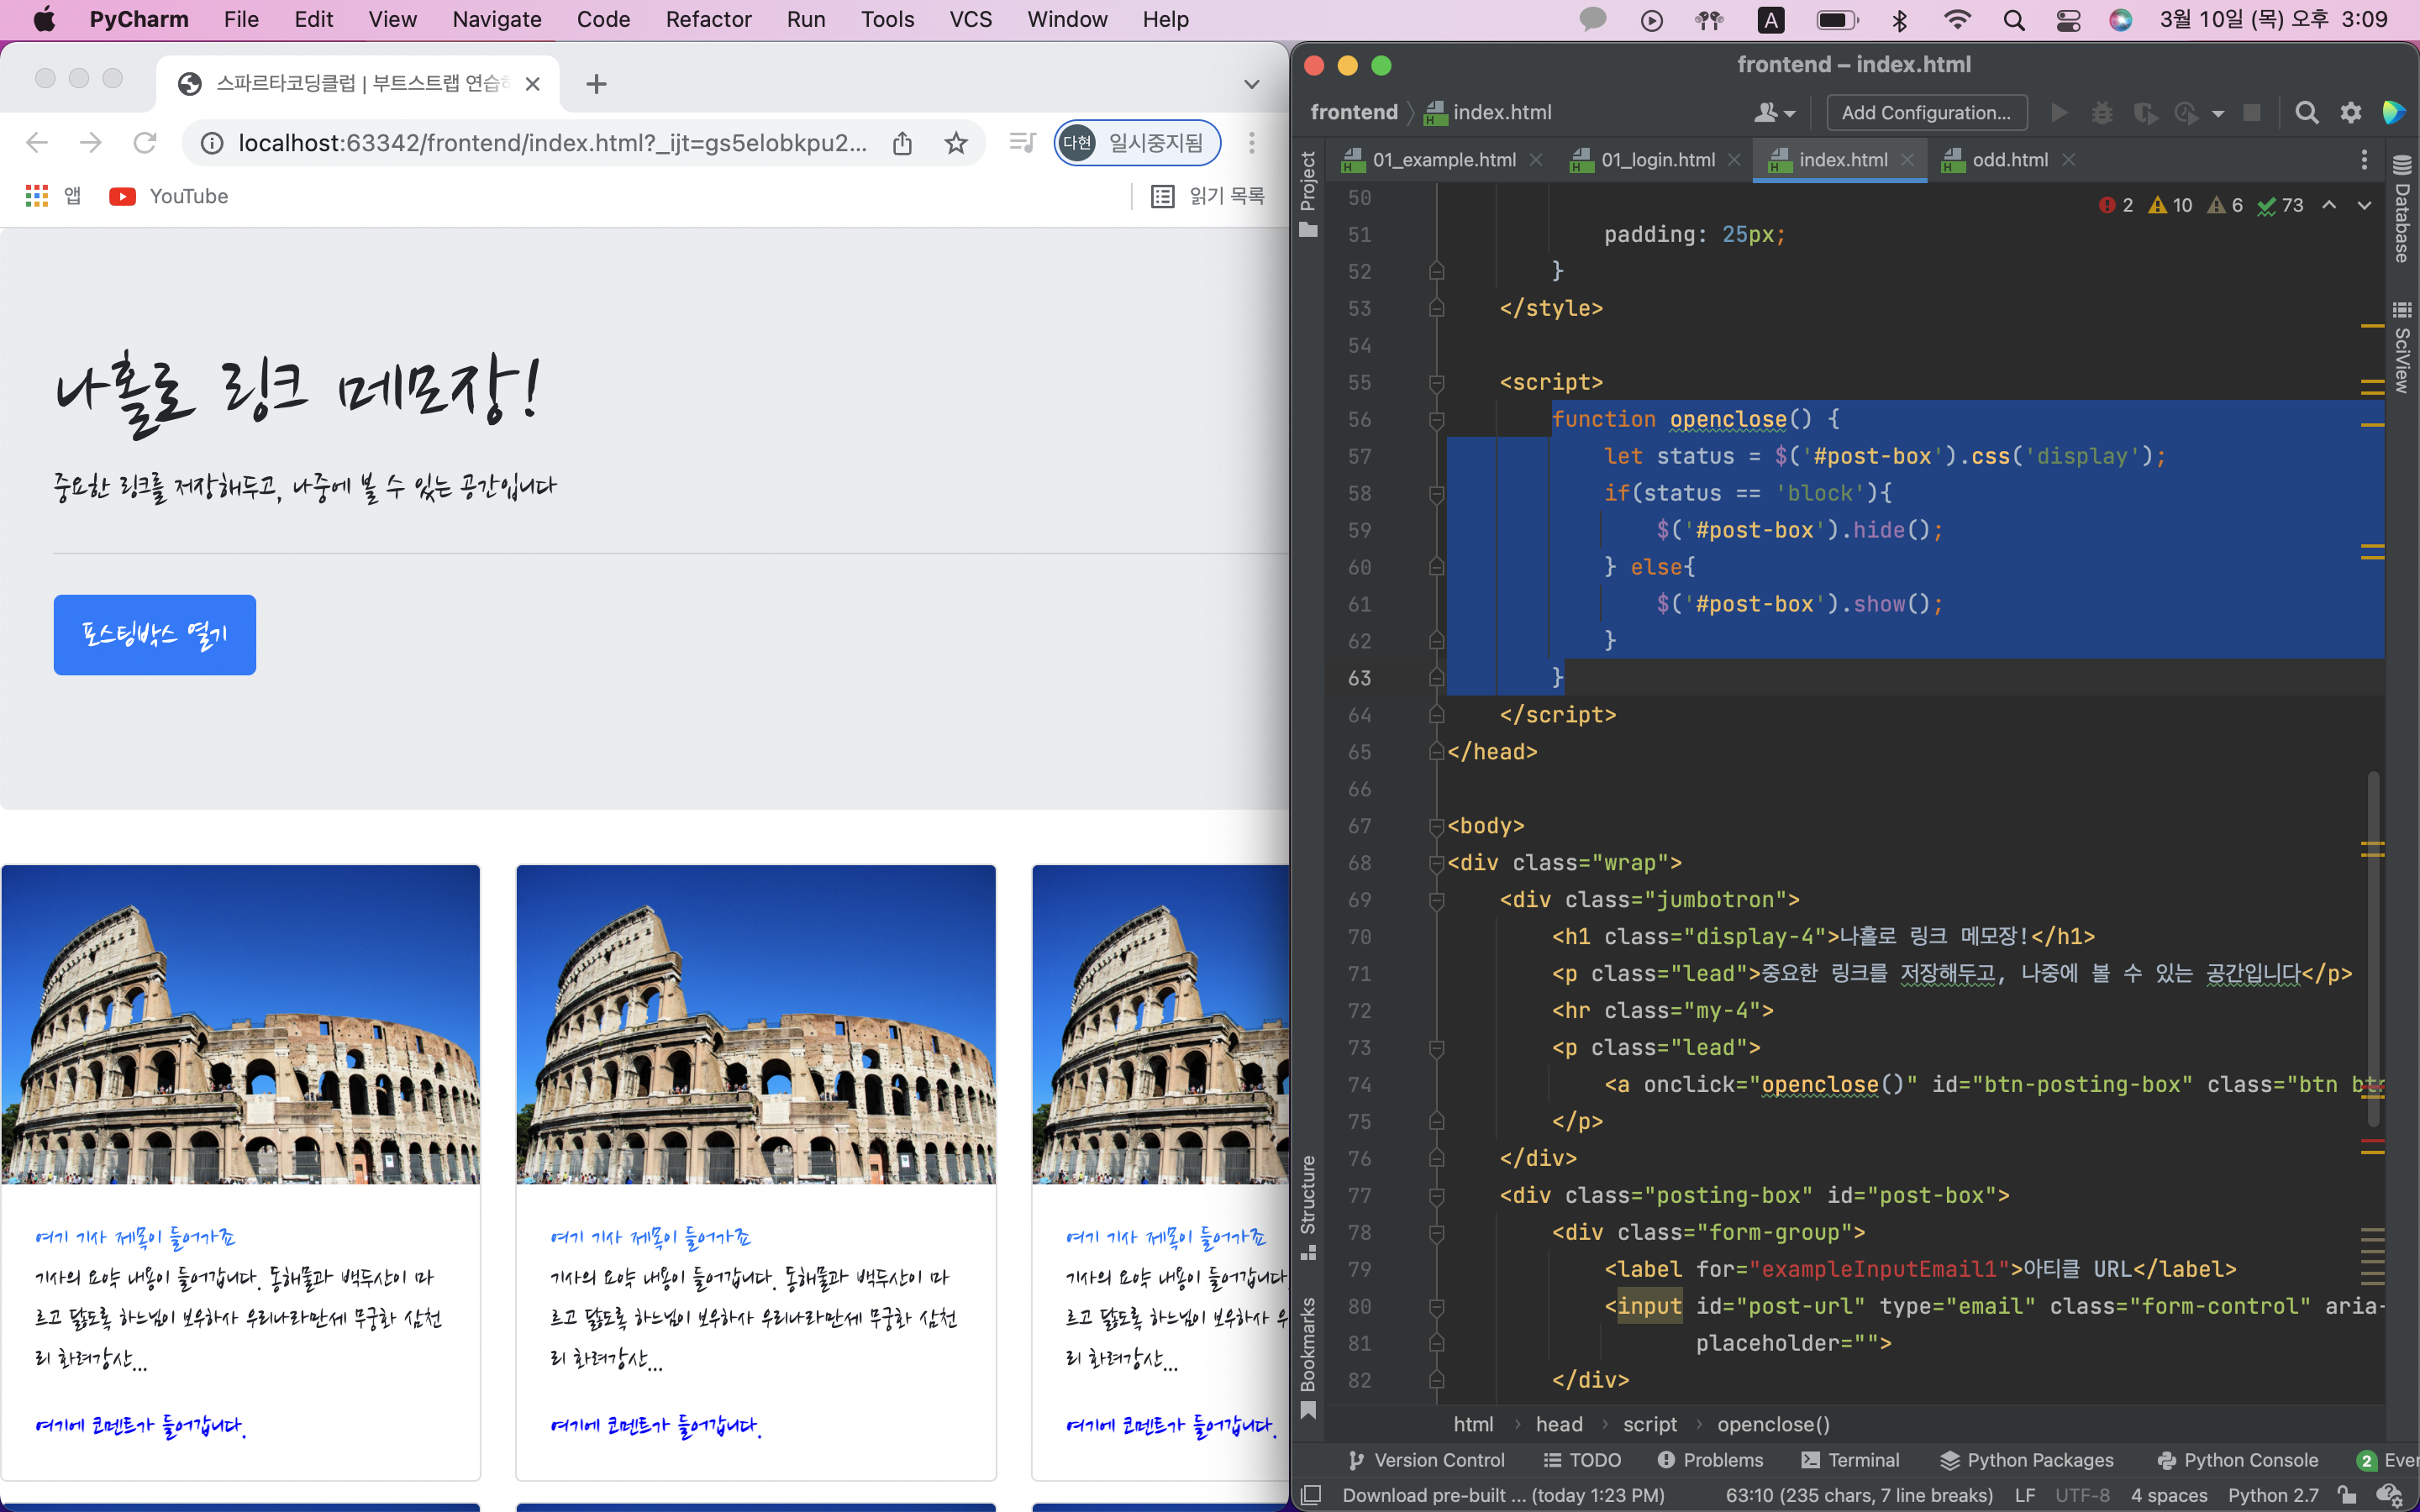
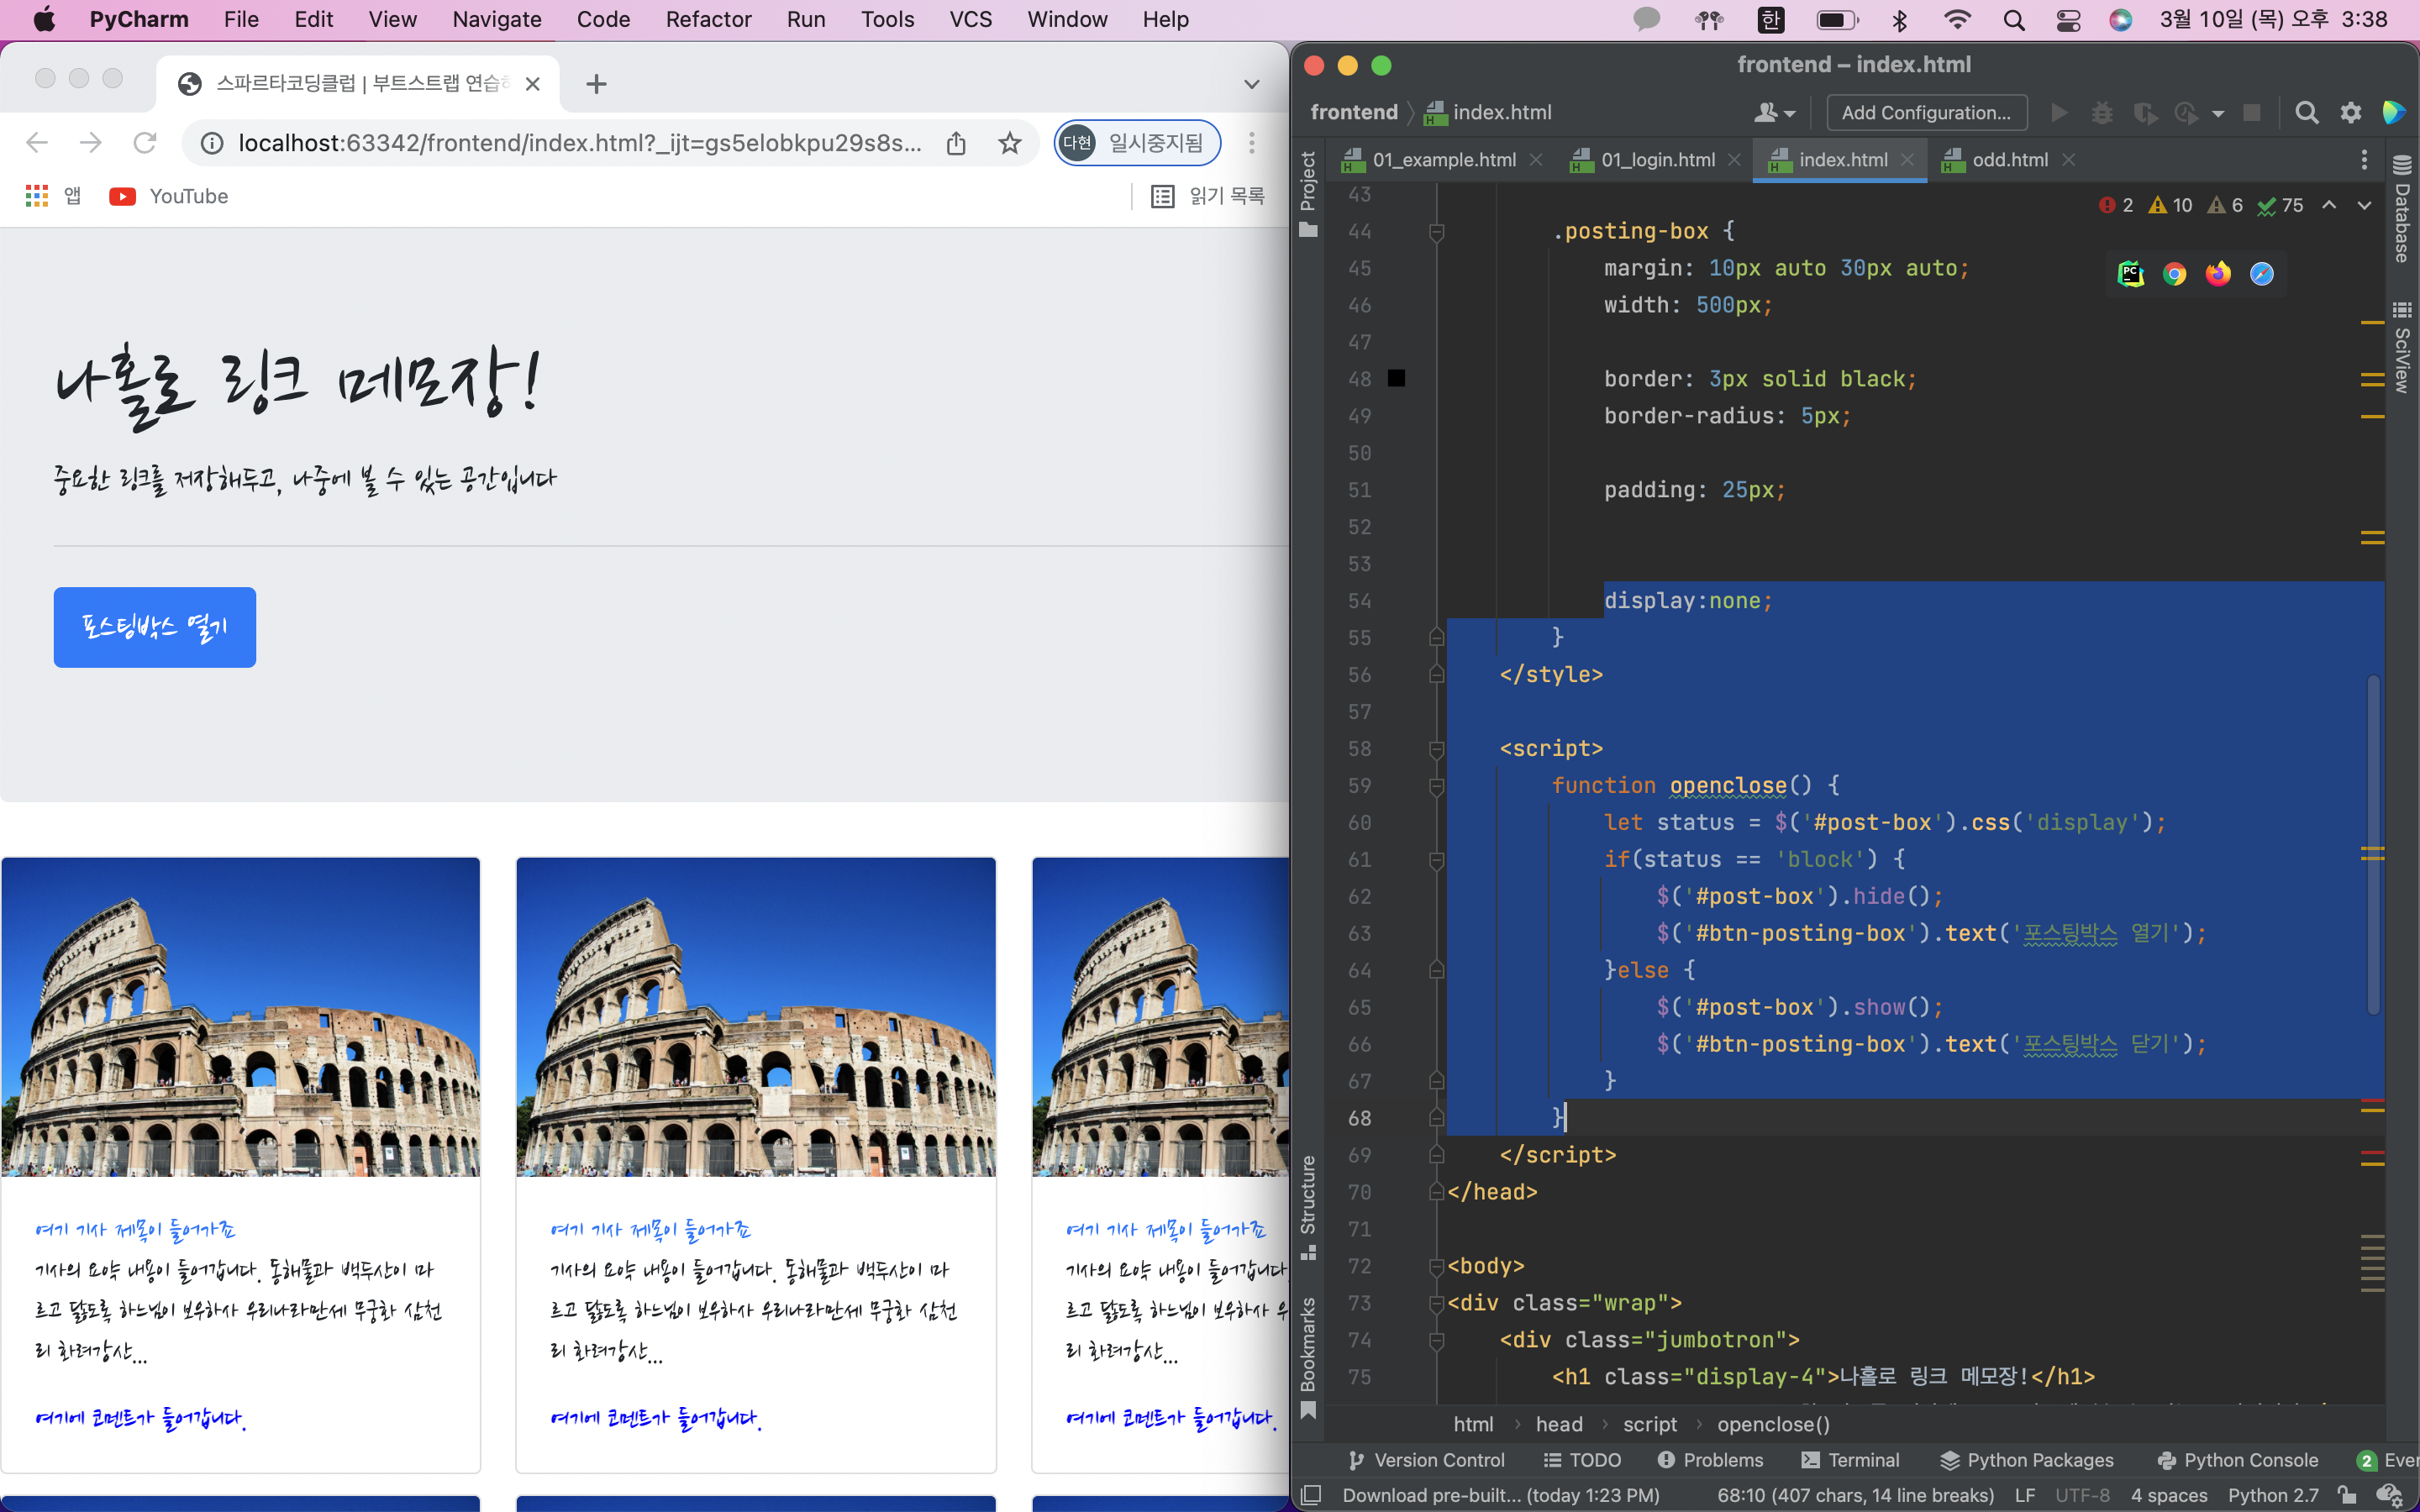
버튼 누르면 포스팅박스 열림
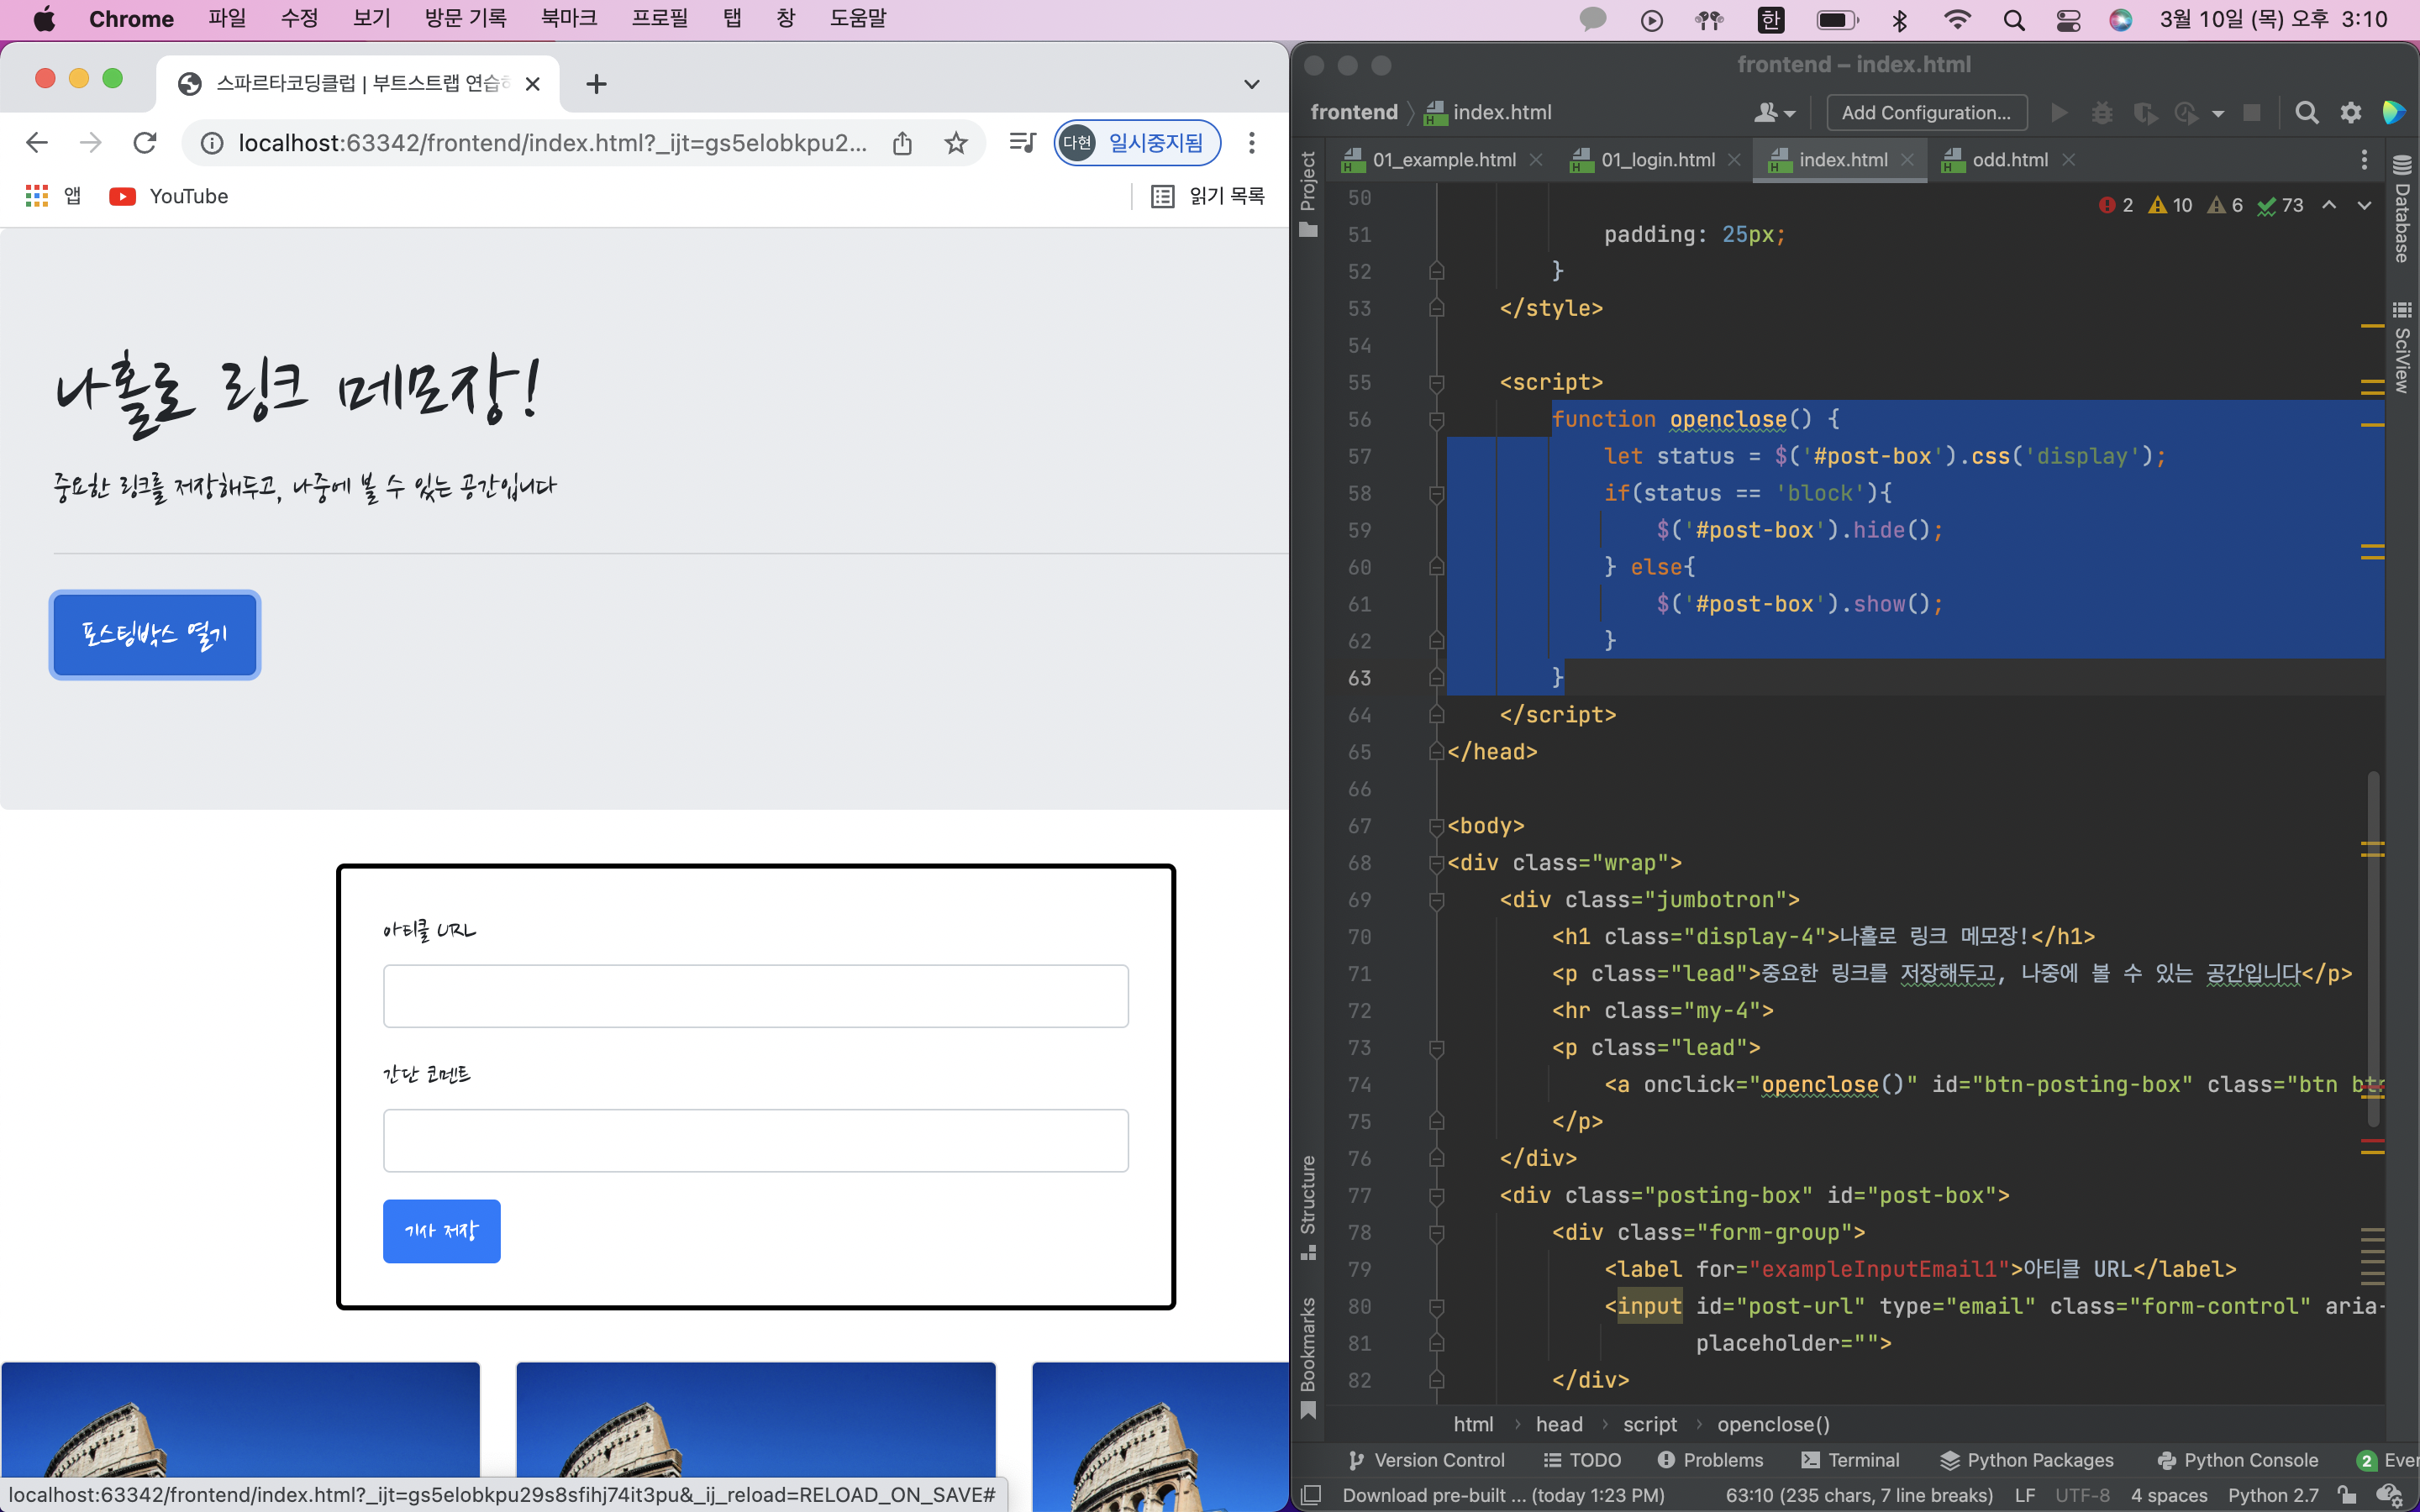
첫화면 포스팅박스 닫힌채로 나오도록하기
display : none;
포스팅박스 글 내용 바꾸기
4) JQuery 연습하기
- 수정할 코드
<!doctype html>
<html lang="ko">

<head>
    <meta charset="UTF-8">
    <title>jQuery 연습하고 가기!</title>

    <!-- JQuery를 import 합니다 -->
    <script src="https://ajax.googleapis.com/ajax/libs/jquery/3.4.1/jquery.min.js"></script>

    <style type="text/css">
        div.question-box {
            margin: 10px 0 20px 0;
        }
    </style>

    <script>
        function q1() {
            // 1. input-q1의 입력값을 가져온다. $('# .... ').val() 이렇게!
            // 2. 만약 입력값이 빈칸이면 if(입력값=='')
            // 3. alert('입력하세요!') 띄우기
            // 4. alert(입력값) 띄우기
        }

        function q2() {
            // 1. input-q2 값을 가져온다.
            // 2. 만약 가져온 값에 @가 있으면 (includes 이용하기 - 구글링!)
            // 3. info.spartacoding@gmail.com -> gmail 만 추출해서 ( .split('@') 을 이용하자!)
            // 4. alert(도메인 값);으로 띄우기
            // 5. 만약 이메일이 아니면 '이메일이 아닙니다.' 라는 얼럿 띄우기
        }

        function q3() {
            // 1. input-q3 값을 가져온다. let txt = ... q1, q2에서 했던 걸 참고!
            // 2. 가져온 값을 이용해 names-q3에 붙일 태그를 만든다. (let temp_html = `<li>${txt}</li>`) 요렇게!
            // 3. 만들어둔 temp_html을 names-q3에 붙인다.(jQuery의 $('...').append(temp_html)을 이용하면 굿!)
        }

        function q3_remove() {
            // 1. names-q3의 내부 태그를 모두 비운다.(jQuery의 $('....').empty()를 이용하면 굿!)
        }

    </script>

</head>

<body>
    <h1>jQuery + Javascript의 조합을 연습하자!</h1>

    <div class="question-box">
        <h2>1. 빈칸 체크 함수 만들기</h2>
        <h5>1-1. 버튼을 눌렀을 때 입력한 글자로 얼럿 띄우기</h5>
        <h5>[완성본]1-2. 버튼을 눌렀을 때 칸에 아무것도 없으면 "입력하세요!" 얼럿 띄우기</h5>
        <input id="input-q1" type="text" /> <button onclick="q1()">클릭</button>
    </div>
    <hr />
    <div class="question-box">
        <h2>2. 이메일 판별 함수 만들기</h2>
        <h5>2-1. 버튼을 눌렀을 때 입력받은 이메일로 얼럿 띄우기</h5>
        <h5>2-2. 이메일이 아니면(@가 없으면) '이메일이 아닙니다'라는 얼럿 띄우기</h5>
        <h5>[완성본]2-3. 이메일 도메인만 얼럿 띄우기</h5>
        <input id="input-q2" type="text" /> <button onclick="q2()">클릭</button>
    </div>
    <hr />
    <div class="question-box">
        <h2>3. HTML 붙이기/지우기 연습</h2>
        <h5>3-1. 이름을 입력하면 아래 나오게 하기</h5>
        <h5>[완성본]3-2. 다지우기 버튼을 만들기</h5>
        <input id="input-q3" type="text" placeholder="여기에 이름을 입력" />
        <button onclick="q3()">이름 붙이기</button>
        <button onclick="q3_remove()">다지우기</button>
        <ul id="names-q3">
            <li>세종대왕</li>
            <li>임꺽정</li>
        </ul>
    </div>
</body>

</html>-
위의 코드를 수정하여 만들 페이지
완성화면 -
정답 코드
<script>
        function q1() {
            let input_q1 = $('#input-q1').val();
            if (input_q1 == '') {
                alert('입력하세요!');
            } else {
                alert(input_q1);
            }
        }

        function q2() {
            let input_q2 = $('#input-q2').val();
            if(input_q2.includes('@')) {
                let email_domain = input_q2.split('@')[1].split('.')[0]
                alert(email_domain);
            } else {
                alert('이메일이 아닙니다.');
            }
        }

        function q3() {
            let input_q3 = $('#input-q3').val();
            if(input_q3==''){
                alert('이름을 입력하세요.');
                return;
            }
            let temp_html = `<li>${input_q3}</li>`;
            $('#names-q3').append(temp_html);
        }

        function q3_remove() {
            $('#names-q3').empty();
        }

</script>
⚠️ 겪은 문제

왼쪽은 정답화면, 오른쪽은 내가 작성한 코드!
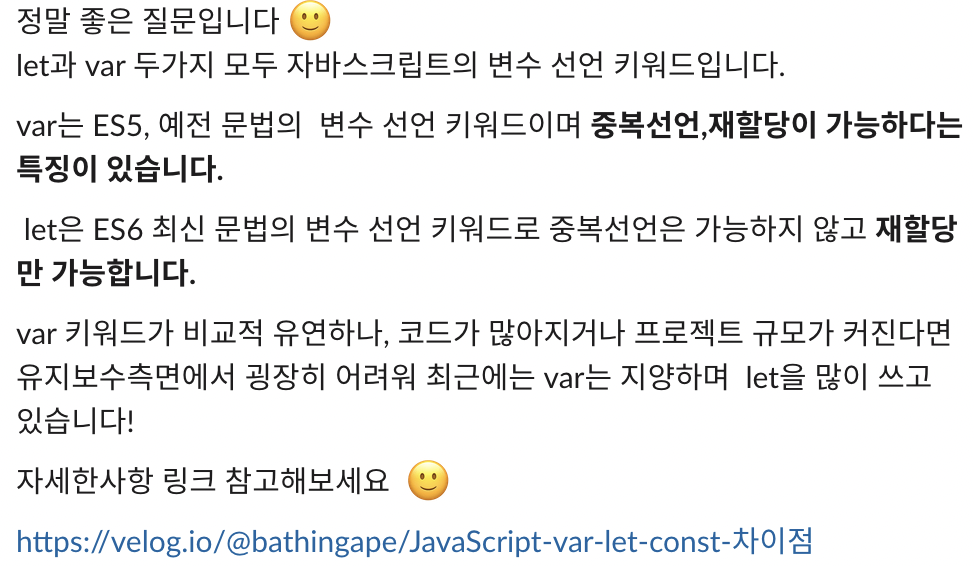
let과 var의 차이점은 무엇일까?
5) 서버-클라이언트 통신 이해하기
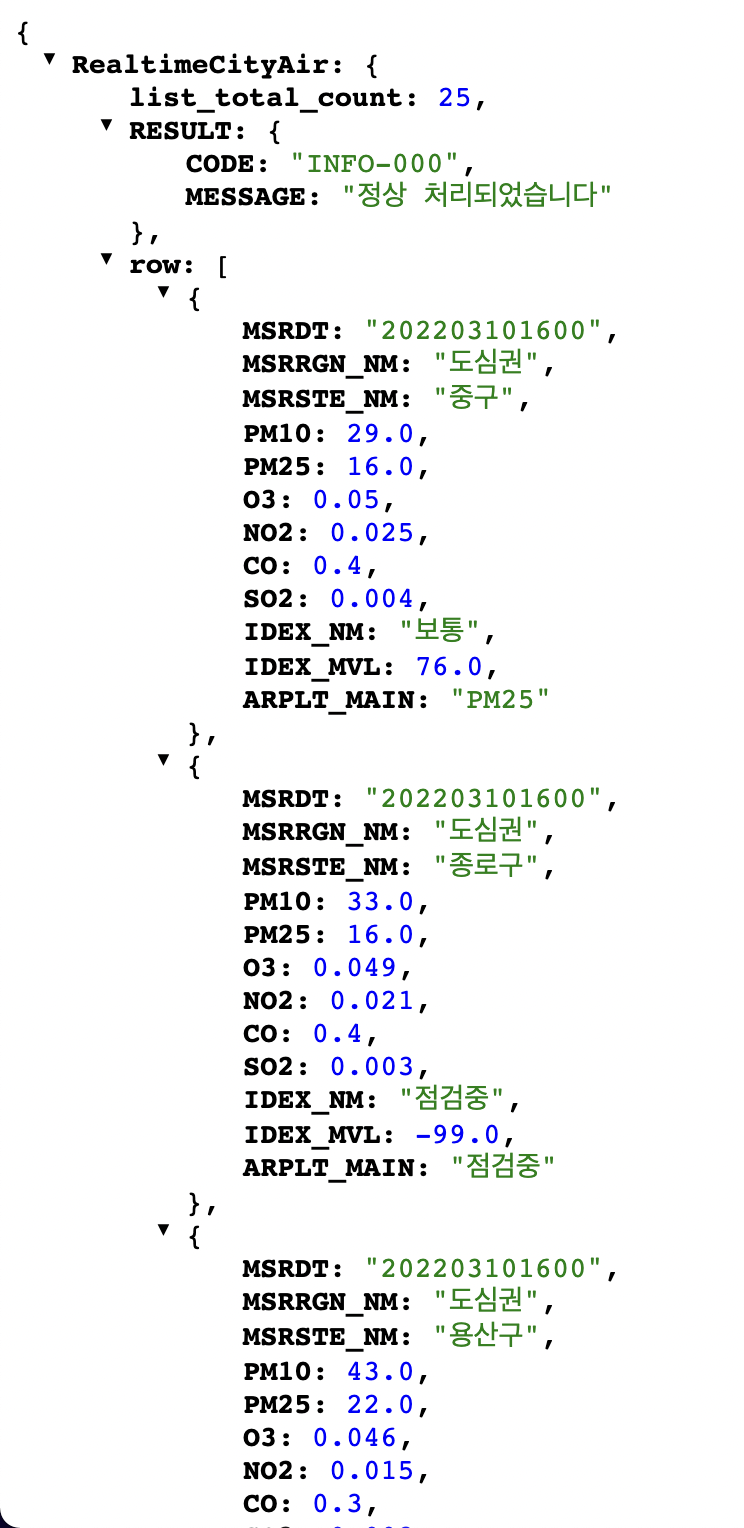
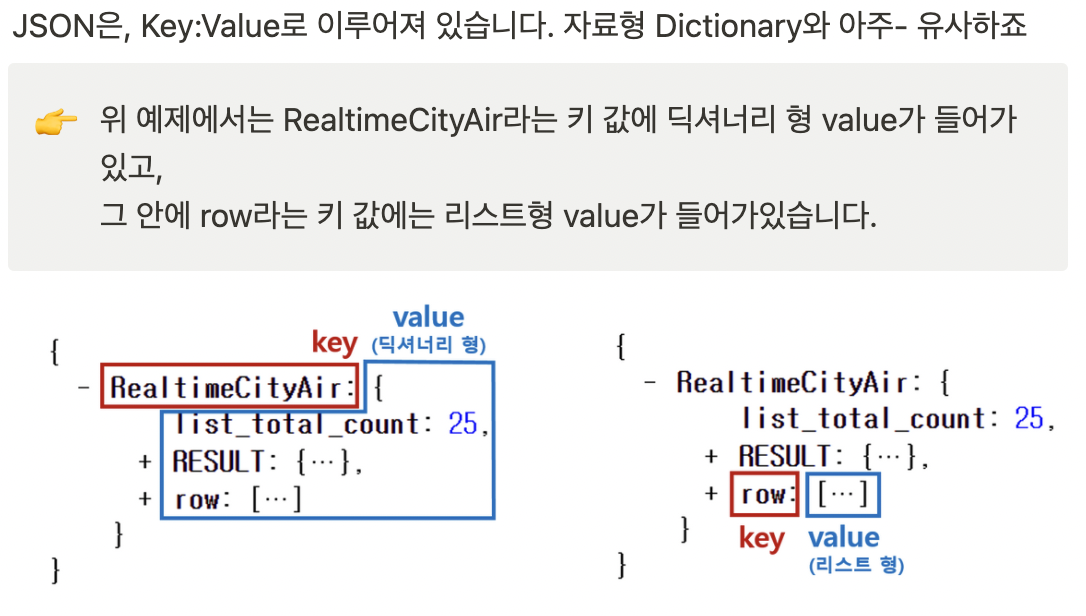
서버 -> 클라이언트 : JSON 이해하기
- JSONView 설치하면 JSON파일을 좀더 보기 쉬운 예쁜 JSON을 열 수 있다.
클라이언트 -> 서버 : GET 요청 이해하기
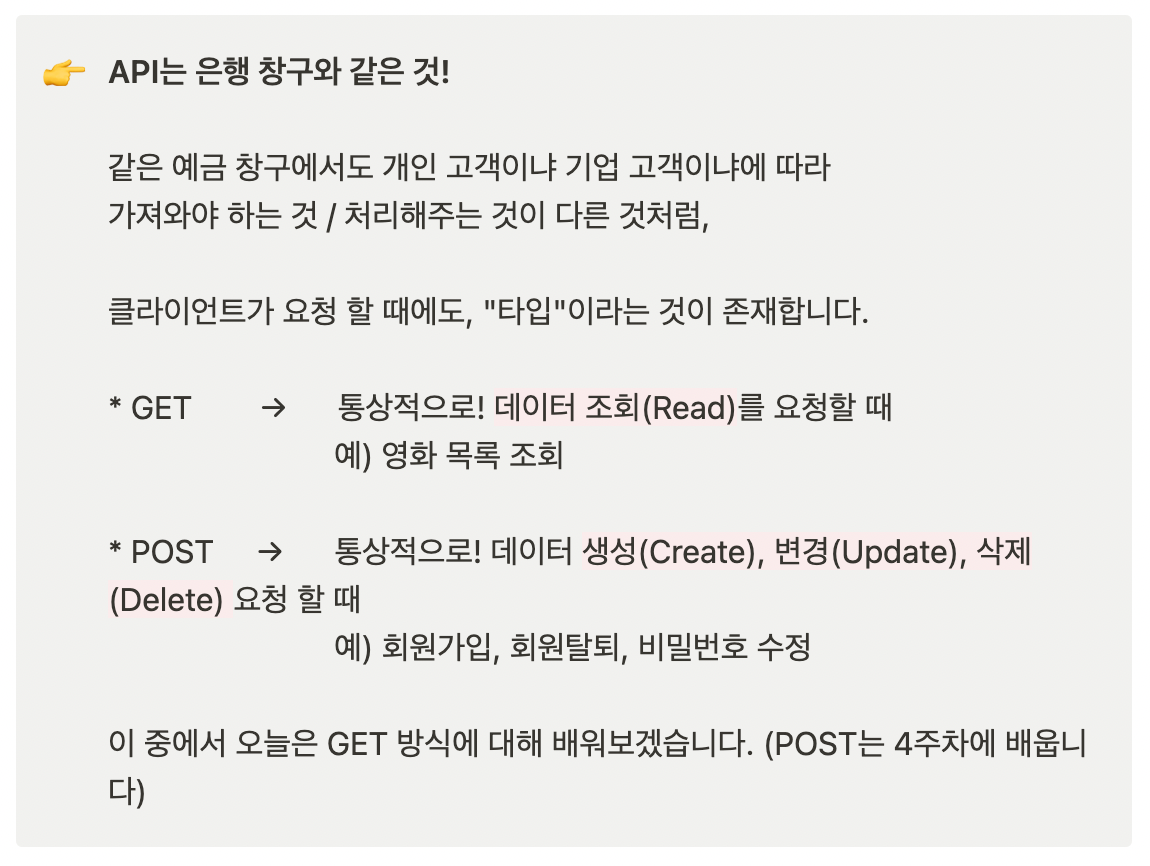
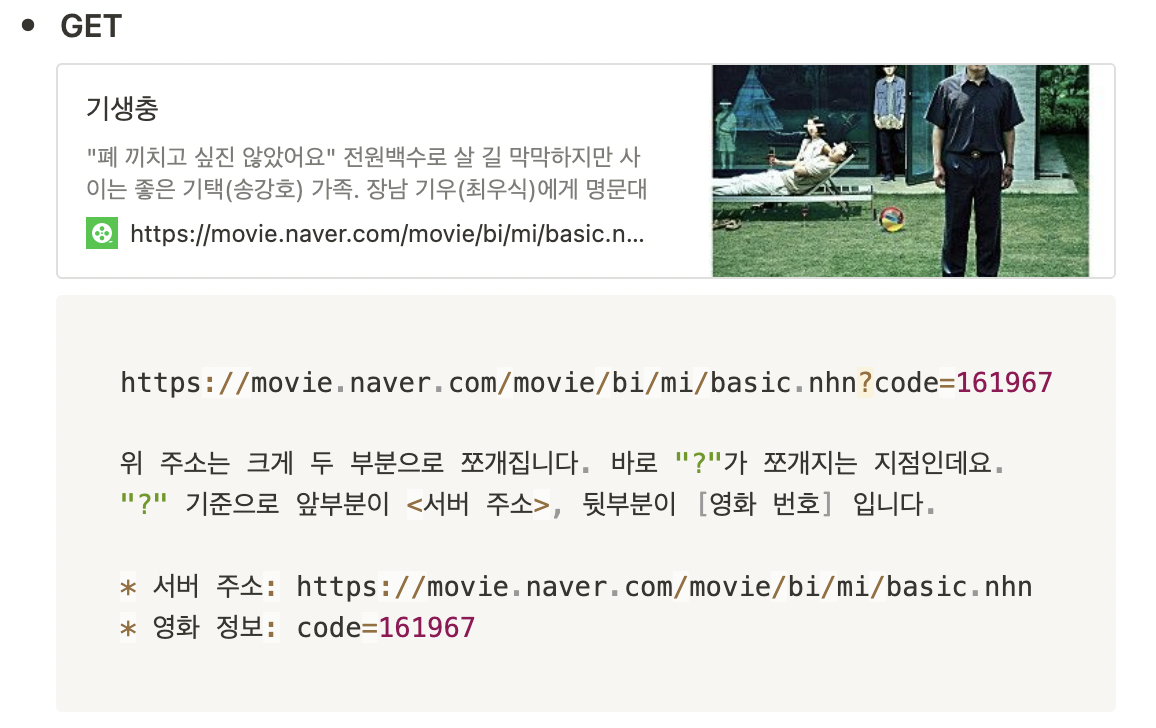
여기서 code라는 이름으로 영화번호를 주자는 것은 누가 정한걸까?
바로 프론트엔드 개발자와 백엔드 개발자가 미리 정해둔 약속!
프론트엔드: "code라는 이름으로 영화번호를 주면 될까요?"
백엔드: "네 그렇게 하시죠. 그럼 code로 영화번호가 들어온다고 생각하고 코딩하고 있을게요"
GET 방식으로 데이터를 전달하는 방법
- ? : 여기서부터 전달할 데이터가 작성된다는 의미
- & : 전달할 데이터가 더 있다는 뜻
예시) google.com/search?q=아이폰&sourceid=chrome&ie=UTF-8
     위 주소는 google.com의 search 창구에 다음 정보를 전달한다!
     q=아이폰                        (검색어)
     sourceid=chrome        (브라우저 정보)
     ie=UTF-8                      (인코딩 정보)
6) Ajax
Ajax 시작하기
Ajax는 jQuery를 임포트한 페이지에서만 동작 가능하다!!
즉, http://google.com/ 과 같은 화면에서 개발자도구를 열면, jQuery가 임포트 되어있지 않기 때문에 아래와 같은 에러가 뜬다.
Uncaught TypeError: $.ajax is not a function→ ajax라는 게 없다는 뜻
Ajax 기본 골격
$.ajax({
  type: "GET",
  url: "여기에URL을입력",
  data: {},
  success: function(response){
    console.log(response)
  }
})- 기본 골격 해석
$.ajax({
  type: "GET", // GET 방식으로 요청한다.
  url: "http://openapi.seoul.go.kr:8088/6d4d776b466c656533356a4b4b5872/json/RealtimeCityAir/1/99",
  data: {}, // 요청하면서 함께 줄 데이터 (GET 요청시엔 비워두세요)
  success: function(response){ // 서버에서 준 결과를 response라는 변수에 담음
    console.log(response) // 서버에서 준 결과를 이용해서 나머지 코드를 작성
  }
})
즉, url의 데이터를 response로 가져온다.
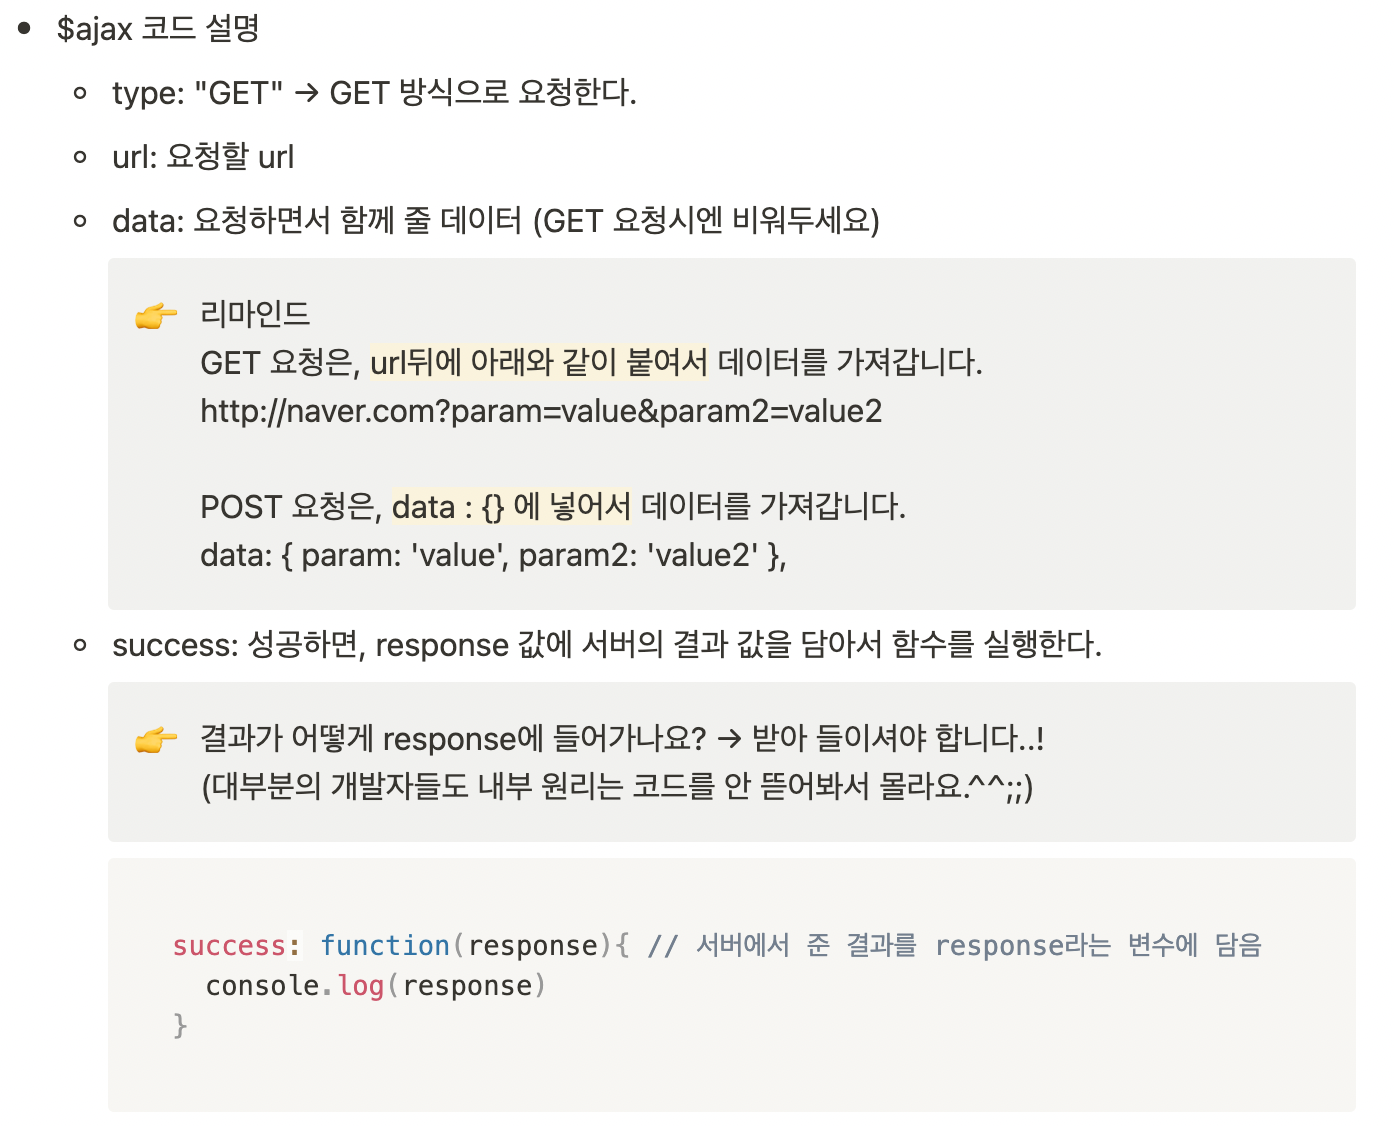
jQuery를 임포트했던 '나홀로메모장'에서 검사-console창에 위의 코드 입력해보기!
url에는 미세먼지openAPI url 입력.
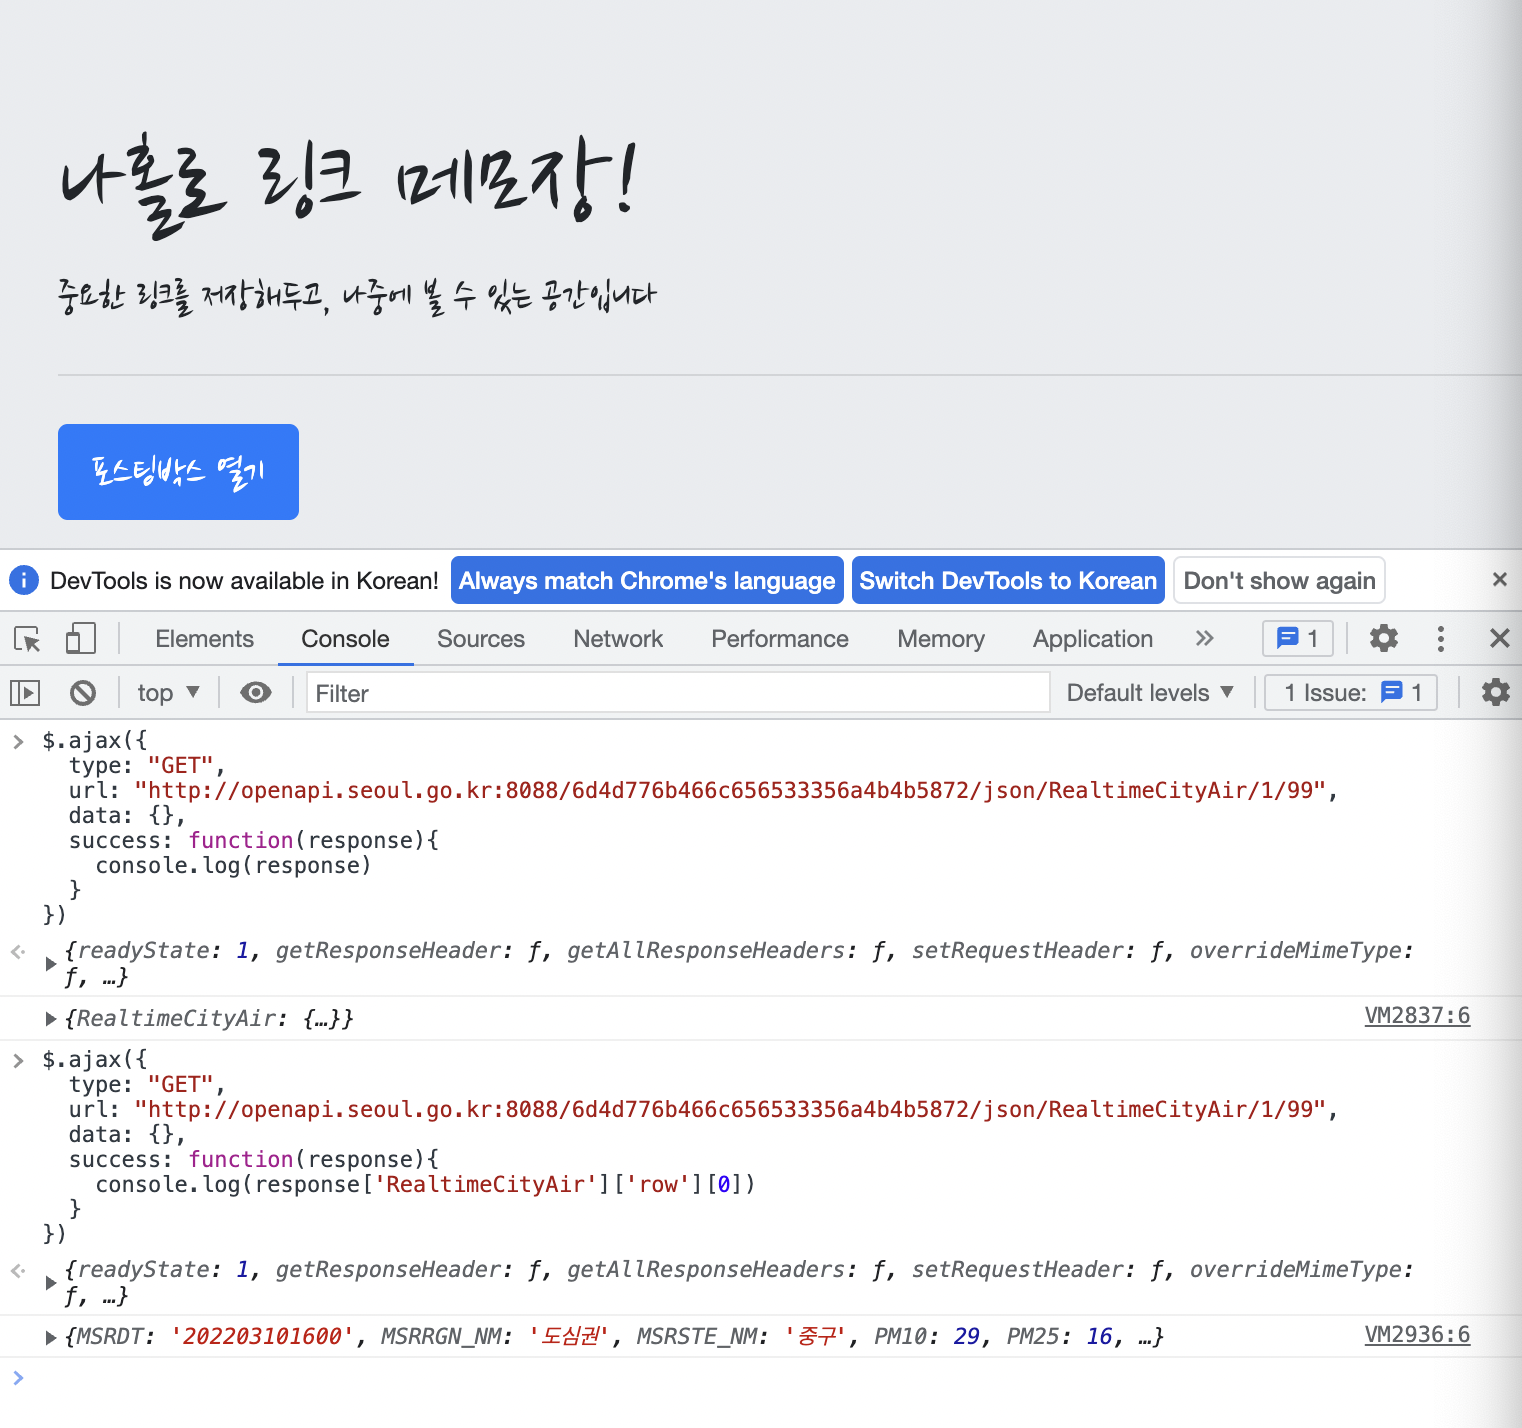
- 도봉구 미세먼지 값만 가져오기
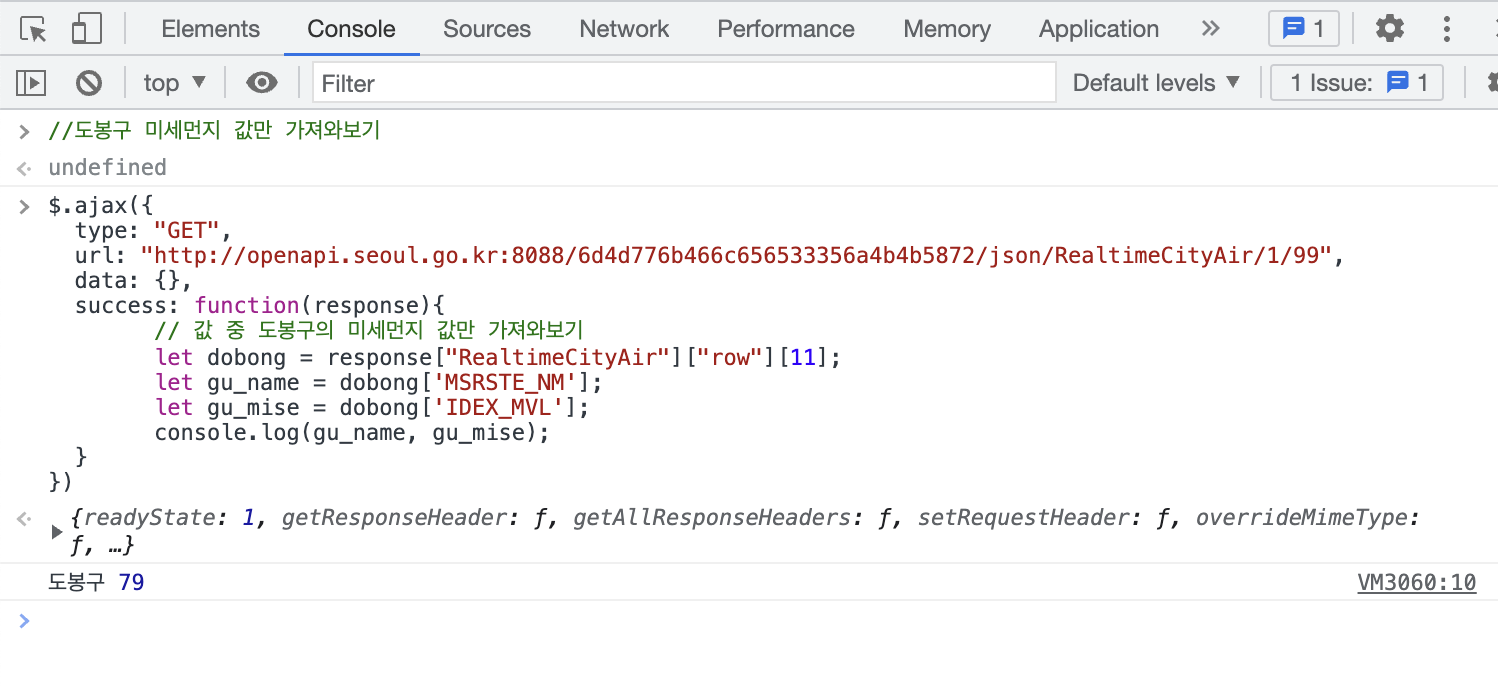
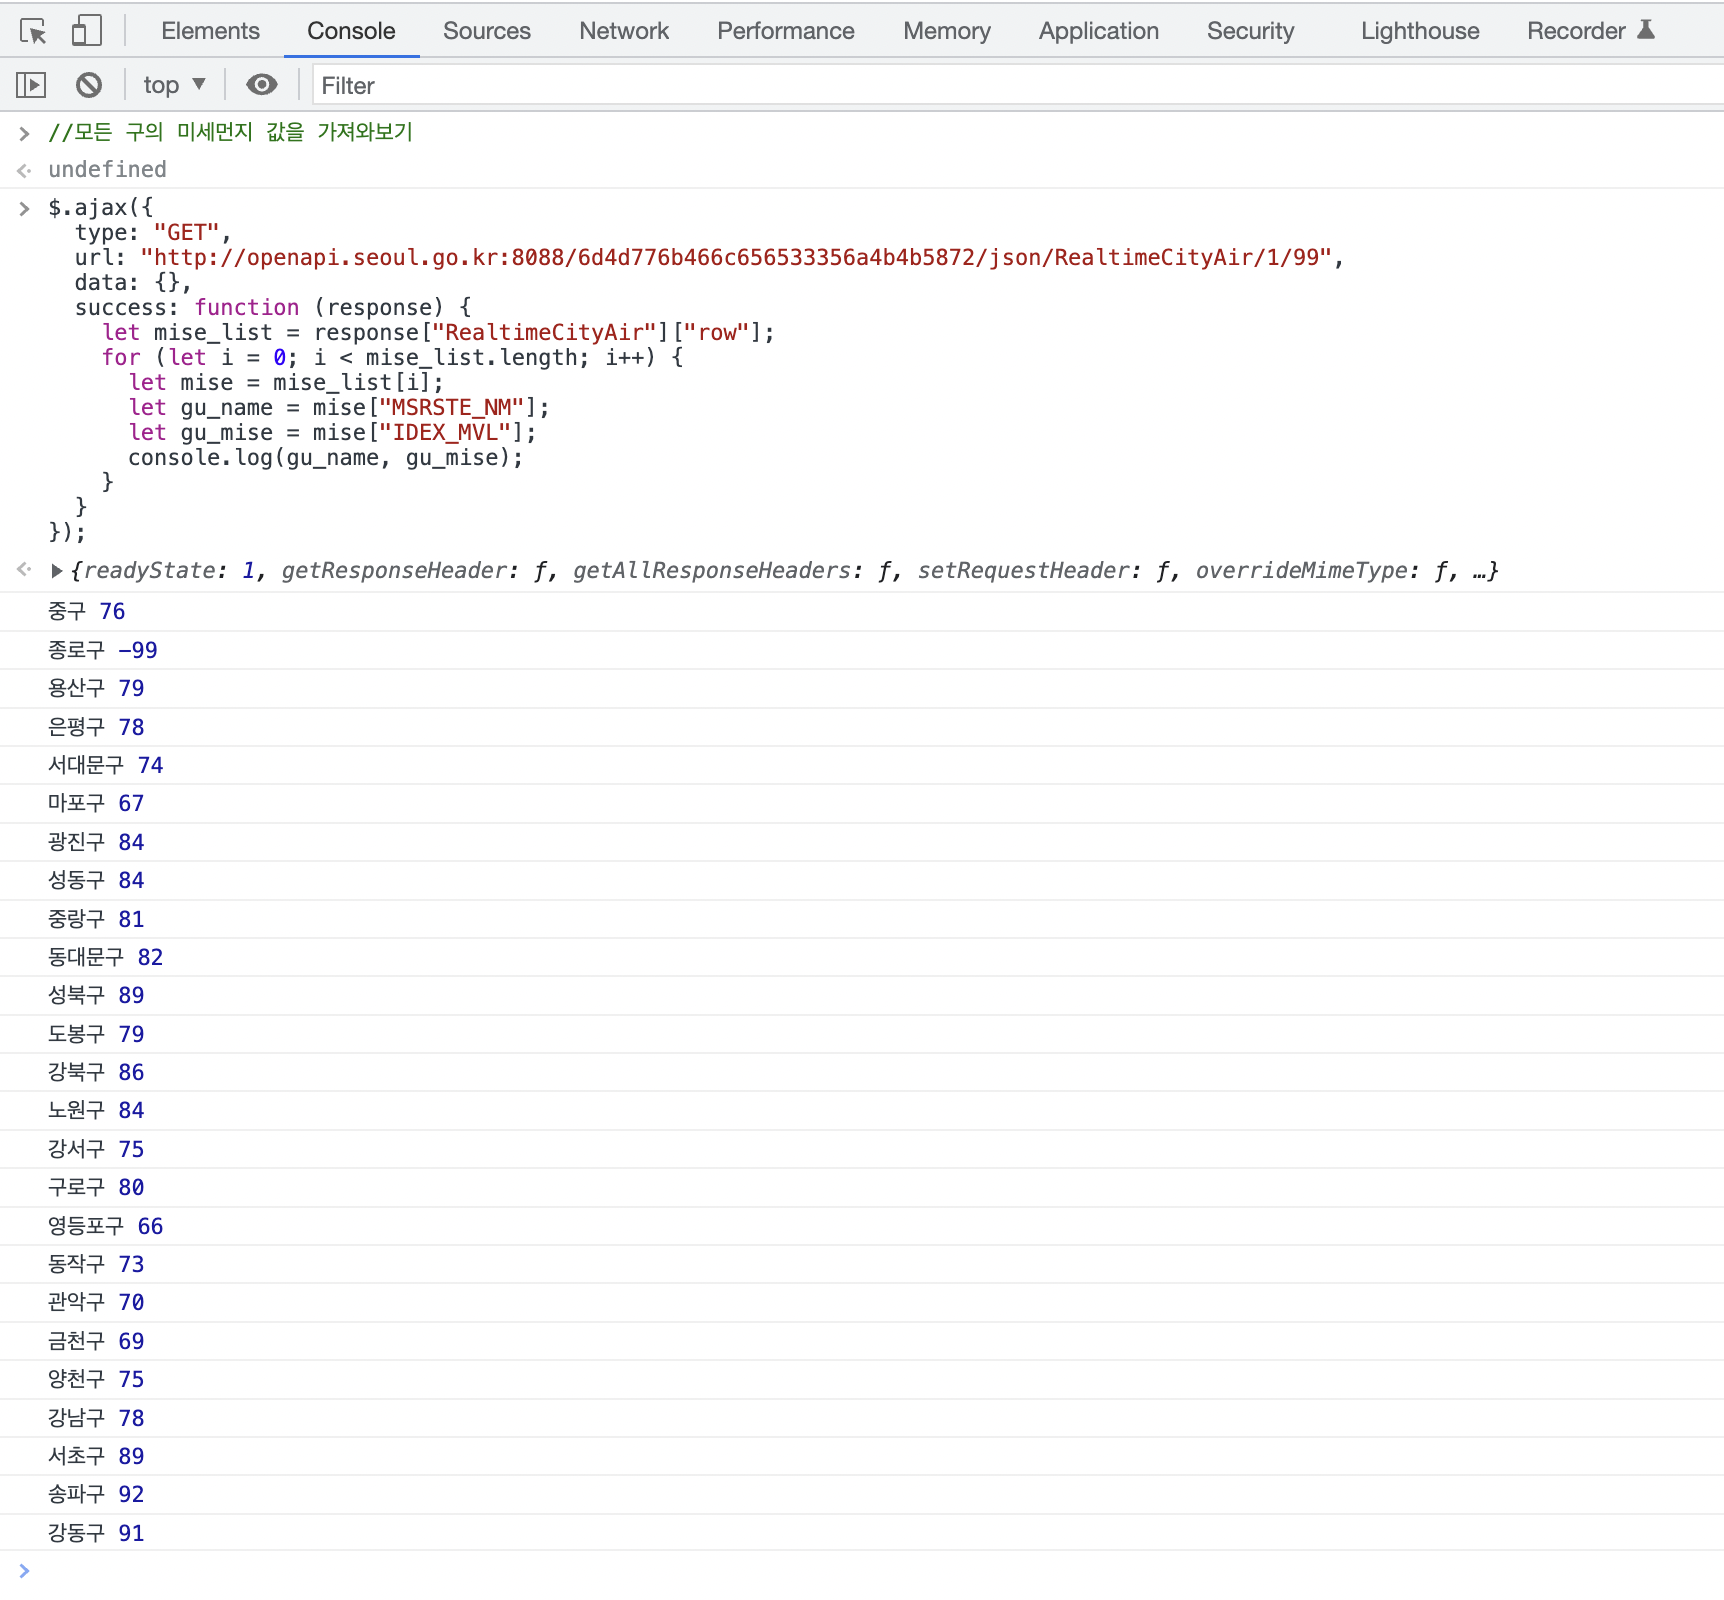
- 모든 구의 미세먼지 값 가져오기
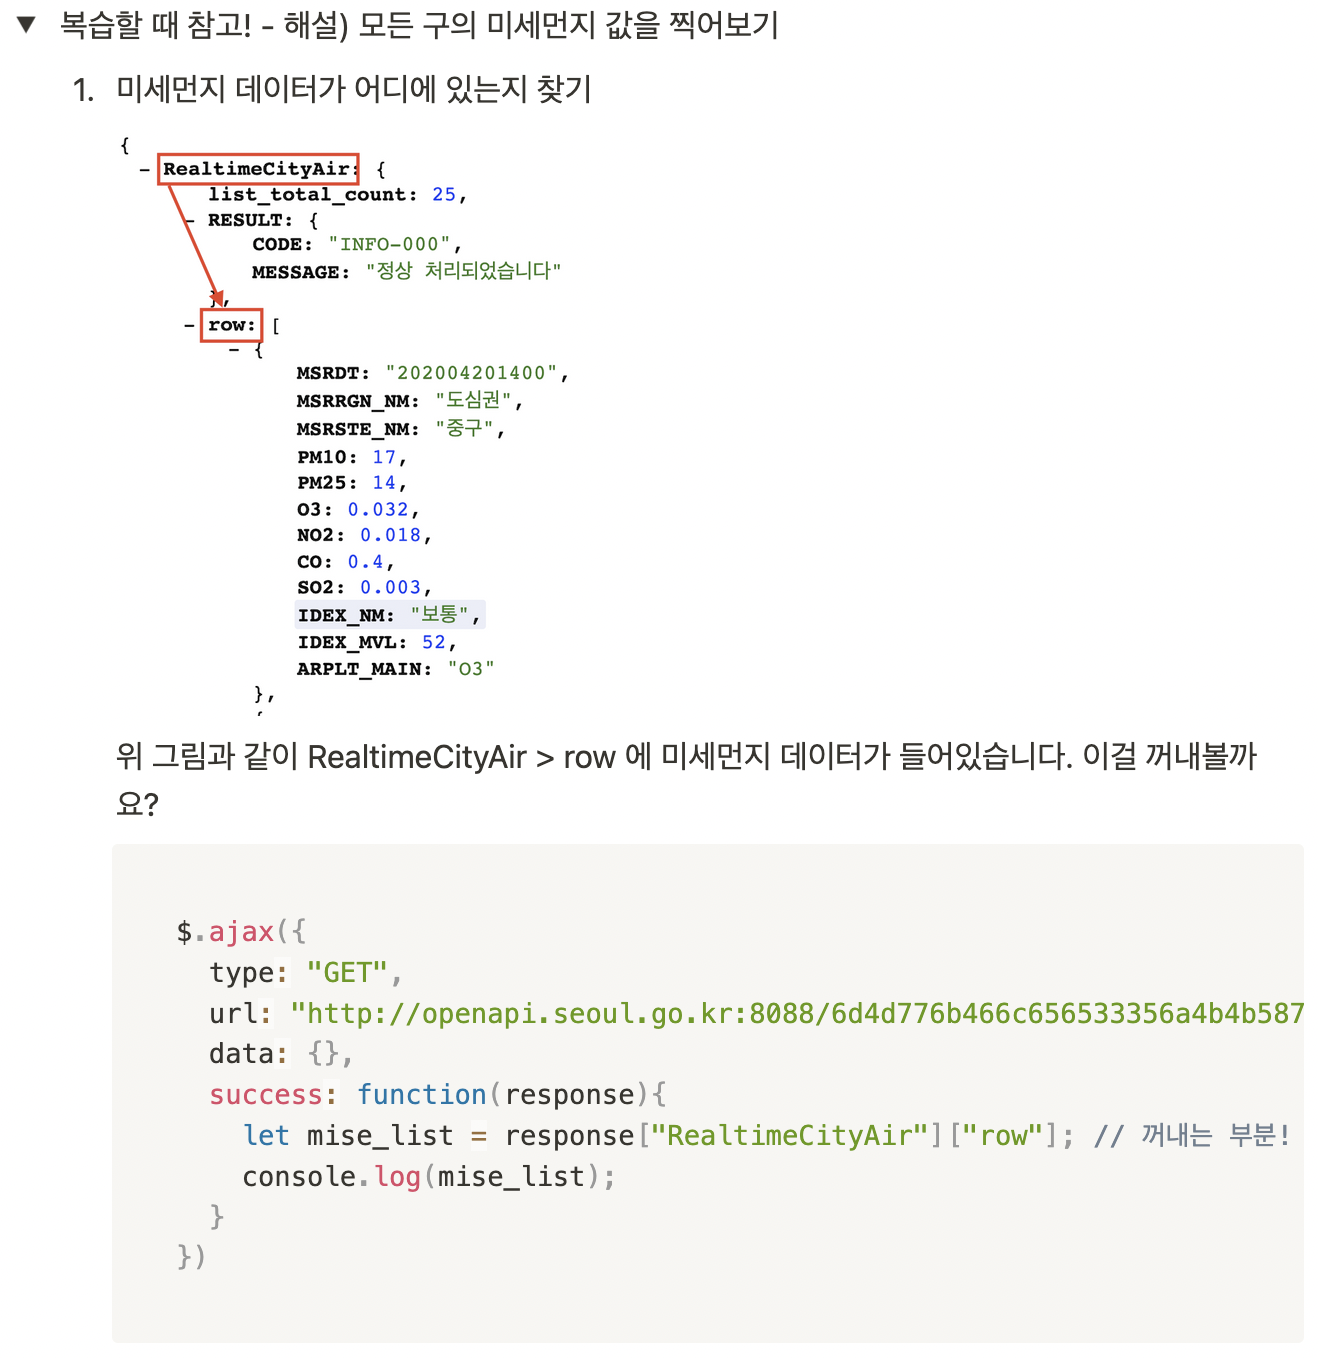
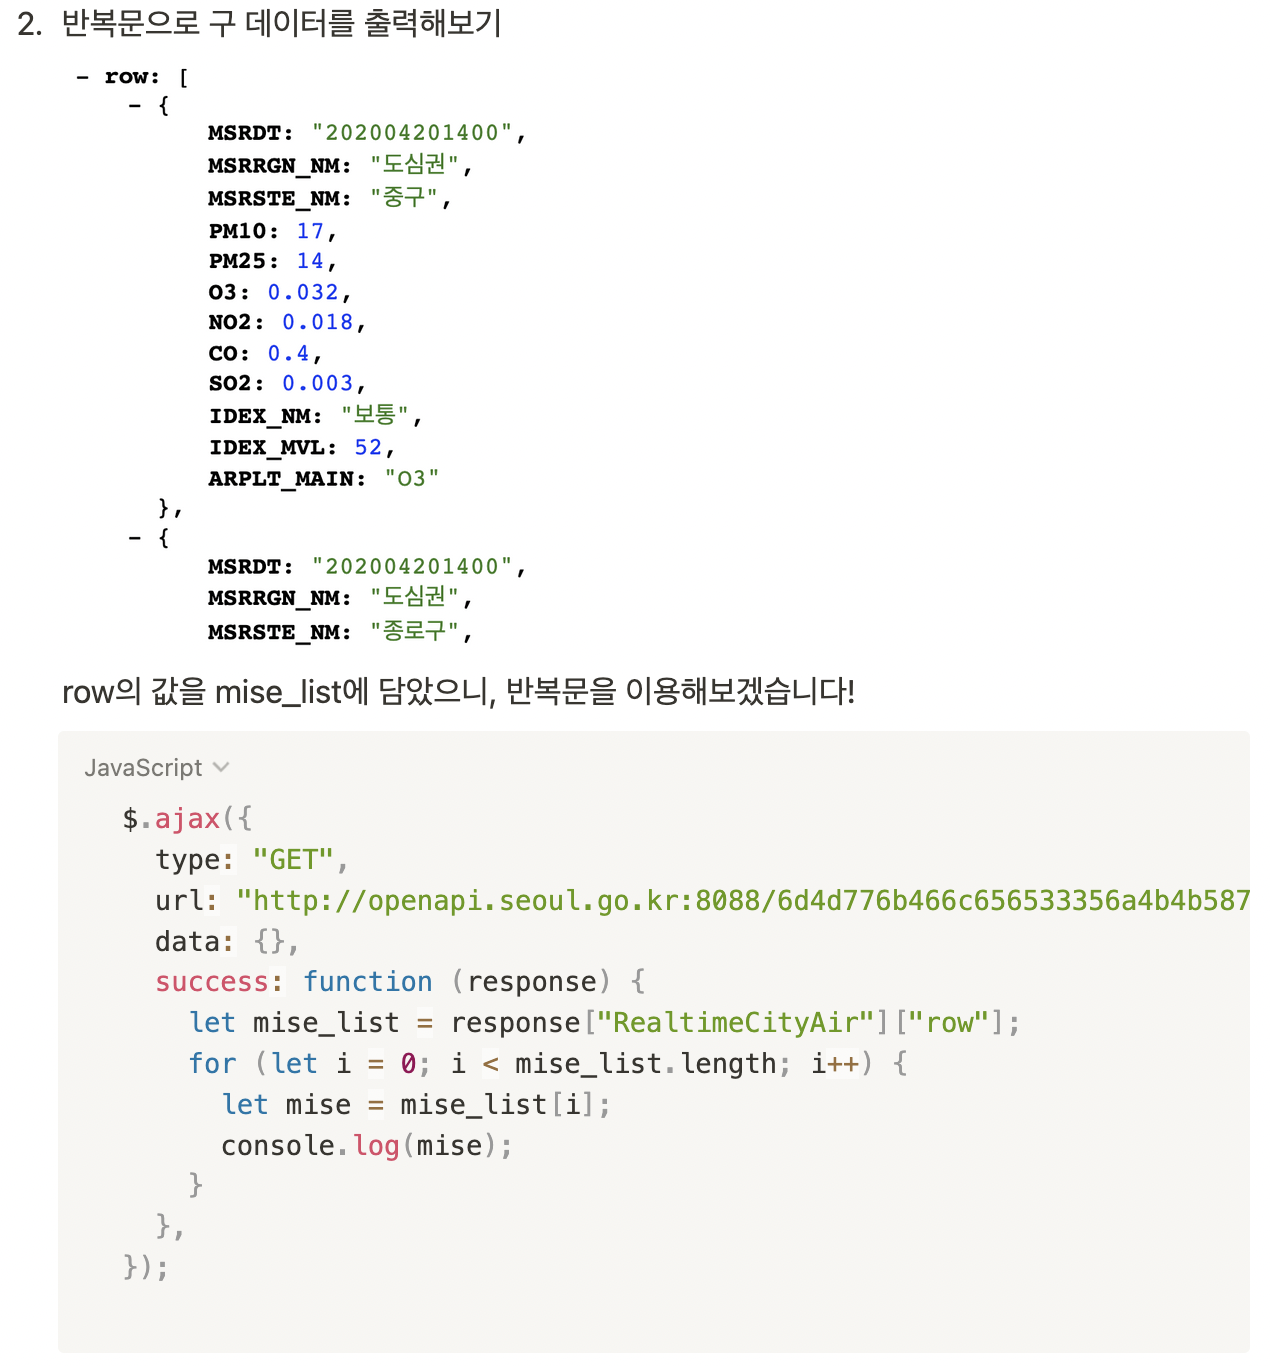
- 해설
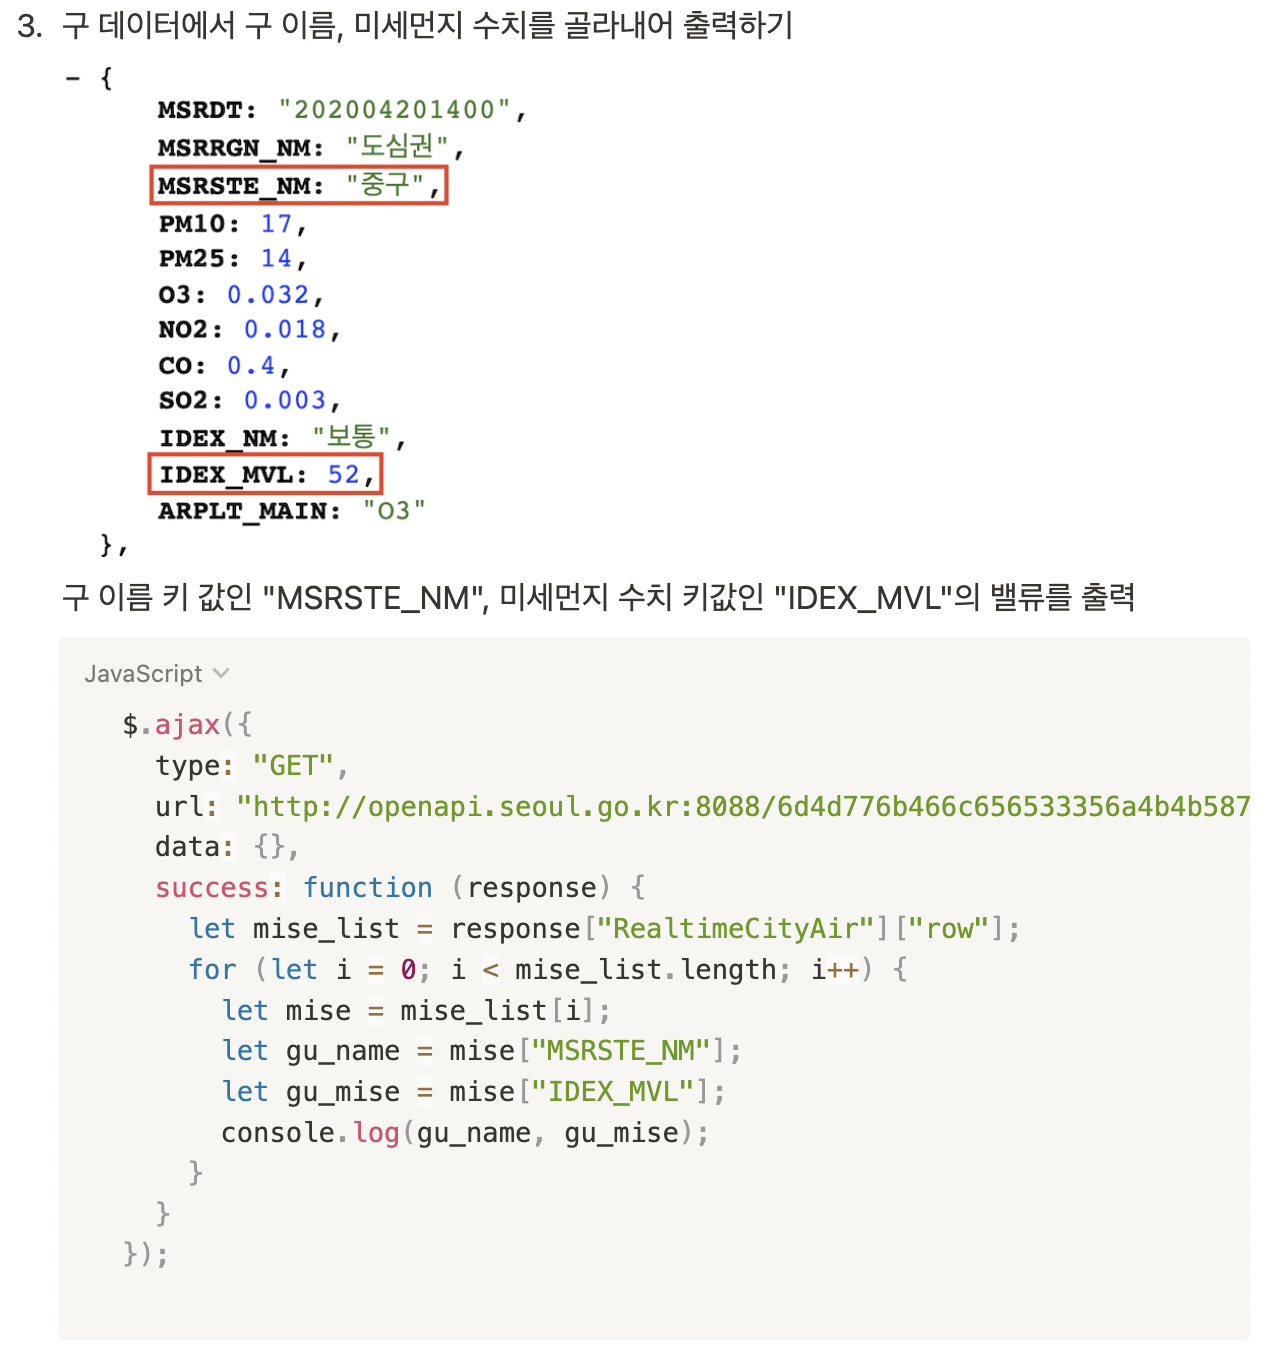
7) Ajax 연습
Q1) 서울시 미세먼지 OpenAPI 이용한 실습
Q) 서울시 실시간 미세먼지 api를 이용하여 구 이름과 수치가 출력되도록 만드세요.
- 수정할 코드
<!doctype html>
<html lang="ko">

<head>
    <meta charset="UTF-8">
    <title>jQuery 연습하고 가기!</title>

    <!-- jQuery를 import 합니다 -->
    <script src="https://ajax.googleapis.com/ajax/libs/jquery/3.4.1/jquery.min.js"></script>

    <style type="text/css">
        div.question-box {
            margin: 10px 0 20px 0;
        }
    </style>

    <script>
        function q1() {
            // 여기에 코드를 입력하세요
        }
    </script>

</head>

<body>
    <h1>jQuery+Ajax의 조합을 연습하자!</h1>

    <hr />

    <div class="question-box">
        <h2>1. 서울시 OpenAPI(실시간 미세먼지 상태)를 이용하기</h2>
        <p>모든 구의 미세먼지를 표기해주세요</p>
        <p>업데이트 버튼을 누를 때마다 지웠다 새로 씌여져야 합니다.</p>
        <button onclick="q1()">업데이트</button>
        <ul id="names-q1">
            <li>중구 : 82</li>
            <li>종로구 : 87</li>
            <li>용산구 : 84</li>
            <li>은평구 : 82</li>
        </ul>
    </div>
</body>

</html>-
위 코드를 수정하여 만들어야하는 화면
완성화면 -
정답 코드
<script>
        function q1() {
            //다 지우고 새로 시작
            $('#names-q1').empty()

            $.ajax({
                type: "GET",
                url: "http://openapi.seoul.go.kr:8088/6d4d776b466c656533356a4b4b5872/json/RealtimeCityAir/1/99",
                data: {},
                success: function (response) {
                    let rows = response['RealtimeCityAir']['row'];
                    for (let i = 0; i<rows.length; i++){
                        let gu_name = rows[i]['MSRSTE_NM'];
                        let mise_val = rows[i]['IDEX_MVL'];

                        // backtick 주의!!
                        let temp_html = `<li>${gu_name} : ${mise_val}</li>`
                        $('#names-q1').append(temp_html);
                    }
                }
            })
        }
</script>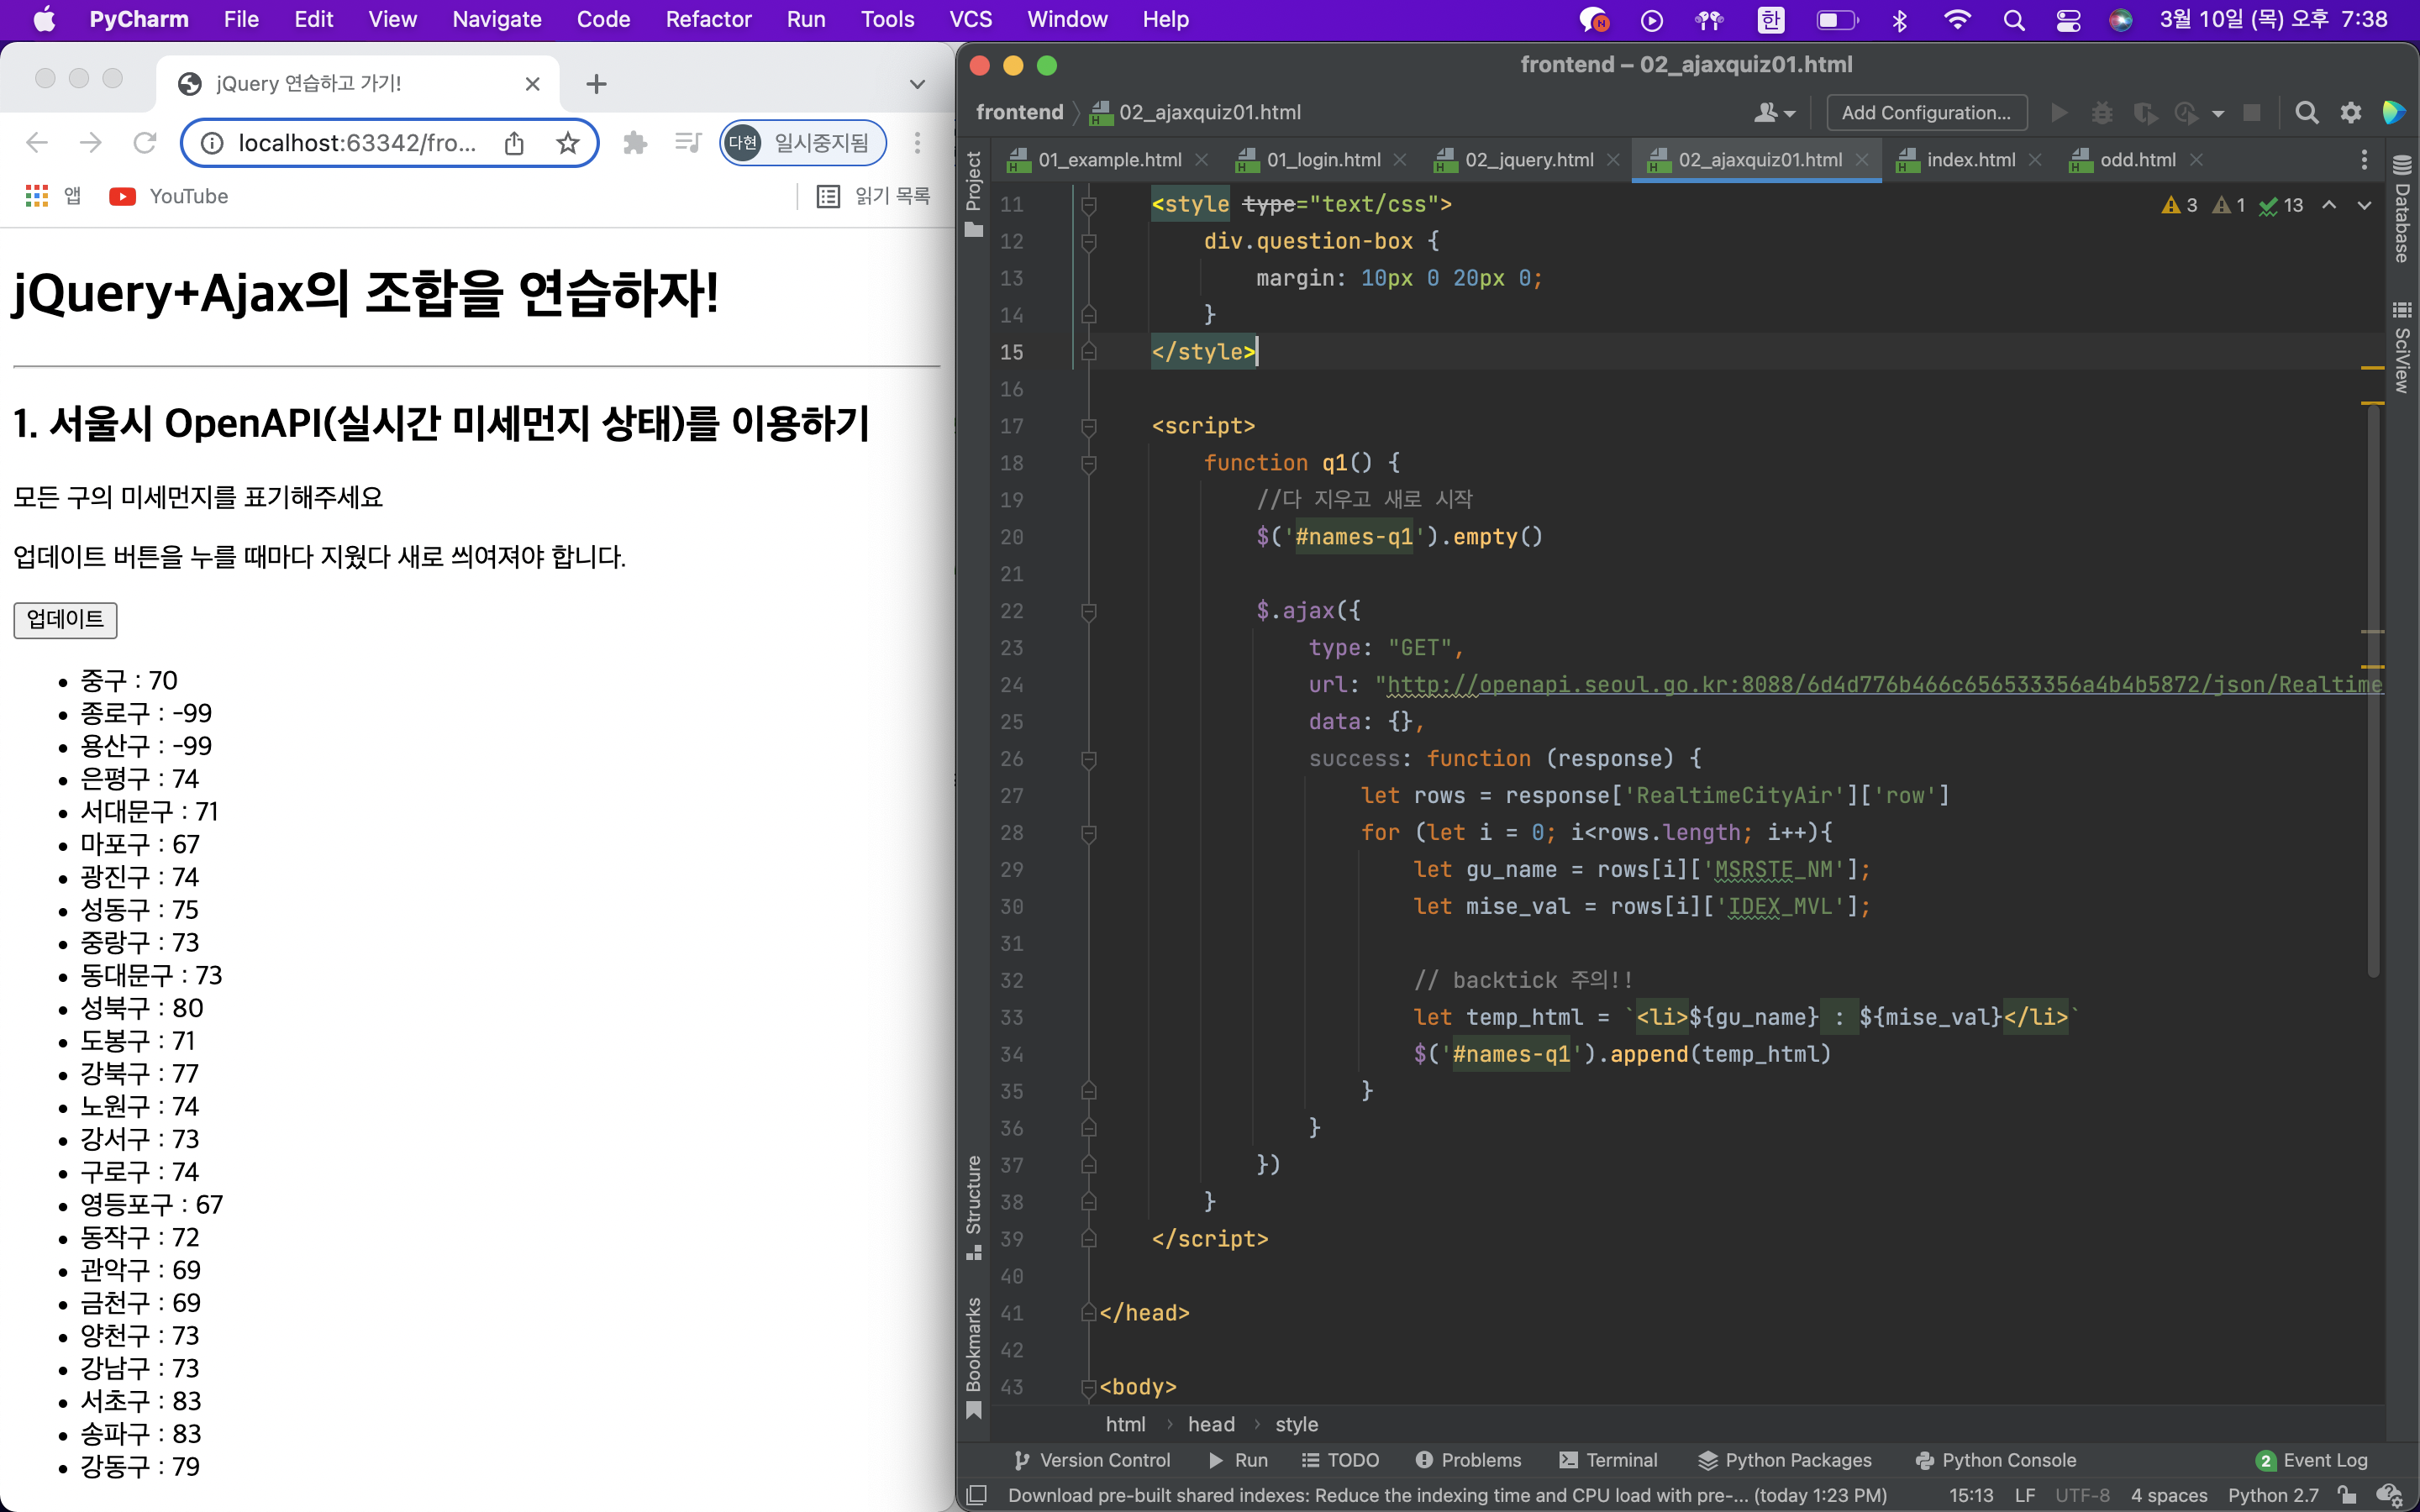
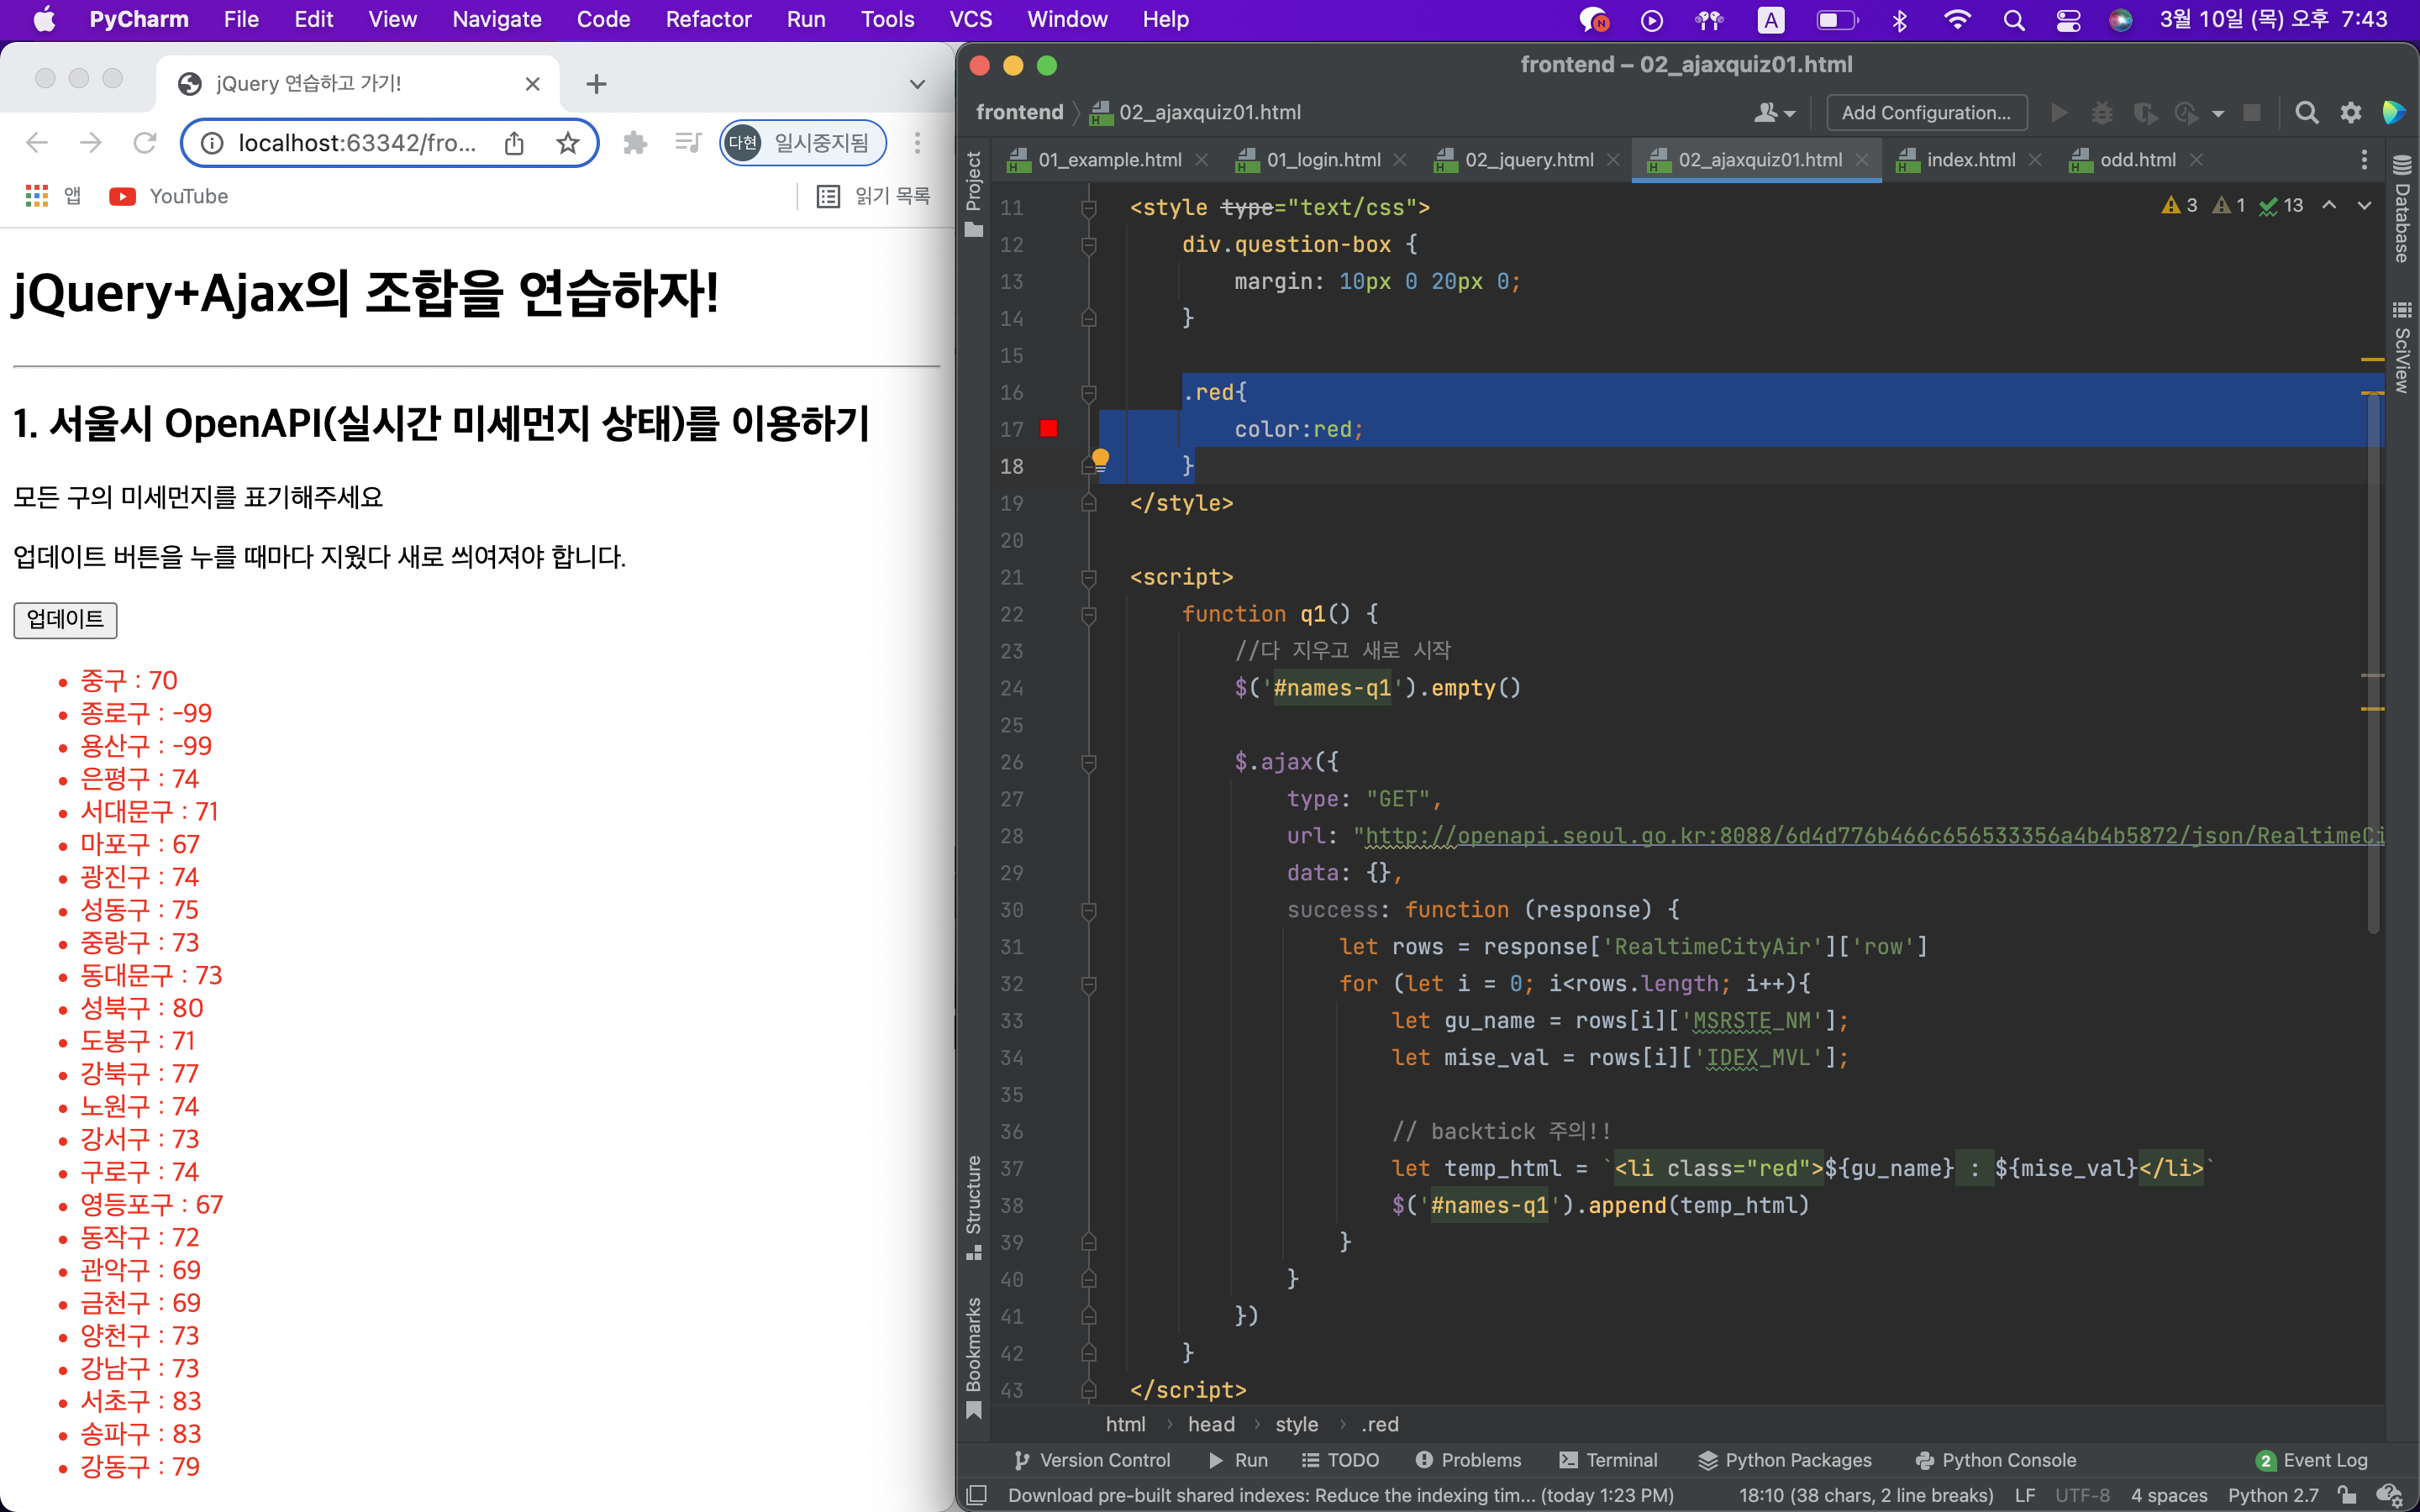
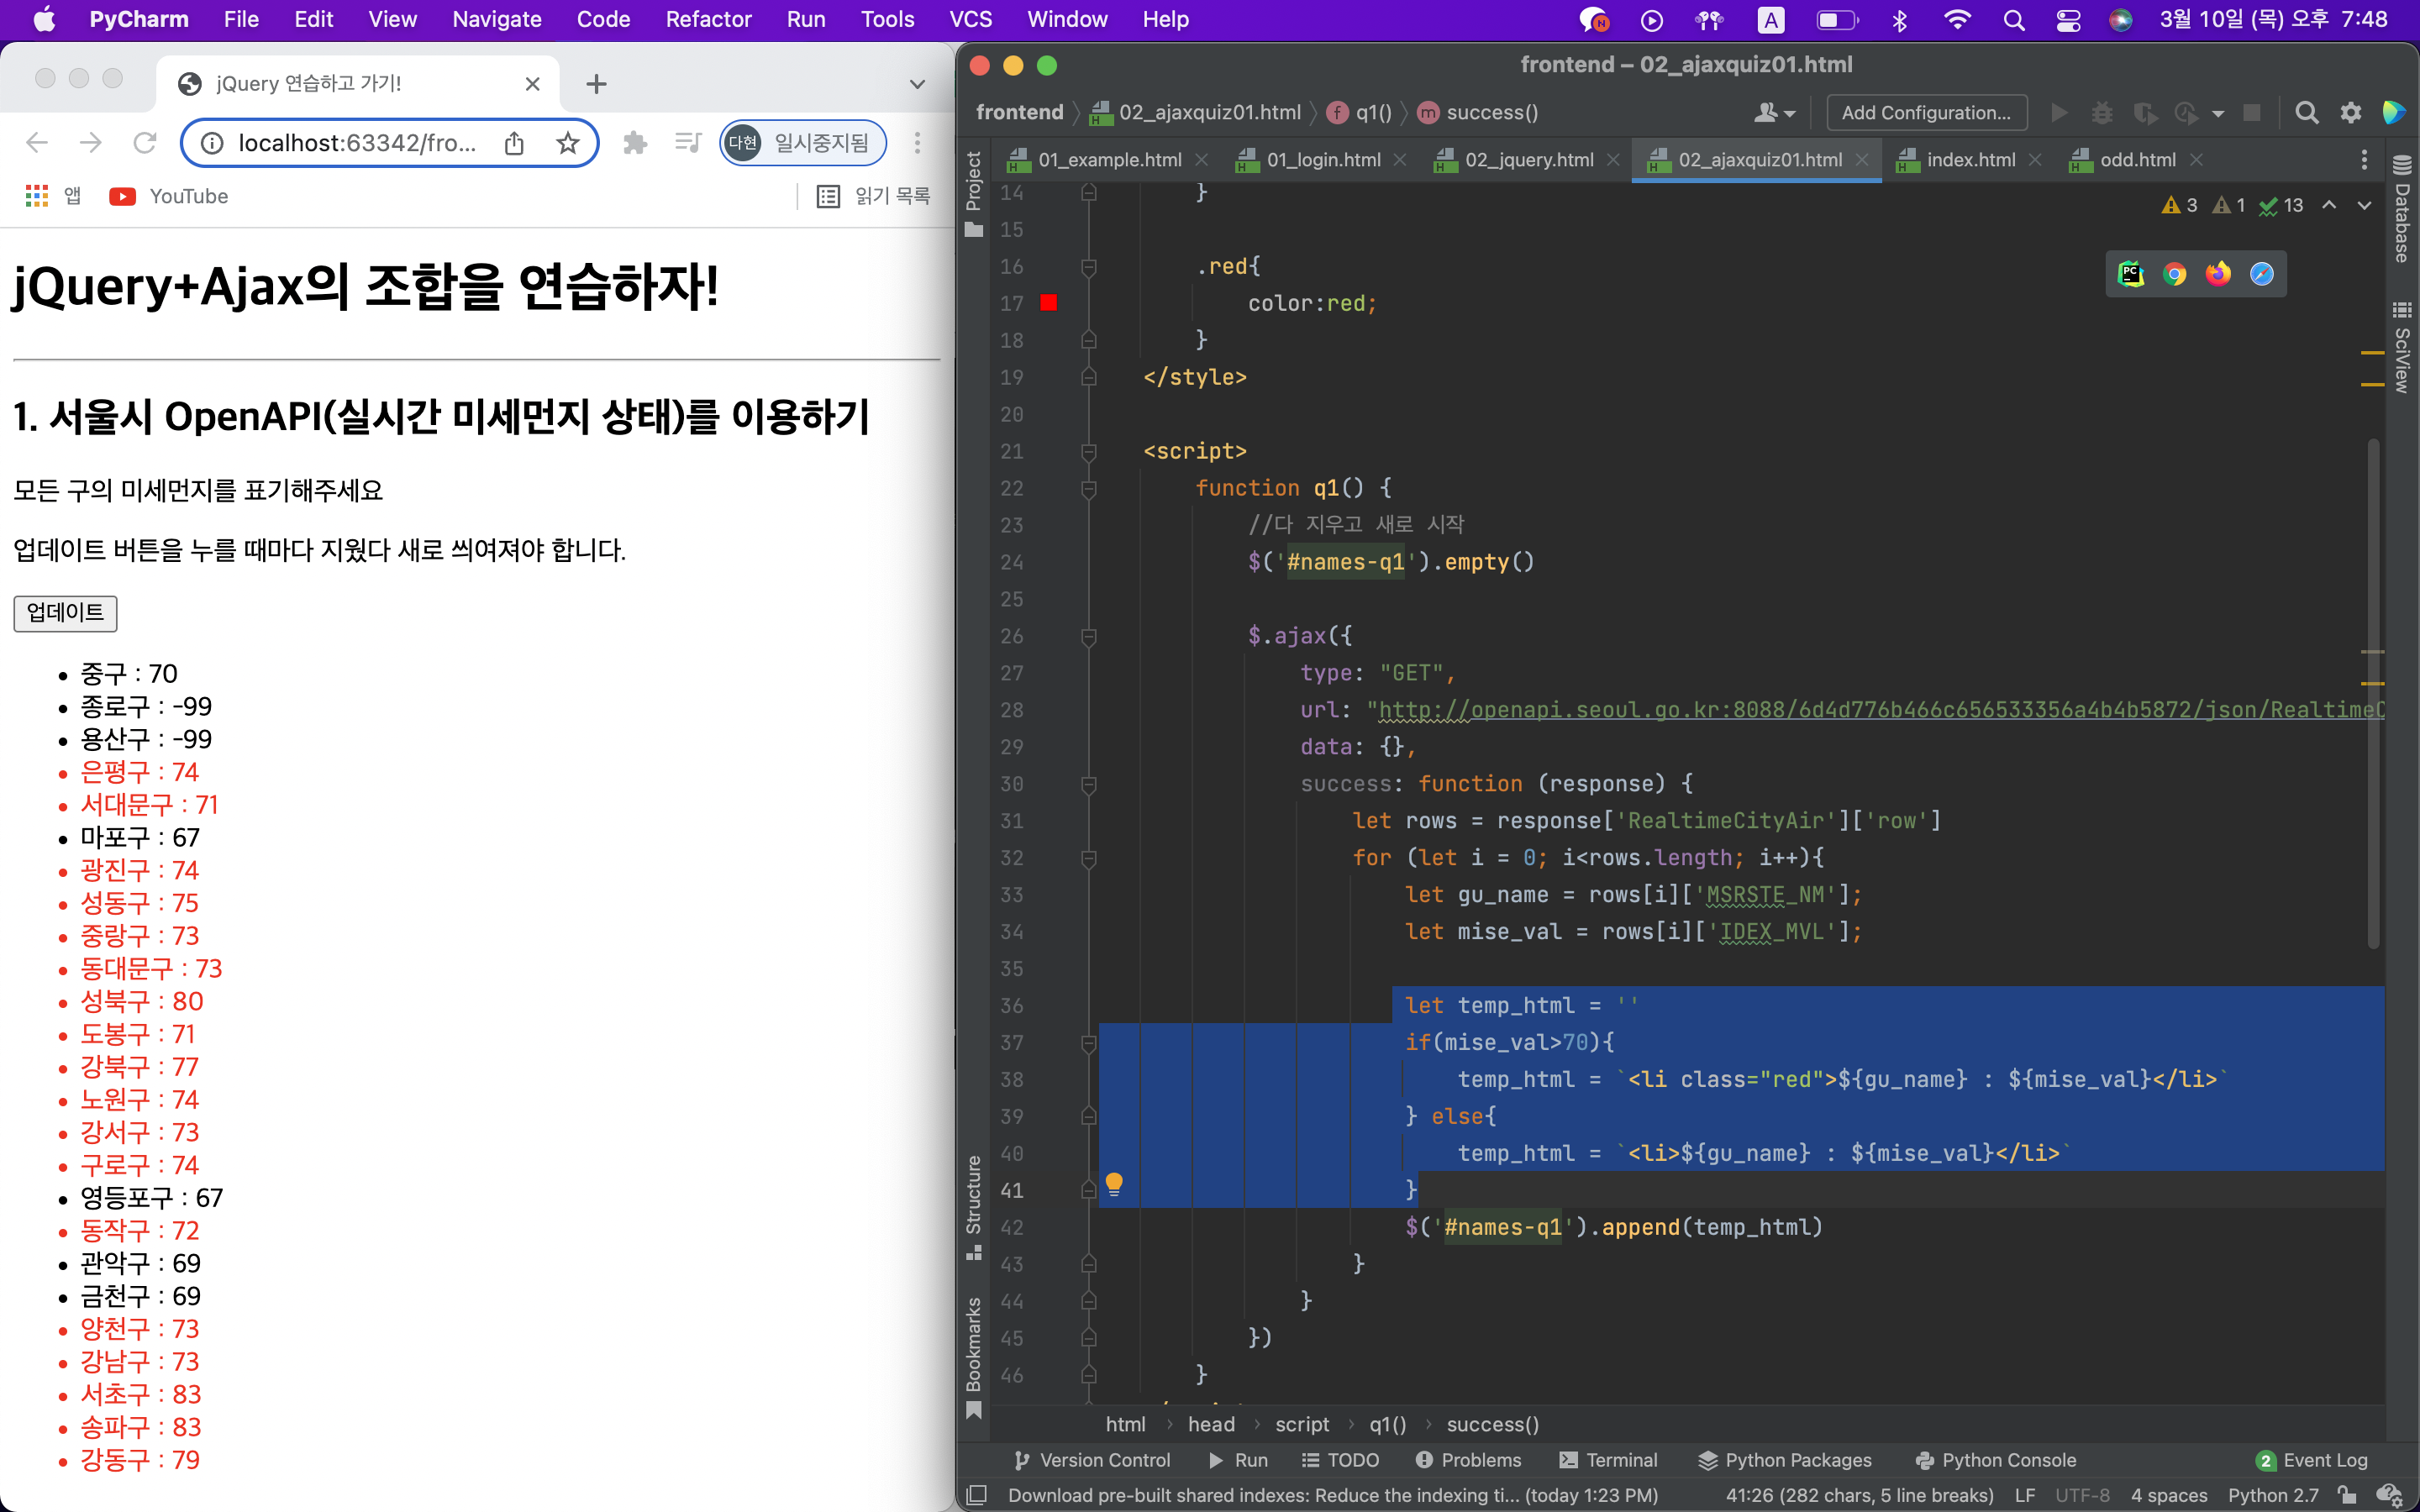
추가 Q) 미세먼지 수치가 70 이상인 곳에 빨갛게 표시하세요.
전체를 빨간색으로 하고 싶은 경우에는 li태그에 class를 지정한 후, css style태그 설정해주면 된다.
그렇다면 이 red class를 선택적으로 적용하면 이 문제를 풀 수 있겠네?
Q2) 서울시 실시간 따릉이 현황 OpenAPI 이용한 실습
Q) 모든 위치와 거치대 수, 거치된 따릉이 수를 실시간으로 보여주세요.
- 수정할 코드
<!doctype html>
<html lang="ko">

<head>
    <meta charset="UTF-8">
    <title>JQuery 연습하고 가기!</title>
    <!-- JQuery를 import 합니다 -->
    <script src="https://ajax.googleapis.com/ajax/libs/jquery/3.4.1/jquery.min.js"></script>

    <style type="text/css">
        div.question-box {
            margin: 10px 0 20px 0;
        }

        table {
            border: 1px solid;
            border-collapse: collapse;
        }

        td,
        th {
            padding: 10px;
            border: 1px solid;
        }
    </style>

    <script>
        function q1() {
            // 여기에 코드를 입력하세요
        }
    </script>

</head>

<body>
    <h1>jQuery + Ajax의 조합을 연습하자!</h1>

    <hr />

    <div class="question-box">
        <h2>2. 서울시 OpenAPI(실시간 따릉기 현황)를 이용하기</h2>
        <p>모든 위치의 따릉이 현황을 보여주세요</p>
        <p>업데이트 버튼을 누를 때마다 지웠다 새로 씌여져야 합니다.</p>
        <button onclick="q1()">업데이트</button>
        <table>
            <thead>
                <tr>
                    <td>거치대 위치</td>
                    <td>거치대 수</td>
                    <td>현재 거치된 따릉이 수</td>
                </tr>
            </thead>
            <tbody id="names-q1">
                <tr>
                    <td>102. 망원역 1번출구 앞</td>
                    <td>22</td>
                    <td>0</td>
                </tr>
                <tr>
                    <td>103. 망원역 2번출구 앞</td>
                    <td>16</td>
                    <td>0</td>
                </tr>
                <tr>
                    <td>104. 합정역 1번출구 앞</td>
                    <td>16</td>
                    <td>0</td>
                </tr>
            </tbody>
        </table>
    </div>
</body>

</html>-
위 코드를 수정하여 만들어야하는 화면
완성화면 -
정답 코드
<script>
        function q1() {
  			$('#names-q1').empty();
            $.ajax({
                type: "GET",
                url: "http://spartacodingclub.shop/sparta_api/seoulbike",
                data: {},
                success: function (response) {
                    let rows = response['getStationList']['row'];
                    for (let i = 0; i < rows.length; i++) {
                        let station_name = rows[i]['stationName'];
                        let rack_cnt = rows[i]['rackTotCnt'];
                        let bike_cnt = rows[i]['parkingBikeTotCnt'];
                        let temp_html = ` <tr>
                                            <td>${station_name}</td>
                                            <td>${rack_cnt}</td>
                                            <td>${bike_cnt}</td>
                                          </tr>`
                        $('#names-q1').append(temp_html);
                    }
                }


            })
        }
</script>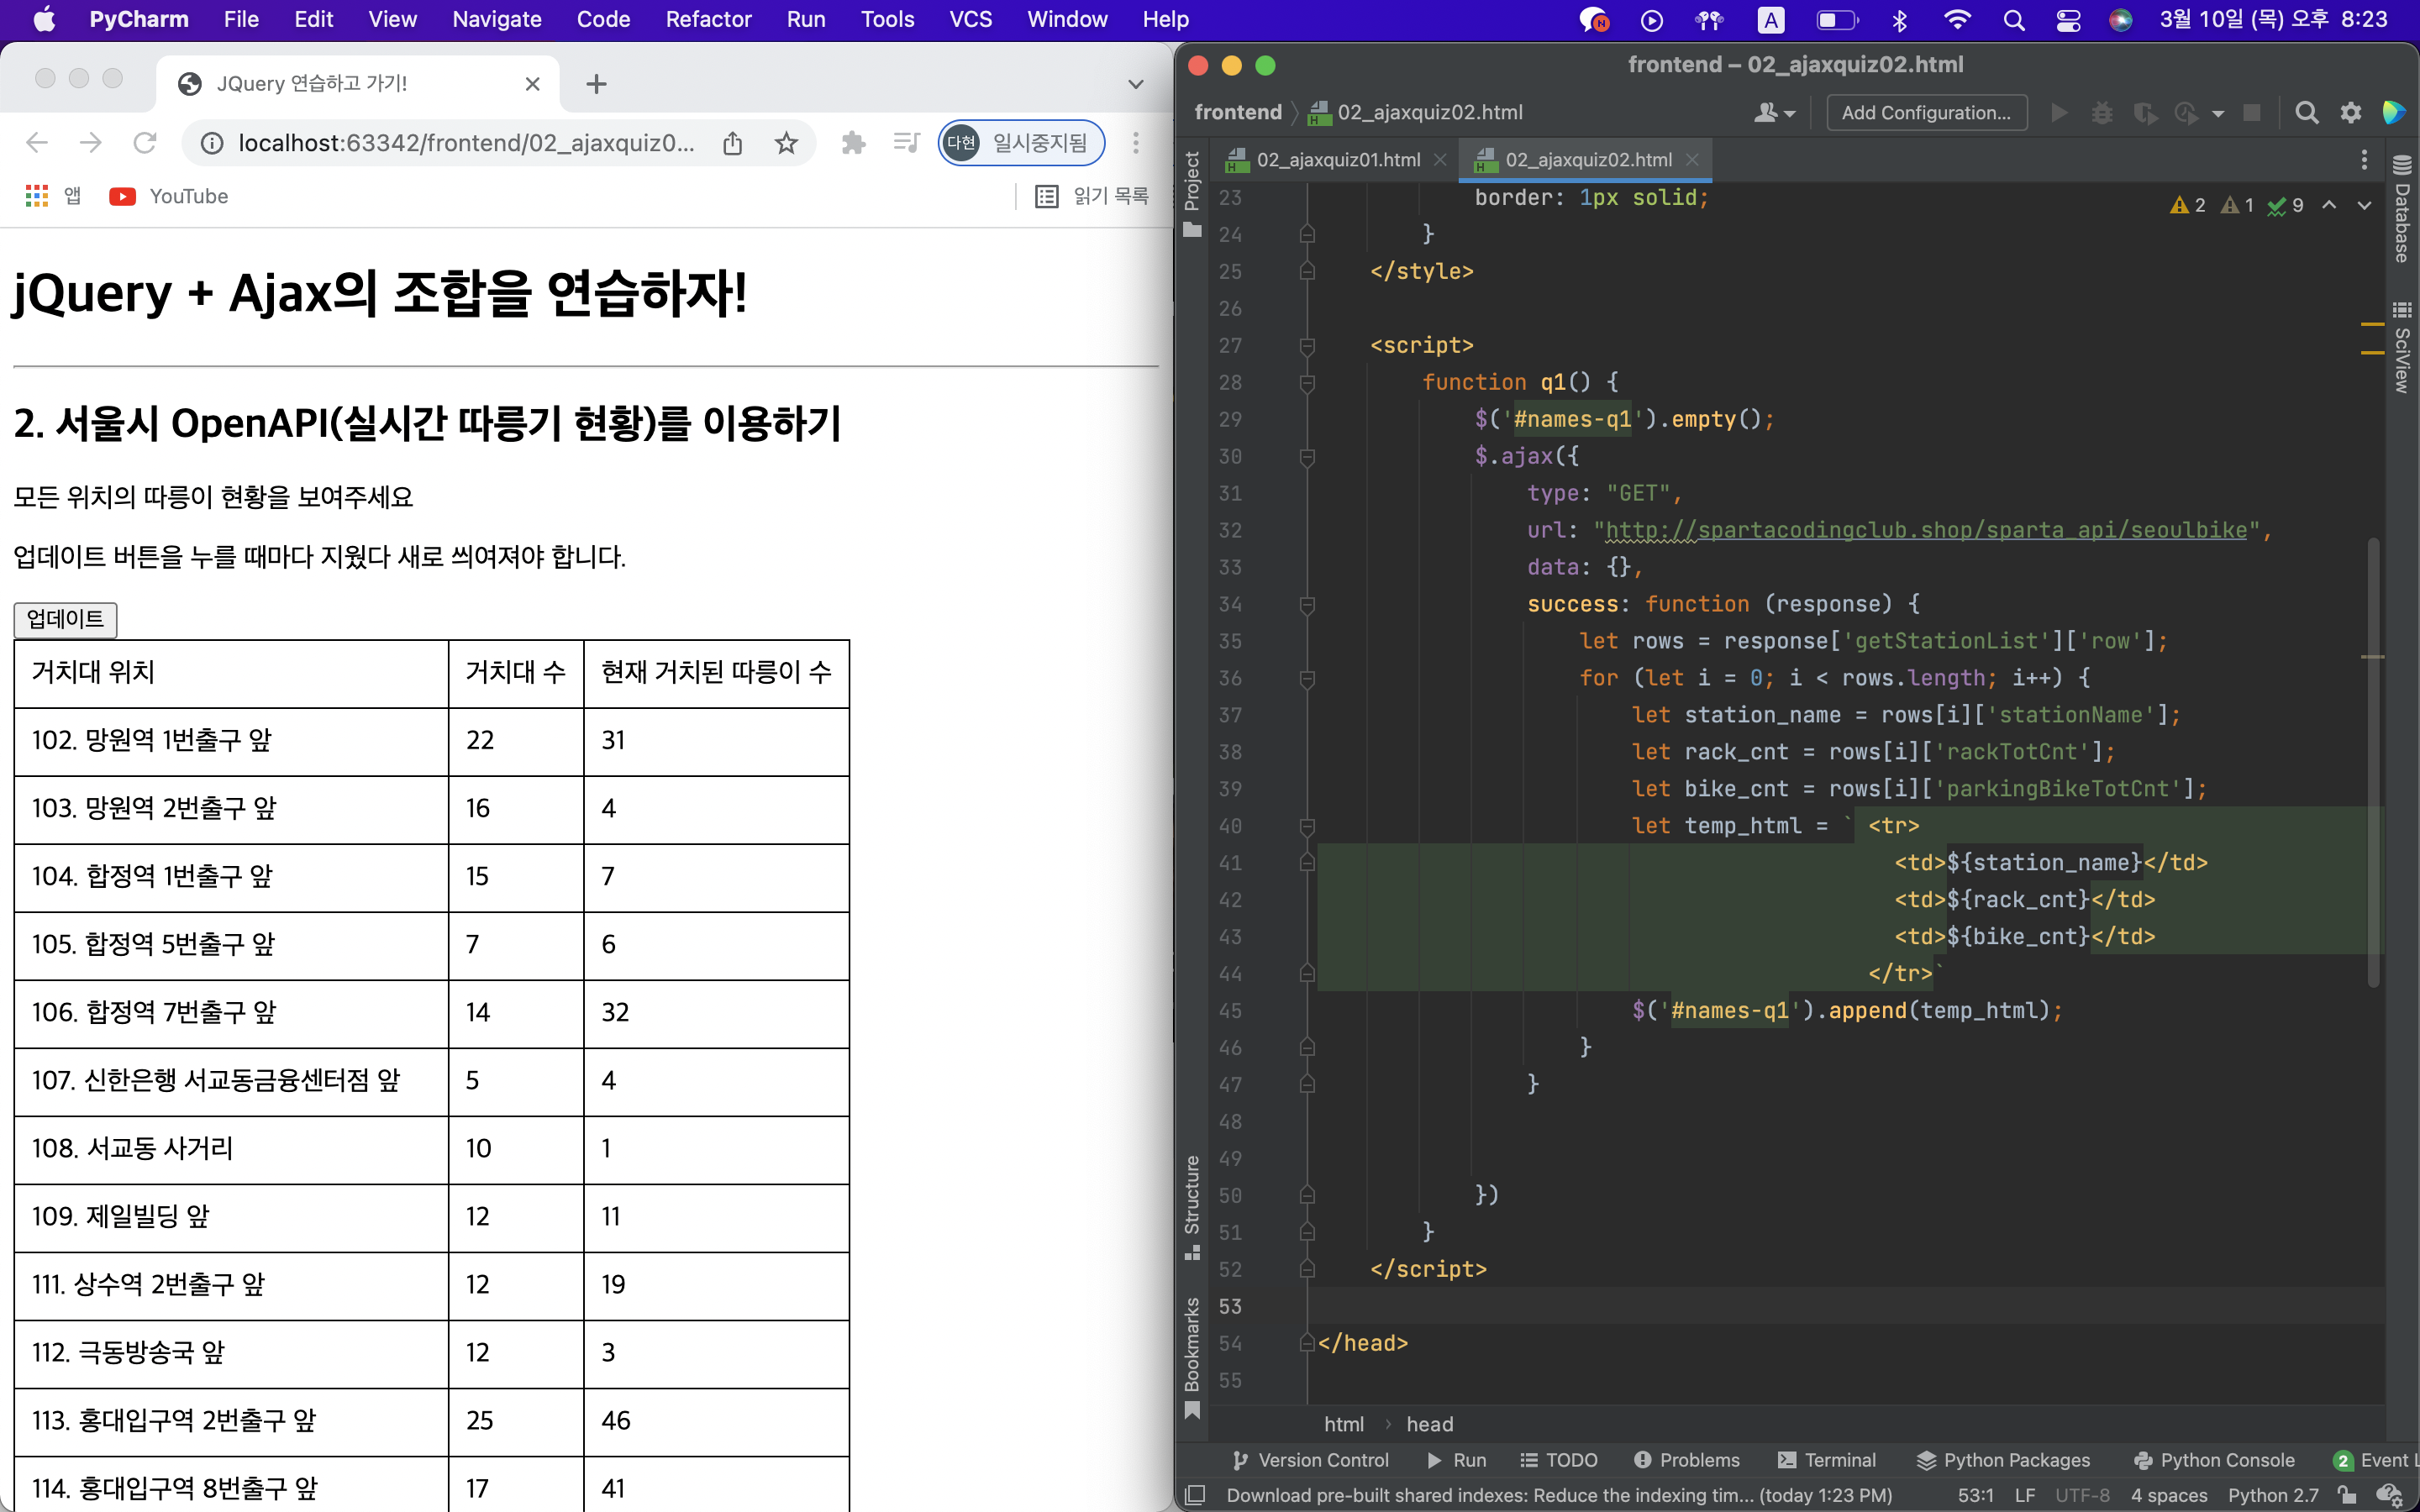
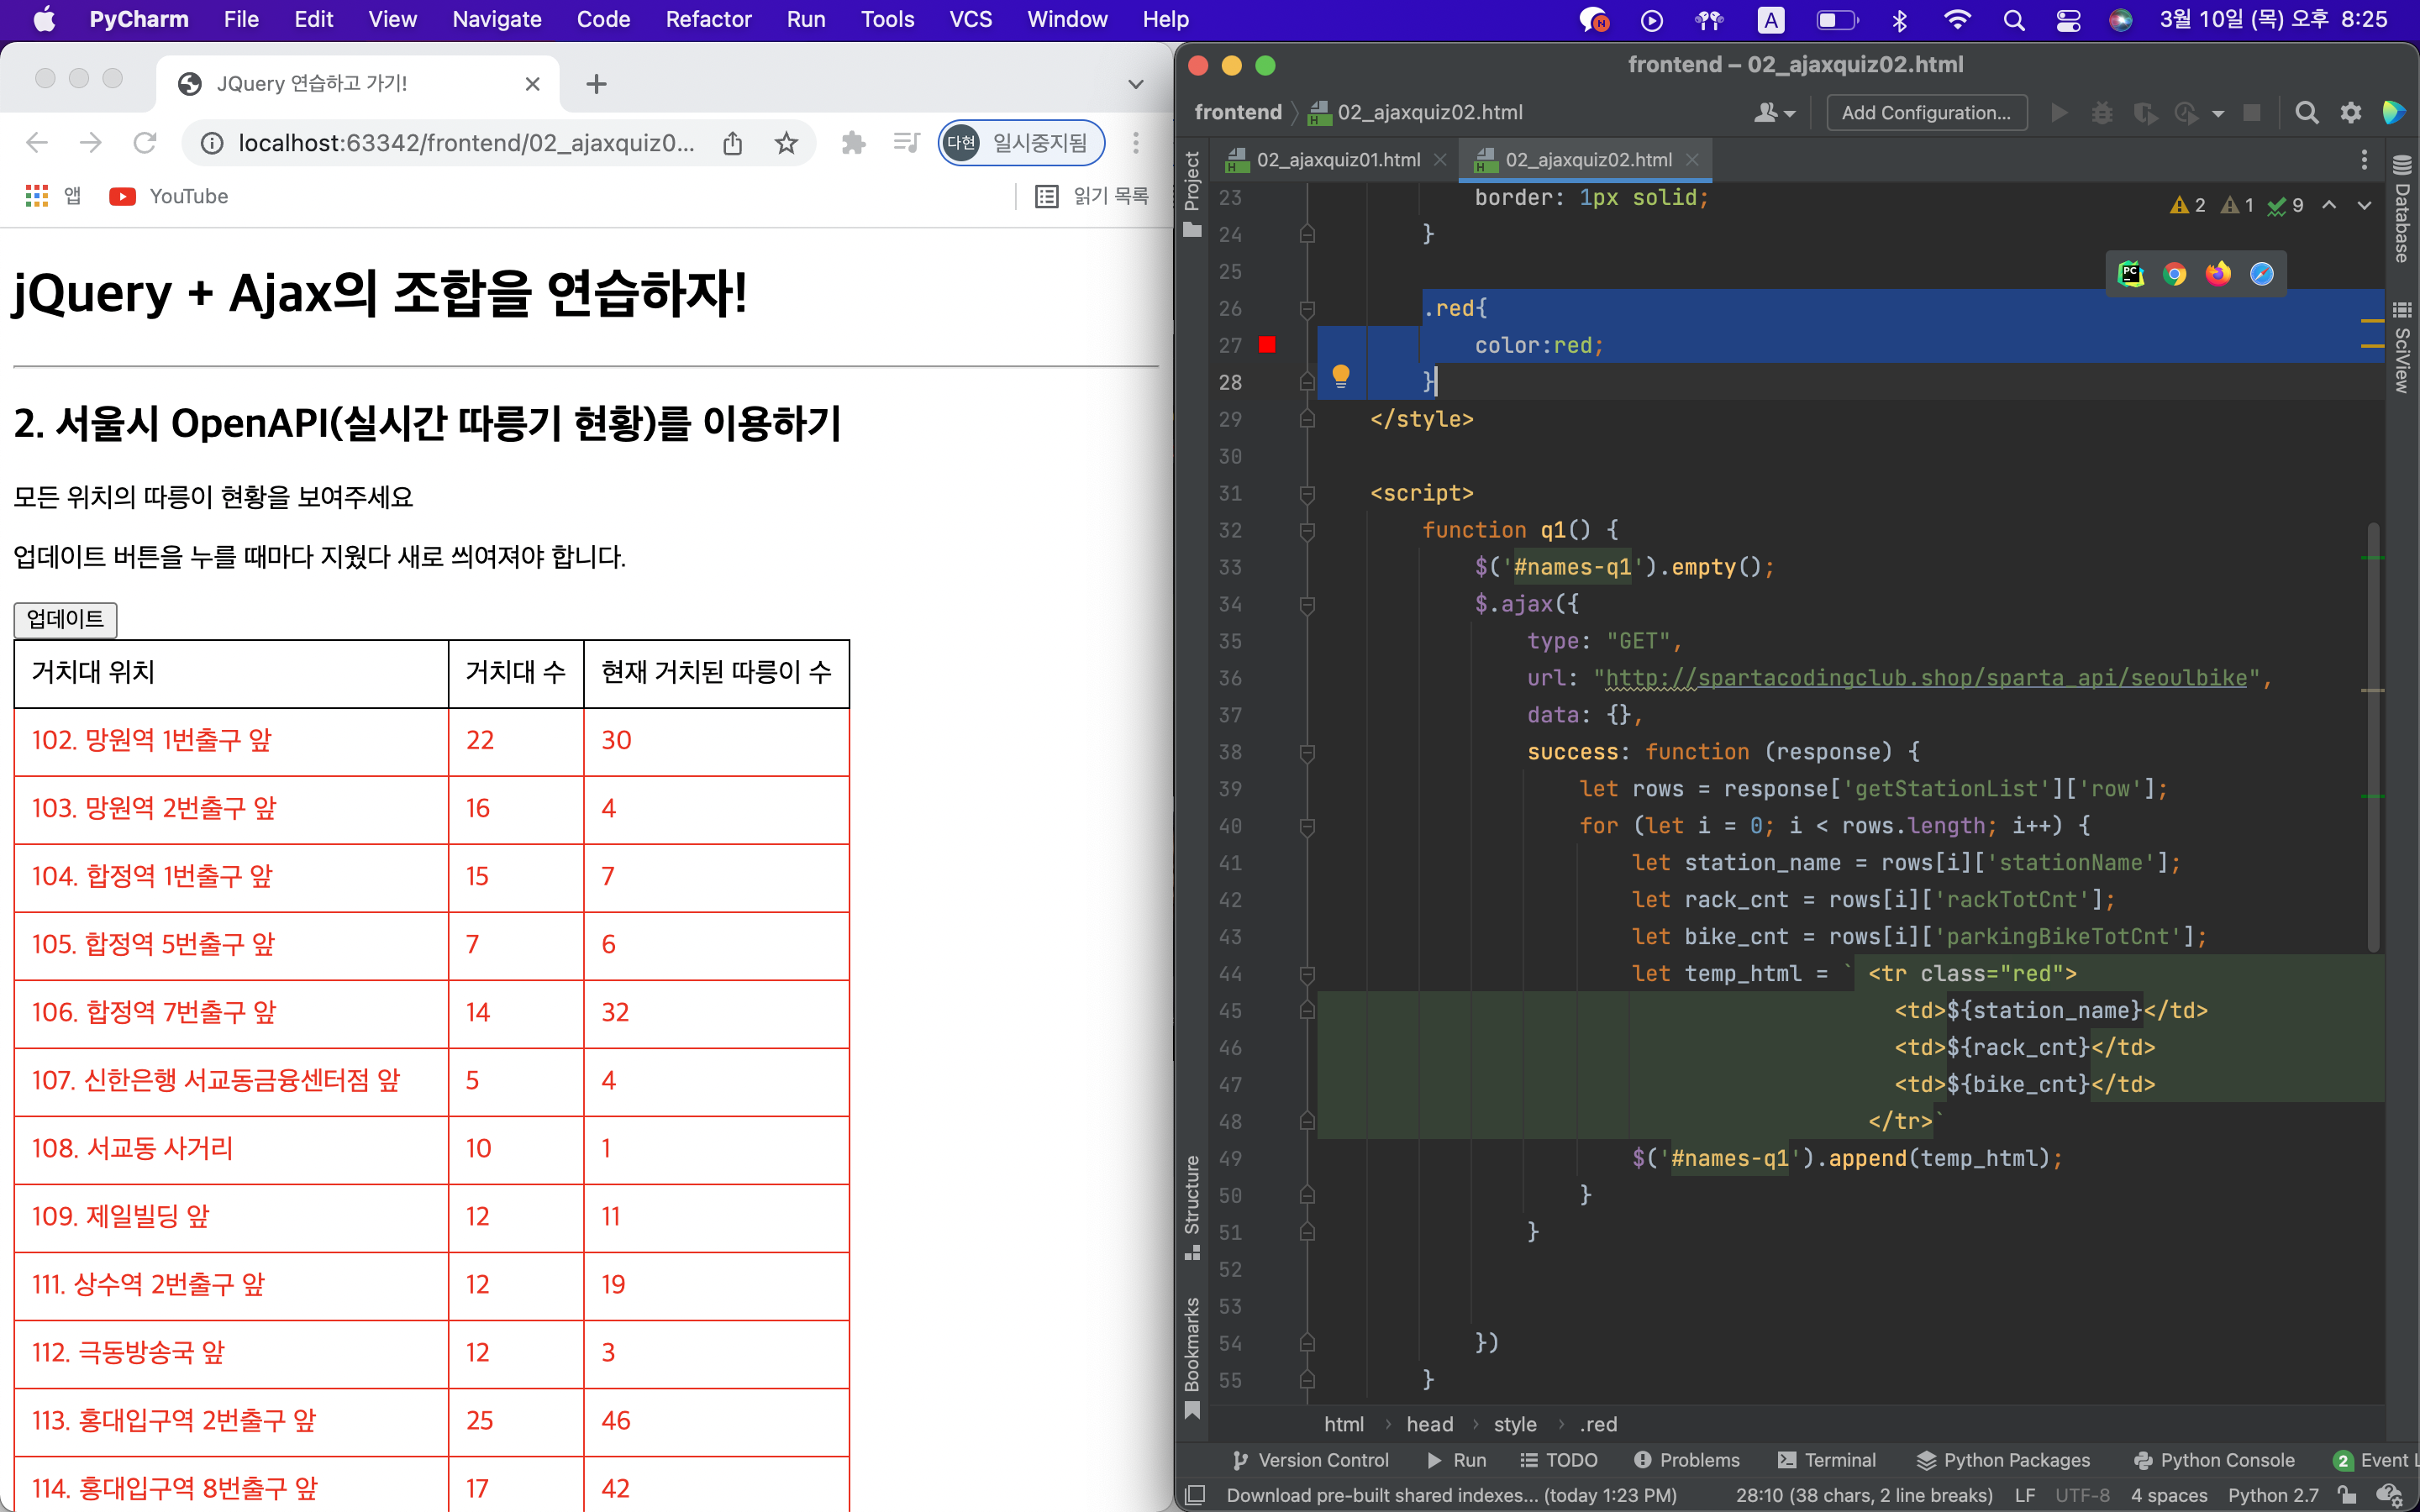
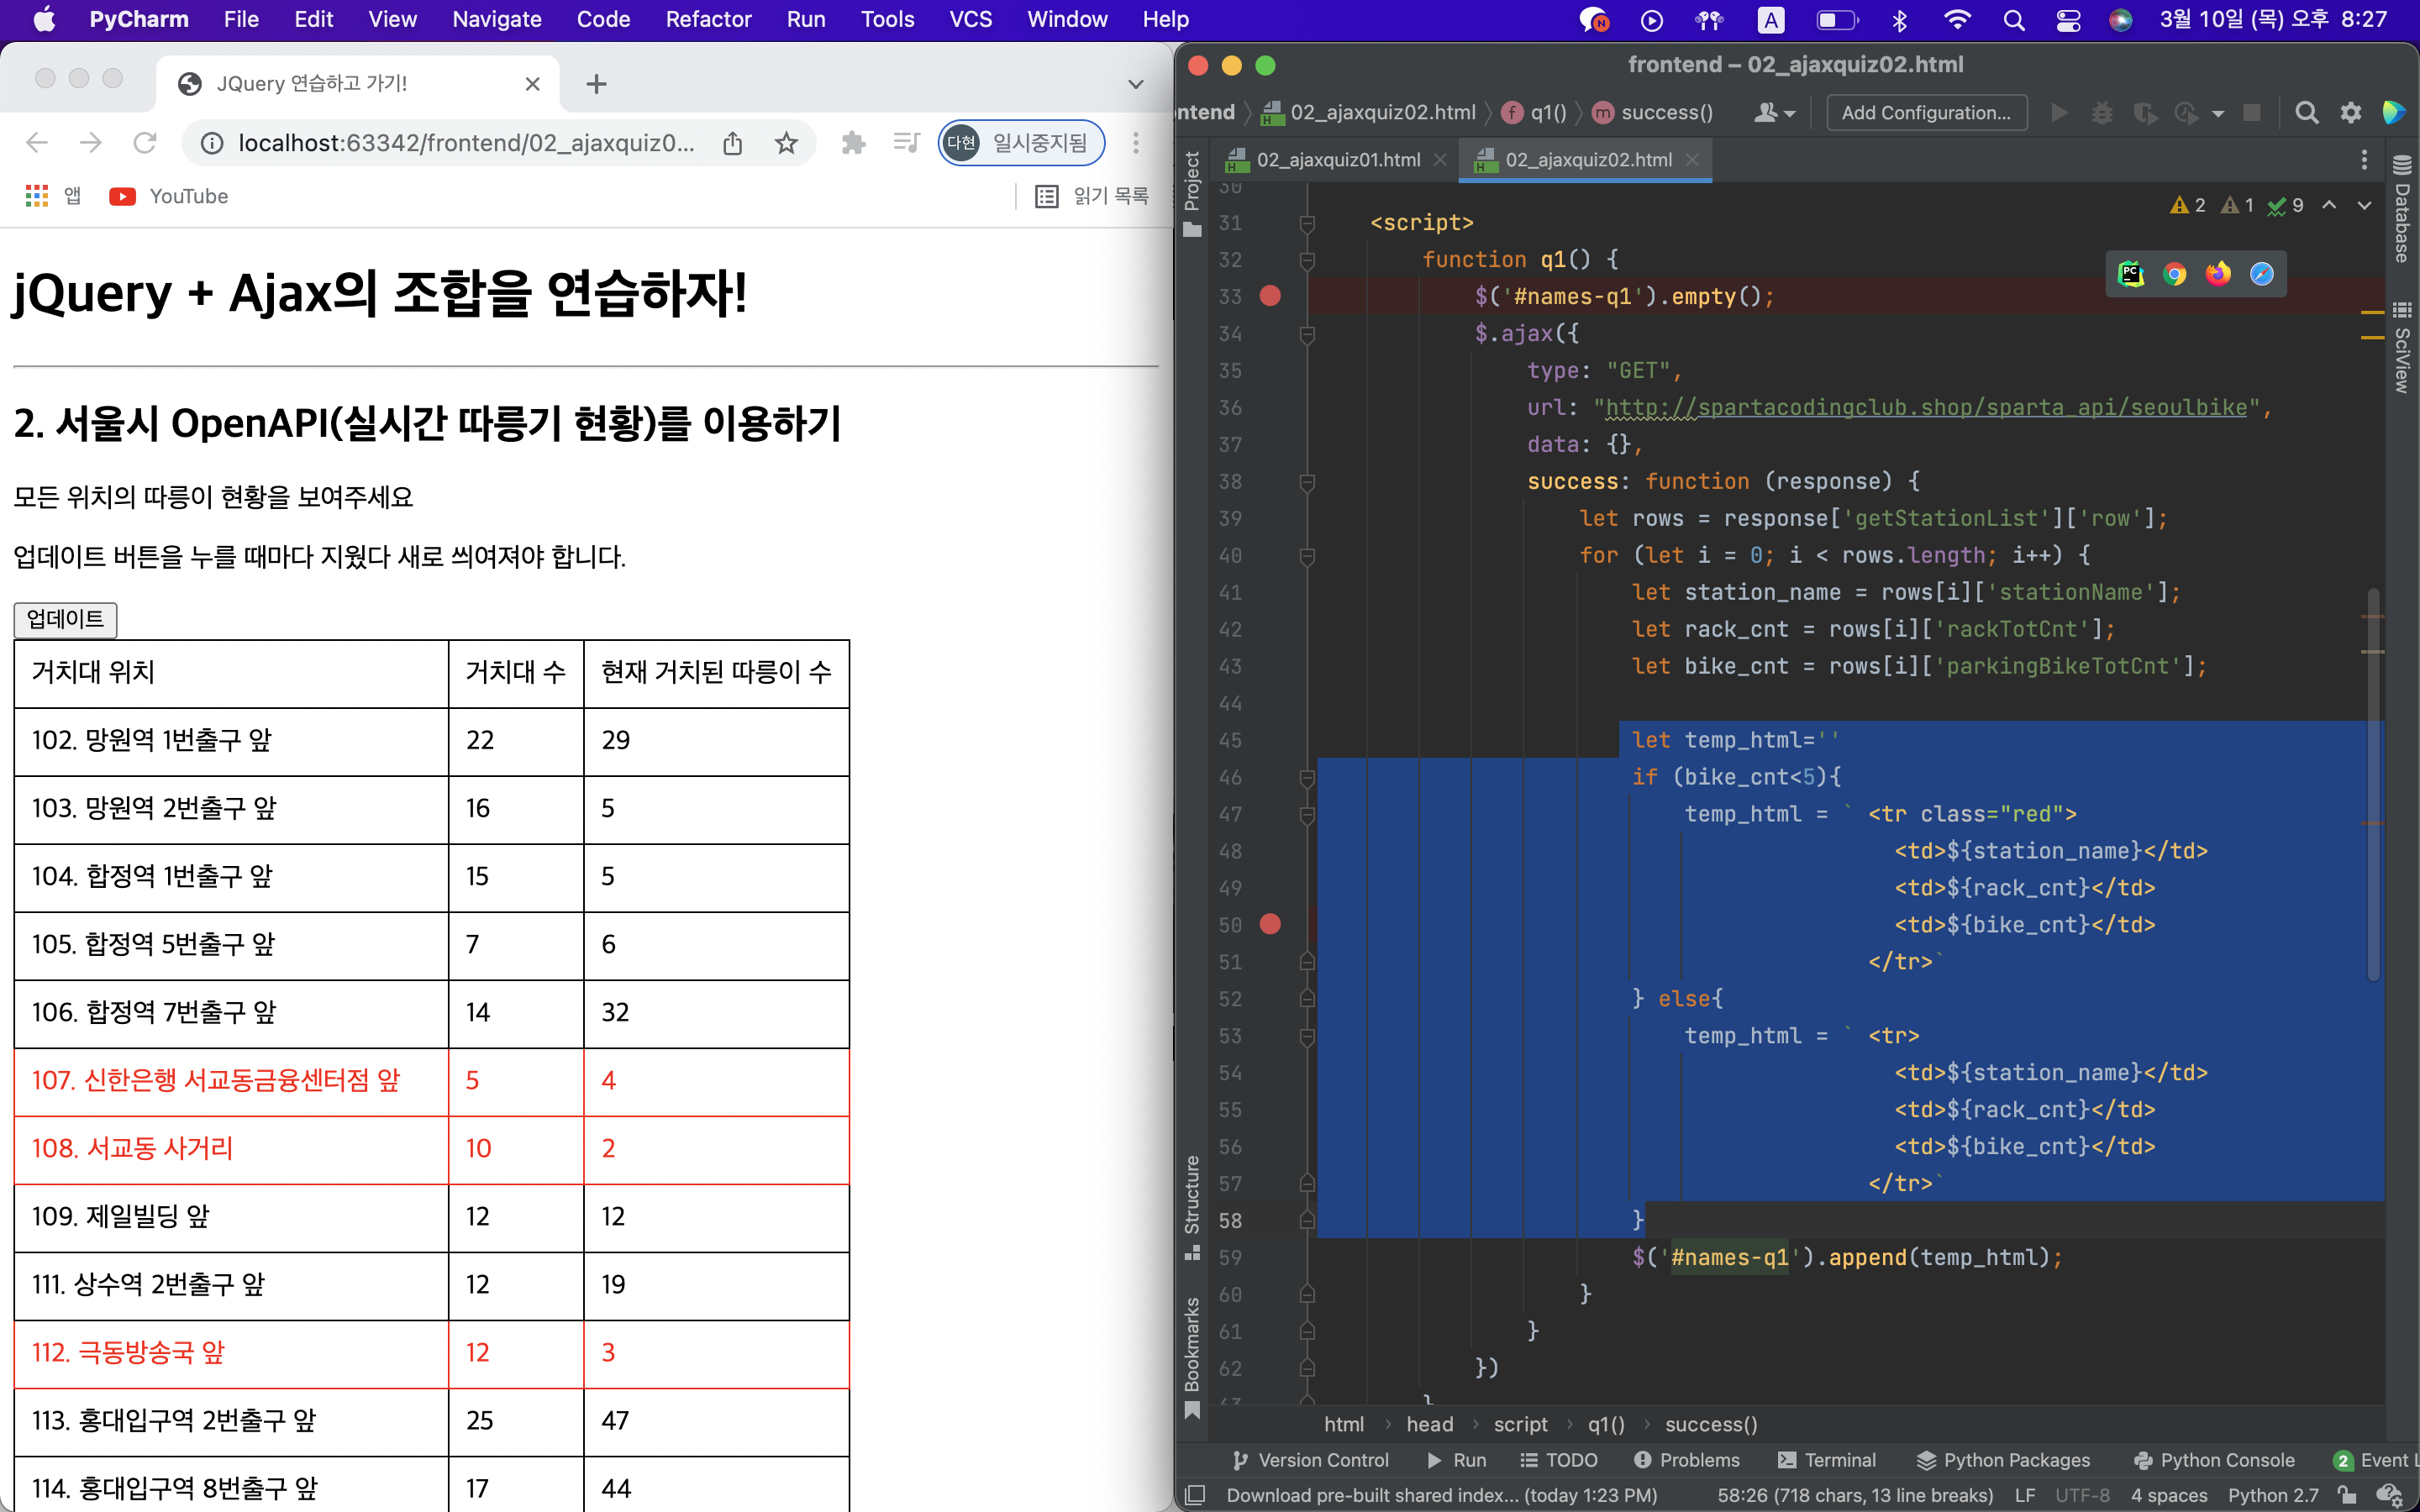
추가 Q) 따릉이 대수가 5대 미만인 곳에 빨갛게 표시하세요.
- 전체 빨간색! 이제 5대 미만인 곳을 선택하면 된다. if문 사용!
Q3) 랜덤 고양이 사진 API 이용하기
jquery img태그 이미지 주소 변경 jquery 이미지 태그 src바꾸기 검색해보기!
검색역량도 키워야함!
- 수정할 코드
<!doctype html>
<html lang="ko">
  <head>
    <meta charset="UTF-8">
    <title>JQuery 연습하고 가기!</title>
    <!-- JQuery를 import 합니다 -->
    <script src="https://ajax.googleapis.com/ajax/libs/jquery/3.4.1/jquery.min.js"></script>

    <style type="text/css">
      div.question-box {
        margin: 10px 0 20px 0;
      }
      div.question-box > div {
        margin-top: 30px;
      }

    </style>

    <script>
      function q1() {
        // 여기에 코드를 입력하세요
      }
    </script>

  </head>
  <body>
    <h1>JQuery+Ajax의 조합을 연습하자!</h1>

    <hr/>

    <div class="question-box">
      <h2>3. 랜덤 고양이 사진 API를 이용하기</h2>
      <p>예쁜 고양이 사진을 보여주세요</p>
      <p>업데이트 버튼을 누를 때마다 지웠다 새로 씌여져야 합니다.</p>
      <button onclick="q1()">고양이를 보자</button>
      <div>
        <img id="img-cat" src="https://www.google.com/images/branding/googlelogo/1x/googlelogo_color_272x92dp.png"/>
      </div>
    </div>
  </body>
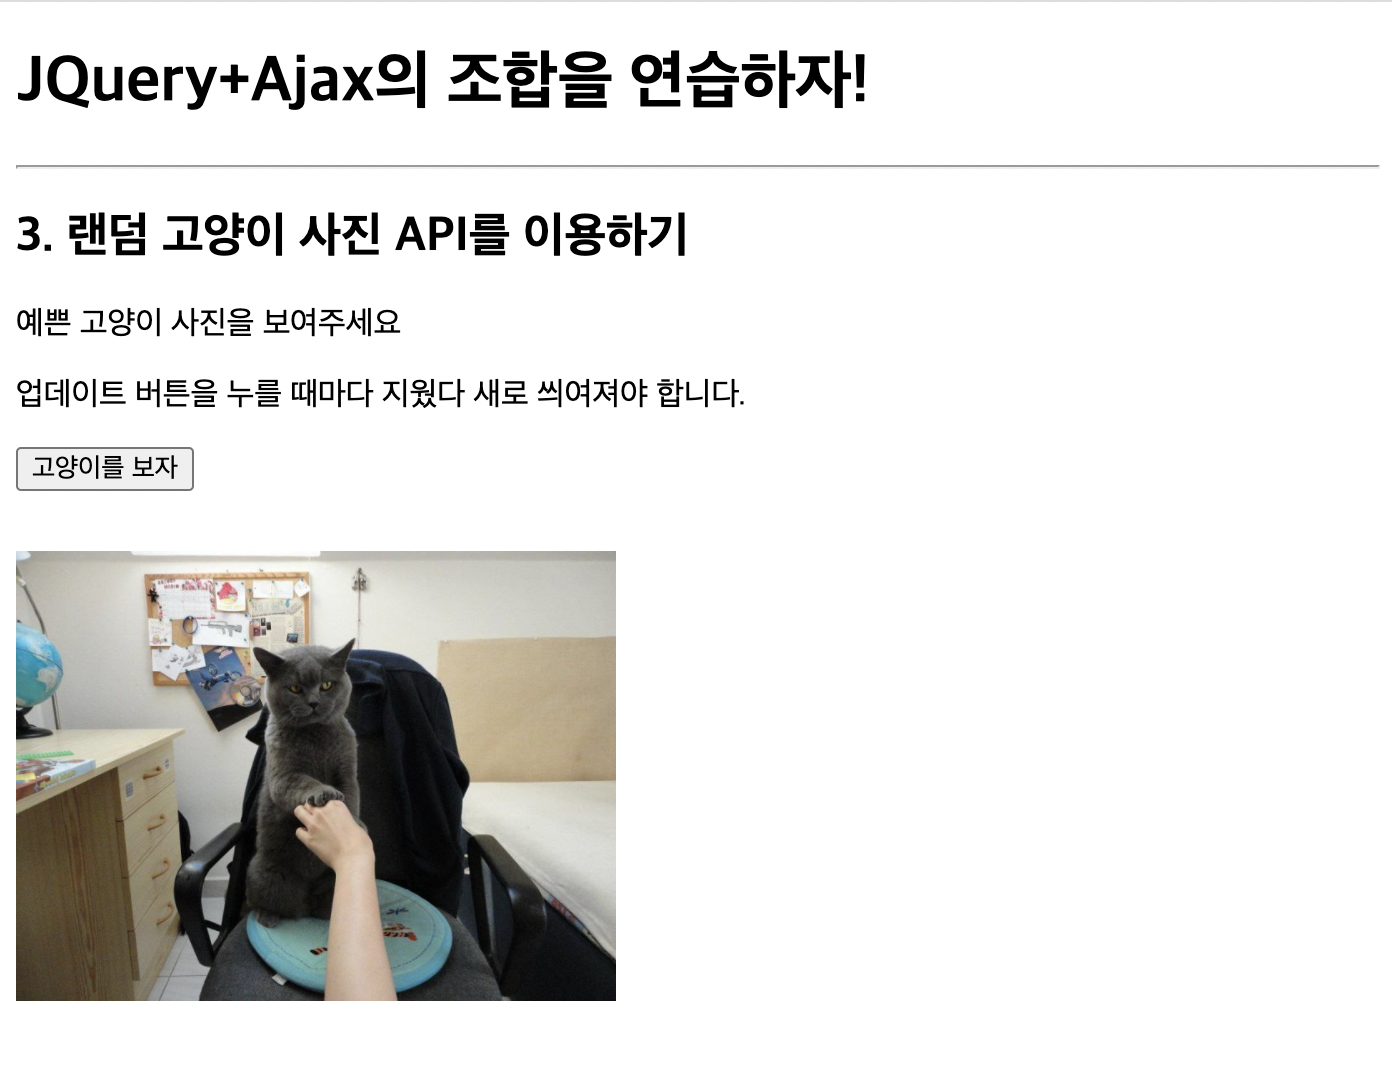
</html>- 위 코드를 수정하여 만들어야하는 화면
완성화면
- 정답 코드
<!doctype html>
<html lang="ko">
  <head>
    <meta charset="UTF-8">
    <title>JQuery 연습하고 가기!</title>
    <!-- JQuery를 import 합니다 -->
    <script src="https://ajax.googleapis.com/ajax/libs/jquery/3.4.1/jquery.min.js"></script>

    <style type="text/css">
      div.question-box {
        margin: 10px 0 20px 0;
      }
      div.question-box > div {
        margin-top: 30px;
      }

    </style>

    <script>
      function q1() {
        $.ajax({
          type: "GET",
          url: "https://api.thecatapi.com/v1/images/search",
          data: {},
          success: function(response){
              let imgurl = response[0]['url'];
              $("#img-cat").attr("src", imgurl);
            }
          })
      }
    </script>

  </head>
  <body>
    <h1>JQuery+Ajax의 조합을 연습하자!</h1>

    <hr/>

    <div class="question-box">
      <h2>3. 랜덤 고양이 사진 API를 이용하기</h2>
      <p>예쁜 고양이 사진을 보여주세요</p>
      <p>업데이트 버튼을 누를 때마다 지웠다 새로 씌여져야 합니다.</p>
      <button onclick="q1()">고양이를 보자</button>
      <div>
        <img id="img-cat" width="300" src="https://www.google.com/images/branding/googlelogo/1x/googlelogo_color_272x92dp.png"/>
      </div>
    </div>
  </body>
</html>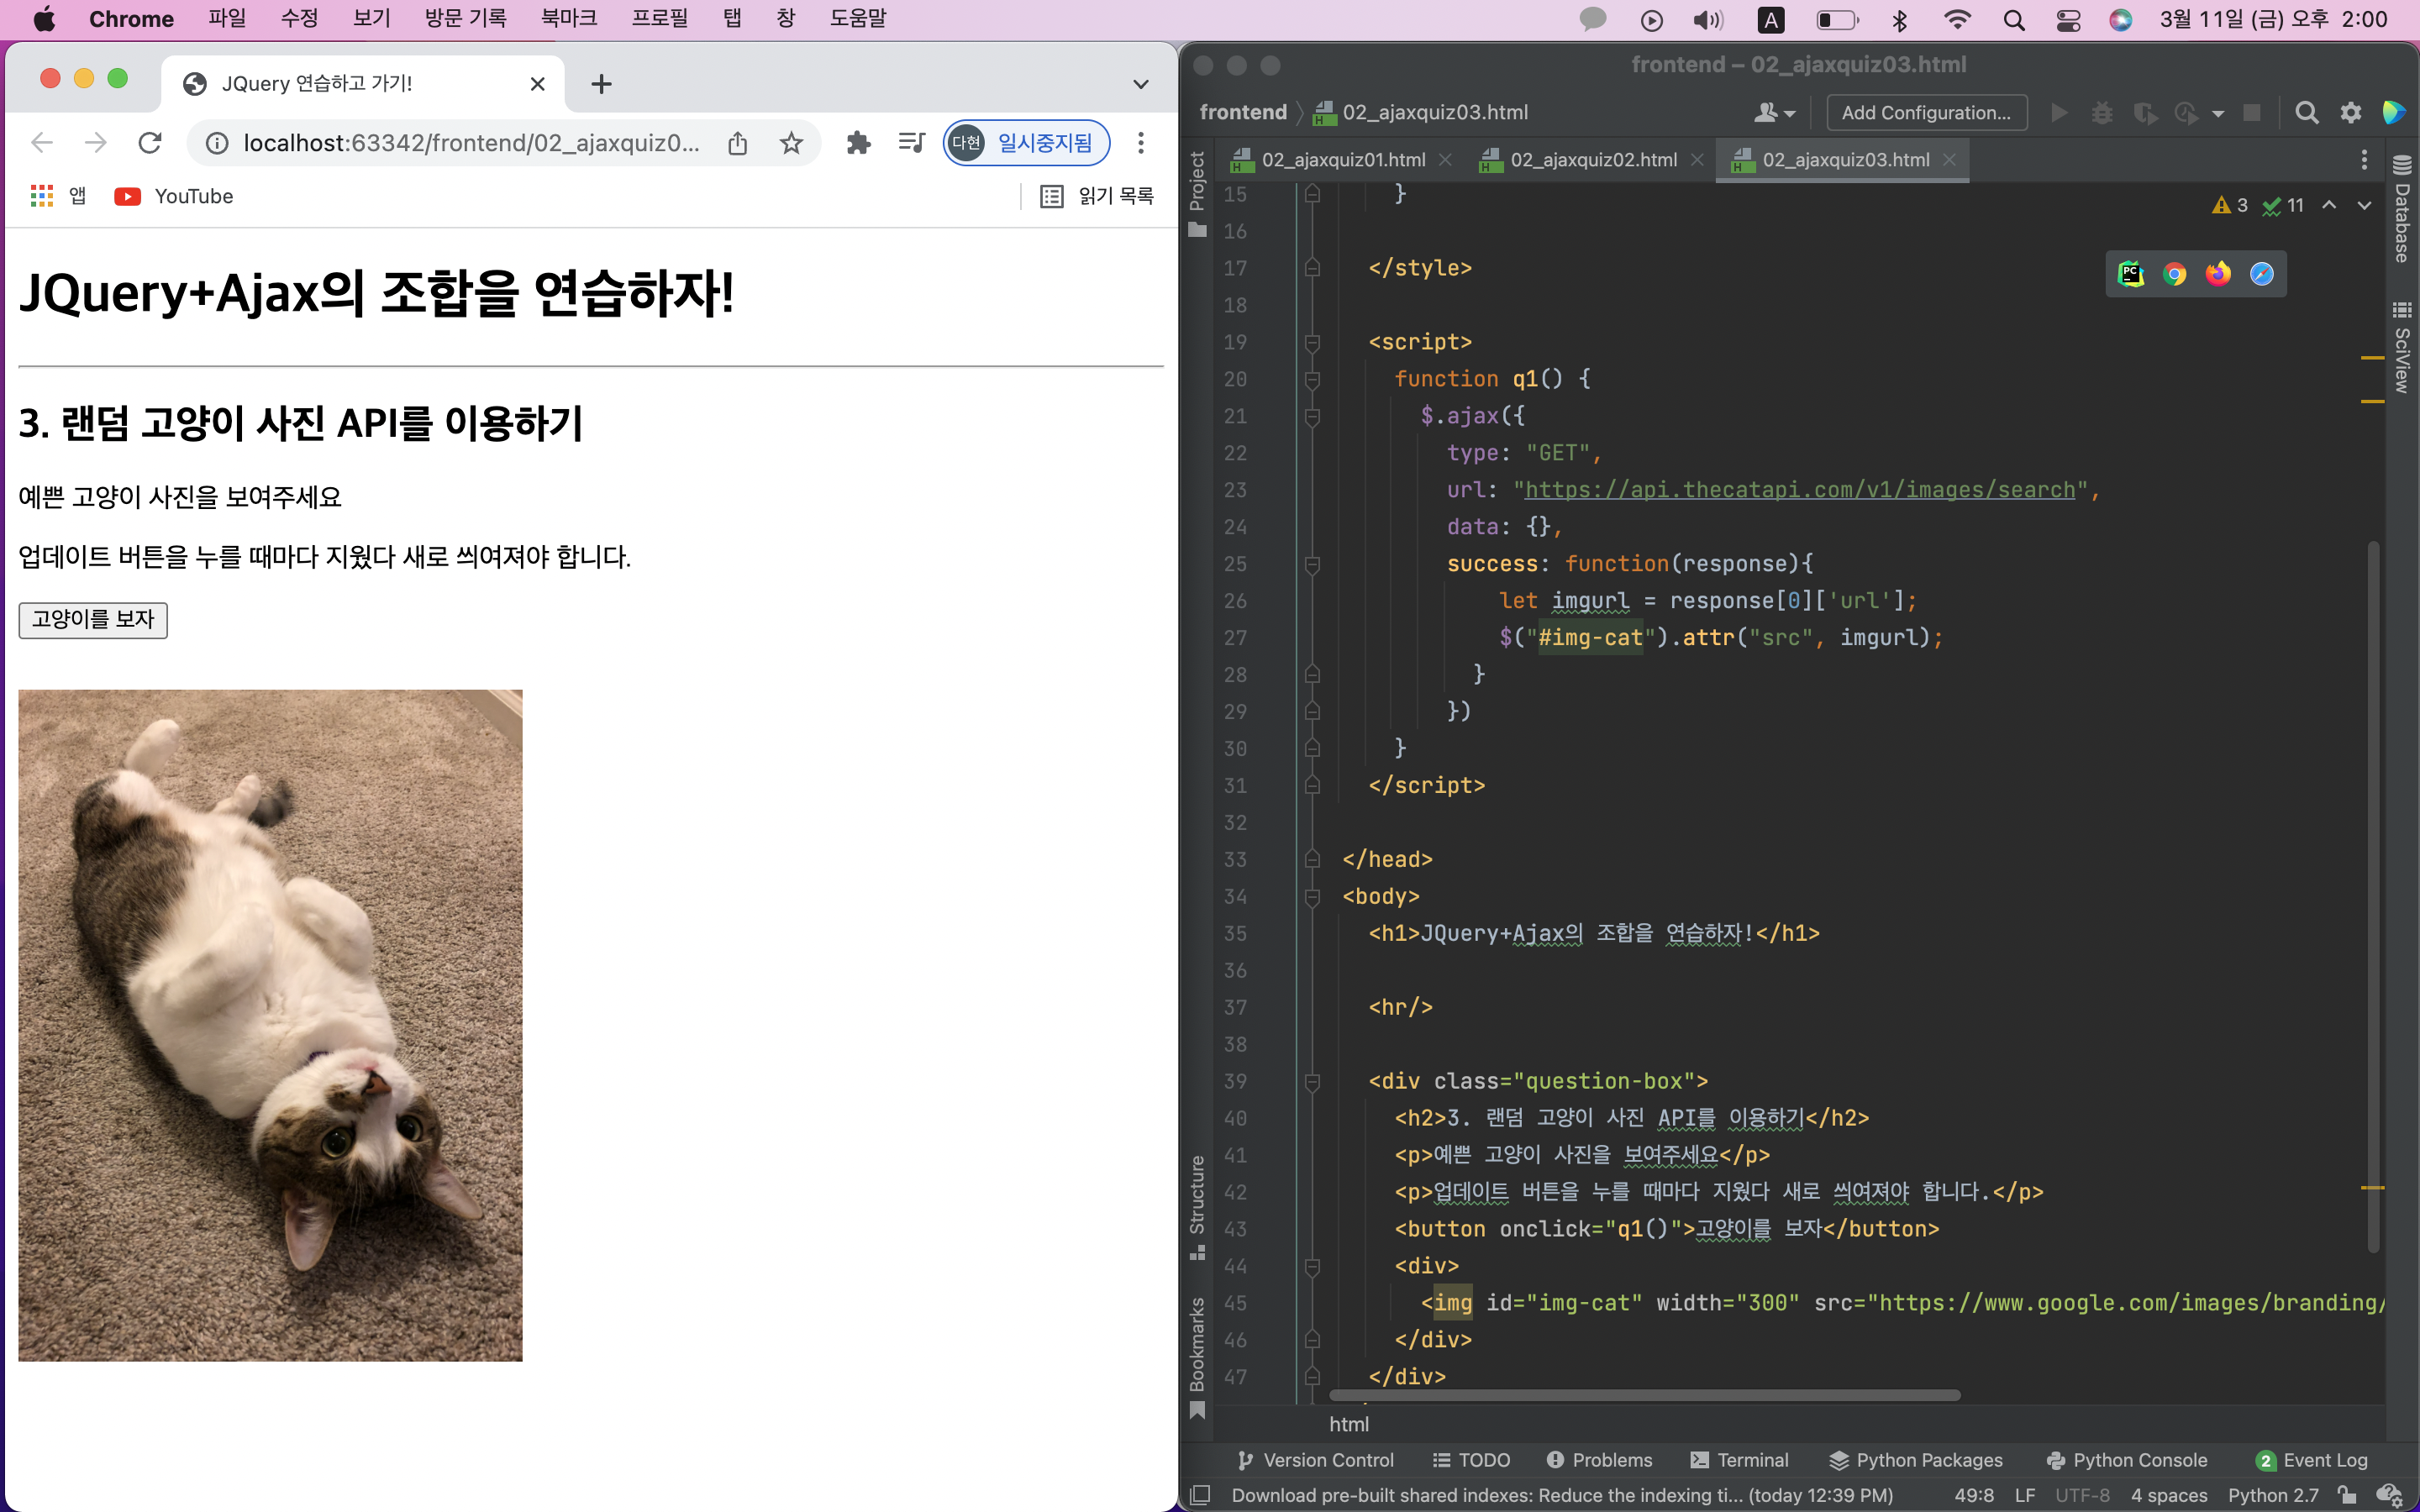
📚 2주차 과제
Q) 1주차에 완성했던 쇼핑몰에, 환율정보를 추가하세요.
로딩하자마자 뜨도록, 환율 API를 이용해 환율을 표시하세요.
힌트!
javascript 로딩 후 실행 검색해보기!
$(document).ready(function(){
	alert('다 로딩됐다!')
});
alert 대신에 바로 실행될 함수를 넣어주면 된다!
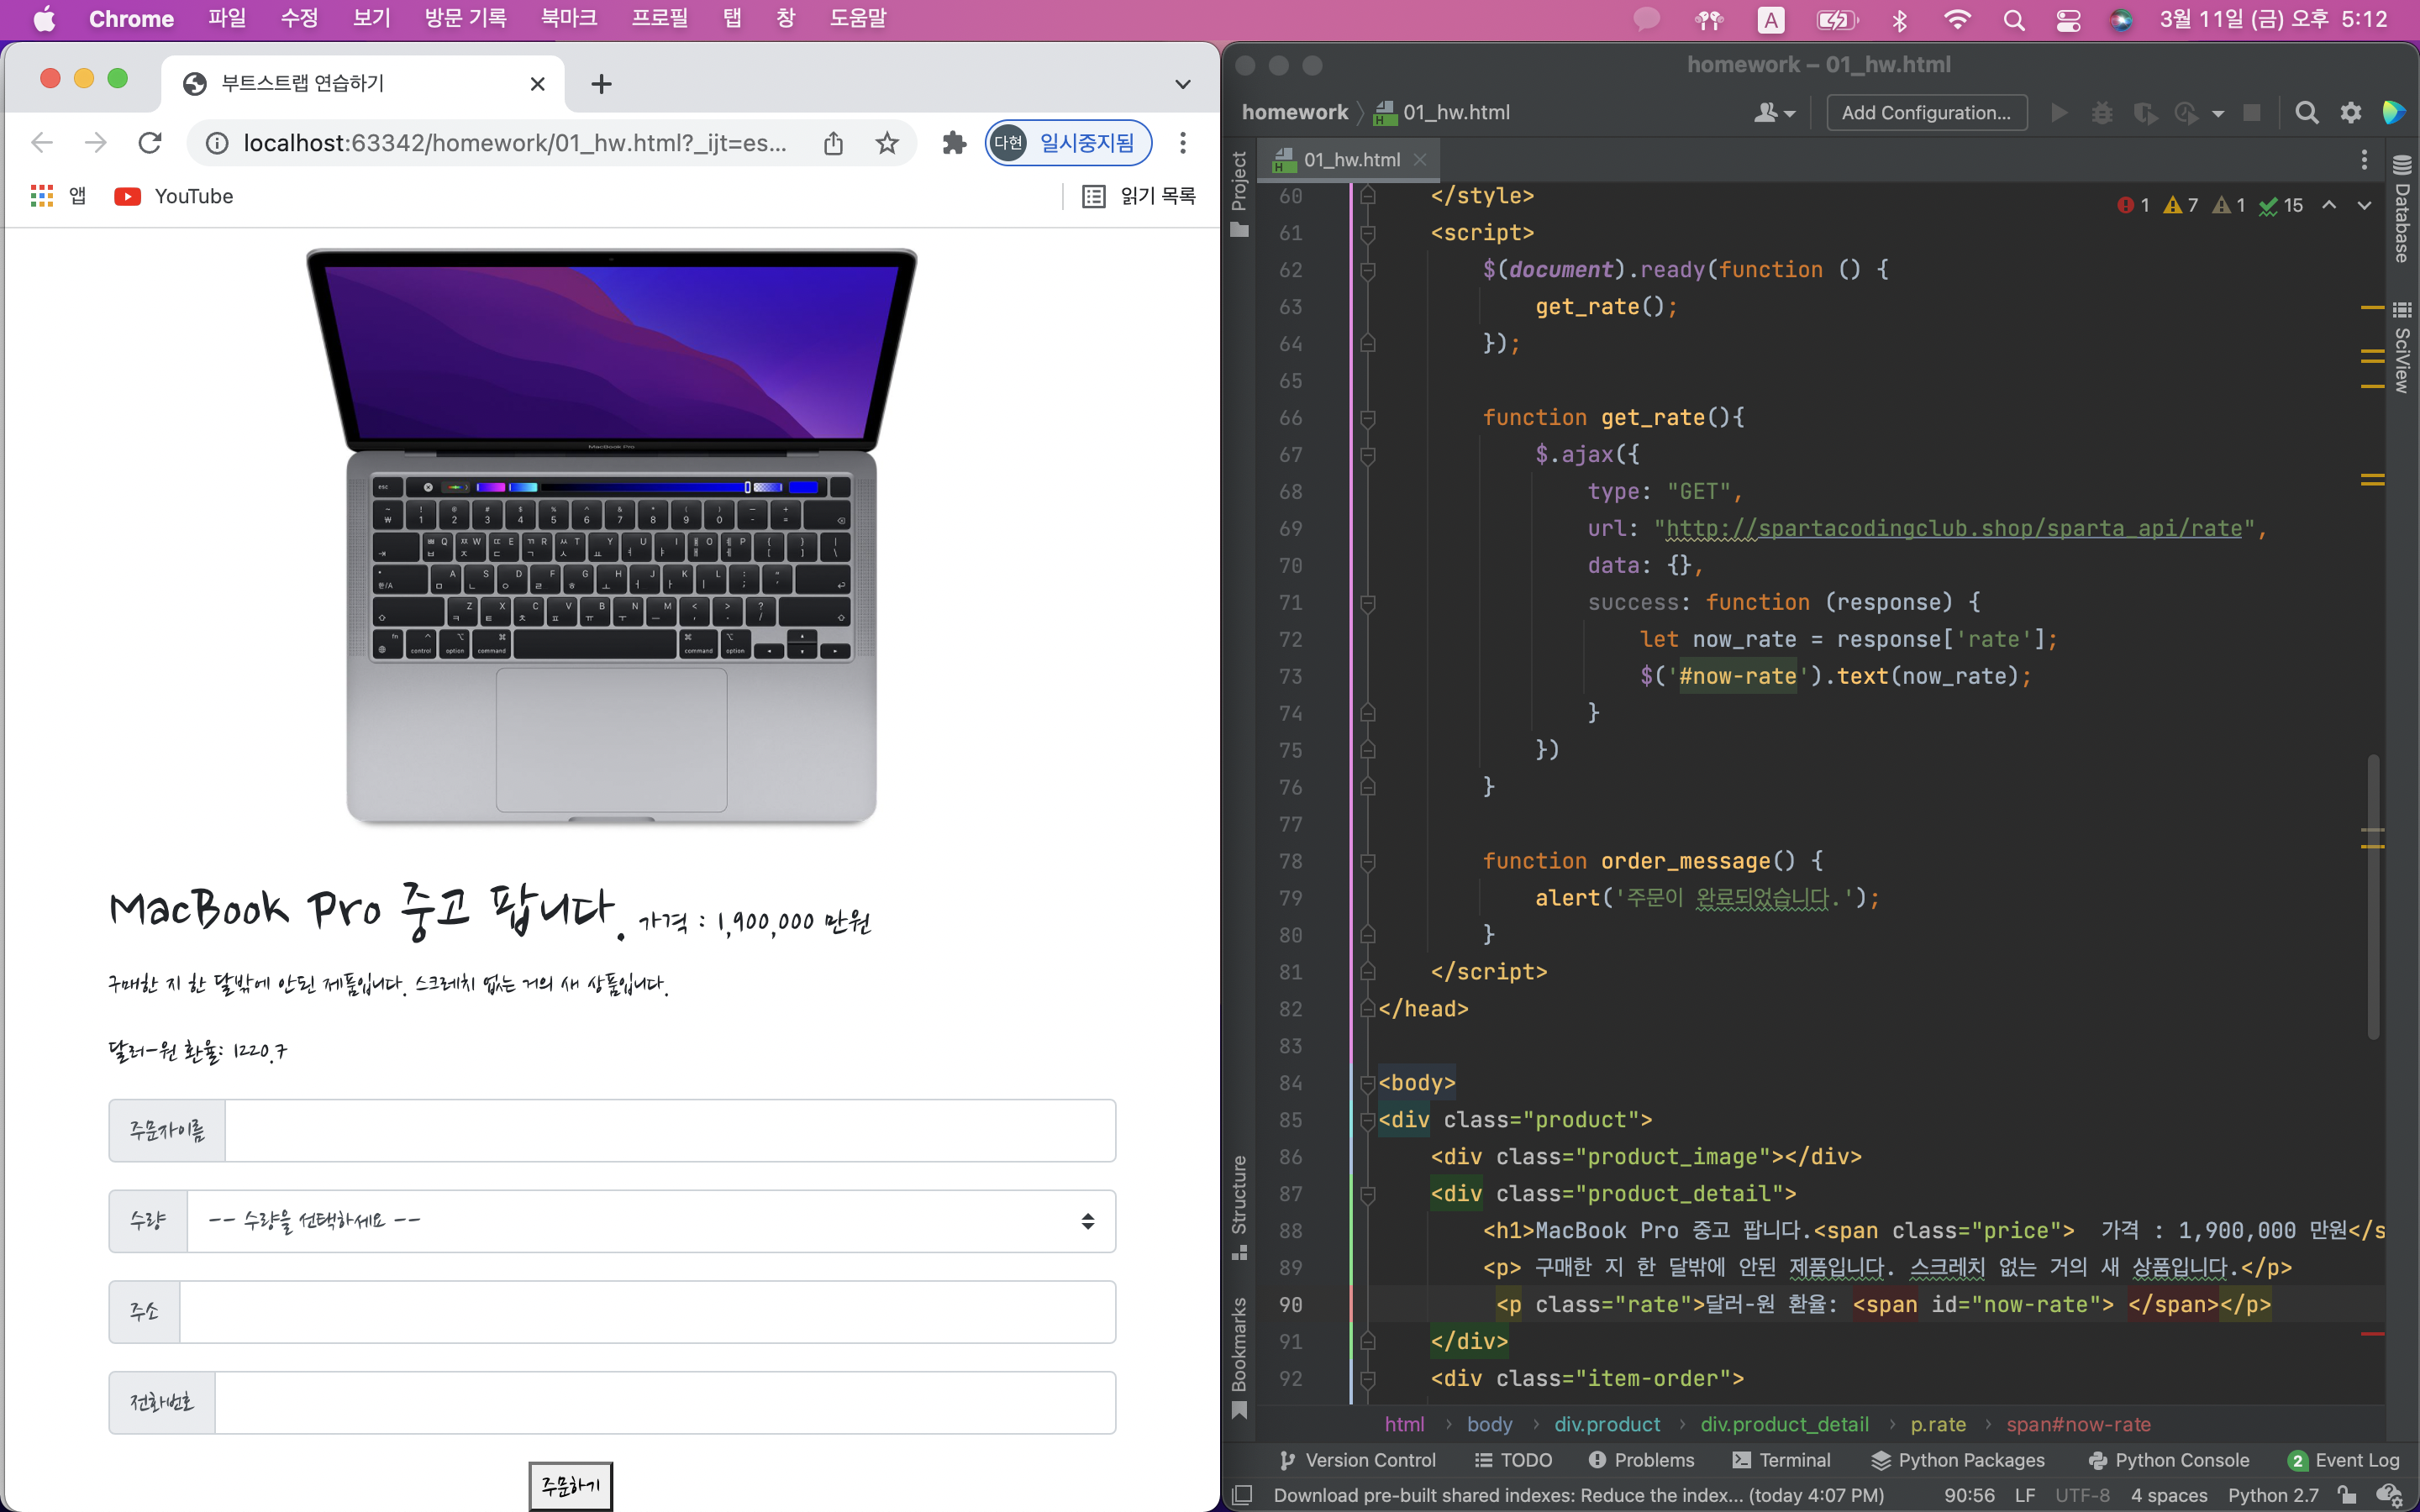
<!doctype html>
<html lang="en">

<head>
    <!-- Required meta tags -->
    <meta charset="utf-8">
    <meta name="viewport" content="width=device-width, initial-scale=1, shrink-to-fit=no">

    <!-- Bootstrap CSS -->
    <link rel="stylesheet" href="https://maxcdn.bootstrapcdn.com/bootstrap/4.0.0/css/bootstrap.min.css"
          integrity="sha384-Gn5384xqQ1aoWXA+058RXPxPg6fy4IWvTNh0E263XmFcJlSAwiGgFAW/dAiS6JXm" crossorigin="anonymous">

    <!-- Optional JavaScript -->
    <!-- jQuery first, then Popper.js, then Bootstrap JS -->
    <script src="https://ajax.googleapis.com/ajax/libs/jquery/3.5.1/jquery.min.js"></script>
    <script src="https://cdnjs.cloudflare.com/ajax/libs/popper.js/1.12.9/umd/popper.min.js"
            integrity="sha384-ApNbgh9B+Y1QKtv3Rn7W3mgPxhU9K/ScQsAP7hUibX39j7fakFPskvXusvfa0b4Q"
            crossorigin="anonymous"></script>
    <script src="https://maxcdn.bootstrapcdn.com/bootstrap/4.0.0/js/bootstrap.min.js"
            integrity="sha384-JZR6Spejh4U02d8jOt6vLEHfe/JQGiRRSQQxSfFWpi1MquVdAyjUar5+76PVCmYl"
            crossorigin="anonymous"></script>

    <title>부트스트랩 연습하기</title>
    <link rel="preconnect" href="https://fonts.googleapis.com">
    <link rel="preconnect" href="https://fonts.gstatic.com" crossorigin>
    <link href="https://fonts.googleapis.com/css2?family=Jua&family=Nanum+Brush+Script&display=swap" rel="stylesheet">
    <style>
        * {
            font-family: 'Jua', sans-serif;
            font-family: 'Nanum Brush Script', cursive;
        }

        .product_image {
            background-color: green;
            width: 400px;
            height: 400px;
            margin: auto;
            background-image: url("https://store.storeimages.cdn-apple.com/8756/as-images.apple.com/is/mbp-spacegray-select-202011_GEO_KR?wid=1280&hei=1190&fmt=jpeg&qlt=80&.v=1632948895000");
            background-size: cover;
            background-position: center;

        }

        .price {
            font-size: 20px;
        }

        .order {
            width: 100px;
            margin: auto;
            display: block;

        }

        .product {
            width: 600px;
            margin: auto;
        }

    </style>
    <script>
        $(document).ready(function () {
            get_rate();
        });

        function get_rate(){
            $.ajax({
                type: "GET",
                url: "http://spartacodingclub.shop/sparta_api/rate",
                data: {},
                success: function (response) {
                    let now_rate = response['rate'];
                    $('#now-rate').text(now_rate);
                }
            })
        }

        function order_message() {
            alert('주문이 완료되었습니다.');
        }
    </script>
</head>

<body>
<div class="product">
    <div class="product_image"></div>
    <div class="product_detail">
        <h1>MacBook Pro 중고 팝니다.<span class="price">  가격 : 1,900,000 만원</span></h1>
        <p> 구매한 지 한 달밖에 안된 제품입니다. 스크레치 없는 거의 새 상품입니다.</p>
         <p class="rate">달러-원 환율: <span id="now-rate"> </span></p>
    </div>
    <div class="item-order">
        <div class="input-group mb-3">
            <div class="input-group-prepend">
                <span class="input-group-text">주문자이름</span>
            </div>
            <input type="text" class="form-control" aria-label="Default" aria-describedby="inputGroup-sizing-default">
        </div>
        <div class="input-group mb-3">
            <div class="input-group-prepend">
                <label class="input-group-text" for="inputGroupSelect01">수량</label>
            </div>
            <select class="custom-select" id="inputGroupSelect01">
                <option selected>-- 수량을 선택하세요 --</option>
                <option value="1">1</option>
                <option value="2">2</option>
                <option value="3">3</option>
            </select>
        </div>
        <div class="input-group mb-3">
            <div class="input-group-prepend">
                <span class="input-group-text">주소</span>
            </div>
            <input type="text" class="form-control" aria-label="Default" aria-describedby="inputGroup-sizing-default">
        </div>
        <div class="input-group mb-3">
            <div class="input-group-prepend">
                <span class="input-group-text">전화번호</span>
            </div>
            <input type="text" class="form-control" aria-label="Default" aria-describedby="inputGroup-sizing-default">
        </div>
    </div>
    <div class="order" onclick="order_message()">
        <button>주문하기</button>
    </div>
</body>

</html>