👀0.개요
이 세상에 존재하는 로봇을 컨트롤 하기 위해서는 컨트롤러가 필요하다.
로봇이 어떤 좌표에 도달하고자 할 때, 어떻게 제어해야 원하는 좌표를 찾아 갈 수 있을까?
이번시간에는 여러가지 컨트롤러들을 통해 로봇을 컨트롤 하는 값을 제어하여 원하는 좌표로 도달할 수 있게끔 하는 방법에 대해서
알아볼 예정이다.
💡1.P Controller
우선 P Controller 에 대해서 간략하게 설명하면,
만약 로봇의 현재 위치와 목적지의 위치의 크기에 따라 제어하는 값을 변경하는 기법이다.
아래에서 파이썬 코드를 작성하고 그래프를 확인하여 해당 컨트롤러의 동작 및 단점에 대해 알아보자.
🐍1.1 파이썬코드
🐍P_controller.py
#!/usr/bin/env python3

from vehicle_model import VehicleModel
import numpy as np
import matplotlib.pyplot as plt

class P_Controller(object):
    def __init__(self,P_Gain= 0.3):
        self.target_y = target_y
        self.P_Gain = P_Gain
    def ControllerInput(self, reference, measure):
        self.target_y = reference
        self.y_measure = measure
        self.error = target_y-measure
        self.u = self.P_Gain*(self.error)

if __name__ == "__main__":
    target_y = 0.0
    measure_y =[]

    time = []
    step_time = 0.1
    simulation_time = 30

    #vehicle
    plant = VehicleModel(step_time, 0.0, 0.99, 0.05) # R, force_ratio, force_bias

    controller = P_Controller()

    # 시뮬레이션
    for i in range(int(simulation_time/step_time)):
        #시간기록
        time.append(step_time*i)
        #y 좌표 기록
        measure_y.append(plant.y_measure[0][0])
        #u 값 측정
        controller.ControllerInput(target_y, plant.y_measure[0][0])
        plant.ControlInput(controller.u)

    #plt line
    plt.figure()
    plt.plot([0, time[-1]], [target_y, target_y], 'k-', label="reference")
    plt.plot(time, measure_y,'r-',label = "Vehicle Position")
    plt.xlabel('time (s)')
    plt.ylabel('signal')
    plt.legend(loc="best")
    plt.axis("equal")
    plt.grid(True)
    plt.show()
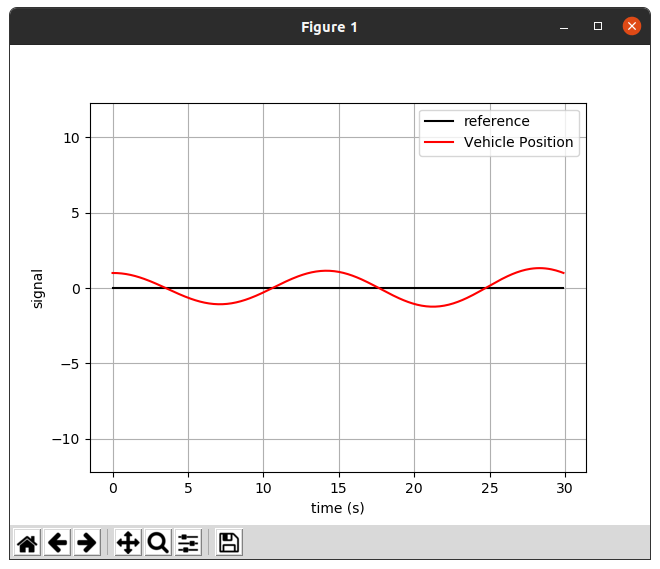
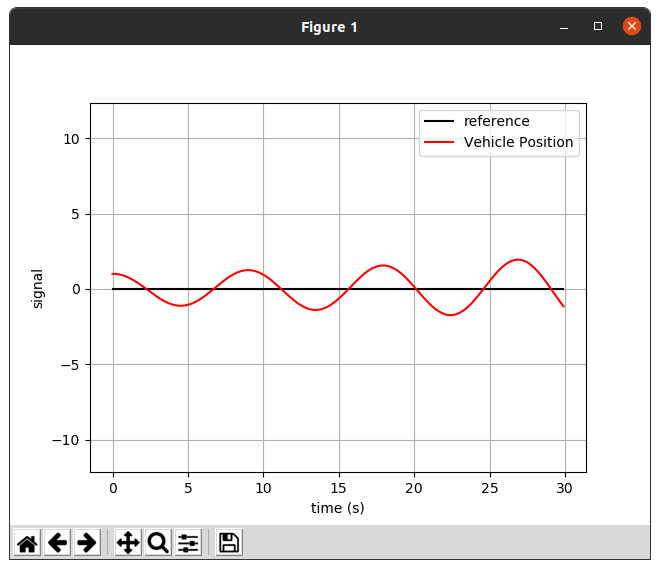
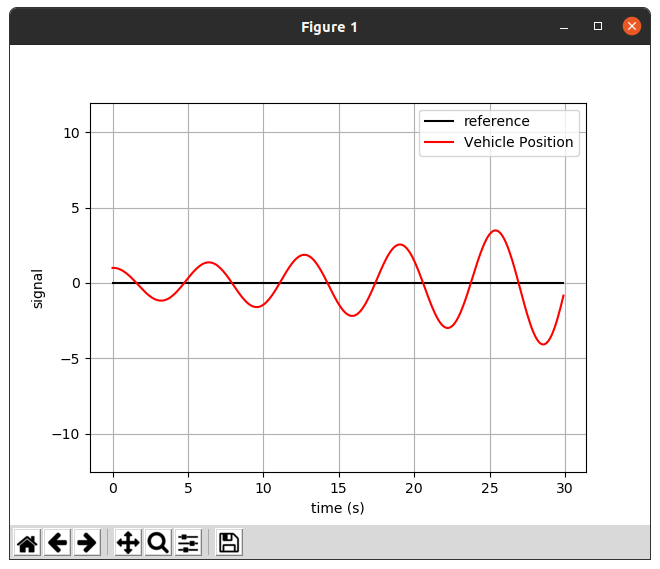
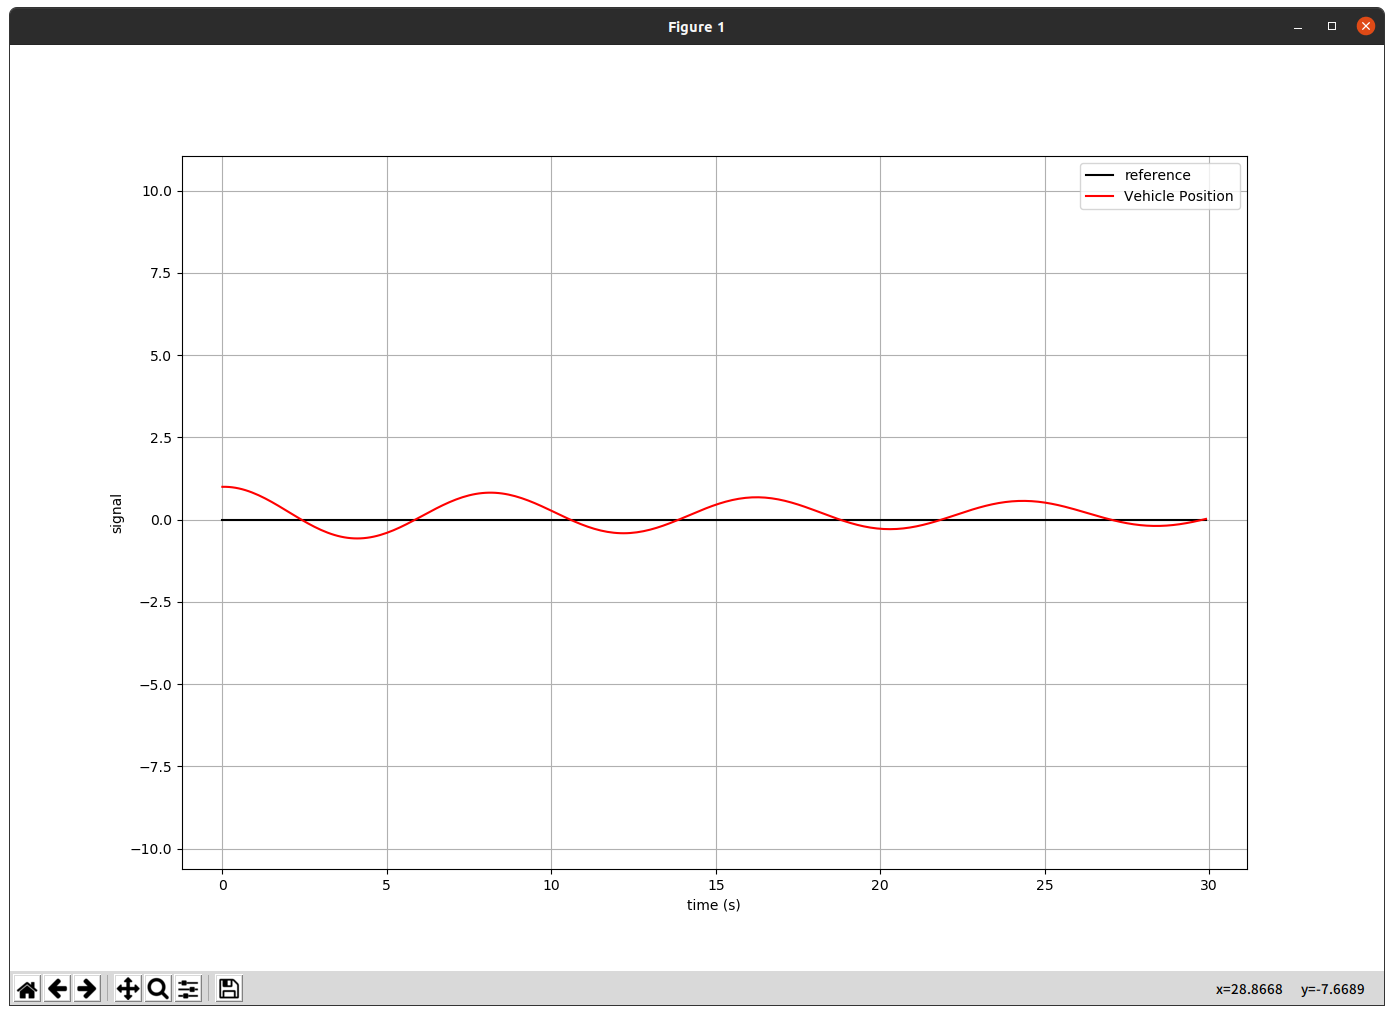
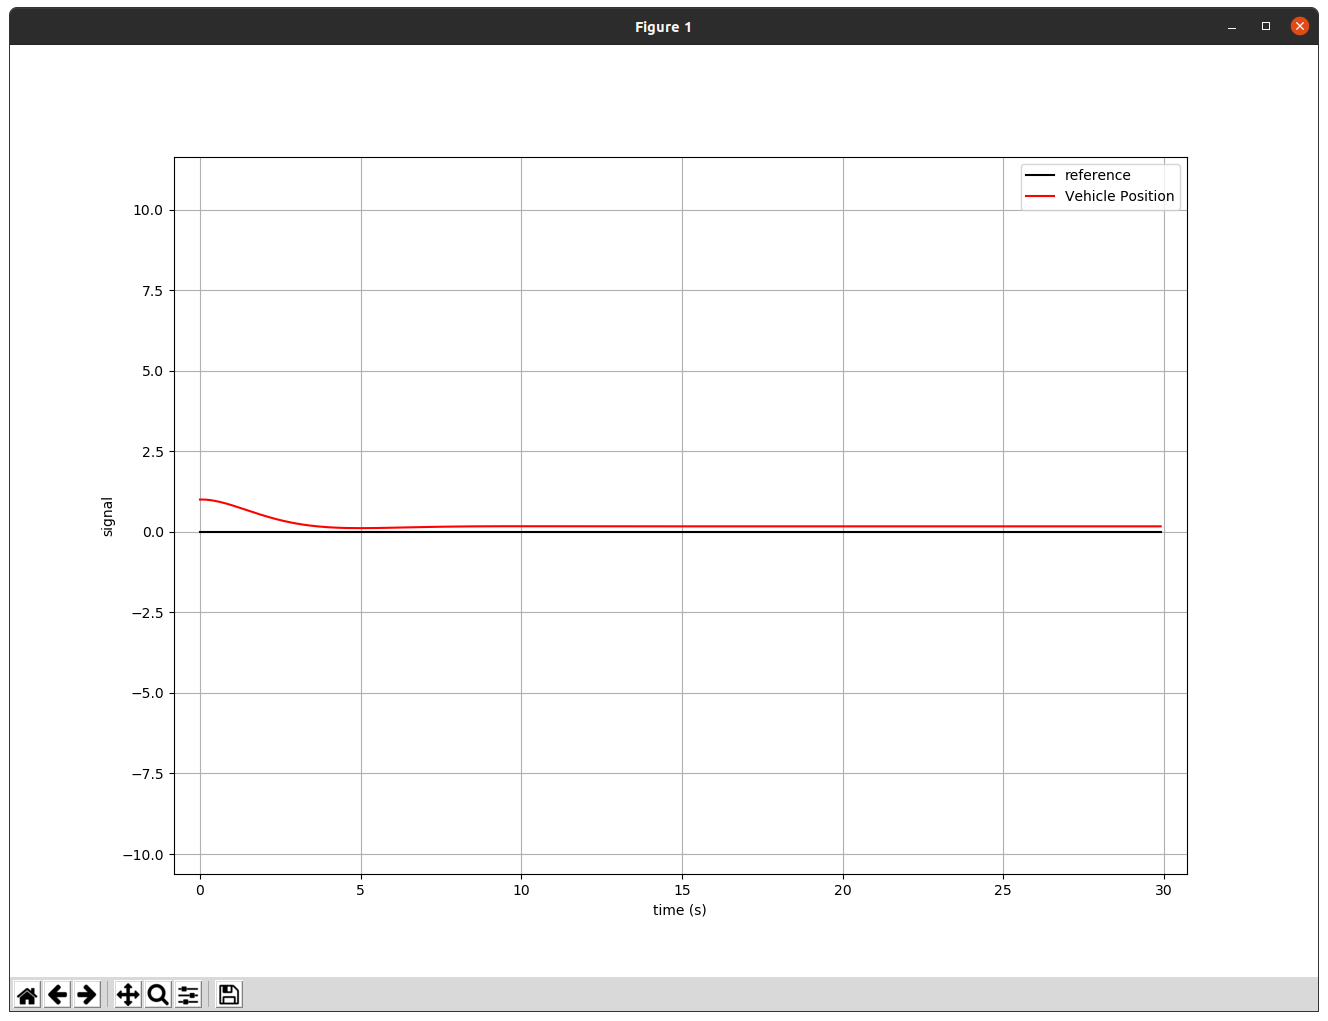
📊1.2 실행화면
1.2.1 Gain = 0.3
1.2.2 Gain = 0.5
1.2.3 Gain = 1.0
🚀1.3 Controller 평가
위 실행화면과 같이 로봇은 reference에 도달하기 힘든 것 같다.
그 이유는 컨트롤러가 제어 값을 변경하긴 하지만 레퍼런스에 도달하기 직전에 가장 속도가 빠르기 때문이다.(에러의 적분 값에 비례하는 속도)
이러한 현상을 overshot 이 발생한다고 한다.
reference 에 도달하기 위해서는 overshot을 줄일 필요가 있을 것 같다.
그리고 Gain 값이 높을 수록 reference에 도달 하는 시간은 빠르지만, 에러가 점점 커지는 것을 볼 수 있었다.
💡2. PD Controller
앞서 알아본 컨트롤러에 D가 추가된 컨트롤러이다.
제어값에 미분값을 추가하여 좀더 reference에 도달할 수 있게 도와준다.
아래코드와 실행화면을 살펴보자.
🐍2.1 파이썬코드
🐍PD_controller.py
#!/usr/bin/env python3
from vehicle_model import VehicleModel
import numpy as np
import matplotlib.pyplot as plt
class PD_Controller(object):
def __init__(self, reference, measure, step_time, P_Gain=0.6, D_Gain=1.2):
self.target_y = reference
self.y_measure = measure
self.step_time = step_time
self.error = reference-measure
self.P_Gain = P_Gain
self.D_Gain = D_Gain
def ControllerInput(self, reference, measure):
self.target_y = reference
self.y_measure = measure
#errorGap
self.errorGap = (reference-measure) - self.error
#update error
self.error = reference-measure
self.p_controller = self.P_Gain * self.error
self.d_controller = self.D_Gain * self.errorGap
self.u = self.p_controller + self.d_controller
if __name__ == "__main__":
target_y = 0.0
measure_y =[]
time = []
step_time = 0.1
simulation_time = 30
plant = VehicleModel(step_time, 0.0, 0.99, 0.1)
controller = PD_Controller(target_y, plant.y_measure[0][0], step_time)
for i in range(int(simulation_time/step_time)):
time.append(step_time*i)
measure_y.append(plant.y_measure[0][0])
controller.ControllerInput(target_y, plant.y_measure[0][0])
plant.ControlInput(controller.u)
plt.figure()
plt.plot([0, time[-1]], [target_y, target_y], 'k-', label="reference")
plt.plot(time, measure_y,'r-',label = "Vehicle Position")
plt.xlabel('time (s)')
plt.ylabel('signal')
plt.legend(loc="best")
plt.axis("equal")
plt.grid(True)
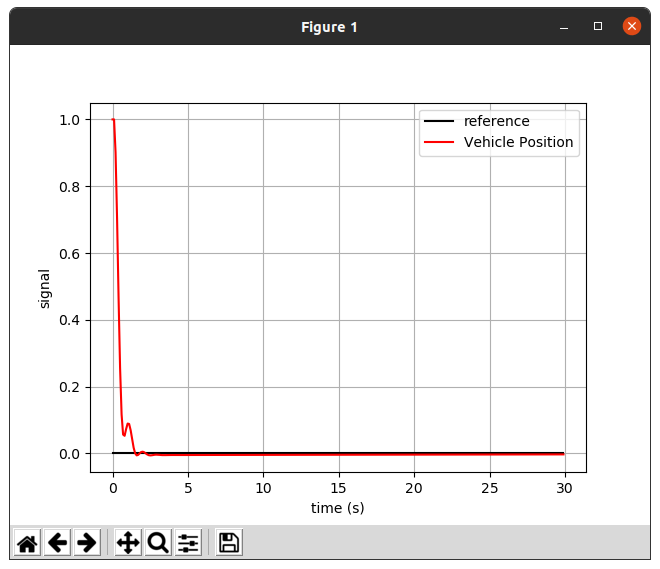
plt.show()📊2.2 실행화면
2.2.1 D_Gain = 1.2
2.2.2 Gain = 10.0
🚀2.3 Controller 평가
D컨트롤러를 추가하니 D_gain 값이 낮을때는 P Controller 와 비슷한 결과를 보였지만, D_gain 값을 10으로 설정하니 reference에 훨씬 가까워 지는 것을 확인 할 수 있었다.
하지만 reference와 일치되는 모습은 확인 할 수 없었는데,
여기에 I control을 추가하면 어떤 모습을 보일까?
💡3.PID Controller
I(적분) 이 추가된 컨트롤러.
에러의 값들을 적분하여 값을 제어한다.
코드에서는 error_sum 값을 추가하여 I_Gain 값에 곱하였다.
코드를 작성해보고, 실행화면을 보자.
🐍3.1 파이썬코드
🐍PID_controller.py
#!/usr/bin/env python3

from vehicle_model import VehicleModel
import numpy as np
import matplotlib.pyplot as plt

class PID_Controller(object):
    def __init__(self, reference, measure, step_time, P_Gain=10.0, D_Gain=50.0, I_Gain=0.02):
        self.target_y = reference
        self.y_measure = measure
        self.step_time = step_time
        self.error = reference-measure
        self.errorSum = 0
        self.P_Gain = P_Gain
        self.D_Gain = D_Gain
        self.I_Gain = I_Gain

    def ControllerInput(self, reference, measure):
        self.target_y = reference
        self.y_measure = measure

        #errorGap for D
        self.errorGap = (reference-measure) - self.error

        #update error
        self.error = reference-measure

        #integral for I
        self.errorSum+= self.error
        #print(self.errorSum)
        self.p_controller = self.P_Gain * self.error
        self.d_controller = self.D_Gain * self.errorGap
        self.i_controller = self.I_Gain * self.errorSum

        self.u = self.p_controller + self.d_controller +self.i_controller

if __name__ == "__main__":
    target_y = 0.0
    measure_y =[]
    time = []
    step_time = 0.1
    simulation_time = 30
    plant = VehicleModel(step_time, 0.0, 0.99, 0.05)
    controller = PID_Controller(target_y, plant.y_measure[0][0], step_time)

    for i in range(int(simulation_time/step_time)):
        time.append(step_time*i)
        measure_y.append(plant.y_measure[0][0])
        controller.ControllerInput(target_y, plant.y_measure[0][0])
        plant.ControlInput(controller.u)

    plt.figure()
    plt.plot([0, time[-1]], [target_y, target_y], 'k-', label="reference")
    plt.plot(time, measure_y,'r-',label = "Vehicle Position")
    plt.xlabel('time (s)')
    plt.ylabel('signal')
    plt.legend(loc="best")
    #plt.axis("equal")
    plt.grid(True)
    plt.show()
📊3.2 실행화면
3.2.1 P_Gain=0.5, D_Gain=1.0, I_Gain=0.02
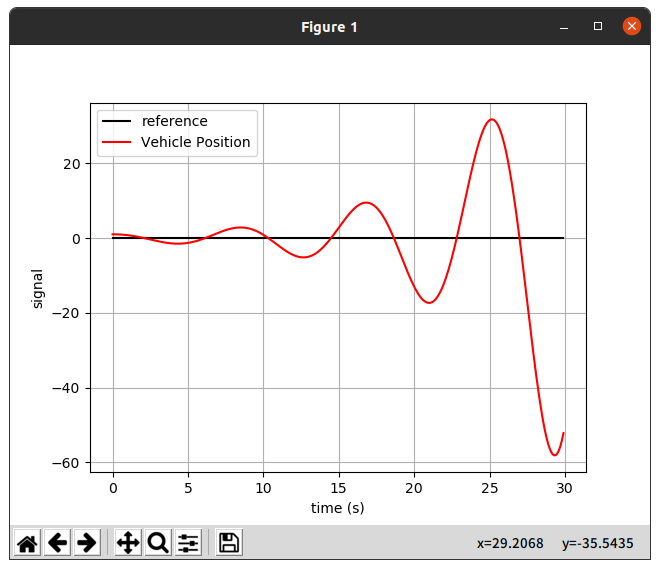
초기 Gain 설정으로는 reference 값에 다가가기 힘들었다.
3.2.2 P_Gain=10.0, D_Gain=50.0, I_Gain=0.02
💡3.3 Controller 평가
초기 설정으로 reference에 근접하기 쉽지가 않아 많은 튜닝을 거쳐 두번째 사진과 같이 거의 근접하는 것을 볼 수 있었다.
초기 화면과 같이 Gain 값을 튜닝하지 않으면 쉽게 맞출 수 없다는 것을 알 수 있었다.
🤔4. PID Controller 돌아보기
세 가지 컨트롤러를 알아보았다. 각 컨트롤러의 특징 및 장,단점을 정리해보자.
P Controller: 에러의 크기에 비례(P)한 컨트롤 값을 전달한다. 제어를 시작 하였을때 , 즉 에러가 가장 클때 많은 영향을 끼칠 수 있다. 미래를 보고 제어를 한다고 하기도 한다.
#장점 : 빠르게 원하는 위치로 이동할 수 있다.
#단점 : 단일로 사용 시 reference 근처에서 진동하는 모습을 보인다.
D Controller: 에러의 변화량,즉 에러를 미분한 값에 따른 제어를 제공한다. 현재를 제어한다고 한다.
#장점 : P Controller만을 사용했을때의 Overshot을 막을 수 있다.
#단점 : 에러의 변화량에 반응하기 때문에 정확한 목적지에 도달할 수 없는 점.
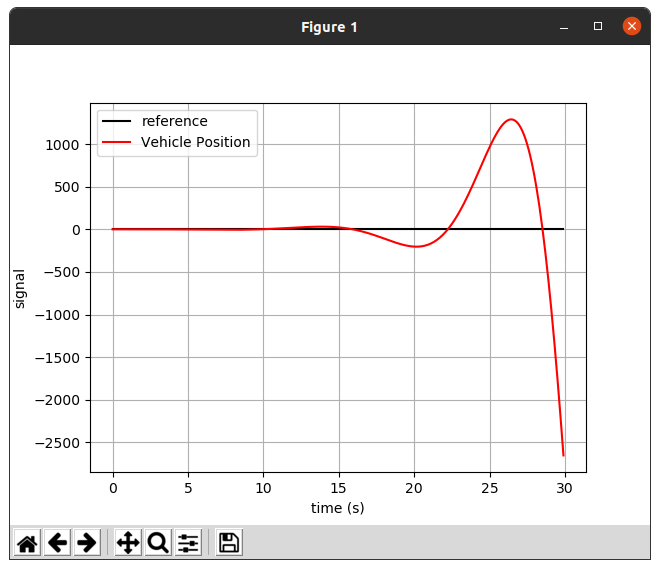
I Controller: 에러의 총합,즉 에러의 적분에 따른 제어를 제공한다. 과거를 보고 제어한다고 한다.
#장점 : PD Controller만을 사용했을때의 reference에 도달 할 수 없는 문제를 해결 할 수 있다.
#단점 : 아래의 사진과 같이 단일로 사용하였을 때 오류가 걷잡을 수 없게 커지는 점이 있다.
💡5.PID Controller 튜닝
PID 각각의 gain 값을 적절히 조절하였다.
🐍5.1 파이썬 코드
🐍Tuning_PID_Controller.py
#!/usr/bin/env python3

from vehicle_model import VehicleModel
import numpy as np
import matplotlib.pyplot as plt

class PID_Controller(object):
    def __init__(self, reference, measure, step_time, P_Gain=10.0, D_Gain=50.0, I_Gain=0.02):
        self.target_y = reference
        self.y_measure = measure
        self.step_time = step_time
        self.error = reference-measure
        self.errorSum = 0
        self.P_Gain = P_Gain
        self.D_Gain = D_Gain
        self.I_Gain = I_Gain

    def ControllerInput(self, reference, measure):
        self.target_y = reference
        self.y_measure = measure

        #errorGap for D
        self.errorGap = (reference-measure) - self.error

        #update error
        self.error = reference-measure

        #integral for I
        self.errorSum+= self.error
        #print(self.errorSum)
        self.p_controller = self.P_Gain * self.error
        self.d_controller = self.D_Gain * self.errorGap
        self.i_controller = self.I_Gain * self.errorSum

        self.u = self.p_controller + self.d_controller +self.i_controller

if __name__ == "__main__":
    target_y = 0.0
    measure_y =[]
    time = []
    step_time = 0.1
    simulation_time = 30
    plant = VehicleModel(step_time, 0.0, 0.99, 0.05)
    controller = PID_Controller(target_y, plant.y_measure[0][0], step_time)

    for i in range(int(simulation_time/step_time)):
        time.append(step_time*i)
        measure_y.append(plant.y_measure[0][0])
        controller.ControllerInput(target_y, plant.y_measure[0][0])
        plant.ControlInput(controller.u)

    plt.figure()
    plt.plot([0, time[-1]], [target_y, target_y], 'k-', label="reference")
    plt.plot(time, measure_y,'r-',label = "Vehicle Position")
    plt.xlabel('time (s)')
    plt.ylabel('signal')
    plt.legend(loc="best")
    #plt.axis("equal")
    plt.grid(True)
    plt.show()
5.2 실행화면

6.PID Controller with State Estimator : Low Pass Filter
🐍6.1 파이썬 코드
🐍PID_Controller_StateEstimator_LPF.py
#!/usr/bin/env python3

from vehicle_model import VehicleModel
import numpy as np
import pandas as pd
import matplotlib.pyplot as plt

class PID_Controller(object):
    def __init__(self, reference, measure, step_time, P_Gain=10.0, D_Gain=50.0, I_Gain=0.02):
        self.target_y = reference
        self.y_measure = measure
        self.step_time = step_time
        self.error = reference-measure
        self.errorSum = 0
        self.P_Gain = P_Gain
        self.D_Gain = D_Gain
        self.I_Gain = I_Gain

    def ControllerInput(self, reference, measure):
        self.target_y = reference
        self.y_measure = measure

        #errorGap for D
        self.errorGap = (reference-measure) - self.error

        #update error
        self.error = reference-measure

        #integral for I
        self.errorSum+= self.error
        #print(self.errorSum)
        self.p_controller = self.P_Gain * self.error
        self.d_controller = self.D_Gain * self.errorGap
        self.i_controller = self.I_Gain * self.errorSum

        self.u = self.p_controller + self.d_controller +self.i_controller

class LowPassFilter:
    def __init__(self, y_initial_measure, alpha=0.1):
        self.y_initial_measure = y_initial_measure
        self.y_estimate = y_initial_measure
        self.i = 0.0
        self.alpha = alpha

    def estimate(self, y_measure):
        if self.i == 0.0:
            value = self.y_initial_measure
            self.i+=1
        else:
            value = self.y_initial_measure * self.alpha + y_measure*(1.0-self.alpha)
        self.y_estimate = value
        return value


if __name__ == "__main__":
    target_y = 0.0
    measure_y =[]
    estimated_y = []

    time = []
    step_time = 0.1
    simulation_time = 30
    plant = VehicleModel(step_time, 0.25, 0.99, 0.05)
    estimator = LowPassFilter(plant.y_measure[0][0])
    controller = PID_Controller(target_y, plant.y_measure[0][0], step_time)

    for i in range(int(simulation_time/step_time)):
        #time
        time.append(step_time*i)

        #measure_y
        measure_y.append(plant.y_measure[0][0])

        # append
        estimated_y.append(estimator.estimate(plant.y_measure[0][0]))

        #estimator.estimate(plant.y_measure[0][0])

        controller.ControllerInput(target_y, estimator.y_estimate)
        plant.ControlInput(controller.u)

    plt.figure()
    plt.plot([0, time[-1]], [target_y, target_y], 'k-', label="reference")
    plt.plot(time, measure_y,'r-',label = "Vehicle Position(Measure)")
    plt.plot(time, estimated_y,'c-',label = "Vehicle Position(Estimator)")
    plt.xlabel('time (s)')
    plt.ylabel('signal')
    plt.legend(loc="best")
    #plt.axis("equal")
    plt.grid(True)
    plt.show()
6.2 실행화면
6.2.1 alpha = 0.2

6.2.2 alpha = 0.7

7.PID Controller with State Estimator : Kalman Filter
To be continue
