Spring MVC는 MVC2 모델의 Controller( Servlet ) - View ( JSP ) - Model와 유사한 구조를 띄며, 몇가지 핵심적인 개념이 추가된다
Spring Web MVC의 핵심은 DispatcherServlet, ViewResolver, HandlerMapping ,HandlerAdapter다
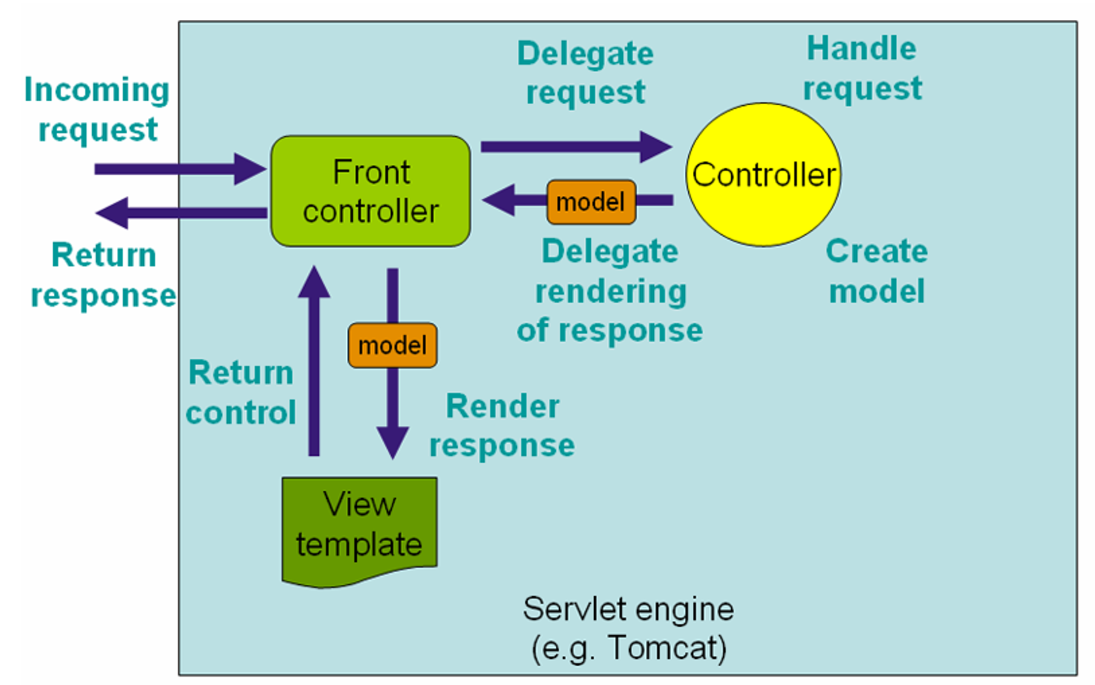
위 이미지에서 FrontController는 DispatherServlet을 의미하는데 간략하게 설명하면 다음과 같다.
- Client에게 받은 요청이
DispatherServlet에 도착 ( 이 사이에Filter동작 )DispatherServlet에서HandlerMapping을 통해 해당 작업을 수행할HandlerAdapter탐색
- Controller로 넘어가기 전에
Interceptor동작HandlerAdapter(Controller)로 로직을 수행하고model( 데이터 ) 을 반환DispatherServlet이ViewResolver를 통해 해당하는View를 탐색하고model정보적용- Client에게 응답
이때 DispatcherServlet이 WebApplicationContext라는 Bean Container를 이용하여
Handlermapping이나 ViewResolver, Controller등을 사용하는 구조를 가진다
Spring Framework 기준, 동작흐름
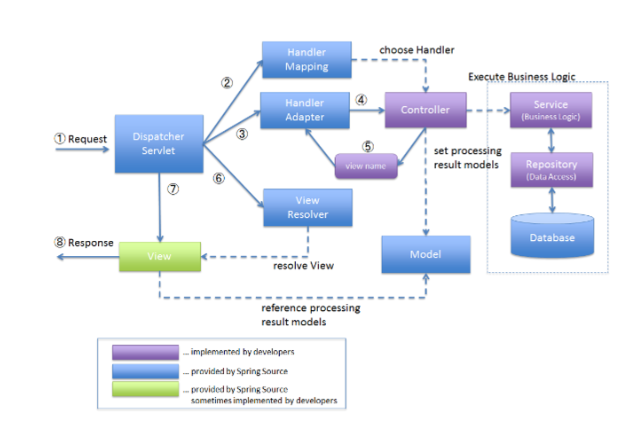
- Tomcat에 있는
server.xml에 실행시킬 프로젝트 설정- Tomcat에 있는
context.xml에 프로젝트 로드시 읽어들일 설정파일 지정web.xml에 프로젝트 load시 먼저 읽어들일 bean파일 지정 (root-context.xml)
- web과 관련없는 DB, service, aop 설정
ContextLoaderListener를 이용해서 WAS가 뜨는지 확인- WAS가 프로젝트를 load하면
root-context.xml을 읽음
RootApplicationContext에bean설정- Client가 request을 보냄 ( DNS 등을 거쳐서 )
DispatcherServlet에 도착하기 전후에Filter동작DispatcherServlet생성 ⇒servlet-context.xml읽음
WebApplicationContext에 web과 관련있는 ViewResolver, Controller, Interceptor 등의bean설정- 이때
RootApplicationContext에 등록된 Bean과 동일한 이름이 있으면 덮어씀DispatcherServlet이HandlerMapping을 통해서 url에 해당하는Controller를 찾아줌
- 이 과정에서
HandlerAdaptor를 사용해서Controller를 실행- 이때
interceptor동작Controller에서 비즈니스 로직을 처리하고 반환된 데이터를ModelAndView객체로 리턴
- 비즈니스 로직 처리과정에서
AOP가 동작DispatherServlet이ViewResolver를 통해 응답페이지 선정
- FE 프레임워크 사용 시, JSON이나 XML형식의 데이터만 보내줌
- Client 응답 수신
요청 Mapping
HTTP Method
먼저 HTTP request에 사용되는 요청메서드를 알아보자
GET
- Client가 서버의 리소스를 요청 시 사용
- 캐싱이 가능
- If-Not-Modified나 Modified-Since와 같은 헤더를 사용해서 조건에 따라 304응답을 통해 브라우저에 캐싱된 데이터를 사용하게 할 수 있다
- 브라우저에 기록이 남음
- 북마크 가능
- URL에 노출되므로 민감한 데이터 X
- 동일한 요청에는 항상 동일한 결과를 리턴해야함
POST
- Client가 서버의 리소스를 수정하거나 새로 만들때 사용
- request 요청 본문( body )에 데이터 담아서 보낸다
- 캐시할 수 없다
- 브라우저에 기록이 안남는다
- 북마크 안된다
- 데이터 길이 제한이 없다
PUT
- URI에 해당하는 데이터를 새로 만들거나 수정할 때 사용한다
- POST와 유사한데 의미가 다르다
- POST : 이 데이터를 처리할 리소스를 지칭
- 동일한 요청이오면 요청 수만큼 자원을 생성함
- PUT : 이 데이터에 해당하는 리소스를 지칭
- 식별자가 포함된 요청이 날아와서 해당하는 자원을 수정함
- POST : 이 데이터를 처리할 리소스를 지칭
- 동일한 요청에는 항상 동일한 결과를 리턴해야함
PATCH
- PUT과 유사한데, 기존 데이터와 새 데이터의 차이점만 보낸다
- PUT은 식별자에 해당하는 자원에서 특정 필드만 변경하면 나머지가 null로 바뀌지만 PATCH는 아니다
- 리소스가 가지고있는 일부의 데이터를 수정하고 싶을때 사용
- 동일한 요청에는 항상 동일한 결과를 리턴해야함
DELETE
- 리소스 삭제시 사용
- 동일한 요청에는 항상 동일한 결과를 리턴해야함
HEAD
- GET 과 동일하지만 response에 본문을 빼고 응답 헤더만 보낸다
OPTIONS
- 사용가능한 HTTP Method들을 보여준다

RequestMapping
이제 Spring에서 앞서 소개한 HTTP Method들을 매핑하는 방법을 알아보자
Spring에서 요청을 mapping하는데는 @RequestMapping애노테이션이 사용된다
내부적으로@RequestMapping을 사용하는@GetMapping이나 @PostMapping 등이 주로 사용된다

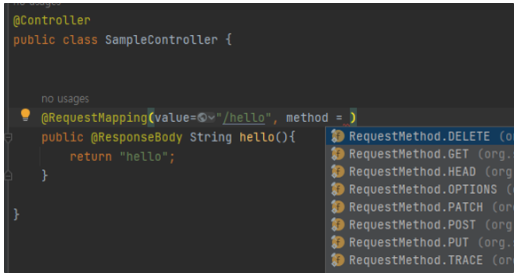
RequestMapping의 경우 Method를 지정해주지 않으면 모든 요청 Method에 매핑되어 처리된다
@Test
    void helloTest() throws Exception {
        this.mockMvc.perform(get("/hello"))
                .andDo(print())
                .andExpect(status().isOk())
                .andExpect(content().string("hello"));

        this.mockMvc.perform(post("/hello"))
                .andDo(print())
                .andExpect(status().isOk())
                .andExpect(content().string("hello"));

        this.mockMvc.perform(put("/hello"))
                .andDo(print())
                .andExpect(status().isOk())
                .andExpect(content().string("hello"));

        this.mockMvc.perform(delete("/hello"))
                .andDo(print())
                .andExpect(status().isOk())
                .andExpect(content().string("hello"));
    }
모든 /hello 요청이 수행된다
@Controller
@RequestMapping("/hello")
public class SampleController {

    @RequestMapping("/ddings")
    public @ResponseBody String hello(){
        return "hello";
    }

}
메서드뿐만 아니라 클래스에도 @RequestMapping 을 달 수 있으며 클래스에 달았을 경우 클래스내의 모든 Mapping uri의 앞에 붙는다
즉, 위 코드에서 hello() 메서드는 /hello/ddings 요청을 수행한다
요청 식별자
@RequestMapping("/hello?") // => /hello1, /hello2, 한 글자를 의미
@RequestMapping("/hello*") // => /helloddings, /hellomobile, 여러 글자
@RequestMapping("/hello**") // => /hello/ddings/modile, /를 포함한 아무런 글자들@RequestMapping은 위의 패턴들을 지원한다
@RequestMapping("/hello/{name:[a-z]+}") // name PathVariable로 소문자 아무거나 와도 된다이 외에도 정규표현식또한 지원하며 만일 중복되는 mapping이 있다면 가장 구체적으로 명시된 handler에 mapping된다
💡 URI 확장자 매핑
Spring MVC에서는
/hellohandler만 있더라도/hello.json과 같이 확장자가 포함된 mapping을 처리했었다
문제는 이때.zip과.bat같은 확장자를 붙히면 파일을 다운로드받게 되는데, 이를 이용한 RFD 공격이 가능했다고 한다
그렇기 떄문에 Spring Boot에서는 기본적으로 확장자 매핑을 지원하지않는다
MediaType
@Controller
@RequestMapping("/hello")
public class SampleController {

    @RequestMapping(value="/ddings", consumes = MediaType.APPLICATION_JSON_VALUE)
    public @ResponseBody String hello(){
        return "hello";
    }

}
consume 속성을 이용해서 특정 MediaType이 왔을때만 처리하는 Handler를 만들 수도 있다
@Test
void helloTest() throws Exception {
    this.mockMvc.perform(get("/hello/ddings"))
            .andDo(print())
            .andExpect(status().isOk())
            .andExpect(content().string("hello"));
}
위 테스트에서 Content-Type으로 json을 지정하지않아서 415 Unsupported Media Type 에러가 발생하며 테스트가 실패한다
@Test
void helloTest() throws Exception {
    this.mockMvc.perform(get("/hello/ddings")
							.contentType(MediaType.APPLICATION_JSON))
            .andDo(print())
            .andExpect(status().isOk())
            .andExpect(content().string("hello"));
}
Content-Type을 json으로 명시해주면 테스트가 통과한다
@Controller
@RequestMapping("/hello")
public class SampleController {

    @RequestMapping(value="/ddings"
            , consumes = MediaType.APPLICATION_JSON_VALUE
            , produces = MediaType.TEXT_PLAIN_VALUE)
    public @ResponseBody String hello(){
        return "hello";
    }

}
produces 를 이용해서 response 시의 MediaType을 지정하는 handler를 만드는 것도 가능하다
이건 request시에 accept헤더를 통해서 필터링을 할 수 있는데.. accept헤더를 설정하지 않으면 그냥 mapping이 된다
이 부분은 살짝 개발자의 의도와 다르게 동작한다고 생각될 수 있는 부분으로 생각한다
Header와 Parameter mapping
@RequestMapping(value="/ddings"
		,headers = HttpHeaders.FROM)
public @ResponseBody String hello(){
    return "hello";
}headers를 이용해서 특정 헤더가 포함된 요청을 처리하는 handler를 만들 수 있다
@Test
void helloTest() throws Exception {
    this.mockMvc.perform(get("/ddings")
                    .header(HttpHeaders.AUTHORIZATION,"zamong"))
            .andDo(print())
            .andExpect(status().isOk())
            .andExpect(content().string("hello"));
}
Header에 FROM을 추가하지않은 위 테스트는 실패하게 된다
headers = "!" + HttpHeaders.FROM!를 붙혀서 not을 처리하는 것도 가능하고
headers = HttpHeaders.AUTHORIZATION + "=" + "zamong"특정 헤더값을 지정하여 mapping하는 것도 가능하다
@RequestMapping(value="/ddings" ,params = "name") public @ResponseBody String hello(){ return "hello"; }params를 이용하여 특정 파라미터가 있는 경우에만 동작하는 handler를 만들 수도 있다
