1.학습한 내용
Deep Learning
Computer Vision and Object Detection 사진 사물 인식
-Computer Vision API를 사용해서 이미지 속에 있는 사물을 인식하는 데모입니다. 네트워크 통신을 위해서 requests 패키지를 import 합니다.
import requests
-이미지처리를 위해서 matplotlib.pyplot, Image, BytesIO 세 개의 패키지를 import 합니다.
import matplotlib.pyplot as plt
from PIL import Image
from io import BytesIO
import json
-Subscription Key와 접속에 필요한 URL을 설정합니다.
subscription_key = 'subscription_key'
vision_base_url = ''
analyze_url = vision_base_url + 'analyze'
image_url = ''
response = requests.get(image_url)
image = Image.open(BytesIO(response.content))
image
headers={'Ocp-Apim-Subscription-Key':subscription_key}
params={'visualFeatures':'Categories,Description,Color'}
data={'url':image_url}
response=requests.post(analyze_url,headers=headers,params=params,json=data)
analysis=response.json()
-분석 결과 입니다. 분석결과에는 랜드마크를 비롯해서 인지한 개체들과 문장으로 구성된 결과가 포함 되어 있습니다.
analysis
analysis['description']['captions'][0]['text']
- 결과 = 'a group of people walking down a street in front of a store'
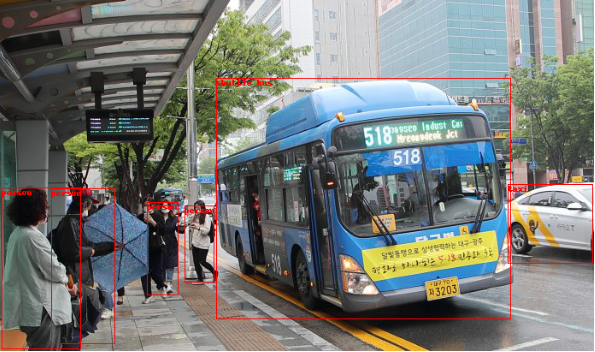
Object Detection 사물 인식
objectDetection_url = vision_base_url + 'detect'
object_image = ''
img = Image.open(BytesIO(requests.get(object_image).content))
img
-필요 사진을 설정, 불러온다
headers={'Ocp-Apim-Subscription-Key':subscription_key}
data={'url':object_image}
response=requests.post(objectDetection_url,headers=headers,json=data)
detectionResult=response.json()
detectionResult
-헤더와 바디를 설정
from PIL import Image, ImageDraw, ImageFont
draw=ImageDraw.Draw(img)
objects=detectionResult['objects']
for obj in objects:
rect=obj['rectangle']
x=rect['x']
y=rect['y']
w=rect['w']
h=rect['h']
#사각형을 그리는 코드
draw.rectangle(((x,y),(x+w,y+h)),outline='red')
#글자를 입력하는 코드
objectName=obj['object']
draw.text((x,y),objectName,fill='red')
img
-해당 사진에 사각형을 그리고 글자를 입력합니다.
-분석결과에는 랜드마크를 비롯해서 인지한 개체들과 문장으로 구성된 결과가 포함 되어 있으며 각 개체를 인식한 사각형 그림과 인지한 개체들의 이름이 표시되어 있습니다.
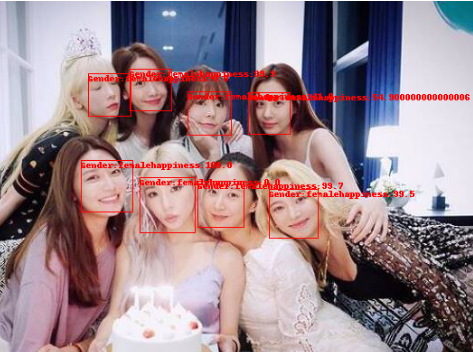
Face API Sample 얼굴 인식
-face api는 인물 분석을 통해서 다양한 정보를 제공해 줍니다. Azure Portal에서 Face API를 먼저 생성하고 접속에 필요한 URL과 subscription key를 가져와서 보여 줍니다.
관련된 라이브러리를 가져옵니다.
-request는 웹 통신을 위해서 가져오고 BytesIO, Image는 이미지를 처리하기 위해서 사용하고 있습니다. ImageDraw, ImageFont는 이미지 위에 선을 긋거나 글씨를 넣기 위해서 사용됩니다.
import requests
from io import BytesIO
from PIL import Image, ImageDraw, ImageFont
-subscription Key와 서비스의 주소를 설정합니다.
subscription_key = ''
faceDetection_url = ''
-분석에 사용할 이미지를 확인합니다
image_url = ''
img = Image.open(BytesIO(requests.get(image_url).content))
img
headers = {'Ocp-Apim-Subscription-Key':subscription_key}
params = {'returnFaceID':'true','returnFaceAttributes':'age,gender,emotion'}
data = {'url':image_url}
-서비스를 호출해서 결과를 확인합니다.
**response = requests.post(faceDetection_url,headers=headers,params=params,json=data)
faces = response.json()
faces
-인지한 각 개체들의 세부 정보들을 표시합니다.
draw=ImageDraw.Draw(img)
for face in faces:
#print(face)
rect = face['faceRectangle']
left = rect['left']
top = rect['top']
width = rect['width']
height = rect['height']
draw.rectangle(((left,top),(left+width,top+height)),outline='red')
face_info = face['faceAttributes']
emotion = face_info['emotion']
happiness = emotion['happiness']
gender = face_info['gender']
result = 'Gender:' + gender + 'happiness:' + str(happiness*100)
draw.text((left,top),result,fill='red')
-세부 정보들은 안경, 성별, 나이, 머리 등 다양하게 설정이 가능합니다.
import requests
from PIL import Image
from io import BytesIO
import matplotlib.pyplot as plt
subscription_key = ''
vision_base_url = ''
analyze_url = vision_base_url + 'analyze'
ocr_url = vision_base_url + 'ocr'
image_url = ''
img = Image.open(BytesIO(requests.get(image_url).content))
-위의 코드들을 바탕으로 사진을 설정 후
headers = {'Ocp-Apim-Subscription-Key': subscription_key}
params = {'language': 'unk', 'detectOrientation': 'true'}
data = {'url': image_url}
response = requests.post(ocr_url,
headers=headers,
params=params,
json=data)
analysis = response.json()
line_infos = [region["lines"] for region in analysis["regions"]]
word_infos = []
for line in line_infos:
for word_metadata in line:
for word_info in word_metadata["words"]:
word_infos.append(word_info)
word_infos
-분석결과에는 인지한 문장의 text로 구성된 결과가 포함 되어있습니다.
2.학습내용 중 어려웠던 점.
-하루만에 순식간에 사진들을 인식해서 사물, 사람, 개별안면, text 인식을 하는 것까지 해보았다. 따라하는 것까지는 어렵지 않지만 응용할 때 막히는 부분이 많을 것 같다.
3.해결방법
-오늘 해본 이미지 분석하는 것들을 하나씩 다른 새로운 사진들로, 또 하나의 사진으로 여러가지 분석을 섞어서 사용해봐야 할 것 같다.
4.학습소감
-코드만 따라감에도 분석이 되는 모습이 신기하고 재미있다. 어떻게 응용할 수 있을까 궁금해진다.