이벤트 리스너란?
이벤트 리스너는 말 그대로 해당 이벤트에 대해 대기 중이다. 항상 Listen 하고 있다는 말이다.
DOM 객체에서 이벤트가 발생할 경우 해당 이벤트 처리 핸들러를 추가할 수 있는 오브젝트이다.
이벤트 리스너를 이용하면 특정 DOM에 위에 말한 Javascirpt 이벤트가 발생할 때 특정 함수를 호출한다.
이벤트란?
어떤 사건을 의미한다.ex) 특정 버튼을 클릭했을 때, DOM이 다 로드되었을 때브라우저는 이벤트를 감지할 수 있으며 이벤트 발생 시 알려 줄 수 있으며 이를 통해 사용자와 웹페이지가 상호 작용이 가능
addEventListener()
target.addEventListener(event, function, useCapture)target
: 이벤트 핸들러를 추가하려는 HTML 요소.
function
: 이벤트 감지 시 실행할 함수를 지정.
useCapture
: 캡쳐나 버블링 단계에서 이벤트를 실행할지 여부를 지정하는 옵셔널 불린 값. 기본 값 false로 둠.
이벤트를 매개변수로 전달
이벤트를 발생시킨 요소 같은 이벤트의 자세한 정보를 알고 싶을 때가 있는데 이 때에는 함수가 이벤트 값을 받아야한다.
button.addEventListener('click', (e) => {
  console.log(e.target.id);
});
여기서 이벤트 매개변수인 e는 "event" 또는 다른 이름으로 바꿀 수 있다.
이 매개변수는 target id 같은 이벤트에 대한 다양한 정보를 가지는 객체이다.
이벤트 객체를 받으려면 별다른 특별한 작업이 필요한 것은 아니고 JavaScript가 알아서 처리해준다.
이벤트 핸들러 제거
이벤트 핸들러가 필요 없어지면 다음과 같이 이벤트 핸들러를 제거할 수 있다.
target.removeEventListener(event, function, useCapture);실습 - s16.html
주석으로 설명..
<!DOCTYPE html>
<html lang="en">
<head>
<meta charset="UTF-8">
<meta name="viewport" content="width=device-width, initial-scale=1.0">
<title>Document</title>
</head>
<body>
<!--태그에 기능을 바로 넣기-->
<h1 id="first" onclick="alert('첫번째클릭')">첫번째</h1>
<h1 id="second" ondblclick="alert('두번째클릭')">두번째</h1>
<h1 id="third">세번째</h1>
<h1 id="fourth">네번째</h1>
<script>
// 이벤트 - 화면에 유저의 입력 등 움직임을 주는 것들
// 마우스, 키보드, 음성, 카메라 등등
// 마우스 이벤트
const third = document.querySelector("#third");
// 자바스크립트로 태그의 프로퍼티에 함수를 넣을 때에는
// 실행결과 alert("...") 로 사용하면 안되고
// 실행을 할 수 있는 함수 ()=>alert(...)를 대입해야한다.
third.onclick = ()=>{
alert("세번째클릭");
}
// 프로퍼티를 null로 만들면 기능을 없앨 수 있다.
third.onclick = null;
const fourth = document.querySelector("#fourth");
// addEventListener는 첫번째 매개변수가 on 이 빠져있는 이벤트 이름
// 두번째 매개변수가 실행을 할 수 있는 함수
fourth.addEventListener("click",()=>{
alert("네번째클릭");
});
const clickEvent =()=>{
alert(",네번째 클릭2");
}
//이벤트 리스너는 여러개가 달릴 수 있다.
fourth.addEventListener("click",clickEvent);
// 특정 이벤트 리스너를 삭제할 수 있다.
fourth.removeEventListener("click",clickEvent);
document.querySelector("#first").addEventListener("click",()=>{
});
</script>
</body>
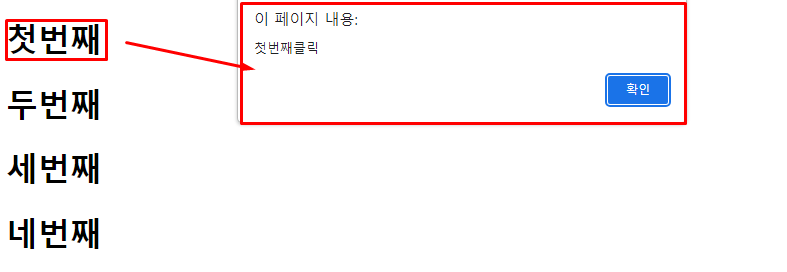
</html>실행결과
클릭 시 다음과 같이 나온다.
실습 - s17.html
주석으로 설명..
<!DOCTYPE html>
<html lang="en">
<head>
<meta charset="UTF-8">
<meta name="viewport" content="width=device-width, initial-scale=1.0">
<title>Document</title>
</head>
<body>
<h1 id="first"></h1>
<script>
// 화면에 키보드를 입력하면 h1에 입력한 key가 들어가도록 해보기
// document.body.addEventListener("keyup", (event) => {
// const first = document.querySelector("#first");
// first.innerHTML = first.innerHTML + event.key;
// });
// 단축키 만들기
document.body.addEventListener("keyup",(event) => {
// console.log(event);
// ctrl + i를 사용하면 alert("ctrl + w") 창 출력
if (event.ctrlKey && event.code === "KeyI") {
alert("ctrl + i");
}
});
</script>
</body>
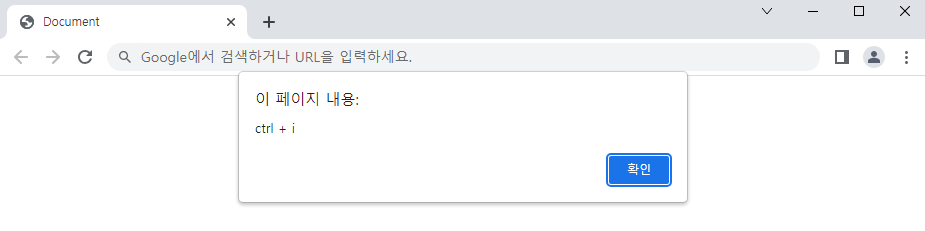
</html>실행결과
ctrl키와 i키를 동시에 눌리면 아래와 같이 경고창이 뜬다.
<!DOCTYPE html>
<html lang="en">
<head>
    <meta charset="UTF-8">
    <meta name="viewport" content="width=device-width, initial-scale=1.0">
    <title>Document</title>
</head>
<body>
    <h1 id="first"></h1>
    <script>
        // 화면에 키보드를 입력하면 h1에 입력한 key가 들어가도록 해보기
        document.body.addEventListener("keyup", (event) => {
            const first = document.querySelector("#first");
            first.innerHTML = first.innerHTML + event.key;
        });

        // 단축키 만들기
        // document.body.addEventListener("keyup",(event) => {
            // // console.log(event);
            // // ctrl + i를 사용하면 alert("ctrl + w") 창 출력
            // if (event.ctrlKey && event.code === "KeyI") {
                // alert("ctrl + i");
            // }
        // });

    </script>
</body>
</html>
실행결과
다음과 같이 실행하면 키보드에 입력한 키들이 화면에 출력된다.
(눌린 키보드 순서대로 - Insert, HomePageUp,Delete,End,PageDown,Enter,ArrowUp,Arrow...)


글 잘 봤습니다, 많은 도움이 되었습니다.