1. An Introduction to Linux Security
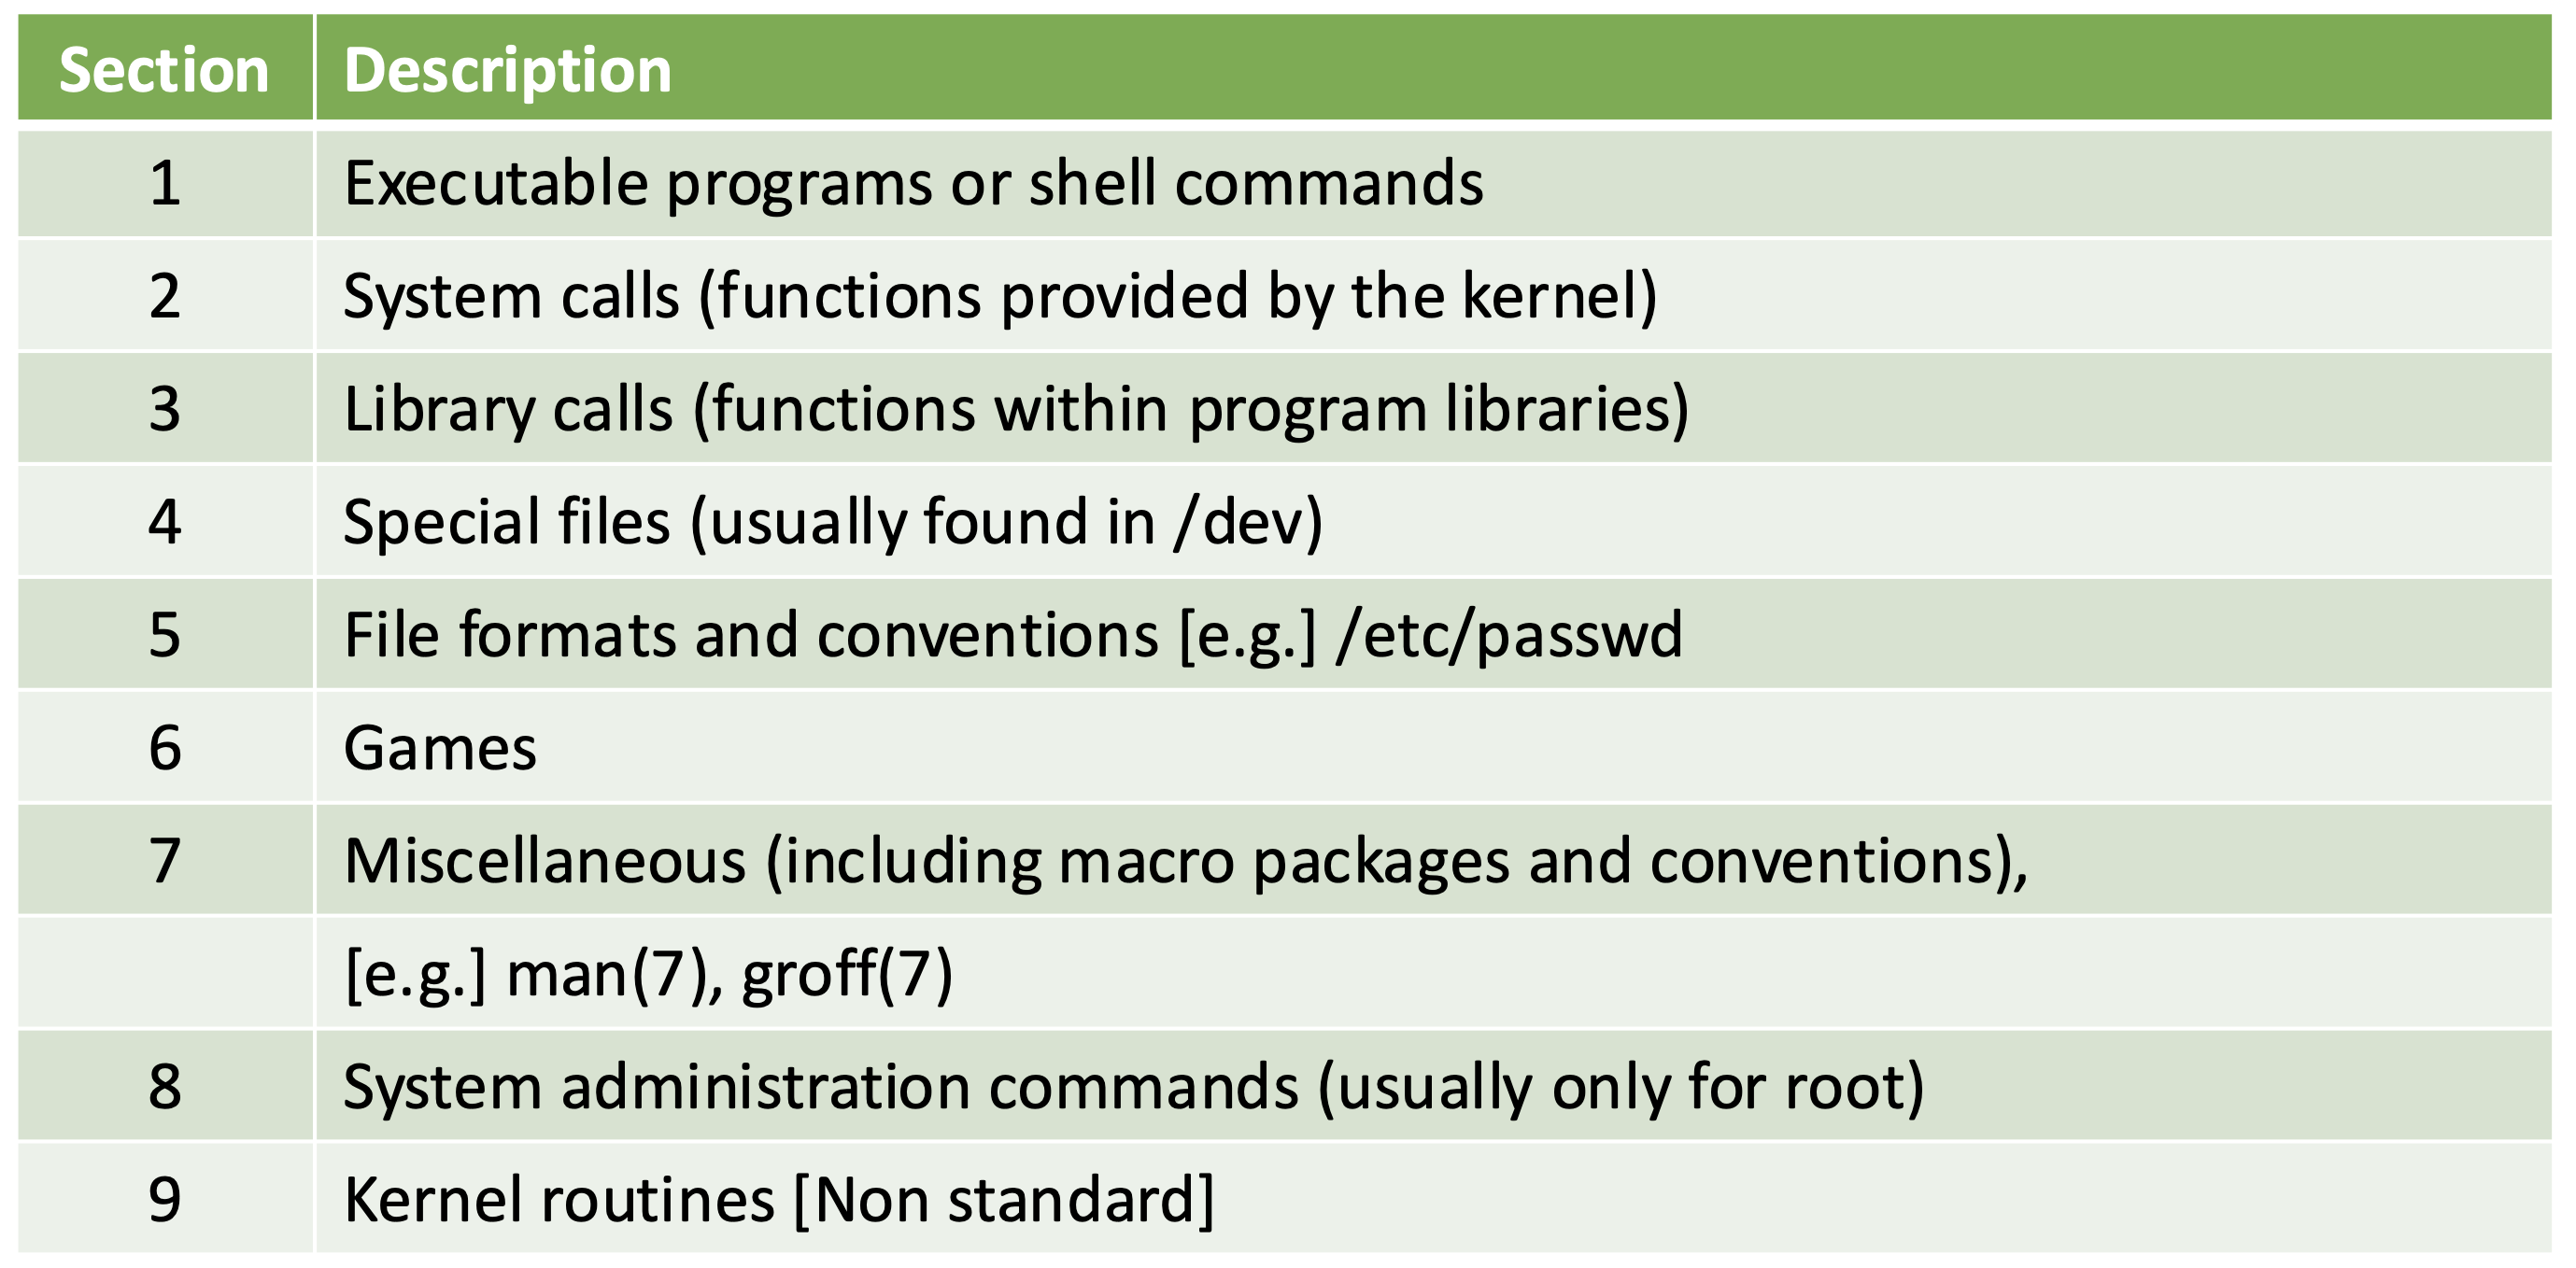
Linux User & Programmer's Manual - Man_pages
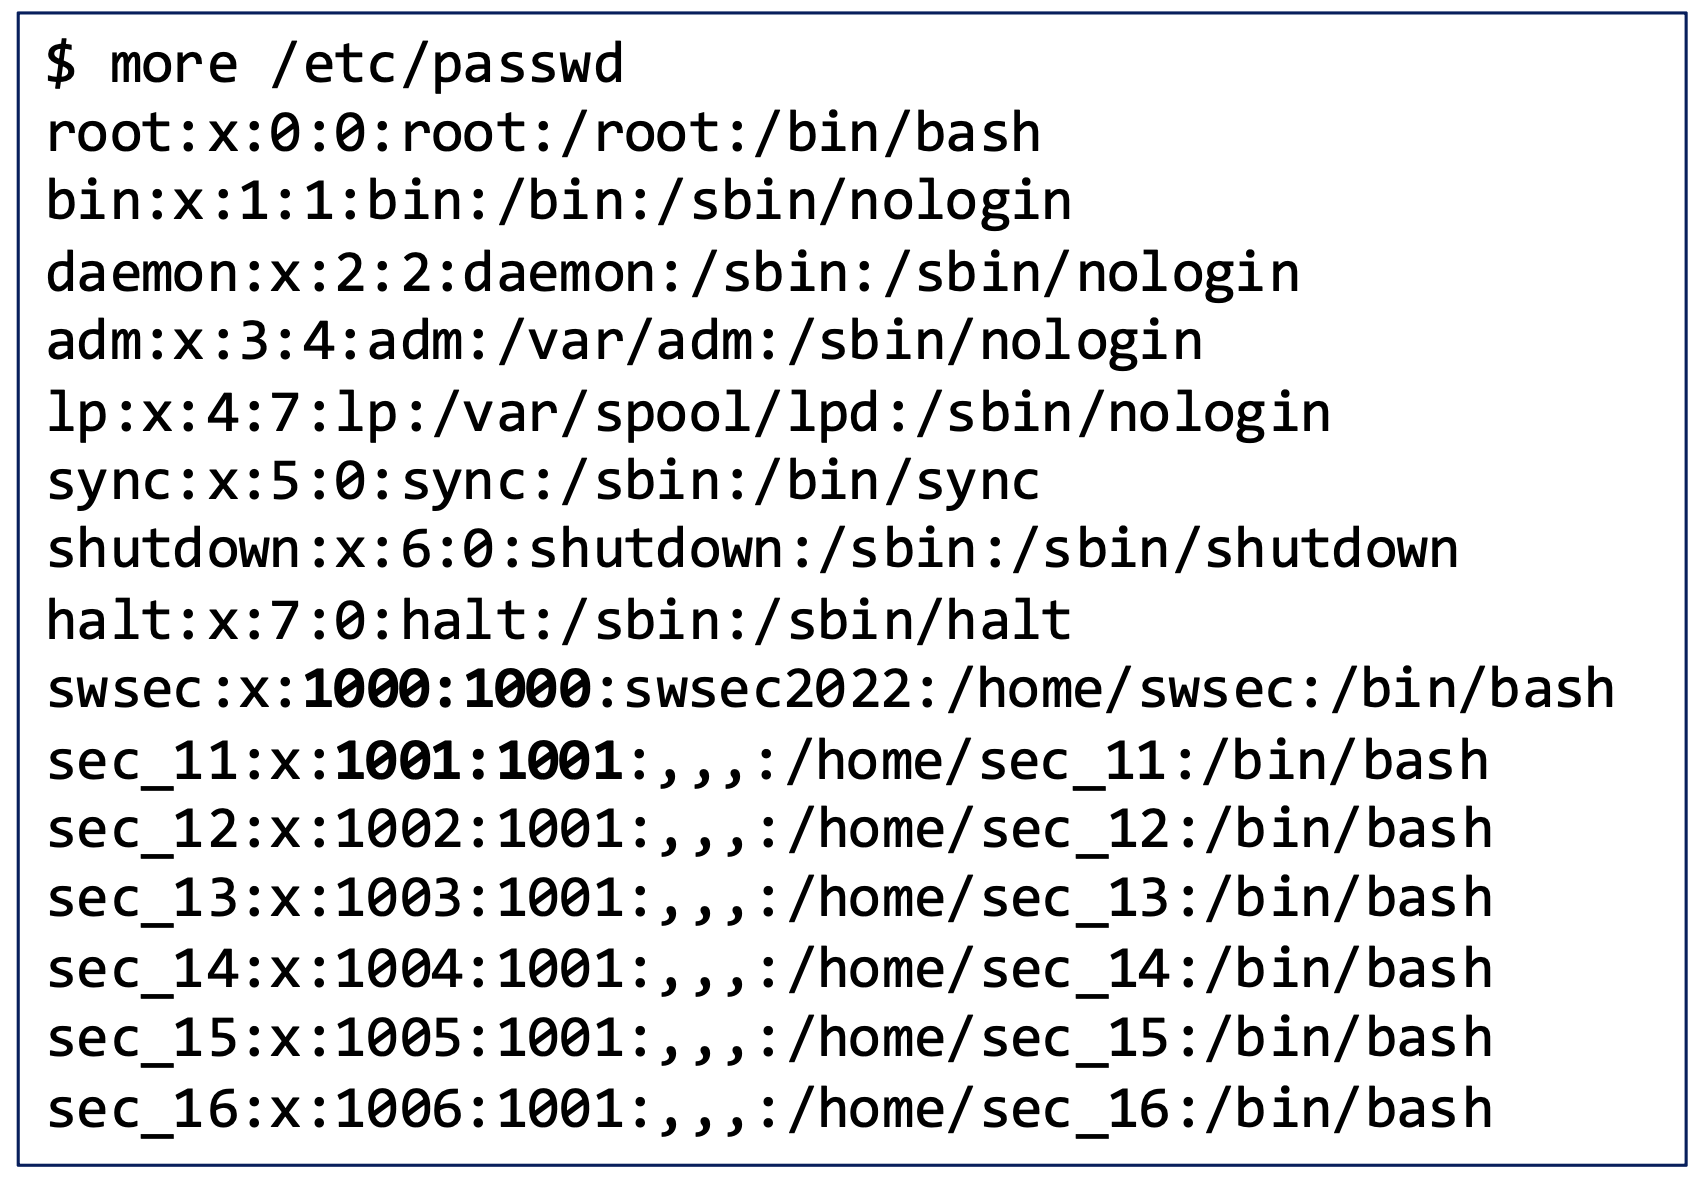
/etc/passwd
- system에 존재하는 모든 사용자 계정 정보를 저장하는 텍스트 파일
- file format, layout, field의 의미 확인
$ man 5 passwd
/usr/bin/passwd
- 사용자가 자신의 비밀번호를 변경할 때 사용하는 실행 파일
$ man 1 passwd
Linux Commands
$ chmod 0755 file1
$ ls -l file1
$ touch file1 prog1 file3 # 빈 파일 생성
$ chown student_2 file1 # change owner
$ groups
$ ps
$ chsh
Users
- In Linux(multi-user), each user is assigned a unique user ID
- User ID is stored in /etc/passwd
- UID 1000번부터는 일반 유저 계정에 해당한다.

- Find user ID
- gid: group id, groups: 속한 그룹 열거

User ID(UID), Group ID(GID)
cat: 파일 전체 내용을 한 번에 표준 출력으로 보여줌
more: 파일을 한 페이지씩 나눠서 보여줌
bin: binary
- UID가 1000번 미만인 계정들은 시스템이 기본적으로 사용하는 계정이며, 운영체제 설치 시 자동으로 생성된다.
- 새로운 사용자를 생성하면 etc/passwd와 etc/group 파일 모두에 해당 사용자 정보가 추가된다.
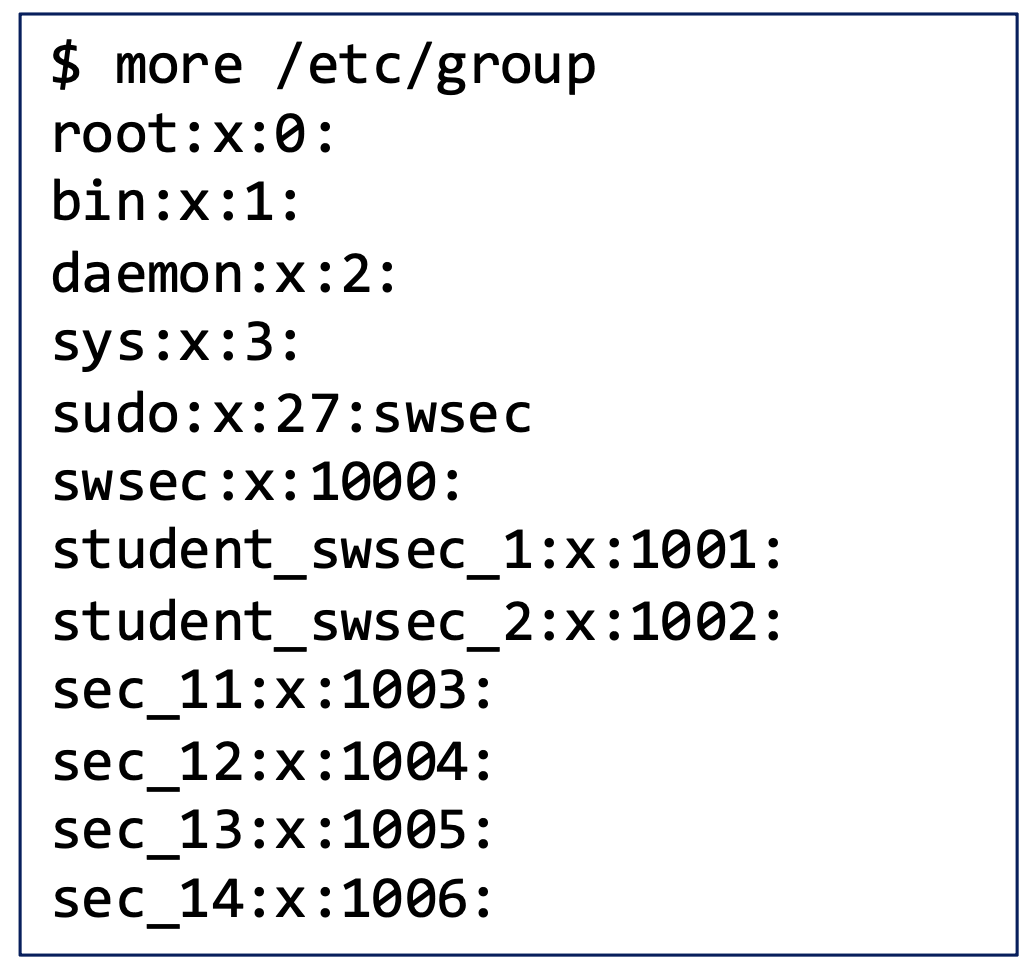
Group
- Represent a group of users
- Assigning permissions based on group
- A user can belog to multiple groups
- A user's primary group is in etc/passwd

groups: 사용자가 속한 모든 그룹 이름만 출력
id: 사용자의 UID, GID, 그리고 속한 이름 정보까지 함께 출력
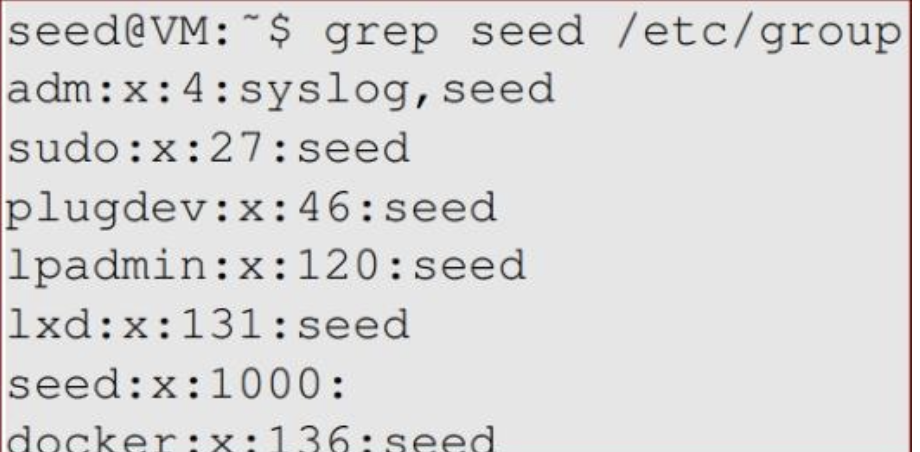
grep: 특정 파일에서 문자열을 검색해 출력하는 명령어
Management of user and group
Add users
- Directly add to /etc/passwd
- Use "adduser" command
Switch to another User

su 명령어는 사용자를 변경하지만, 현재 세션(작업 dir)을 그대로 유지한 채로 사용자만 바꾼다. 따라서 사용자 bob의 권한으로 전환되지만, 이전 사용자의 dir에 계속 머물러 있는 상태가 된다.
Creating a group and adding users

sudo(최고관리권한)로 alpha라는 group에 seed, bob을 추가한다.
Users and Superuser in UNIX/Linux
A user has username, group name, password

Root is an administrator / superuser (UID 0)
- Can read and write any file or system resource (e.g. network)
- Can modify the operating system
- Can become any other user
- Execute commands under any other user's ID
- Can the superuser read passwords?
- No, Linux system에서는 모든 사용자 계정의 실제 비밀번호는 /etc/shadow 파일에 암호화된 형태로 저장되어 있다. 일반 사용자는 접근할 수 없고, root가 파일을 읽더라도 원래 비밀번호는 알 수 없다.
Root == Superuser
- Root account is all-powerful user
- Maximum priviege -- can read, write any file
- Root == superuser or "God"
- Root acts as an owner for all files
- UID == 0
- "root" could be called anything, provided UID is 0
- Can be multiple root accounts
2. File permissions, Set-UID bit
Traditional Permisson Model
Types of access of files
- read: user can view the contents of the file
- write: user can change the contents of the file
- execute: user can execute or run the file if it is a program or script
Types of access on directories
- read: user can list the contents of the directory(e.g. ls)
- write: user can create files and sub-directories inside the directory
- execute: user can access and enter the directory(e.g. cd)
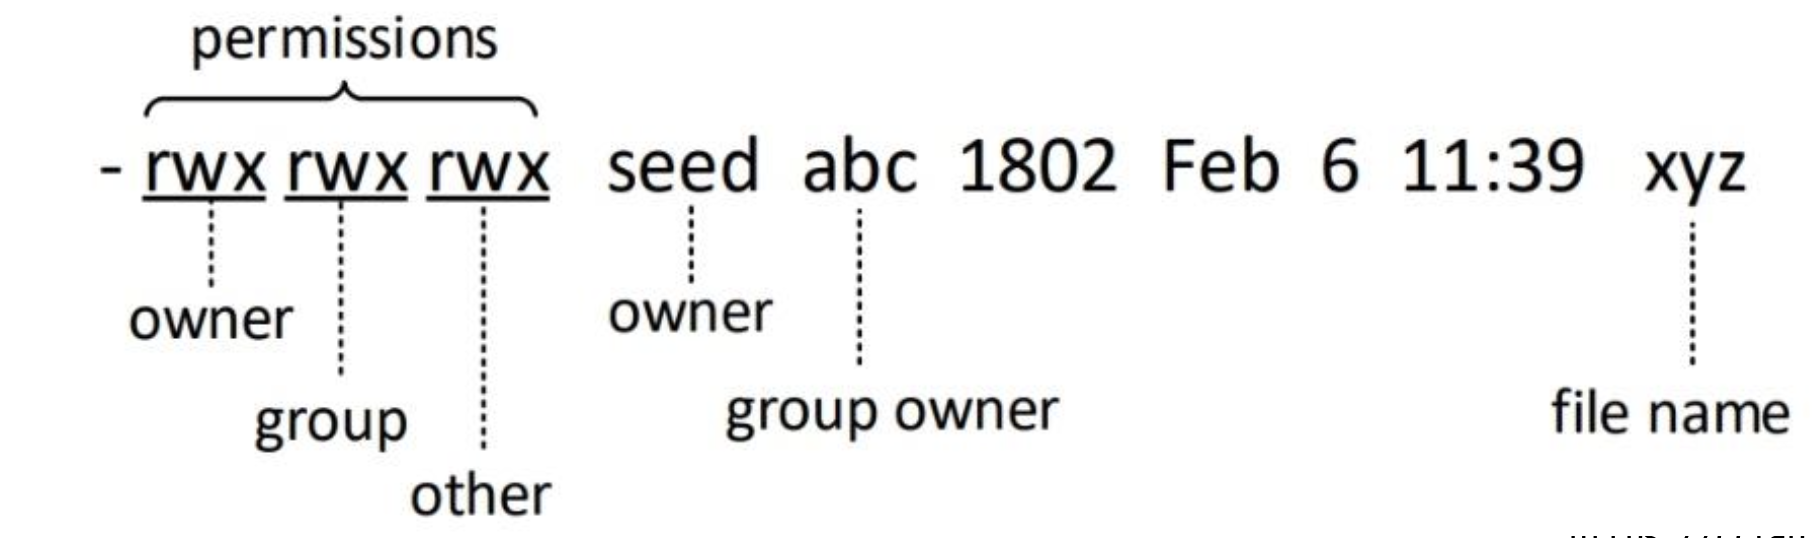
File Permissions
Every file has an owner and group
Owner (or root) sets permissions
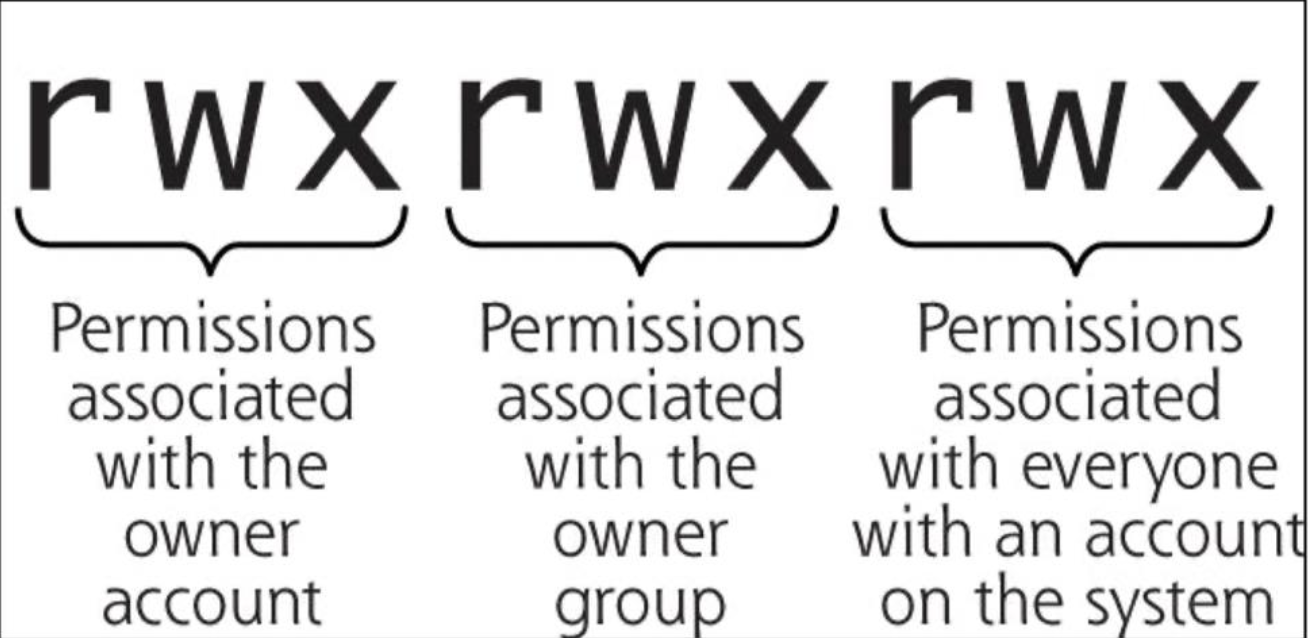
- Permissions: owner, group, everybody
- For each of the 3, read, write, execute
- Use "ls -l" to see permissions

Linux는 Multi-user system이기 때문에, Windows와 달리 file, directory의 소유권과 권한이 명확하게 구분되어 있다.
Permission Bits
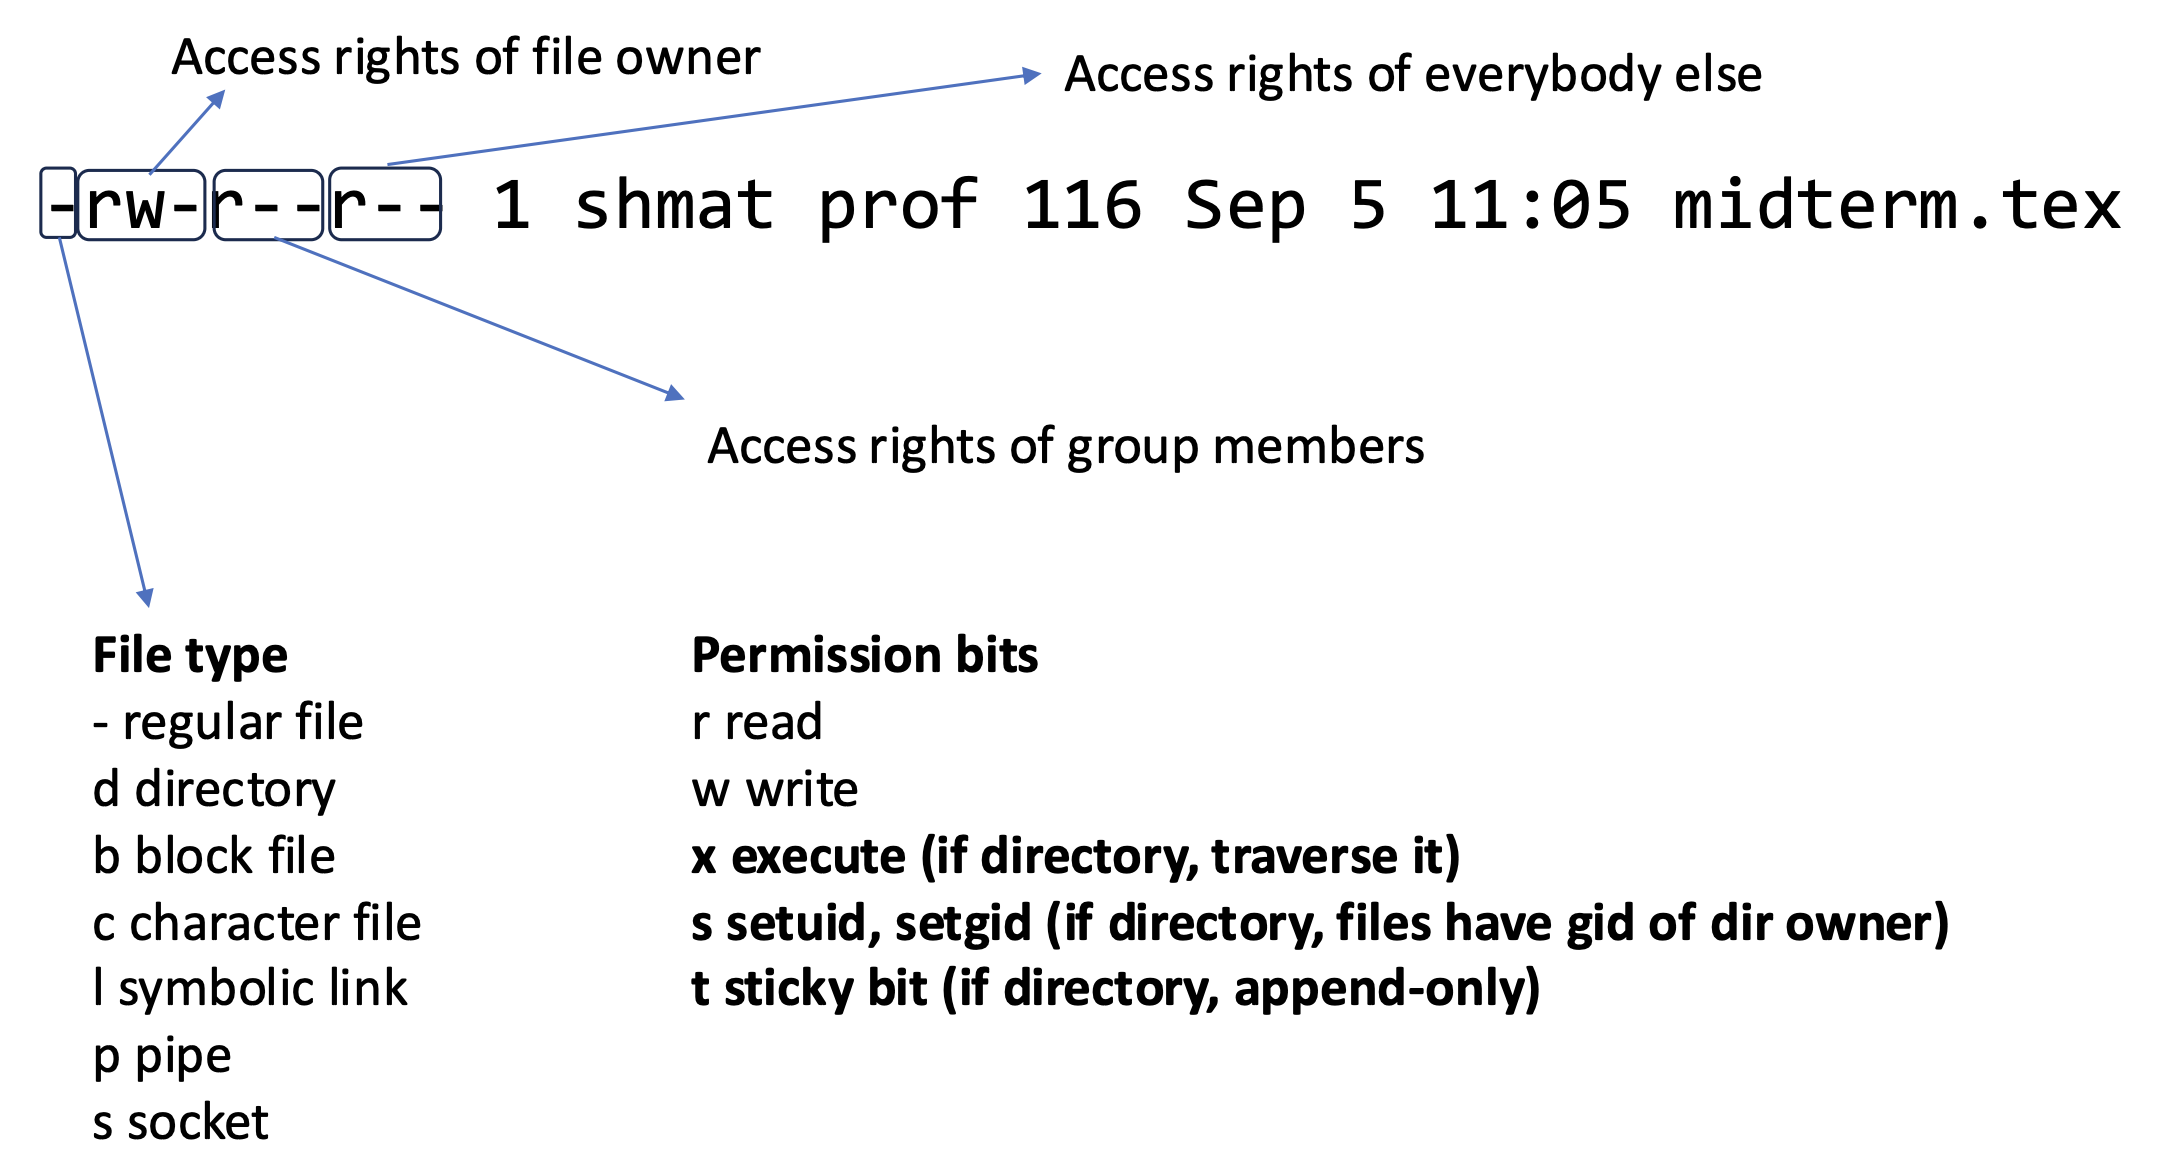
t(sticky bit): dir에 설정하면, 해당 directory 내의 file이나 sub dir는 본인 소유자만 삭제 또는 이름 변경이 가능하며, 다른 사용자는 추가만 할 수 있게 삭제할 수 없다. (e.g. /tmp)
symbolic link: windows의 바로가기와 유사한 기능으로, 다른 file, dir를 참조하는 특수 file이다.
Default File Permissions
umask value: decides the default permissions for new files
- umask는 새 파일을 생성할 때 기본적으로 부여되는 권한 중 제외할 권한을 지정하는 값
- 즉 permission에서 umask 값을 빼면 실제 파일의 권한
- (Default) file: 666, dir: 777
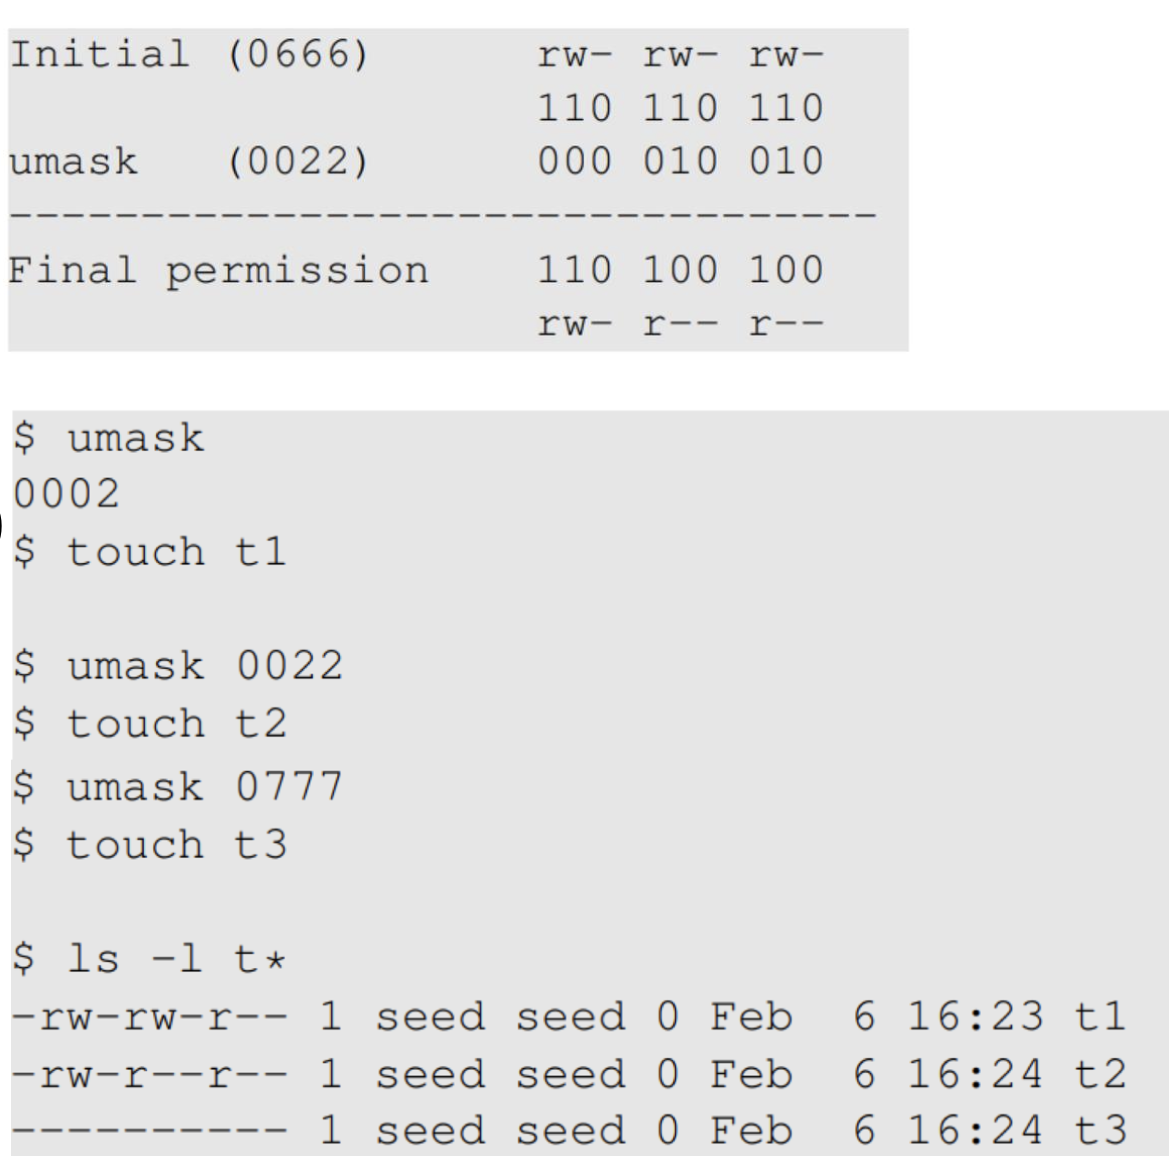
새 파일의 기본 권한은 일반적으로 666이다. 여기서 umask 0022를 적용하면 -> 644
두 번째 경우: 각각의 umask를 적용하면 t1: 664, t2: 644, t3: 000
Access Control List
Fine-grained ACL
- Assign permissions to individual users/groups
- Coexist with traditional permission model
- $getfacl: get file ACL
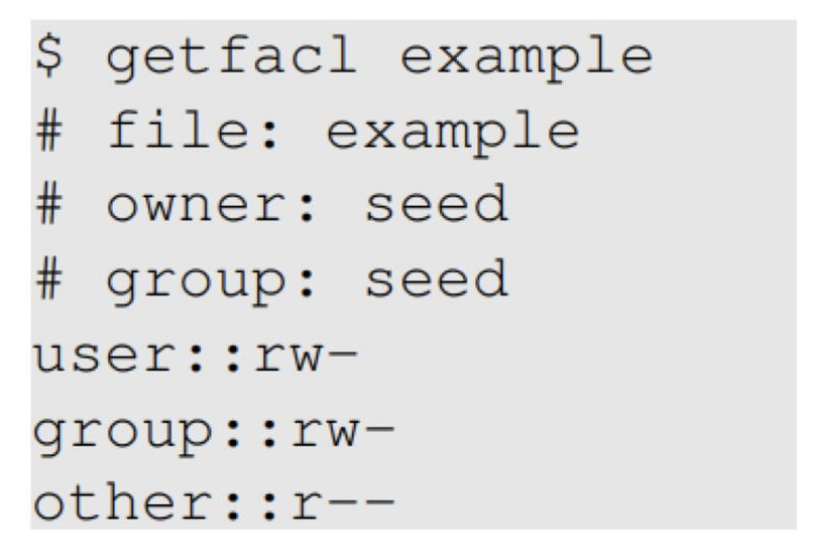
ACL은 각 사용자와 그룹마다 별도의 권한을 부여할 수 있어, 기존의 소유자.그룹.기타 3단계 권한 모델보다 훨씬 세분화된 접근 제어가 가능하다.
ACL Commands
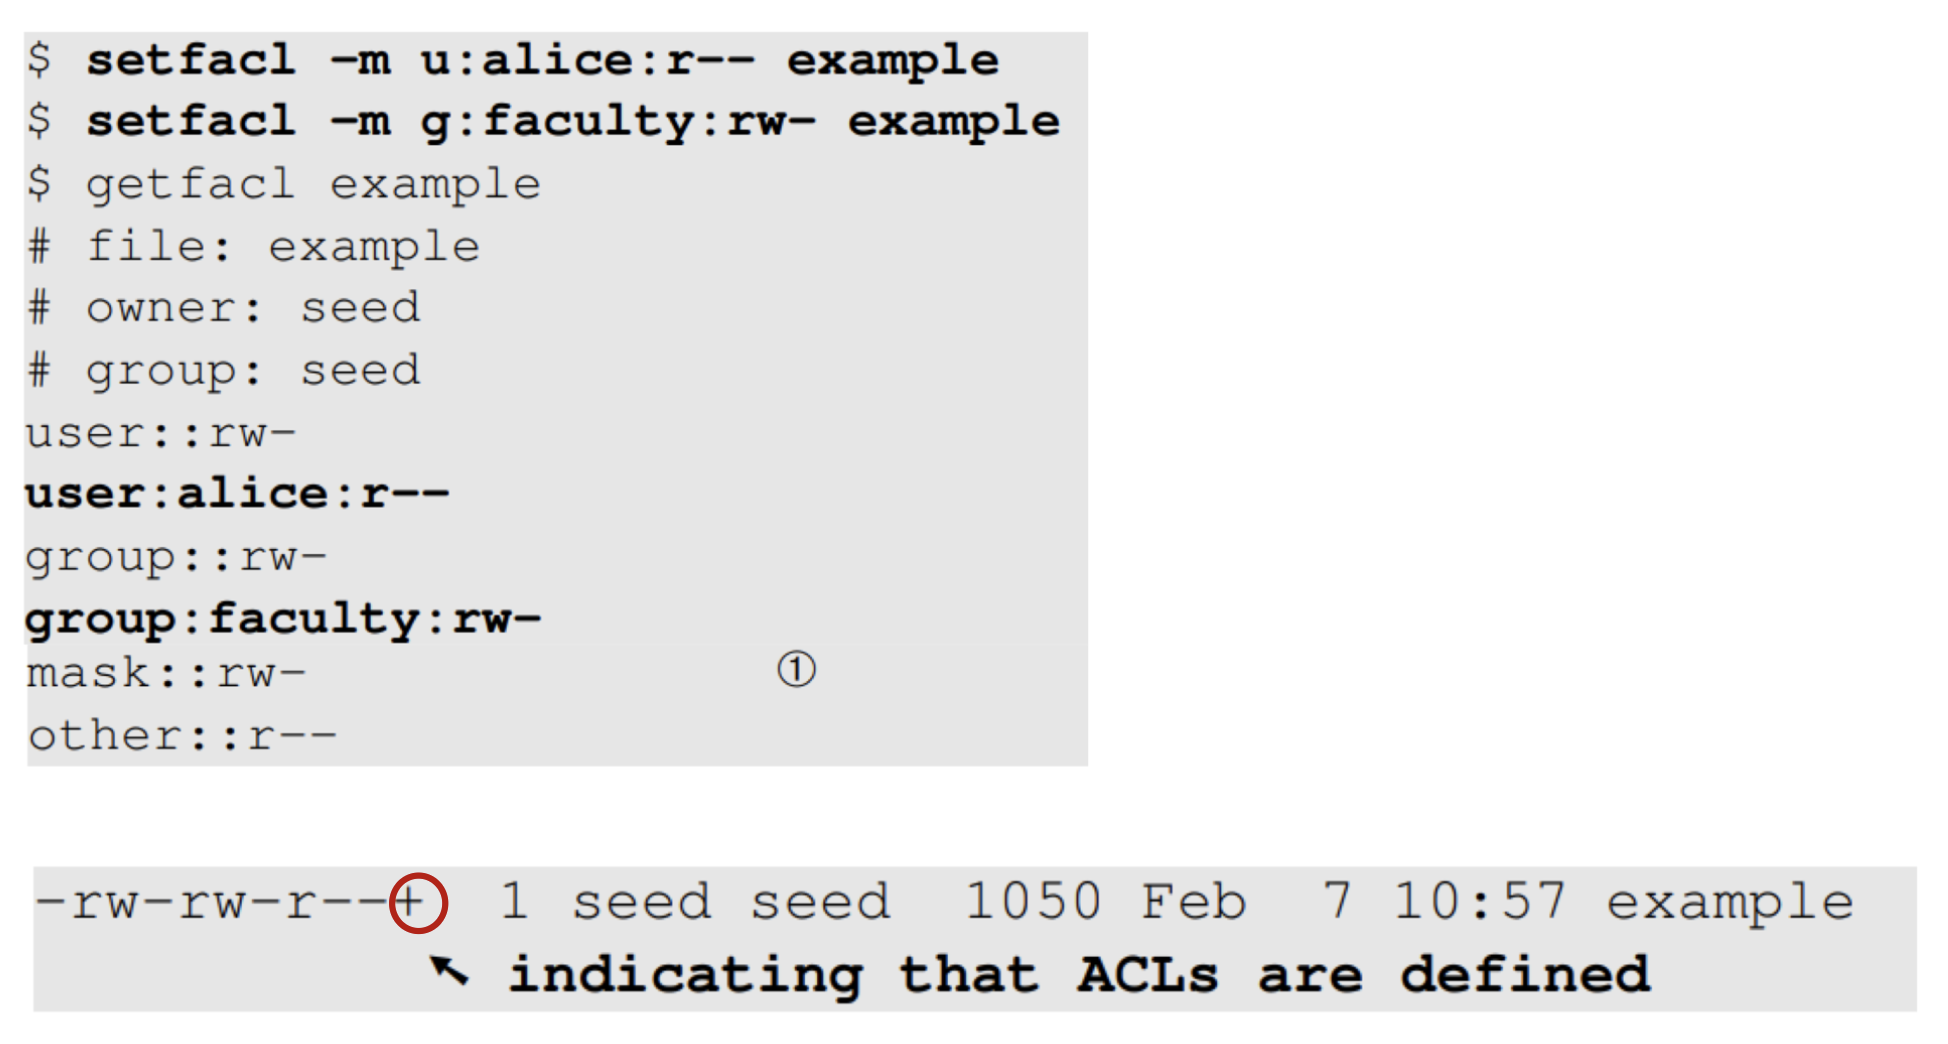
setfacl {-m, -x} {u,g}:<이름>:[r,w,x] <파일 또는 디렉터리>
- Option
- m: modify, x: remove
- user or group's name: r, w, x 권한 부여
- others 가능
- file or dir's name
사전에 정의되지 않은 사용자는 setfcal이 불가하다. 시스템이 미리 정의된 사용자가 맞다면, 이 사용자가 해당 file, dir에 직접적인 관련이 없어도 ACL 권한을 부여받을 수 있다.
setfacl
- u:alice:r--
- alice 사용자에게 읽기 권한 부여
- g:faculty:rw-
- faculty 그룹에 읽기·쓰기 권한 부여
- +: 파일에 추가적인 ACL 권한이 정의되어 있음을 의미
3. Running Command with Privilege
Why
Three command mechanisms
- Set-uid programs
- Details are covered in a separate chapter
- sudo
- POSIX capabilities
Using sudo
- sudo: Super-user Do
- Run commands as a superuser
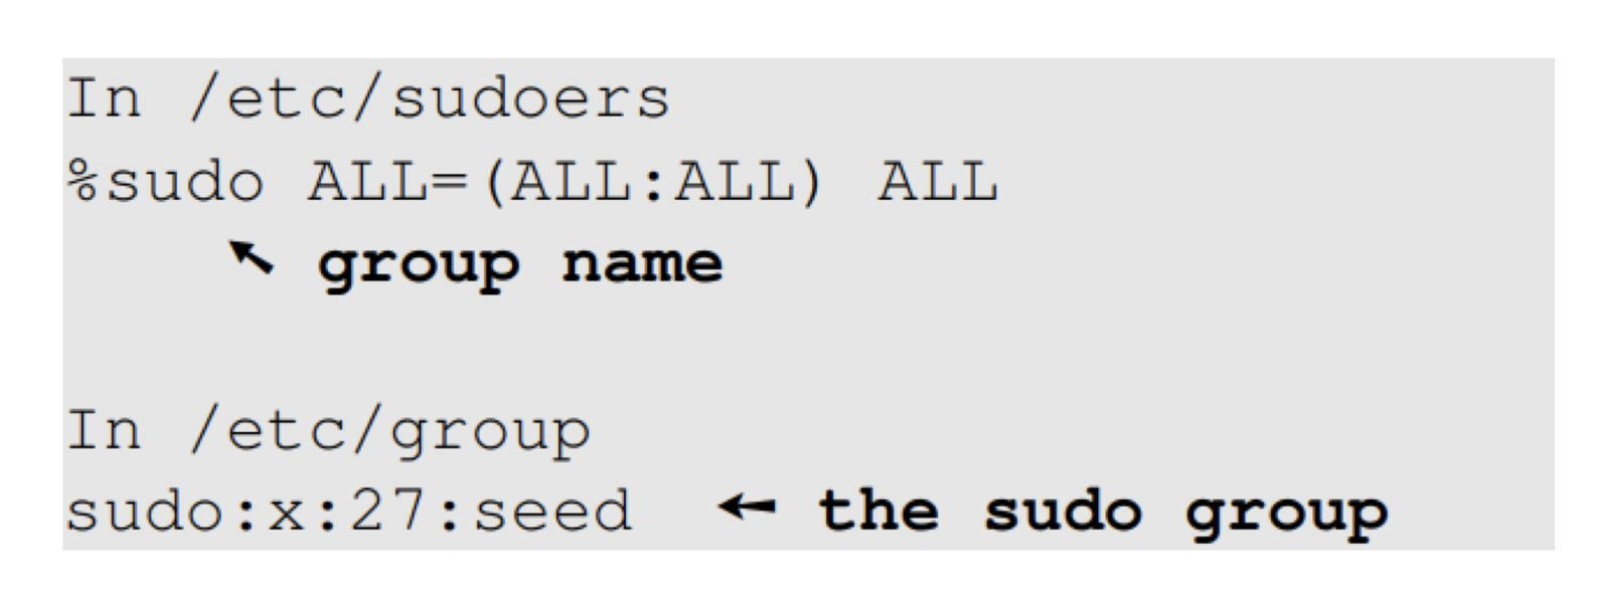
- A user must be authorized (/etc/sudousers)
- Here is how the seed user is allowed to run sudo
Getting Root Shell
- In Ubuntu 20.04, the root user account is locked by default
- Cannot log into the root account
- There are many ways to get a root shell
- sudo -s
- sudo bash
- sudo su
- It is not recommended to run commands using a root shell. Instead, use sudo to run individual commands.
최신 ubuntu는 root 계정이 기본적으로 잠겨 있어서 직접 로그인이 불가하다. 보안 차원에서, 전체 shell을 root로 사용하는 것보다는, sudo <명령어> 형태로 필요한 명령어만 일시적으로 root 권한으로 실행하는 것이 더 안전하다.
Using sudo
sudo 사용법
- 일반 사용자는 권한이 제한되어 있어서 '/etc/sudoers' 파일처럼 root만 읽을 수 있는 파일에 바로 접근할 수 없다.
- 하지만 sudo를 붙이면, 자신의 비밀번호를 입력해 임시로 root 권한을 받아 명령을 실행할 수 있다.
sudo more /etc/sudoers
Run command using another user (instead of root, default)
- bob의 uid/gid, group 정보가 출력되며, 마치 bob으로 로그인한 것처럼 동작한다.
sudo -u bob id
POSIX Capabilities
Portable Operating System Interface for Unix의 약자로, Unix system을 바탕으로, 다양한 운영체제(Linux, macOS)에서 호환성과 이동성을 보장하도록 만든 국제 표준
POSIX capabilities를 이용하면 특정 작업만 root처럼 할 수 있게, 일부 권한 체크를 우회해서 동작을 허용할 수 있다.
- Divide the root privilege into smaller privilege units
- Known as capabilities
- Use “$ man capabilities” to find all the capabilities
- getcap: 해당 파일에 설정된 capabilities를 출력
- setcap: 지정한 파일에 개별 capabilities를 부여
e.g. Capabilities

- CAT_CHOWN: file owner change permission
- CAT_NET_RAW: network raw packe/socket
Setting File Capabilities
Before

- /bin/bash를 복사해서 ./mybash라는 커스텀 셀 생성
- 일반 유저로 ./mybash 실행 후, 접근 제한 파일 /etc/shadow를 읽으려고 하면 permission denied
Setting the capabilities

- mybash 파일에 파일 읽기 권한 체크 무시 capability 부여
- mybash를 다시 실행하면 capabilty가 적용되어, root 계정이 아니어도 읽기 권한 제한을 우회할 수 있다.
- getcaps $$: 현재 셀 프로세스의 POSIX capability 확인
After
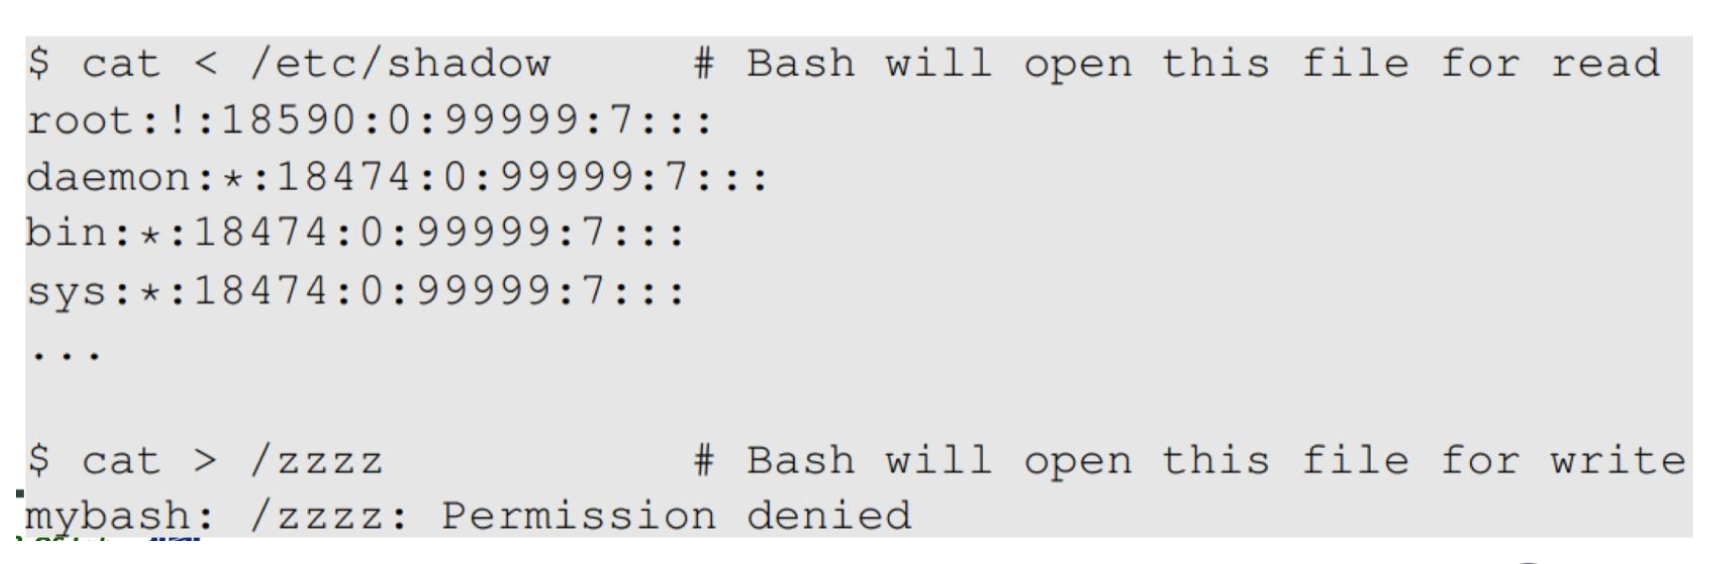
- mybash를 통해 shadow 파일을 읽으면 contents가 정상적으로 출력된다.
- root 권한 없이도, capability 때문만으로 읽기가 가능하다.
- ">"는 write 권한이므로 permission denied 발생
- read 권한만 부여했기 때문에
Case
1. Wireshark
- Sniffing tool, needs privilege
- The graphic part is not privileged
- The sniffing part is done by dumpcap, privileged
네트워크 패킷을 스니핑(캡쳐)하는 도구이기 때문에 높은 접근 권한이 필요하다.
$getcap /usr/bin/dumpcap
/usr/bin/dumpcap = cap_net_admin,cap_net_raw+eip
2. The ping program
- Uses raw socket
- Has the CAP_NEW_RAW capability
ping은 Raw socket 사용이 필수로, root 권한 또는 해당 capability가 필요하다.
ping 프로그램에는 CAP_NEW_RAW capability만 부여되어 특정 네트워크 작업만 root처럼 가능하게 설계되었다.
$getcap /usr/bin/ping
/usr/bin/ping = cap_net_raw+ep
e: effective, 프로그램이 실행 중일 때, 실제로 활성화
p: permitted, 해당 cap 사용 권한 존재
i: inheritable, 자식 프로세스로 권한 상속 가능
일반적인 socket
네트워크에서 서로 다른 컴퓨터 간 데이터 송수신을 위한 소프트웨어 통신 채널
MAC / IP / TCP, UDP
4. User Authentication
인증(authentication)은 사용자가 본인인지를 증명하는 과정이며, 일반적으로 로그인 과정에서 아이디와 비밀번호 등으로 신원을 확인하는 행위이다.
인가(authorization)는 인증을 통해 신원이 확인된 사용자에 대해 특정 리소스나 기능에 대한 접근 권한을 확인하고 허가하는 과정이다.
Authentication Methods
- A process to verify a user's identity
- Typical authentication methods
- based on something the user knows: password
- based on something the user has: ID card
- based on something the user is or does: fingerprint
- Multi-factor authentication
- 2차 인증(2FA)의 예시로 OTP(One Time Password)를 들 수 있다.
Passwords
- Something you know: Passwords
- Very common
- Very easily guessed
- Originally stored in plaintext, but that's a very bad idea
- Today, passwords are usually stored hased
- However — some network authentication schemes, such as challenge/response, require plaintext (or equivalent)
- Related files under Linux
- /etc/passwd
- /etc/shadow
- /etc/groups
/etc/{passwd, shadow, groups}
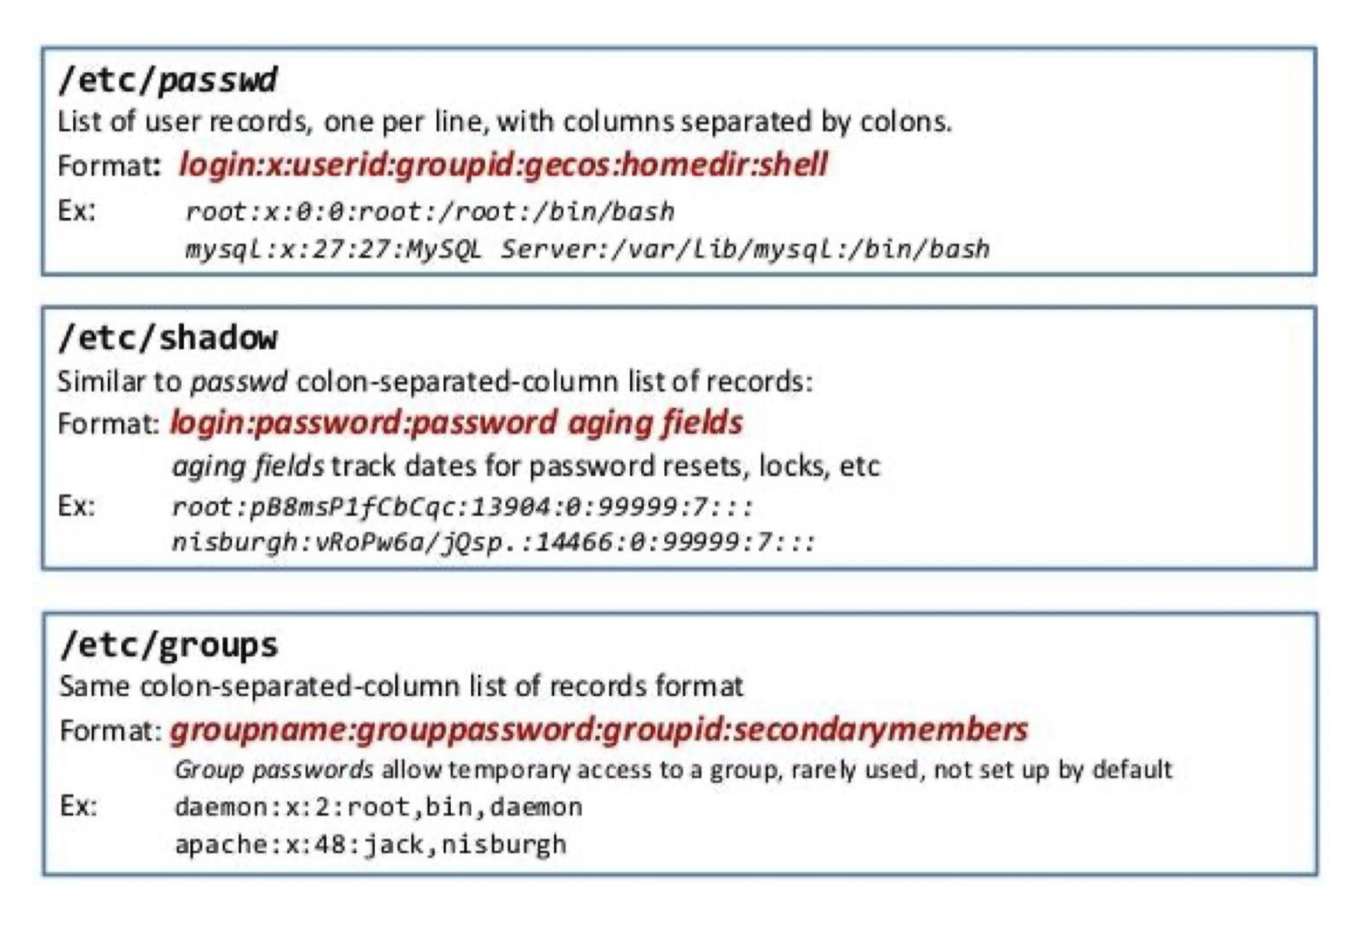
/etc/passwd/ 파일에 실제 비밀번호를 저장하지 않고 대신에 x나 * 같은 표시를 둔다. 그리고 실제 해시된 비밀번호는 /etc/shadow 파일에 저장한다. etc/shadow 파일은 root 권한만 접근할 수 있어서 비밀번호 보안이 강화된다.
hash는 단방향 함수로, 해시된 값을 역으로 원래 비밀번호로 복원하는 것은 불가능하다.
/etc/passwd

- Username
- It is used when user logs in
- Password
- An characture indicates the encrypted password is stored in /etc/shadow file
- User ID
- UID 0 (zero) is reserved for root and UIDs 1-99 are reserved for other predefined accounts. Further UID 100-999 are reserved by system for administrative and system accounts/groups.
- 1~999: system이 이미 사용 중
- UID 0 (zero) is reserved for root and UIDs 1-99 are reserved for other predefined accounts. Further UID 100-999 are reserved by system for administrative and system accounts/groups.
- Group ID
- The primary group ID (stored in /etc/group file)
- User ID info
- The comment field
- Home directory
- The absolute path to the directory or the user will be there when they log in. If this directory does not exist then the users directory becomes /
- 물리적으로 꼭 home/으로 지정할 필요는 없다.
- Command/shell
- The absolute path of a command or shell (/bin/bash). Typically,
this is a shell. Please note that it does not have to be a shell.
- The absolute path of a command or shell (/bin/bash). Typically,
First Command After Login
- The last field of each entry
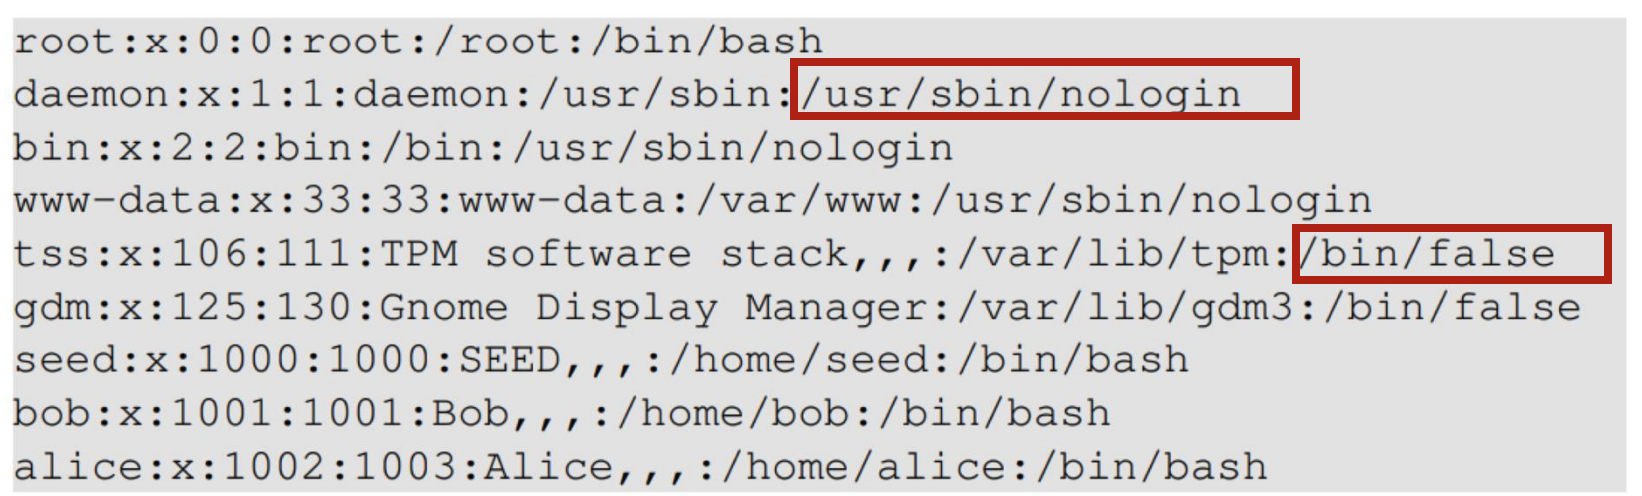
마지막 필드는 로그인 후 실행될 명령어나 셀을 의미한다.
-
/usr/sbin/nologin
- 주로 시스템 계정, 서비스 계정 등에 사용되어 로그인 자체를 막으면서도 사용자에게 안내 메시지를 보여줄 때 사용하는데, SSH 접근도 불가하다.
- sudo로도 불가
-
/bin/false
- 로그인 시도 즉시 종료되며 별도의 메시지를 출력하지 않는다. 조용히 로그인을 막고 싶을 때 사용하며, SSH, FTP 등 모든 접근을 차단한다.
bin/false or sbin/nologin인 계정은 아무리 sudo, su, ssh 등 관리자 권한을 써도 shell 전환, login 불가하다.
The Shadow File
- Store password, why not use /etc/passwd anymore?
- Structure for each entry
 Hash 알고리즘이 같고, 입력하는 비밀번호도 같으면 Hash값은 같게 나온다. 같은 입력값에 대해 항상 동일한 고정 길이의 Hash값을 생성하는 성질이 있기 때문이다.
- The purpose of Salt
- Defeat brute-force attacks
- dictionary attack, rainbow table attack
- Defeat brute-force attacks
- These 3 sub-fields have the same password

같은 패스워드라도 사용자마다 다른 salt 값이 적용되기에 Hash 결과는 모두 다르다.
Salt를 이용하면 brute-force 공격 등에 대한 방어가 가능하다.
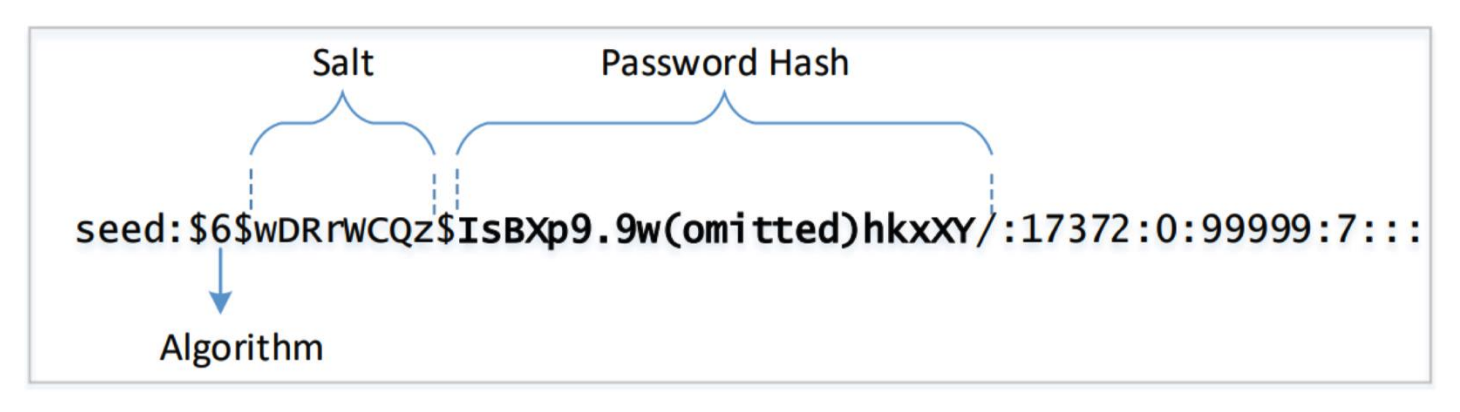
/etc/shadow
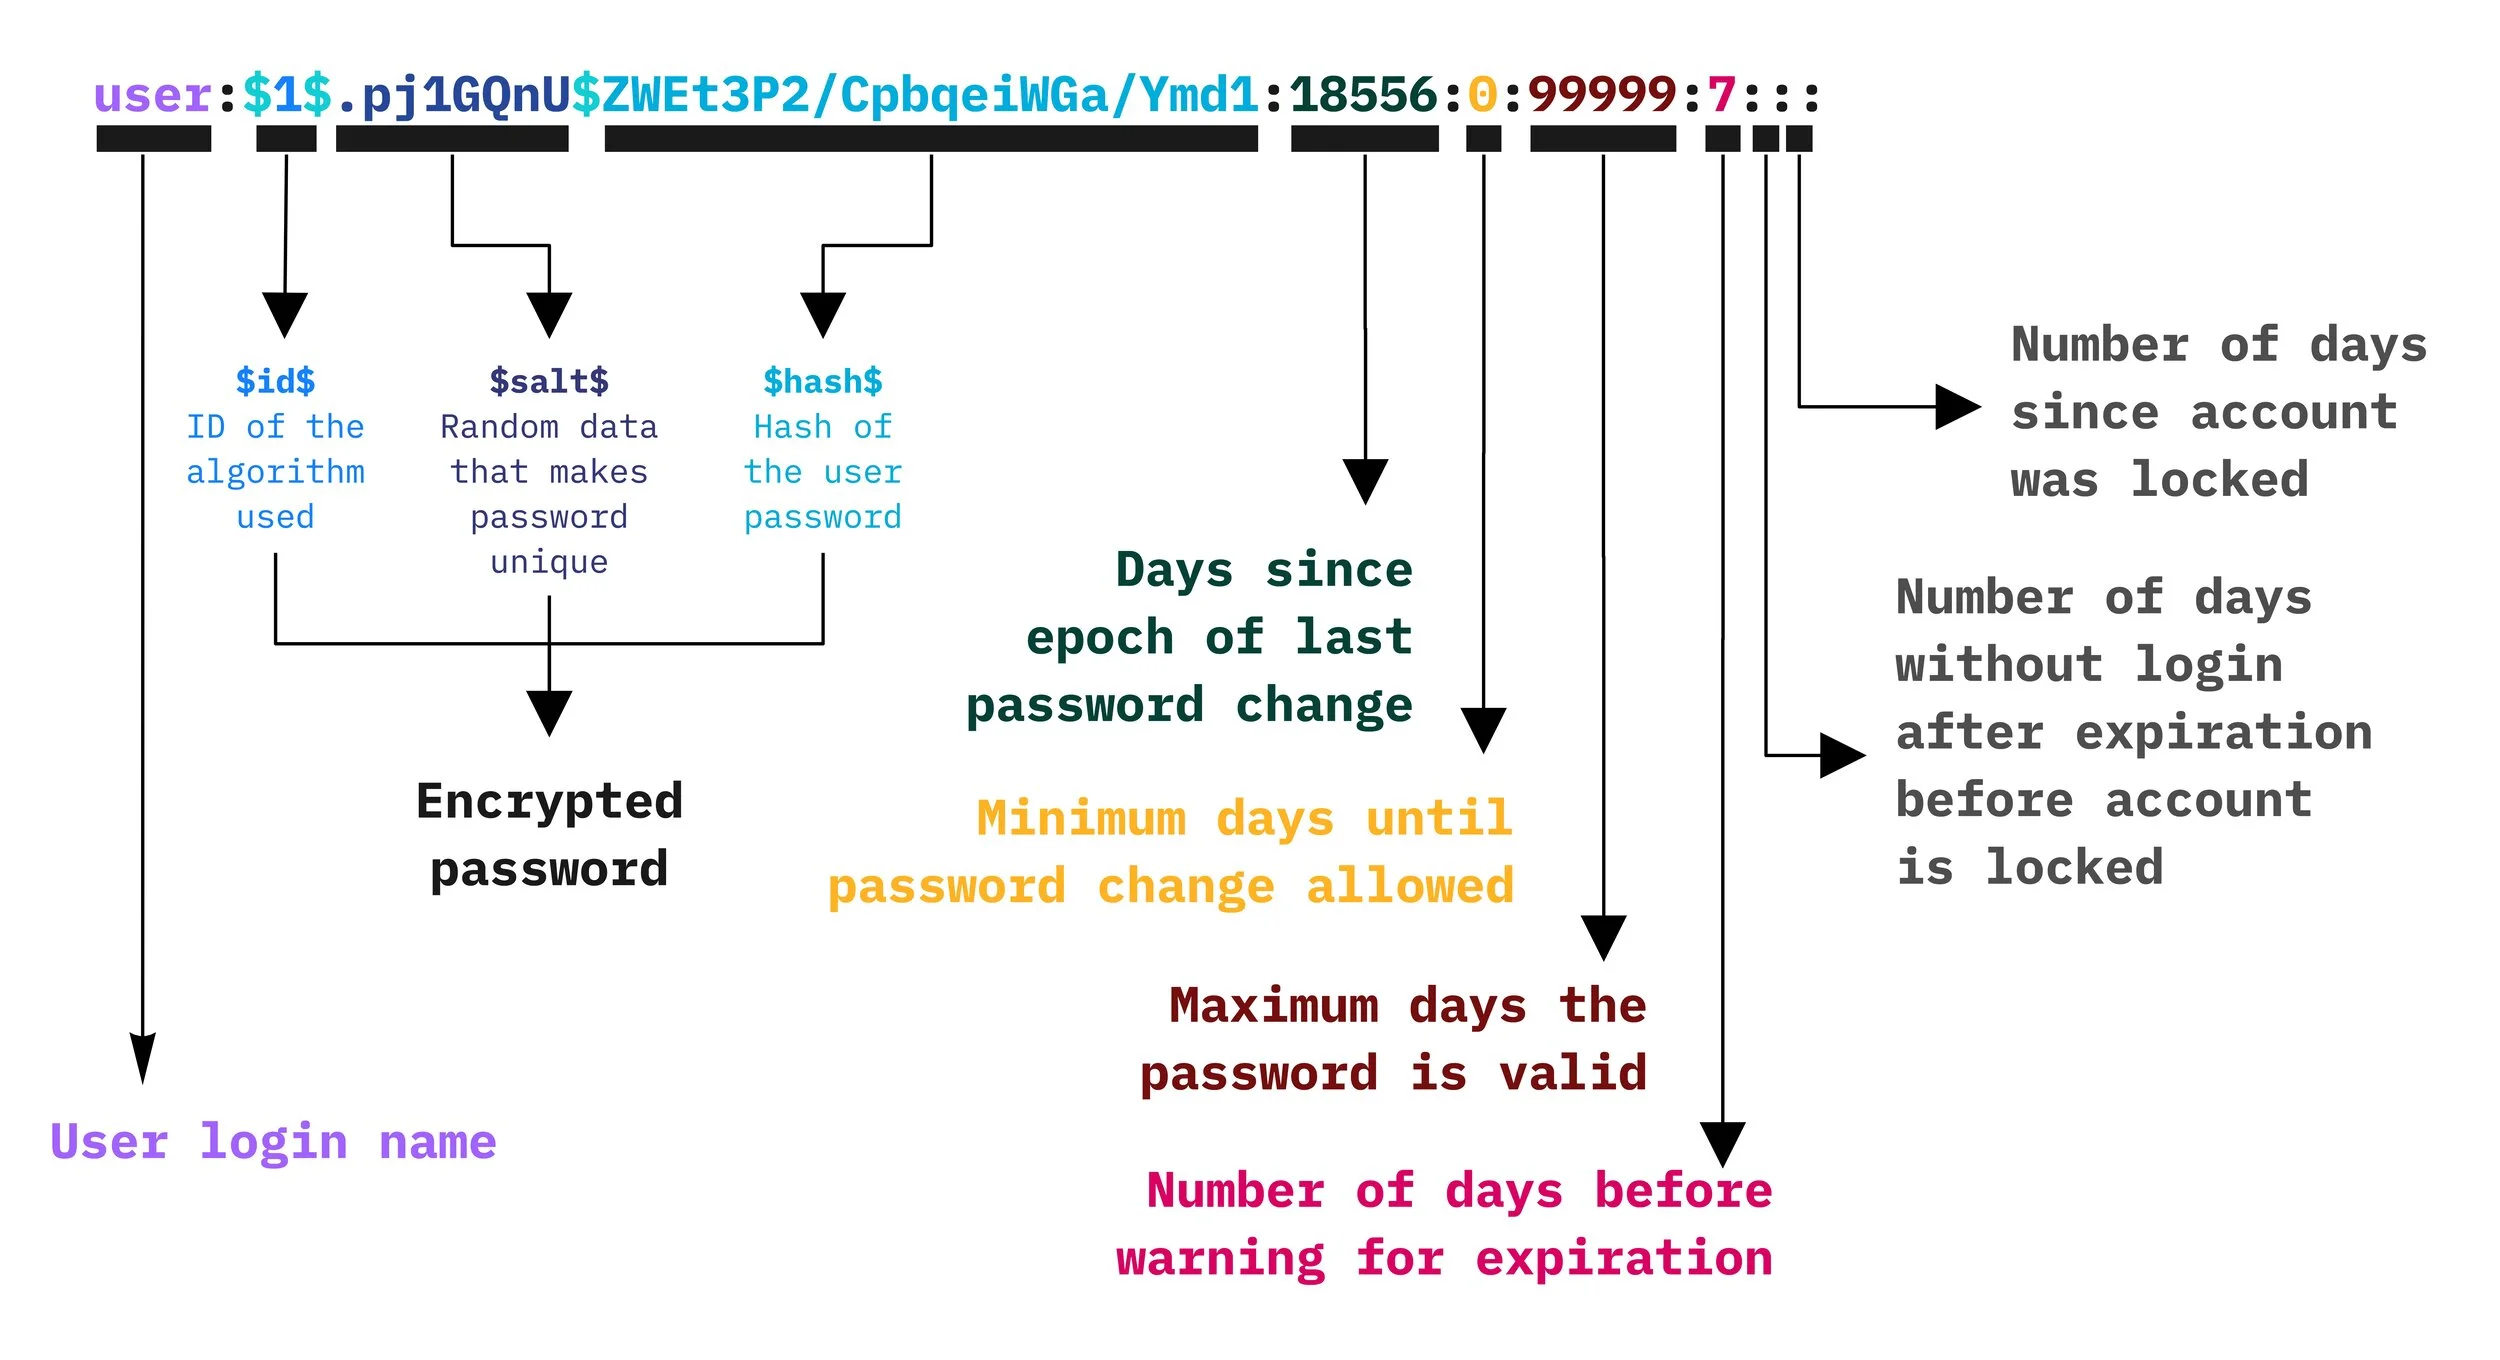
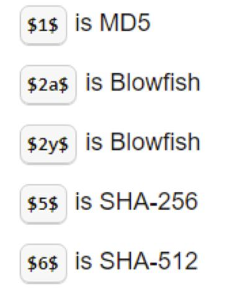 맨 앞에 적히는 숫자는 ID of the algorithm used로, SHA256만 되더라도 salt_len이 16byte이다.

- Username
- Password
- password format: $id$salt$hashed
- Last password change
- 1970년 1월 1일 이후 며칠이 지났는지로 표시
- Minimum
- 비밀번호 변경 불가 기간
- Maximum
- 비밀번호가 유효한 최대 일수
- Warn
- 비밀번호 만료가 다가오면, 몇 일 전에 미리 경고 메시지 보낼지 지정
- Inactive
- 비밀번호 만료 후 계정 비활성화의 유예 일수
- Expire
- 계정이 비활성화되는 절대 날짜
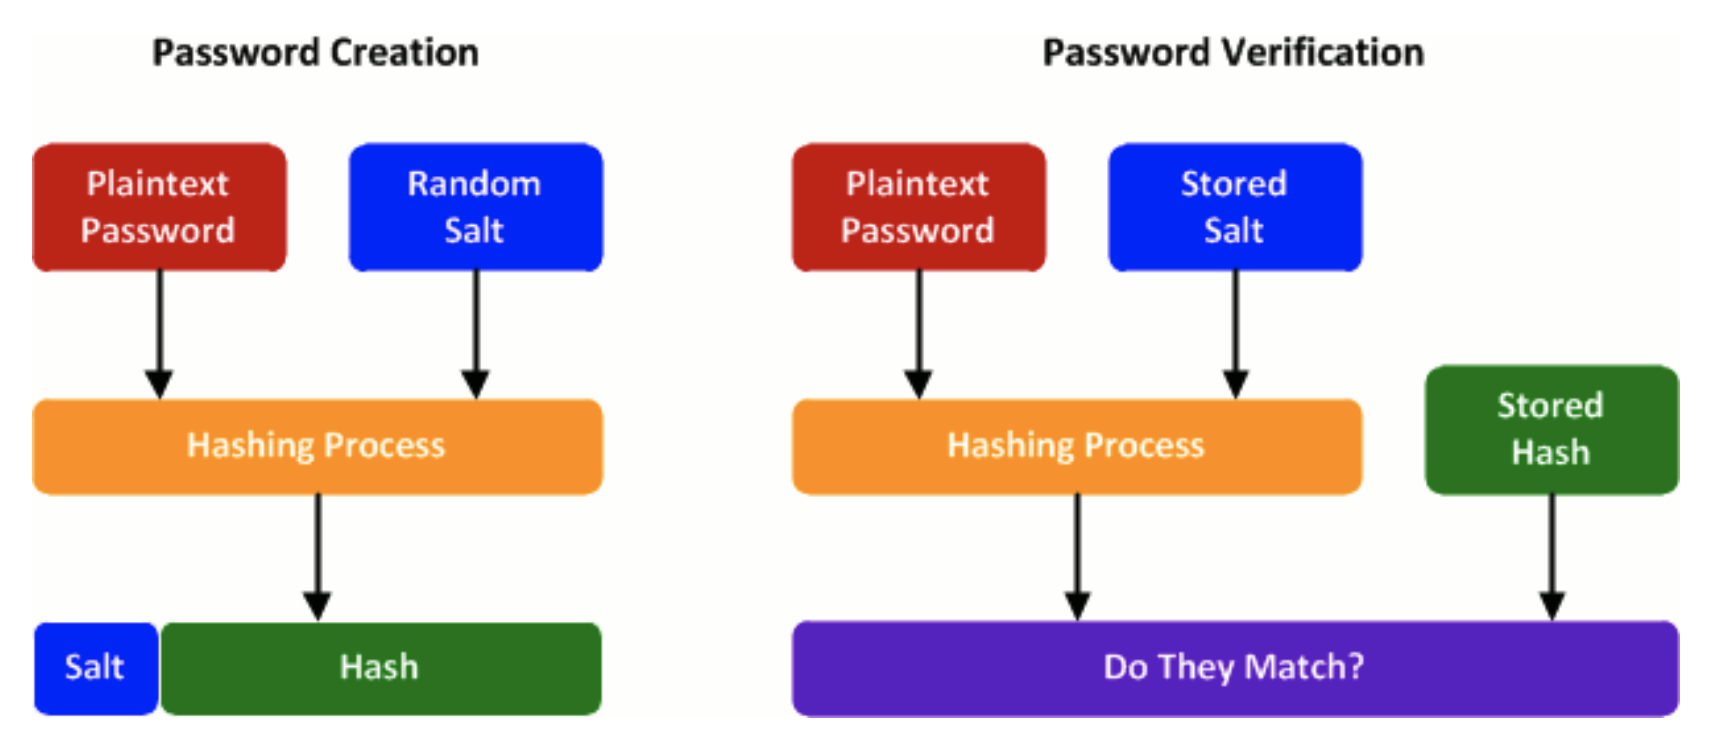
Creation of Password

- 원본 패스워드와 랜덤하게 생성된 Salt값을 합치고 Hash function에 입력하여 Hash Result 생성
- Hash Function은 한 번만 적용할 수도 있지만, 보완 강화를 위해 여러 번 반복 적용 가능
- 최종적으로 생성된 Hash 값과 salt만 저장되고, 원본의 패스워드는 별도로 저장되지 않는다.
Creation and Verification of Password
1. Creation
사용자가 새로운 비밀번호를 등록할 때, 무작위 salt를 생성해서 합치고 Hashing 과정을 거쳐 최종 Hash값이 생성된다.
2. Password Verification
사용자가 로그인 시 입력한 비밀번호와 저장된 salt를 합쳐서 똑같이 해싱한다.
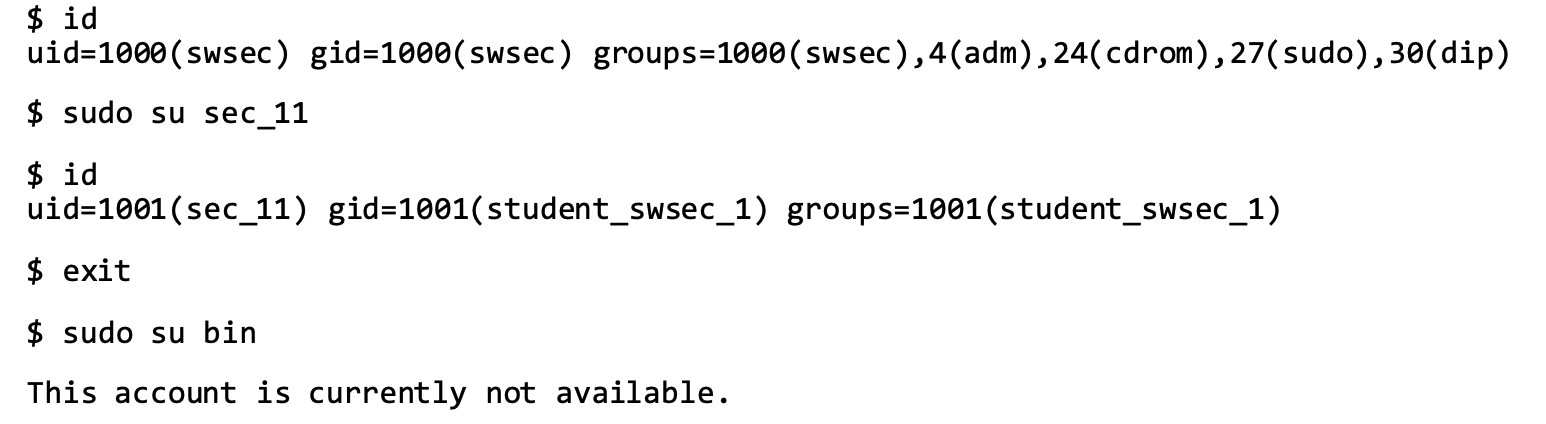
Locking Account
- Putting an invalid value in the password field in /etc/shadow
- '*': By convention, accounts that are not intended to be logged in to
(e.g. bin, daemon, sshd) only contain a single asterisk in the password field - '!': Both "!" and "!!" being present in the password field mean an account is locked.
- '!!': But "!!" in an account entry in shadow means the account of an user has been created, but not yet given a password.
- '*': By convention, accounts that are not intended to be logged in to
*는 전통적인 시스템 계정에서 로그인 불가 계정으로 쓰이고, !!는 비밀번호가 없어서 로그인이 불가한 것이고, !는 명시적으로 잠긴 상태, 로그인 차단 의도이다.
- The root account is locked
- 최초 잠금은 보안상 기본 상태이기 때문에 sudo passwd 명령어로 비밀번호 설정 후 사용 가능하게 된다.

- 최초 잠금은 보안상 기본 상태이기 때문에 sudo passwd 명령어로 비밀번호 설정 후 사용 가능하게 된다.
sudo passwd root로 root 계정의 암호 새로 설정하면 !가 제거되긴 하나, 보안상의 이유로 root 계정의 직접적인 사용을 막고 sudo만 활용하는 것을 더 권장한다.