🪝 Git Hooks
🤓 Git Hooks란?
Git의 다양한 작업(commit, merge, push 등)이 실행될 때 자동으로 호출되는 스크립트로 이를 통해 코드의 품질을 보장하거나, 자동화된 작업을 수행할 수 있다.
모든 Git 리포지토리의 .git/hooks 디렉토리 아래에 스크립트가 존재한다.
applypatch-msg.sample       pre-push.sample
commit-msg.sample           pre-rebase.sample
post-update.sample          prepare-commit-msg.sample
pre-applypatch.sample       update.sample
pre-commit.sample
.sample 확장자를 제거하면 사용 가능하고, 기본으로 제공되는 스크립트는 대부분 셸 스크립트와 PERL 스크립트이지만 실행 파일로 실행할 수만 있으면 되기 때문에 Python, Ruby로 작성해도 된다.
- Python
#!/usr/bin python - Bash
#!/bin/bash - shell
#!/bin/sh
Git Hooks는 특정 Git 리포지토리에 로컬로 존재하고 git clone을 실행할 때 새 리포지토리로 복사되지 않는다!
그렇다면 팀 전체가 동일한 Hook을 사용하도록 보장하려면 어떻게 해야 할까? 크게 두 가지 방법이 있다.
보통 husky를 사용하는 두 번째 방법을 많이 사용한다!
📜 Git Hooks의 종류
Client(Local) Hooks
pre-commit: commit message를 작성하기 전에 실행된다.
주로 코드 스타일 검사, 테스트 실행 등을 수행하여 commit 전 코드의 품질을 확인한다.prepare-commit-msg: commit message 편집기가 실행되기 전에 실행된다.
자동으로 message를 추가하거나 특정 형식을 적용하는 데 사용된다.$1: commit message가 들어 있는 파일의 경로$2: commit의 종류$3: SHA-1 해시 (Amending commit일 때에만)
commit-msg: commit message 완성 후 최종 commit이 완료되기 전에 실행된다.
message의 형식을 검사하거나, 특정 조건을 확인하는 데 사용된다.$1: commit message가 들어 있는 임시 파일의 경로
post-commit: commit이 완료된 후 실행된다.
주로 알림을 보내거나, 추가적인 로컬 작업을 실행할 때 사용된다.post-checkout: branch나 파일을 checkout한 후 실행된다.
환경 설정을 변경하거나, 특정 파일을 재설정하는 데 유용하다.pre-rebase: rebase가 시작되기 전에 실행된다.post-rewrite: commit을 변경하는 명령이 실행된 후에 실행된다.
commit이 재작성된 후에 후속 작업을 처리할 수 있다.post-merge: merge가 완료된 후에 실행된다.
주로 merge 후 정리 작업이나 알림을 보내는 데 사용된다.pre-push:git push명령을 실행하기 전에 실행된다.
push 전에 코드 검사를 다시 하거나, 서버와의 동기화를 확인하는 데 유용하다.
Server Hooks
pre-receive: 서버 측에서 push가 수신되기 전에 실행된다. push된 commit의 유효성을 검사하고, push를 차단할 수 있다.update: 서버에서 branch나 tag에 대한 참조가 업데이트될 때 실행된다. 특정 branch에 대한 접근 제어를 설정하거나, push된 내용의 무결성을 확인할 수 있다.post-receive: push가 서버에 적용된 후 실행된다. CI/CD pipeline을 trigger하거나, push된 변경 사항을 다른 서비스와 동기화하는 데 사용된다.
✨ husky로 Git Hooks 적용하기
💾 Repository 종류
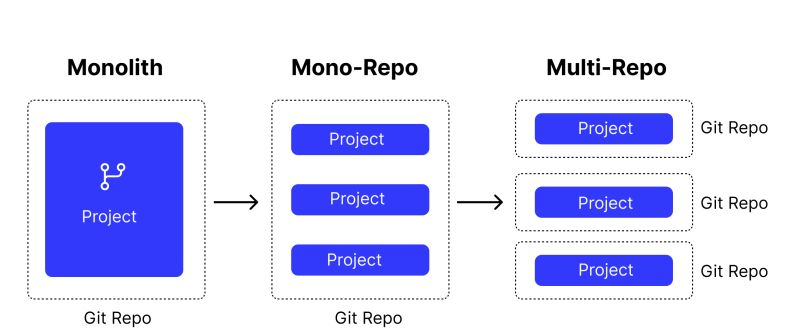
보통 하나의 repo 안에 하나의 프로젝트가 들어있는 것이 일반적이다. 이를 Multi-Repo 또는 PolyRepo라고 한다.
Mono-Repo는 하나의 repo 안에 여러 개의 프로젝트가 있는 형태이다.
🛠️ Mono-Repo에 husky 설정하기
댕댕워크 프로젝트는 다음과 같은 구조의 Mono-Repo이다.
dangdang-walk/
├── .git
├── backend/
│   └── package.json
└── frontend/
    └── package.json
따라서 각 package.json에서의 prepare script가 .git을 찾아갈 수 있도록 수정해주어야 한다.
예를 들어 backend에 husky를 설정하는 방법은 다음과 같다.
-
dangdang-walk/backend에서 husky 설치 및 초기화npm install --save-dev husky npx husky init # .husky 폴더가 생성된다.(
.git can't be found가 출력되지만 아직 설정을 해주지 않았기 때문에 정상이다.) -
dangdang-walk/backend/package.json의 script를 다음과 같이 수정"scripts": { "prepare": "cd .. && husky backend/.husky" }, -
dangdang-walk/backend에서 prepare script를 실행한다.npm run prepare # .husky/_ 폴더가 생성된다.
frontend도 동일하게 작업한다.
이제 .husky 폴더에 필요한 git hooks 스크립트를 작성하면 된다.
추후 리포지토리를 clone/fork한 뒤 작업할 폴더에서 npm install을 하면 husky setting이 완료되어 git hooks 스크립트를 사용할 수 있다.
🧹 git commit 전 ESLint/Prettier 적용하기
-
lint-staged설치하기npm install --save-dev lint-staged -
package.json에lint-staged설정하기"lint-staged": { "*.{ts,tsx}": [ "eslint --fix", "prettier --write" ] }, -
pre-commitgit hook 스크립트 작성하기# .husky/pre-commit npx lint-staged
🧹 git commit 후 message 검사하기
-
commitlint 설치하기
npm install --save-dev @commitlint/{cli,config-conventional} -
commitlint설정하기 (Rules 참고)// commitlint.config.js module.exports = { extends: ['@commitlint/config-conventional'], rules: { 'subject-case': [2, 'always', 'sentence-case'], } }; -
commit-msggit hook 스크립트 작성하기# .husky/commit-msg npx --no -- commitlint --edit ${1}