1. 이미지 출력용 함수 정의
from IPython.display import Image, display
import cv2
import mediapipe as mp

def img_show(image, width=400):
  _, buffer = cv2.imencode(".jpg", image)
  display(Image(data=buffer, width=width))

img = mp.Image.create_from_file("smile.jpg")
img_cv = img.numpy_view()
img_cv = cv2.cvtColor(img_cv, cv2.COLOR_BGR2RGB)
img_show(img_cv)
출처: freepik
2. Face Detection 실시
FaceMesh()객체 이용 Face Detection 실시
# FaceMesh 객체 초기화
face_mesh = mp.solutions.face_mesh.FaceMesh(
min_detection_confidence=.5,
min_tracking_confidence=.5,
)
# landmark 표시 스타일 설정
drawing_specs = mp.solutions.drawing_utils.DrawingSpec(
thickness=5,
circle_radius=5,
color=(0, 150, 0),
)
# Face Detection 실시
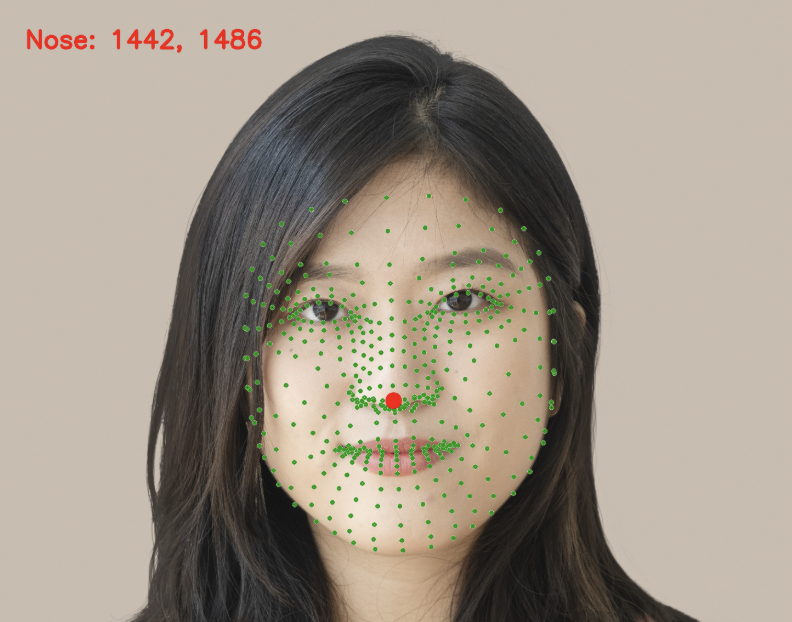
res = face_mesh.process(img_cv)3. Landmark 표시
- 이미지 내 얼굴인식 Landmark 및 코 위치 좌표 표시
# 함수 정의
def find_nose_position(img):
  img_copy = img.copy()
  img_h, img_w, img_c = img.shape

  for face_landmarks in res.multi_face_landmarks:
    mp.solutions.drawing_utils.draw_landmarks(
        image=img_copy,
        landmark_list=face_landmarks,
        landmark_drawing_spec=drawing_specs,
    )

    for idx, lm in enumerate(res.multi_face_landmarks[0].landmark):
      if idx == 1: # 코 끝
        nose_x = lm.x * img_w # 정규화된 x좌표를 이미지에 맞게 변환
        nose_y = lm.y * img_h # 정규화된 y좌표를 이미지에 맞게 변환
        text = f"Nose: {int(nose_x)}, {int(nose_y)}"

		# 좌상단 코 좌표 표시
        cv2.putText(img_copy, text, (100, 200), cv2.FONT_HERSHEY_SIMPLEX, 3, (0, 0, 255), 10)
        # 코 끝 원 표시
        cv2.circle(img_copy, (int(nose_x), int(nose_y)), 30, (0, 0, 255), -1)

  # 이미지 출력
  img_show(img_copy)

find_nose_position(img_cv)
*이 글은 제로베이스 데이터 취업 스쿨의 강의 자료 일부를 발췌하여 작성되었습니다.

데이터 분석, 데이터 사이언스 학습 저장소