Chapter 14. Secure HTTP
(해석 또는 이해가 잘못된 부분이 있다면 댓글로 편하게 알려주세요.)
✏️ 원문 번역
A Real HTTP Client
SSL is a complicated binary protocol. Unless you are a crypto expert, you shouldn’t send raw SSL traffic directly. Thankfully, several commercial and open source libraries exist to make it easier to program SSL clients and servers.
-
SSL은 복잡한 바이너리 프로토콜입니다.
-
암호학을 전공한 사람이 아닌 이상 원시 SSL 트래픽을 직접적으로 전송해서는 안 됩니다.
-
다행히 오픈소스 혹은 상업용 라이브러리가 존재하여 우리는 SSL 클라이언트와 서버를 더 쉽게 프로그래밍할 수 있습니다.
OpenSSL
OpenSSL is the most popular open source implementation of SSL and TLS. The OpenSSL Project is a collaborative volunteer effort to develop a robust, commercial-grade, full-featured toolkit implementing the SSL and TLS protocols, as well as a full-strength, general-purpose cryptography library. You can get information about OpenSSL, and download the software, from http://www.openssl.org.
-
OpenSSL은 SSL과 TLS를 구현한 대표적인 오픈소스입니다.
-
OpenSSL Project는 자발적인 협동을 통해 강력한 범용 암호학 라이브러리와 SSL과 TLS 프로토콜을 구현하는 상업용 수준의 Robust, Full-featured Toolkit을 만들어 냈습니다.
-
OpenSSL에 관해 자세히 알아보거나 소프트웨어를 설치하기 위해서는 http://www.openssl.org를 방문하시기 바랍니다.
You might also hear of SSLeay (pronounced S-S-L-e-a-y). OpenSSL is the successor to the SSLeay library, and it has a very similar interface. SSLeay was originally developed by Eric A. Young (the “eay” of SSLeay).
-
SSLeay에 대해서도 들어보신 분이 있을지도 모릅니다.
-
OpenSSL은 SSLeay 라이브러리의 후속 버전으로, 매우 유사한 인터페이스를 가지고 있습니다.
-
SSLeay는 Eric A. Young(SSLeay의 "eay")에 의해 처음 개발되었습니다.
A Simple HTTPS Client
In this section, we’ll use the OpenSSL package to write an extremely primitive HTTPS client. This client establishes an SSL connection with a server, prints out some identification information from the site server, sends an HTTP GET request across the secure channel, receives an HTTP response, and prints the response.
-
이번 섹션에서는 OpenSSL 패키지를 사용하여 매우 원시적인 HTTPS 클라이언트를 작성해보려고 합니다.
-
클라이언트는 서버에 SSL 연결을 생성하고 사이트 서버의 신원 정보를 출력합니다.
-
이후 보안 채널을 통해 HTTP GET 요청을 전송하고 HTTP 응답을 받아 출력합니다.
The C program shown below is an OpenSSL implementation of the trivial HTTPS client. To keep the program simple, error-handling and certificate-processing logic has not been included.
-
하단의 C 프로그램은 간단한 HTTP 클라이언트의 OpenSSL 구현을 나타냅니다.
-
프로그램을 간단히 하기 위해 에러 핸들링과 인증서 처리 과정은 포함하지 않았습니다.
Because error handling has been removed from this example program, you should use it only for explanatory value. The software will crash or otherwise misbehave in normal error conditions.
-
예제 프로그램에서 에러 핸들링이 삭제되었기 때문에 이 코드는 오직 설명을 위한 용도로만 사용됩니다.
-
이 소프트웨어는 일반적인 오류 조건에서 충돌하거나 오작동할 수 있습니다.
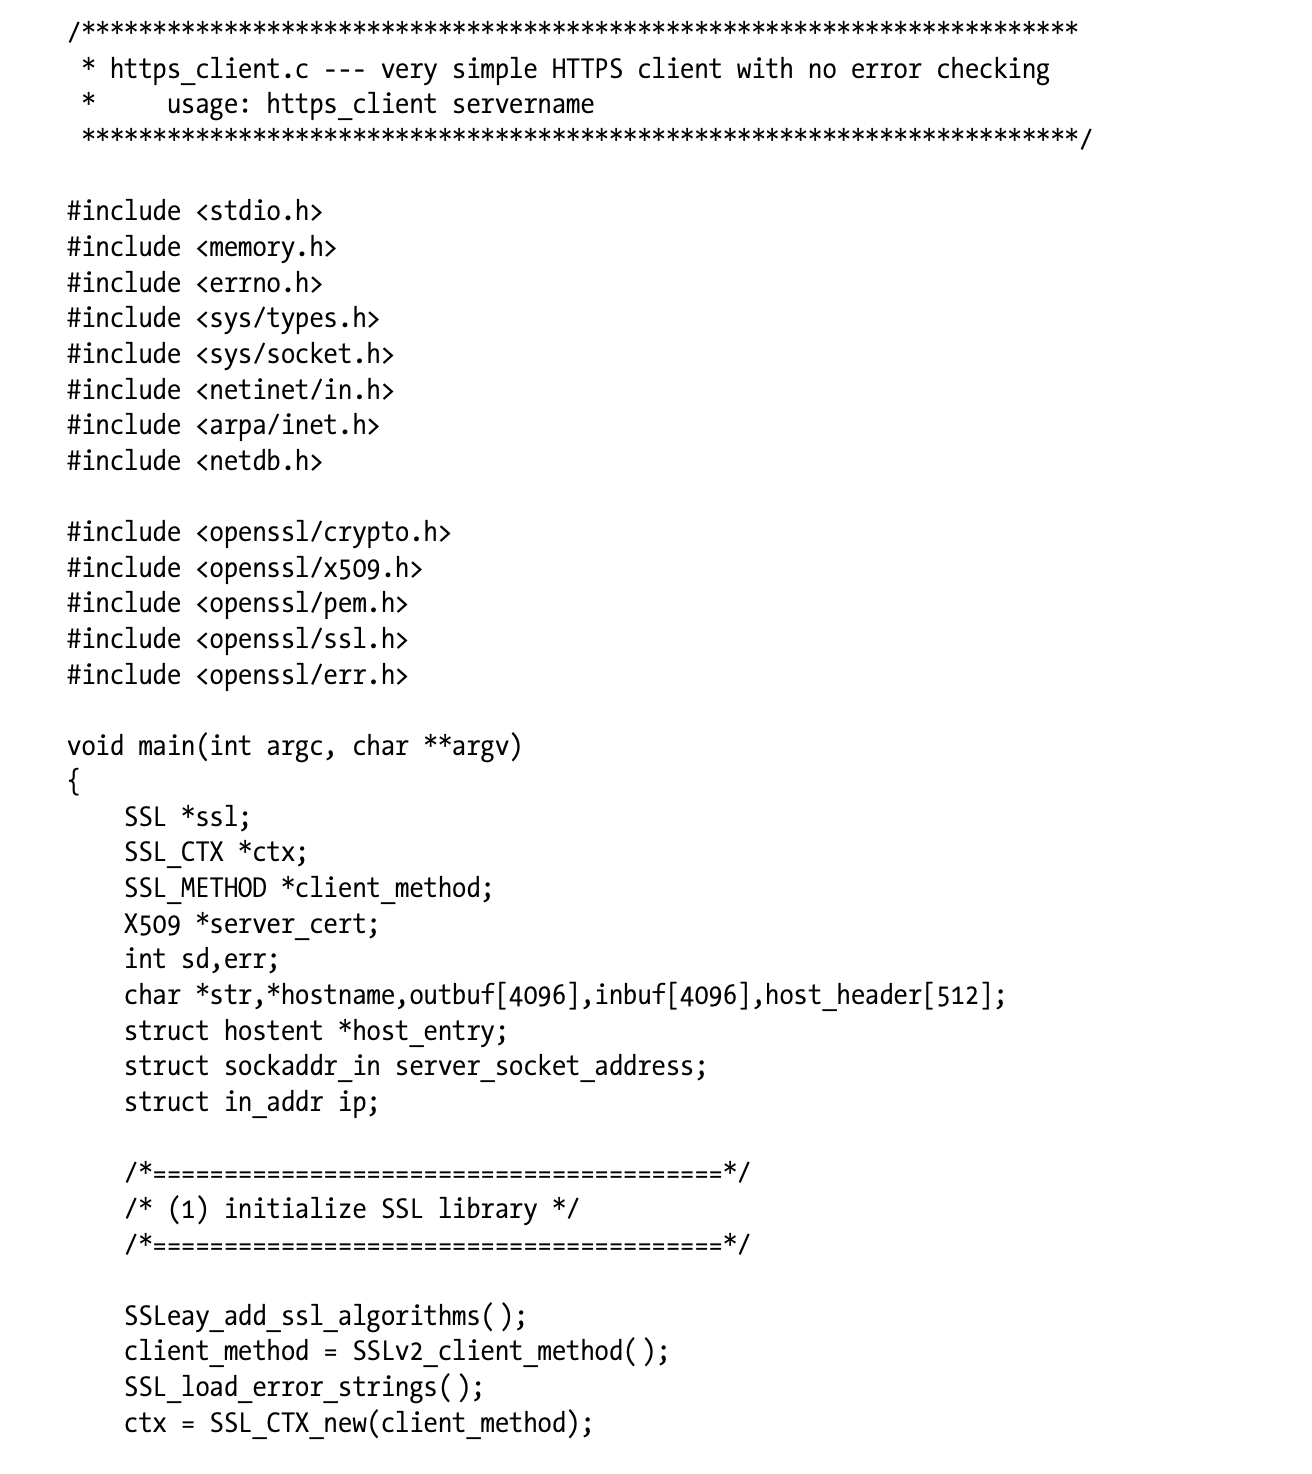
This example compiles and runs on Sun Solaris, but it is illustrative of how SSL programs work on many OS platforms. This entire program, including all the encryption and key and certificate management, fits in a three-page C program, thanks to the powerful features provided by OpenSSL.
-
해당 예제는 Sun Solaris를 컴파일 및 빌드하고 있지만 이 코드는 다양한 OS에서 SSL이 동작하는 방식을 나타냅니다.
-
SSL이 제공하는 강력한 특성으로 인해 암호화와 키, 인증서 관리를 모두 포함하는 전체 프로그램이 3페이지의 C 프로그램으로 표현될 수 있습니다.
Let’s walk through the program section by section:
- 각각의 프로그램 섹션을 상세히 살펴봅시다.
• The top of the program includes support files needed to support TCP networking and SSL.
- 프로그램의 상단에서는 TCP 네트워킹과 SSL을 지원하기 위한 몇 가지 파일들을 포함하고 있습니다.
• Section 1 creates the local context that keeps track of the handshake parameters and other state about the SSL connection, by calling SSL_CTX_new.
- Section 1은 SSL_CTX_new()를 호출하여 Handshake 파라미터를 지속적으로 추적하기 위한 로컬 context와 그 밖의 SSL 연결 상태를 생성합니다.
• Section 2 converts the input hostname (provided as a command-line argument) to an IP address, using the Unix gethostbyname function. Other platforms may have other ways to provide this facility.
-
Section 2에서는 Unix의 gethostbyname 함수를 이용하여 Command-line Argument로부터 입력받은 호스트명을 IP 주소로 변환합니다.
-
다른 플랫폼은 해당 기능을 제공하기 위해 다른 방식을 사용할 수 있습니다.
• Section 3 opens a TCP connection to port 443 on the server by creating a local socket, setting up the remote address information, and connecting to the remote server.
-
Section 3은 서버의 44번 포트에 TCP 연결을 형성합니다.
-
로컬 소켓을 형성한 후 원격 주소 정보를 설정하여 원격 서버와 연동하는 과정입니다.
• Once the TCP connection is established, we attach the SSL layer to the TCP connection using SSL_new and SSL_set_fd and perform the SSL handshake with the server by calling SSL_connect. When section 4 is done, we have a functioning SSL channel established, with ciphers chosen and certificates exchanged.
-
TCP 연결이 설정되고 나면 SSL_new와 SSL_set_fd를 사용하여 TCP 연결 위에 SSL 레이어를 올립니다.
-
SSL_connect를 사용하면 서버와 SSL Handshake를 수행할 수 있습니다.
-
Section 4가 완료되면 Cipher간 선택되고 인증서가 교환되는 등 정상적으로 동작하는 SSL Channel이 설정됩니다.
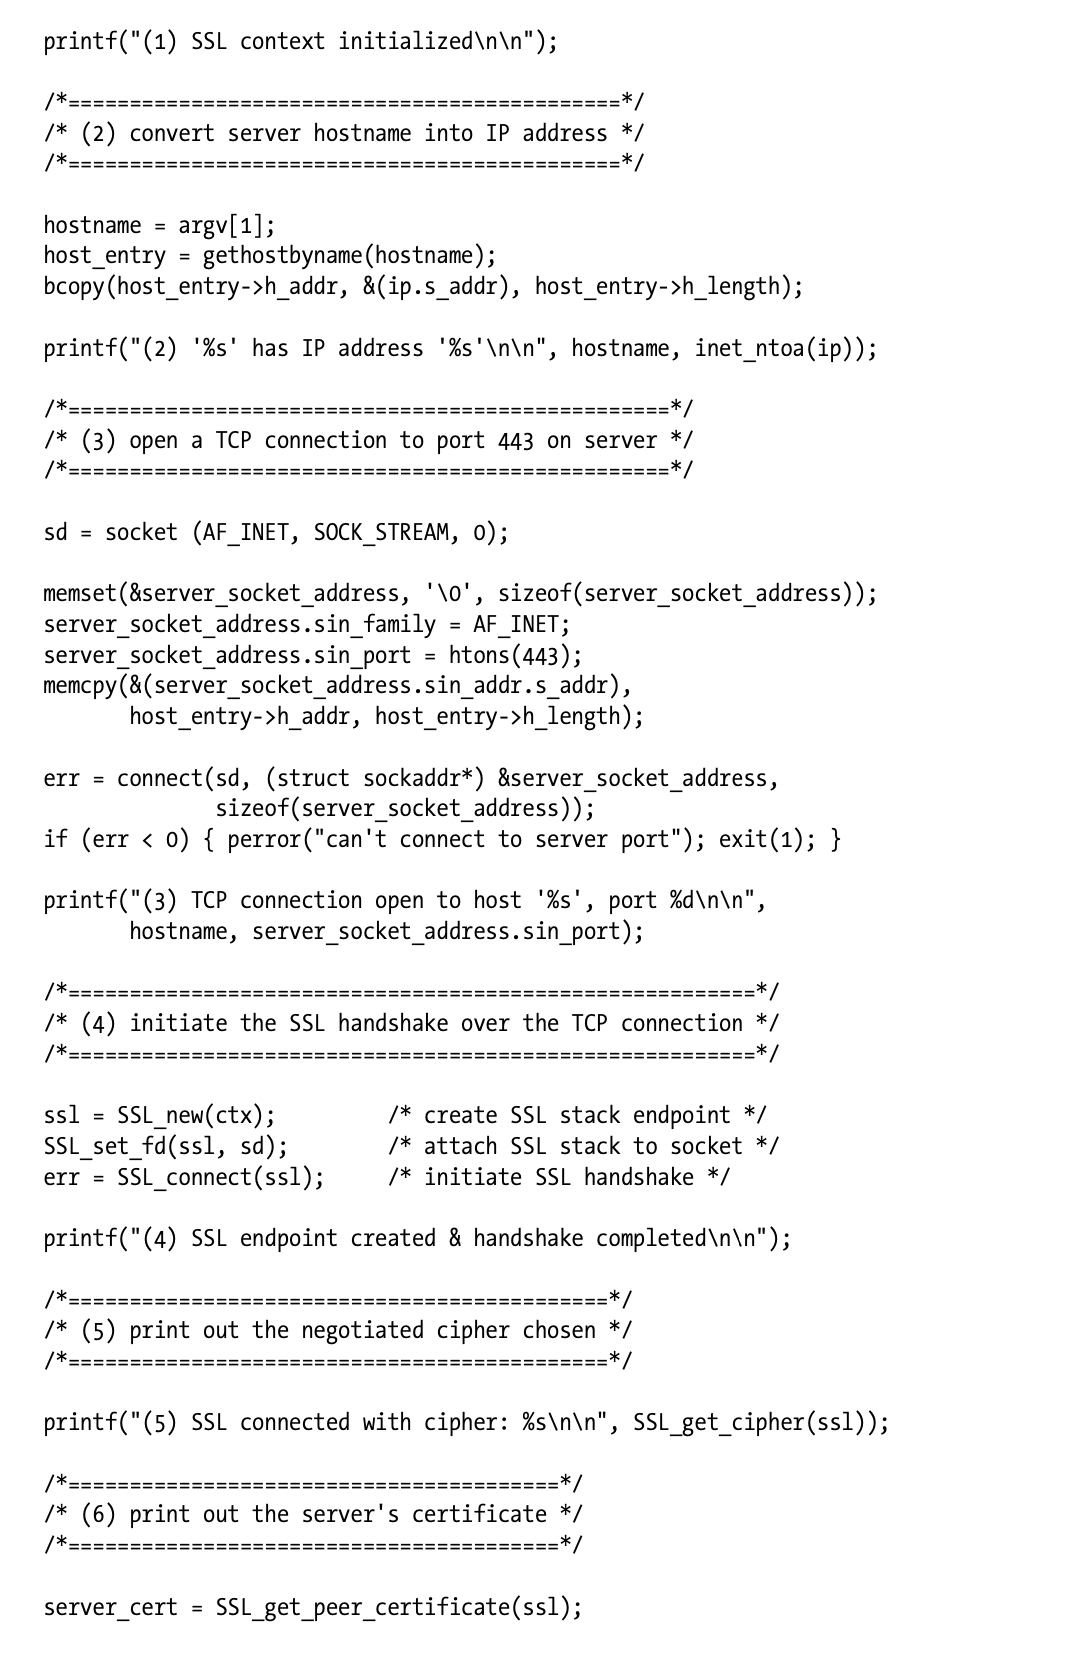
• Section 5 prints out the value of the chosen bulk-encryption cipher.
- Section 5에서는 선택된 암호화 Cipher의 값을 출력합니다.
• Section 6 prints out some of the information contained in the X.509 certificate sent back from the server, including information about the certificate holder and the organization that issued the certificate. The OpenSSL library doesn’t do anything special with the information in the server certificate. A real SSL application, such as a web browser, would do some sanity checks on the certificate to make sure it is signed properly and came from the right host. We discussed what browsers do with server certificates in “Site Certificate Validation.”
-
Section 6은 서버로부터 전송받은 X.509 인증서에 포함된 일부 정보를 출력합니다.
-
해당 정보는 인증서 소유자에 관한 정보와 인증서를 발급한 기관에 대한 정보를 포함합니다.
-
OpenSSL 라이브러리는 서버 인증서에 들어있는 정보를 별도로 가공하지 않습니다.
-
웹 브라우저와 같은 실제 SSL 응용 프로그램에서는 인증석 올바른 호스트로부터 적절하게 서명되어 전달되었는지 보장하기 위해 Sanity Check를 수행하는 것이 좋습니다.
-
브라우저가 서버 인증서를 검증하는 방식에 대해서는 "Site Certificate Validation"에서 논의하였습니다.
• At this point, our SSL connection is ready to use for secure data transfer. In section 7, we send the simple HTTP request “GET / HTTP/1.0” over the SSL channel usingSSL_write, then close the outbound half of the connection.
-
이제 SSL 연결은 비공개 데이터를 전송하기 위한 준비가 되었습니다.
-
Section 7에서 클라이언트는 SSL 채널을 통해 "GET / HTTP/1.0"의 간단한 HTTP 요청을 전송한 후 연결의 아웃바운드를 종료합니다(더 이상 데이터를 전송하지 않겠다는 것을 의미합니다).
• In section 8, we read the response back from the connection using SSL_read, and print it on the screen. Because the SSL layer takes care of all the encryption and decryption, we can just write and read normal HTTP commands.
-
Section 8에서는 SSL_read를 사용하여 연결을 통해 돌아온 응답을 읽고 화면에 출력합니다.
-
SSL 레이어가 모든 암호화와 복호화를 관장하고 있기 때문에 일반적인 HTTP 명령만 쓰거나 읽을 수 있습니다.
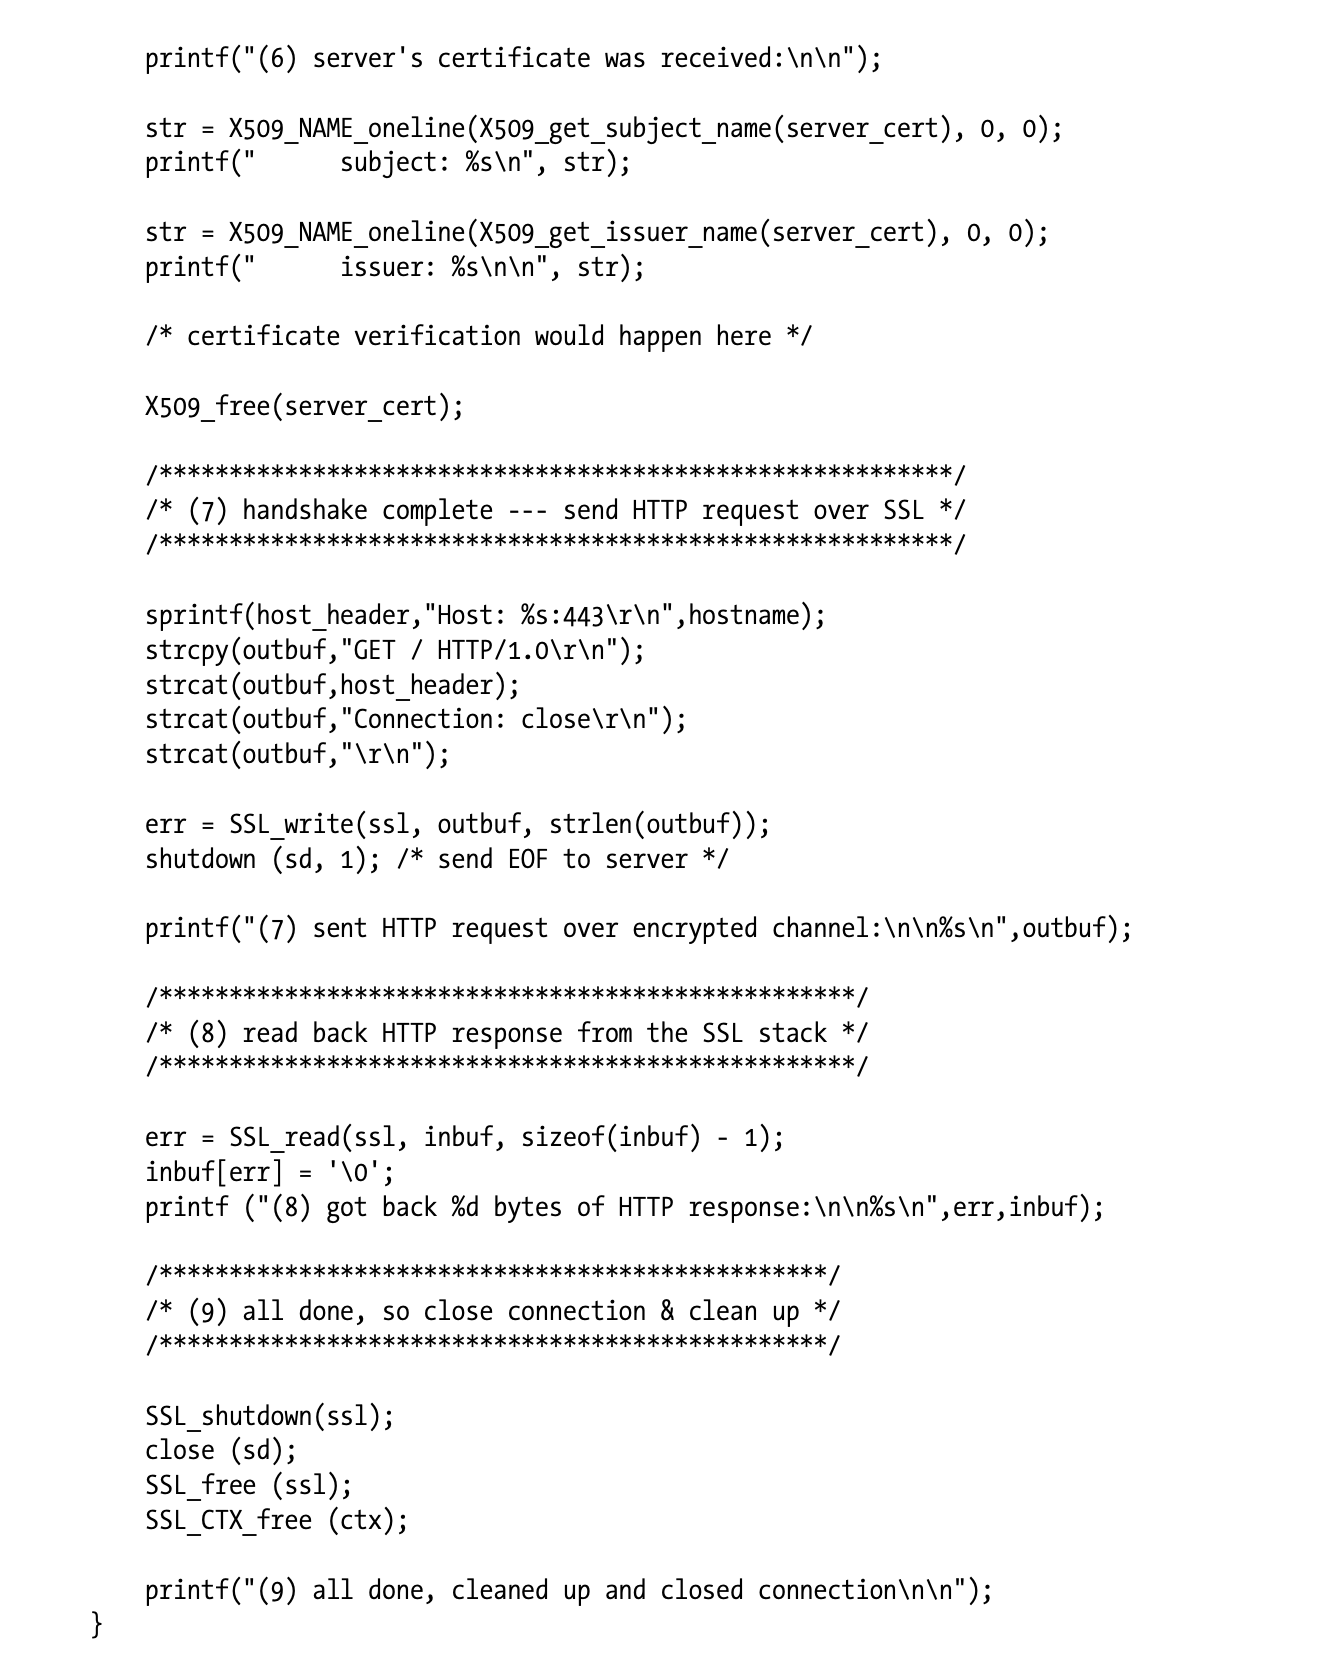
• Finally, we clean up in section 9.
- 마지막으로 Section 9에서 후처리 및 뒷정리를 수행합니다.
Refer to http://www.openssl.org for more information about the OpenSSL libraries.
- OpenSSL 라이브러리에 관한 상세 정보는 http://www.openssl.org 를 참고하시기 바랍니다.
✏️ 요약
OpenSSL Client
- OpensSL : SSL/TLS 프로토콜을 구현한 오픈소스 라이브러리
Implementation
-
SSL_CTX_new() : OpenSSL에서 SSL/TLS 연결을 설정하기 위한 구조체 -> Handshake를 위한 파라미터 지속 추적, 로컬 context 생성
-
TCP 연결 생성
- gethostbyname() : hostname을 ip 주소로 변환
- socket(AF_INET, SOCK_STREAM, 0) : IPv4(AF_INET) 주소 체계로 TCP(SOCK_STREAM) 연결 생성
- sockaddr_in 설정 : 서버의 sin_family(AF_INET)와 sin_port(SSL -> 443) 지정
- connect() : TCP 연결 생성
- SSL Handshake
- SSL_new(ctx) : 실제 연결에 사용할 SSL 객체 생성
- SSL_set_fd(ssl, sd) : 소켓에 SSL 스택 추가
- SSL_connect : SSL 연결 생성
- SSL_get_chipher(ssl) : Cipher 선택
- SSL_get_peer_certificate(ssl) : 서버 인증서 조회
- Site Certificate Validation
- HTTP GET 요청 전송
- SSL_write(ssl, buf, strlen(buf)) : SSL을 통해 서버의 root에 HTTP GET 요청 전송
- shudown(sd, 1) : 서버에 EOF 전송 -> Half-Close
- SSL_ read(ssl, buf, sizeof(buf)-1) : 서버 응답 읽기
- SSL 연결 종료 및 정리
- SSL_shutdown(ssl) : SSL 연결 종료
- close(sd) : Socket 연결 종료
- SSL_free(ssl) : Heap에 할당된 SSL 객체 메모리 정리
- SSL_CTX_free(ctx) : Heap에 할당된 CTX 객체 메모리 정리
✏️ 감상
TCP 연결만 주구장창 했던 기억
예전에 IPC를 공부하면서 Socket을 사용해 C 프로그래밍을 해본 적이 있다. 원시 코드로 TCP 통신을 구현할 일은 거의 없다고 생각하긴 하지만, 여러모로 딥하게 파는 걸 좋아하는 나로서는 그것만큼 재미있는 일이 없었다(?) 당시에 꽤 재미있게 공부했던 기억이 난다.
아무튼 TCP 통신은 C로도 구현해보고 파이썬으로도 구현해 봤었는데... 놀랍게도 지금까지 TCP 위에 SSL까지 얹어본 적은 한 번도 없었다..! 내가 왜 그 생각을 못했을까. 이왕 하는 김에 OpenSSL도 같이 써보았으면 좋았을 것을 이걸 왜 굳이 번거롭게 따로 공부하고 있는 걸까...ㅋㅋㅋㅋㅋㅋㅋㅋ 하기야 그때는 보안의 ㅂ자도 모르던 시절이라 SSL 자체를 잘 모르니까 공부할 생각도 안 들었던 것 같다. 이래서 사람이 아는 만큼 보인다고 하는가보다.
그래도 다행히 TCP 연결을 주구장창 했던 경험이 있어서 SSL 코드는 쉽게 금방 이해할 수 있었다. TCP Socket 연결하는 코드 위에 SSL 레이어 하나만 더 얹으면 끝나는 거라 별로 어렵지 않았다. 포트만 443번 써주고 데이터를 읽고 쓸 때 read(), write() System Call 대신 OpenSSL 함수를 사용해주기만 하면 된다. 라이브러리 함수가 Abstraction이 직관적으로 잘 되어 있기 때문에 생긴 것도 socket 통신 함수랑 비슷하게 생겼다. 그냥 socket 연결하듯이 똑같이 SSL 연결을 해주면 끝.. 요로코롬 간단할 수가 없다.
OpenSSL Server는 어떻게 구현할까
책에서는 클라이언트 기준으로 예를 들었다. 당연하다. 클라이언트는 서버랑 연결 하나 생성해서 SSL 통신을 주고받으면 끝이니까.
항상 문제는 서버에서 생긴다. 우리는 클라이언트의 요청을 순서대로 멍청하게 처리하지 않을 것이다. Multi-process, Multi-thread 환경을 사용한다는 것은 동기화부터 추가적인 연결 관리가 필요해진다는 뜻이다. 일단 클라이언트처럼 TCP 위에 SSL 코드를 올리는 것은 기본이고, 요청마다 Multi-thread를 사용하기 위한 thread 라이브러리가 함께 올라간다. 여기에 서버가 가질 수 있는 연결의 개수를 관리하기 위해 최대 파일 디스크립터 수를 조정하거나 타임아웃 시간을 설정하는 등 고려해야 할 사항들이 백만 개로 늘어난다. 그래서 서버가 재미있는 것이죵
참고로 SSL은 OSI 7 Layer에서 Layer 5-6의 역할을 동시에 한다고 보면 된다. SSL은 Handshake 과정이 추가되는 만큼 성능상의 오버헤드가 발생할 수 밖에 없는데 요청이 올 때마다 Handshake를 하고 있으면 매우 비효율적이다. 그래서 보통 SSL은 하나의 연결에 대해 암호화 세션을 만들어서 마치 Session Layer처럼 동작하고, 해당 세션에 전송되는 데이터를 암호화함으로써 Presentation Layer처럼 동작한다.