도커/쿠버네티스를 활용한 컨테이너 개발 실전 입문 - 04. 스웜을 이용한 실전 애플리케이션 개발

01. 웹 애플리케이션 구성
지금까지 배운 것을 토대로 웹 애플리케이션 제작 실습을 해본다.
애플리케이션 요구 조건
- 주제 : TODO 앱
- TODO를 등록, 수정, 삭제할 수 있다.
- 등록된 TODO의 목록을 출력할 수 있다.
- 브라우저에서 사용할 수 있는 웹 애플리케이션이다.
- JSON API 엔드포인트를 제공한다.
아키텍처
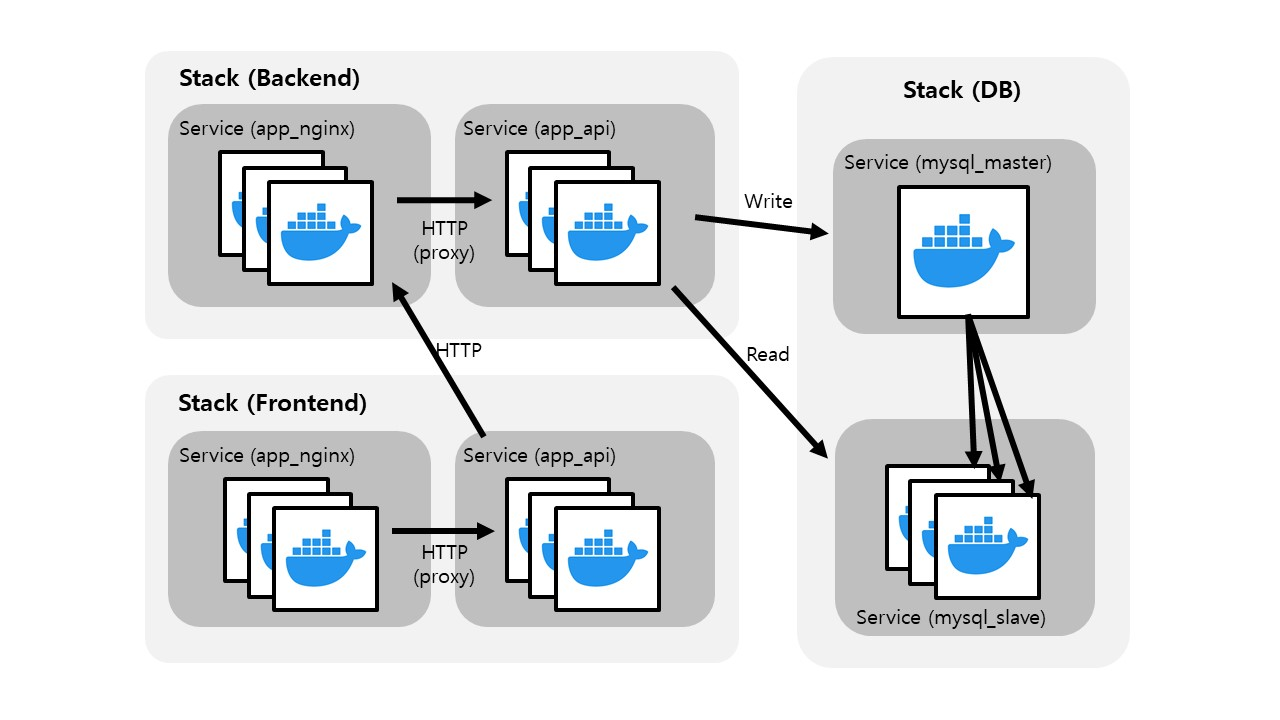
구성
MySQL
마스터-슬레이브 구조로 구성. insert, update, delete 쿼리는 master db에서 처리하고, select 쿼리는 slave db가 처리한다. 마스터 컨테이너는 레플리카를 한 개만 둔다.
API & Frontend & Nginx
흔히 볼 수 있는 평범한 구성. 모두 레플리카 수를 우선 3개로 한다.
overlay 네트워크
3개의 stack이 서로 소통해야 하므로, 모두 하나의 네트워크를 공유하도록 한다.
02. MySQL 서비스 구축
MySQL 서비스 구축
mysql의 설정파일인 mysqld.conf를 수정해 마스터-슬레이브 db를 구축한다. 스택 내의 각 서비스들이 중복이 없도록 이 파일안에 server-id를 설정해야 한다.
add-server-id.sh를 통해 이 작업을 수행한다.
#!/bin/bash -e
OCTETS=(`hostname -i | tr -s '.' ' '`)

MYSQL_SERVER_ID=`expr ${OCTETS[2]} \* 256 + ${OCTETS[3]}`
echo "server-id=$MYSQL_SERVER_ID" >> /etc/mysql/mysql.conf.d/mysqld.conf
그 다음 master인지 slave인지의 여부를 환경변수로 받아 경우에 맞게 db 설정을 해주고 서버를 시작하는 prepare.sh파일을 작성한다. (내용 생략)
Dockerfile
FROM mysql:5.7

# (1) 패키지 업데이트 및 wget 설치
RUN apt-get update
RUN apt-get install -y wget

# (2) entrykit 설치
RUN wget https://github.com/progrium/entrykit/releases/download/v0.4.0/entrykit_0.4.0_linux_x86_64.tgz
RUN tar -xvzf entrykit_0.4.0_linux_x86_64.tgz
RUN rm entrykit_0.4.0_linux_x86_64.tgz
RUN mv entrykit /usr/local/bin/
RUN entrykit --symlink

# (3) 스크립트 및 각종 설정 파일 복사
COPY add-server-id.sh /usr/local/bin/
COPY etc/mysql/mysql.conf.d/mysqld.cnf /etc/mysql/mysql.conf.d/
COPY etc/mysql/conf.d/mysql.cnf /etc/mysql/conf.d/
COPY prepare.sh /docker-entrypoint-initdb.d
COPY init-data.sh /usr/local/bin/
COPY sql /sql

# (4) 스크립트, mysqld 실행
ENTRYPOINT [ \
  "prehook", \
    "add-server-id.sh", \
    "--", \
  "docker-entrypoint.sh" \
]

CMD ["mysqld"]
** entrykit을 통해 mysql 서비스 시작 이전에 해야할 일(add-server-id.sh)을 실행시킬 수 있다.
stack 정의 파일
todo-mysql.yml
version: "3"

services:
    master:
        image: registry:5000/ch04/tododb:latest
        deploy:
            replicas: 1
            placement:
                constraints: [node.role != manager]
        environment:
            MYSQL_ROOT_PASSWORD: gihyo
            MYSQL_DATABASE: tododb
            MYSQL_USER: gihyo
            MYSQL_PASSWORD: gihyo
            MYSQL_MASTER: "true"
        networks:
            - todoapp

    slave:
        image: registry:5000/ch04/tododb:latest
        deploy:
            replicas: 2
            placement:
                constraints: [node.role != manager]
        depends_on:
            - master
        environment:
            MYSQL_MASTER_HOST: master
            MYSQL_ROOT_PASSWORD: gihyo
            MYSQL_DATABASE: tododb
            MYSQL_USER: gihyo
            MYSQL_PASSWORD: gihyo
            MYSQL_REPL_USER: repl
            MYSQL_REPL_PASSWORD: gihyo
        networks:
            - todoapp

networks:
    todoapp:
        external: true
04-01에서 정의했듯이 마스터는 레플리카 수를 1개만, 슬레이브는 2개로 설정하여 스택정의 파일을 작성한 후, 아래 명령어로 스택을 스웜 클러스터에 배포한다.
docker container exec -it manager \
docker stack deploy -c /stack/todo-mysql.yml todo_mysql
아래와 같이 배포 현황을 확인할 수 있다.
docker container exec -it manager \
docker service ls

ID                  NAME                MODE                REPLICAS            IMAGE                               PORTS
nd3qtgaf6yr1        todo_mysql_master   replicated          1/1                 registry:5000/ch04/tododb:latest
d3vkcoroi2nl        todo_mysql_slave    replicated          2/2                 registry:5000/ch04/tododb:latest
03. API 서비스 구축
API 서버 서비스 구축
go를 이용해 간단한 CRUD operation을 수행할 수 있는 api 서버를 만들고, 이를 도커 스웜으로 배포한다.
Dockerfile
FROM golang:1.13.6

WORKDIR /
ENV GOPATH /go

COPY . /go/src/github.com/gihyodocker/todoapi
RUN go get github.com/go-sql-driver/mysql
RUN go get gopkg.in/gorp.v1
RUN cd /go/src/github.com/gihyodocker/todoapi && go build -o bin/todoapi cmd/main.go
RUN cd /go/src/github.com/gihyodocker/todoapi && cp bin/todoapi /usr/local/bin/

CMD ["todoapi"]
Stack 정의 파일
todo-app.yml
version: "3"

services:
    api:
        image: registry:5000/ch04/todoapi:latest
        deploy:
            replicas: 2
        environment:
            TODO_BIND: ":8080"
            TODO_MASTER_URL: "gihyo:gihyo@tcp(todo_mysql_master:3306)/tododb?parseTime=true"
            TODO_SLAVE_URL: "gihyo:gihyo@tcp(todo_mysql_slave:3306)/tododb?parseTime=true"
        networks:
            - todoapp

networks:
    todoapp:
        external: true
stack 배포
(생략)
04. nginx 구축
nginx 구축
nginx는 웹 UI 서비스 앞단에 1개, api 서버 앞단에 1개로 총 2개를 배치한다. nginx와 같은 웹 서버를 api의 앞단에 배치하는 이유는 접근 로그를 생성하기 편리하다는 점,
캐시 제어, 애플리케이션을 수정하지 않고도 임의로 라우팅 설정이 가능하다는 점 등을 들 수 있다.
Dockerfile
FROM nginx:1.13

RUN apt-get update
RUN apt-get install -y wget
RUN wget https://github.com/progrium/entrykit/releases/download/v0.4.0/entrykit_0.4.0_linux_x86_64.tgz
RUN tar -xvzf entrykit_0.4.0_linux_x86_64.tgz
RUN rm entrykit_0.4.0_linux_x86_64.tgz
RUN mv entrykit /usr/local/bin/
RUN entrykit --symlink

RUN rm /etc/nginx/conf.d/*
COPY etc/nginx/nginx.conf.tmpl /etc/nginx/
COPY etc/nginx/conf.d/ /etc/nginx/conf.d/

ENTRYPOINT [ \
  "render", \
      "/etc/nginx/nginx.conf", \
      "--", \
  "render", \
      "/etc/nginx/conf.d/upstream.conf", \
      "--", \
  "render", \
      "/etc/nginx/conf.d/public.conf", \
      "--" \
]

CMD ["nginx", "-g", "daemon off;"]
stack 정의 파일
04-03에서 작성했던 api 서버의 스택 정의 파일에 다음 내용을 추가한다.
	nginx:
		image: registry:5000/ch04/nginx:latest
		deploy:
			replicas: 2
			placement:
				constraints: [node.role != manager]
		depends_on:
			- api
		environment:
			WORKER_PROCESSES: 2
			WORKER_CONNECTIONS: 1024
			KEEPALIVE_TIMEOUT: 65
			GZIP: "on"
			BACKEND_HOST: todo_app_api:8080
			BACKEND_MAX_FAILS: 3
			BACKEND_FAIL_TIMEOUT: 10S
			SERVER_PORT: 80
			SERVER_NAME: todo_app_nginx
			LOG_STDOUT: "true"
		networks:
			- todoapp
05. 웹 서비스 구축
웹 서비스 구축
정적 파일을 다루는 방법
정적 파일은 node.js를 통해 제공할 필요가 없기 때문에 nginx에서 바로 제공하도록 설정할 필요가 있다. nginx의 conf 파일에 다음과 같은 내용을 추가한다.
server {
  location /_nuxt/ {
    alias /var/www/_nuxt/$1;
    {{ if var "LOG_STDOUT" }}
    access_log /dev/stdout json;
    error_log /dev/stderr;
    {{ else }}
    access_log /var/log/nginx/assets_access.log json;
    error_log /var/log/nginx/assets_error.log;
    {{ end }}
  }
}
이렇게 하면 /_nuxt/ 경로로 들어오는 요청은 api 서버를 통하지 않고 nginx 단에서 바로 처리한다. 그리고 api 서버 단에서 생성되는 정적 에셋 파일들을 nginx와 공유할 수 있도록 하기위해
volume 설정을 스택 정의 파일에 넣어야 한다.
todo-frontend.yml
version: "3"
services:
	nginx:
		image: registry:5000/ch04/nginx-nuxt:latest
		deploy:
			replicas: 2
		placement:
			constraints: [node.role != manager]
		depends_on:
			- web
		environment:
			SERVICE_PORTS: 80
			WORKER_PROCESSES: 2
			WORKER_CONNECTIONS: 1024
			KEEPALIVE_TIMEOUT: 65
			GZIP: "on"
			BACKEND_HOST: todo_frontend_web:3000 (이 nginx 서비스의 백엔드는 web 서비스임)
			BACKENT_MAX_FAILS: 3
			BACKENT_FAIL_TIMEOUT: 10s
			SERVER_PORT: 80
			SERVER_NAME: localhost
			LOG_STDOUT: "true"
		networks:
			- todoapp
		volumes:
			- assets:/var/www/_nuxt

	web:
		image: registry:5000/ch04/todoweb:latest
		deploy:
			replicas: 2
			placement:
				constraints: [node.role != manager]
		environment:
			TODO_API_URL: http://todo_app_nginx
		networks:
			- todoapp
		volumes:
			- assets:/todoweb/.nuxt/dist

networks:
	todoapp:
		external: true

volumes:
	assets:
		driver: local
db, api, web, nginx 까지 해서 스웜 클러스터 구축이 끝났기 때문에, 이 애플리케시연을 스웜 외부로 노출시키기 위한 인그레스가 필요하다. 이 또한 스택을 ㅗ만들어 클러스터에 배포한다.
todo-ingress.yml
version: "3"
services:
	haproxy:
		image: dockercloud/haproxy
		networks:
			- todoapp
		volumes:
			- /var/run/docker.sock:/var/run/docker.sock
		deploy:
			mode: global
			placement:
				constraints:
					- node.role == manager
		ports:
			- 80:80
			- 1936:1936

networks:
	todoapp:
		external: true