1. 조이스틱 상태 시리얼 모니터 출력하기
// 조이스틱 상태 시리얼 모니터 출력하기
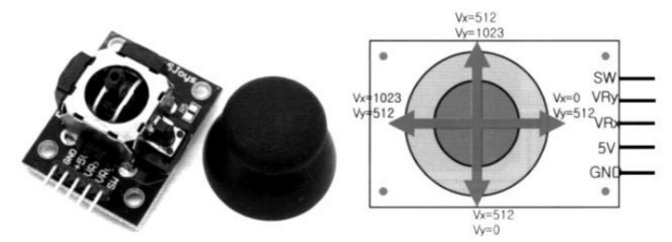
const int x_joystick = A0; // X축 아날로그 연결핀
const int y_joystick = A1; // Y축 아날로그 연결핀
const int z_sw = A2; //Z축 스위치 연결핀
void setup()
{
Serial.begin(115200);
pinMode(z_sw, INPUT_PULLUP); // Z축 스위치 연결핀 내부 풀업 설정
}
void loop(){
int dx, dy;
boolean sw;
dx = analogRead(x_joystick); // x축 방향 전압값(좌우)
dy = analogRead(y_joystick); // y축 방향 전압값(상하)
sw = digitalRead(z_sw); // z축 스위치 상태 읽기
// X축 방향 조이스틱 전압값 출력
Serial.print("X-axiz = ");
Serial.println(dx);
// Y축 방향 조이스틱 전압값 출력
Serial.print("Y-axis = ");
Serial.println(dy);
// Z축 스위치 상태 출력
Serial.print("Z-switch = ");
if(sw == 0) Serial.println("0(ON)");
else Serial.println("1(OFF)");
delay(2000);
}// 조이스틱 상태 시리얼 모니터 출력하기
#include <MiniCom.h>
#include <Analog.h>
#include <Button.h>
MiniCom com;
Analog x(A0);
Analog y(A1);
Button z(A2);
void check() {
int dx, d;
boolean sw;
dx = x.read();
dy = y.read();
sw = z.read();
char buf[17];
sprintf(buf, "%d, %d [%d]", dx, dy, sw);
com.print(1, buf);
}
void setup() {
com.init();
com.setInterval(100, check);
com.print(0, "[[Joystick]]")
}
void loop() {
com.run();
}2. joystick으로 서보보터 조정하기(실습해 볼 것)
- 조이스틱의 X 값으로 서보모터 각도 조정: LCD에 각도 표시
- 조이스틱의 버튼을 누르면 서보모터 각도 고정: 조이스틱으로 각도조정불거, LCD에 LOCK 표시, 고정된 각도 표시
- 조이스틱의 버튼을 다시 노르면 서보 모터 각도 고정 해제: 조이스틱으로 각도 조정 가능

좋은 지식 나누어요