BLE 개발 관련 내용 정리
딱 알아야 할 것만 알고 넘어가자!
BLE를 비롯한 네트워크 분야는 전산학이 탄생한 이후 70여년 동안 끊임없이 발전하며 고인물들의 학문이 돼버렸다. 그러므로 우리는 이번 글에서 BLE에 대해서 딱 알아야 할 내용만 간단하게 알아보고자 한다. 시험보려고 공부하는 게 아니지않는가? 개발하려고 공부하는거지!
학습목표
- BLE 통신 방법과 프로토콜 구조에 대해서 학습한다.
- BLE 개발을 위한 라이브러리를 분석한다.
1. BLE 통신방법
BLE 통신방법은 'Subscription-Notification' 방식으로 이뤄진다. 유튜브를 생각하면 아주 쉽게 이해할 수 있다. 우리는 보통 유튜브를 아래와 같이 이용한다.
- Advertising : 유튜브 메인화면 들어가면 수많은 유튜버의 다양한 영상이 올라와있다. 영상들은 우리들의 클릭을 바라고있다.
- Scanning: 우리는 볼만한 영상을 스크롤을 내리거나 검색창에 검색하면서 찾는다.
- Connect: 볼만한 영상을 찾았으니 클릭해서 시청한다.
- Subscription: 보니까 이 유튜버 영상은 다 재밌어보인다. 추천과 구독버튼을 누른다.
- Notification: 구독한 유튜버가 새로운 영상을 올렸다. 핸드폰에 알람이 울린다.
- 유튜브: 정보를 제공하는 디바이스고 Server 또는 Peripheral device라고 부른다.
- 우리: 정보를 제공받는 디바이스고 Client 또는 Central device라고 부른다.
- 영상: 제공되는 정보를 의미한다. 영상은 여러 정보의 집합체고 Serivce라고 부른다.
- 영상 속 타임스탬프: 영상의 구성에 따라 여러 소챕터로 나뉜다. 보통 업로더나 베스트댓글에 소챕터가 타임스탬프로 공유된다. Service 속 하위 정보를 Characteristic라고 부른다.
이해가 좀 됐다면, 아래 정리글로 마무리하자.
- Server (또는 Peripheral device)는 Service와 Characteristic을 만든 뒤 advertising 해서 자기 자신을 광고한다.
- Client (또는 Central device)는 scanning 해서 advertising 중인 디바이스들을 찾고, 하나와 연결한다.
- Client는 Server의 Service와 Characteristic을 구독(등록)하고 원하는 callback 함수를 정의한다.
- Server는 주기적으로 또는 원할 때 characteristic의 값을 갱신한다.
- 갱신될 때마다 Client가 정의한 notify에 대한 callback 함수가 호출돼 실행된다.
2. BLE 프로토콜 스택과 자료구조
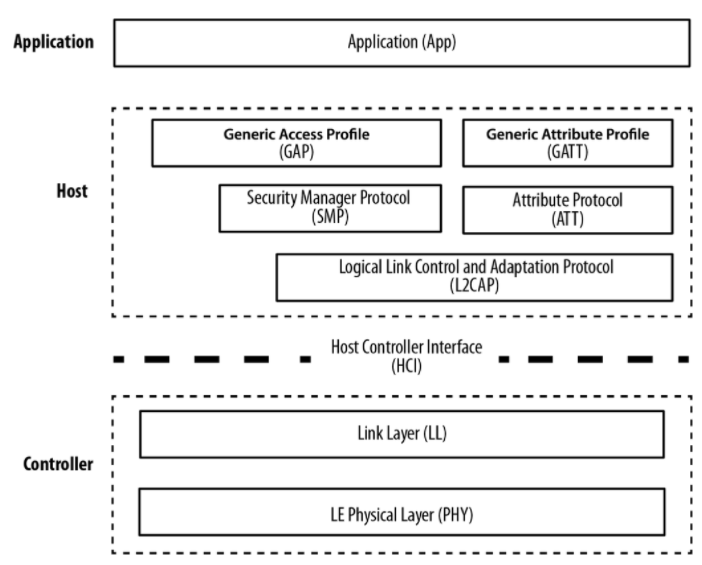
- BLE 프로토콜 스택은 Controller, Host, Application으로 나뉜다.
- Controller에는 connection 수립을 위한 로우-레벨의 프로토콜이 정의돼있다. Physical layer와 link layer가 포함돼있다. ADC 및 DAC로 아날로그 신호를 TX로 쏘고 RX로 받는 과정과 기초 연결 수립 역할을 수행한다.
- Host에선 서로 다른 제조사가 만든 제품도 서로 통신할 수 있도록 일반화된 표준 통신 규약이 정의돼있다. 크게 GAP(Generic Access Profile)와 GATT(Generic Attribute Profile)가 포함된다.
- GAP에서는 BLE 통신에 필요한 역할과 모드 그리고 절차를 정의한다. 아까 말했던 peripharal, central, broadcaster, scanner가 바로 '역할'을 의미한다.
- GATT에서는 BLE 통신에 필요한 자료구조 (Service나 Characteristics)를 정의한다.

- BLE에서 사용하는 자료구조는 GATT에 정의돼있으며 Service와 Characteristic로 이뤄져있다.
- Service는 데이터의 집합을 의미한다.
'컴퓨터' 라고 하는 큰 범주의 데이터 집합을 Service라고 해보자. - Characteristic은 개별 데이터 항목을 의미한다.
'CPU'와 'GPU' 그리고 'RAM' 등등이 하나의 characteristic을 의미한다.
- Service는 데이터의 집합을 의미한다.
3. BLE 라이브러리 분석
지금까지 짧았지만, BLE 통신방법과 구조에 대해서 알아봤다. 우리의 목표는 개발을 하기 위한 최소 지식 습득이므로 기준치는 어느정도 충족시켰다고 판단한다.
이번 챕터에서는 실제로 사용되는 BLE 관련 라이브러리를 두 개 분석할 것이다.
- Arduino 사에서 만든 라이브러리 - 'ArduinoBLE'
- Espressif 사에서 만든 라이브러리 - 'Arduino-ESP32-BLE'
두 라이브러리는 사뭇 분위기가 다르다.
- 'ArduinoBLE'는 초보적인 사용자들이 편하게 이용할 수 있도록 BLE 통신에 필요한 거의 모든 함수를 간단한 API로 제공하고 있다. 그리고 읽기 편리한 레퍼런스 사이트(링크)도 함께 제공된다. 하지만, 만들어진지 얼마 안된 라이브러리라 그런지 외부 자료가 별로 없다. 그리고 레퍼런스 설명이 함수명으로도 유추할 수 있는 내용만 적혀있는 수준이다.
- 'Arduino-ESP32-BLE'는 ESP-IDF의 BLE 라이브러리를 Arduino 실행구조에서 사용할 수 있도록 조금 변형한 것이다. 원활한 사용을 위해서는 C++에 대한 어느정도 숙련된 지식이 필요하다. 사용은 어렵지만, ESP 관련 커뮤니티는 워낙 활성화가 잘 돼있고, 제공하는 함수가 정말 다양하다보니 입맛에 맞도록 설정이 가능하다.
그럼 이제 하나씩 살펴보자.
3.1. ArduinoBLE
3.1.1. Scan (주체 : Central device | Client)
#include <ArduinoBLE.h>

void setup() {
	Serial.begin(9600);
	while (!Serial);
	// begin initialization
	if (!BLE.begin()) {
		Serial.println("starting BLE failed!");
		while (1);
	}
	Serial.println("BLE Central scan");
	// start scanning for peripheral
	BLE.scan();
}

void loop() {
	// check if a peripheral has been discovered
	BLEDevice peripheral = BLE.available();

	if (peripheral) {
		// discovered a peripheral
		Serial.println("Discovered a peripheral");
		Serial.println("-----------------------");

		// print address
		Serial.print("Address: ");
		Serial.println(peripheral.address());

		// print the local name, if present
		if (peripheral.hasLocalName()) {
			Serial.print("Local Name: ");
			Serial.println(peripheral.localName());
		}

		// print the advertised service UUIDs, if present
		if (peripheral.hasAdvertisedServiceUuid()) {
			Serial.print("Service UUIDs: ");
			for (int i = 0; i < peripheral.advertisedServiceUuidCount(); i++) {
				Serial.print(peripheral.advertisedServiceUuid(i));
				Serial.print(" ");
			}
			Serial.println();
		}
	}
}
- Central device (Client)가 자신에게 정보를 줄 server를 찾기위해 scan하는 예제다.
setup()문에서는 시리얼모니터 출력을 위한Serial.begin()과 BLE 통신을 위한BLE.begin()문이 있다. 최대한 기존 arduino API와 형식을 비슷하게 맞춰주기 위한 노력이 보인다.BLE.scan()이 호출되면 scan을 시작한다.BLE.available()는 인근에 advertising 중인 peripheral device를 발견했는지 확인해준다.loop()문에 정의된print문들에 따라 여러 정보를 출력하게 된다.
이 예제에서는 주변 기기를 발견하더라도 따로 연결하지는 않고 그저 스캔만 주기적으로 계속 수행한다. 스캔을 할 수 있다, 검출한 기기의 MAC 주소와 이름 그리고 UUID를 알아낼 수 있구나 정도만 알면 된다. UUID에 대해서는 후술한다.
3.1.2. CallbackLED (주체: Peripheral device | Server)
#include <ArduinoBLE.h>

const int ledPin = LED_BUILTIN;
BLEService ledService("19B10000-E8F2-537E-4F6C-D104768A1214");
BLEByteCharacteristic switchCharacteristic("19B10001-E8F2-537E-4F6C-D104768A1214", BLERead | BLEWrite);

void setup() {
	Serial.begin(9600);
	while (!Serial);

	pinMode(ledPin, OUTPUT); // use the LED pin as an output

	// begin initialization
	if (!BLE.begin()) {
		Serial.println("starting BLE failed!");
		while (1);
	}
	// set the local name peripheral advertises
	BLE.setLocalName("LEDCallback");
	// set the UUID for the service this peripheral advertises
	BLE.setAdvertisedService(ledService);
	// add the characteristic to the service
	ledService.addCharacteristic(switchCharacteristic);
	// add service
	BLE.addService(ledService);
	// assign event handlers for connected, disconnected to peripheral
	BLE.setEventHandler(BLEConnected, blePeripheralConnectHandler);
	BLE.setEventHandler(BLEDisconnected, blePeripheralDisconnectHandler);
	// assign event handlers for characteristic
	switchCharacteristic.setEventHandler(BLEWritten, switchCharacteristicWritten);
	// set an initial value for the characteristic
	switchCharacteristic.setValue(0);
	// start advertising
	BLE.advertise();

	Serial.println(("Bluetooth device active, waiting for connections..."));
}

void loop() {
	// poll for BLE events
	BLE.poll();
}

void blePeripheralConnectHandler(BLEDevice central) {
	// central connected event handler
	Serial.print("Connected event, central: ");
	Serial.println(central.address());
}

void blePeripheralDisconnectHandler(BLEDevice central) {
	// central disconnected event handler
	Serial.print("Disconnected event, central: ");
	Serial.println(central.address());
}

void switchCharacteristicWritten(BLEDevice central, BLECharacteristic characteristic) {
	// central wrote new value to characteristic, update LED
	Serial.print("Characteristic event, written: ");

	if (switchCharacteristic.value()) {
		Serial.println("LED on");
		digitalWrite(ledPin, HIGH);
	} else {
		Serial.println("LED off");
		digitalWrite(ledPin, LOW);
	}
}
한 줄 한 줄 살펴보자
BLEService ledService("19B10000-E8F2-537E-4F6C-D104768A1214");
BLEByteCharacteristic switchCharacteristic("19B10001-E8F2-537E-4F6C-D104768A1214", BLERead | BLEWrite);-
Service는
BLEService클래스의 인스턴스로 정의한다. -
Characteristic은
BLE~~Characteristic클래스의 인스턴스로 정의한다. -
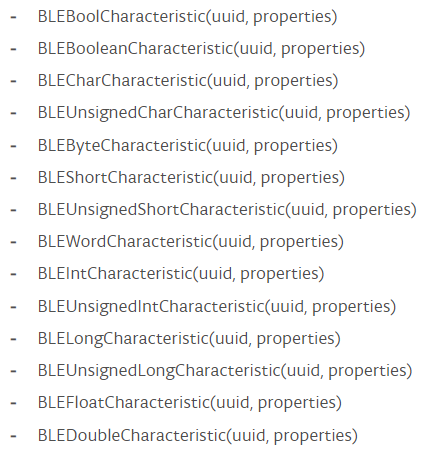
Characteristic은 데이터가 저장되는 공간이므로 라이브러리에서는 다양한 데이터 타입을 지원한다.
-
Service와 Characteristic을 선언할 때 사용되는 저 의미불명의 string은 UUID(universally unique identifier)라고 부르는 unique한 ID다.
- BLE에서 제공하는 다양한 service가 이미 정의돼있다. 우리가 제공하려는 서비스는 어쩌면 이미 제공돼고있을 수도 있다. 할당된 번호 | 블루투스 ® 기술 웹 사이트 (bluetooth.com) 에서 확인해볼 수 있다.
- BLE의 공식 UUID는 16bits로 이뤄져있다. UUID는 16진수로 표현되므로 한 글자는 4bits를 사용하는 꼴이다. 따라서 공식 UUID는 4글자로 돼있다.
- 우리가 직접 Service나 Characteristic을 정의할 수 있는데, 이 경우에는 커스텀 UUID가 필요하다. 커스텀 UUID는 128bits로 이뤄져있다.
- 위 예제에서는 Service와 Characteristic을 커스텀으로 만들었으므로 32글자로 이뤄진 UUID를 선언했다. 커스텀 UUID는 이 사이트(Online UUID Generator Tool)에서 만들 수 있다.
-
Characteristic에는
BLERead | BLEWrite같은 여러 속성(Attributes)을 부여할 수 있다. 위 예제의switchCharacteristic라는 속성은 읽거나 쓸 수 있다.
// set the local name peripheral advertises
BLE.setLocalName("LEDCallback");
// set the UUID for the service this peripheral advertises
BLE.setAdvertisedService(ledService);
// add the characteristic to the service
ledService.addCharacteristic(switchCharacteristic);
// add service
BLE.addService(ledService);- BLE Device의 기초적인 설정을 수행하는 부분이다.
setLocalName은 BLE device의 이름을 설정하는 부분이다. 우리가 핸드폰에서 블루투스를 키면 이어폰이나 스피커나 애플팬슬의 이름을 확인할 수 있다. 이 이름이 바로localName이다.- Device의 이름을 등록했으니, 이제 service를 등록할 차례다.
setAdvertisedService()로 service를 광고할 service 목록에 추가한다. - Server를 등록했으니, 이제 characteristic을 등록할 차례다.
addCharacteristic()으로 사전에 정의한 characteristic을 service에 추가한다. - 이제 server를 BLE device에 등록한다.
// assign event handlers for connected, disconnected to peripheral
BLE.setEventHandler(BLEConnected, blePeripheralConnectHandler);
BLE.setEventHandler(BLEDisconnected, blePeripheralDisconnectHandler);
// assign event handlers for characteristic
switchCharacteristic.setEventHandler(BLEWritten, switchCharacteristicWritten);
// set an initial value for the characteristic
switchCharacteristic.setValue(0);
// start advertising
BLE.advertise();- 특정 상황에 따라 자동으로 호출될 callback 함수를 정의해줄 수 있다.
- 첫째 줄에서 BLE 연결이 수립될 때
blePeripheralConnectHandler라는 함수가 호출되도록 만든다.
둘째 줄에서 BLE 연결이 끊길 때blePeripheralDisconnectHandler라는 함수가 호출되도록 만든다.
셋째 줄에서 characteristic에 대해 새로운 데이터가 써질 때switchCharacteristicWritten라는 함수가 호출되도록 만든다. - 각 callback 함수는 매개변수로
BLEDevice central를 가진다.
Callback 함수 호출 주체가 상대편이므로 반드시 잊지말고 기입해준다. - 모든 설정이 완료됐으니 이제 이 peripheral device 또는 server를 advertising한다.
3.1.3. LEDControl (주체: Central device | Client)
#include <ArduinoBLE.h>

const int buttonPin = 2;
int oldButtonState = LOW;

void setup() {
	Serial.begin(9600);
	while (!Serial);
	// configure the button pin as input
	pinMode(buttonPin, INPUT);
	// initialize the BLE hardware
	BLE.begin();
	Serial.println("BLE Central - LED control");
	// start scanning for peripherals
	BLE.scanForUuid("19b10000-e8f2-537e-4f6c-d104768a1214");
}

void loop() {
	// check if a peripheral has been discovered
	BLEDevice peripheral = BLE.available();

	if (peripheral) {
		// discovered a peripheral, print out address, local name, and advertised service
		Serial.print("Found: ");
		Serial.print(peripheral.address());
		Serial.print(peripheral.localName());
		Serial.println(peripheral.advertisedServiceUuid());

		if (peripheral.localName() != "LED") return;
		// stop scanning
		BLE.stopScan();
		controlLED(peripheral);
		// peripheral disconnected, start scanning again
		BLE.scanForUuid("19b10000-e8f2-537e-4f6c-d104768a1214");
	}
}

void controlLED(BLEDevice peripheral) {
	// connect to the peripheral
	Serial.println("Connecting ...");

	if (peripheral.connect()) {
		Serial.println("Connected");
	} else {
		Serial.println("Failed to connect!");
		return;
	}
	// retrieve the LED characteristic
	BLECharacteristic ledCharacteristic = peripheral.characteristic("19b10001-e8f2-537e-4f6c-d104768a1214");

	if (!ledCharacteristic) {
		Serial.println("Peripheral does not have LED characteristic!");
		peripheral.disconnect();
		return;
	} else if (!ledCharacteristic.canWrite()) {
		Serial.println("Peripheral does not have a writable LED characteristic!");
		peripheral.disconnect();
		return;
	}

	while (peripheral.connected()) {
		// read the button pin
		int buttonState = digitalRead(buttonPin);

		if (oldButtonState != buttonState) {
			// button changed
			oldButtonState = buttonState;
			if (buttonState) {
				Serial.println("button pressed");
				ledCharacteristic.writeValue((byte)0x01);
			} else {
				Serial.println("button released");
				ledCharacteristic.writeValue((byte)0x00);
			}
		}
	}
	Serial.println("Peripheral disconnected");
}BLE.scanForUuid("19b10000-e8f2-537e-4f6c-d104768a1214");을 통해 client는 해당 UUID를 service로 advertising하고 있는 BLE device를 찾게된다. 상대의 UUID를 알고있다면 이런 식으로 연결할 수도 있다. 만일 알지 못한다면, 3.1절의 코드를 참조하면 된다.- BLE device를 찾았다면 정보를 출력하고,
BLE.stopScan()으로 scan을 멈춘다. - 연결 중에는 loop() 함수가 아니라,
controlLED함수를 계속 돌게 된다. BLECharacteristic ledCharacteristic = peripheral.characteristic("19b10001-e8f2-537e-4f6c-d104768a1214");문장을 통해 server의 characteristic을 받아온다. 그리고 적당히 예외처리 해준 뒤에 데이터를 읽는다. (이 코드에서는 따로 정보를 읽지않고, 바로writeValue()로 데이터를 써준다.)- BLE 통신에서 넘겨주는 데이터 타입은
uint8_t이다. 정수나 실수를 그대로 넘겨줄 수 없기 때문에 받는 쪽에서는 적절한 캐스팅을 해줘야한다.
3.2. ESP32-BLE
설명을 편하게 하기 위해 3.2.1절은 server 예제와 notify 예제를, 3.2.2절은 client와 scan 예제를 적당히 합쳐 편집했습니다.
3.2.1. Server
#include <BLEDevice.h>
#include <BLEServer.h>
#include <BLEUtils.h>
#include <BLE2902.h>

uint32_t value = 0;
bool deviceConnected = false;
bool oldDeviceConnected = false;

BLEServer* pServer = NULL;
BLECharacteristic* pCharacteristic = NULL;

#define SERVICE_UUID        "4fafc201-1fb5-459e-8fcc-c5c9c331914b"
#define CHARACTERISTIC_UUID "beb5483e-36e1-4688-b7f5-ea07361b26a8"

class MyServerCallbacks: public BLEServerCallbacks {
    void onConnect(BLEServer* pServer) { deviceConnected = true; };
    void onDisconnect(BLEServer* pServer) { deviceConnected = false; }
};

void setup() {
	Serial.begin(115200);
	// Create the BLE Device
	BLEDevice::init("ESP32");
	// Create the BLE Server
	pServer = BLEDevice::createServer();
	pServer->setCallbacks(new MyServerCallbacks());

	// Create the BLE Service
	BLEService *pService = pServer->createService(SERVICE_UUID);

	// Create a BLE Characteristic
	pCharacteristic = pService->createCharacteristic(
						CHARACTERISTIC_UUID,
						BLECharacteristic::PROPERTY_READ   |
						BLECharacteristic::PROPERTY_WRITE  |
						BLECharacteristic::PROPERTY_NOTIFY |
						BLECharacteristic::PROPERTY_INDICATE
                    );
	// Create a BLE Descriptor
	pCharacteristic->setValue("Hello World says Neil");
	pCharacteristic->addDescriptor(new BLE2902());

	// Start the service
	pService->start();

	// Start advertising
	BLEAdvertising *pAdvertising = BLEDevice::getAdvertising();
	pAdvertising->addServiceUUID(SERVICE_UUID);
	pAdvertising->setScanResponse(false);
	pAdvertising->setMinPreferred(0x0);  // set value to 0x00 to not advertise this parameter
	// // functions that help with iPhone connections issue
	// pAdvertising->setScanResponse(true);
	// pAdvertising->setMinPreferred(0x06);
	// pAdvertising->setMinPreferred(0x12);
	BLEDevice::startAdvertising();
	Serial.println("Waiting a client connection to notify...");
}

void loop() {
    // notify changed value
    if (deviceConnected) {
        pCharacteristic->setValue((uint8_t*)&value, 4);
        pCharacteristic->notify();
        value++;
        delay(3); // bluetooth stack will go into congestion, if too many packets are sent, in 6 hours test i was able to go as low as 3ms
    }
    // disconnecting
    if (!deviceConnected && oldDeviceConnected) {
        delay(500); // give the bluetooth stack the chance to get things ready
        pServer->startAdvertising(); // restart advertising
        Serial.println("start advertising");
        oldDeviceConnected = deviceConnected;
    }
    // connecting
    if (deviceConnected && !oldDeviceConnected) {
        // do stuff here on connecting
        oldDeviceConnected = deviceConnected;
    }
}BLEDevice::init("ESP32");
pServer = BLEDevice::createServer();
pServer->setCallbacks(new MyServerCallbacks());
BLEService *pService = pServer->createService(SERVICE_UUID);
pCharacteristic = pService->createCharacteristic(
CHARACTERISTIC_UUID,
BLECharacteristic::PROPERTY_READ |
BLECharacteristic::PROPERTY_WRITE |
BLECharacteristic::PROPERTY_NOTIFY |
BLECharacteristic::PROPERTY_INDICATE
);
pCharacteristic->setValue("Hello World says Neil");
pCharacteristic->addDescriptor(new BLE2902());
pService->start();
BLEAdvertising *pAdvertising = BLEDevice::getAdvertising();
pAdvertising->addServiceUUID(SERVICE_UUID);
pAdvertising->setScanResponse(false);
pAdvertising->setMinPreferred(0x0);
BLEDevice::startAdvertising();-
BLEDevice 헤더파일의
init()을 통해 BLE device의 localName을 설정할 수 있다. -
Server는
BLEServer클래스의 인스턴스로,
Service는BLEService클래스의 인스턴스로,
Characteristic는BLECharacteristic클래스의 인스턴스로 선언할 수 있다. -
Service는 Server의
createService()로 만들 수 있고,
Characteristic은 Service의createCharacteristic()로 만들 수 있다. -
Characteristic에는 속성을 부여할 수 있으며, 읽고, 쓰기가 가능하고, 수정할 때마다 indicate와 notify가 되도록 속성을 부여했다.
-
->setValue()로 데이터를 갱신할 수 있다.- [주의]
abort() was called at PC 0x40173a1f on core 1라는 오류가 등장할 수도 있으니 setup문에서setValue()하는 건 주의하도록 하자.
- [주의]
-
->addDescriptor(new BLE2902())로 characteristic의 특성을 설명하는 메타데이터를 설정할 수 있다.- [주의] 이 문장이 없으면 notification이 제대로 이뤄지지않는다.
데이터가 갱신될 때 마다 client가 적절한 callback을 수행하도록 만들고 싶다면, 반드시 이 문장을 사용하자.
- [주의] 이 문장이 없으면 notification이 제대로 이뤄지지않는다.
-
->start()로 Service 설정을 마무리한다. 이제 advertising 관련 설정을 한다. -
->setScanResponse()로 연결 정확도를 향상시킬 수 있다. -
->setMinPreferred()는 advertising 할 때 선호하는 주파수 대역폭과 채널을 설정할 수 있는데, 굳이 손 댈 필요는 없다고 한다. 일부 아이폰에서는 연결 문제가 있으니 0x06으로 설정하라는 말이 있다. -
BLEDevice::startAdvertising();으로 advertising을 시작한다.
if (deviceConnected) {	// notify changed value
    pCharacteristic->setValue((uint8_t*)&value, 4);
    pCharacteristic->notify();
    value++;
    delay(3);
}
if (!deviceConnected && oldDeviceConnected) {	// disconnecting
    delay(500); // give the bluetooth stack the chance to get things ready
    pServer->startAdvertising(); // restart advertising
    Serial.println("start advertising");
    oldDeviceConnected = deviceConnected;
}
if (deviceConnected && !oldDeviceConnected) {	// connecting
    oldDeviceConnected = deviceConnected;
}-
loop문에서는 현재 연결 상태에 따라 서로 다른 기능을 수행하게끔 2가지 분기가 있다.
-
연결이 잘 되고있다면?
deviceConnected플래그가true라면, characteristic의 value를 갱신해준다.notify()를 호출하는 순서에 주의하자. 갱신 후 알려줘야 맞지, 알려준 뒤 갱신하면 정보가 밀린다.delay(3)은 client가 올바르게 정보를 수신할 수 있도록 여유 시간을 준다. 레퍼런스에 의하면 3ms면 적절하다고 한다.
-
연결은 끊겼는데, 이전에 연결한 기록이 있다면?
- 적절한 초기화 과정을 알아서 넣어준 뒤,
delay(500)으로 잠시 BLE device가 stack을 정리할 시간을 준다. ->startAdvertising으로 advertising을 재시작한다.
- 적절한 초기화 과정을 알아서 넣어준 뒤,
-
연결은 됐는데, 이전에 연결한 기록이 없다면?
-
별 중요한 분기는 아니다. 그냥 첫 번째 분기에 넣어도 상관없는 문장이다.
-
이제 연결이 됐으니 기록을 남긴다.
-
3.2.2. Client
#include <BLEDevice.h>
#include <BLEClient.h>
#include <BLEUtils.h>

static boolean doConnect = false;
static boolean connected = false;
static boolean doScan = false;
static BLEUUID charUUID("beb5483e-36e1-4688-b7f5-ea07361b26a8");
static BLEUUID serviceUUID("4fafc201-1fb5-459e-8fcc-c5c9c331914b");
static BLEAdvertisedDevice* server;
static BLERemoteCharacteristic* remoteCharacteristic;

class MyClientCallback : public BLEClientCallbacks {
	void onConnect(BLEClient* pclient) { }
	void onDisconnect(BLEClient* pclient) {
		connected = false;
		Serial.println("onDisconnect");
	}
};

class MyAdvertisedDeviceCallbacks: public BLEAdvertisedDeviceCallbacks {
	void onResult(BLEAdvertisedDevice advertisedDevice) {
		Serial.print("BLE Advertised Device found: ");
		Serial.println(advertisedDevice.toString().c_str());

		if (advertisedDevice.haveServiceUUID() && advertisedDevice.isAdvertisingService(serviceUUID)) {
			BLEDevice::getScan()->stop();
			server = new BLEAdvertisedDevice(advertisedDevice);
			doConnect = true;
		}
		doScan = true;
	}
};

void notifyCallback(BLERemoteCharacteristic* characteristic, uint8_t* data, size_t len, bool isNotify) {
	Serial.print("Notify callback for characteristic ");
	Serial.print(characteristic->getUUID().toString().c_str());
	Serial.print(" of data length ");
	Serial.println(len);
	Serial.print("data: ");
	Serial.println((char*)data);
}

void connectToServer() {
    BLEClient* client  = BLEDevice::createClient();
    client->setClientCallbacks(new MyClientCallback());
    client->connect(server);

    BLERemoteService* pRemoteService = client->getService(serviceUUID);
    if (pRemoteService == nullptr) {
		Serial.print("Failed to find our service UUID: ");
		Serial.println(serviceUUID.toString().c_str());
		client->disconnect();
		return;
    }
    Serial.println(" - Found our service");

    remoteCharacteristic = pRemoteService->getCharacteristic(charUUID);
    if (remoteCharacteristic == nullptr) {
		Serial.print("Failed to find our characteristic UUID: ");
		Serial.println(charUUID.toString().c_str());
		client->disconnect();
		return;
    }
    Serial.println(" - Found our characteristic");

    if(remoteCharacteristic->canRead()) {
		std::string value = remoteCharacteristic->readValue();
		Serial.print("The characteristic value was: ");
		Serial.println(value.c_str());
    }
    if(remoteCharacteristic->canNotify())
		remoteCharacteristic->registerForNotify(notifyCallback);
    connected = true;
}

void setup() {
	Serial.begin(115200);
	BLEDevice::init("");

	BLEScan* pBLEScan = BLEDevice::getScan();
	pBLEScan->setAdvertisedDeviceCallbacks(new MyAdvertisedDeviceCallbacks());
	// scan interval과 window 사이의 상관관계는 논문 찾아봐야 함.
	pBLEScan->setInterval(1349);
	pBLEScan->setWindow(449);
	pBLEScan->setActiveScan(false);
	pBLEScan->start(5, false);
}

void loop() {
	if (doConnect == true) {
		connectToServer()
		doConnect = false;
	}
	if(!connected && doScan){
		// 새로운 연결을 위해 적절한 초기화 과정 넣어주기
		BLEDevice::getScan()->start(0);
	}
}
Client의 코드도 구조적으로는 ArduinoBLE와 동일하다.
void setup() {
	Serial.begin(115200);
	BLEDevice::init("");

	BLEScan* pBLEScan = BLEDevice::getScan();
	pBLEScan->setAdvertisedDeviceCallbacks(new MyAdvertisedDeviceCallbacks());
	// scan interval과 window 사이의 상관관계는 논문 찾아봐야 함.
	pBLEScan->setInterval(1349);
	pBLEScan->setWindow(449);
	pBLEScan->setActiveScan(false);
	pBLEScan->start(5, false);
}-
BLEDevice::init()으로 Client의 local name을 설정한다. -
BLEDevice::getScan()으로BLEScan*타입 scan 객체를 생성한다.
우리는 scan을 할 때 이 객체의 내부값을 수정해서 scan에 대한 환경설정을 진행한다.-
Callback 함수를 지정한다. Scan으로 어떤 외부 advertising device를 찾았을 때 호출될 함수를 선언한다.
-
class MyAdvertisedDeviceCallbacks: public BLEAdvertisedDeviceCallbacks { void onResult(BLEAdvertisedDevice advertisedDevice) { Serial.print("BLE Advertised Device found: "); Serial.println(advertisedDevice.toString().c_str()); if (advertisedDevice.haveServiceUUID() && advertisedDevice.isAdvertisingService(serviceUUID)) { BLEDevice::getScan()->stop(); server = new BLEAdvertisedDevice(advertisedDevice); doConnect = true; } doScan = true; } };BLEAdvertisedDeviceCallbacks의 파생 클래스 형태로 callback을 만든다.Serial.print()문은 객체를 그대로 출력할 수 없다.
BLEAdvertisedDevice클래스에서는 내부적으로 오버라이딩 된toString()함수를 지원해서 객체 내부의 정보 (MAC 주소, local name 등)를std::string형으로 반환해준다.Serial. print()문은std::string을 그대로 출력할 수 없다.
.c_str()함수로 반드시char array타입으로 변형한 뒤 출력하자.- 만일 scanning으로 찾은 BLE device의 UUID가 우리가 찾으려는 그 UUID였다면, scan을 멈추고
BLEAdvertisedDevice에 해당 device를 저장한다.doConnect = true로 connect할 준비를 마친다.
-
-
Scan interval과 window 사이의 상관관계에 따라 최적화된 BLE 통신이 가능하다고 하는데, 잠깐 검색해보니 따로 편리한 공식이 있는게 아니고 논문 뿐이라 논문을 찾아봐야 한다. 여기서는 예제를 그대로 따라한다.
-
setActiveScan(false)은 Server 코드의setScanResponse(false)와 호응된다. Advertising packet을 받아도 딱히 ACK 신호를 보내지 않고, 저쪽도 받을 생각이 없는 상황이다. 저전력에 도움이 된다. -
start()로 scanning을 시작한다.
void loop() {
	if (doConnect == true) {
		connectToServer()
		doConnect = false;
	}
	if(!connected && doScan){
		// 새로운 연결을 위해 적절한 초기화 과정 넣어주기
		BLEDevice::getScan()->start(0);
	}
}- 적절한 server를 찾았다면,
doConnect = true가 되어 첫 if문으로 진입한다. connectToServer()에서 연결을 수립하고, service와 characteristic을 가져온다.- 이제 connect를 할 필요없으니
doConnect = false로 해줘서 중복 연결하지 않도록 한다.
4. 결론
여기까지 우리는 BLE의 통신과정부터 개발방법까지 모든 것을 얕게 다뤘다. 여기까지 이해했다면, BLE를 사용해서 원하는 개발을 하는 것은 전혀 무리가 아닐 것이라 생각한다.
나는 위 공부 내용을 바탕으로 NodeMCU-32S 모듈 2개를 사용해서 BLE 통신을 이용한 간단한 프로젝트를 진행했다. Arduino Nano 33 IoT를 이용해서도 진행했지만, 안타깝게도 ArduinoBLE 라이브러리는 굉장히 제한적인 보드만 지원하므로 HM-10 같은 모듈이 장착된 보드와 호환되지 않았다. 지금 글을 쓰는 현재로써는 Nano 33 IoT와 HM-10을 연결할 수는 있지만, 데이터를 주고받을 방법이 없다. 참고바라며 이만 글을 마무리한다.

10개의 댓글

BLECharacteristic = peripheral.characteristic 문장이 잘 이해가 되지 않는데 Client의 characteristic의 데이터를 Server characteristic에 저장시킨다는 의미인가요?

포스트 잘 보았습니다. esp32로 ble 스캔 예제를 보고 있습니다. (아두이노 ide)
pBLEScan->setActiveScan(true); //active scan uses more power, but get results faster
pBLEScan->setInterval(100);
pBLEScan->setWindow(99); // less or equal setInterval value
이 부분이 이해가 잘 안가는데, 액티브스캔후, 인터벌을 100밀리세컨드 넣었는데 그다음 셋윈도우에는 왜 99밀리세컨드만 넣나요? 주석을 보니, 인터벌 값보다 같거나 작다라고 했는데
- setwindow가 뜻하는것이 무엇지, 2. 왜 인터벌값보다 작은 값을 넣는지 궁금합니다!
nano 33 BLE 모듈과 nano 33 IoT 모듈 간의 데이터 송수신이 이루어지나요?
(예를 들어 nano 33 BLE 모듈의 A0 포트에 3.3V 전압이 인가되었을 때 nano 33 IoT에서 그 데이터를 그대로 수신할 수 있는지? 3.3V가 인가되면 1023이 출력되므로 nano 33 IoT 모듈에서도 1023이 출력되는지)